heater SKODA SUPERB 2015 3.G / (B8/3V) User Guide
[x] Cancel search | Manufacturer: SKODA, Model Year: 2015, Model line: SUPERB, Model: SKODA SUPERB 2015 3.G / (B8/3V)Pages: 276, PDF Size: 42.14 MB
Page 202 of 276

CAUTION■For Alcantara ®
seat covers, do not use any solvents, floor wax, shoe cream,
stain remover, leather cleaners or similar agents.■
Avoid leaving the vehicle in bright sunlight for long periods of time in order
to stop the artificial leather, materials or Alcantara ®
from bleaching. During ex-
tended periods of standing outdoors, protect artificial leather, fabrics or Alcan-
tara ®
by covering.
■
Some clothing materials, e.g. dark denim, do not have sufficient colour fast-
ness. This can cause damage or clearly visible discolouration to seat covers,
even when used correctly. This applies particularly to light-coloured seat cov-
ers. This does not relate to a fault in the seat cover, but rather to poor colour
fastness of the clothing textiles.
Seat covers
Read and observe
and on page 198 first.
Electrically heated seats
Use a specific cleaning agent such as dry foam or similar to clean the covers.
»
.
Seats without seat heating
Thoroughly vacuum the seat covers with a vacuum cleaner before cleaning.
Clean the seat covers with a damp cloth or cleaning products specially de-
signed for this purpose.
Indented points arising on the fabrics by everyday use, can be removed by
brushing against the direction of hair with a damp brush.
Always clean all parts of the covers, so that there are no visible edges. Then
allow the seat to dry completely.
CAUTION
■ Do not clean the covers of electrically heated seats either with water or with
other liquids - there is a risk of damaging the seat heating system.■
Regularly remove dust from the seat covers using a vacuum cleaner.
■
Electrically heated seats must not be dried after cleaning by switching on the
heater.
■
Do not sit on wet seats - risk of seat deformation.
■
Always clean the seats from “seam to seam”.
Safety belts
Read and observe
and on page 198 first.
Wash dirty seat belts with mild soapy water.
Remove coarse dirt with a soft brush.
WARNING■ The seat belts must not be removed for cleaning.■Never clean the seat belts chemically as chemical cleaning products could
destroy the fabric.■
The seat belts must not be allowed to come into contact with corrosive
liquids (e.g. acids).
■
The seat belts must be fully dried before being rolled up.
200General Maintenance
Page 207 of 276
Note■The AdBlue ®
solution freezes at a temperature of -11° C and lower. The sys-
tem has a heater to ensure the operability at low temperatures.■
We recommend purchasing AdBlue ®
refill bottles from the ŠKODA original
parts.
■
AdBlue ®
is a registered trademark of the VDA. AdBlue ®
is also known as AUS
32 (Aqueous Urea Solution) or DEF (Diesel Exhaust Fluid).
Tank and level check
Read and observe
and on page 204 first.
Tank
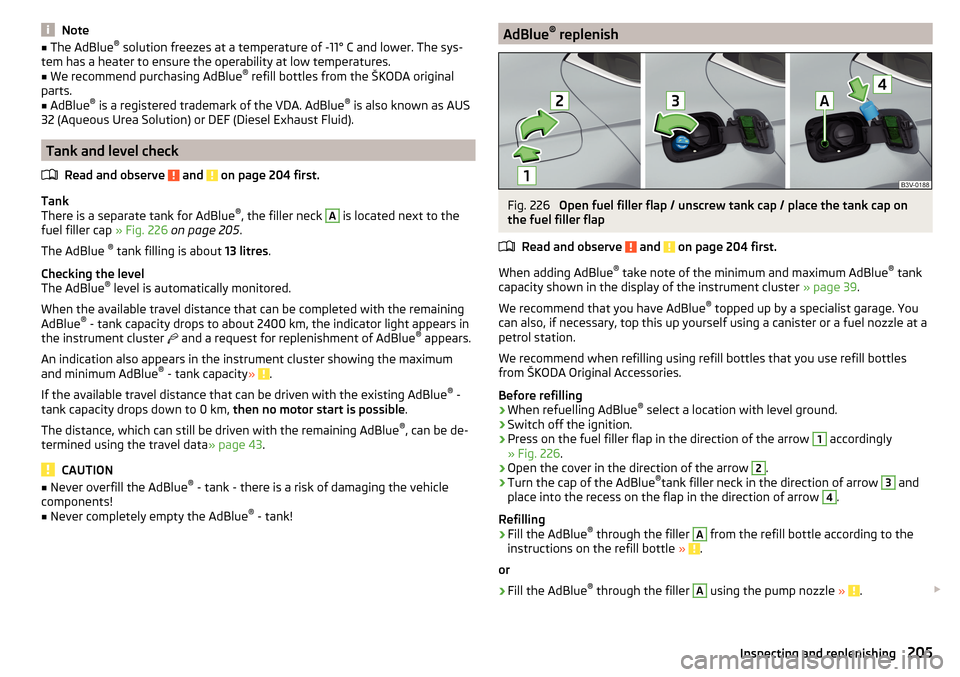
There is a separate tank for AdBlue ®
, the filler neck
A
is located next to the
fuel filler cap » Fig. 226 on page 205 .
The AdBlue ®
tank filling is about 13 litres.
Checking the level
The AdBlue ®
level is automatically monitored.
When the available travel distance that can be completed with the remaining
AdBlue ®
- tank capacity drops to about 2400 km, the indicator light appears in
the instrument cluster and a request for replenishment of AdBlue ®
appears.
An indication also appears in the instrument cluster showing the maximum
and minimum AdBlue ®
- tank capacity »
.
If the available travel distance that can be driven with the existing AdBlue ®
-
tank capacity drops down to 0 km, then no motor start is possible.
The distance, which can still be driven with the remaining AdBlue ®
, can be de-
termined using the travel data » page 43.
CAUTION
■
Never overfill the AdBlue ®
- tank - there is a risk of damaging the vehicle
components!■
Never completely empty the AdBlue ®
- tank!
AdBlue ®
replenishFig. 226
Open fuel filler flap / unscrew tank cap / place the tank cap on
the fuel filler flap
Read and observe
and on page 204 first.
When adding AdBlue ®
take note of the minimum and maximum AdBlue ®
tank
capacity shown in the display of the instrument cluster » page 39.
We recommend that you have AdBlue ®
topped up by a specialist garage. You
can also, if necessary, top this up yourself using a canister or a fuel nozzle at a
petrol station.
We recommend when refilling using refill bottles that you use refill bottles
from ŠKODA Original Accessories.
Before refilling
›
When refuelling AdBlue ®
select a location with level ground.
›
Switch off the ignition.
›
Press on the fuel filler flap in the direction of the arrow
1
accordingly
» Fig. 226 .
›
Open the cover in the direction of the arrow
2
.
›
Turn the cap of the AdBlue ®
tank filler neck in the direction of arrow
3
and
place into the recess on the flap in the direction of arrow
4
.
Refilling
›
Fill the AdBlue ®
through the filler
A
from the refill bottle according to the
instructions on the refill bottle » .
or
›
Fill the AdBlue ®
through the filler
A
using the pump nozzle » .
205Inspecting and replenishing
Page 213 of 276

The proportion of coolant additive in the mixture must be at least 40%.
The coolant additive may be increased to a maximum of 60%.
The correct mixing ratio of water and coolant additive is to be checked if nec-
essary by a specialist garage or is to be restored if necessary.
The description of the coolant is shown in the coolant expansion reservoir
» Fig. 231 on page 211 .WARNINGThe engine compartment of your car is a hazardous area. The following
warning instructions must be followed at all times when working in the en- gine compartment » page 206.■
The coolant is harmful to health.
■
Avoid contact with the coolant.
■
Coolant vapours are harmful to health.
■
Never open the end cover of the coolant expansion reservoir while the
engine is still warm. The cooling system is pressurized!
■
When opening the end cover of the coolant expansion reservoir, cover it
with a cloth to protect your face, hands and arms from hot steam or hot
coolant.
■
If any coolant splashes into your eyes, immediately rinse out your eyes
with clear water and contact a doctor as soon as possible.
■
Always keep the coolant in the original container, safe from people who
are not completely independent, especially children - there is a danger of
poisoning!
■
If coolant is swallowed, consult a doctor immediately.
■
Never spill operating fluids over the hot engine - risk of fire.
CAUTION
■ Do not continue if for some reason it is not possible to fill with coolant un-
der the current circumstances! Switch off the engine and seek assistance from
a specialist garage.■
If the expansion tank is empty, do not top up with coolant. The system could
ventilate - there is a risk of engine damage,
not continue! Switch off the en-
gine and seek assistance from a specialist garage.
■
The concentration of coolant additive in the coolant must never be under
40%.
■
Over 60% of coolant additive in the coolant reduces the antifreeze protec-
tion and cooling effect.
■
A coolant additive that does not comply with the correct specification can
significantly reduce the corrosion protection of the cooling system.
■ Any faults resulting from corrosion may cause a loss of coolant and can con-
sequently result in major engine damage.■
Do not fill the coolant above the mark
A
» Fig. 231 on page 211 .
■
If an error occurs, leading to the engine overheating, the help of a professio-
nal garage is to be sought - there is a risk of serious engine damage occurring.
■
Additional headlights and other attached components in front of the air inlet
impair the cooling efficiency of the coolant.
■
Never cover the radiator - there is a risk of the engine overheating.
Note
The coolant capacity is approximately 1 l greater on vehicles that are fitted
with an auxiliary heater (auxiliary heating and ventilation).
Checking the coolant level
Fig. 231
Coolant expansion reservoir
Read and observe and on page 211 first.
The coolant expansion bottle is located in the engine compartment.
Coolant expansion reservoir » Fig. 231
Mark for the maximum permissible coolant level
Mark for the lowest permissible coolant level
The coolant level should be kept between the marks
A
and
B
.
The coolant can be checked and topped up, if the following conditions are sat-
isfied.
The vehicle is standing on a horizontal surface.
The engine is turned off.
The engine is not heated.
The bonnet is open.
AB211Inspecting and replenishing
Page 218 of 276
›First, disconnect the negative terminal
first, then the positive terminal
of the battery.
Connecting›
First, connect the positive
first, then the negative
battery terminal.
After disconnecting and re-connecting the vehicle battery, the following func-
tions or devices are partially or completely inoperative.
Function / deviceOperating measureElectric window lifters» page 64Panorama sliding/tilting roof» page 65Sun screen» page 66Time setting» page 31
CAUTION
■ Disconnect the vehicle battery only with the ignition turned off - there is a
risk of damaging the electrical system of the vehicle.■
Under no circumstances must the battery cables be connected incorrectly –
risk of a cable fire.
Note
■ After disconnecting and re-connecting the vehicle battery, we recommend
having the vehicle checked by a specialist to ensure that the full functionality
of all electrical systems is guaranteed.■
The data of the multi-function display will be reset.
Automatic load deactivation
Read and observe
and on page 213 first.
The vehicle's electrical system automatically prevents the battery from dis-
charging when the battery is being heavily used. This manifests itself by the
following. ▶ The idling speed is raised to allow the generator to deliver more electricity to
the electrical system.
▶ Where necessary, large convenience consumers such as seat heaters and
rear window heaters have their power limited or are shut off completely in
the event of an emergency.
CAUTION■ Despite such intervention by the vehicle electric system management, the
vehicle battery may be drained. For example, when the ignition is switched on
a long time with the engine turned off or the side or parking lights are turned
on during longer parking.■
Consumers that are supplied via a 12-V power socket can cause the vehicle
battery to discharge when the ignition is switched off.
Note
Driving comfort is not impaired by consumers being deactivated. The driver is
often not aware of it having taken place.216General Maintenance
Page 242 of 276
Installing the storage compartment›Raise the storage compartment in the direction of the arrow 4.›
Overcome the resistance of the detents
A
.
›
Insert the brake control linkage in the opposite direction to arrow
2
.
›
Lock the brake control linkage in the opposite direction to arrow
1
.
›
Close the storage compartment.
Assignment of the fuses in the dash panel
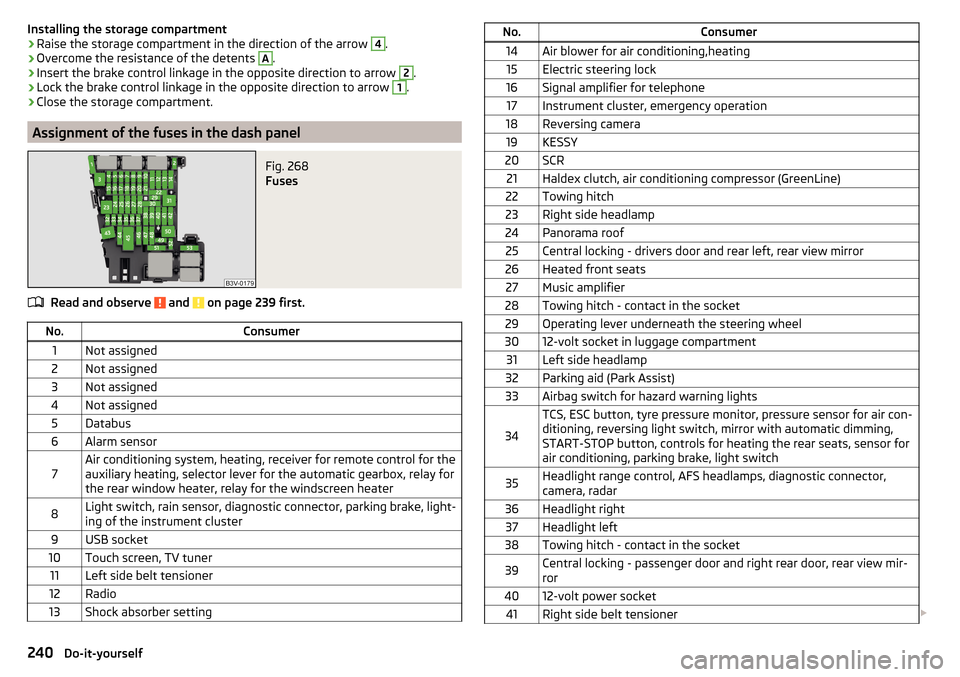
Fig. 268
Fuses
Read and observe and on page 239 first.
No.Consumer1Not assigned2Not assigned3Not assigned4Not assigned5Databus6Alarm sensor7Air conditioning system, heating, receiver for remote control for the
auxiliary heating, selector lever for the automatic gearbox, relay for
the rear window heater, relay for the windscreen heater8Light switch, rain sensor, diagnostic connector, parking brake, light-
ing of the instrument cluster9USB socket10Touch screen, TV tuner11Left side belt tensioner12Radio13Shock absorber settingNo.Consumer14Air blower for air conditioning,heating15Electric steering lock16Signal amplifier for telephone17Instrument cluster, emergency operation18Reversing camera19KESSY20SCR21Haldex clutch, air conditioning compressor (GreenLine)22Towing hitch23Right side headlamp24Panorama roof25Central locking - drivers door and rear left, rear view mirror26Heated front seats27Music amplifier28Towing hitch - contact in the socket29Operating lever underneath the steering wheel3012-volt socket in luggage compartment31Left side headlamp32Parking aid (Park Assist)33Airbag switch for hazard warning lights
34
TCS, ESC button, tyre pressure monitor, pressure sensor for air con-
ditioning, reversing light switch, mirror with automatic dimming,
START-STOP button, controls for heating the rear seats, sensor for
air conditioning, parking brake, light switch35Headlight range control, AFS headlamps, diagnostic connector,
camera, radar36Headlight right37Headlight left38Towing hitch - contact in the socket39Central locking - passenger door and right rear door, rear view mir-
ror4012-volt power socket41Right side belt tensioner 240Do-it-yourself
Page 243 of 276
No.Consumer42Boot lid, headlight washers, windscreen washer system43Visor for gas discharge bulbs, interior lighting44Towing hitch - contact in the socket45Operating the seat adjustment46230-Volt power socket47Rear window wiper48Blind spot detection49Coil on starter relay, clutch pedal switch50Opening the boot lid51Heating of the rear seats52Cooling of the front seats53Relay for rear window heater
Fuses in the engine compartment
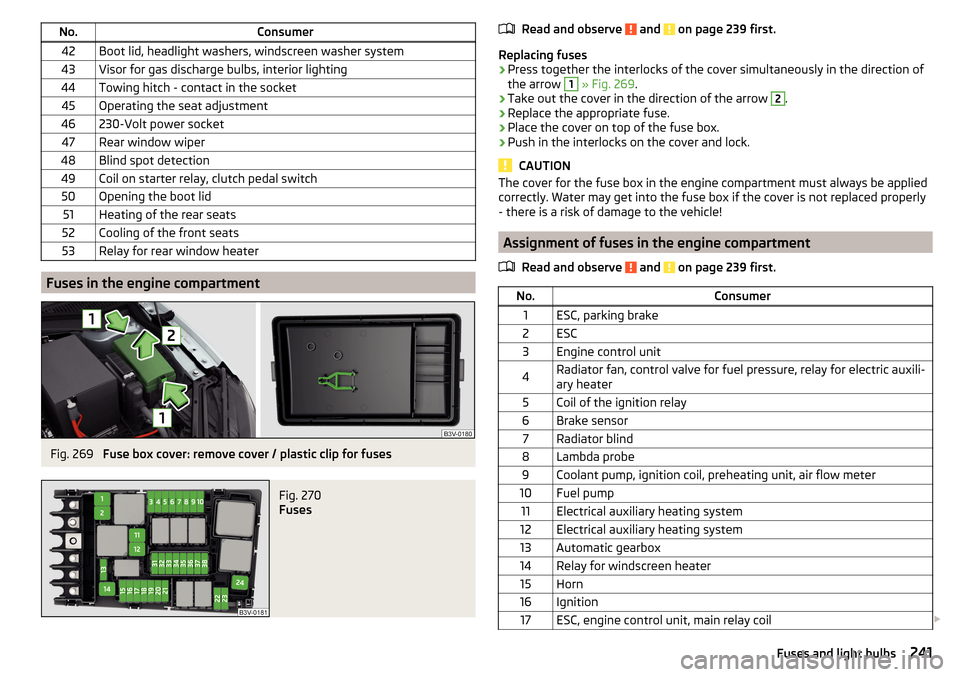
Fig. 269
Fuse box cover: remove cover / plastic clip for fuses
Fig. 270
Fuses
Read and observe and on page 239 first.
Replacing fuses
›
Press together the interlocks of the cover simultaneously in the direction of
the arrow
1
» Fig. 269 .
›
Take out the cover in the direction of the arrow
2
.
›
Replace the appropriate fuse.
›
Place the cover on top of the fuse box.
›
Push in the interlocks on the cover and lock.
CAUTION
The cover for the fuse box in the engine compartment must always be applied
correctly. Water may get into the fuse box if the cover is not replaced properly
- there is a risk of damage to the vehicle!
Assignment of fuses in the engine compartment
Read and observe
and on page 239 first.
No.Consumer1ESC, parking brake2ESC3Engine control unit4Radiator fan, control valve for fuel pressure, relay for electric auxili-
ary heater5Coil of the ignition relay6Brake sensor7Radiator blind8Lambda probe9Coolant pump, ignition coil, preheating unit, air flow meter10Fuel pump11Electrical auxiliary heating system12Electrical auxiliary heating system13Automatic gearbox14Relay for windscreen heater15Horn16Ignition17ESC, engine control unit, main relay coil 241Fuses and light bulbs
Page 262 of 276
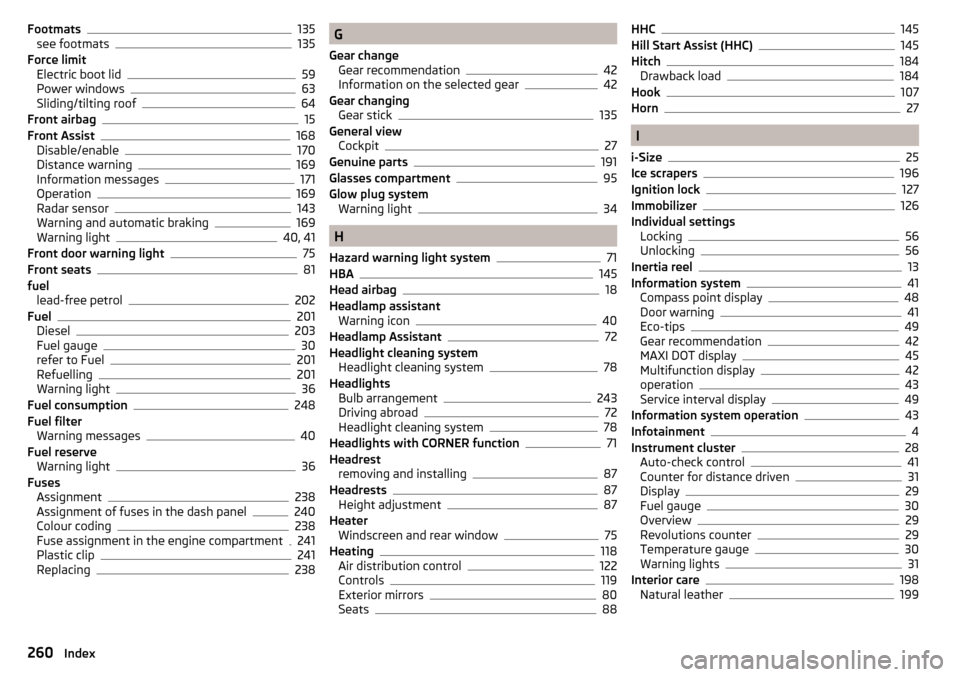
Footmats135
see footmats135
Force limit Electric boot lid
59
Power windows63
Sliding/tilting roof64
Front airbag15
Front Assist168
Disable/enable170
Distance warning169
Information messages171
Operation169
Radar sensor143
Warning and automatic braking169
Warning light40, 41
Front door warning light75
Front seats81
fuel lead-free petrol
202
Fuel201
Diesel203
Fuel gauge30
refer to Fuel201
Refuelling201
Warning light36
Fuel consumption248
Fuel filter Warning messages
40
Fuel reserve Warning light
36
Fuses Assignment
238
Assignment of fuses in the dash panel240
Colour coding238
Fuse assignment in the engine compartment241
Plastic clip241
Replacing238
G
Gear change Gear recommendation
42
Information on the selected gear42
Gear changing Gear stick
135
General view Cockpit
27
Genuine parts191
Glasses compartment95
Glow plug system Warning light
34
H
Hazard warning light system
71
HBA145
Head airbag18
Headlamp assistant Warning icon
40
Headlamp Assistant72
Headlight cleaning system Headlight cleaning system
78
Headlights Bulb arrangement
243
Driving abroad72
Headlight cleaning system78
Headlights with CORNER function71
Headrest removing and installing
87
Headrests87
Height adjustment87
Heater Windscreen and rear window
75
Heating118
Air distribution control122
Controls119
Exterior mirrors80
Seats88
HHC145
Hill Start Assist (HHC)145
Hitch184
Drawback load184
Hook107
Horn27
I
i-Size
25
Ice scrapers196
Ignition lock127
Immobilizer126
Individual settings Locking
56
Unlocking56
Inertia reel13
Information system41
Compass point display48
Door warning41
Eco-tips49
Gear recommendation42
MAXI DOT display45
Multifunction display42
operation43
Service interval display49
Information system operation43
Infotainment4
Instrument cluster28
Auto-check control41
Counter for distance driven31
Display29
Fuel gauge30
Overview29
Revolutions counter29
Temperature gauge30
Warning lights31
Interior care198
Natural leather199
260Index
Page 265 of 276
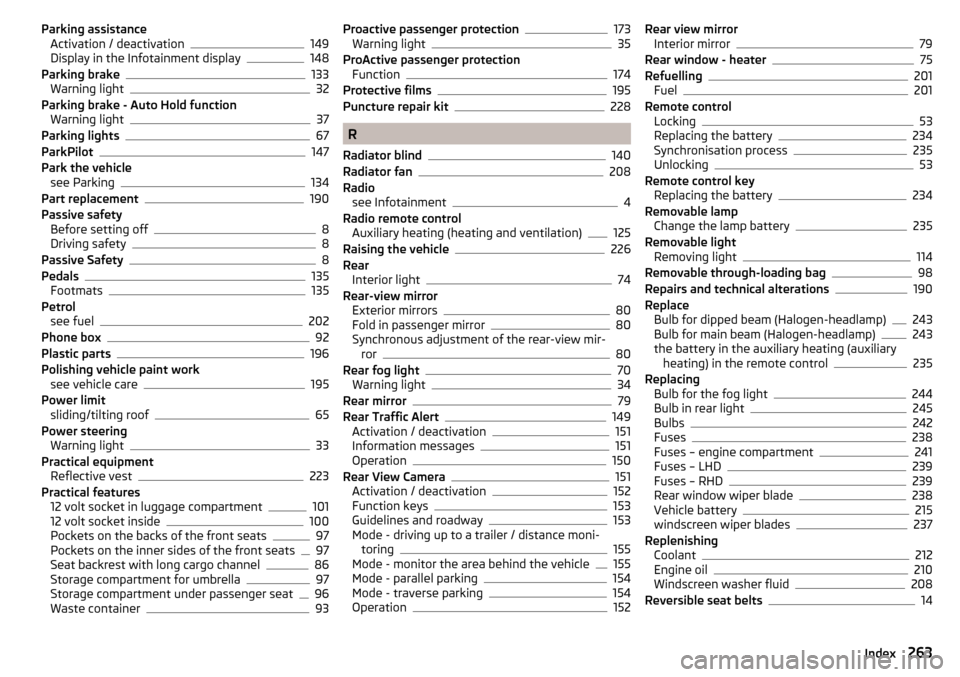
Parking assistanceActivation / deactivation149
Display in the Infotainment display148
Parking brake133
Warning light32
Parking brake - Auto Hold function Warning light
37
Parking lights67
ParkPilot147
Park the vehicle see Parking
134
Part replacement190
Passive safety Before setting off
8
Driving safety8
Passive Safety8
Pedals135
Footmats135
Petrol see fuel
202
Phone box92
Plastic parts196
Polishing vehicle paint work see vehicle care
195
Power limit sliding/tilting roof
65
Power steering Warning light
33
Practical equipment Reflective vest
223
Practical features 12 volt socket in luggage compartment
101
12 volt socket inside100
Pockets on the backs of the front seats97
Pockets on the inner sides of the front seats97
Seat backrest with long cargo channel86
Storage compartment for umbrella97
Storage compartment under passenger seat96
Waste container93
Proactive passenger protection173
Warning light35
ProActive passenger protection Function
174
Protective films195
Puncture repair kit228
R
Radiator blind
140
Radiator fan208
Radio see Infotainment
4
Radio remote control Auxiliary heating (heating and ventilation)
125
Raising the vehicle226
Rear Interior light
74
Rear-view mirror Exterior mirrors
80
Fold in passenger mirror80
Synchronous adjustment of the rear-view mir- ror
80
Rear fog light70
Warning light34
Rear mirror79
Rear Traffic Alert149
Activation / deactivation151
Information messages151
Operation150
Rear View Camera151
Activation / deactivation152
Function keys153
Guidelines and roadway153
Mode - driving up to a trailer / distance moni- toring
155
Mode - monitor the area behind the vehicle155
Mode - parallel parking154
Mode - traverse parking154
Operation152
Rear view mirror Interior mirror79
Rear window - heater75
Refuelling201
Fuel201
Remote control Locking
53
Replacing the battery234
Synchronisation process235
Unlocking53
Remote control key Replacing the battery
234
Removable lamp Change the lamp battery
235
Removable light Removing light
114
Removable through-loading bag98
Repairs and technical alterations190
Replace Bulb for dipped beam (Halogen-headlamp)
243
Bulb for main beam (Halogen-headlamp)243
the battery in the auxiliary heating (auxiliary heating) in the remote control
235
Replacing Bulb for the fog light
244
Bulb in rear light245
Bulbs242
Fuses238
Fuses – engine compartment241
Fuses – LHD239
Fuses – RHD239
Rear window wiper blade238
Vehicle battery215
windscreen wiper blades237
Replenishing Coolant
212
Engine oil210
Windscreen washer fluid208
Reversible seat belts14
263Index
Page 269 of 276

Materials199
Natural leather199
Plastic parts196
Polishing vehicle paint work195
Rubber seals196
Safety belt200
Seat covers200
Under-body protections198
washing193
Vehicle condition see Auto-check control
41
Vehicle data sticker246
Vehicle data sticker and nameplate Vehicle data sticker and nameplate
246
Vehicle dimensions249, 250
Vehicle height249, 250
Vehicle Identification Number (VIN)246
Vehicle length249, 250
Vehicle tool kit223
Vehicle width249, 250
Ventilation Front seats
89
Seats88
vest holder for reflective vest
223
VIN Vehicle Identification Number
246
Virtual pedal61
Visibility75
Visors see front sun visors
76
see Sun screen76
W
Warning lights
31
Warning symbols see Warning lights
31
Warning triangle222
warning when speeding44
Washing Automatic car wash system194
by hand193
High-pressure cleaner194
Washing vehicles193
Waste container93
Water in the fuel filter Warning light
40
Warning messages40
Weather conditions190
Wheel bolts Anti-theft wheel bolts
225
Caps225
Loosening and tightening226
Wheel rims217
Wheels Age of wheels
217
Changing224
Driving style218
Full trim225
General information217
Load index220
Snow chains221
Speed symbol220
Storage of wheels217
Tyre damage219
Tyre pressure217
Tyre size220
Tyre wear218
Tyre wear indicator219
unidirectional tyres219
Wheel balance218
Wheel replacement219
Winter tyres221
Wi-Fi Connection
50
Password50
Password change51
Setting51
Wi-Fi Direct Connection51
Password change51
Setting51
Window operation61
Button in the passenger door63
Button in the rear doors63
Buttons in the driver's door62
Comfort operation63
Malfunctions64
Window wiper Replacing the rear window wiper blade
238
Windscreen Heater
75
Windscreen washer fluid Checking
208
Replenishing208
Warning light40
Winter208
Windscreen washers Windscreen washers
78
Windscreen washer system208
Windscreen wipers automatic rear window wipers
78
operation78
Replacing the windscreen wipers237
Windscreen washer fluid208
Windscreen wipers and washers77
Winter operation220
De-icing windows196
Snow chains221
Winter tyres221
Winter tyres See Wheels
221
Wiper blades198
Service position of the windscreen wiper arms 237
Wiper interval
78
Wipers Maintaining wiper blades
198
267Index