heater SKODA SUPERB 2015 3.G / (B8/3V) Owner's Manual
[x] Cancel search | Manufacturer: SKODA, Model Year: 2015, Model line: SUPERB, Model: SKODA SUPERB 2015 3.G / (B8/3V)Pages: 276, PDF Size: 42.14 MB
Page 77 of 276

Variant 3 » Fig. 63
Switching on / off
The rear lights - variant 1/variant 3 are operated together with the front lights. ▶ When the front interior lighting is switched on, the rear interior lighting also
turns on automatically.
▶ When the front interior lighting is switched off, the rear interior lighting can
be turned on/off as required.
Ambient lighting
The ambient lighting illuminates the panel, side door panels and the footwell.
The brightness (and in certain cases the colour) of the lighting can be adjusted
in the Infotainment system » Owner´s Manual Infotainment , chapter CAR vehi-
cle settings .
Door warning light
Fig. 64
Front door warning light
The warning light » Fig. 64 turns on when the door is opened.
The warning light turns off when the door is closed.
There is a reflector installed here on some vehicles instead.
Entry space lighting
The lighting is positioned on the bottom edge of the exterior mirror and can
illuminate the entry area of the front door.
The light turns off after the vehicle is unlocked or the front door opens, de-
pending on external conditions and the particular vehicle equipment.
The lighting switches off around 30 seconds after the front door is closed or the ignition is switched on.
DVisibility
Introduction
This chapter contains information on the following subjects:
Windscreen and rear window heater
75
Sun visors in the front
76
Sun screen
76
Sun screen in the rear doors
77WARNINGMake sure that the view outside is not covered by ice, snow, mist or other
objects.
Windscreen and rear window heater
Fig. 65
Buttons for the front and rear window heater: Climatronic / man-
ual air conditioning
Read and observe
on page 75 first.
The heating for quick defrosting and ventilation of the front /and rear window.The heating can be activated with the ignition on.
The heater is turned on after the engine has started.
Buttons for the heating in the centre console (depending on vehicle equip-
ment) » Fig. 65
Activate/deactivate the heated rear window
Activate/deactivate the windshield heating
When the heater is activated, a lamp illuminates inside or below the button.
75Lights and visibility
Page 78 of 276
The heater automatically switches off after approximately 10 minutes.
If the engine is switched off when the heating is on and turned back on again
within 10 minutes, the heating is continued.
Note
■ If the on-board voltage decreases, the heating switches off automatically
» page 216 , Automatic load deactivation .■
If the light within or below the button flashes, the radiator will not work be-
cause of the low state of the battery.
■
If the Climatronic recognises that the windshield could fog up, the windshield
heating is automatically switched on. This function can be activated/deactiva-
ted in the Infotainment » Owner´s Manual Infotainment , chapter CAR - vehicle
settings .
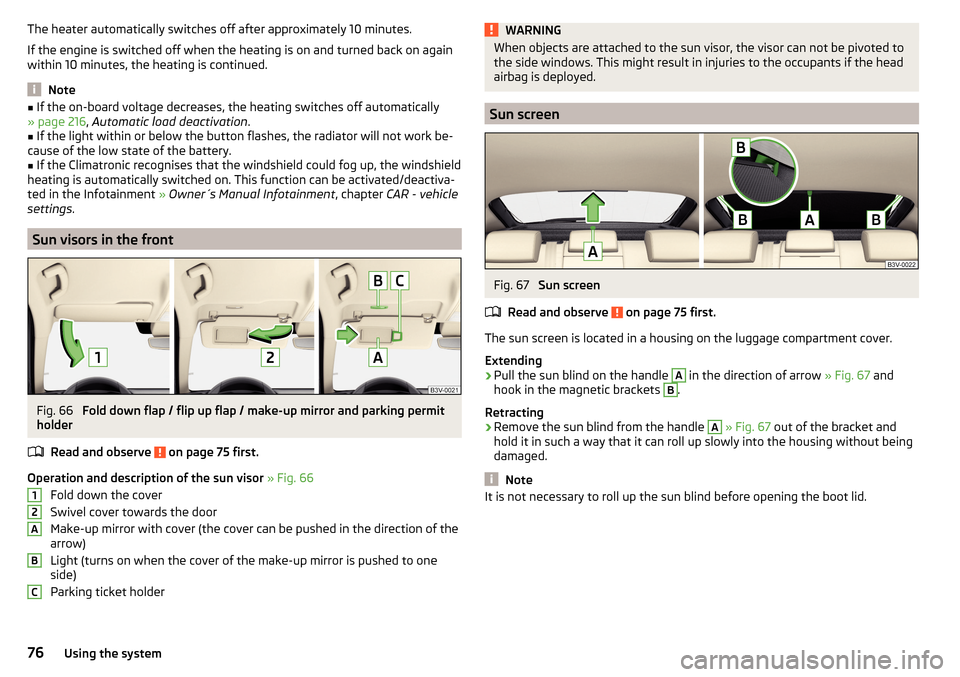
Sun visors in the front
Fig. 66
Fold down flap / flip up flap / make-up mirror and parking permit
holder
Read and observe
on page 75 first.
Operation and description of the sun visor » Fig. 66
Fold down the cover
Swivel cover towards the door
Make-up mirror with cover (the cover can be pushed in the direction of the
arrow)
Light (turns on when the cover of the make-up mirror is pushed to one
side)
Parking ticket holder
12ABCWARNINGWhen objects are attached to the sun visor, the visor can not be pivoted to
the side windows. This might result in injuries to the occupants if the head
airbag is deployed.
Sun screen
Fig. 67
Sun screen
Read and observe
on page 75 first.
The sun screen is located in a housing on the luggage compartment cover.
Extending
›
Pull the sun blind on the handle
A
in the direction of arrow » Fig. 67 and
hook in the magnetic brackets
B
.
Retracting
›
Remove the sun blind from the handle
A
» Fig. 67 out of the bracket and
hold it in such a way that it can roll up slowly into the housing without being
damaged.
Note
It is not necessary to roll up the sun blind before opening the boot lid.76Using the system
Page 82 of 276

Exterior mirrorsFig. 71
Exterior mirror operation
Read and observe on page 79 first.
The rotary knob can be moved into the following positions (depending on ve-
hicle equipment)
Adjust the left mirror
Adjust the right mirror
Switch off mirror control
Mirror heater
Fold in both mirrors housings, to fold back move the knob to another posi-
tion
The mirror heating only works when the engine is running.
Adjust the position
The mirror can be adjusted to the desired position by moving the knob in the
direction of the arrow » Fig. 71.
The movement of the mirror surface is identical to the movement of the rotary
knob.
If the electrical mirror setting fails at any time, the mirrors can be adjusted by
hand by pressing on the edge of the mirror surface.
Synchronous adjustment of the mirror
›
The synchronous adjustment of the mirrors is activated in the Infotainment
» Owner´s Manual Infotainment , chapter CAR - Vehicle settings .
›
Turn the knob for the mirror control to the position for the driver mirror ad-
justment.
›
Adjust the mirror to the desired position.
Automatic folding in / back of both mirror housings
The exterior mirrors are automatically collapsed after locking the vehicle in the
park position.
The exterior mirrors are folded back to the driving position after unlocking the
vehicle.
Automatic folding in / out of both mirror housings can be activated or deactiva-
ted in the Infotainment » Owner´s Manual Infotainment , chapter CAR - Vehicle
settings .
Mirror with automatic dimming
The exterior mirror blackout is controlled together with the automatic dimming
interior mirror » page 79.
Memory function for mirrors
Valid for vehicles with electrically adjustable driver's seat.
It is possible to save the current setting of the exterior mirror when saving the
driver's seat position with » page 83, Memory Function of the electrically ad-
justable seat or » page 83 , Memory function of the remote control key .
Fold in passenger's mirror
Valid for vehicles with electrically adjustable driver's seat.
The passenger-side mirror can be tilted to the stored position to improve the
view to the curb when reversing.
Operating conditions. The function is activated in Infotainment » Owner´s Manual Infotainment ,
chapter CAR - Vehicle settings .
The mirror setting has been previously stored » page 83, Memory Func-
tion of the electrically adjustable seat or » page 83 , Memory function of
the remote control key .
The reverse gear is engaged.
The knob for the mirror control is in the position for the passenger mirror
adjustment.
The mirror returns to its initial position after the rotary knob is put into anoth-
er position or if the speed is more than 15 km/h.WARNINGDo not touch the exterior mirror surfaces, if the exterior mirror heating is
switched on - hazard of burning. 80Using the system
Page 90 of 276
Removing›Pull the head restraint out of the seat backrest as far as the stop.›
Press down the locking button
A
in the direction of arrow
1
» Fig. 84 , while
at the same time using a flat screwdriver with a max. width of 5 mm to press
the locking button in opening
B
in the direction of arrow
2
.
›
Remove the restraint in the direction of arrow
3
.
Fitting
›
Slide the restraint into the seat backrest in the direction of arrow
4
until the
locking button clicks into place.
CAUTION
Store the head restraints that were removed in such a way that they are not
damaged or soiled.
Seat heating and ventilation
Introduction
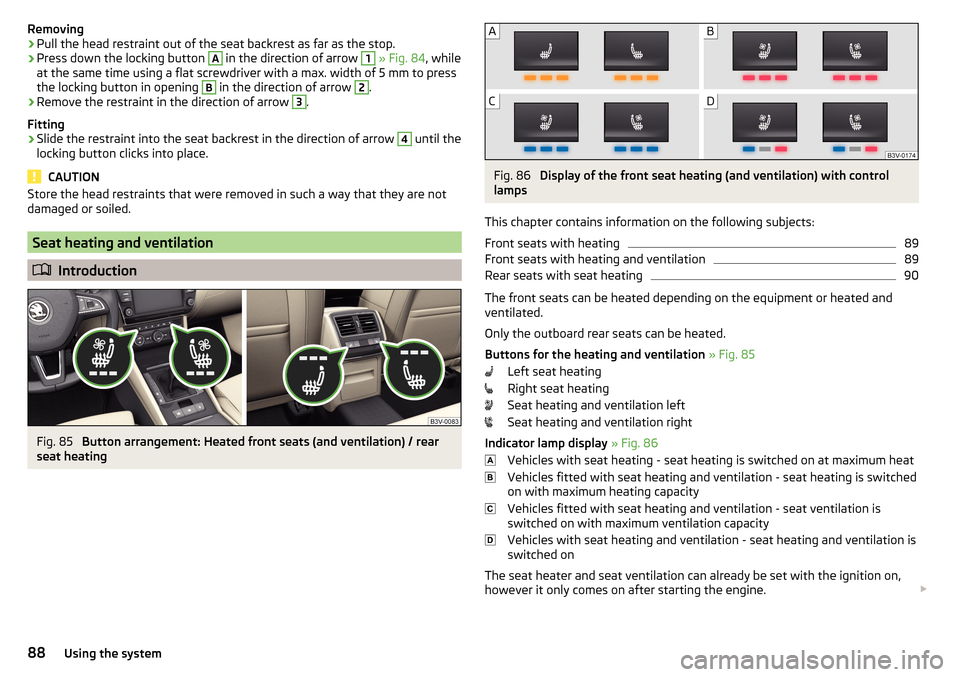
Fig. 85
Button arrangement: Heated front seats (and ventilation) / rear
seat heating
Fig. 86
Display of the front seat heating (and ventilation) with control
lamps
This chapter contains information on the following subjects:
Front seats with heating
89
Front seats with heating and ventilation
89
Rear seats with seat heating
90
The front seats can be heated depending on the equipment or heated and
ventilated.
Only the outboard rear seats can be heated.
Buttons for the heating and ventilation » Fig. 85
Left seat heating
Right seat heating
Seat heating and ventilation left
Seat heating and ventilation right
Indicator lamp display » Fig. 86
Vehicles with seat heating - seat heating is switched on at maximum heat
Vehicles fitted with seat heating and ventilation - seat heating is switched
on with maximum heating capacity
Vehicles fitted with seat heating and ventilation - seat ventilation is
switched on with maximum ventilation capacity
Vehicles with seat heating and ventilation - seat heating and ventilation is
switched on
The seat heater and seat ventilation can already be set with the ignition on,
however it only comes on after starting the engine.
88Using the system
Page 91 of 276

When the ignition is switched off, the seat heating and seat ventilation is also
switched off. If the engine is started again within 10 minutes, the driver's seat
heating and seat ventilation is automatically turned on again at the last set-
ting.WARNINGIf you have a subdued pain and/or temperature sensitivity, e.g. through
medication, paralysis or because of chronic illness (e.g. diabetes), we rec-
ommend not to use the seat heating. There may be difficult to heal burns. If
the seat heating is used, we recommend to make regular breaks in your
journey when driving long distances, so that the body can recuperate from
the stress of the journey. Please consult your doctor, who can evaluate
your specific condition.
CAUTION
The following instructions must be observed to avoid damage to the seats.■Do not kneel on the seats or otherwise apply concentrated pressure to them.■
Do not turn on any of the seat heaters if seats are not occupied.
■
Do not switch on the relevant seat heating if the seats have objects attached
to or placed on them, for example a child seat, a bag, etc.
■
When there are additional protective covers or protective covers mounted on
each of the seats, do not turn the seat heating on.
Note
If the on-board voltage decreases, the seat heating and ventilation switches
off automatically » page 216, Automatic load deactivation .
Front seats with heating
Read and observe
and on page 89 first.
The level of the seat heating is indicated by the number of illuminated warning
lights below the switch.
Seat heating operation
›
Press button or
.
The seat heating is switched on at maximum heat » Fig. 86 on page 88 -
.
With repeated pressing of the switch, the level is down-regulated up to the
switch-off.
Front seats with heating and ventilationFig. 87
Infotainment display: Front seat
heating and ventilation with
maximum heating / ventilation
level switched on
Read and observe and on page 89 first.
The heating / ventilation level is indicated by the number of illuminated func-
tion keys in Infotainment, if necessary, by the number of illuminated warning
lights below the button.
The heating / ventilation setting can also be adjusted in the Infotainment us-
ing function keys
A
and
B
» Fig. 87 and with the respective function key
turned off.
Seat heating operation only
›
Press button or
.
The seat heating is switched on at maximum heat » Fig. 86 on page 88 -
.
With repeated pressing of the switch, the level is down-regulated up to the
switch-off.
The heat output can be set in the Infotainment.
Only use seat ventilation
›
Press button or
.
›
Turn off the seat heating.
›
Set the ventilation level in the Infotainment with the function keys
A
» Fig. 87
.
Another setting of the ventilation level up to turn off can also take place by
pressing the buttons and
again.
Operating the seat heating and ventilation simultaneously
›
Press button or
.
›
Adjust the heating / ventilation level in the Infotainment.
Below the button the control lamps » Fig. 86 on page 88 -
illuminate.
89Seats and head restraints
Page 108 of 276

When transporting cargo the following the instructions must be adhered to
▶ When transporting heavy objects, the driving characteristics change due to
the shift in centre-of-gravity. The speed and style of driving must be adjus-
ted accordingly.
▶ The cargo is stowed in the luggage compartment. To prevent this from mov-
ing it should be secured with suitable lashing straps to the lashing eyes or
secured with fixing nets.
▶ Distribute loads as evenly as possible.
▶ Place heavy objects as far forward as possible.
▶ The transported items must be stowed in such a way that no objects are able
to slip forward on sudden driving or braking manoeuvres – risk of injury!
▶ Tyre pressure is to match the load.
▶ When transporting loads in the luggage compartment that has been en-
larged by folding the rear seats forward, ensure the safety of the passengers
transported on the other rear seats .
In the event of an accident, even small and light objects gain so much kinetic energy that they can cause severe injuries.
The magnitude of the kinetic energy is dependent on the speed at which the
vehicle is travelling and the weight of the object.
Example: In the event of a frontal collision at a speed of 50 km/h, an object
with a weight of 4.5 kg produces an energy, which corresponds to 20 times its
own weight. This means that it results in a weight of approx. 90 kg “ ”.
Luggage compartment light
The warning light turns on when tailgate is opened.
The warning light turns off when the tailgate is closed.
If the boot lid is open and the ignition switched off, the light will extinguish
automatically after around 10 minutes.
The luggage compartment illumination using the removable lamp » page 114.WARNING■
Never exceed the maximum permissible load of the respective fasteners,
nets, hooks etc. Heavy objects were not secured sufficiently – risk of injury!■
If the cargo is tied down with unsuitable or damaged lashing straps, inju-
ries can occur in the event of braking manoeuvres or accidents.
■
Loose cargo can be thrown forward during a sudden manoeuvre or in case
of an accident and can injure the occupants or other road users.
■
Loose cargo could hit a deployed airbag and injure occupants – danger of
death!
CAUTION■ Never exceed the maximum permissible load of the respective fasteners,
nets, hooks etc. - these could be damaged.■
Make sure that transported objects with sharp edges do not damage the
threads of the following devices. ■Rear window heater.
■ Rear window with an integrated antenna.
■ Integrated antenna in the rear side windows.
Fastening elements
Fig. 127
Fastening elements: Variant 1/ Variant 2
Read and observe
and on page 106 first.
The fasteners are located on both sides of the luggage compartment.
Overview of the fastening elements » Fig. 127
Fastening elements for fastening fixing nets
Lashing eyes for fastening items of luggage and fixing nets
The maximum permissible load for the individual lashing eyes
B
is 350 kg.
For vehicles with the variable loading floor, the luggage can only be secured
using the eyelets
B
when the variable loading floor is in the lower position
» page 115 .
AB106Using the system
Page 121 of 276

WARNING■For your own safety and that of other road users, ensure that all the win-
dows are free of ice, snow and misting. The blower should always be on to
prevent the windows from misting up.■
Under certain circumstances, air at a temperature of about 5 °C can flow
out of the vents when the cooling system is switched on.
CAUTION
■ The air inlet in front of the windscreen must be free of e.g. ice, snow or
leaves to ensure that the heating and cooling system operates properly.■
After switching on the cooling Condensation from the evaporator of the air
conditioning may drip down and form a puddle below the vehicle. This is not a
leak!
■
If the coolant temperature is too high, the cooling system is switched off to
ensure that the engine cools down.
Heating and manual air conditioning
Fig. 153
Heating Controls
Fig. 154
Controls of the manual air conditioning
Read and observe
and on page 119 first.
Individual functions can be set and switched on by turning the rotary switch or
by pressing the button in question. When the function is switched on, the indi-
cator lamp below the button lights up.
Functions of the individual controls » Fig. 153 and » Fig. 154
Setting temperature
▶ Lower the temperature
▶ Increase the temperature
Set the blower speed (Level 0: fan off, Level 6: high speed)
Set the direction of the air flow » page 122
▶ Air flow to the windows
▶ Air flow to the upper body
▶ Air flow into the footwell and to the body (warmer air directed to the
footwell than to the body)
▶ Air flow to the footwell
▶ Air flow to the windows and the footwell
Depending on equipment fitted:
▶ Auxiliary heating and ventilation on / switch off
» page 124
▶ Switching the windscreen heater on/off
» page 75
Operate seat heating for the front left seat » page 88
Switching the cooling system on/off
Switch the heated rear window function on/off » page 75
Switch recirculation on/off » page 122
Operate seat heating for the front right seat » page 88
ABCD119Heating and ventilation
Page 123 of 276
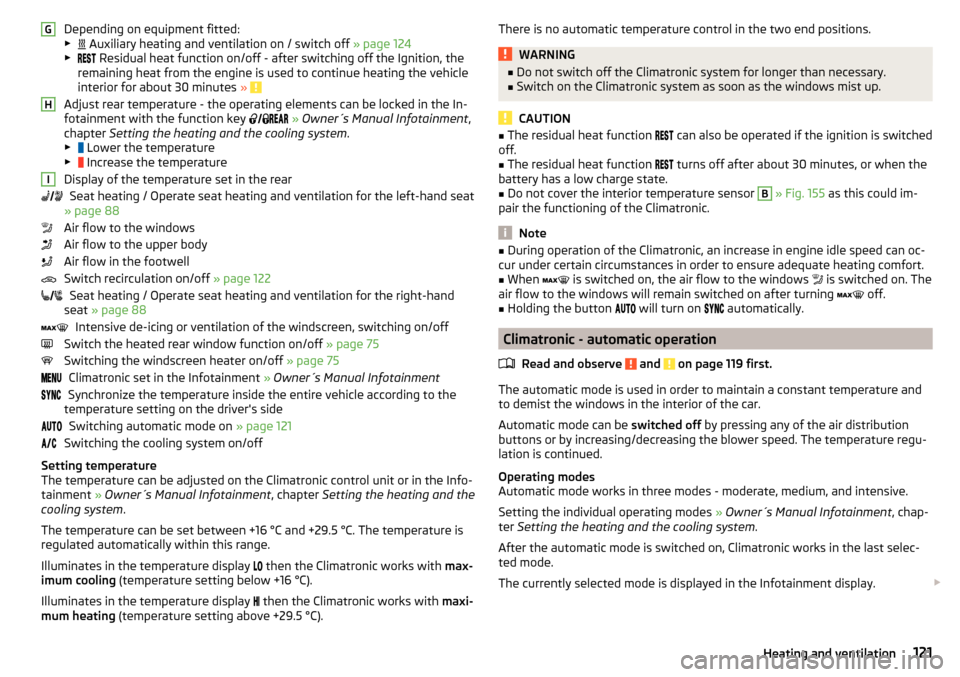
Depending on equipment fitted:
▶ Auxiliary heating and ventilation on / switch off » page 124
▶ Residual heat function on/off - after switching off the Ignition, the
remaining heat from the engine is used to continue heating the vehicle
interior for about 30 minutes »
Adjust rear temperature - the operating elements can be locked in the In-
fotainment with the function key
» Owner´s Manual Infotainment ,
chapter Setting the heating and the cooling system .
▶ Lower the temperature
▶ Increase the temperature
Display of the temperature set in the rear Seat heating / Operate seat heating and ventilation for the left-hand seat
» page 88
Air flow to the windows
Air flow to the upper body
Air flow in the footwell
Switch recirculation on/off » page 122
Seat heating / Operate seat heating and ventilation for the right-hand
seat » page 88
Intensive de-icing or ventilation of the windscreen, switching on/off
Switch the heated rear window function on/off » page 75
Switching the windscreen heater on/off » page 75
Climatronic set in the Infotainment » Owner´s Manual Infotainment
Synchronize the temperature inside the entire vehicle according to the
temperature setting on the driver's side
Switching automatic mode on » page 121
Switching the cooling system on/off
Setting temperature
The temperature can be adjusted on the Climatronic control unit or in the Info-
tainment » Owner´s Manual Infotainment , chapter Setting the heating and the
cooling system .
The temperature can be set between +16 °C and +29.5 °C. The temperature is
regulated automatically within this range.
Illuminates in the temperature display then the Climatronic works with
max-
imum cooling (temperature setting below +16 °C).
Illuminates in the temperature display then the Climatronic works with
maxi-
mum heating (temperature setting above +29.5 °C).
GHIThere is no automatic temperature control in the two end positions.WARNING■
Do not switch off the Climatronic system for longer than necessary.■Switch on the Climatronic system as soon as the windows mist up.
CAUTION
■The residual heat function can also be operated if the ignition is switched
off.■
The residual heat function
turns off after about 30 minutes, or when the
battery has a low charge state.
■
Do not cover the interior temperature sensor
B
» Fig. 155 as this could im-
pair the functioning of the Climatronic.
Note
■ During operation of the Climatronic, an increase in engine idle speed can oc-
cur under certain circumstances in order to ensure adequate heating comfort.■
When
is switched on, the air flow to the windows
is switched on. The
air flow to the windows will remain switched on after turning
off.
■
Holding the button
will turn on
automatically.
Climatronic - automatic operation
Read and observe
and on page 119 first.
The automatic mode is used in order to maintain a constant temperature and
to demist the windows in the interior of the car.
Automatic mode can be switched off by pressing any of the air distribution
buttons or by increasing/decreasing the blower speed. The temperature regu-
lation is continued.
Operating modes
Automatic mode works in three modes - moderate, medium, and intensive.
Setting the individual operating modes » Owner´s Manual Infotainment , chap-
ter Setting the heating and the cooling system .
After the automatic mode is switched on, Climatronic works in the last selec-
ted mode.
The currently selected mode is displayed in the Infotainment display.
121Heating and ventilation
Page 126 of 276
WARNING■The auxiliary heating (auxiliary heating and ventilation) (following as aux.
heating) must never be operated in closed rooms (e.g. garages) – risk of
poisoning!■
The auxiliary heating must not be allowed to run during refuelling – risk
of fire.
■
The exhaust pipe of the auxiliary heating is located on the underside of
the vehicle. If you want to use the heater, do not switch off the car in pla-
ces where the exhaust fumes can come into contact with flammable mate-
rials such as dry grass, undergrowth, leaves, spilled fuel etc. -. risk of fire.
CAUTION
■ The exhaust pipe of the auxiliary heating, which is located on the underside
of the vehicle, must not be clogged and the exhaust flow must not be blocked.■
If the auxiliary heating is running, the vehicle battery discharges.
■
The air inlet in front of the windscreen must be free (e.g. of ice, snow or
leaves) to ensure that the auxiliary heating operates properly.
Note
■ The auxiliary heating only switches the blower on, if it has achieved a coolant
temperature of approx. 50 °C.■
At low outside temperatures, this can result in a formation of water vapour in
the area of the engine compartment. This is quite normal and is not an operat-
ing problem.
■
So that warm air can flow into the vehicle interior after switching on the aux.
heating, you must maintain the comfort temperature normally selected by you,
leave the fan switched on and leave the air outlet vents in open. It is recom-
mended to put the air flow in the position
or
.
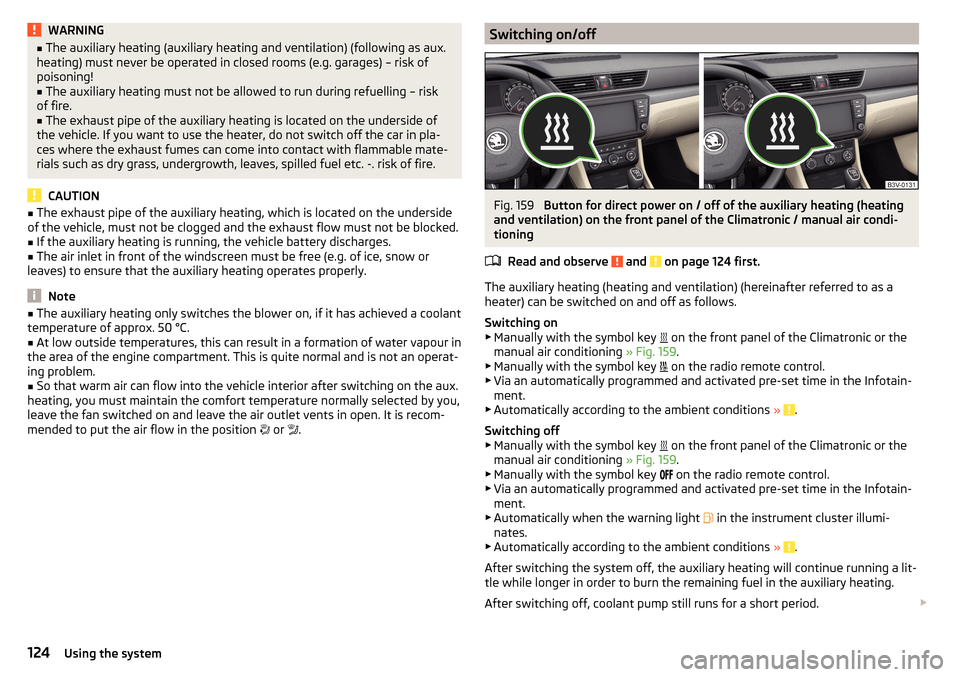
Switching on/offFig. 159
Button for direct power on / off of the auxiliary heating (heating
and ventilation) on the front panel of the Climatronic / manual air condi-
tioning
Read and observe
and on page 124 first.
The auxiliary heating (heating and ventilation) (hereinafter referred to as a
heater) can be switched on and off as follows.
Switching on
▶ Manually with the symbol key on the front panel of the Climatronic or the
manual air conditioning » Fig. 159.
▶ Manually with the symbol key on the radio remote control.
▶ Via an automatically programmed and activated pre-set time in the Infotain-
ment.
▶ Automatically according to the ambient conditions »
.
Switching off
▶ Manually with the symbol key on the front panel of the Climatronic or the
manual air conditioning » Fig. 159.
▶ Manually with the symbol key on the radio remote control.
▶ Via an automatically programmed and activated pre-set time in the Infotain-
ment.
▶ Automatically when the warning light in the instrument cluster illumi-
nates.
▶ Automatically according to the ambient conditions »
.
After switching the system off, the auxiliary heating will continue running a lit-
tle while longer in order to burn the remaining fuel in the auxiliary heating.
After switching off, coolant pump still runs for a short period.
124Using the system
Page 127 of 276
Programming the auxiliary heating in the Infotainment
For vehicles with Climatronic: on the front panel of the Climatronic button
→
Press
For vehicles with manual air conditioning: button in the Infotainment fea-
ture
→
Press
When automatic switching on is activated, the indicator light in the symbol key
lights up » Fig. 159 for about 10 seconds after the ignition is turned off.
CAUTION
The automatic switching on and off the heating for rapid heating of the vehicle
interior can be disabled in the Infotainment » Owner´s Manual Infotainment ,
chapter Setting the heating and the cooling system .
Radio remote control
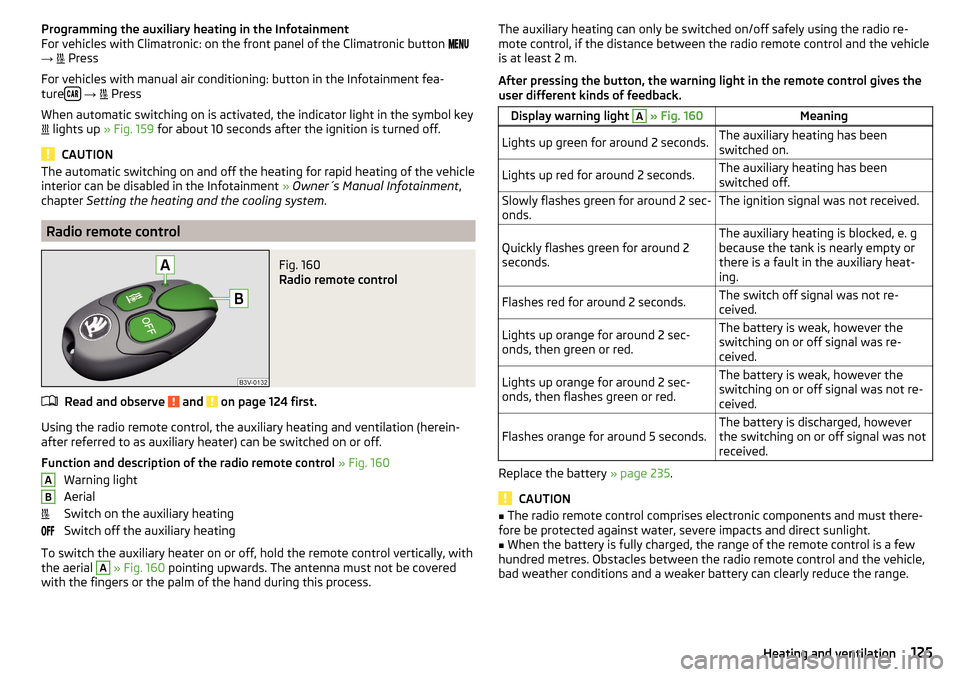
Fig. 160
Radio remote control
Read and observe and on page 124 first.
Using the radio remote control, the auxiliary heating and ventilation (herein-
after referred to as auxiliary heater) can be switched on or off.
Function and description of the radio remote control » Fig. 160
Warning light
Aerial
Switch on the auxiliary heating
Switch off the auxiliary heating
To switch the auxiliary heater on or off, hold the remote control vertically, with
the aerial
A
» Fig. 160 pointing upwards. The antenna must not be covered
with the fingers or the palm of the hand during this process.
ABThe auxiliary heating can only be switched on/off safely using the radio re-
mote control, if the distance between the radio remote control and the vehicle
is at least 2 m.
After pressing the button, the warning light in the remote control gives the
user different kinds of feedback.Display warning light A » Fig. 160MeaningLights up green for around 2 seconds.The auxiliary heating has been
switched on.Lights up red for around 2 seconds.The auxiliary heating has been
switched off.Slowly flashes green for around 2 sec-
onds.The ignition signal was not received.Quickly flashes green for around 2
seconds.The auxiliary heating is blocked, e. g
because the tank is nearly empty or
there is a fault in the auxiliary heat-
ing.Flashes red for around 2 seconds.The switch off signal was not re-
ceived.Lights up orange for around 2 sec-
onds, then green or red.The battery is weak, however the
switching on or off signal was re-
ceived.Lights up orange for around 2 sec-
onds, then flashes green or red.The battery is weak, however the
switching on or off signal was not re-
ceived.Flashes orange for around 5 seconds.The battery is discharged, however
the switching on or off signal was not
received.
Replace the battery » page 235.
CAUTION
■
The radio remote control comprises electronic components and must there-
fore be protected against water, severe impacts and direct sunlight.■
When the battery is fully charged, the range of the remote control is a few
hundred metres. Obstacles between the radio remote control and the vehicle,
bad weather conditions and a weaker battery can clearly reduce the range.
125Heating and ventilation