check engine SKODA SUPERB 2015 3.G / (B8/3V) Owner's Manual
[x] Cancel search | Manufacturer: SKODA, Model Year: 2015, Model line: SUPERB, Model: SKODA SUPERB 2015 3.G / (B8/3V)Pages: 276, PDF Size: 42.14 MB
Page 10 of 276
Safety
Passive Safety
General information
Introduction
This chapter contains information on the following subjects:
Before setting off
8
Driving safety
8
In this section of the instructions you will find important information, tips and
notes on the subject of passive safety.
We have combined everything here which you should be familiar with, for ex-
ample, regarding seat belts, airbags, safety of children and anything similar.
You can find further information on safety concerning you and those travelling
with you in the following chapters of this Owner's Manual.
The complete on-board literature should therefore always be in the vehicle.
This applies in particular, if you rent out or sell the vehicle.
Before setting off
For your own safety and the safety of the people travelling with you, please
pay attention to the following points before setting off.
▶ Ensure that the lighting and the turn signal system are functioning properly.
▶ Ensure that the function of the wipers and the condition of the wiper blades
are free of any defects.
▶ Ensure that all of the windows offer good visibility to the outside.
▶ Adjust the rear-view mirror so that vision to the rear is guaranteed.
▶ Ensure that the mirrors are not covered.
▶ Check the tyre inflation pressure.
▶ Check the engine oil, brake fluid and coolant level.
▶ Secure all items of luggage.
▶ Do not exceed the permissible axle loads and permissible gross weight of the
vehicle.
▶ Close all doors as well as the bonnet and boot lid.
▶ Ensure that no objects can obstruct the pedals.
▶
Protect children in suitable child seats with correctly fastened seat belts
» page 20 , Transporting children safely .
▶ Adopt the correct seated position » page 8, Correct and safe seated posi-
tion . Tell your passengers to assume the correct seated position.
Driving safety
The driver is fully responsible for himself and passengers, especially children. If
your driving safety is effected, you place yourself and the oncoming traffic at
risk.
The following guidelines must therefore be observed. ▶ Do not become distracted from concentrating on the traffic situation, (e.g. by
your passengers or mobile phone calls).
▶ Never drive when your driving ability is impaired, (e.g. due to medication, al-
cohol or drugs).
▶ Keep to the traffic regulations and the permissible speed limit.
▶ Always adjust the driving speed to the road, traffic and weather conditions.
▶ Take regular breaks on long journeys (at least every two hours).
The following list contains instructions for the Passenger which, if not ob-
served, may cause serious injuries or death. ▶ Do not lean against the dash panel.
▶ Do not put your feet on the dash panel.
The following list contains instructions for all Passengers which, if not ob-
served, may cause serious injuries or death. ▶ Do not sit only on the front part of the seat.
▶ Do not sit facing to the side.
▶ Do not lean out of the window.
▶ Do not put your limbs out of the window.
▶ Do not put your feet on the seat cushion.
Correct and safe seated position
Introduction
This chapter contains information on the following subjects:
Correct seat position of the driver
9
Adjusting the steering wheel position
9
Correct seated position for the front passenger
10
Correct seated position for the passengers in the rear seats
10
8Safety
Page 34 of 276
Engine electronics check (petrol engine)35 Safety systems35
Tyre pressure
35
Brake linings
36
Fuel reserve
36
Lane departure warning (Lane Assist)
36
Turn signal system
36
Trailer turn signal lights
36
Fog lights
36
Speed regulating system / Speed limiter
37
Brake pedal (automatic transmission)
37
Parking brake - Auto Hold function
37
Main beam
37
Automatic transmission
37
Rear seat belt warning light
37
Alternator
37
Coolant
38
Engine oil pressure too low
38
Engine oil level
38
AdBlue ®
39
Lamp failure
39
Diesel particulate filter (diesel engine)
39
Windscreen washer fluid level
40
Headlamp assistant
40
START-STOP system
40
Low temperature displayed
40
Water in the fuel filter (diesel engine)
40
Automatic Distance Control (ACC)
40
Distance warning (Front Assist)
40
Advance warning / emergency braking (Front Assist)
41
Economy mode
41
Adaptive chassis control (DCC) fault
41
Service
41
The warning lights in the instrument cluster indicate certain functions or
faults.
Some warning lights can be accompanied by acoustic signals and messages in
the display of the instrument cluster.
After switching on the ignition, some warning lights light up briefly as a func-
tion test.
If the tested systems are OK, the corresponding warning lights go out a few
seconds after switching on the ignition or after starting the engine.
Warning lights in the display
Depending on the importance the warning light
(danger) or
(warning) illu-
minate along with some of the warning lights in the list with the warning
lights.
Depending on vehicle specification, some warning lights may be displayed in
colour on the display. For example. the coolant warning lamp may be represen-
ted as follows.
▶ - Segment Display / monochromatic (“black and white”) MAXI DOT display
▶ - colour MAXI DOT displayWARNING■
Ignoring illuminated warning lights and related messages or instructions
in the display of the instrument cluster may lead to serious personal injury
or damage to the vehicle.■
If you have to stop for technical reasons, then park the vehicle at a safe
distance from the traffic, switch off the engine and switch on the hazard
warning lights » page 71. Place the warning triangle at the prescribed dis-
tance.
■
The engine compartment of your car is a hazardous area. The following
warning instructions must be followed at all times when working in the en-
gine compartment » page 206, Engine compartment .
Parking brake
Read and observe
on page 32 first.
illuminates - the hand brake light is switched on.
Parking brake error
illumi-
nates
Fault: electric parking brakePARKING BRAKE FAULT
Seek help from a specialist garage.
Parking on a slope that is too steep
illumi-
nates
Parking brake: grad. too steep. Owner's manual!GRADIENT TOO STEEP
32Using the system
Page 35 of 276
Find a parking space on a flat surface or on a slope that is not so steep.
Brake systemRead and observe
on page 32 first.
illuminates – the brake fluid level in the braking system is too low.
Brake fluid: Owner's manual!BRAKE FLUID PLEASE CHECK›
Stop the vehicle, switch off the engine, and check the level of the brake fluid
» page 212 .
WARNING■
If the warning light illuminates simultaneously with warning light
» page 34 , Anti-lock braking system (ABS) , do not continue your
journey! Seek help from a specialist garage.■
A fault to the ABS system or the braking system can increase the vehi-
cle's braking distance – risk of accident!
Seat belt warning light
Read and observe
on page 32 first.
illuminates - the driver or front passenger has not fastened their seat belt.
At a speed of more than approximately 30 km/h the warning light flashes
and an audible warning sounds at a time.
If the seat belt is not fastened by the driver or front passenger during the next
approx. 2 seconds, the warning signal is deactivated and the warning light
lights up permanently.
Automatic Distance Control (ACC)
Read and observe
on page 32 first.
illuminates - ACC deceleration is insufficient.
Apply the brake!›
Apply the brake.
For more information about the ACC system » page 163.
Power steering / steering lock (KESSY system)
Read and observe
on page 32 first.
Fault in the power steering
illuminates – this indicates a complete failure of the power steering and the
steering assist has failed (significantly higher steering forces).
illuminates – this indicates a partial failure of the power steering and the
steering forces can be greater.
Seek help from a specialist garage.
Steering lock defect (KESSY system)
An audible signal sounds as a warning.
flashes
Steering lock faulty. Stop!STOP VEHICLE STEERING FAULTY
Park the vehicle, do not continue to drive
. After switching off the ignition, it
is no longer possible to lock the steering, to activate the electrical components
(e.g. Infotainment ), to switch on the ignition again and to start the engine.
Seek help from a specialist garage.
flashes
Steering lock: Workshop!STEERING WORKSHOP
Seek help from a specialist garage.
Steering column lock not unlocked (System KESSY)
flashes
Move the steering wheel!MOVE STEERING WHEEL
▶ Move the steering wheel slightly back and forth, thereby facilitating unlock-
ing the steering lock.
If the steering does also not unlock then, the help of a specialist garage is re-
quired.
Disconnecting the vehicle battery
If the vehicle's battery has been disconnected and reconnected, the indicator
light comes on after switching on the ignition.
The warning light should go out after driving a short distance.
If, after the motor is restarted and a short drive, the indicator light does not go
out, there is a system error.
33Instruments and warning lights
Page 37 of 276
There is a fault in the glow plug system if the warning light does not come
on or illuminates continuously.
Seek help from a specialist garage.
Engine electronics check (petrol engine)
Read and observe
on page 32 first.
illuminates – there is a fault in the engine management system. The system
makes possible operation emergency mode - there may be a noticeable reduc-
tion in engine performance.
Seek help from a specialist garage.
Safety systems
Read and observe
on page 32 first.
System fault
illuminates – there is a fault in the airbag system.
Error: AirbagAIRBAG ERROR
Seek help from a specialist garage.
The front passenger airbag has been disabled with the key switch
Illuminates for around 4 seconds after the ignition has been switched on.
beneath the lettering
in the middle section of the dash
panel illuminates after the ignition has been switched on » page 19.
One of the airbags or a belt tensioner has been disabled by the diagnostic
tool
illuminates for approximately 4 seconds after the ignition is switched on
and then flashes for approximately 12 seconds.
Airbag/ belt tensioner deactivated.AIRBAG/ BELT TENSIONER OFF
ProActive passenger protection
illuminates and one of the following messages is shown in the instrument
cluster display.
Proactive passenger protection not available.PROACTIVE PASSENGER PROTECT NOT AVAILorProactive passenger protection: function restricted.LIMITED PROACTIVE PASSENGER PROTECT
The seat belt for the driver and front passenger needs to be replaced. Seek
help from a specialist garage.
WARNINGWhen a fault in the airbag system occurs, there is a risk of the system not
being triggered in the event of an accident. Therefore, this must be
checked immediately by a specialized garage.
Tyre pressure
Read and observe
on page 32 first.
Change of tyre pressure values
illuminates – there was a pressure change in one of the tyres.
An audible signal sounds as a warning.
›
Immediately reduce speed and avoid sudden steering and braking manoeu-
vres.
›
Stop the vehicle, turn the ignition off and check the tyres and their inflation
pressures » page 217 .
›
Correct the tyre pressure if necessary or replace the affected wheel
» page 224 or use the repair kit » page 228.
›
Save the tyre pressure values in the system » page 183.
System fault
flashes for approximately 1 minute and remains lit – there may be a fault in
the tyre pressure monitoring system.
›
Stop the vehicle, turn the ignition off and start the engine again.
If the warning light flashes after starting the engine again, there is a system
error.
Seek help from a specialist garage.
Disconnecting the vehicle battery
If the vehicle's battery has been disconnected and reconnected, the indicator
light comes on after switching on the ignition.
The warning light should go out after driving a short distance.
35Instruments and warning lights
Page 40 of 276
CoolantRead and observe
on page 32 first.
Coolant level too low
illumi-
nates
Check coolant! Owner's manual!ENGINE COOLANT PLEASE CHECK
▶ Stop the vehicle, switch off the engine and let it cool.
▶ Check the coolant level » page 211, Checking the coolant level .
If the coolant level is within the specified range and the warning light
lights
up again, then there may be a malfunction of the cooling fan.
▶ Switch off the ignition.
▶ Check the fuse for the radiator fan, replace if necessary.
If the coolant level and fan fuse are both OK but the warning light lights up
again,
stop driving!
Seek help from a specialist garage.
Coolant temperature too high
illumi-
nates
Engine overheat. Stop! Owner's manual!ENGINE OVERHEAT STOP
▶ Stop the vehicle, switch off the engine and let it cool.
▶ Continue your journey only after the warning light has disappeared.
Engine oil pressure too low
Read and observe
on page 32 first.
flashes – the engine oil pressure is too low.
Oil pressure: stop! Owner's manual!STOP VEHICLE OIL PRESSURE›
Stop the vehicle, switch off the engine, and check the engine oil level.
Even if the oil level is correct,
do not drive any further if the warning light is
flashing. Also do not leave the engine running at an idling speed.
Seek help from a specialist garage.
CAUTIONDo not continue if for some reason it is not possible to fill with engine oil un-
der the current circumstances! Switch off the engine and seek assistance
from a specialist garage.
Engine oil level
Read and observe
on page 32 first.
Engine oil level too low
illumi-
nates
Oil level: add oil!ADD OIL
▶ Stop the vehicle, switch off the engine, and check the engine oil level, top up
if necessary.
The warning light will go out if the bonnet is left open for more than 30 sec-
onds. If no engine oil has been replenished, the warning light will come on
again after driving about 100 km.
Engine oil level too high
illumi-
nates
Reduce oil level!OIL LEVEL TOO HIGH
▶ Stop the vehicle, switch off the engine, and check the engine oil level.
In the event of a high oil level, seek assistance from a specialist garage.
Fault on the engine oil level sensor
illumi-
nates
Oil sensor: workshop!OIL SENSOR WORKSHOP
Seek help from a specialist garage.
CAUTION
Do not continue if for some reason it is not possible to fill with engine oil un-
der the current circumstances! Switch off the engine and seek assistance
from a specialist garage.38Using the system
Page 41 of 276
AdBlue®
Read and observe
on page 32 first.
AdBlue ®
level too low
Information on the amount of AdBlue ®
to be added is also shown. The values
"min" and "max" stand for the minimum and maximum AdBlue ®
replenishment
amounts.
illuminates
Add AdBlue (DEF)! Range:ADD ADBLUE (DEF) … RANGE …
The range in the display indicates the distance that can be driven with the re-
maining AdBlue ®
left in the tank.
Add AdBlue ®
» page 204 .
illumi-
nates
Add AdBlue (DEF)! No engine start in ….ADD ADBLUE (DEF)_NO START IN …
The value in the display indicates the distance that can still be travelled, after
which no engine restart is possible unless AdBlue ®
is added.
Add AdBlue ®
» page 204 .
illumi-
nates
Add AdBlue (DEF)! Engine start disabled.ADD ADBLUE (DEF) RESTART DISABLED
It is no longer possible to start the engine.
Add AdBlue ®
» page 204 .
AdBlue ®
fault
illumi-
nates
Error: AdBlue (DEF). No engine start in ….ADBLUE (DEF) ERROR NO START IN …
There is a fault in the AdBlue ®
system.
The value in the display indicates the distance to travel, after which no engine
restart is possible.
Seek help from a specialist garage.
illumi-
nates
Error: AdBlue (DEF). Engine start disabled.ADD ADBLUE (DEF) RESTART DISABLED
There is a fault in the AdBlue ®
system.
It is no longer possible to start the engine.
Seek help from a specialist garage.
Lamp failure
Read and observe
on page 32 first.
illuminates – one of the lamps is defective. A message will appear con-
cerning the affected lamp.
An example message in the display of the instrument cluster
Check right dipped headlight beam!DIPPED HEADLIGHT CHECK RIGHT
Diesel particulate filter (diesel engine)
Read and observe
on page 32 first.
The diesel particulate filter separates the soot particles from the exhaust. The soot particles collect in the diesel particulate filter where they are burnt on a
regular basis.
illuminates – the filter is clogged with soot.
To clean the filter, and where traffic conditions permit »
, drive as follows for
at least 15 minutes or until the indicator light goes out.
4th or 5th gear engaged (automatic gearbox: Position D/S).
Vehicle speed at least 70 km/h.
Engine speed between 1800 - 2500 rpm.
If the filter is properly cleaned, the warning light extinguishes.
If the filter is not properly cleaned, the warning light does not go out and
the warning light begins to flash.
Particulate filter: owner's manual!PARTICLE FILTER OWNER MANUAL
Seek help from a specialist garage.
39Instruments and warning lights
Page 45 of 276
OperationFig. 30
Buttons / dial: on the control lever / the multifunction steering
wheel
Read and observe
on page 42 first.
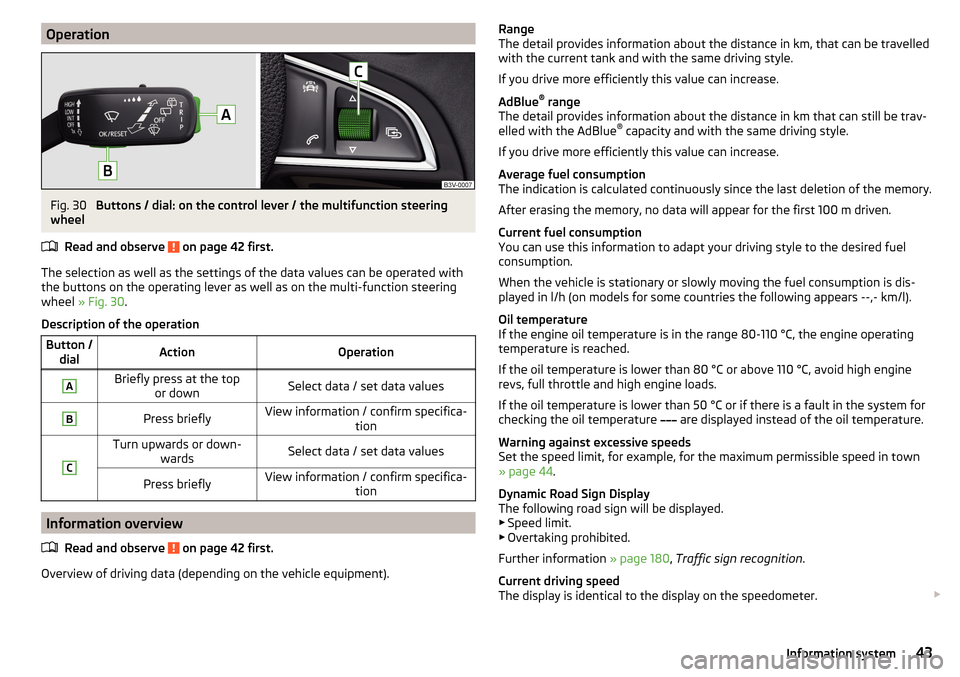
The selection as well as the settings of the data values can be operated with
the buttons on the operating lever as well as on the multi-function steering
wheel » Fig. 30 .
Description of the operation
Button / dialActionOperationABriefly press at the top or downSelect data / set data valuesBPress brieflyView information / confirm specifica- tionCTurn upwards or down-wardsSelect data / set data valuesPress brieflyView information / confirm specifica- tion
Information overview
Read and observe
on page 42 first.
Overview of driving data (depending on the vehicle equipment).
Range
The detail provides information about the distance in km, that can be travelled
with the current tank and with the same driving style.
If you drive more efficiently this value can increase.
AdBlue ®
range
The detail provides information about the distance in km that can still be trav-
elled with the AdBlue ®
capacity and with the same driving style.
If you drive more efficiently this value can increase.
Average fuel consumption
The indication is calculated continuously since the last deletion of the memory.
After erasing the memory, no data will appear for the first 100 m driven.
Current fuel consumption
You can use this information to adapt your driving style to the desired fuel
consumption.
When the vehicle is stationary or slowly moving the fuel consumption is dis-
played in l/h (on models for some countries the following appears --,- km/l).
Oil temperature
If the engine oil temperature is in the range 80-110 °C, the engine operating
temperature is reached.
If the oil temperature is lower than 80 °C or above 110 °C, avoid high engine
revs, full throttle and high engine loads.
If the oil temperature is lower than 50 °C or if there is a fault in the system for
checking the oil temperature are displayed instead of the oil temperature.
Warning against excessive speeds
Set the speed limit, for example, for the maximum permissible speed in town
» page 44 .
Dynamic Road Sign Display
The following road sign will be displayed. ▶ Speed limit.
▶ Overtaking prohibited.
Further information » page 180, Traffic sign recognition .
Current driving speed
The display is identical to the display on the speedometer. 43Information system
Page 53 of 276

›Switch on the Wi-Fi on the communication device to be connected.›Allow the communication device to be connected to search for available Wi-
Fi networks (see the Owner's Manual for the communication device to be
connected).›
In the menu of the detected networks select “SmartGate_...” 1)
or “DIRECT
SmartGate_...” 1 )
.
›
Enter the password » page 51.
With SmartGate, a maximum of four communication devices can be connected
simultaneously using Wi-Fi. In these communication devices, up to four ŠKODA
applications can be started simultaneously.
Disconnection
Disconnection is possible in one of the following ways.
›
Switch off the ignition for longer than 5 seconds (for vehicles with a starter
button, switch off the engine and open the driver's door).
›
End the connection in the SmartGate application.
›
Switch off the Wi-Fi on the connected communication device.
Automatic connection
If the communication device has already been connected with SmartGate be-
fore, then the connection is automatically restored under the following condi-
tions.
The ignition is switched on.
The Wi-Fi on the communication device to be connected is switched on.
The communication device to be connected has stored the password re-
quired for the connection check.
Connection to SmartGate using Wi-Fi Direct
Read and observe
and on page 50 first.
This type of connection is intended for communication devices running theAndroid operating system.
Establishing a connection
›
Switch on the ignition.
›
Start the SmartGate application using the communication device to be con-
nected.
›
Then follow the instructions which are included in the SmartGate application.
With SmartGate, a maximum of two communication devices can be connected
simultaneously using Wi-Fi Direct, with as many ŠKODA applications running
simultaneously as required.
If you want to connect to SmartGate in another vehicle, you must first end the
existing connection to the SmartGate application and then re-establish the
connection.
Disconnection
Disconnection is possible in one of the following ways.›
Switch off the ignition for longer than 5 seconds (for vehicles with a starter
button, switch off the engine and open the driver's door).
›
End the connection in the SmartGate application.
›
Switch off the Wi-Fi on the connected communication device.
Automatic connection
If the communication device has already been connected with SmartGate be-
fore, then the connection is automatically restored after the ignition is started.
SmartGate web interface
Read and observe
and on page 50 first.
SmartGate parameters can be set in the SmartGate web interface.
The following address must be entered in the web browser of the connected
communication device via Wi-Fi.
HTTP://192.168.123.1
The setting changes are only effective after pressing the “Save” button and
then the “Reboot” button.
Password/PIN code change
Read and observe
and on page 50 first.
The factory set password for the Wi-Fi connection is the complete vehicle
identification number (upper case); the factory set PIN code for the Wi-Fi Direct
connection is the last 6 digits of the vehicle identification number.
1)
The last 6 characters of the vehicle identification number of your vehicle are displayed at position
....
51Information system
Page 134 of 276
Manually deactivating/activating the systemFig. 165
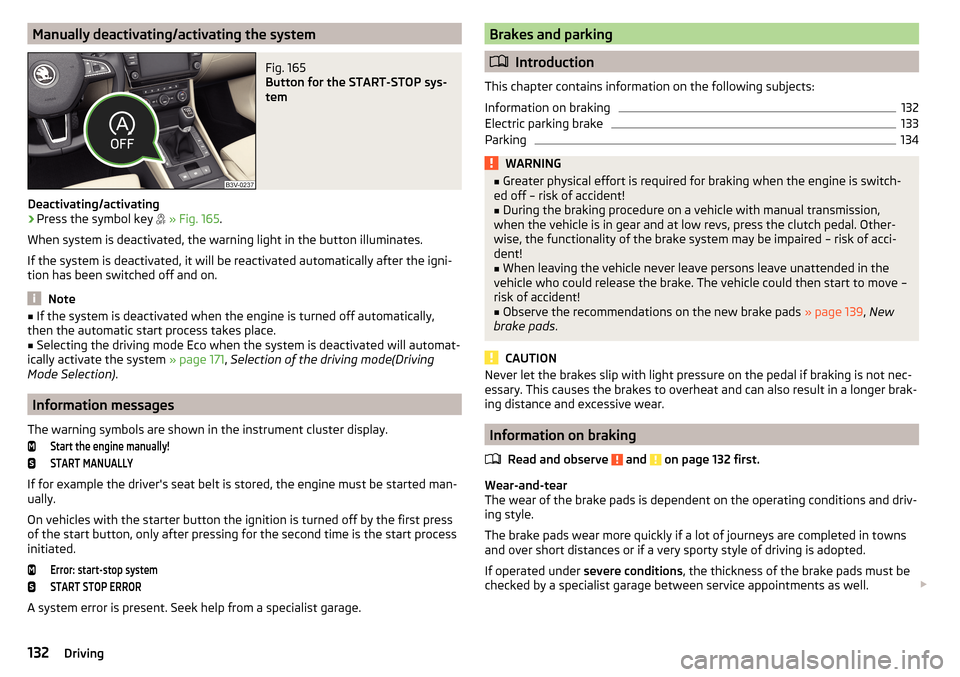
Button for the START-STOP sys-
tem
Deactivating/activating
›
Press the symbol key
» Fig. 165 .
When system is deactivated, the warning light in the button illuminates.
If the system is deactivated, it will be reactivated automatically after the igni-
tion has been switched off and on.
Note
■ If the system is deactivated when the engine is turned off automatically,
then the automatic start process takes place.■
Selecting the driving mode Eco when the system is deactivated will automat-
ically activate the system » page 171, Selection of the driving mode(Driving
Mode Selection) .
Information messages
The warning symbols are shown in the instrument cluster display.
Start the engine manually!START MANUALLY
If for example the driver's seat belt is stored, the engine must be started man-
ually.
On vehicles with the starter button the ignition is turned off by the first press
of the start button, only after pressing for the second time is the start process
initiated.
Error: start-stop systemSTART STOP ERROR
A system error is present. Seek help from a specialist garage.
Brakes and parking
Introduction
This chapter contains information on the following subjects:
Information on braking
132
Electric parking brake
133
Parking
134WARNING■ Greater physical effort is required for braking when the engine is switch-
ed off – risk of accident!■
During the braking procedure on a vehicle with manual transmission,
when the vehicle is in gear and at low revs, press the clutch pedal. Other-
wise, the functionality of the brake system may be impaired – risk of acci-
dent!
■
When leaving the vehicle never leave persons leave unattended in the
vehicle who could release the brake. The vehicle could then start to move –
risk of accident!
■
Observe the recommendations on the new brake pads » page 139, New
brake pads .
CAUTION
Never let the brakes slip with light pressure on the pedal if braking is not nec-
essary. This causes the brakes to overheat and can also result in a longer brak-
ing distance and excessive wear.
Information on braking
Read and observe
and on page 132 first.
Wear-and-tear
The wear of the brake pads is dependent on the operating conditions and driv-
ing style.
The brake pads wear more quickly if a lot of journeys are completed in towns
and over short distances or if a very sporty style of driving is adopted.
If operated under severe conditions , the thickness of the brake pads must be
checked by a specialist garage between service appointments as well.
132Driving
Page 143 of 276
If the functioning of the blinds is impaired and the vehicle reaches a speed of
about 150 km/h, the following message appears in the display of the instru-
ment cluster.Error: radiator shutter. Function restricted.RADIATOR SHUTTER RESTRICT_
After displaying the above message, the speed of the vehicle is automatically
limited to about 170 km/h.
If this message appears in the winter, the cause may be ice or snow caught up
in the blinds. After the ice or snow has thawed, the blinds are functional again.
If the impairment not due to ice or snow, then assistance from a specialist
should be sought.
Avoiding damage to your vehicle
Introduction
This chapter contains information on the following subjects:
Driving Tips
141
Driving through water
141
This section of the manual contains important information on preventing dam-
age to the vehicle while driving.
Driving Tips
Only drive on such roads and in such terrain, which match the vehicle parame-
ters » page 246 , Technical data as well as your driving skills.
The driver is always responsible for deciding whether the vehicle can handle
travelling in the given terrain.
WARNING■ Always adjust your driving to the current terrain and weather conditions.
Excessive speed or incorrect driving manoeuvres can cause damage to the
vehicle and lead to serious injuries.■
Combustible objects such as dry leaves or twigs caught under the base of
the vehicle could ignite on hot vehicle parts - risk of fire!
CAUTION■ Pay attention to the ground clearance of the vehicle! When driving over ob-
jects which are larger than the ground clearance, the vehicle can get damaged.■
Any objects that get trapped under the vehicle floor must be removed as
soon as possible. These objects can damage the fuel lines, the brake system,
seals and other parts of the vehicle.
■
Drive slowly in unknown terrain and watch out for unexpected obstacles,
such as potholes, rocks, stumps, etc.
■
Check up on confusing sections of unpaved roads before travelling on them
and consider whether such travelling is possible without risk.
Driving through water
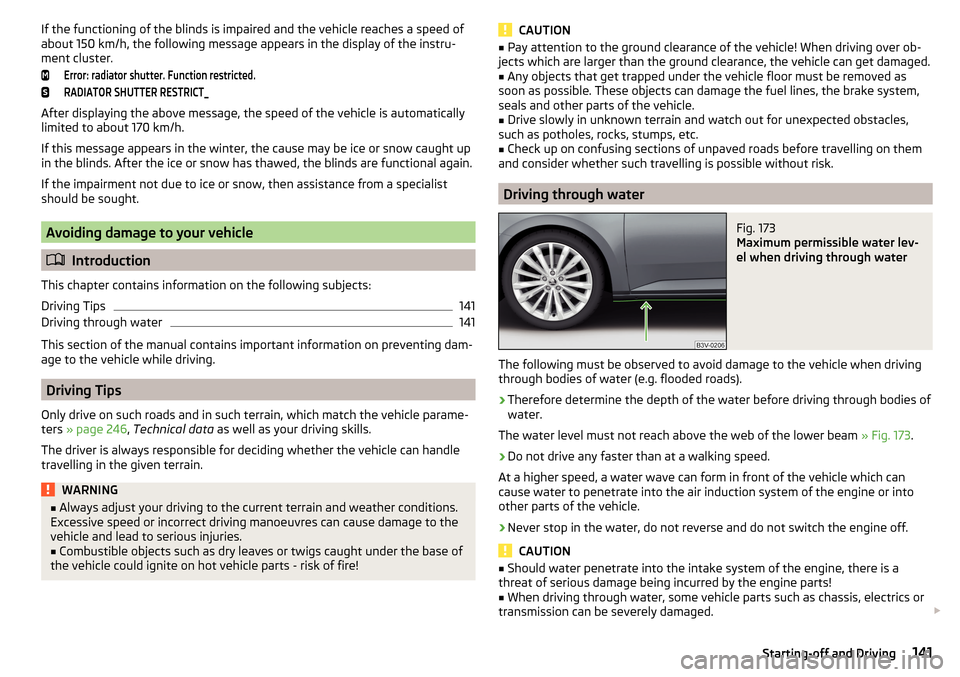
Fig. 173
Maximum permissible water lev-
el when driving through water
The following must be observed to avoid damage to the vehicle when driving
through bodies of water (e.g. flooded roads).
›
Therefore determine the depth of the water before driving through bodies of
water.
The water level must not reach above the web of the lower beam » Fig. 173.
›
Do not drive any faster than at a walking speed.
At a higher speed, a water wave can form in front of the vehicle which can
cause water to penetrate into the air induction system of the engine or into
other parts of the vehicle.
›
Never stop in the water, do not reverse and do not switch the engine off.
CAUTION
■ Should water penetrate into the intake system of the engine, there is a
threat of serious damage being incurred by the engine parts!■
When driving through water, some vehicle parts such as chassis, electrics or
transmission can be severely damaged.
141Starting-off and Driving