Kessy SKODA SUPERB 2016 3.G / (B8/3V) User Guide
[x] Cancel search | Manufacturer: SKODA, Model Year: 2016, Model line: SUPERB, Model: SKODA SUPERB 2016 3.G / (B8/3V)Pages: 336, PDF Size: 53.89 MB
Page 65 of 336

Rear door, right
Deactivate/activate the buttons in the rear doors (the deactivation may be
advantageous if, for example, children are transported on the rear seats)
Open/close window›
To open , lightly press the appropriate button down and hold it until the win-
dow has moved into the desired position.
›
or: press the button to the stop, the window automatically opens fully. Re-
newed pressing of the button causes the window to stop.
›
To close , pull gently on the top edge of the corresponding button and hold
until the window has moved into the desired position.
›
or: pull the button briefly to the stop, the window automatically closes fully.
Renewed pulling of the button causes the window to stop immediately.
Disable / enable buttons in the rear doors
›
To deactivate/activate the buttons in the rear doors, press the
E
button. If
the buttons in the rear doors are deactivated, the warning light illumi-
nates in the
E
button.
Note
■ After switching off the ignition, the windows can still open and close for
about 10 minutes.■
After the driver or front passenger door is opened, the operation of the win-
dow is only possible with the button
A
» Fig. 43 , in which case this is pressed
or pulled for approx. 2 seconds.
Force limiter
Read and observe
and on page 62 first.
The electrical power windows are fitted with a force limiter.
If there is an obstacle, the closing process is stopped and the window goes
down by several centimetres.
If the obstacle prevents the window from being closed during the next 10 sec-
onds, the closing process is interrupted once again and the window goes down
by several centimetres.
If you attempt to close the window again within 10 seconds of the window be-
ing moved down for the second time, even though the obstacle was not yet
been removed, the closing process is only stopped. During this time it is not
possible to automatically close the window. The force limiter is still switched
on.
DEThe force limiter is only not operational if you attempt to close the window
again within the next 10 seconds – the window will now close with full force!
If you wait longer than 10 seconds, the force limiter is switched on again.
Window convenience operation
Read and observe
and on page 62 first.
The convenience operation for the window offers the option to open/close all
the windows at once (or only the window in the driver's door). The functions of
the comfort operation can be individually adjusted in infotainment in the
→
→
Opening and closing
menu.
Opening
›
Press and hold the button on the key.
›
Or
Switch off the ignition, open the driver's door and hold the key
A
until it
stops in the open position » Fig. 43 on page 62 .
Closing
›
Press and hold the button on the key.
›
Or
Switch off the ignition, open the driver's door and hold the key
A
until it
stops in the closed position » Fig. 43 on page 62 .
›
In the KESSY system, hold your finger on the sensor on the outside of the
door handle of the front door » Fig. 35 on page 55 .
The convenience operation will only function correctly if all the windows auto-
matically open/close properly.
Convenience opening or closing the window using the key in the driver's door
locking cylinder is only possible within 45 seconds of locking the vehicle.
The movement of the window is stopped immediately when the respective
button is released.
Note
The settings for the window convenience operation are stored (depending on
the Infotainment type) in the active user account personalisation » page 49.63Unlocking and opening
Page 69 of 336
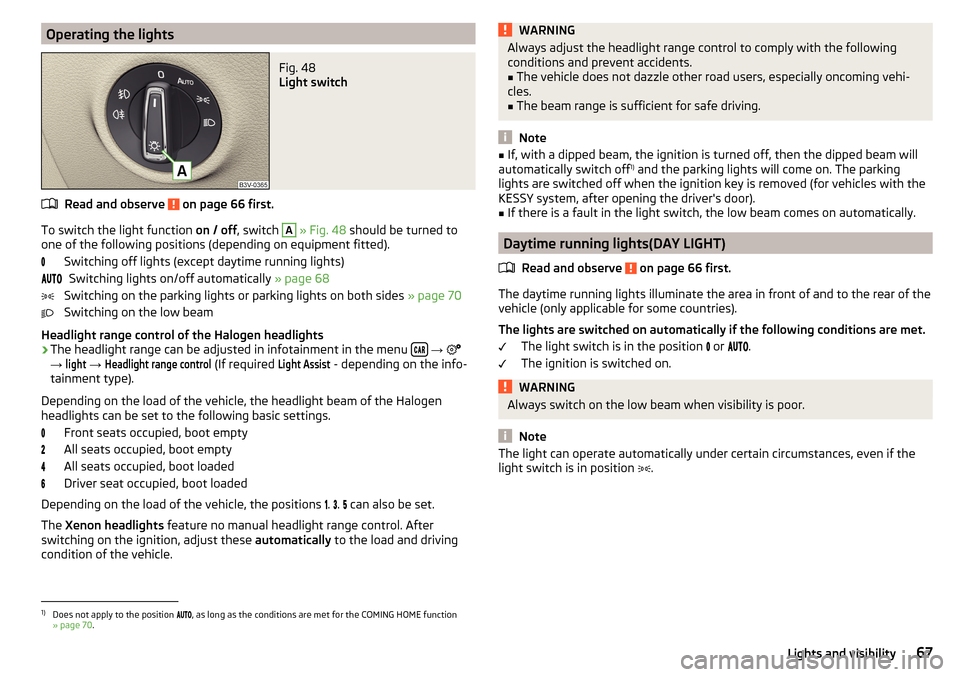
Operating the lightsFig. 48
Light switch
Read and observe on page 66 first.
To switch the light function on / off, switch
A
» Fig. 48 should be turned to
one of the following positions (depending on equipment fitted).
Switching off lights (except daytime running lights)Switching lights on/off automatically » page 68
Switching on the parking lights or parking lights on both sides » page 70
Switching on the low beam
Headlight range control of the Halogen headlights
›
The headlight range can be adjusted in infotainment in the menu
→
→
light
→
Headlight range control
(If required
Light Assist
- depending on the info-
tainment type).
Depending on the load of the vehicle, the headlight beam of the Halogen
headlights can be set to the following basic settings.
Front seats occupied, boot empty
All seats occupied, boot empty
All seats occupied, boot loaded
Driver seat occupied, boot loaded
Depending on the load of the vehicle, the positions .
.
can also be set.
The Xenon headlights feature no manual headlight range control. After
switching on the ignition, adjust these automatically to the load and driving
condition of the vehicle.
WARNINGAlways adjust the headlight range control to comply with the following
conditions and prevent accidents.■
The vehicle does not dazzle other road users, especially oncoming vehi-
cles.
■
The beam range is sufficient for safe driving.
Note
■ If, with a dipped beam, the ignition is turned off, then the dipped beam will
automatically switch off 1)
and the parking lights will come on. The parking
lights are switched off when the ignition key is removed (for vehicles with the
KESSY system, after opening the driver's door).■
If there is a fault in the light switch, the low beam comes on automatically.
Daytime running lights(DAY LIGHT)
Read and observe
on page 66 first.
The daytime running lights illuminate the area in front of and to the rear of thevehicle (only applicable for some countries).
The lights are switched on automatically if the following conditions are met. The light switch is in the position
or
.
The ignition is switched on.
WARNINGAlways switch on the low beam when visibility is poor.
Note
The light can operate automatically under certain circumstances, even if the
light switch is in position .1)
Does not apply to the position , as long as the conditions are met for the COMING HOME function
» page 70 .
67Lights and visibility
Page 270 of 336
We recommend when refilling using refill bottles that you use refill bottles
from ŠKODA Original Accessories.
When adding AdBlue ®
take note of the minimum and maximum AdBlue ®
tank
capacity shown in the display of the instrument cluster » page 40.
Refill AdBlue ®
under the following conditions.
The vehicle is on a horizontal surface.
The ignition is switched off.
Refilling›
Press the fuel filler flap in direction of arrow
1
and fold in the direction of
arrow
2
» Fig. 317 .
›
Unscrew the tank cap in the direction of arrow
3
.
›
Remove the tank cap and place in the recess on top of the fuel filler flap in
the direction of arrow
4
.
›
Refill AdBlue ®
in the neck
A
by means of a refill or a fuel nozzle refill (follow
the instructions on the container or the instructions of the petrol station op-
erator).
The AdBlue ®
- tank is full when no AdBlue ®
flows from the refill bottle or as
soon as the correctly operated pump cuts out for the first time. Do not contin-
ue refilling AdBlue ®
.
›
After refilling AdBlue ®
put the cap on the fuel filler neck and turn in the oppo-
site direction of the arrow
3
until it engages.
›
Close the fuel filler flap until it clicks into place.
Before continuing your journey , switch on just the ignition for 30 s so that the
refilling can be recognized by the system. Only then start the engine.
Engine compartment
Introduction
This chapter contains information on the following subjects:
Open the bonnet and close
269
Engine compartment overview
269
Windscreen washer fluid
270WARNINGNever cover the engine with additional insulation material (e.g. with a cov-
er) – risk of fire!WARNINGWhen working in the engine compartment, the following instructions must
be observed - risk of injury or fire. The engine compartment of your car is a
hazardous area!WARNINGInstructions before beginning work in the engine compartment■Stop the engine and remove the ignition key, on vehicles with the KESSY
system, open the driver's door.■
Switch on the parking brake.
■
For vehicles with manual transmission the lever into the neutral position.
On vehicles with automatic transmission , place the selector lever in the P
position.
■
Allow the engine to cool.
■
Never open the bonnet if you can see steam or coolant flowing out of the
engine compartment – risk of scalding! Wait until the steam or coolant has
stopped escaping.
WARNINGInformation for working in the engine room■Keep everyone away from the engine compartment.■
Do not touch any hot engine parts – risk of burns!
■
Never touch the radiator fan. The radiator fan suddenly switch on approx.
10 minutes after switching off the ignition!
■
Do not smoke or use open flames in the vicinity of the engine.
■
Do not leave any items (e.g. cloths or tools) in the engine compartment.
This presents a fire hazard and the risk of engine damage.
■
Read and observe the information and warning instructions on the fluid
containers.
WARNINGInformation for working in the engine compartment with the engine run-
ning■
If it is necessary to work on the engine compartment with the engine run-
ning, then observe the rotating engine parts and electrical plants - it can
be fatal!
■
Never touch the electric wiring on the ignition system.
■
Avoid short circuits in the electrical system, particularly on the vehicle's
battery.
268General Maintenance
Page 292 of 336
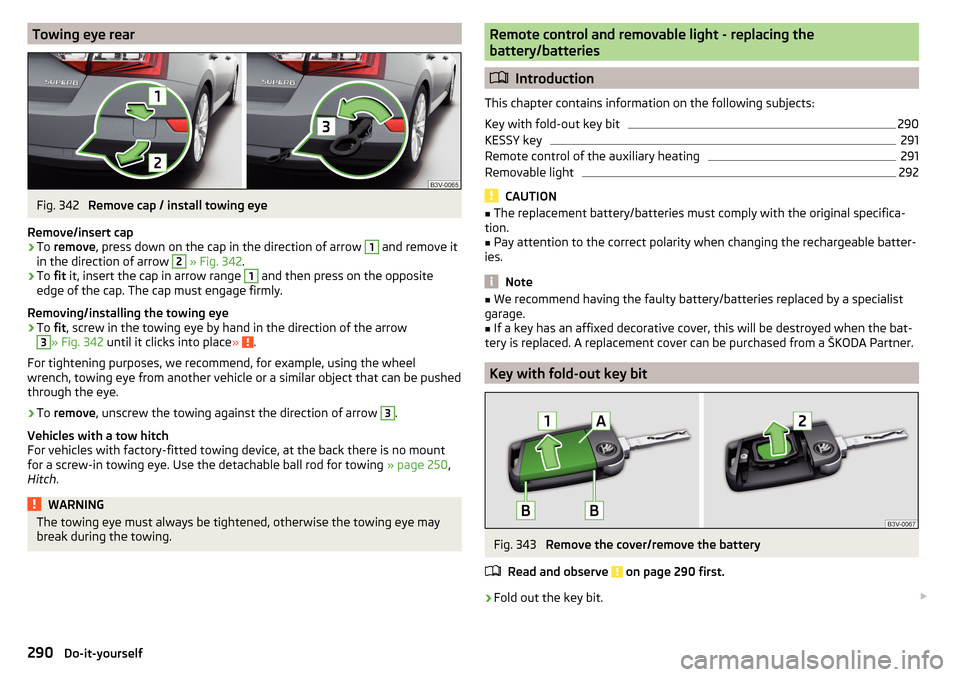
Towing eye rearFig. 342
Remove cap / install towing eye
Remove/insert cap
›
To remove , press down on the cap in the direction of arrow
1
and remove it
in the direction of arrow
2
» Fig. 342 .
›
To fit it, insert the cap in arrow range
1
and then press on the opposite
edge of the cap. The cap must engage firmly.
Removing/installing the towing eye
›
To fit, screw in the towing eye by hand in the direction of the arrow
3
» Fig. 342 until it clicks into place » .
For tightening purposes, we recommend, for example, using the wheel
wrench, towing eye from another vehicle or a similar object that can be pushed
through the eye.
›
To remove , unscrew the towing against the direction of arrow
3
.
Vehicles with a tow hitch
For vehicles with factory-fitted towing device, at the back there is no mount
for a screw-in towing eye. Use the detachable ball rod for towing » page 250,
Hitch .
WARNINGThe towing eye must always be tightened, otherwise the towing eye may
break during the towing.Remote control and removable light - replacing the
battery/batteries
Introduction
This chapter contains information on the following subjects:
Key with fold-out key bit
290
KESSY key
291
Remote control of the auxiliary heating
291
Removable light
292
CAUTION
■ The replacement battery/batteries must comply with the original specifica-
tion.■
Pay attention to the correct polarity when changing the rechargeable batter-
ies.
Note
■ We recommend having the faulty battery/batteries replaced by a specialist
garage.■
If a key has an affixed decorative cover, this will be destroyed when the bat-
tery is replaced. A replacement cover can be purchased from a ŠKODA Partner.
Key with fold-out key bit
Fig. 343
Remove the cover/remove the battery
Read and observe
on page 290 first.
›
Fold out the key bit.
290Do-it-yourself
Page 293 of 336
›Press off the battery cover A
» Fig. 343 with your thumb or by using a flat
screwdriver in region B.›
Open the battery in the direction of the arrow
1
.
›
Remove the discharged battery in the direction of arrow
2
and install a new
battery.
›
Insert the battery cover
A
and press it down until it clicks audibly into place.
The key has to be synchronised if the vehicle cannot be unlocked or locked
with the key after replacing the battery » page 57.
KESSY key
Fig. 344
Remove emergency key
Fig. 345
Replacing the battery
Read and observe
on page 290 first.
›
Unlock the locking lug
A
in the direction of arrow
1
and remove the emer-
gency key
B
in the direction of arrow
2
» Fig. 344 .
›
Insert a narrow screwdriver (3 mm wide) approximately 12 mm into the open-
ing in the direction of arrow
3
» Fig. 345 .
›Turn the screwdriver in the direction of arrow 4 until the battery cover is re-
leased.›
Push the battery cover
C
in the direction of arrow
5
.
›
Remove the discharged battery in the direction of arrow
6
and install a new
battery.
›
Insert the battery cover
C
and press it down until it clicks audibly into place.
The key has to be synchronised if the vehicle cannot be unlocked or locked
with the key after replacing the battery » page 57.
Remote control of the auxiliary heating
Fig. 346
Radio remote control: Battery cover
Read and observe
on page 290 first.
›
Use a thin screwdriver to remove the cover
A
in the area
B
» Fig. 346 .
›
Open the cover in the direction of arrow
1
and push out in the direction of
arrow
2
.
›
Use the screwdriver to remove and replace the battery in the area
C
.
›
Insert the battery cover in the opposite direction to arrow
2
until it audibly
clicks into place.
291Emergency equipment and self-help
Page 294 of 336
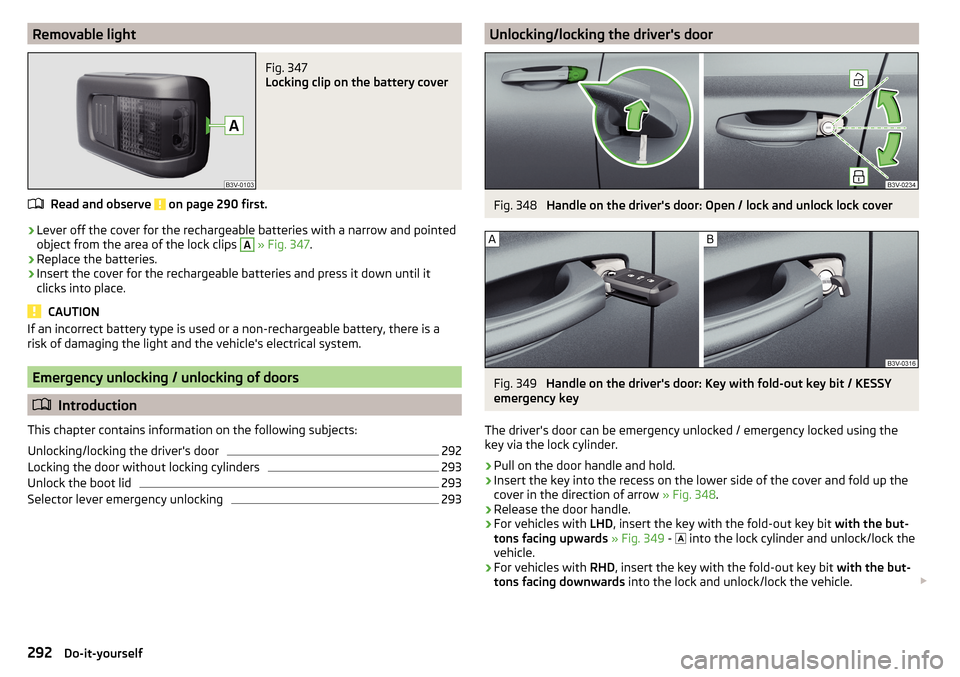
Removable lightFig. 347
Locking clip on the battery cover
Read and observe on page 290 first.
›
Lever off the cover for the rechargeable batteries with a narrow and pointed
object from the area of the lock clips
A
» Fig. 347 .
›
Replace the batteries.
›
Insert the cover for the rechargeable batteries and press it down until it
clicks into place.
CAUTION
If an incorrect battery type is used or a non-rechargeable battery, there is a
risk of damaging the light and the vehicle's electrical system.
Emergency unlocking / unlocking of doors
Introduction
This chapter contains information on the following subjects:
Unlocking/locking the driver's door
292
Locking the door without locking cylinders
293
Unlock the boot lid
293
Selector lever emergency unlocking
293Unlocking/locking the driver's doorFig. 348
Handle on the driver's door: Open / lock and unlock lock cover
Fig. 349
Handle on the driver's door: Key with fold-out key bit / KESSY
emergency key
The driver's door can be emergency unlocked / emergency locked using the
key via the lock cylinder.
›
Pull on the door handle and hold.
›
Insert the key into the recess on the lower side of the cover and fold up the
cover in the direction of arrow » Fig. 348.
›
Release the door handle.
›
For vehicles with LHD, insert the key with the fold-out key bit with the but-
tons facing upwards » Fig. 349 -
into the lock cylinder and unlock/lock the
vehicle.
›
For vehicles with RHD, insert the key with the fold-out key bit with the but-
tons facing downwards into the lock and unlock/lock the vehicle.
292Do-it-yourself
Page 295 of 336
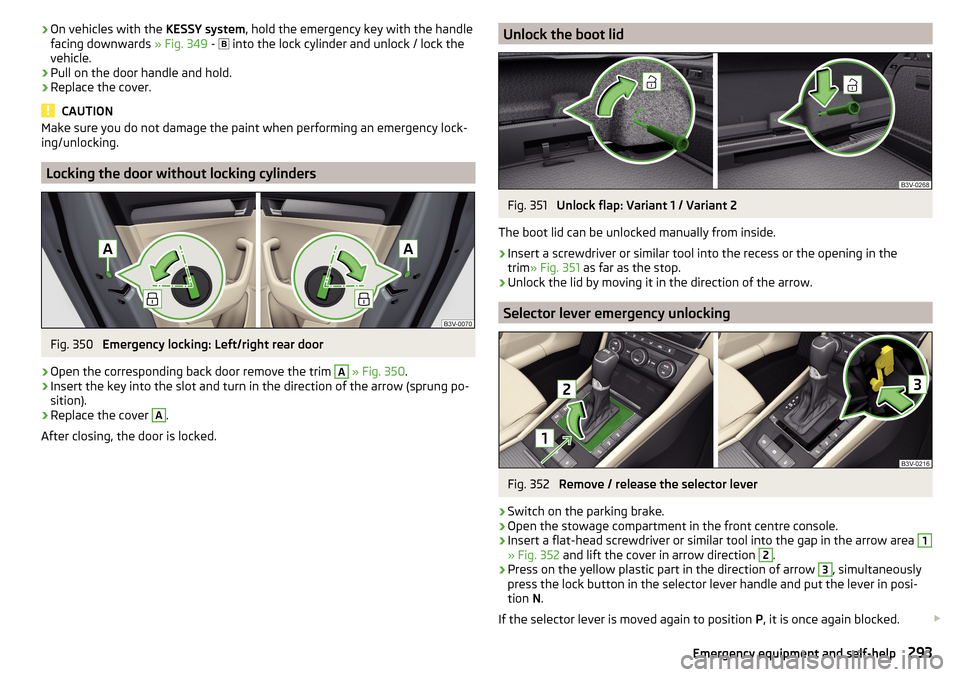
›On vehicles with the
KESSY system, hold the emergency key with the handle
facing downwards » Fig. 349 - into the lock cylinder and unlock / lock the
vehicle.›
Pull on the door handle and hold.
›
Replace the cover.
CAUTION
Make sure you do not damage the paint when performing an emergency lock-
ing/unlocking.
Locking the door without locking cylinders
Fig. 350
Emergency locking: Left/right rear door
›
Open the corresponding back door remove the trim
A
» Fig. 350 .
›
Insert the key into the slot and turn in the direction of the arrow (sprung po-
sition).
›
Replace the cover
A
.
After closing, the door is locked.
Unlock the boot lidFig. 351
Unlock flap: Variant 1 / Variant 2
The boot lid can be unlocked manually from inside.
›
Insert a screwdriver or similar tool into the recess or the opening in the
trim » Fig. 351 as far as the stop.
›
Unlock the lid by moving it in the direction of the arrow.
Selector lever emergency unlocking
Fig. 352
Remove / release the selector lever
›
Switch on the parking brake.
›
Open the stowage compartment in the front centre console.
›
Insert a flat-head screwdriver or similar tool into the gap in the arrow area
1
» Fig. 352 and lift the cover in arrow direction
2
.
›
Press on the yellow plastic part in the direction of arrow
3
, simultaneously
press the lock button in the selector lever handle and put the lever in posi-
tion N.
If the selector lever is moved again to position P, it is once again blocked.
293Emergency equipment and self-help
Page 299 of 336
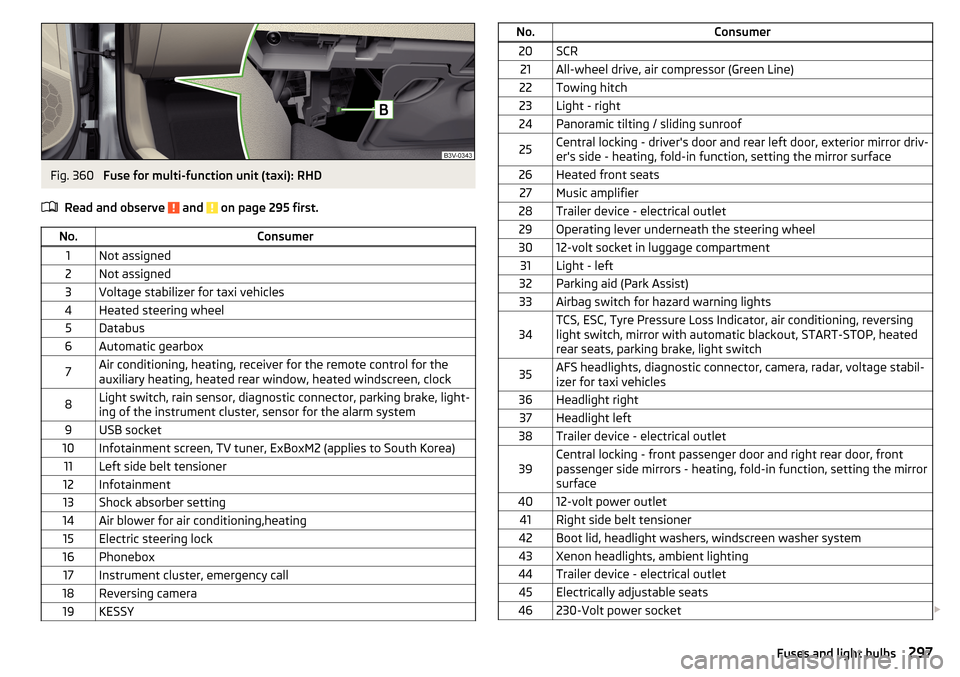
Fig. 360
Fuse for multi-function unit (taxi): RHD
Read and observe
and on page 295 first.
No.Consumer1Not assigned2Not assigned3Voltage stabilizer for taxi vehicles4Heated steering wheel5Databus6Automatic gearbox7Air conditioning, heating, receiver for the remote control for the
auxiliary heating, heated rear window, heated windscreen, clock8Light switch, rain sensor, diagnostic connector, parking brake, light-
ing of the instrument cluster, sensor for the alarm system9USB socket10Infotainment screen, TV tuner, ExBoxM2 (applies to South Korea)11Left side belt tensioner12Infotainment13Shock absorber setting14Air blower for air conditioning,heating15Electric steering lock16Phonebox17Instrument cluster, emergency call18Reversing camera19KESSYNo.Consumer20SCR21All-wheel drive, air compressor (Green Line)22Towing hitch23Light - right24Panoramic tilting / sliding sunroof25Central locking - driver's door and rear left door, exterior mirror driv-
er's side - heating, fold-in function, setting the mirror surface26Heated front seats27Music amplifier28Trailer device - electrical outlet29Operating lever underneath the steering wheel3012-volt socket in luggage compartment31Light - left32Parking aid (Park Assist)33Airbag switch for hazard warning lights34TCS, ESC, Tyre Pressure Loss Indicator, air conditioning, reversing
light switch, mirror with automatic blackout, START-STOP, heated
rear seats, parking brake, light switch35AFS headlights, diagnostic connector, camera, radar, voltage stabil-
izer for taxi vehicles36Headlight right37Headlight left38Trailer device - electrical outlet39Central locking - front passenger door and right rear door, front
passenger side mirrors - heating, fold-in function, setting the mirror
surface4012-volt power outlet41Right side belt tensioner42Boot lid, headlight washers, windscreen washer system43Xenon headlights, ambient lighting44Trailer device - electrical outlet45Electrically adjustable seats46230-Volt power socket 297Fuses and light bulbs
Page 320 of 336
I
I-PAD holder
99
I-Size27
Ignition lock200
Images Display
135
Main menu153
safe removal of the data source133
Select Image Source153
service154
Set to135
Image viewer153
Immobilizer199
Import contacts136, 141
Import destinations186
Import my destinations186
Inertia reels17
Information about the towing process288
Information call168
Information system43
Auto Check Control43
Door alarm43
Eco tips43
Gear recommendation44
MAXI DOT display48
Multifunction display46
Service interval display49
Infotainment Auxiliary heating (auxiliary heating and ventila-tion)
119
Restart126
Software update131
Infotainment language132, 140
Infotainment menu CAR
198
Media (video)155
Sound131
TV tuner156
Infotainment menus127
Infotainment operation125
Infotainment screen125
Infotainment operation using an application in the external device
128
Infotainment screen132, 139
Areas125
important information124
Important information124
keyboard126
Maintenance124
Operation125
Input screen Language characters
140
Input screen with keyboard126
Instrument cluster32
Auto Check Control44
Warning lights33
Interior light73
Interior lighting72, 73
Ambient lighting73
Interior monitor58
Intermediate target190
ISOFIX26
J
Jack
281
- fit284
Jukebox151
Jump-starting287, 288
K
KESSY Unlock / lock
55
key Starting / stopping the engine
200
Switch on/off ignition200
Key Changing battery
290, 291
Take out emergency key54
keyboard126
L
L-band
135
Lamp failure Warning light
41
Lamps Warning light
41
Lan Departure Warning Activation / deactivation
245
Lane Assist Malfunctions
245
See lane departure warning243
Settings in Infotainment243
Warning light38
Lane Departure Warning243
Operation244
Settings in Infotainment243
Lane recommendation191
Language characters132
Last destinations184
Latitude180
LEAVING HOME70
Lever ACC
235
Cruise control230
Front Assist239
Operation of the information system45
Speed limiter with ACC232
Speed limiter with GRA232
Turn signal/main beam68
Windscreen wipers76, 77
Liability for defects5
Light66
Cockpit72
COMING HOME / LEAVING HOME70
Daytime running lights67
Flash68
Fog lights/rear fog light69
Fog lights with CORNER function70
318Index
Page 321 of 336
Hazard warning light system70
Headlight assistant71
Headlight cleaning system77
Parking light70
Replacing bulbs299
Turn signal/main beam68
Xenon headlight69
Light Assist71
Lighting Entry space
71
Interior lighting72
Luggage compartment101
Lights Automatic driving light control
68
Dipped beam67
Driving abroad71
Headlight range control67
Parking lights67
Switching on and off67
Warning lights33
List of available stations
143
of available stations (TV tuner)157
of telephone contacts169
With folder / track list148
List of paired external devices164
List of traffic reports196
Load305
Lock Individual settings
56
KESSY55
Locking Central locking button
55
in case of emergency293
Remote control54
Lock steering lock199
Long cargo channel95
Longitude180
Luggage compartment101
Cover104
Fastening elements101
Fastening the flooring103
Fixing nets102
Floor covering on both sides103
foldable hook103
Lighting101
Net on the luggage compartment cover103
Net partition111
Removable light109
Roll-up cover105
Side pockets106
Storage compartments under the floor cover- ing
107
tray with cargo element106
unlock manually293
Unlock the boot lid293
Variable loading floor109
Luggage compartment cover104
Roll-up cover105
Luggage storage Multi-function pocket
108
M
Main beam
68
Warning light39
Main menu Android Auto
177
Apple CarPlay178
CAR198
Images153
Media146
Media Command158
MirrorLink®179
Navigation181
Radio142
SmartLink176
SMS172
TV tuner156
Video DVD155
Waypoint mode194
Manage favourites141
Manage Favourites136
Manage memory137
Managing paired devices164
Managing saved routes194
Manoeuvre Graphical driving recommendations
191
Nav. announcements192
Manoeuvring216
Manual air conditioning Air distribution control
117
Controls114
Manual gear changing See Gear changing
206
Map automatic scale
188
Display181
Display of road signs137
Display options187
Display options in the split screen189
Fast Map188
Lane recommendation137
Main menu181
Manual scale188
Map alignment189
Operation181
POI display137
Road sign189
Show POI187
|Alignment188
MAXI DOT See MAXI DOT display
48
MAXI DOT display Assist systems menu item
48
Audio menu item48
Main menu48
319Index