long SKODA SUPERB 2016 3.G / (B8/3V) User Guide
[x] Cancel search | Manufacturer: SKODA, Model Year: 2016, Model line: SUPERB, Model: SKODA SUPERB 2016 3.G / (B8/3V)Pages: 336, PDF Size: 53.89 MB
Page 51 of 336
▶Front Assist
▶ Lane Assist
▶ Rear Traffic Alert
▶ Assist system for blind spot monitoring
Service interval display
Introduction
This chapter contains information on the following subjects:
Displaying the distance and days until the next service interval
49
Service messages
49
Resetting the service interval display
49
The service interval display shows the kilometres or days until the next service
event.
Information regarding the service intervals » page 258.
Displaying the distance and days until the next service interval
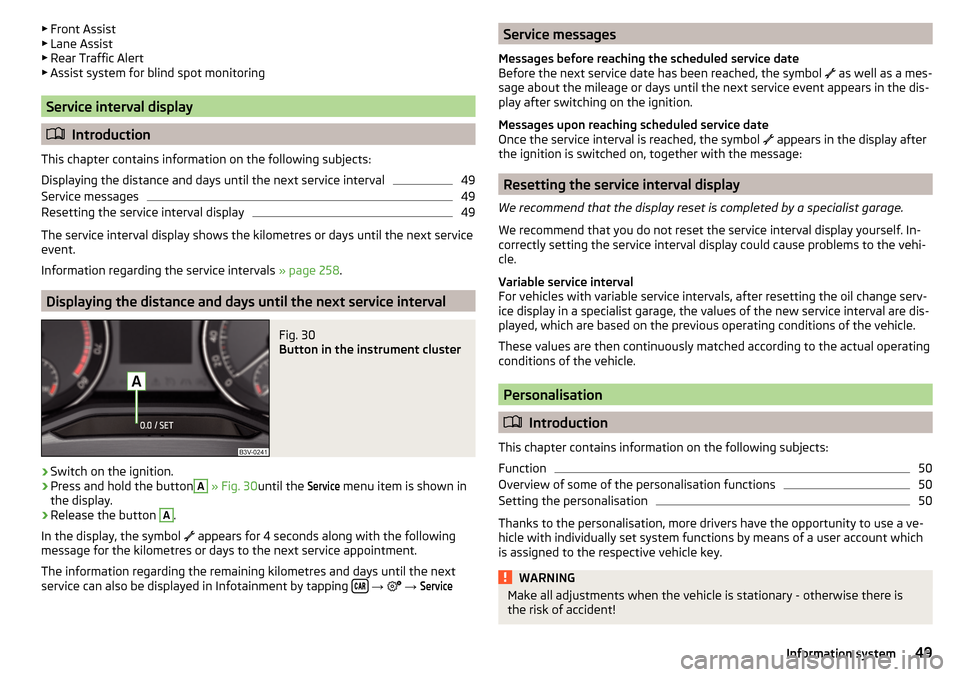
Fig. 30
Button in the instrument cluster
›
Switch on the ignition.
›
Press and hold the button
A
» Fig. 30 until the
Service
menu item is shown in
the display.
›
Release the button
A
.
In the display, the symbol appears for 4 seconds along with the following
message for the kilometres or days to the next service appointment.
The information regarding the remaining kilometres and days until the next service can also be displayed in Infotainment by tapping
→
→
ServiceService messages
Messages before reaching the scheduled service date
Before the next service date has been reached, the symbol
as well as a mes-
sage about the mileage or days until the next service event appears in the dis-
play after switching on the ignition.
Messages upon reaching scheduled service date
Once the service interval is reached, the symbol
appears in the display after
the ignition is switched on, together with the message:
Resetting the service interval display
We recommend that the display reset is completed by a specialist garage.
We recommend that you do not reset the service interval display yourself. In-
correctly setting the service interval display could cause problems to the vehi-
cle.
Variable service interval
For vehicles with variable service intervals, after resetting the oil change serv-
ice display in a specialist garage, the values of the new service interval are dis-
played, which are based on the previous operating conditions of the vehicle.
These values are then continuously matched according to the actual operating
conditions of the vehicle.
Personalisation
Introduction
This chapter contains information on the following subjects:
Function
50
Overview of some of the personalisation functions
50
Setting the personalisation
50
Thanks to the personalisation, more drivers have the opportunity to use a ve-
hicle with individually set system functions by means of a user account which
is assigned to the respective vehicle key.
WARNINGMake all adjustments when the vehicle is stationary - otherwise there is
the risk of accident!49Information system
Page 54 of 336
›Enter the password (vehicle identification number using uppercase let-
ters » page 52 ).
With SmartGate, a maximum of four external devices can be connected simul-
taneously using Wi-Fi. In these external devices, up to four ŠKODA applications
can be started simultaneously.
Disconnection
The connection can be switched off in one of the following ways.›
Switch off the ignition for longer than 5 seconds (for vehicles with a starter
button, switch off the engine and open the driver's door).
›
End the connection in the SmartGate application.
›
Switch off Wi-Fi in the connected external device.
Automatic connection
If the communication device has already had a connection with SmartGate,
then the connection is automatically restored under the following conditions.
The ignition is switched on.
Wi-Fi is switched on in the external device that is to be connected to.
The external device that is to be connected to stores the password re-
quired for the connection check.
Connection to SmartGate using Wi-Fi direct
This type of connection is intended for external devices running the Android
operating system.
Establishing a connection
›
Switch on the ignition.
›
In the external device that is to be connected to, start the SmartGate appli- cation.
›
In the application, change the connection type to Wi-Fi direct.
›
Then follow the instructions in the manual, which is included in the
SmartGate application.
The password for the connection to SmartGate _... 1)
includes the last six digits
of the vehicle identification number » page 52.
With SmartGate, a maximum of two external devices can be connected simul-
taneously using Wi-Fi direct, with as many launched ŠKODA applications as re-
quired.
If you want to connect to SmartGate in a different vehicle, you must make a
new connection in the SmartGate application.
Disconnection
The connection can be switched off in one of the following ways.›
Switch off the ignition for longer than 5 seconds (for vehicles with a starter
button, switch off the engine and open the driver's door).
›
End the connection in the SmartGate application.
›
Switch off Wi-Fi in the connected external device.
Automatic connection
If the external device once had a connection with SmartGate, then the connec-
tion is automatically restored after the ignition is started.
SmartGate web interface
SmartGate parameters can be set in the SmartGate web interface.
The following address must be entered in the web browser of the external de-
vice that is connected with SmartGate.
HTTP://192.168.123.1
The setting changes are only effective after tapping the buttons “Save” →
“Reboot”.
Password/PIN code
The password for the Wi-Fi connection preset by the factory is the complete
vehicle identification number (entered in upper case); the PIN code for the Wi-
Fi direct connection is the last 6 digits of the vehicle identification number.
After changing the password/PIN, the connection to SmartGate must be re-es-
tablished on the external device to be connected using the new password or
new PIN code.
Changing the password for the Wi-Fi connection
›
Open the SmartGate web interface » page 52.
›
In the menu item “WPA / WPA2 key:”enter the new password (8 to 63 alpha-
numeric characters and special characters, small and capital letters) .
›
Confirm the password change by tapping on the “Save” button.
1)
The last 6 characters of the vehicle identification number of your vehicle are displayed at position
....
52Using the system
Page 58 of 336
SafeLockRead and observe
and on page 54 first.
SafeLock prevents the doors from behind opened from inside as well as win-
dow operation. This makes it more difficult for anyone to break into the vehi-
cle.
Switching on
SafeLock switches on when the vehicle is locked.
This function is pointed out by the following message on the display of the in-
strument cluster after the ignition is switched off.
Observe SAFE interlock! Log book!CHECK SAFELOCK
Switch-on display
With the activated SafeLock, the warning light in the driver´s door flashes for 2
seconds in rapid succession, this then starts to flash at longer intervals.
Switching off ▶ By locking twice within 2 seconds.
▶ or: by deactivating the interior monitor and the towing protection
» page 58 .
The warning light in the driver´s door flashes fast for about 2 seconds, goes
out and starts to flash at longer intervals after about 30 seconds.
If the vehicle is locked and the safe securing system is switched off, the door
can be opened separately from the inside by a single pull on opening lever.
The safelock switches on the next time the vehicle is locked.
WARNINGIf the car is locked and the safe securing system activated, no people must
remain in the car as it will then not be possible to either unlock a door or
open a window from the inside. The locked doors make it more difficult for
rescuers to get into the vehicle in an emergency – risk to life!
Individual settings
Read and observe
and on page 54 first.
The following functions of the central locking can be individually adjusted in
infotainment in the
→
→
Opening and closing
menu.
All doors
The function allows you to unlock all doors, the boot lid and the fuel filler flap.
Single door
The function allows you to unlock only the driver's door and the fuel filler flap
with the radio remote control. KESSY allows the unlocking of a single door
which is in the vicinity of the key, as well as the fuel filler flap. The other doors
and the boot lid are only unlocked once the door handle is unlocked or
touched.
Doors on a vehicle side
This function enables you to unlock both doors on the driver's side and the
fuel filler flap with the radio remote control unit. KESSY allows the unlocking of
both doors which are in the vicinity of the key, as well as the fuel filler flap. The
other doors and the boot lid are only unlocked once the door handle is un-
locked or touched.
Automatic locking/unlocking
This function enables the locking of all doors and the boot lid from a speed of
15 km/h. Opening the doors and the boot lid from the outside is not possible.
The renewed unlocking of the doors and the boot lid is carried out when the
ignition key is removed or when the door is opened from inside (depending on
the individual setting for the central locking system).
Note
The individual adjustment of the central locking system is stored (depending
on the Infotainment type) in the active user account personalisation
» page 49 .56Using the system
Page 65 of 336

Rear door, right
Deactivate/activate the buttons in the rear doors (the deactivation may be
advantageous if, for example, children are transported on the rear seats)
Open/close window›
To open , lightly press the appropriate button down and hold it until the win-
dow has moved into the desired position.
›
or: press the button to the stop, the window automatically opens fully. Re-
newed pressing of the button causes the window to stop.
›
To close , pull gently on the top edge of the corresponding button and hold
until the window has moved into the desired position.
›
or: pull the button briefly to the stop, the window automatically closes fully.
Renewed pulling of the button causes the window to stop immediately.
Disable / enable buttons in the rear doors
›
To deactivate/activate the buttons in the rear doors, press the
E
button. If
the buttons in the rear doors are deactivated, the warning light illumi-
nates in the
E
button.
Note
■ After switching off the ignition, the windows can still open and close for
about 10 minutes.■
After the driver or front passenger door is opened, the operation of the win-
dow is only possible with the button
A
» Fig. 43 , in which case this is pressed
or pulled for approx. 2 seconds.
Force limiter
Read and observe
and on page 62 first.
The electrical power windows are fitted with a force limiter.
If there is an obstacle, the closing process is stopped and the window goes
down by several centimetres.
If the obstacle prevents the window from being closed during the next 10 sec-
onds, the closing process is interrupted once again and the window goes down
by several centimetres.
If you attempt to close the window again within 10 seconds of the window be-
ing moved down for the second time, even though the obstacle was not yet
been removed, the closing process is only stopped. During this time it is not
possible to automatically close the window. The force limiter is still switched
on.
DEThe force limiter is only not operational if you attempt to close the window
again within the next 10 seconds – the window will now close with full force!
If you wait longer than 10 seconds, the force limiter is switched on again.
Window convenience operation
Read and observe
and on page 62 first.
The convenience operation for the window offers the option to open/close all
the windows at once (or only the window in the driver's door). The functions of
the comfort operation can be individually adjusted in infotainment in the
→
→
Opening and closing
menu.
Opening
›
Press and hold the button on the key.
›
Or
Switch off the ignition, open the driver's door and hold the key
A
until it
stops in the open position » Fig. 43 on page 62 .
Closing
›
Press and hold the button on the key.
›
Or
Switch off the ignition, open the driver's door and hold the key
A
until it
stops in the closed position » Fig. 43 on page 62 .
›
In the KESSY system, hold your finger on the sensor on the outside of the
door handle of the front door » Fig. 35 on page 55 .
The convenience operation will only function correctly if all the windows auto-
matically open/close properly.
Convenience opening or closing the window using the key in the driver's door
locking cylinder is only possible within 45 seconds of locking the vehicle.
The movement of the window is stopped immediately when the respective
button is released.
Note
The settings for the window convenience operation are stored (depending on
the Infotainment type) in the active user account personalisation » page 49.63Unlocking and opening
Page 66 of 336
MalfunctionsRead and observe
and on page 62 first.
Repeatedly opening and closing the window can cause the window mecha-
nism to overheat and become temporarily blocked. You will be able to operate
the window again as soon as the operating mechanisms has cooled down.
After disconnecting the vehicle battery, automatic opening / closing the win-
dow can be deactivated. In this case the system must be activated as follows.
Activate window operation
›
Switch-on the ignition.
›
Pull the top edge of the button and close the window.
›
Release the button.
›
Pull up the respective button and hold for 1 second.
Panoramic tilting / sliding sunroof
Introduction
This chapter contains information on the following subjects:
Operation
64
Force limiter
64
Activate operation of the sliding/tilting roof
65
Manually operated sunshade
65
Electrically operated sunshade
65
Activating operation of the sunshade
66
The panorama sliding/tilting roof (hereinafter referred to as sliding/tilting roof)
can only be operated when the ignition is turned on and when the outdoor
temperature is no lower than -20 °C.
The sliding/tilting roof can still be operated for approx. 10 minutes after
switching the ignition off. After opening the driver or front passenger door, it
is no longer possible to operate the sliding/tilting roof.
WARNINGWhen operating the sliding/tilting roof and the sunshade, proceed with
caution to avoid causing crushing injuries – risk of injury!CAUTION■ During the winter it may be necessary to remove any ice and snow in the vi-
cinity of the sliding/tilting roof before opening it to prevent any damage to the
opening mechanism.■
Always close the sliding/tilting roof before disconnecting the battery.
Operation
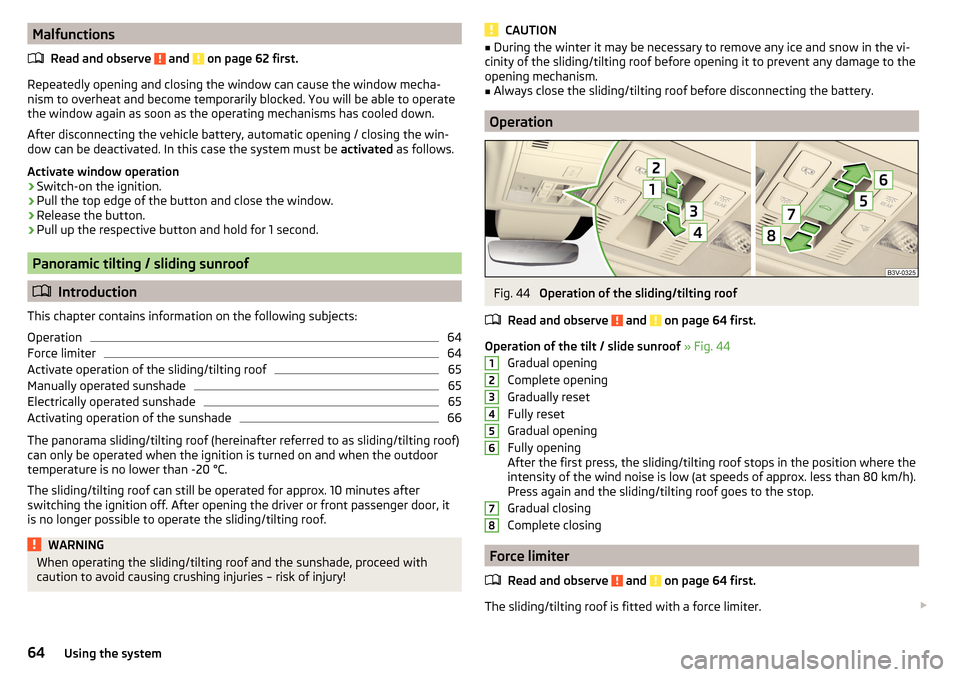
Fig. 44
Operation of the sliding/tilting roof
Read and observe
and on page 64 first.
Operation of the tilt / slide sunroof » Fig. 44
Gradual opening
Complete opening
Gradually reset
Fully reset
Gradual opening
Fully opening
After the first press, the sliding/tilting roof stops in the position where the
intensity of the wind noise is low (at speeds of approx. less than 80 km/h). Press again and the sliding/tilting roof goes to the stop.
Gradual closing
Complete closing
Force limiter
Read and observe
and on page 64 first.
The sliding/tilting roof is fitted with a force limiter.
1234567864Using the system
Page 69 of 336
Operating the lightsFig. 48
Light switch
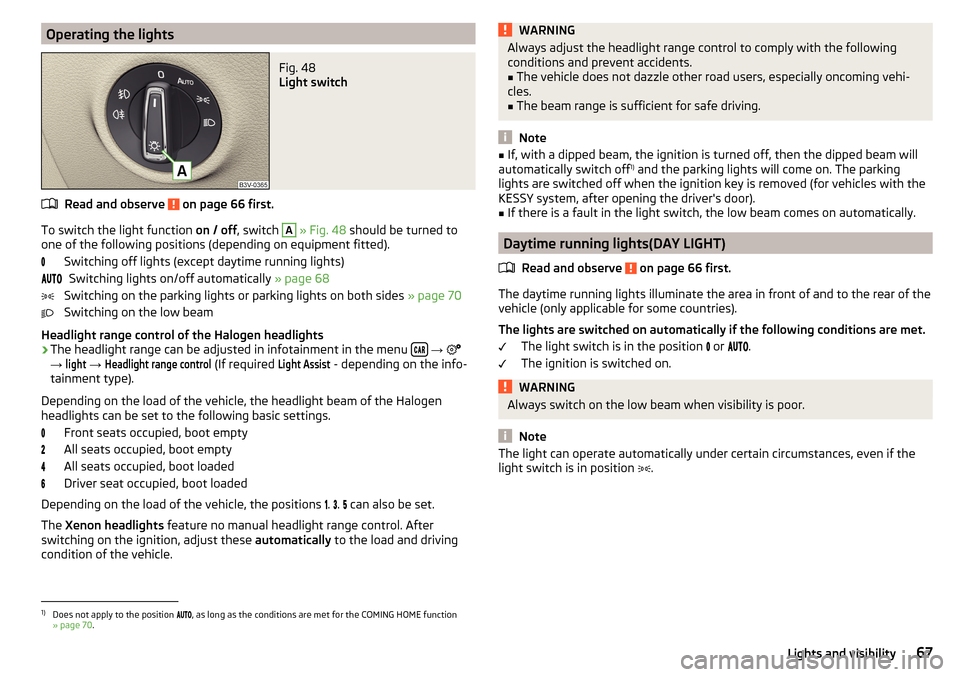
Read and observe on page 66 first.
To switch the light function on / off, switch
A
» Fig. 48 should be turned to
one of the following positions (depending on equipment fitted).
Switching off lights (except daytime running lights)Switching lights on/off automatically » page 68
Switching on the parking lights or parking lights on both sides » page 70
Switching on the low beam
Headlight range control of the Halogen headlights
›
The headlight range can be adjusted in infotainment in the menu
→
→
light
→
Headlight range control
(If required
Light Assist
- depending on the info-
tainment type).
Depending on the load of the vehicle, the headlight beam of the Halogen
headlights can be set to the following basic settings.
Front seats occupied, boot empty
All seats occupied, boot empty
All seats occupied, boot loaded
Driver seat occupied, boot loaded
Depending on the load of the vehicle, the positions .
.
can also be set.
The Xenon headlights feature no manual headlight range control. After
switching on the ignition, adjust these automatically to the load and driving
condition of the vehicle.
WARNINGAlways adjust the headlight range control to comply with the following
conditions and prevent accidents.■
The vehicle does not dazzle other road users, especially oncoming vehi-
cles.
■
The beam range is sufficient for safe driving.
Note
■ If, with a dipped beam, the ignition is turned off, then the dipped beam will
automatically switch off 1)
and the parking lights will come on. The parking
lights are switched off when the ignition key is removed (for vehicles with the
KESSY system, after opening the driver's door).■
If there is a fault in the light switch, the low beam comes on automatically.
Daytime running lights(DAY LIGHT)
Read and observe
on page 66 first.
The daytime running lights illuminate the area in front of and to the rear of thevehicle (only applicable for some countries).
The lights are switched on automatically if the following conditions are met. The light switch is in the position
or
.
The ignition is switched on.
WARNINGAlways switch on the low beam when visibility is poor.
Note
The light can operate automatically under certain circumstances, even if the
light switch is in position .1)
Does not apply to the position , as long as the conditions are met for the COMING HOME function
» page 70 .
67Lights and visibility
Page 71 of 336
CAUTIONPoorer visibility is evaluated by a sensor mounted below the windscreen in the
holder of the rear-view mirror. Do not cover the sensor - the system can be af-
fected.
Note
The setting (activate/deactivate) of the automatic driving light control during
rain is stored (depending on the Infotainment type) in the active user account
personalisation » page 49.
Xenon headlight
Read and observe
on page 66 first.
The Xenon headlights (hereinafter referred to as just system) use the drivingdata to automatically ensure the for the best possible light cone in front of the
vehicle.
The system will automatically operate in the following modes: urban, extra-ur-
ban, motorway, rain, fog, adjusting the lighting direction of the headlights for
road illumination on bends.
The system works as long as the light switch is in position
.
WARNINGIf there is a system malfunction the headlights are automatically lowered
to the emergency position, which prevents a possible dazzling of oncoming
traffic. This reduces the cone of light in front of the vehicle. Seek help from
a specialist garage.Fog lights/rear fog lightFig. 51
Light switch – switch on front
and rear fog lights
Read and observe on page 66 first.
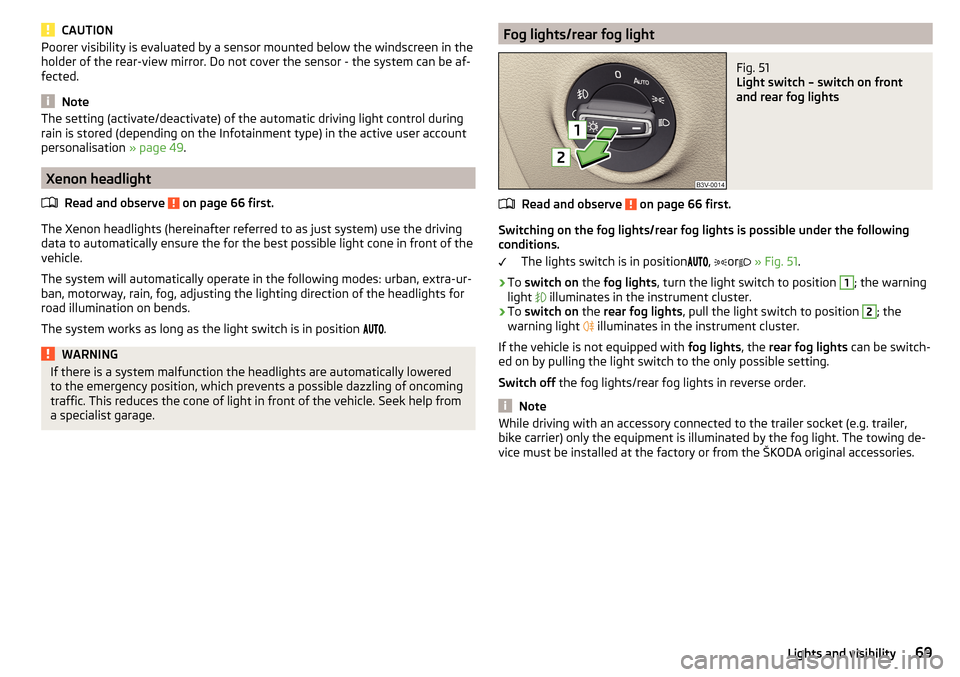
Switching on the fog lights/rear fog lights is possible under the following
conditions.
The lights switch is in position ,
or
» Fig. 51 .
›
To switch on the fog lights , turn the light switch to position
1
; the warning
light illuminates in the instrument cluster.
›
To
switch on the rear fog lights , pull the light switch to position
2
; the
warning light illuminates in the instrument cluster.
If the vehicle is not equipped with fog lights, the rear fog lights can be switch-
ed on by pulling the light switch to the only possible setting.
Switch off the fog lights/rear fog lights in reverse order.
Note
While driving with an accessory connected to the trailer socket (e.g. trailer,
bike carrier) only the equipment is illuminated by the fog light. The towing de-
vice must be installed at the factory or from the ŠKODA original accessories.69Lights and visibility
Page 82 of 336
Seats and head restraints
Front seats
Introduction
This chapter contains information on the following subjects:
Manual adjustment
80
Electrical adjustment
80
Convenience operation of the front passenger seat
81
Memory Function of the electrically adjustable seat
81
Memory function of the remote control key
81
Folding front passenger seat
82
Armrest setting
82WARNING■ Only adjust the driver's seat when the vehicle is stationary – risk of acci-
dent!■
Caution when adjusting the seat! You may suffer injuries or bruises as a
result of adjusting the seat without paying proper attention.
Manual adjustment
Fig. 68
Control elements on the seat
Read and observe on page 80 first.
The seats can be adjusted by the respective operating element being pulled,
pressed or turned in the direction of the arrows » Fig. 68.
Adjusting the seat in the longitudinal direction (after releasing the control
lever must lock audibly)
Adjusting height of seat
ABAdjust the tilt of the backrest (do not lean on the backrest when adjusting)
Setting the extent of the curvature of the lumbar support
Note
After a certain time, play can develop within the adjustment mechanism of the
backrest angle.
Electrical adjustment
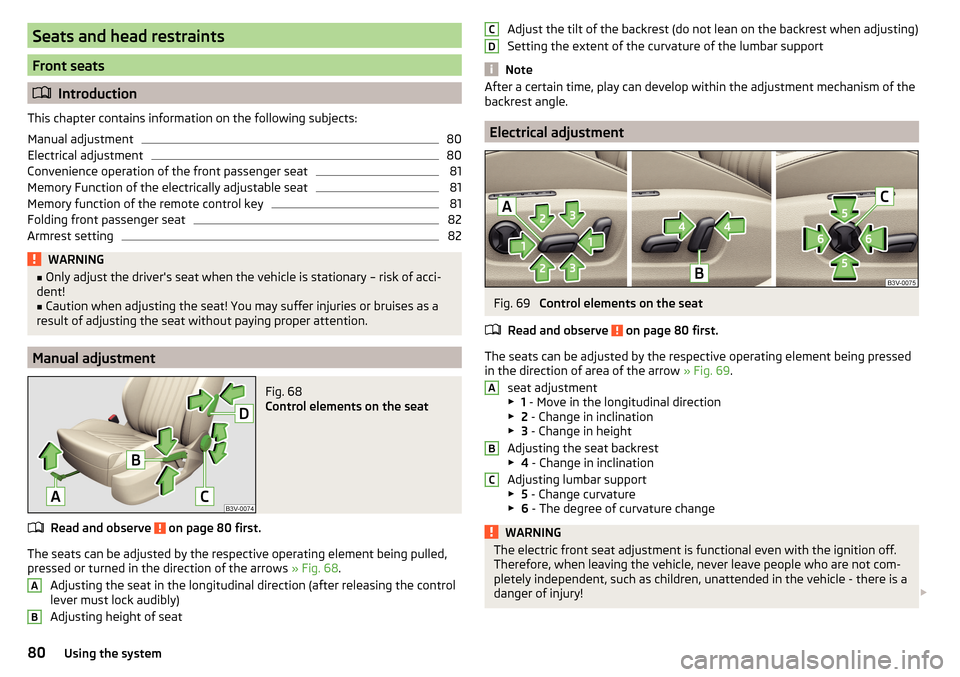
Fig. 69
Control elements on the seat
Read and observe
on page 80 first.
The seats can be adjusted by the respective operating element being pressed in the direction of area of the arrow » Fig. 69.
seat adjustment
▶ 1 - Move in the longitudinal direction
▶ 2 - Change in inclination
▶ 3 - Change in height
Adjusting the seat backrest
▶ 4 - Change in inclination
Adjusting lumbar support
▶ 5 - Change curvature
▶ 6 - The degree of curvature change
WARNINGThe electric front seat adjustment is functional even with the ignition off.
Therefore, when leaving the vehicle, never leave people who are not com-
pletely independent, such as children, unattended in the vehicle - there is a
danger of injury! CDABC80Using the system
Page 87 of 336
Seat heating and ventilation
Introduction
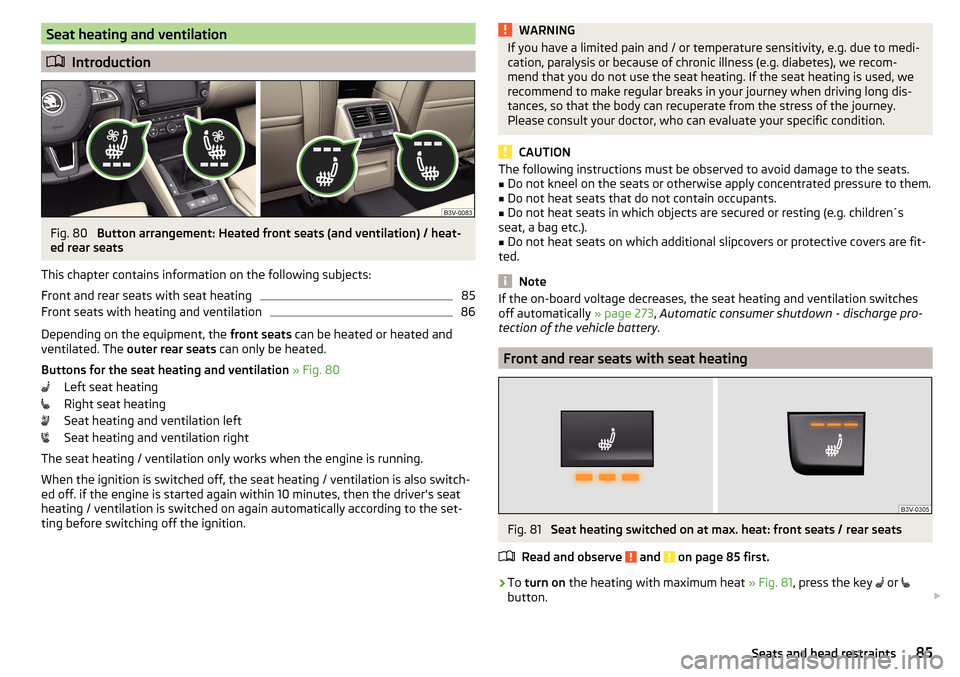
Fig. 80
Button arrangement: Heated front seats (and ventilation) / heat-
ed rear seats
This chapter contains information on the following subjects:
Front and rear seats with seat heating
85
Front seats with heating and ventilation
86
Depending on the equipment, the front seats can be heated or heated and
ventilated. The outer rear seats can only be heated.
Buttons for the seat heating and ventilation » Fig. 80
Left seat heating
Right seat heating
Seat heating and ventilation left
Seat heating and ventilation right
The seat heating / ventilation only works when the engine is running. When the ignition is switched off, the seat heating / ventilation is also switch-ed off. if the engine is started again within 10 minutes, then the driver's seat
heating / ventilation is switched on again automatically according to the set-
ting before switching off the ignition.
WARNINGIf you have a limited pain and / or temperature sensitivity, e.g. due to medi-
cation, paralysis or because of chronic illness (e.g. diabetes), we recom-
mend that you do not use the seat heating. If the seat heating is used, we
recommend to make regular breaks in your journey when driving long dis-
tances, so that the body can recuperate from the stress of the journey.
Please consult your doctor, who can evaluate your specific condition.
CAUTION
The following instructions must be observed to avoid damage to the seats.■Do not kneel on the seats or otherwise apply concentrated pressure to them.■
Do not heat seats that do not contain occupants.
■
Do not heat seats in which objects are secured or resting (e.g. children´s
seat, a bag etc.).
■
Do not heat seats on which additional slipcovers or protective covers are fit-
ted.
Note
If the on-board voltage decreases, the seat heating and ventilation switches
off automatically » page 273, Automatic consumer shutdown - discharge pro-
tection of the vehicle battery .
Front and rear seats with seat heating
Fig. 81
Seat heating switched on at max. heat: front seats / rear seats
Read and observe
and on page 85 first.
›
To turn on the heating with maximum heat » Fig. 81, press the key
or
button.
85Seats and head restraints
Page 88 of 336

With repeated pressing of the button, the level is down-regulated until it
switches off . The level of the seat heating is indicated by the number of illu-
minated warning lights underneath / in the button.
Increasing in heating power of the rear seats can be locked / unlocked , to do
this, press button
on the Climatronic → Tap the function surfaces
/
on
the Infotainment screen. In the locked heating power increase, the heating
power can only be adjusted down to turn off.
Front seats with heating and ventilation
Fig. 82
Heating switched on / cooling switched on / heating and cooling
are switched on simultaneously
Fig. 83
Infotainment screen: Front seat heating and ventilation with
maximum heating / ventilation level switched on
Read and observe
and on page 85 first.
›
Press the button
or
on the control panel of the air conditioner, a menu
for operating the front seat heating and ventilation is displayed on the Info-
tainment screen » Fig. 83,
Function surfaces for setting the ventilation level
Function surfaces for setting the heating power
Functional surfaces for switching off the ventilation (in addition to the
function surfaces A
) or for switching off the heating (in addition to the
function surfaces
B
)
If the seat heating was switched on before the ignition was switched off, then,
by pressing the buttons
and
, the seat heating will » Fig. 82 - switch on
with maximum output
.
If the seat cooling was switched on before the ignition was switched off, then,
by pressing the buttons
and
, the seat cooling will » Fig. 82 - switch on with
maximum output .
By repeatedly pressing the button or.
, the heating or cooling output is con-
trolled down to off. The power of the seat heating is indicated by the number
of illuminated warning lights underneath the switch.
Only the heating or ventilation can be operated using the buttons or.
.
If ventilation and heating are switched on simultaneously on the infotainment
screen, under each button or.
the blue and red light warning illuminates
» Fig. 82 -
, the button
or.
is not functioning (as long as the ventilation
and the heating is switched on simultaneously).
Heated steering wheel
Fig. 84
Button for steering wheel heat-
ing
Switching steering wheel heating on/off using Infotainment
›
To switch on / off press the button
on the Climatronic
→ Tap on the
function area on the Infotainment screen. When the heating is switched
on, the symbol in the function surface
A
is green » Fig. 84 .
AB86Using the system