stop start SKODA SUPERB 2016 3.G / (B8/3V) User Guide
[x] Cancel search | Manufacturer: SKODA, Model Year: 2016, Model line: SUPERB, Model: SKODA SUPERB 2016 3.G / (B8/3V)Pages: 336, PDF Size: 53.89 MB
Page 56 of 336
WARNING■Never leave the key in the vehicle when you exit the vehicle. Unauthor-
ized persons (e.g. children) could lock the car, turn on the ignition or start
the engine - there is a danger of injury and accidents!■
When leaving the vehicle, never leave people who are not completely in-
dependent, such as children, unattended in the vehicle. These individuals
might not be able to leave the vehicle on their own or to help themselves.
Can be fatal at very high or very low temperatures!
CAUTION
■ Each key contains electronic components; therefore it must be protected
against moisture and severe shocks.■
Keep the keyway clean. Impurities (textile fibres, dust etc.) have a negative
effect on the functionality of the locking cylinder and ignition lock.
Unlocking/locking with the remote control key
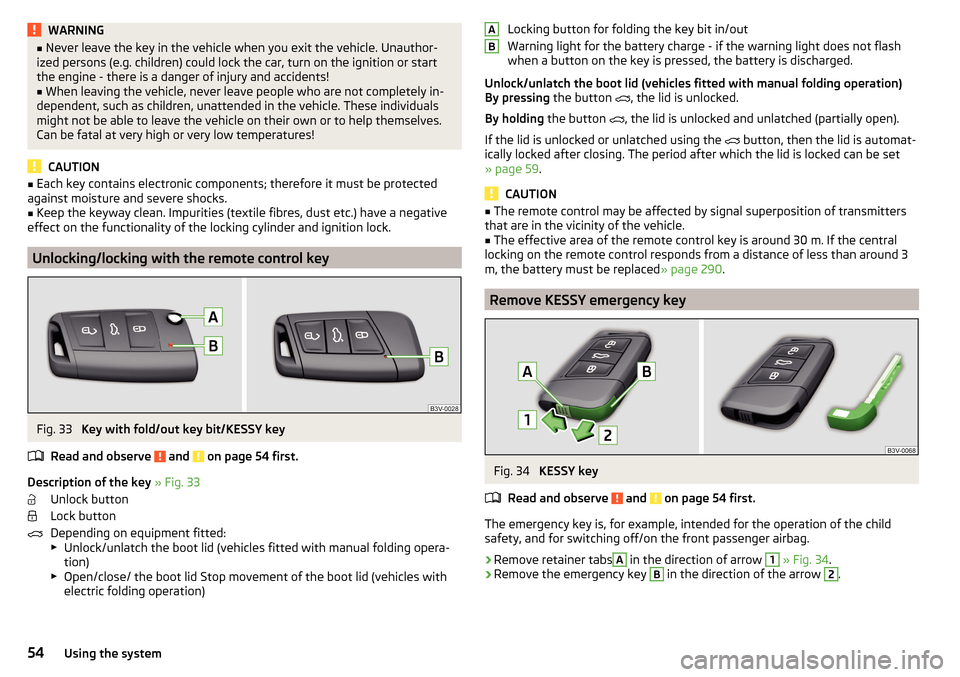
Fig. 33
Key with fold/out key bit/KESSY key
Read and observe
and on page 54 first.
Description of the key » Fig. 33
Unlock button
Lock button
Depending on equipment fitted:
▶ Unlock/unlatch the boot lid (vehicles fitted with manual folding opera-
tion)
▶ Open/close/ the boot lid Stop movement of the boot lid (vehicles with
electric folding operation)
Locking button for folding the key bit in/out
Warning light for the battery charge - if the warning light does not flash
when a button on the key is pressed, the battery is discharged.
Unlock/unlatch the boot lid (vehicles fitted with manual folding operation)
By pressing the button
, the lid is unlocked.
By holding the button
, the lid is unlocked and unlatched (partially open).
If the lid is unlocked or unlatched using the
button, then the lid is automat-
ically locked after closing. The period after which the lid is locked can be set
» page 59 .
CAUTION
■
The remote control may be affected by signal superposition of transmitters
that are in the vicinity of the vehicle.■
The effective area of the remote control key is around 30 m. If the central
locking on the remote control responds from a distance of less than around 3
m, the battery must be replaced » page 290.
Remove KESSY emergency key
Fig. 34
KESSY key
Read and observe
and on page 54 first.
The emergency key is, for example, intended for the operation of the child
safety, and for switching off/on the front passenger airbag.
›
Remove retainer tabs
A
in the direction of arrow
1
» Fig. 34 .
›
Remove the emergency key
B
in the direction of the arrow
2
.
AB54Using the system
Page 61 of 336
CAUTIONThe opened glasses storage compartment reduces the effectiveness of the in-
terior monitor. To ensure the full functionality of the interior monitor, the
glasses storage compartment must always be closed before locking the vehi-
cle.
Manually operated tailgate
Introduction
This chapter contains information on the following subjects:
Open/close boot lid
59
Setting the delayed locking of the boot lid
59WARNING■ Never drive with the boot lid open or ajar, as otherwise exhaust gases
may get into the interior of the vehicle – risk of poisoning!■
Ensure that the lock is properly engaged after closing the lid. Otherwise,
the lid might open suddenly while the vehicle is moving, even if the lid was
locked – risk of accident!
■
Make sure that when closing the boot lid, no body parts are crushed -
there is danger of injury!
■
Do not press on the rear window when closing the boot lid, it could crack
– risk of injury!
Open/close boot lid
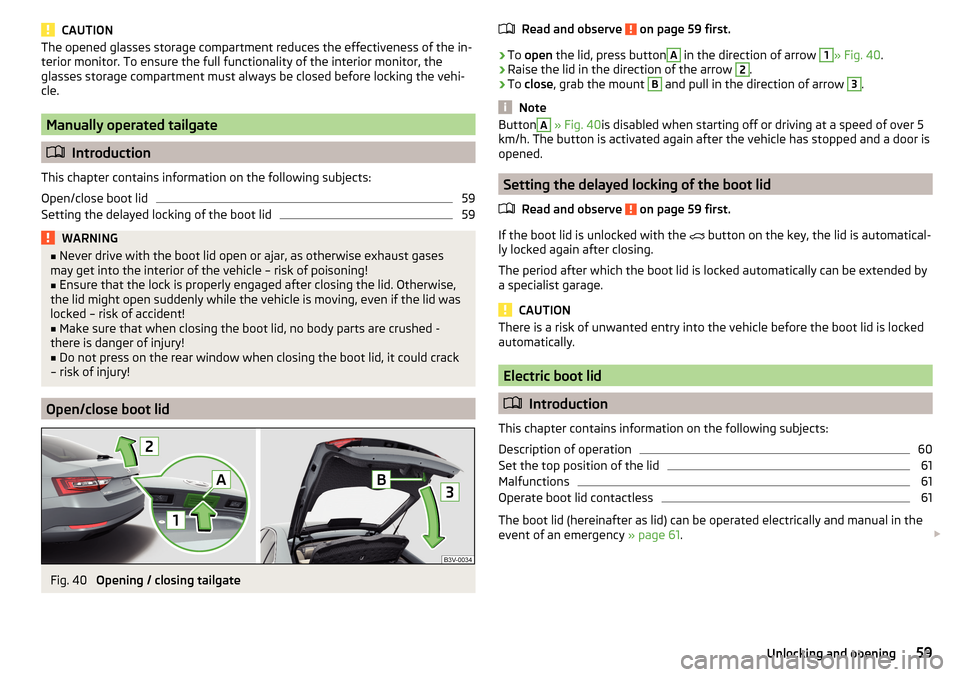
Fig. 40
Opening / closing tailgate
Read and observe on page 59 first.›
To open the lid, press button
A
in the direction of arrow
1
» Fig. 40 .
›
Raise the lid in the direction of the arrow
2
.
›
To close , grab the mount
B
and pull in the direction of arrow
3
.
Note
ButtonA » Fig. 40 is disabled when starting off or driving at a speed of over 5
km/h. The button is activated again after the vehicle has stopped and a door is
opened.
Setting the delayed locking of the boot lid
Read and observe
on page 59 first.
If the boot lid is unlocked with the button on the key, the lid is automatical-
ly locked again after closing.
The period after which the boot lid is locked automatically can be extended by
a specialist garage.
CAUTION
There is a risk of unwanted entry into the vehicle before the boot lid is locked
automatically.
Electric boot lid
Introduction
This chapter contains information on the following subjects:
Description of operation
60
Set the top position of the lid
61
Malfunctions
61
Operate boot lid contactless
61
The boot lid (hereinafter as lid) can be operated electrically and manual in the
event of an emergency » page 61.
59Unlocking and opening
Page 63 of 336
▶By holding the button D on the key.
▶ By pressing the handle A.
Audible signals
When opening the door using the buttonC
and opening / closing of the flap
using the button
D
audible signals are emitted.
Note
■ ButtonA » Fig. 40 on page 59 is disabled when starting off or driving at a
speed of over 5 km/h. The button is activated again after the vehicle has stop-
ped and a door is opened.■
If you rapidly enter the vehicle during the opening or closing process of the
lid, the whole vehicle may jerk and, as a result, the movement of the lid can be
interrupted.
Set the top position of the lid
Read and observe
and on page 60 first.
The top position of the lid can be adjusted (e.g. in a limited space to open thelid due to the garage height or for a more comfortable operation, depending on
the height of the person).
Adjusting the top position of the lid
›
Stop the lid in the desired position.
›
Press and hold button
B
» Fig. 41 on page 60 until you hear an acoustic sig-
nal.
Adjusting the top starting position of the lid
›
Carefully raise the flap manually to the limit.
›
Press and hold button
B
» Fig. 41 on page 60 until you hear an acoustic sig-
nal.
Note
The top position which is reached when the lid opens automatically, is always
lower than the maximum top position which can be reached when the lid is
opened manually.Malfunctions
Read and observe
and on page 60 first.
Examples of operational malfunctions
Description of the malfunc-
tionRemedyThe lid cannot be openedUnlocking the lid » page 293
The lid does not react to an
opening signal
Removing a possible obstacle (e.g. snow), re-
opening the lid » page 60
Press the handle A
» Fig. 41 on page 60 and
pull the lid upwards
The lid remains in the top
position
Manual closing of the lid
The lid is open and the bat-
tery was disconnected
Close manually
Close the door slowly, push down the lid, push in the lock on the centre of the
edge, above the ŠKODA logo.
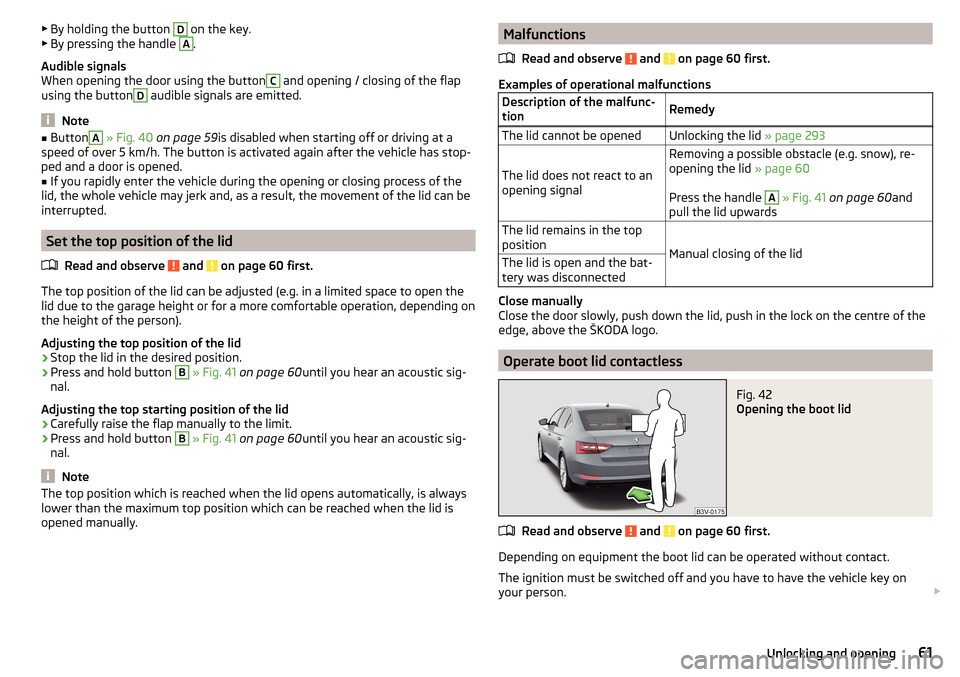
Operate boot lid contactless
Fig. 42
Opening the boot lid
Read and observe and on page 60 first.
Depending on equipment the boot lid can be operated without contact.
The ignition must be switched off and you have to have the vehicle key on
your person.
61Unlocking and opening
Page 67 of 336
If there is an obstacle, the closing process is stopped and the glass pane re-
tracts by several centimetres.WARNINGIf the sliding/tilting roof is closed by holding down the switch 7 / 8,
» Fig. 44 on page 64 and the closing process is hindered by an obstacle,
then when attempting to close for a third time, the force limiter is rendered inoperable (if the period of 5 s is not reached between the individual at-
tempts to close). The sliding/tilting roof closes with full force - it may cause
injury.
Activate operation of the sliding/tilting roof
Fig. 45
Operation of the sliding/tilting
roof
Read and observe and on page 64 first.
If the operation of the sliding/tilting roof is deactivated (e.g. after disconnect-
ing and connecting the battery), then operation will have to be activated.
›
Switch on the ignition, pull the switch on the recess all the way down in the
direction of arrow
1
» Fig. 45 and hold.
The sliding/tilting roof opens/closes again after around 10 seconds.
›
Release the lever.
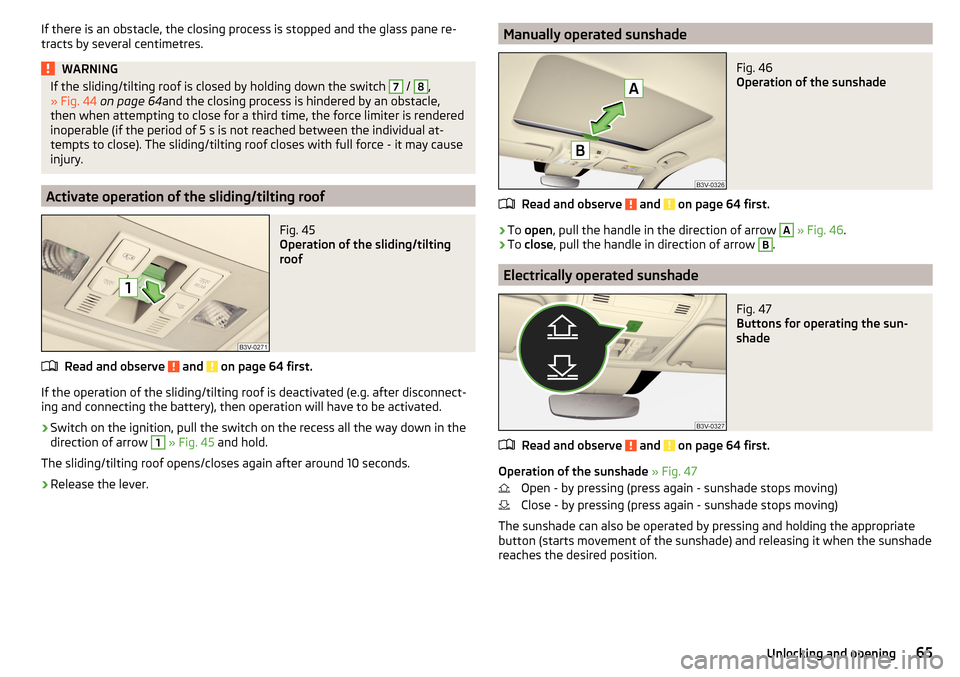
Manually operated sunshadeFig. 46
Operation of the sunshade
Read and observe and on page 64 first.
›
To open , pull the handle in the direction of arrow
A
» Fig. 46 .
›
To
close , pull the handle in direction of arrow
B
.
Electrically operated sunshade
Fig. 47
Buttons for operating the sun-
shade
Read and observe and on page 64 first.
Operation of the sunshade » Fig. 47
Open - by pressing (press again - sunshade stops moving)
Close - by pressing (press again - sunshade stops moving)
The sunshade can also be operated by pressing and holding the appropriate
button (starts movement of the sunshade) and releasing it when the sunshade
reaches the desired position.
65Unlocking and opening
Page 92 of 336
Note■At the start of the wireless charging process, the appropriate message ap-
pears on the Infotainment screen.■
For the optimum telephone signal strength and uninterrupted wireless
charging, we recommend position the telephone in the storage compartment
without the protective sleeve, if possible.
■
Place a max. 146x80 telephone in the storage compartment.
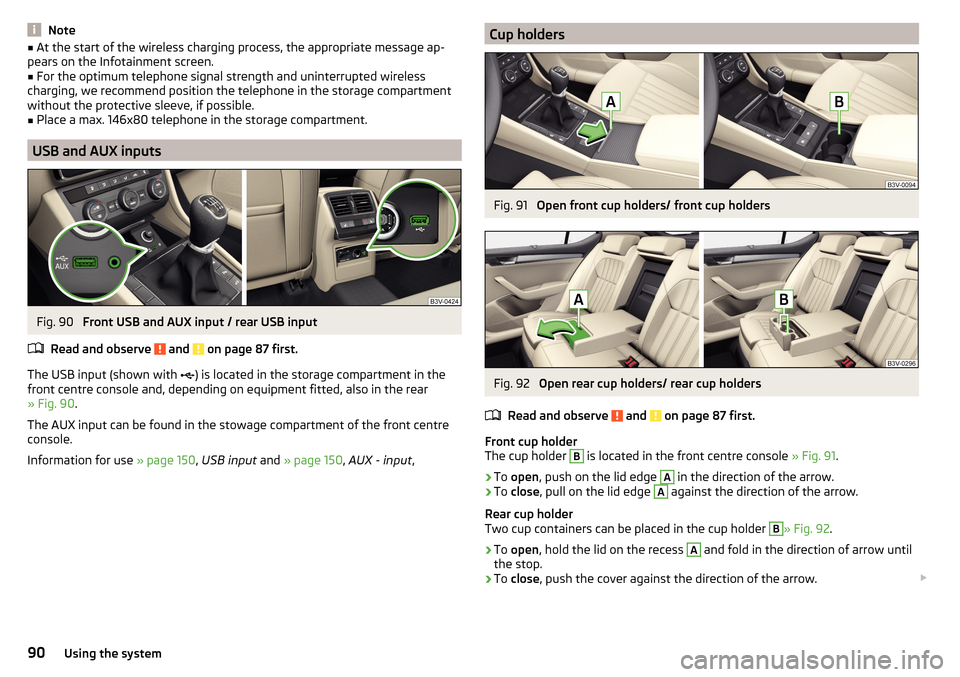
USB and AUX inputs
Fig. 90
Front USB and AUX input / rear USB input
Read and observe
and on page 87 first.
The USB input (shown with ) is located in the storage compartment in the
front centre console and, depending on equipment fitted, also in the rear
» Fig. 90 .
The AUX input can be found in the stowage compartment of the front centre
console.
Information for use » page 150, USB input and » page 150 , AUX - input ,
Cup holdersFig. 91
Open front cup holders/ front cup holders
Fig. 92
Open rear cup holders/ rear cup holders
Read and observe
and on page 87 first.
Front cup holder
The cup holder
B
is located in the front centre console » Fig. 91.
›
To open , push on the lid edge
A
in the direction of the arrow.
›
To close , pull on the lid edge
A
against the direction of the arrow.
Rear cup holder
Two cup containers can be placed in the cup holder
B
» Fig. 92 .
›
To open , hold the lid on the recess
A
and fold in the direction of arrow until
the stop.
›
To close , push the cover against the direction of the arrow.
90Using the system
Page 99 of 336
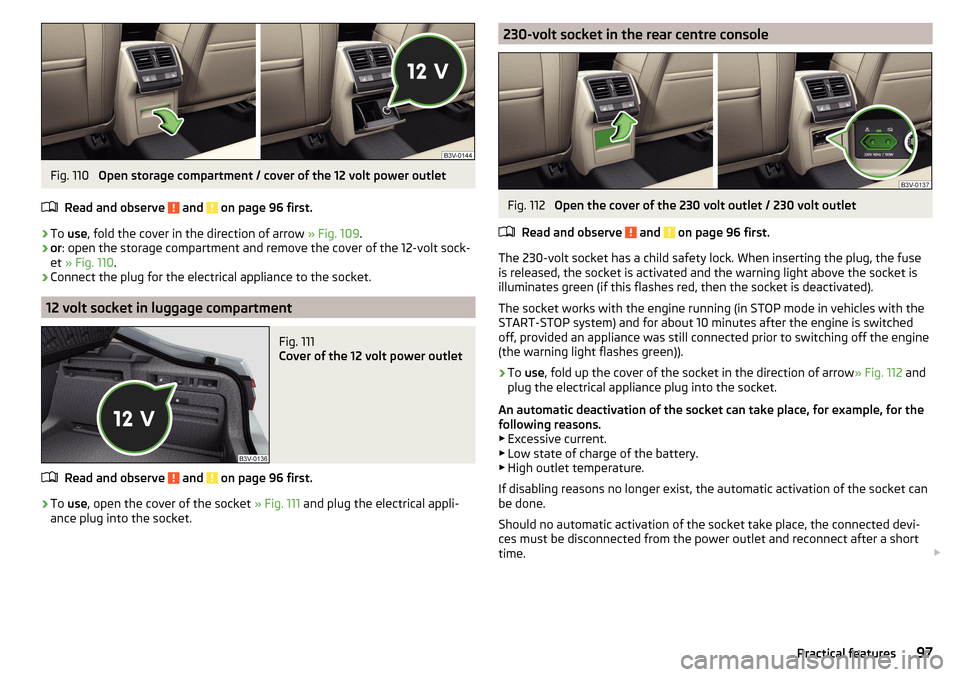
Fig. 110
Open storage compartment / cover of the 12 volt power outlet
Read and observe
and on page 96 first.
›
To use , fold the cover in the direction of arrow » Fig. 109.
›
or: open the storage compartment and remove the cover of the 12-volt sock-
et » Fig. 110 .
›
Connect the plug for the electrical appliance to the socket.
12 volt socket in luggage compartment
Fig. 111
Cover of the 12 volt power outlet
Read and observe and on page 96 first.
›
To use , open the cover of the socket » Fig. 111 and plug the electrical appli-
ance plug into the socket.
230-volt socket in the rear centre consoleFig. 112
Open the cover of the 230 volt outlet / 230 volt outlet
Read and observe
and on page 96 first.
The 230-volt socket has a child safety lock. When inserting the plug, the fuse
is released, the socket is activated and the warning light above the socket is
illuminates green (if this flashes red, then the socket is deactivated).
The socket works with the engine running (in STOP mode in vehicles with the
START-STOP system) and for about 10 minutes after the engine is switched
off, provided an appliance was still connected prior to switching off the engine
(the warning light flashes green)).
›
To use , fold up the cover of the socket in the direction of arrow » Fig. 112 and
plug the electrical appliance plug into the socket.
An automatic deactivation of the socket can take place, for example, for the
following reasons. ▶ Excessive current.
▶ Low state of charge of the battery.
▶ High outlet temperature.
If disabling reasons no longer exist, the automatic activation of the socket can
be done.
Should no automatic activation of the socket take place, the connected devi-
ces must be disconnected from the power outlet and reconnect after a short
time.
97Practical features
Page 132 of 336
Voice commands
Enter
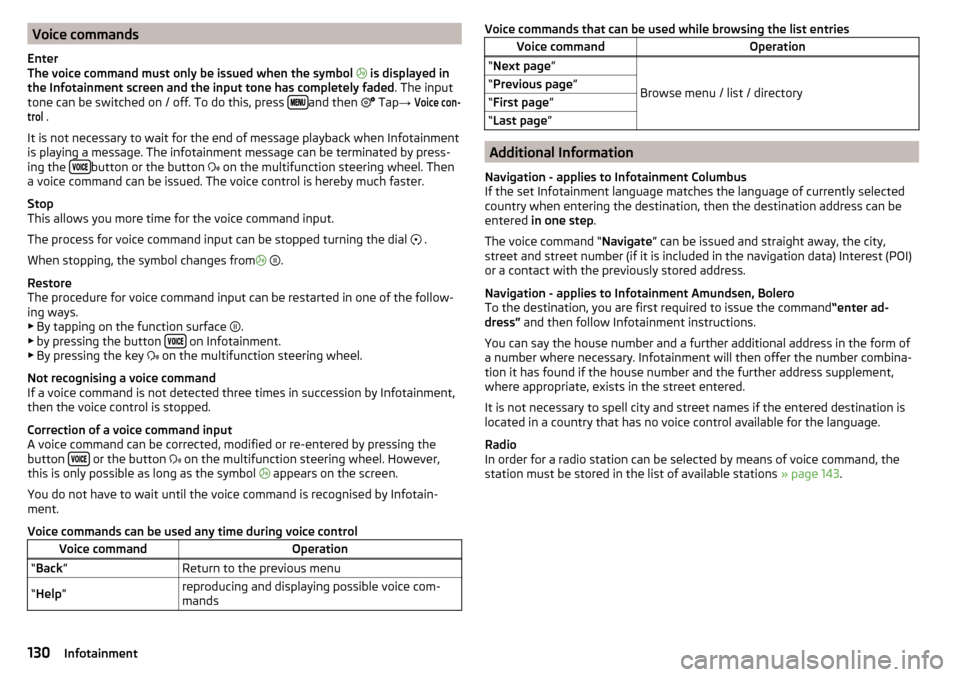
The voice command must only be issued when the symbol
is displayed in
the Infotainment screen and the input tone has completely faded . The input
tone can be switched on / off. To do this, press
and then
Tap →
Voice con-trol
.
It is not necessary to wait for the end of message playback when Infotainment
is playing a message. The infotainment message can be terminated by press-
ing the
button or the button
on the multifunction steering wheel. Then
a voice command can be issued. The voice control is hereby much faster.
Stop
This allows you more time for the voice command input.
The process for voice command input can be stopped turning the dial .
When stopping, the symbol changes from
.
Restore
The procedure for voice command input can be restarted in one of the follow-
ing ways.
▶ By tapping on the function surface .
▶ by pressing the button
on Infotainment.
▶ By pressing the key on the multifunction steering wheel.
Not recognising a voice command
If a voice command is not detected three times in succession by Infotainment,
then the voice control is stopped.
Correction of a voice command input
A voice command can be corrected, modified or re-entered by pressing the
button
or the button
on the multifunction steering wheel. However,
this is only possible as long as the symbol appears on the screen.
You do not have to wait until the voice command is recognised by Infotain-
ment.
Voice commands can be used any time during voice control
Voice commandOperation“ Back ”Return to the previous menu“Help ”reproducing and displaying possible voice com-
mandsVoice commands that can be used while browsing the list entriesVoice commandOperation“ Next page ”
Browse menu / list / directory
“Previous page ”“First page ”“Last page ”
Additional Information
Navigation - applies to Infotainment Columbus
If the set Infotainment language matches the language of currently selected
country when entering the destination, then the destination address can be
entered in one step .
The voice command “ Navigate” can be issued and straight away, the city,
street and street number (if it is included in the navigation data) Interest (POI)
or a contact with the previously stored address.
Navigation - applies to Infotainment Amundsen, Bolero
To the destination, you are first required to issue the command “enter ad-
dress” and then follow Infotainment instructions.
You can say the house number and a further additional address in the form of
a number where necessary. Infotainment will then offer the number combina-
tion it has found if the house number and the further address supplement,
where appropriate, exists in the street entered.
It is not necessary to spell city and street names if the entered destination is
located in a country that has no voice control available for the language.
Radio
In order for a radio station can be selected by means of voice command, the
station must be stored in the list of available stations » page 143.
130Infotainment
Page 159 of 336
List of available stations / preset list
In the list of available stations, stations are presented in alphabetical order
with a sufficiently strong signal.›
to Display the list of available stations , from theTV tunermain menu, tap the
function surface
or rotate the slider
.
›
To store a station on a station button first tap the function surface
Store
in
the list of available stations and then touch the corresponding station but-
ton.
Up to 99 stations can be stored in the memory list.
Find available stations and select
Infotainment features a TV tuner to receive digital TV channels Freeview and DVB-T2 (Only codec h. 264).
Setting stations
›
In the TV tuner main menu , tap on the function surface
→
or
surface.
A search commences in the selected direction and stops at the next station
group with sufficient signal strength.
The search is carried out by pressing the function button again or
stopped.
Select a station from the preset list
›
In the TV tuner main menu , tap on the function surface
surface.
›
Select the desired station.
Select the station from the station list
›
In the TV tuner main menu, turn the controller
Or tap on the function sur-
face .
›
Select the desired station.
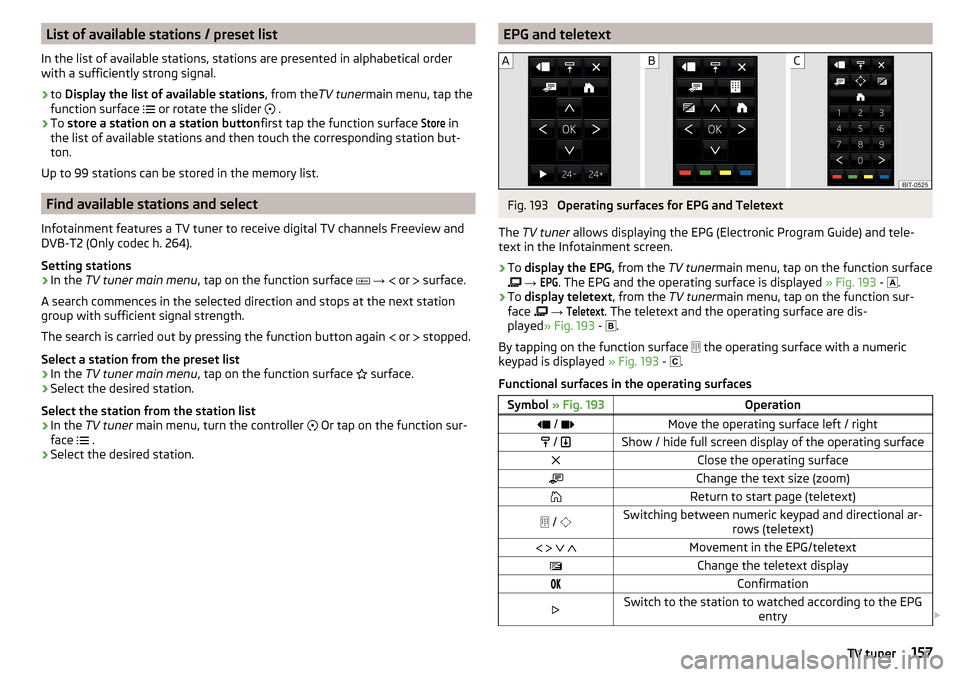
EPG and teletextFig. 193
Operating surfaces for EPG and Teletext
The TV tuner allows displaying the EPG (Electronic Program Guide) and tele-
text in the Infotainment screen.
›
To display the EPG , from the TV tunermain menu, tap on the function surface
→
EPG
. The EPG and the operating surface is displayed » Fig. 193 -
.
›
To
display teletext , from the TV tunermain menu, tap on the function sur-
face
→
Teletext
. The teletext and the operating surface are dis-
played » Fig. 193 -
.
By tapping on the function surface the operating surface with a numeric
keypad is displayed » Fig. 193 -
.
Functional surfaces in the operating surfaces
Symbol » Fig. 193Operation / Move the operating surface left / right / Show / hide full screen display of the operating surfaceClose the operating surfaceChange the text size (zoom)Return to start page (teletext) / Switching between numeric keypad and directional ar-
rows (teletext) Movement in the EPG/teletextChange the teletext displayConfirmationSwitch to the station to watched according to the EPG
entry 157TV tuner
Page 192 of 336
›Press the
button, then tap on the function surface
→ Driver assistance →Speed warning:
.
For trailer towing , we recommend that you activate detection of road signs
relevant to trailers.›
Press the button, then tap on the function surface
Tap →
Driver assis-tance
→
Show road signs relevant to trailers
.
Route guidance
Introduction to the subject
A route is created by starting route guidance to a destination. Additional inter-
mediate destinations can be added to the route.
The route guidance takes place as follows
▶ Through graphical driving instructions in the Infotainment display screen and
in the display of the instrument cluster.
▶ With navigation announcements.
Infotainment tries to allow for continued guidance even if the navigation data
is incomplete or there is no data at all for the given area.
The route is recalculated each time if you ignore driving recommendations or
change the route.
CAUTION
The nav. announcements provided may vary from the actual situations, e.g.
due to out-of-date navigation data.
Destination details
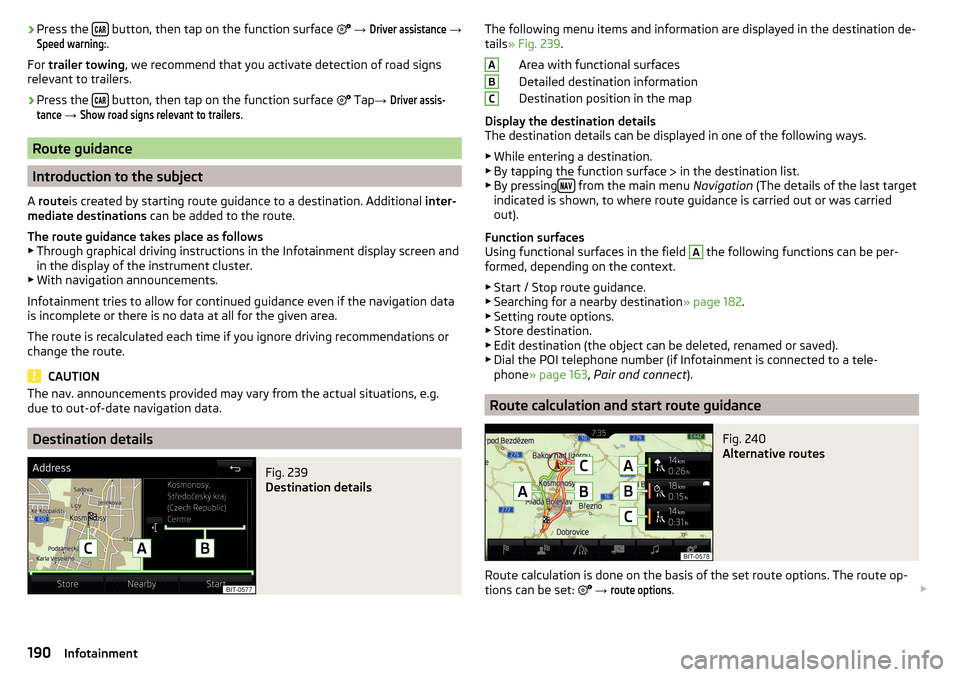
Fig. 239
Destination details
The following menu items and information are displayed in the destination de-
tails » Fig. 239 .
Area with functional surfaces
Detailed destination information
Destination position in the map
Display the destination details
The destination details can be displayed in one of the following ways.
▶ While entering a destination.
▶ By tapping the function surface
in the destination list.
▶ By pressing
from the main menu
Navigation (The details of the last target
indicated is shown, to where route guidance is carried out or was carried
out).
Function surfaces
Using functional surfaces in the field
A
the following functions can be per-
formed, depending on the context.
▶ Start / Stop route guidance.
▶ Searching for a nearby destination » page 182.
▶ Setting route options.
▶ Store destination.
▶ Edit destination (the object can be deleted, renamed or saved).
▶ Dial the POI telephone number (if Infotainment is connected to a tele-
phone » page 163 , Pair and connect ).
Route calculation and start route guidance
Fig. 240
Alternative routes
Route calculation is done on the basis of the set route options. The route op-
tions can be set:
→
route options
.
ABC190Infotainment
Page 194 of 336
Speed limits
With activated function → Advanced settings
→
Note: National border crossed
dis-
play the country-specific speed limits when crossing international borders.
These speed limits can be displayed by tapping the function surface
→
Topspeed
in the main menu navigation.
Nav. announcements
Infotainment issues nav. announcements during route guidance.
The navigation announcements are generated by Infotainment. The flawless clarity of the message (e.g., road or city name) cannot always be guaranteed.
The last navigation announcement is repeated by pressing the controller .
The timing of the navigation message is dependent on the type of road and on
the driving speed.
The type of nav. announcements can be set:
→
Nav. announcements
.
Note
Guidance on the most frequently traveled route takes place without nav. an-
nouncements.
Most common routes
The most frequently travelled routes are automatically saved by Infotainment.
Of these, up to 3 routes can be offered, which best match the current time, day
of the week as well as the vehicle position.
A route guidance to one of the most travelled routes can be started as long as
no route guidance takes place.
›
To display the menus of the most frequently traveled routes, in the split
screen, tap on the function surface
Freq. Routes
→
show on map
.
›
Select the desired route.
Then a selected route is calculated and the route guidance starts.
The menu display in the split can be turned on/off in the main menu naviga-
tion by tapping the function surface
→
Route options
→
Freq. Routes
Switched
on/off .
The stored most frequent routes can be deleted in the main menu navigation
by tapping the functional surface
→
Manage memory
→
Delete User Data
→
Mostroutes
is deleted .
NoteGuidance on the most frequently traveled route takes place without nav. an-
nouncements.
Finish route guidance
The route guidance can be finished in one of the following ways.
›
The final destination is reached.
›
In the main menu Navigation by tapping the functional surface
→
Stop routeguidance
.
›
By turning off the ignition for longer than 120 minutes.
Abort route guidance
If the ignition is switched off and on again, then the route guidance is contin-
ued depending on the stop time in one of the following ways.
▶ Within 15 min. - route guidance is continued taking into account the calcula-
ted route.
▶ Between 15 min and 120 min - the screen displays the message
Continue routeguidance?
, after you confirm the message, the route guidance continues using
the calculated route.
▶ After 120 min - the route guidance is cancelled.
Route
Route schedule
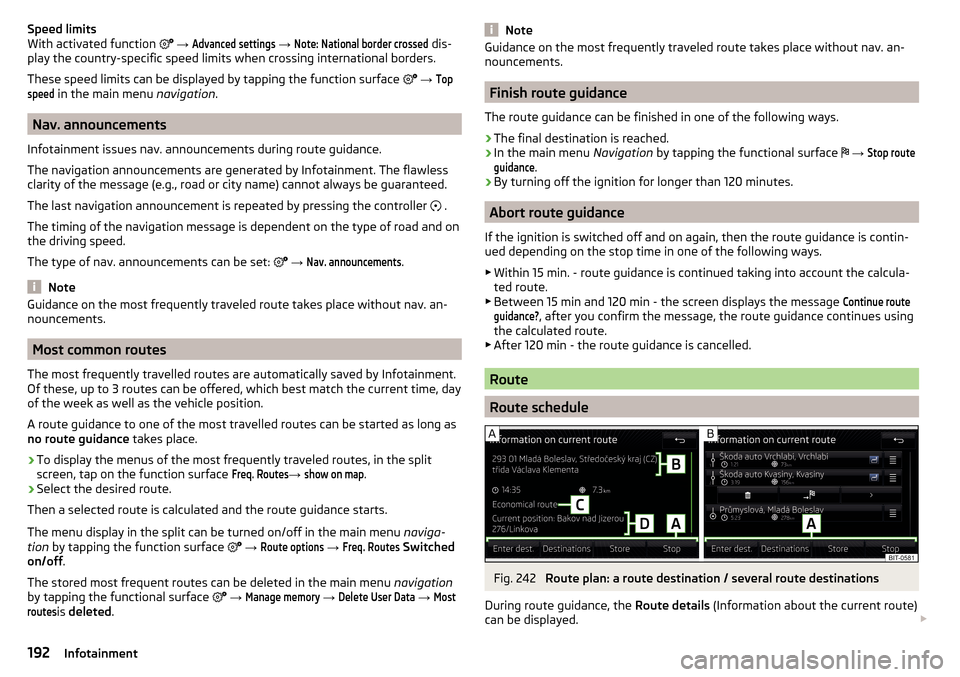
Fig. 242
Route plan: a route destination / several route destinations
During route guidance, the Route details (Information about the current route)
can be displayed.
192Infotainment