instrument cluster SKODA SUPERB 2016 3.G / (B8/3V) Owner's Guide
[x] Cancel search | Manufacturer: SKODA, Model Year: 2016, Model line: SUPERB, Model: SKODA SUPERB 2016 3.G / (B8/3V)Pages: 336, PDF Size: 53.89 MB
Page 214 of 336
Assist systems
General information
Introduction
This chapter contains information on the following subjects:
Radar sensor
212WARNING■ The assistance systems only serve to support the driver and do not re-
lieve the driver of the responsibility for driving the vehicle.■
The increased safety provision, as well as the increased occupant protec-
tion provided by the assistance systems must not tempt you to take risks -
risk of accident!
■
Adjust the speed and driving style to the current visibility, weather, road
and traffic conditions.
■
The assistance systems have physical and system-related limitations. For
this reason, the driver may experience some undesired or delayed system
responses in certain situations. You should therefore always be alert and
ready to intervene!
■
Only enable, disable or set the assistance systems when you have the car
fully under control, in every traffic situation - risk of accident!
Radar sensor
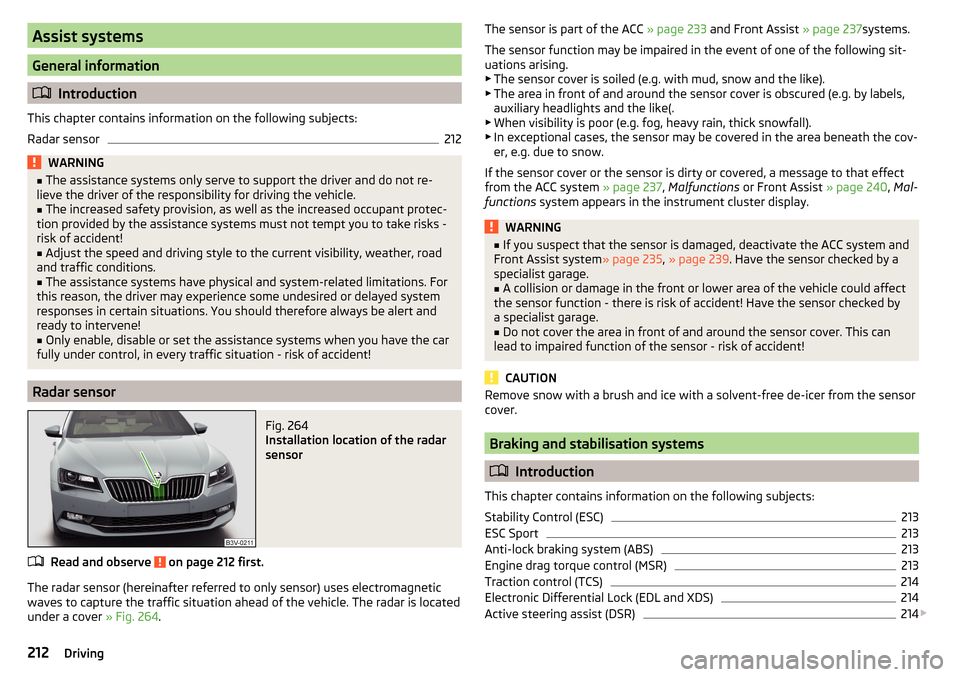
Fig. 264
Installation location of the radar
sensor
Read and observe on page 212 first.
The radar sensor (hereinafter referred to only sensor) uses electromagnetic
waves to capture the traffic situation ahead of the vehicle. The radar is located
under a cover » Fig. 264.
The sensor is part of the ACC » page 233 and Front Assist » page 237systems.
The sensor function may be impaired in the event of one of the following sit-
uations arising. ▶ The sensor cover is soiled (e.g. with mud, snow and the like).
▶ The area in front of and around the sensor cover is obscured (e.g. by labels,
auxiliary headlights and the like(.
▶ When visibility is poor (e.g. fog, heavy rain, thick snowfall).
▶ In exceptional cases, the sensor may be covered in the area beneath the cov-
er, e.g. due to snow.
If the sensor cover or the sensor is dirty or covered, a message to that effect
from the ACC system » page 237, Malfunctions or Front Assist » page 240, Mal-
functions system appears in the instrument cluster display.WARNING■
If you suspect that the sensor is damaged, deactivate the ACC system and
Front Assist system » page 235, » page 239 . Have the sensor checked by a
specialist garage.■
A collision or damage in the front or lower area of the vehicle could affect
the sensor function - there is risk of accident! Have the sensor checked by
a specialist garage.
■
Do not cover the area in front of and around the sensor cover. This can
lead to impaired function of the sensor - risk of accident!
CAUTION
Remove snow with a brush and ice with a solvent-free de-icer from the sensor
cover.
Braking and stabilisation systems
Introduction
This chapter contains information on the following subjects:
Stability Control (ESC)
213
ESC Sport
213
Anti-lock braking system (ABS)
213
Engine drag torque control (MSR)
213
Traction control (TCS)
214
Electronic Differential Lock (EDL and XDS)
214
Active steering assist (DSR)
214
212Driving
Page 215 of 336
Brake Assist (HBA)214Hill Start Assist (HHC)214
Multicollision brake (MCB)
215
Trailer stabilisation system (TSA)
215
The brake and stabilization systems are automatically activated each time the
ignition is switched on, unless otherwise indicated.
The error display is in Chapter » page 33, Warning lights .
WARNINGThe general information relating to the use of assistance systems must be
observed » page 212, in section Introduction .
Stability Control (ESC)
Read and observe
on page 213 first.
ESC improves vehicle stability in critical driving situations (e.g. if the vehicle
starts to skid) by the braking the individual wheels to maintain the direction.
During an ECS intervention, the warning light flashes in the instrument clus-
ter.
ESC Sport
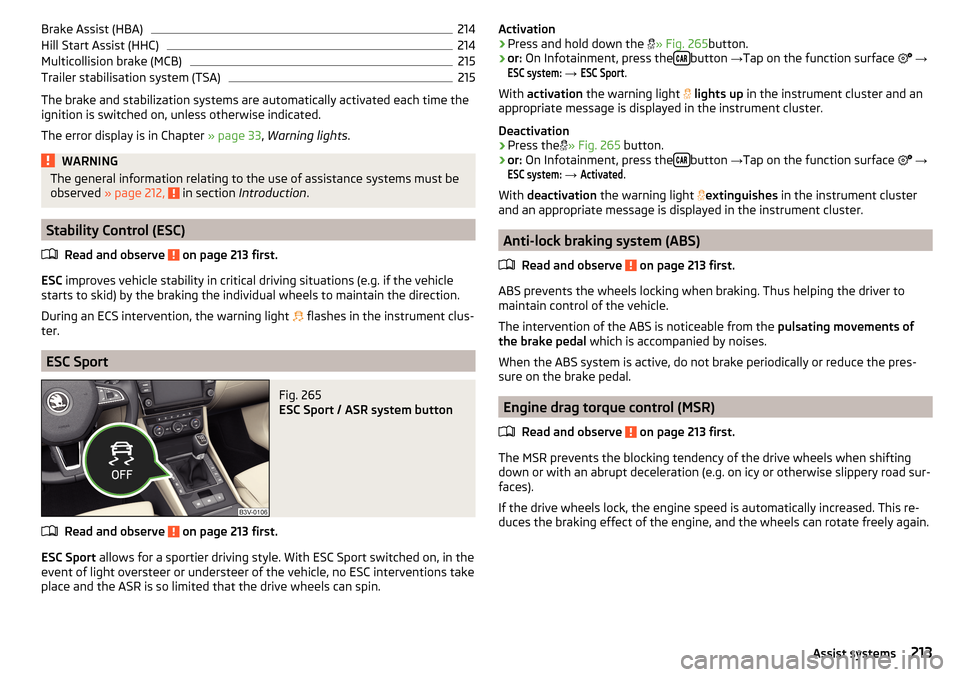
Fig. 265
ESC Sport / ASR system button
Read and observe on page 213 first.
ESC Sport allows for a sportier driving style. With ESC Sport switched on, in the
event of light oversteer or understeer of the vehicle, no ESC interventions take
place and the ASR is so limited that the drive wheels can spin.
Activation›Press and hold down the » Fig. 265 button.›
or: On Infotainment, press the button
→Tap on the function surface
→
ESC system:
→
ESC Sport
.
With activation the warning light
lights up in the instrument cluster and an
appropriate message is displayed in the instrument cluster.
Deactivation
›
Press the
» Fig. 265 button.
›
or: On Infotainment, press the button
→Tap on the function surface
→
ESC system:
→
Activated
.
With deactivation the warning light
extinguishes
in the instrument cluster
and an appropriate message is displayed in the instrument cluster.
Anti-lock braking system (ABS)
Read and observe
on page 213 first.
ABS prevents the wheels locking when braking. Thus helping the driver to
maintain control of the vehicle.
The intervention of the ABS is noticeable from the pulsating movements of
the brake pedal which is accompanied by noises.
When the ABS system is active, do not brake periodically or reduce the pres-
sure on the brake pedal.
Engine drag torque control (MSR)
Read and observe
on page 213 first.
The MSR prevents the blocking tendency of the drive wheels when shiftingdown or with an abrupt deceleration (e.g. on icy or otherwise slippery road sur-
faces).
If the drive wheels lock, the engine speed is automatically increased. This re-
duces the braking effect of the engine, and the wheels can rotate freely again.
213Assist systems
Page 216 of 336
Traction control (TCS)Read and observe
on page 213 first.
The ASR prevents spinning of the drive wheels. TCS reduces the drive powertransmitted to the wheels in the case of slipping wheels. Thus, for example,
driving on road surfaces with low grip is made easier.
During a TCS intervention, the indicator light
flashes in the instrument clus-
ter.
Deactivation
›
Press the
» Fig. 265 on page 213 button.
›
or: On Infotainment, press the button
→Tap on the function surface
→
ESC system:
→
ASR off
.
With deactivation the warning light lights up in the instrument cluster
and
an appropriate message is displayed in the instrument cluster.
Activation
›
Press the
» Fig. 265 on page 213 button.
›
or: On Infotainment, press the button
→Tap on the function surface
→
ESC system:
→
Activated
.
With activation the warning light
is
extinguished and an appropriate mes-
sage is displayed in the instrument cluster.
The TCS should normally always be enabled. The system should be deactivated
only in the following situations, for example. ▶ When driving with snow chains.
▶ When driving in deep snow or on a very loose surface.
▶ When it is necessary to “rock” a car free when it has become stuck.
Electronic Differential Lock (EDL and XDS)
Read and observe
on page 213 first.
EDL prevents the turning of the respective wheel of the driven axle. EDL
brakes the spinning wheel, if necessary, and transmits the driving force to the
other driving wheel. Driving becomes easier on road surfaces with different
traction under each wheel of the driven axle.
EDL switches off automatically to avoid excessive heat generation on the
brake of the wheel being braked. Once the brakes have cooled down, there is
an automatic re-activation of EDL.
XDS is an extension to the electronic differential lock (EDL). XDS does not re-
spond to the relieved inner curve wheel of the driven axle in the case of fast
cornering.
By applying braking force to the relieved wheel, spinning is prevented by the
XDS. This has a positive effect on the driving stability and steerability of the
vehicle.
Active steering assist (DSR)
Read and observe
on page 213 first.
In critical situations, the DSR provides the driver with a steering recommenda-tion in order to stabilise the vehicle. DSR is activated, for example, on the right
and left vehicle side when braking sharply on different road surfaces.
Brake Assist (HBA)
Read and observe
on page 213 first.
The HBA increases the braking effect and helps to reduce the braking dis-
tance.
The HBA is activated by very quick operation of the brake pedal. In order to
achieve the shortest possible braking distance, the brake pedal must be ap-
plied firmly until the vehicle has come to a standstill.
The HBA function is automatically deactivated when the brake pedal is re-
leased.
Hill Start Assist (HHC)
Read and observe
on page 213 first.
When driving on slopes, HHC allows you to move your foot from the brake ped-al to the accelerator pedal without the vehicle rolling downhill on its own.
The vehicle is braked by the system for about 2 seconds after releasing the
brake pedal.
The HHC is active on gradients upwards of 5 % if the driver door is closed. HHC
is only ever active on slopes when in forward or reverse start off.
214Driving
Page 219 of 336
Note■If with Version 3 vehicles not all fields around the vehicle silhouette are ac-
tive after activation the vehicle should be moved forwards or backwards.■
The signal tones for front obstacle recognition are factory-set to be higher
than for rear obstacle recognition.
■
The setting of the acoustic signals is stored (depending on the Infotainment
type) in the active user account personalisation » page 49.
Display in Infotainment screen
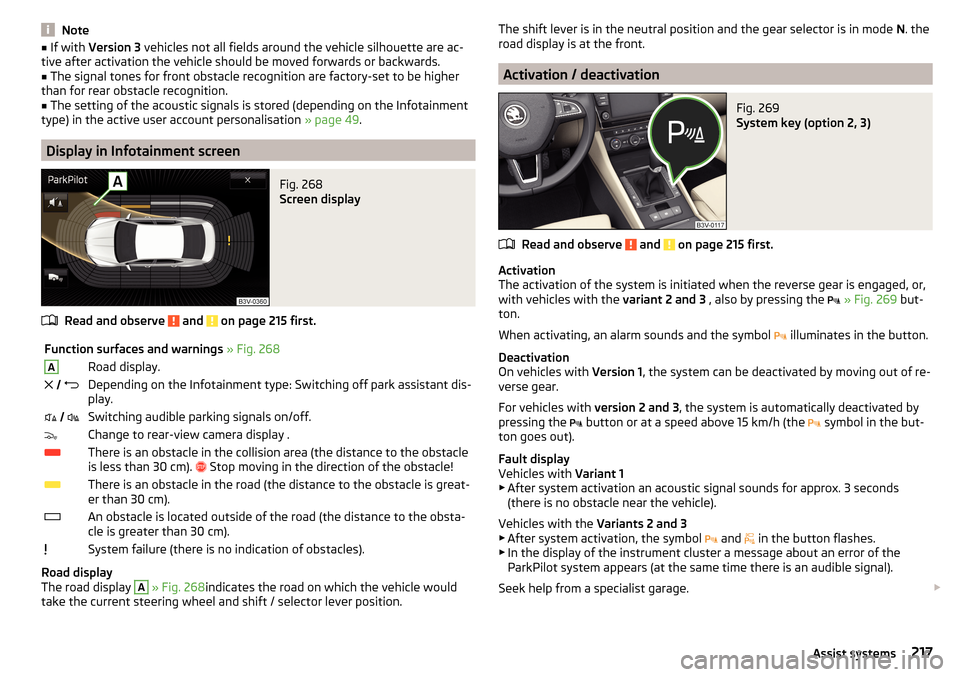
Fig. 268
Screen display
Read and observe and on page 215 first.
Function surfaces and warnings » Fig. 268ARoad display. Depending on the Infotainment type: Switching off park assistant dis-
play. Switching audible parking signals on/off.Change to rear-view camera display .There is an obstacle in the collision area (the distance to the obstacle
is less than 30 cm).
Stop moving in the direction of the obstacle!There is an obstacle in the road (the distance to the obstacle is great-
er than 30 cm).An obstacle is located outside of the road (the distance to the obsta-
cle is greater than 30 cm).System failure (there is no indication of obstacles).
Road display
The road display
A
» Fig. 268 indicates the road on which the vehicle would
take the current steering wheel and shift / selector lever position.
The shift lever is in the neutral position and the gear selector is in mode N. the
road display is at the front.
Activation / deactivation
Fig. 269
System key (option 2, 3)
Read and observe and on page 215 first.
Activation
The activation of the system is initiated when the reverse gear is engaged, or,
with vehicles with the variant 2 and 3 , also by pressing the
» Fig. 269 but-
ton.
When activating, an alarm sounds and the symbol illuminates in the button.
Deactivation
On vehicles with Version 1, the system can be deactivated by moving out of re-
verse gear.
For vehicles with version 2 and 3, the system is automatically deactivated by
pressing the button or at a speed above 15 km/h (the
symbol in the but-
ton goes out).
Fault display
Vehicles with Variant 1
▶ After system activation an acoustic signal sounds for approx. 3 seconds
(there is no obstacle near the vehicle).
Vehicles with the Variants 2 and 3
▶ After system activation, the symbol and
in the button flashes.
▶ In the display of the instrument cluster a message about an error of the
ParkPilot system appears (at the same time there is an audible signal).
Seek help from a specialist garage.
217Assist systems
Page 221 of 336
WARNINGThe general information relating to the use of assistance systems must be
observed » page 212, in section Introduction .WARNING■
In the case of a collision or damage to the rear of the vehicle, the function
of the systems may be affected - risk of accident! Have the vehicle checked
by a specialist garage.■
Do not cover the sensor area - the function of the systems could be limi-
ted. ■ Remove snow, ice and such obstacles from the sensor environment im-
mediately.
WARNINGThe wizard for “blind spot”monitoring is limited by physical and system-re-
lated limits. Therefore, in the following situations the system can be de-
layed in drawing attention (or not at all) to a vehicle in the next land.■
When a vehicle is approaching at a very high speed.
■
When passing through a very sharp curve or a roundabout.
CAUTION
■ If a trailer or other accessory is to be connected to the trailer socket, then
the two systems are not available.■
In adverse weather conditions (heavy rain, water vapour, very low or high
temperatures, etc.), the system function may be limited - “failure to recognise
a vehicle”.
■
Accessories additionally installed on the vehicle rear, such as bicycle carriers,
can impair the system function.
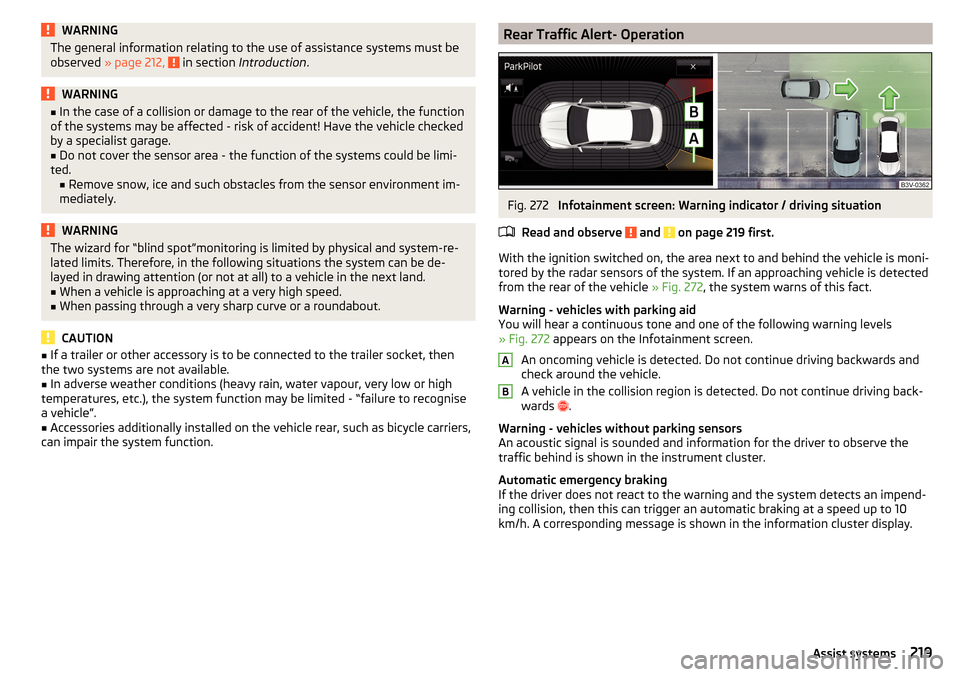
Rear Traffic Alert- OperationFig. 272
Infotainment screen: Warning indicator / driving situation
Read and observe
and on page 219 first.
With the ignition switched on, the area next to and behind the vehicle is moni-
tored by the radar sensors of the system. If an approaching vehicle is detected
from the rear of the vehicle » Fig. 272, the system warns of this fact.
Warning - vehicles with parking aid
You will hear a continuous tone and one of the following warning levels
» Fig. 272 appears on the Infotainment screen.
An oncoming vehicle is detected. Do not continue driving backwards and
check around the vehicle.
A vehicle in the collision region is detected. Do not continue driving back-
wards .
Warning - vehicles without parking sensors
An acoustic signal is sounded and information for the driver to observe the
traffic behind is shown in the instrument cluster.
Automatic emergency braking
If the driver does not react to the warning and the system detects an impend-
ing collision, then this can trigger an automatic braking at a speed up to 10
km/h. A corresponding message is shown in the information cluster display.
AB219Assist systems
Page 223 of 336
NoteThe brightness of the indicator light is dependent on the setting of the ve-
hicle lighting. With the low or high beam on the brightness of the light will be
lower.
Activation / deactivation
Read and observe
and on page 219 first.
The activation or deactivation of the system can be carried out in one of the
following ways. ▶ In the instrument cluster display » page 48, Menu item
Assist systems
.
▶ In Infotainment in the menu
→
→
Driver assistance
(Applies to the wizard
for “Blind Spot” Monitoring).
▶ In Infotainment in the
menu
→
→
Parking and manoeuvring
(Applies to
Rear Traffic Alerts).
After switching off and switching on the ignition, depending on the setting pri-
or to switching off the ignition, the systems remains activated / deactivated.
Note
When activating the wizard for “blind spot” monitoring, the warning lights
illuminate briefly in the two exterior mirrors.
Malfunctions
Read and observe
and on page 219 first.
If the systems are not available for some unknown reason, an appropriate
message appears in the display of the instrument cluster.
Sensor covered / dirty
If the sensor is dirty or covered, a message indicating that there is no sensor
view appears. Clean or remove the obstructing object from the sensor environ-
ment » Fig. 271 on page 218 .
Systems unavailable
If the systems are currently unavailable, a message regarding the unavailability
appears. Stop the vehicle, switch off the engine and then start it again. If the
systems are still not available, seek the assistance of a specialist garage.
System fault
In the case of a system fault, an error message appears. Seek help from a spe-
cialist garage.
Reversing camera
Introduction
This chapter contains information on the following subjects:
Operation
222
Activation / deactivation
222
Function surfaces
223
Orientation lines and roadway
223
Mode - Lateral Parking
224
Mode - Parallel parking
224
mode- Driving up to a trailer / Distance monitoring
225
Mode - Monitoring the area behind the vehicle
225
The rear view camera (following as system) helps the driver when parking and
manoeuvring by displaying the area behind the vehicle in the Infotainment
screen (hereinafter only referred to as screen).
There are four modes available for different situations during the park and ma- noeuvring action. The mode change is carried out using the function surfaces
on the screen » page 223.
WARNING■
The general information relating to the use of assistance systems must
be observed » page 212, in section Introduction .■
The system detects obstacles. The display of the auxiliary boxes and lines
is independent of the actual vehicle environment. The driver must judge for
themselves whether the vehicle can park safely in the selected parking
space.
■
The camera may not be soiled or obscured, otherwise the system function
will be significantly affected - there is a risk of accident. For information on
cleaning » page 261 .
221Assist systems
Page 228 of 336
WARNING■The general information relating to the use of assistance systems must
be observed » page 212, in section Introduction .■
During the parking process, the system automatically performs rapid
steering movements. While it is doing so, do not place your hands between
the steering wheel – risk of injury!
■
During a parking manoeuvre on loose or slippery surfaces (gravel, snow,
ice, etc.) you may stray from the calculated road. It is therefore recommen-
ded that you do not use the system in such situations.
CAUTION
The correct evaluation of the parking space and the parking procedure de-
pends on the circumference of the wheels on the vehicle.■
The system only works correctly if the vehicle is fitted with the wheel size
approved by ŠKODA AUTO.
■
Abstain from using the system when the vehicle is fitted with snow chains or
a temporary spare wheel.
■
If wheels other than those approved by ŠKODA AUTO are fitted, the resulting
position of the vehicle in the parking space can differ slightly. This can be avoi-
ded by readjusting the system at a specialist garage.
CAUTION
If other vehicles are parked behind or on the curb, the system can drive your
vehicle over the kerb or up to the kerb - there is a risk of damage to the
wheels. If necessary, intervene in good time.
Note
■ We recommend performing the parking at a safe speed to about 5 km/h.■The parking procedure can be stopped at any time by pressing the
» Fig. 282 on page 226 button or by a steering intervention.OperationFig. 282
System button
Read and observe and on page 226 first.
The system support is provided in the following manner.
▶ While the parking space search is going on, a measurement and evaluation of
the parking space size is completed.
▶ The display of the instrument cluster (hereinafter only display) shows suita-
ble parking spaces and a parking mode is recommended.
▶ The display shows instructions and information before the start and during
the parking.
▶ Based on the calculated road surface, the front wheels will be automatically
rotated during the parking.
Conditions for the system function
The system can look for a parking space only if the following basic conditions
are met.
The system is activated.
The vehicle is travelling at less than 40 km/h.
The vehicle is travelling at less than 20 km/h.
The distance to a number of parked vehicles is approximately 0.5 - 1.5 m.
TCS is activated » page 214.
The system can only carry out the parking procedure if the following basic con-
ditions are met.
The vehicle is travelling at less than 7 km/h.
The parking procedure takes less than 6 minutes.
There is no driver intervention in the automatic steering operation.
TCS is activated » page 214.
The TCS does not engage.
No trailer or other accessory is connected to the trailer socket.
226Driving
Page 231 of 336
Departing from a parallel parking spaceRead and observe
and on page 226 first.
The system supports the driver when leaving a parking space of a parallel
parking space.
Leaving a parking space process
›
Press the
» Fig. 282 on page 226 button.
The following message is displayed:
Park Assist: Set indicators and engage reverse gear!›
Activate the turn signal for side of the vehicle where the parking space is out
of which you wish to manoeuvre.
›
Select reverse gear or move the selector lever into position R.
The further procedure is analogous to that for reverse parking.
›
Follow the system instructions shown in the display.
As soon as the parking procedure is complete, an audible signal sounds and
the following message appears in the display.
If the parking space is too small, it is not possible to use the system to leave
the parking space. A corresponding message is shown in the information clus-
ter display.
Automatic brake assist
Read and observe
and on page 226 first.
Automatic brake assist when speeding
If a velocity of 7 km / h is exceeded during the parking manoeuvre for the first
time, the speed will be automatically reduced by the system to less than 7 km /
h. This prevents the parking manoeuvre from aborting.
Automatic emergency braking
If the system detects a risk of collision during parking, automatic emergency
braking takes place to prevent a collision.
The parking is terminated by the emergency braking.
CAUTION
The automatic emergency braking is not triggered by the system when the
parking process stops due to the speed of 7 km / hr being exceeded!Malfunctions
Read and observe
and on page 226 first.
If, for some unknown reason, the system is not available, an appropriate mes-
sage appears in the display of the instrument cluster.
System unavailable
If the system is not available because the vehicle has a fault, a message ap-
pears concerning the unavailability. Seek help from a specialist garage.
System fault
In the case of a system fault, an error message appears. Seek help from a spe-
cialist garage.
Cruise Control System
Introduction
This chapter contains information on the following subjects:
Operation
230
Operation description
230
The Cruise Control System (CCS) maintains a set speed without you having to
actuate the accelerator pedal. The state where the CCS maintains the speed is
referred to hereinafter as the control.
WARNING■
The general information relating to the use of assistance systems must
be observed » page 212, in section Introduction .■
After pressing the clutch pedal, no interrupted control occurs! For exam-
ple, if a different gear is engaged and the clutch pedal is released, control is
continued.
229Assist systems
Page 232 of 336
OperationFig. 287
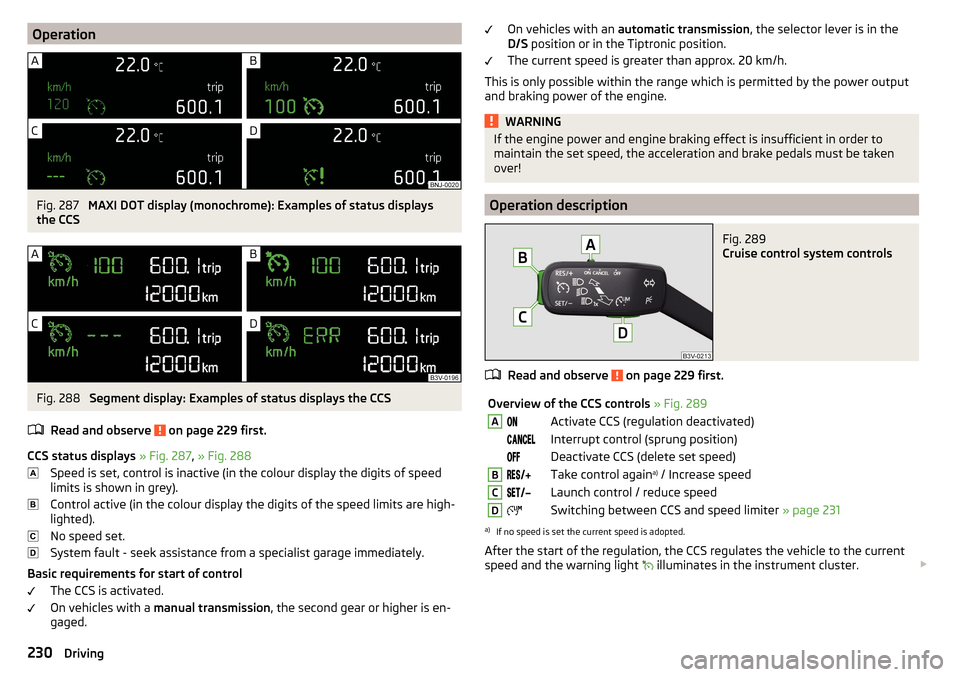
MAXI DOT display (monochrome): Examples of status displays
the CCS
Fig. 288
Segment display: Examples of status displays the CCS
Read and observe
on page 229 first.
CCS status displays » Fig. 287 , » Fig. 288
Speed is set, control is inactive (in the colour display the digits of speed
limits is shown in grey).
Control active (in the colour display the digits of the speed limits are high-
lighted).
No speed set.
System fault - seek assistance from a specialist garage immediately.
Basic requirements for start of control The CCS is activated.
On vehicles with a manual transmission , the second gear or higher is en-
gaged.
On vehicles with an automatic transmission , the selector lever is in the
D/S position or in the Tiptronic position.
The current speed is greater than approx. 20 km/h.
This is only possible within the range which is permitted by the power output
and braking power of the engine.WARNINGIf the engine power and engine braking effect is insufficient in order to
maintain the set speed, the acceleration and brake pedals must be taken
over!
Operation description
Fig. 289
Cruise control system controls
Read and observe on page 229 first.
Overview of the CCS controls » Fig. 289AActivate CCS (regulation deactivated) Interrupt control (sprung position) Deactivate CCS (delete set speed)BTake control again a)
/ Increase speedCLaunch control / reduce speedDSwitching between CCS and speed limiter » page 231a)
If no speed is set the current speed is adopted.
After the start of the regulation, the CCS regulates the vehicle to the current
speed and the warning light illuminates in the instrument cluster.
230Driving
Page 234 of 336
After starting the system, the current speed is set as the speed limit, the
warning light lights up in the instrument cluster.
Exceeding the speed limit during the regulation
If, during the control, it is necessary to exceed the speed limit (e.g. to over-
take), the accelerator pedal must be pressed fully.
When exceeding the speed limit (e.g. driving down a hill), an acoustic signal
sounds and the warning light
flashes in the instrument cluster.
The regulation is resumed once the speed has fallen below the set limit.
Operation description - Variant with GRA
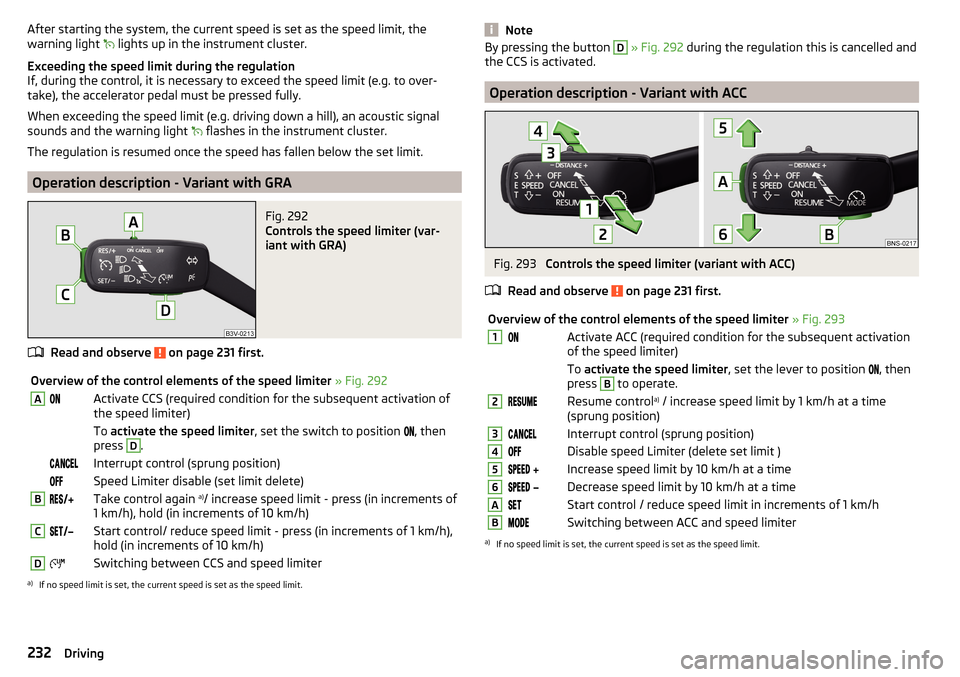
Fig. 292
Controls the speed limiter (var-
iant with GRA)
Read and observe on page 231 first.
Overview of the control elements of the speed limiter » Fig. 292AActivate CCS (required condition for the subsequent activation of
the speed limiter) To activate the speed limiter , set the switch to position , then
press D
. Interrupt control (sprung position) Speed Limiter disable (set limit delete)BTake control again a)
/ increase speed limit - press (in increments of
1 km/h), hold (in increments of 10 km/h)CStart control/ reduce speed limit - press (in increments of 1 km/h),
hold (in increments of 10 km/h)DSwitching between CCS and speed limitera)
If no speed limit is set, the current speed is set as the speed limit.
NoteBy pressing the button D » Fig. 292 during the regulation this is cancelled and
the CCS is activated.
Operation description - Variant with ACC
Fig. 293
Controls the speed limiter (variant with ACC)
Read and observe
on page 231 first.
Overview of the control elements of the speed limiter » Fig. 2931Activate ACC (required condition for the subsequent activation
of the speed limiter) To activate the speed limiter , set the lever to position , then
press B
to operate.
2Resume control a)
/ increase speed limit by 1 km/h at a time
(sprung position)3Interrupt control (sprung position)4Disable speed Limiter (delete set limit )5 Increase speed limit by 10 km/h at a time6 Decrease speed limit by 10 km/h at a timeAStart control / reduce speed limit in increments of 1 km/hBSwitching between ACC and speed limitera)
If no speed limit is set, the current speed is set as the speed limit.
232Driving