instrument cluster SKODA SUPERB 2016 3.G / (B8/3V) Workshop Manual
[x] Cancel search | Manufacturer: SKODA, Model Year: 2016, Model line: SUPERB, Model: SKODA SUPERB 2016 3.G / (B8/3V)Pages: 336, PDF Size: 53.89 MB
Page 250 of 336
Data from the sensor is supplemented by information from the Infotainment
Navigation. This is the reason why traffic signs with maximum speeds can also
be shown on sections of roads which do not have any traffic signs.
Warning when exceeding the speed limit
The warning when exceeding the permissible speed (based on the detected
traffic sign) can be activated and set in Infotainment » page 247.
Mode when towing a trailer
For vehicles with a factory-fitted towing device, in the Infotainment it is possi- ble to enable or disable the relevant traffic signs for trailer operation and the
top speed for towing a trailer » page 247, Settings in Infotainment .
Additional display
Read and observe
on page 246 first.
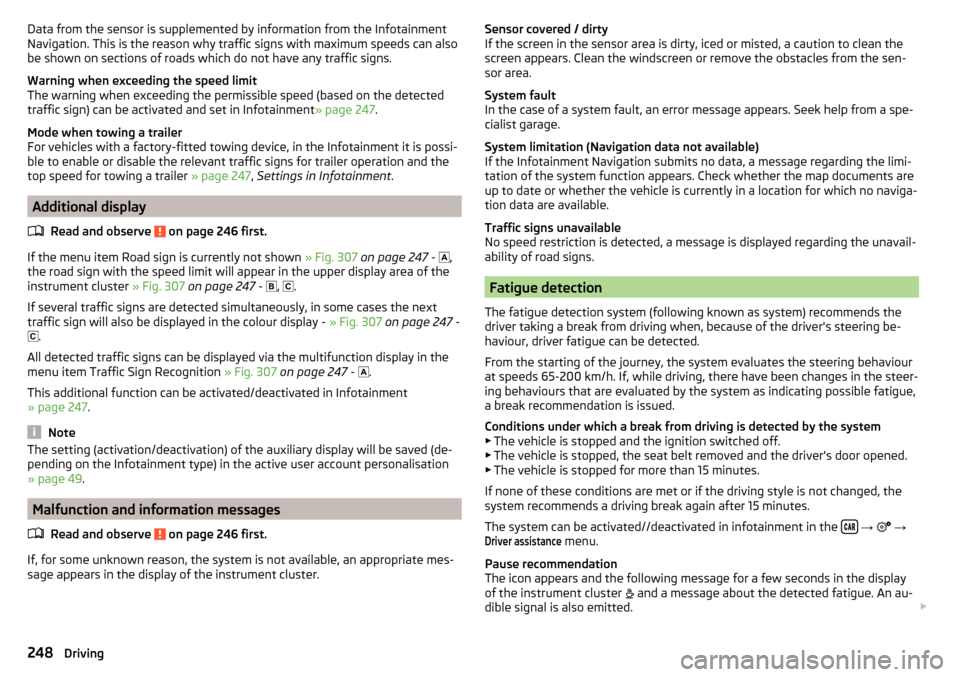
If the menu item Road sign is currently not shown » Fig. 307 on page 247 -
,
the road sign with the speed limit will appear in the upper display area of the
instrument cluster » Fig. 307 on page 247 -
,
.
If several traffic signs are detected simultaneously, in some cases the next
traffic sign will also be displayed in the colour display - » Fig. 307 on page 247 -
.
All detected traffic signs can be displayed via the multifunction display in the
menu item Traffic Sign Recognition » Fig. 307 on page 247 -
.
This additional function can be activated/deactivated in Infotainment
» page 247 .
Note
The setting (activation/deactivation) of the auxiliary display will be saved (de-
pending on the Infotainment type) in the active user account personalisation
» page 49 .
Malfunction and information messages
Read and observe
on page 246 first.
If, for some unknown reason, the system is not available, an appropriate mes-
sage appears in the display of the instrument cluster.
Sensor covered / dirty
If the screen in the sensor area is dirty, iced or misted, a caution to clean the
screen appears. Clean the windscreen or remove the obstacles from the sen-
sor area.
System fault
In the case of a system fault, an error message appears. Seek help from a spe-
cialist garage.
System limitation (Navigation data not available)
If the Infotainment Navigation submits no data, a message regarding the limi- tation of the system function appears. Check whether the map documents are
up to date or whether the vehicle is currently in a location for which no naviga-
tion data are available.
Traffic signs unavailable
No speed restriction is detected, a message is displayed regarding the unavail-
ability of road signs.
Fatigue detection
The fatigue detection system (following known as system) recommends the
driver taking a break from driving when, because of the driver's steering be-
haviour, driver fatigue can be detected.
From the starting of the journey, the system evaluates the steering behaviour
at speeds 65-200 km/h. If, while driving, there have been changes in the steer-
ing behaviours that are evaluated by the system as indicating possible fatigue,
a break recommendation is issued.
Conditions under which a break from driving is detected by the system ▶ The vehicle is stopped and the ignition switched off.
▶ The vehicle is stopped, the seat belt removed and the driver's door opened.
▶ The vehicle is stopped for more than 15 minutes.
If none of these conditions are met or if the driving style is not changed, the
system recommends a driving break again after 15 minutes.
The system can be activated//deactivated in infotainment in the
→
→
Driver assistance
menu.
Pause recommendation
The icon appears and the following message for a few seconds in the display
of the instrument cluster and a message about the detected fatigue. An au-
dible signal is also emitted.
248Driving
Page 251 of 336
WARNING■Please take note of the general points relating to the use of assistance
systems » page 212, in section Introduction .■
For the driving ability is always the driver's responsibility. Never drive if
you feel tired.
■
The system may not detect all cases where a break is needed.
■
Therefore, take regular, sufficient breaks during long trips.
■
There will be no system warning during the so-called micro-sleep.
Note
■ In some situations, the system may evaluate the driving incorrectly and thus
mistakenly recommend a break (e.g. sporty driving, adverse weather condi-
tions or poor road conditions).■
The system is designed primarily for use on motorways.
Tyre pressure monitoring
Introduction
This chapter contains information on the following subjects:
Storing the tyre pressure values and Infotainment display
249
The tyre pressure monitoring function (following known as system) monitors
the tyre pressure while driving.
If the tyre inflation pressure changes, the warning light
lights up in the in-
strument cluster and an audible signal sounds » page 37.
The system can only function properly if the tyres have the prescribed inflation
pressure and these pressure values are stored in the system.
Always save the tyre pressure values in the system if one of the following
events occurs.
▶ Change of tyre pressure values.
▶ Change one or more wheels.
▶ Change in position of a wheel on the vehicle.
▶ The warning light
in the instrument cluster.
WARNING■
Please take note of the general points relating to the use of assistance
systems » page 212, in section Introduction .■
Having the correct tyre inflation pressure is always the driver's responsi-
bility. Tyre pressure should be checked regularly » page 277.
■
The system cannot warn in case of very rapid tyre inflation pressure loss,
e.g. in case of sudden tyre damage.
■
Before storing the pressures, the tyres must be inflated to the specified
inflation pressure » page 277. If the wrong pressure valuesare stored, the
system may not issue any warnings, even if the tyre pressure is too low.
CAUTION
To ensure proper system function, the tire pressure values must be stored ev-
ery 10 000 km or 1x a year.
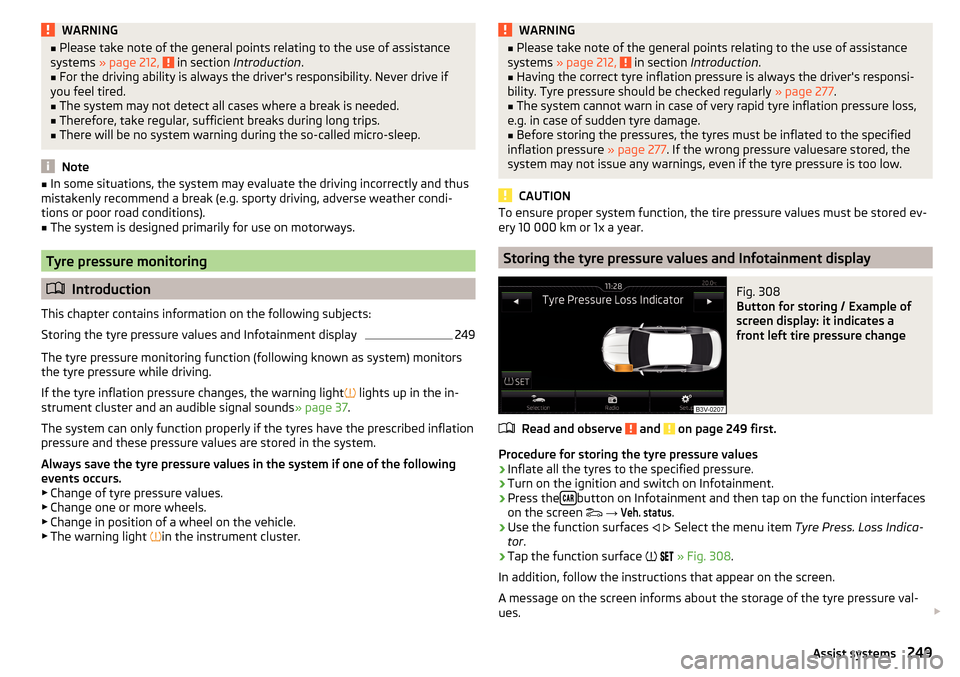
Storing the tyre pressure values and Infotainment display
Fig. 308
Button for storing / Example of
screen display: it indicates a
front left tire pressure change
Read and observe and on page 249 first.
Procedure for storing the tyre pressure values
›
Inflate all the tyres to the specified pressure.
›
Turn on the ignition and switch on Infotainment.
›
Press the button on Infotainment and then tap on the function interfaces
on the screen
→
Veh. status
.
›
Use the function surfaces
Select the menu item
Tyre Press. Loss Indica-
tor .
›
Tap the function surface
» Fig. 308 .
In addition, follow the instructions that appear on the screen.
A message on the screen informs about the storage of the tyre pressure val- ues.
249Assist systems
Page 252 of 336

NoteWhen a warning light in the instrument cluster appears, the affected tyre
can be displayed on the infotainment » Fig. 308.Towing device and trailer
Hitch
Introduction
This chapter contains information on the following subjects:
Swinging in and out the tow bar
250
Vertical load with mounted accessories
251
The maximum trailer nose weight when towing a trailer is 90 kg. Other data
(e.g. shown on the rating plate of the hitch) only provides information about
the test values of the device.
WARNINGDo not use the towing device if it is damaged or if there are parts missing.
Swinging in and out the tow bar
Fig. 309
Tow bar: swing in and out
Read and observe
on page 250 first.
The pivotable tow bar cannot be removed. Its correct latching in both positions is indicated by a warning light.
Swing out the tow bar
›
Pull the release lever
A
in the direction of arrow
1
» Fig. 309 » . The tow
bar pivots in the direction of arrow
2
and the warning light beside the han-
dle flashes red .
›
Allow the handle
A
to retract slowly and check if this is properly seated in
the starting position.
250Driving
Page 253 of 336
›Press the tow bar in the direction of the arrow 2, until it audibly clicks into
place. The warning light lights green.
Swivel tow bar
No trailer or other accessory is connected to the tow bar. A socket or adapter
may not be plugged into the 13-pin socket.›
Pull the release lever
A
in the direction of arrow
1
» Fig. 309 . The tow bar
is unlocked and the warning light beside the handle flashes red.
›
Allow the handle
A
to retract slowly and check if this is properly seated in
the starting position.
›
Swing in the tow bar under the bumper in the direction of arrow
3
until it
clicks into place. The warning light lights green.
Check latching
If the tow bar is incorrectly locked, the warning light flashes red, after the igni-
tion is switched on an acoustic signal is sounded and the following message
appears in the instrument cluster.
WARNING■ Take care with the towing device - it may cause injury.■When swinging out the ball rod away from the central area of the rear
bumper, there is a danger of injury to the legs.■
Do not manipulate the release lever as long as a trailer or another acces-
sory is coupled to the tow bar. The tow bar could come loose - risk of acci-
dent and injury.
■
If the warning light does not turn green, or the tow bar cannot engage,
then do not use the tow bar. Seek help from a specialist garage.
Note
When not using the towing device, always swing the tow bar under the bump-
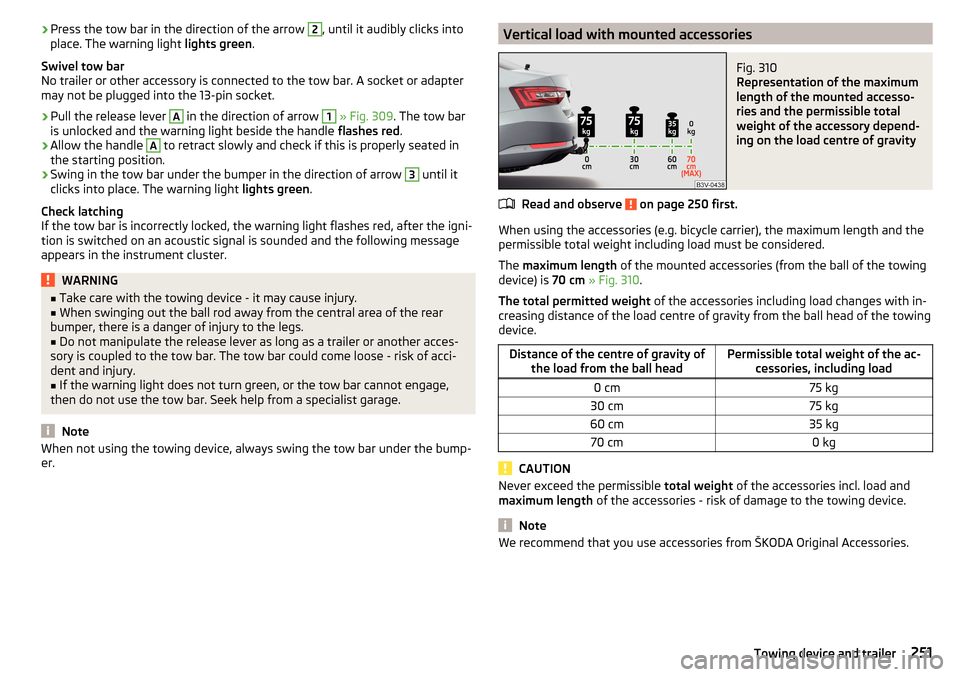
er.Vertical load with mounted accessoriesFig. 310
Representation of the maximum
length of the mounted accesso-
ries and the permissible total
weight of the accessory depend-
ing on the load centre of gravity
Read and observe on page 250 first.
When using the accessories (e.g. bicycle carrier), the maximum length and the
permissible total weight including load must be considered.
The maximum length of the mounted accessories (from the ball of the towing
device) is 70 cm » Fig. 310 .
The total permitted weight of the accessories including load changes with in-
creasing distance of the load centre of gravity from the ball head of the towing
device.
Distance of the centre of gravity of the load from the ball headPermissible total weight of the ac- cessories, including load0 cm75 kg30 cm75 kg60 cm35 kg70 cm0 kg
CAUTION
Never exceed the permissible total weight of the accessories incl. load and
maximum length of the accessories - risk of damage to the towing device.
Note
We recommend that you use accessories from ŠKODA Original Accessories.251Towing device and trailer
Page 259 of 336

ŠKODA Original partsRead and observe
on page 256 first.
We recommend the use of ŠKODA Original Parts for your vehicle, as these
parts are approved by ŠKODA AUTO. These parts correspond exactly to the
ŠKODA AUTO regulations and are identical to the parts used in series produc-
tion.
ŠKODA AUTO is able to warrant the safety, suitability, and long life of these
products.
ŠKODA Service Partners are liable for any defects of ŠKODA Genuine Parts for
a period of 2 years after sale in accordance with the materials defect liability,
unless agreed otherwise in the purchase agreement.
ŠKODA Original accessories
Read and observe
on page 256 first.
If you wish to fit accessories to your vehicle, you should remember the follow-ing.
We recommend that you use ŠKODA Genuine Accessories in your vehicle.
ŠKODA AUTO has selected such accessories to ensure that they are reliable,
safe and suitable for your particular vehicle. Although we constantly monitor
the market, we are not able to assess or vouch for other products, even
though in some instances such parts may have operational approval or may have been approved by a nationally recognised testing laboratory.
ŠKODA Service Partners are liable for any defects of ŠKODA Genuine Accesso- ries for a period of 2 years after installation or delivery in accordance with the
materials defect liability, unless agreed otherwise in the purchase agreement
or any other agreements.
Spoiler
Read and observe
on page 256 first.
WARNINGIf your vehicle is equipped with an original spoiler on the front bumper in
combination with the spoiler on the boot lid, the following instructions
must be observed - otherwise there is a risk of accidents and serious inju-
ries!■
The vehicle must always be equipped with a spoiler on the front bumper
only in combination with the corresponding spoiler on the boot lid.
■
This kind of spoiler cannot be left on the front bumper either on its own,
in combination with another spoiler not on the luggage compartment lid or
in combination with an unsuitable spoiler on the luggage compartment lid.
■
We recommend that you consult the ŠKODA Service Partner for any re-
pairs to or replacement, addition or removal of spoilers.
■
Improperly conducted work on the spoilers of your vehicle may result in
malfunction.
Component protection
Read and observe
on page 256 first.
Some electronic vehicle components (such as the instrument cluster) are fac-
tory-equipped with component protection. This ensures the functional limita-
tion of these components in a non-legitimate installation in another vehicle
(e.g. after a theft) or operation outside the vehicle.
Airbags
Read and observe
on page 256 first.
WARNING■Modifications, repairs and technical alterations that have been carried out
unprofessionally can cause damage and operational faults, and can also se-
riously impair the effectiveness of the airbag system – risk of accident and
fatal injury!■
A change to the vehicle's wheel suspension, including the use of non-ap-
proved wheels and tyre combinations, can alter the functioning of the air-
bag system - risk of accident and fatal injury!
257Care and maintenance
Page 260 of 336
WARNING■No changes may be made to parts of the airbag system, the front bumper
and the body.■
Any work on the airbag system including the installation and removal of
system components due to other repair work (e.g. removal of the steering
wheel) must only be carried out by a specialist garage.
■
Do not manipulate individual parts of the airbag system, as this might re-
sult in the airbag being deployed.
■
If the airbag is triggered, the airbag system must be exchanged.
WARNINGThe airbag system operates using pressure sensors located in the front
doors. For this reason, no adjustments may be carried out to the doors or
door panels (e.g. installation of additional loudspeakers). The resulting
damage can negatively affect the function of the airbag system - there is a
risk of accidents and fatal injuries! The following guidelines must be ob-
served.■
Any work on the front doors and their door panels must be carried out by
a specialist garage.
■
Never drive with removed inner door panels or openings in the panels.
Acceptance and recycling of used vehicles
Read and observe
on page 256 first.
All new ŠKODA vehicles are 95% recyclable.
Service intervals
Introduction
This chapter contains information on the following subjects:
Overview of service intervals
259
Fixed service intervals QI1 - QI4
259
Flexible service interval QI6
259
Digital Service Plan
260
The service interval display in the display of the instrument cluster will remind
you to carry out every service stipulated by the manufacturer at the right time
in order to prevent you from forgetting them » page 49.
The completion of services can be verified through the printed verification
from the digital service schedule and the respective receipts.
The specified service intervals are tailored to normal operating conditions.
In the case of difficult operating conditions, it is necessary to have some serv-
ice work performed before the date of the next service or between the speci-
fied service intervals. This applies mainly to the cleaning or the replacement of
the air filter insert in regions with heavy dust pollution as well as checking and
replacing the toothed belt, but also to vehicles with diesel particle filters,
which can put greater strain on the engine oil.
The following is understood under difficult conditions:
▶ Fuel containing sulphur.
▶ Frequent short trips.
▶ Longer periods of engine idling (e.g. taxis).
▶ Operation in areas with heavy dust pollution.
▶ Frequent trailer operation.
▶ Predominantly stop-and-go traffic as is often the case in city driving, for ex-
ample.
▶ Operation predominantly during winter.
You will be told at the specialist garage whether the operating conditions of your vehicle may make it necessary for service work to be carried out between
the normal service intervals.
Different service charges may apply from the particular scope of work required,
depending on the vehicle type and equipment and the status of your vehicle.
Note
■ The customer is responsible for covering the cost of all services including
changing or replenishing the oil, even during the warranty period, unless sta-
ted otherwise in the ŠKODA AUTO. warranty terms or other agreements.■
You will be informed about the current service scopes for the particular serv-
ice work by the specialist garage.
258General Maintenance
Page 269 of 336
CAUTIONDiesel fuel additives■The diesel fuel in accordance with the prescribed standards meets all the
conditions for a smooth running engine. Therefore, we recommend that you do
not add any fuel additives to the diesel - - there is a risk of engine damage or
damage to the exhaust system.
AdBlue ®
and its refilling
Introduction
This chapter contains information on the following subjects:
Check level
267
AdBlue ®
Refill
267
In order to reduce pollutant emissions from vehicles with diesel engines and
the SCR catalyst, a urea - AdBlue ®
solution is injected into the exhaust system.
Only use AdBlue ®
that corresponds to the standard ISO 22241-1. Do not add
additives to AdBlue ®
.
The AdBlue ®
-consumption depends on driving style, the operating tempera-
ture of the system and on the weather conditions.
The AdBlue ®
-tank filling is about 13 litres.
WARNINGAdBlue®
can cause skin, eye and respiratory irritation. If your eyes or skin
come into contact with the AdBlue ®
fluid, immediately wash the affected
area for a few minutes long with a lot of water. Seek medical assistance if
required.
CAUTION
AdBlue ®
attacks the surface of some materials (e.g. as painted parts, plastics,
fabrics). Clean the areas affected with AdBlue ®
using a damp cloth and plenty
of cold water. Remove any dried AdBlue ®
with warm water and a sponge.
Note
■ The AdBlue ®
solution freezes at a temperature of -11° C and lower. The sys-
tem has a heater to ensure the operability at low temperatures.■
We recommend purchasing AdBlue ®
refill bottles from the ŠKODA original
parts.
■ The working life of the AdBlue ®
solution is 4 years. Thereafter the solution
must be replaced by a specialist garage.■
AdBlue ®
is a registered trademark of the VDA. AdBlue ®
is also known as AUS
32 (Aqueous Urea Solution) or DEF (Diesel Exhaust Fluid).
Check level
Read and observe
and on page 267 first.
The AdBlue ®
level is automatically monitored.
If the available travel distance that can be completed with the remaining AdBl- ue ®
tank capacity drops to about 2400 km, the warning
appears on the in-
strument cluster and a request for replenishment of AdBlue ®
appears.
An indication also appears in the instrument cluster showing the maximum
and minimum AdBlue ®
tank capacity.
If the available travel distance that can be driven with the existing AdBlue ®
-
tank capacity drops down to 0 km, then no motor start is possible.
The distance which can still be driven with the remaining AdBlue ®
, can be de-
termined using the travel data » page 46.
AdBlue®
Refill
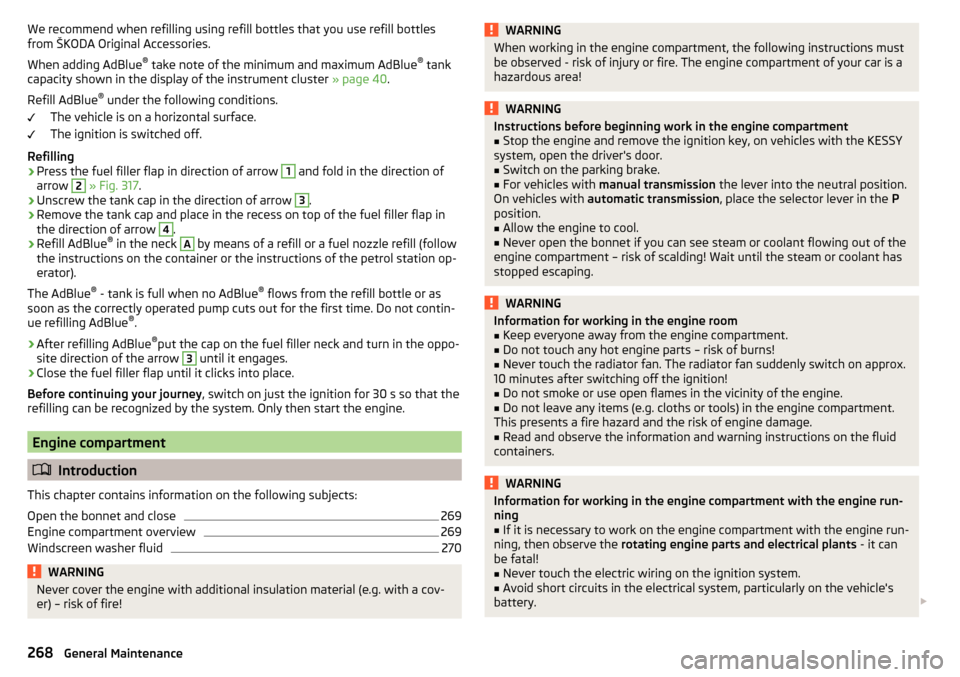
Fig. 317
Open fuel filler flap / unscrew tank cap / place the tank cap on
the fuel filler flap
Read and observe
and on page 267 first.
We recommend AdBlue ®
to be refilled by a specialist workshop. If necessary, it
can refill itself using a refill or a fuel nozzle at a petrol station.
267Inspecting and replenishing
Page 270 of 336
We recommend when refilling using refill bottles that you use refill bottles
from ŠKODA Original Accessories.
When adding AdBlue ®
take note of the minimum and maximum AdBlue ®
tank
capacity shown in the display of the instrument cluster » page 40.
Refill AdBlue ®
under the following conditions.
The vehicle is on a horizontal surface.
The ignition is switched off.
Refilling›
Press the fuel filler flap in direction of arrow
1
and fold in the direction of
arrow
2
» Fig. 317 .
›
Unscrew the tank cap in the direction of arrow
3
.
›
Remove the tank cap and place in the recess on top of the fuel filler flap in
the direction of arrow
4
.
›
Refill AdBlue ®
in the neck
A
by means of a refill or a fuel nozzle refill (follow
the instructions on the container or the instructions of the petrol station op-
erator).
The AdBlue ®
- tank is full when no AdBlue ®
flows from the refill bottle or as
soon as the correctly operated pump cuts out for the first time. Do not contin-
ue refilling AdBlue ®
.
›
After refilling AdBlue ®
put the cap on the fuel filler neck and turn in the oppo-
site direction of the arrow
3
until it engages.
›
Close the fuel filler flap until it clicks into place.
Before continuing your journey , switch on just the ignition for 30 s so that the
refilling can be recognized by the system. Only then start the engine.
Engine compartment
Introduction
This chapter contains information on the following subjects:
Open the bonnet and close
269
Engine compartment overview
269
Windscreen washer fluid
270WARNINGNever cover the engine with additional insulation material (e.g. with a cov-
er) – risk of fire!WARNINGWhen working in the engine compartment, the following instructions must
be observed - risk of injury or fire. The engine compartment of your car is a
hazardous area!WARNINGInstructions before beginning work in the engine compartment■Stop the engine and remove the ignition key, on vehicles with the KESSY
system, open the driver's door.■
Switch on the parking brake.
■
For vehicles with manual transmission the lever into the neutral position.
On vehicles with automatic transmission , place the selector lever in the P
position.
■
Allow the engine to cool.
■
Never open the bonnet if you can see steam or coolant flowing out of the
engine compartment – risk of scalding! Wait until the steam or coolant has
stopped escaping.
WARNINGInformation for working in the engine room■Keep everyone away from the engine compartment.■
Do not touch any hot engine parts – risk of burns!
■
Never touch the radiator fan. The radiator fan suddenly switch on approx.
10 minutes after switching off the ignition!
■
Do not smoke or use open flames in the vicinity of the engine.
■
Do not leave any items (e.g. cloths or tools) in the engine compartment.
This presents a fire hazard and the risk of engine damage.
■
Read and observe the information and warning instructions on the fluid
containers.
WARNINGInformation for working in the engine compartment with the engine run-
ning■
If it is necessary to work on the engine compartment with the engine run-
ning, then observe the rotating engine parts and electrical plants - it can
be fatal!
■
Never touch the electric wiring on the ignition system.
■
Avoid short circuits in the electrical system, particularly on the vehicle's
battery.
268General Maintenance
Page 271 of 336
CAUTIONRefill only operating fluids of the correct specification - danger of damaging
the vehicle!
Note
■ Fluids with the proper specifications can be purchased from the ŠKODA Origi-
nal Accessories or from the ŠKODA Genuine Parts ranges.■
We recommend you have the battery replaced by a specialist garage.
Open the bonnet and close
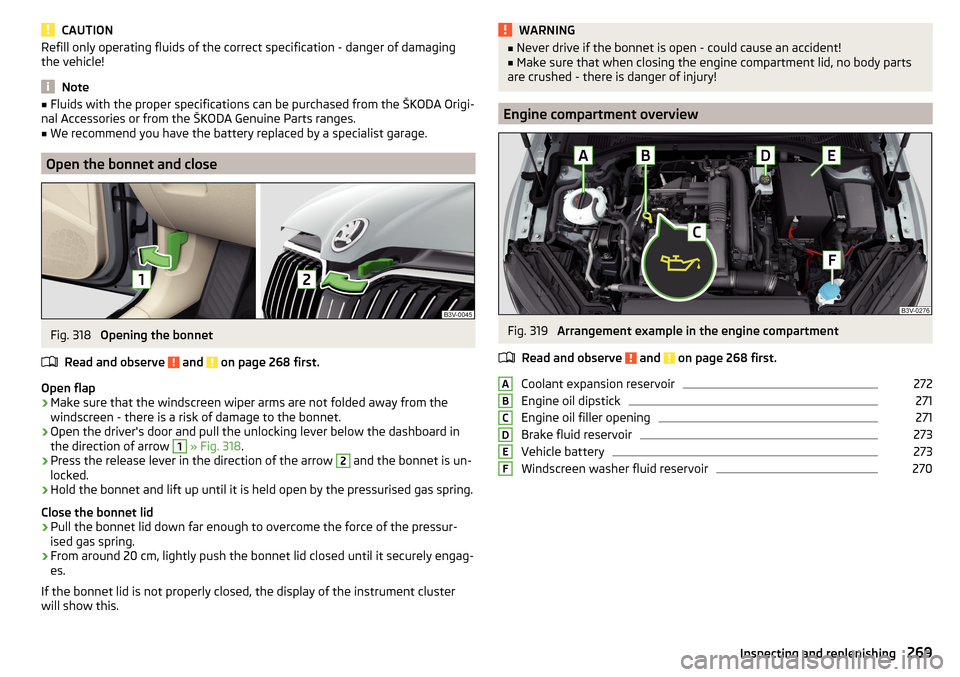
Fig. 318
Opening the bonnet
Read and observe
and on page 268 first.
Open flap
›
Make sure that the windscreen wiper arms are not folded away from the
windscreen - there is a risk of damage to the bonnet.
›
Open the driver's door and pull the unlocking lever below the dashboard in
the direction of arrow
1
» Fig. 318 .
›
Press the release lever in the direction of the arrow
2
and the bonnet is un-
locked.
›
Hold the bonnet and lift up until it is held open by the pressurised gas spring.
Close the bonnet lid
›
Pull the bonnet lid down far enough to overcome the force of the pressur-
ised gas spring.
›
From around 20 cm, lightly push the bonnet lid closed until it securely engag-
es.
If the bonnet lid is not properly closed, the display of the instrument cluster
will show this.
WARNING■ Never drive if the bonnet is open - could cause an accident!■Make sure that when closing the engine compartment lid, no body parts
are crushed - there is danger of injury!
Engine compartment overview
Fig. 319
Arrangement example in the engine compartment
Read and observe
and on page 268 first.
Coolant expansion reservoir
272
Engine oil dipstick
271
Engine oil filler opening
271
Brake fluid reservoir
273
Vehicle battery
273
Windscreen washer fluid reservoir
270ABCDEF269Inspecting and replenishing
Page 273 of 336

Diesel enginesSpecification1.6 ltr. / 88 kW TDI CRVW 507 002.0 l/110, 130, 140 kW TDI CR
Vehicles with fixed service intervals
Petrol enginesSpecification1.4 l/92, 110 kW TSI
VW 502 00
1.8 ltr./132 kW TSI2.0 l/162, 206 kW TSIDiesel enginesSpecification1.6 ltr. / 88 kW TDI CRVW 507 002.0 l/110, 130, 140 kW TDI CR
Engine oil VW 505 01 can optionally be used in diesel engines without a DPF.
CAUTION
■
If no prescribed engine oil is available, then max. 0.5 l oil of the following
specifications can be refilled. ■Petrol engines: ACEA A3/ACEA B4 or API SN, (API SM);
■ Diesel engines: ACEA C3 or API CJ-4.
Check and refill
Fig. 321
Dipstick variants
Read and observe and on page 270 first.
Check the oil under the following conditions and refill.
The vehicle is standing on a horizontal surface.
The engine operating temperature is reached.
The engine is turned off.
Checking the level
›
Wait a few minutes until the engine oil flows back into the oil trough.
›
Remove the dipstick and wipe with a clean cloth.
›
Push the dipstick to the stop and pull out again.
›
Read the oil level and push in the dipstick.
The oil level must be in range
A
» Fig. 321 . If the oil level is below the range
A
, refill the oil.
Refilling
›
Unscrew the cap of the engine oil filler opening
C
» Fig. 319 on page 269 .
›
Add oil of the correct specification in portions of 0.5 litres » page 270.
›
Check the oil level .
›
Screw the lid of the engine oil filler closed carefully.
CAUTION
■
The oil level must never be below the range A » Fig. 321 – risk of damage to
the motor as well as the exhaust system.■
If a top up with oil is not possible or the oil level is above range
A
,
stop
driving! Switch off the engine and seek assistance from a specialist garage.
Note
Too low engine oil level is shown in the instrument cluster by the warning
light illuminating and also indicated by the message » page 40. Nevertheless,
we recommend to check the oil level on a regular basis with the dipstick.
Coolant
Introduction
This chapter contains information on the following subjects:
Checking and refilling
272
The coolant cools the engine and consists of water and coolant additive (with
additives that protect the cooling system against corrosion and prevents fur-
ring).
271Inspecting and replenishing