instrument cluster SKODA SUPERB 2016 3.G / (B8/3V) Owner's Manual
[x] Cancel search | Manufacturer: SKODA, Model Year: 2016, Model line: SUPERB, Model: SKODA SUPERB 2016 3.G / (B8/3V)Pages: 336, PDF Size: 53.89 MB
Page 4 of 336
Table of Contents
Liability for defects and ŠKODA Warranty for
new cars5
Printed Owner's Manual
7
Online Owner's Manual
8
Notes
9
Structure of the Owner´s Manual and further
information
10
Abbreviations
Safety
Passive Safety
12
General information
12
Correct and safe seated position
12
Seat belts
15
Using seat belts
15
Belt retractors and belt tensioners, reversible
seat belts
17
Airbag system
18
Description of the airbag system
18
Airbag deactivation
21
Transporting children safely
22
Child seat
22
Fastening systems
26
Using the system
Cockpit
31
Overview
30
Instruments and warning lights
32
Instrument cluster
32
Warning lights
33Information system43Driver information system43
Operation of the information system
45
Driving data (Multifunction display)
46
MAXI DOT display
48
Service interval display
49
Personalisation
49
SmartGate
51
Unlocking and opening
53
Unlocking and locking
53
Anti-theft alarm system
58
Manually operated tailgate
59
Electric boot lid
59
Window operation
62
Panoramic tilting / sliding sunroof
64
Lights and visibility
66
Light
66
Headlight Assist (Light Assist / Dynamic Light
Assist)
71
Interior lighting
72
Visibility
74
Windscreen wipers and washers
76
Rear view mirror
77
Seats and head restraints
80
Front seats
80
Rear seats
83
Headrests
84
Seat heating and ventilation
85
Heated steering wheel
86
Practical features
87
Interior equipment
87
Electrical sockets
96
Ashtray and cigarette lighter
98
Tablet holder
99Transport of cargo101Luggage compartment101
Variable loading floor in the luggage
compartment (Estate)
109
Net partition
111
Transportation on the roof rack
112
Heating and ventilation
113
Heating, manual air conditioning system,
Climatronic
113
Auxiliary heating (auxiliary heating and
ventilation)
118
Infotainment
Introductory information
121
Important information
121
Infotainment overview
122
Infotainment operation
125
Infotainment operation
125
Voice control
128
Software Infotainment update
131
Infotainment settings - Columbus, Amundsen,
Bolero
131
Infotainment system settings
131
Menu Settings Radio
134
Media menu settings
135
Image menu settings
135
Video DVD menu settings
135
TV tuner menu settings
135
Telephone menu settings
136
SmartLink menu settings
137
Navigation menu settings
137
Infotainment settings - Swing
139
Infotainment system settings
139
Radio menu settings
140
Media menu settings
141
Telephone menu settings
1412Table of Contents
Page 20 of 336
Airbag system
Description of the airbag system
Introduction
This chapter contains information on the following subjects:
System description
18
Airbag deployment
19
Safety instructions
19
As a supplement to the seat belts, the airbag system provides additional pas-
senger protection in the event of severe frontal and side collisions.
The best possible protective effect of the airbag can only be achieved if the
seat belts are applied properly. The airbag is not a substitute for the seat
belts .
The functional status of the airbag system is indicated by the warning light
in the instrument cluster » page 37.
System description
Fig. 7
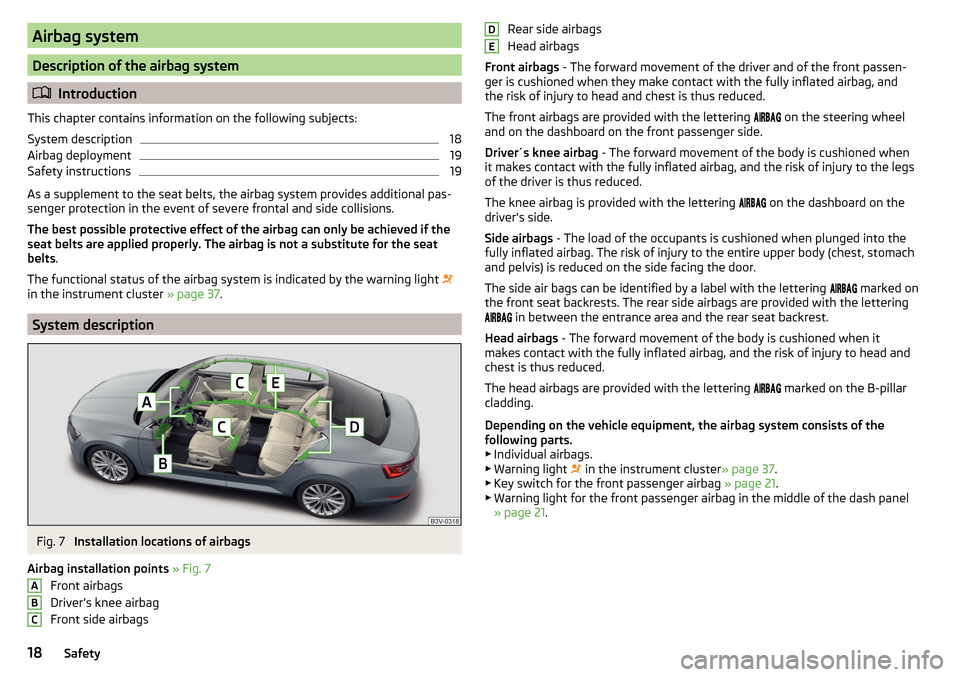
Installation locations of airbags
Airbag installation points » Fig. 7
Front airbags
Driver’s knee airbag
Front side airbags
ABCRear side airbags
Head airbags
Front airbags - The forward movement of the driver and of the front passen-
ger is cushioned when they make contact with the fully inflated airbag, and
the risk of injury to head and chest is thus reduced.
The front airbags are provided with the lettering
on the steering wheel
and on the dashboard on the front passenger side.
Driver´s knee airbag - The forward movement of the body is cushioned when
it makes contact with the fully inflated airbag, and the risk of injury to the legs
of the driver is thus reduced.
The knee airbag is provided with the lettering on the dashboard on the
driver's side.
Side airbags - The load of the occupants is cushioned when plunged into the
fully inflated airbag. The risk of injury to the entire upper body (chest, stomach
and pelvis) is reduced on the side facing the door.
The side air bags can be identified by a label with the lettering marked on
the front seat backrests. The rear side airbags are provided with the lettering
in between the entrance area and the rear seat backrest.
Head airbags - The forward movement of the body is cushioned when it
makes contact with the fully inflated airbag, and the risk of injury to head and
chest is thus reduced.
The head airbags are provided with the lettering marked on the B-pillar
cladding.
Depending on the vehicle equipment, the airbag system consists of the
following parts. ▶ Individual airbags.
▶ Warning light in the instrument cluster
» page 37.
▶ Key switch for the front passenger airbag » page 21.
▶ Warning light for the front passenger airbag in the middle of the dash panel
» page 21 .DE18Safety
Page 33 of 336
Using the system
Cockpit
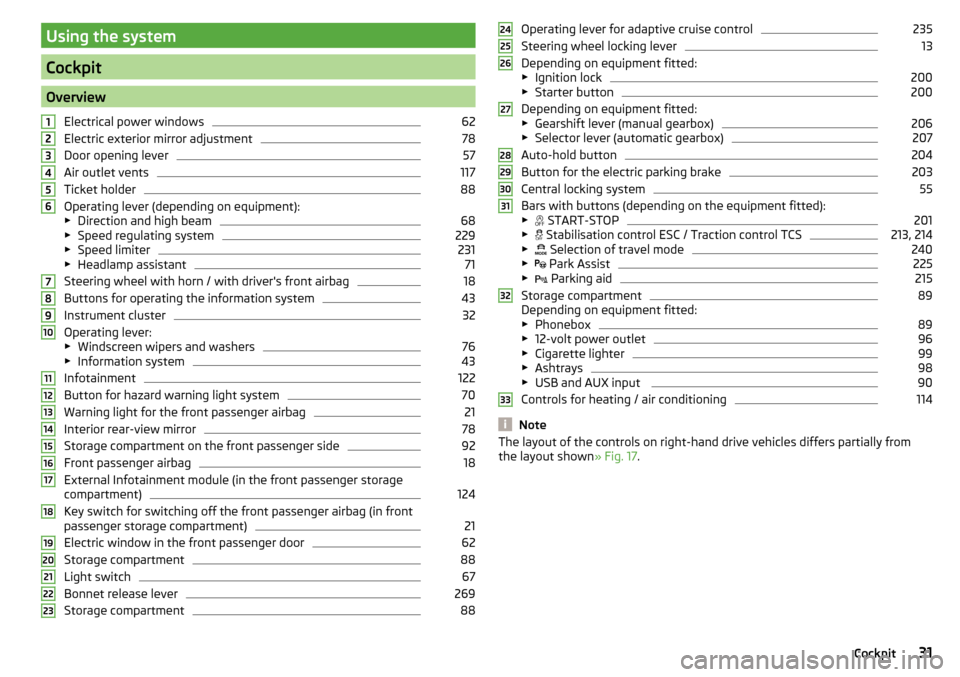
OverviewElectrical power windows
62
Electric exterior mirror adjustment
78
Door opening lever
57
Air outlet vents
117
Ticket holder
88
Operating lever (depending on equipment):
▶ Direction and high beam
68
▶Speed regulating system
229
▶Speed limiter
231
▶Headlamp assistant
71
Steering wheel with horn / with driver's front airbag
18
Buttons for operating the information system
43
Instrument cluster
32
Operating lever:
▶ Windscreen wipers and washers
76
▶Information system
43
Infotainment
122
Button for hazard warning light system
70
Warning light for the front passenger airbag
21
Interior rear-view mirror
78
Storage compartment on the front passenger side
92
Front passenger airbag
18
External Infotainment module (in the front passenger storage
compartment)
124
Key switch for switching off the front passenger airbag (in front
passenger storage compartment)
21
Electric window in the front passenger door
62
Storage compartment
88
Light switch
67
Bonnet release lever
269
Storage compartment
881234567891011121314151617181920212223Operating lever for adaptive cruise control235
Steering wheel locking lever
13
Depending on equipment fitted:
▶ Ignition lock
200
▶Starter button
200
Depending on equipment fitted:
▶ Gearshift lever (manual gearbox)
206
▶Selector lever (automatic gearbox)
207
Auto-hold button
204
Button for the electric parking brake
203
Central locking system
55
Bars with buttons (depending on the equipment fitted):
▶ START-STOP
201
▶
Stabilisation control ESC / Traction control TCS
213, 214
▶
Selection of travel mode
240
▶
Park Assist
225
▶
Parking aid
215
Storage compartment
89
Depending on equipment fitted:
▶ Phonebox
89
▶12-volt power outlet
96
▶Cigarette lighter
99
▶Ashtrays
98
▶USB and AUX input
90
Controls for heating / air conditioning
114
Note
The layout of the controls on right-hand drive vehicles differs partially from
the layout shown » Fig. 17.2425262728293031323331Cockpit
Page 34 of 336
Instruments and warning lights
Instrument cluster
Introduction
Fig. 18
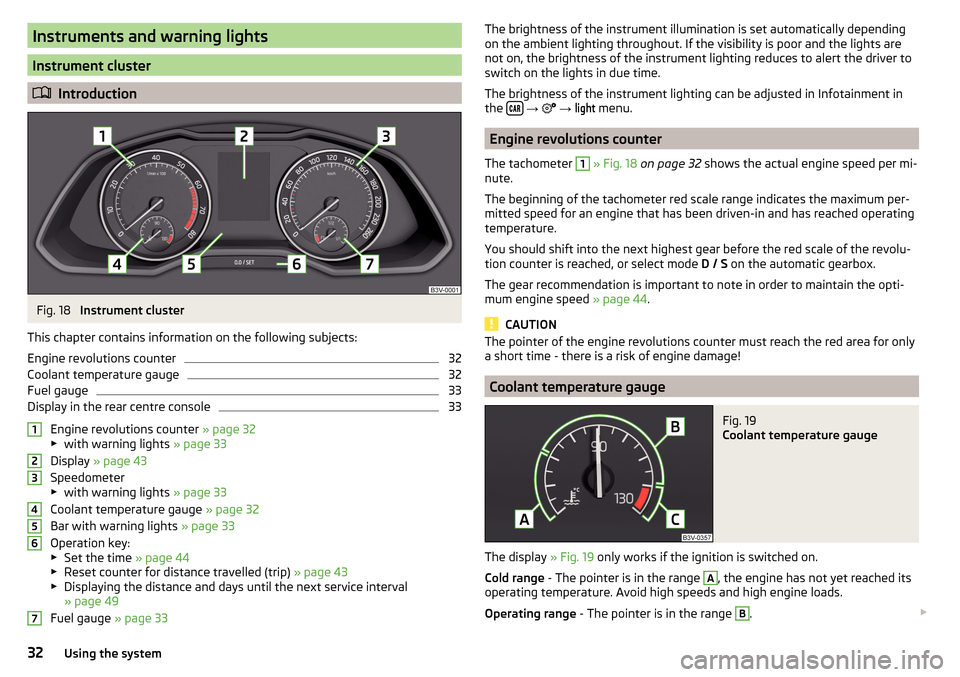
Instrument cluster
This chapter contains information on the following subjects:
Engine revolutions counter
32
Coolant temperature gauge
32
Fuel gauge
33
Display in the rear centre console
33
Engine revolutions counter » page 32
▶ with warning lights » page 33
Display » page 43
Speedometer
▶ with warning lights » page 33
Coolant temperature gauge » page 32
Bar with warning lights » page 33
Operation key:
▶ Set the time » page 44
▶ Reset counter for distance travelled (trip) » page 43
▶ Displaying the distance and days until the next service interval
» page 49
Fuel gauge » page 33
1234567The brightness of the instrument illumination is set automatically depending
on the ambient lighting throughout. If the visibility is poor and the lights are
not on, the brightness of the instrument lighting reduces to alert the driver to
switch on the lights in due time.
The brightness of the instrument lighting can be adjusted in Infotainment in
the
→
→
light
menu.
Engine revolutions counter
The tachometer
1
» Fig. 18 on page 32 shows the actual engine speed per mi-
nute.
The beginning of the tachometer red scale range indicates the maximum per-
mitted speed for an engine that has been driven-in and has reached operating
temperature.
You should shift into the next highest gear before the red scale of the revolu-
tion counter is reached, or select mode D / S on the automatic gearbox.
The gear recommendation is important to note in order to maintain the opti-
mum engine speed » page 44.
CAUTION
The pointer of the engine revolutions counter must reach the red area for only
a short time - there is a risk of engine damage!
Coolant temperature gauge
Fig. 19
Coolant temperature gauge
The display » Fig. 19 only works if the ignition is switched on.
Cold range - The pointer is in the range
A
, the engine has not yet reached its
operating temperature. Avoid high speeds and high engine loads.
Operating range - The pointer is in the range
B
.
32Using the system
Page 35 of 336
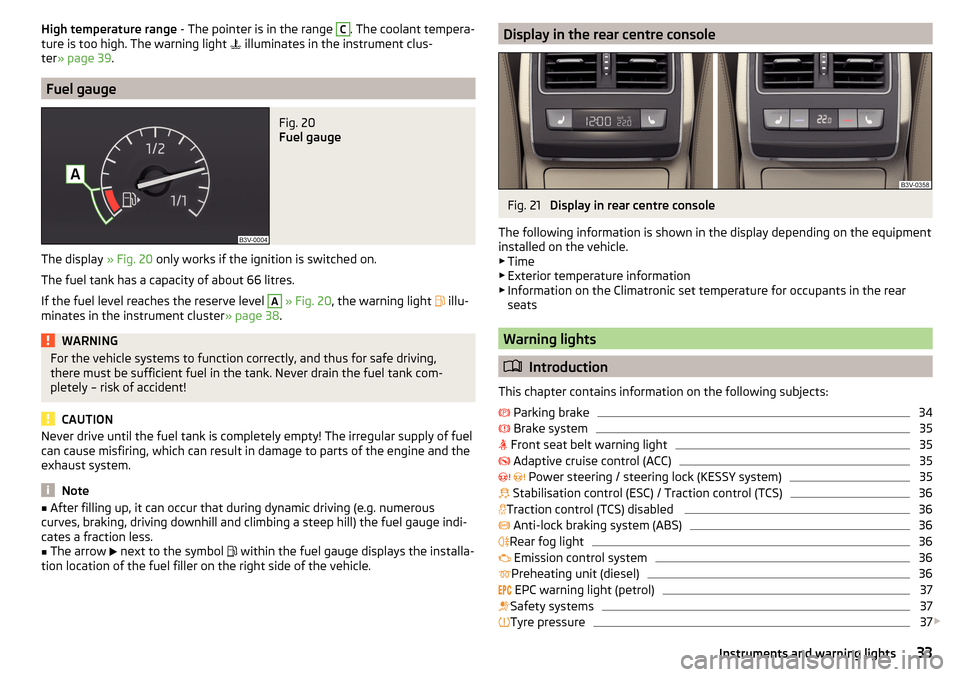
High temperature range - The pointer is in the range C. The coolant tempera-
ture is too high. The warning light illuminates in the instrument clus-
ter » page 39 .
Fuel gauge
Fig. 20
Fuel gauge
The display » Fig. 20 only works if the ignition is switched on.
The fuel tank has a capacity of about 66 litres.
If the fuel level reaches the reserve level
A
» Fig. 20 , the warning light
illu-
minates in the instrument cluster » page 38.
WARNINGFor the vehicle systems to function correctly, and thus for safe driving,
there must be sufficient fuel in the tank. Never drain the fuel tank com-
pletely – risk of accident!
CAUTION
Never drive until the fuel tank is completely empty! The irregular supply of fuel
can cause misfiring, which can result in damage to parts of the engine and the
exhaust system.
Note
■ After filling up, it can occur that during dynamic driving (e.g. numerous
curves, braking, driving downhill and climbing a steep hill) the fuel gauge indi-
cates a fraction less.■
The arrow
next to the symbol
within the fuel gauge displays the installa-
tion location of the fuel filler on the right side of the vehicle.
Display in the rear centre consoleFig. 21
Display in rear centre console
The following information is shown in the display depending on the equipment
installed on the vehicle.
▶ Time
▶ Exterior temperature information
▶ Information on the Climatronic set temperature for occupants in the rear
seats
Warning lights
Introduction
This chapter contains information on the following subjects:
Parking brake
34
Brake system
35
Front seat belt warning light
35
Adaptive cruise control (ACC)
35
Power steering / steering lock (KESSY system)
35
Stabilisation control (ESC) / Traction control (TCS)
36
Traction control (TCS) disabled
36
Anti-lock braking system (ABS)
36
Rear fog light
36
Emission control system
36
Preheating unit (diesel)
36
EPC warning light (petrol)
37
Safety systems
37
Tyre pressure
37
33Instruments and warning lights
Page 36 of 336
Brake linings38 Fuel reserve38
Lane Departure Warning (Lane Assist)
38
Turn signal system
38
Trailer turn signal lights
38
Fog lights
38
Speed regulating system / speed limiter
38
Brake pedal (automatic gearbox)
38
Auto Hold function
39
Main beam
39
Automatic gearbox
39
Rear seat belt warning light
39
Generator
39
Coolant
39
Engine oil pressure
40
Engine oil level
40
AdBlue ®
40
Lamp failure
41
Diesel particle filter (diesel)
41
Windscreen washer fluid level
41
Headlight assistant
41
START-STOPsystem
41
Display - a low temperature
42
Water in the fuel filter (diesel)
42
Adaptive cruise control (ACC)
42
Distance warning (Front Assist)
42
front Assist
42
Economy mode
42
Adaptive Chassis Control (DCC)
42
Service
42
The warning lights in the instrument cluster indicate certain functions or
faults.
Some warning lights can be accompanied by acoustic signals and messages in
the display of the instrument cluster.
After switching on the ignition, some warning lights light up briefly as a func-
tion test. If the tested systems are OK, the corresponding warning lights go
out a few seconds after switching on the ignition or after starting the engine.
The warning lights are located at the following positions in the instrument
cluster » Fig. 18 on page 32 .
▶ Engine revolutions counter 1
▶Display
2
▶Speedometer
3
▶Bar with warning lights
5
Warning lights in the display
Depending on the importance the warning light
(danger) or
(warning) illu-
minate along with some of the warning lights in the list with the warning
lights.
Depending on vehicle equipment, some warning lights can be displayed in col-
our on the display. For example. the coolant warning lamp may be represented
as follows.
▶ - Segment display / monochromatic (“black and white”) MAXI DOT display
▶ - Coloured MAXI DOT display
WARNING■
Ignoring illuminated warning lights and related messages or instructions
in the display of the instrument cluster may lead to serious personal injury
or damage to the vehicle.■
If you have to stop for technical reasons, then park the vehicle at a safe
distance from the traffic, switch off the engine and switch on the hazard
warning lights » page 70. Place the warning triangle at the prescribed dis-
tance.
■
The engine compartment of your car is a hazardous area. While working in
the engine compartment, be sure to observe the following warnings
» page 268 .
Parking brake
Read and observe
on page 34 first.
illuminates - the parking brake is switched on.
Parking brake error
Illumi-
nates
Error: electronic parking brakePARKING BRAKE FAILURE
▶ Seek help from a specialist garage.
34Using the system
Page 39 of 336
EPC warning light (petrol)Read and observe
on page 34 first.
lights up – there is a fault in the engine management system. The system
makes it possible to drive on in emergency mode - there may be a noticeable
reduction in engine performance.
▶ You can drive on, exercising appropriate caution. Seek assistance from a spe-
cialist garage immediately.
Safety systems
Read and observe
on page 34 first.
System fault
lights up - there is a fault in the airbag system.
Error: AirbagAIRBAG ERROR
▶
Seek help from a specialist garage.
The front passenger airbag has been disabled with the key switch
illuminates for around 4 seconds after the ignition has been switched on.
One of the airbags or a belt tensioner has been disabled by the diagnostic
tool
illuminates for around 4 seconds after the ignition is switched on and then
flashes for approximately 12 seconds.
Airbag/ belt tensioner deactivated.AIRBAG/ BELT TENSIONER OFF
ProActive passenger protection
illuminates and the following message is shown in the information cluster
display.
Proactive passenger protection unavailable.PROACTIVE PASSENGER PROTECTION UNAVAILABLE
or
Proactive passenger protection: function restricted.LIMITED PROACTIVE PASSENGER PROTECT
The seat belt for the driver and front passenger needs to be replaced.
▶ Seek help from a specialist garage.WARNINGWhen a fault in the airbag system occurs, there is a risk of the system not
being triggered in the event of an accident. Therefore, this must be
checked immediately by a specialized garage.
Tyre pressure
Read and observe
on page 34 first.
Change of tyre pressure values
lights up - there was a pressure change in one of the tyres.
An audible signal sounds as a warning. ▶ Immediately reduce speed and avoid sudden steering and braking manoeu-
vres.
▶ Stop the vehicle, turn the ignition off and check the tyres and their inflation
pressures » page 277 .
▶ Correct the tyre pressure if necessary or replace the affected wheel
» page 282 or use the repair kit » page 285.
▶ Save the tyre pressure values in the system » page 249.
System fault
flashes for approximately 1 minute and remains lit – there may be a fault in
the tyre pressure monitoring system.
▶ Stop the vehicle, turn the ignition off and start the engine again.
If the warning light flashes after starting the engine again, there is a system
error.
▶ You can drive on, exercising appropriate caution. Seek assistance from a spe-
cialist garage immediately.
Disconnecting the vehicle battery
If the vehicle's battery has been disconnected and reconnected, the indicator
light comes on after switching on the ignition.
The warning light should go out after driving a short distance.
If, after a short drive, the indicator light does not go out, there is a system er-
ror.
▶ You can drive on, exercising appropriate caution. Seek assistance from a spe-
cialist garage immediately.
37Instruments and warning lights
Page 44 of 336
Display - a low temperatureRead and observe
on page 34 first.
illuminates – the outside temperature is below +4 °C.
WARNINGEven at temperatures around +4 °C, black ice may still be on the road sur-
face! Do not only rely upon the information given on the outside tempera-
ture display that there is no ice on the road.
Water in the fuel filter (diesel)
Read and observe
on page 34 first.
The fuel filter with water separator, filters out dirt and water from the fuel.
If too much water is present in the separator, the following information ap-
pears on the instrument cluster display.
The warning light is only shown in the MAXI DOTdisplay.
Illumi-
nates
Water in fuel filter. Log book!WATER IN FUEL FILTER
▶ You can drive on, exercising appropriate caution. Seek assistance from a spe-
cialist garage immediately.
Adaptive cruise control (ACC)
Read and observe
on page 34 first.
The warning lights
indicate the condition of the ACC system
» page 233 .
Distance warning (Front Assist)
Read and observe
on page 34 first.
The warning light is only shown in the MAXI DOTdisplay.
illuminates – the safe distance to the vehicle in front is below the mini-
mum.
Information on the Front Assist system » page 237.
front Assist
Read and observe
on page 34 first.
Illuminates
▶ Front Assist has recognised the risk of a collision or automatically triggered
an emergency braking manoeuvre » page 237.
▶ An automatic deactivation of Front Assist took place when activating ESC
Sport » page 213 and when deactivating the ASR » page 214.
▶ Front Assist is currently not available » page 240.
with the lettering
illuminates- Front Assist is deactivated » page 239.
Economy mode
Read and observe
on page 34 first.
illuminates - the vehicle is in economy mode due to the intervention of the
active cylinder management or due to the neutral position of the automatic
gearbox.
Adaptive Chassis Control (DCC)
Read and observe
on page 34 first.
The warning light is only shown in the MAXI DOTdisplay.
illuminates – there is a DCC fault.
▶ You can drive on, exercising appropriate caution. Seek assistance from a spe-
cialist garage immediately.
Service
Read and observe
on page 34 first.
illuminates – information regarding a service appointment that is due
» page 49 , Service interval display .
42Using the system
Page 45 of 336
Information system
Driver information system
Introduction
This chapter contains information on the following subjects:
Display in the instrument cluster
43
Setting the clock
44
Gear recommendation
44
Vehicle condition
44
Display in the instrument cluster
Fig. 22
Display types: MAXI DOT / Segment Display
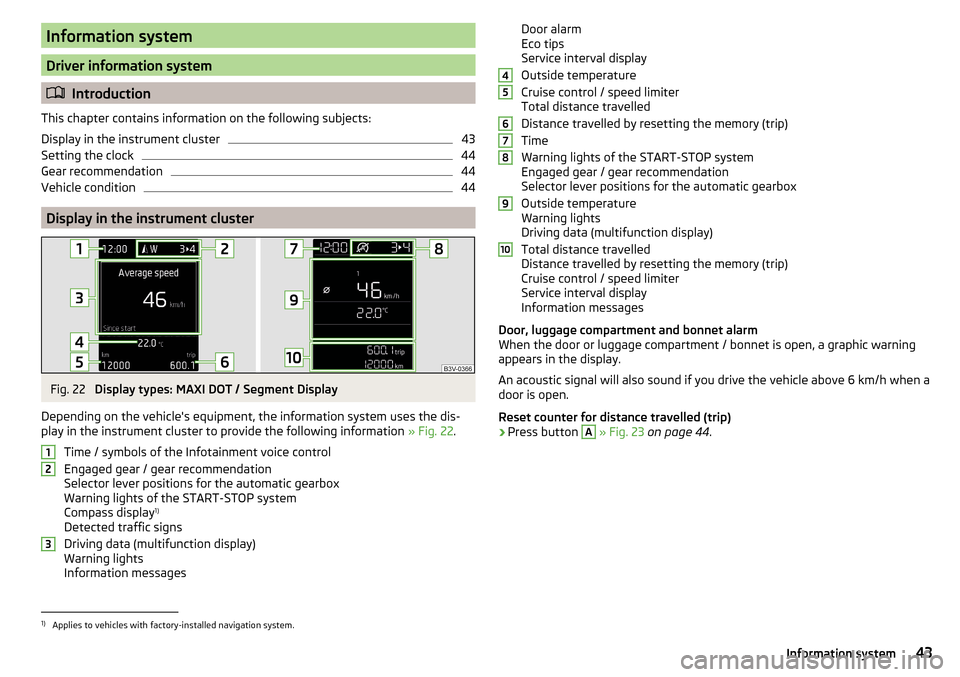
Depending on the vehicle's equipment, the information system uses the dis-
play in the instrument cluster to provide the following information » Fig. 22.
Time / symbols of the Infotainment voice control
Engaged gear / gear recommendation
Selector lever positions for the automatic gearbox
Warning lights of the START-STOP system
Compass display 1)
Detected traffic signs
Driving data (multifunction display)
Warning lights
Information messages
123Door alarm
Eco tips
Service interval display
Outside temperature
Cruise control / speed limiter
Total distance travelled
Distance travelled by resetting the memory (trip)
Time
Warning lights of the START-STOP system
Engaged gear / gear recommendation
Selector lever positions for the automatic gearbox
Outside temperature
Warning lights
Driving data (multifunction display)
Total distance travelled
Distance travelled by resetting the memory (trip)
Cruise control / speed limiter
Service interval display
Information messages
Door, luggage compartment and bonnet alarm
When the door or luggage compartment / bonnet is open, a graphic warning
appears in the display.
An acoustic signal will also sound if you drive the vehicle above 6 km/h when a
door is open.
Reset counter for distance travelled (trip)›
Press button
A
» Fig. 23 on page 44 .
456789101)
Applies to vehicles with factory-installed navigation system.
43Information system
Page 46 of 336
Setting the clockFig. 23
Button in the instrument cluster
›
Switch on the ignition.
›
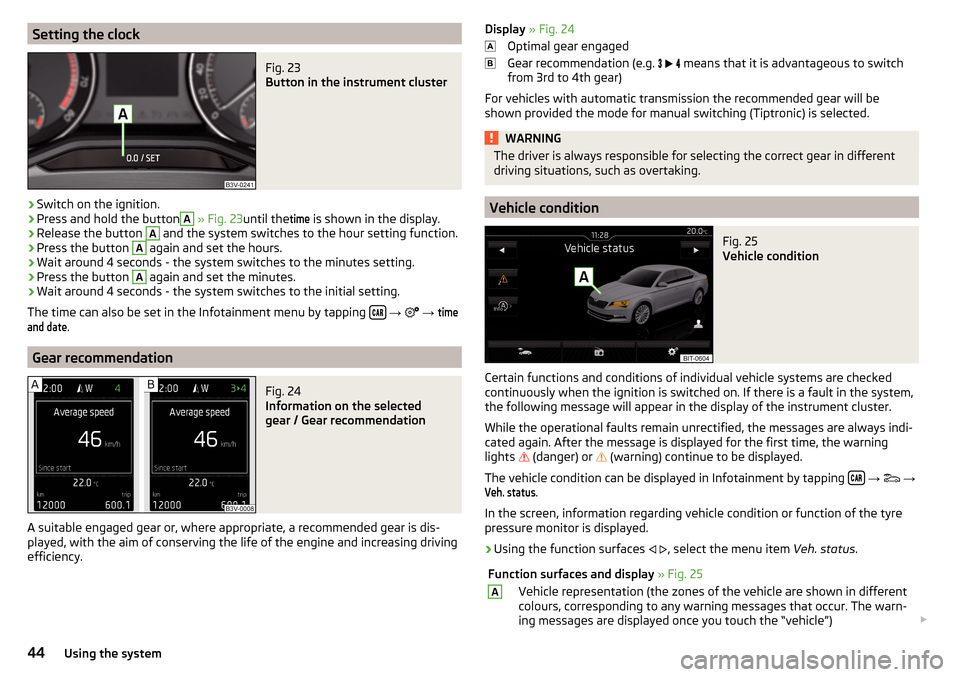
Press and hold the button
A
» Fig. 23 until the
time
is shown in the display.
›
Release the button
A
and the system switches to the hour setting function.
›
Press the button
A
again and set the hours.
›
Wait around 4 seconds - the system switches to the minutes setting.
›
Press the button
A
again and set the minutes.
›
Wait around 4 seconds - the system switches to the initial setting.
The time can also be set in the Infotainment menu by tapping
→
→
timeand date
.
Gear recommendation
Fig. 24
Information on the selected
gear / Gear recommendation
A suitable engaged gear or, where appropriate, a recommended gear is dis-
played, with the aim of conserving the life of the engine and increasing driving
efficiency.
Display » Fig. 24
Optimal gear engaged
Gear recommendation (e.g.
means that it is advantageous to switch
from 3rd to 4th gear)
For vehicles with automatic transmission the recommended gear will be
shown provided the mode for manual switching (Tiptronic) is selected.WARNINGThe driver is always responsible for selecting the correct gear in different
driving situations, such as overtaking.
Vehicle condition
Fig. 25
Vehicle condition
Certain functions and conditions of individual vehicle systems are checked
continuously when the ignition is switched on. If there is a fault in the system,
the following message will appear in the display of the instrument cluster.
While the operational faults remain unrectified, the messages are always indi-
cated again. After the message is displayed for the first time, the warning
lights
(danger) or
(warning) continue to be displayed.
The vehicle condition can be displayed in Infotainment by tapping
→
→
Veh. status
.
In the screen, information regarding vehicle condition or function of the tyre
pressure monitor is displayed.
›
Using the function surfaces
, select the menu item Veh. status.
Function surfaces and display » Fig. 25AVehicle representation (the zones of the vehicle are shown in different
colours, corresponding to any warning messages that occur. The warn-
ing messages are displayed once you touch the “vehicle”) 44Using the system