navigation SKODA SUPERB 2016 3.G / (B8/3V) Owner's Guide
[x] Cancel search | Manufacturer: SKODA, Model Year: 2016, Model line: SUPERB, Model: SKODA SUPERB 2016 3.G / (B8/3V)Pages: 336, PDF Size: 53.89 MB
Page 195 of 336
›In the
Navigation main menu, tap the functional surface → Route details .
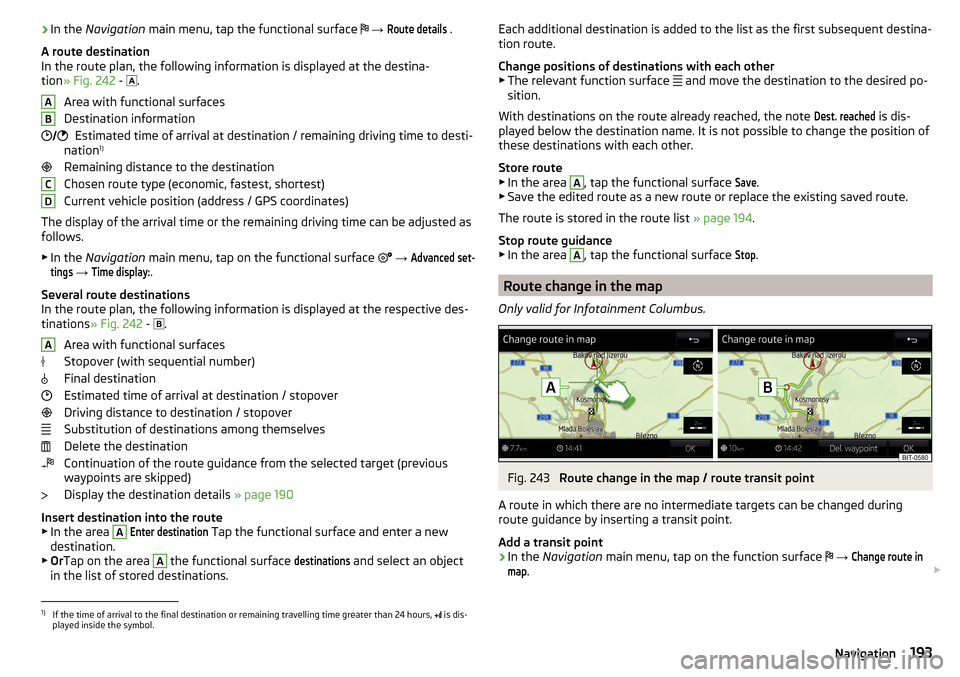
A route destination
In the route plan, the following information is displayed at the destina-
tion » Fig. 242 -
.
Area with functional surfaces
Destination information Estimated time of arrival at destination / remaining driving time to desti-
nation 1)
Remaining distance to the destination
Chosen route type (economic, fastest, shortest)
Current vehicle position (address / GPS coordinates)
The display of the arrival time or the remaining driving time can be adjusted as
follows.
▶ In the Navigation main menu, tap on the functional surface
→ Advanced set-tings
→
Time display:
.
Several route destinations
In the route plan, the following information is displayed at the respective des- tinations » Fig. 242 -
.
Area with functional surfaces
Stopover (with sequential number)
Final destination
Estimated time of arrival at destination / stopover
Driving distance to destination / stopover
Substitution of destinations among themselves
Delete the destination
Continuation of the route guidance from the selected target (previous
waypoints are skipped)
Display the destination details » page 190
Insert destination into the route ▶ In the area
A
Enter destination
Tap the functional surface and enter a new
destination.
▶ Or Tap on the area
A
the functional surface
destinations
and select an object
in the list of stored destinations.
AB CDAEach additional destination is added to the list as the first subsequent destina-
tion route.
Change positions of destinations with each other
▶ The relevant function surface
and move the destination to the desired po-
sition.
With destinations on the route already reached, the note Dest. reached
is dis-
played below the destination name. It is not possible to change the position of
these destinations with each other.
Store route ▶ In the area
A
, tap the functional surface
Save
.
▶ Save the edited route as a new route or replace the existing saved route.
The route is stored in the route list » page 194.
Stop route guidance ▶ In the area
A
, tap the functional surface
Stop
.
Route change in the map
Only valid for Infotainment Columbus.
Fig. 243
Route change in the map / route transit point
A route in which there are no intermediate targets can be changed during
route guidance by inserting a transit point.
Add a transit point
›
In the Navigation main menu, tap on the function surface
→
Change route inmap
.
1)
If the time of arrival to the final destination or remaining travelling time greater than 24 hours,
is dis-
played inside the symbol.
193Navigation
Page 196 of 336
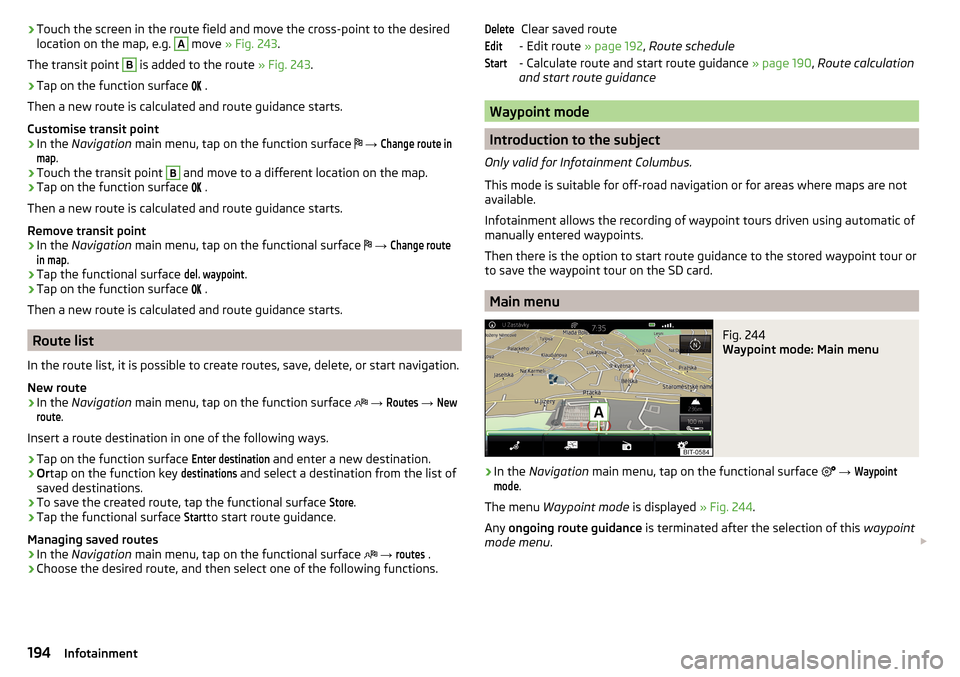
›Touch the screen in the route field and move the cross-point to the desired
location on the map, e.g. A move » Fig. 243 .
The transit point B
is added to the route » Fig. 243.
›
Tap on the function surface
.
Then a new route is calculated and route guidance starts.
Customise transit point
›
In the Navigation main menu, tap on the function surface
→
Change route inmap
.
›
Touch the transit point
B
and move to a different location on the map.
›
Tap on the function surface
.
Then a new route is calculated and route guidance starts.
Remove transit point
›
In the Navigation main menu, tap on the functional surface
→
Change routein map
.
›
Tap the functional surface
del. waypoint
.
›
Tap on the function surface
.
Then a new route is calculated and route guidance starts.
Route list
In the route list, it is possible to create routes, save, delete, or start navigation.
New route
›
In the Navigation main menu, tap on the function surface
→
Routes
→
Newroute
.
Insert a route destination in one of the following ways.
›
Tap on the function surface
Enter destination
and enter a new destination.
›
Or tap on the function key
destinations
and select a destination from the list of
saved destinations.
›
To save the created route, tap the functional surface
Store
.
›
Tap the functional surface
Start
to start route guidance.
Managing saved routes
›
In the Navigation main menu, tap on the functional surface
→
routes
.
›
Choose the desired route, and then select one of the following functions.
Clear saved route
- Edit route » page 192, Route schedule
- Calculate route and start route guidance » page 190, Route calculation
and start route guidance
Waypoint mode
Introduction to the subject
Only valid for Infotainment Columbus.
This mode is suitable for off-road navigation or for areas where maps are not
available.
Infotainment allows the recording of waypoint tours driven using automatic of
manually entered waypoints.
Then there is the option to start route guidance to the stored waypoint tour or
to save the waypoint tour on the SD card.
Main menu
Fig. 244
Waypoint mode: Main menu
›
In the Navigation main menu, tap on the functional surface
→
Waypointmode
.
The menu Waypoint mode is displayed » Fig. 244.
Any ongoing route guidance is terminated after the selection of this waypoint
mode menu .
DeleteEditStart194Infotainment
Page 197 of 336
Description of the function surfaces A » Fig. 244
Context-dependent:
▶ There is no route guidance - Start recording a waypoint tour/ manage
saved waypoint tours/ leave Waypoint mode menu
▶ Recording a waypoint tour - Stop recording a waypoint tour/ manually
adjust waypoint / leave Waypoint mode menu
▶ There is no route guidance Stop route guidance / skip the next way-
point / leave Waypoint mode menu
Setting the map display / show / hide the split screen / switch on / off the display of POIs on the map
Playback control Radio
/
Media
/
TV tuner
Setting Navigation is not available in the Waypoint mode menu
Record waypoints
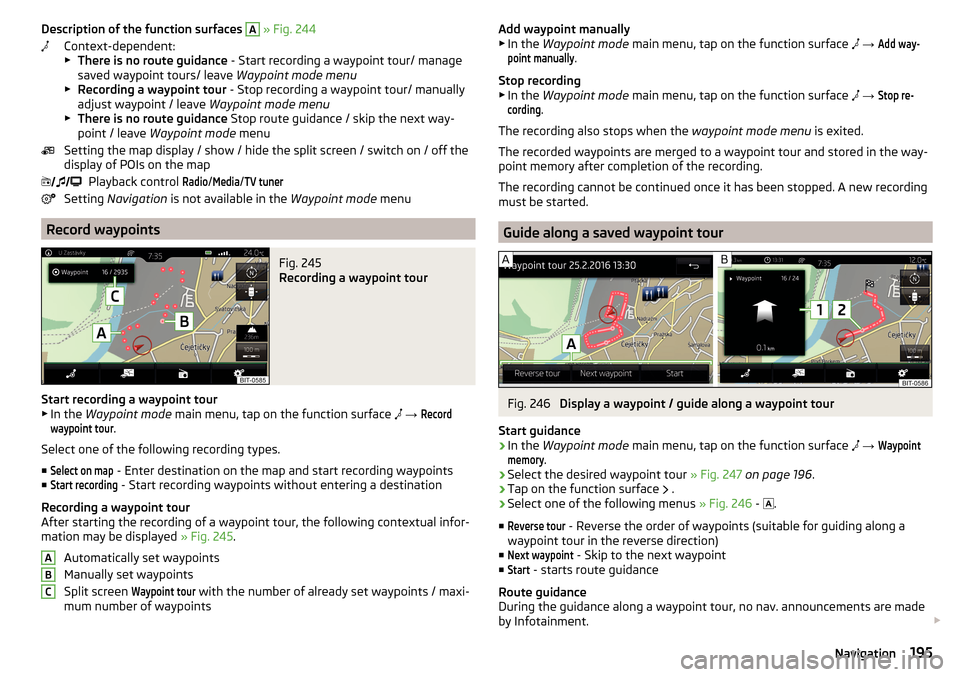
Fig. 245
Recording a waypoint tour
Start recording a waypoint tour
▶ In the Waypoint mode main menu, tap on the function surface
→
Recordwaypoint tour
.
Select one of the following recording types. ■
Select on map
- Enter destination on the map and start recording waypoints
■
Start recording
- Start recording waypoints without entering a destination
Recording a waypoint tour
After starting the recording of a waypoint tour, the following contextual infor-
mation may be displayed » Fig. 245.
Automatically set waypoints
Manually set waypoints
Split screen
Waypoint tour
with the number of already set waypoints / maxi-
mum number of waypoints
ABCAdd waypoint manually
▶ In the Waypoint mode main menu, tap on the function surface → Add way-point manually
.
Stop recording
▶ In the Waypoint mode main menu, tap on the function surface
→
Stop re-cording
.
The recording also stops when the waypoint mode menu is exited.
The recorded waypoints are merged to a waypoint tour and stored in the way- point memory after completion of the recording.
The recording cannot be continued once it has been stopped. A new recording
must be started.
Guide along a saved waypoint tour
Fig. 246
Display a waypoint / guide along a waypoint tour
Start guidance
›
In the Waypoint mode main menu, tap on the function surface
→
Waypointmemory
.
›
Select the desired waypoint tour » Fig. 247 on page 196 .
›
Tap on the function surface
.
›
Select one of the following menus
» Fig. 246 -
.
■
Reverse tour
- Reverse the order of waypoints (suitable for guiding along a
waypoint tour in the reverse direction)
■
Next waypoint
- Skip to the next waypoint
■
Start
- starts route guidance
Route guidance
During the guidance along a waypoint tour, no nav. announcements are made
by Infotainment.
195Navigation
Page 199 of 336
Display options▶ Route guidance is disabled - All traffic messages are displayed.
▶ There is route guidance - By tapping the functional surfaceB
» Fig. 248 all
traffic messages are selectable in the displayed menu by pressing the func-
tion surface
All
, or by tapping the functional surface
route
,only the traffic infor-
mation present on the route selected.
A traffic report may contain some of the following information. ▶ Symbol of the traffic obstruction
▶ Number of roads affected
▶ Name of the location in question
▶ Description of the traffic obstruction
The importance of a traffic obstruction is distinguished in colour by a TMC
message
The symbol for traffic obstruction (e.g. ,
,
) precedes the obstruction and
the length of the obstruction is shown in the map on the right along the route.
Depending on the context, the symbol for the obstruction is displayed in one
of the following ways.
No route guidance is carried out ▶ Red - All traffic obstructions
Route guidance takes place
▶ Gray - The traffic obstruction is not on the route
▶ Red - The traffic obstruction is on the route, the route will not be recalcula-
ted the route and the route passes through the traffic obstruction
▶ Orange - The traffic obstruction is on the route, the route is recalculated and
an alternative route is available
Update
The list of traffic reports will be automatically updated by Infotainment on a
continuous basis.
The list of traffic messages can be updated manually by pressing
.
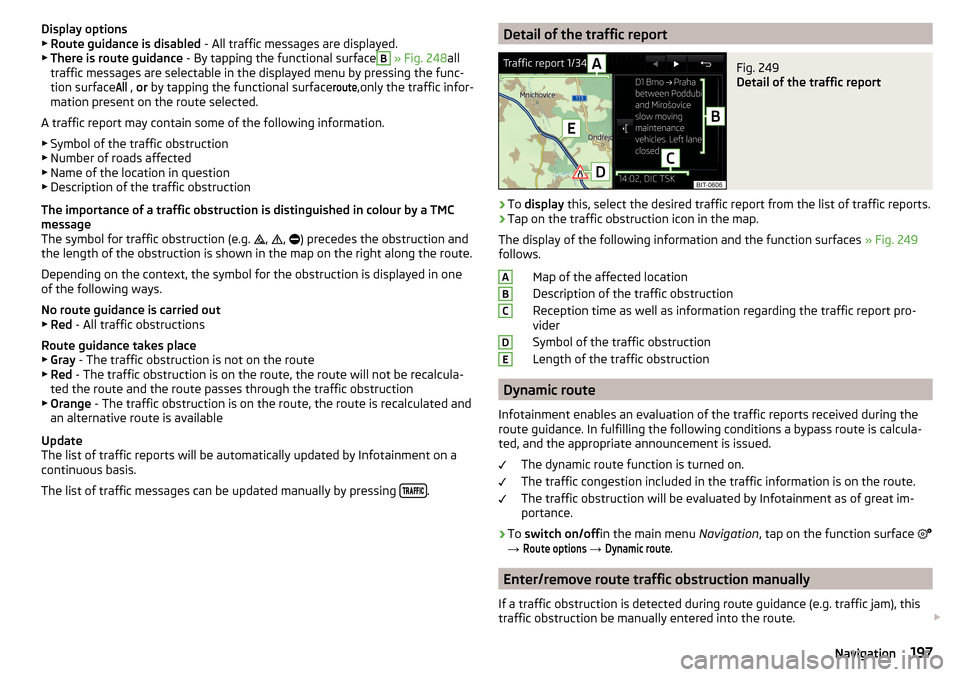
Detail of the traffic reportFig. 249
Detail of the traffic report
›
To
display this, select the desired traffic report from the list of traffic reports.
›
Tap on the traffic obstruction icon in the map.
The display of the following information and the function surfaces » Fig. 249
follows.
Map of the affected location
Description of the traffic obstruction
Reception time as well as information regarding the traffic report pro-
vider
Symbol of the traffic obstruction
Length of the traffic obstruction
Dynamic route
Infotainment enables an evaluation of the traffic reports received during the route guidance. In fulfilling the following conditions a bypass route is calcula-
ted, and the appropriate announcement is issued.
The dynamic route function is turned on.
The traffic congestion included in the traffic information is on the route.
The traffic obstruction will be evaluated by Infotainment as of great im-
portance.
›
To switch on/off in the main menu Navigation, tap on the function surface
→
Route options
→
Dynamic route
.
Enter/remove route traffic obstruction manually
If a traffic obstruction is detected during route guidance (e.g. traffic jam), this
traffic obstruction be manually entered into the route.
ABCDE197Navigation
Page 200 of 336
After entering, Infotainment calculates and provides an alternative route.
Enter traffic obstruction›
In the Navigation main menu, tap the function surface
→
Congestion ahead
.
›
Adjust the length of the traffic obstruction.
The traffic obstruction will be displayed in red in the map to the right along the
route.
Remove traffic obstruction
The traffic obstruction is removed from the route after completion of the route
guidance or can manually be removed as follows.
›
In the Navigation main menu, tap the function surface
→
Cancel "congest.ahead"
.
vehicle systems
CAR - Vehicle settings
Introduction to the subject
In the menu CAR travel data and information displayed on the vehicle and
some vehicle systems can be set.
Reset to factory settings
The factory reset be carried out in the
→
→
Factory settings
menu.
Note
Settings relating to the vehicle systems can only be made when the ignition is
switched on.
Main menu
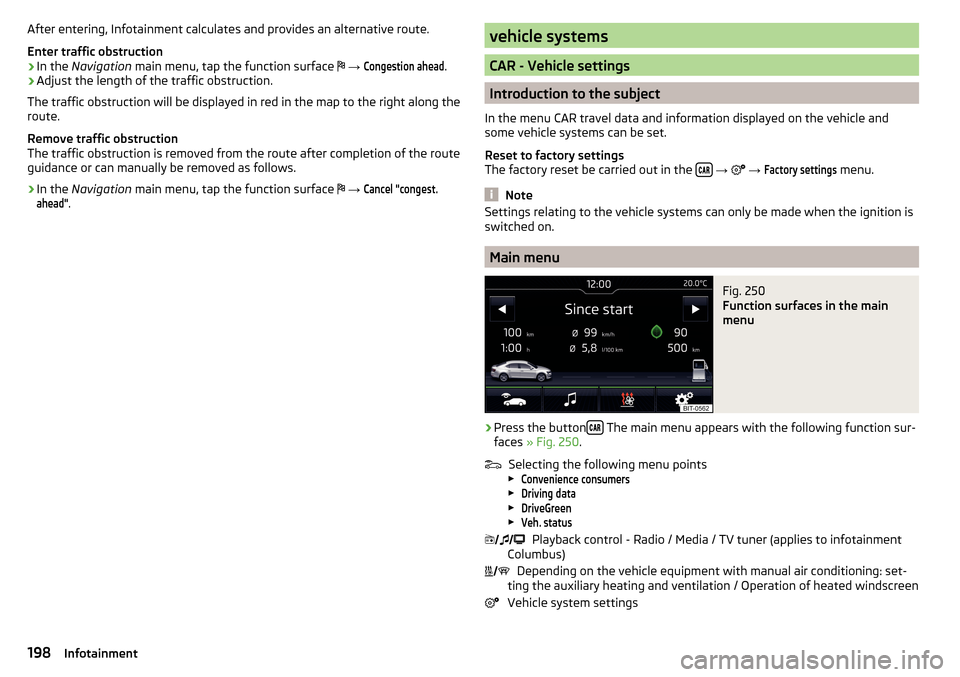
Fig. 250
Function surfaces in the main
menu
›
Press the button The main menu appears with the following function sur-
faces » Fig. 250 .
Selecting the following menu points
▶
Convenience consumers
▶
Driving data
▶
DriveGreen
▶
Veh. status
Playback control - Radio / Media / TV tuner (applies to infotainment
Columbus)
Depending on the vehicle equipment with manual air conditioning: set-
ting the auxiliary heating and ventilation / Operation of heated windscreen
Vehicle system settings
198Infotainment
Page 249 of 336
WARNINGThe traffic signs may not be displayed or displayed incorrectly in the system
e.g. in the following situations.■
When visibility is poor, (e.g. fog, heavy rain, thick snowfall).
■
The sensor is blinded by the sun or oncoming traffic.
■
The field of view of the sensor is limited by an obstacle or a preceding ve-
hicle.
■
Travelling at high speed.
■
The traffic signs are covered (e.g. by trees, snow or dirt).
■
The traffic signs are not standard (round with a red border) or are dam-
aged.
■
The traffic signs are attached to flashing neon signs.
■
The traffic signs were changed (the navigation data are out of date).
Note
The system is only available in some countries.
Settings in Infotainment
Read and observe
on page 246 first.
›
Press the button, then tap on the function surface
→
Driver assistance
.
■ Dynamic Road Sign Display - Settings for the Dynamic Road Sign Display
■
Show in instrument cluster
- Activation/deactivation of the additional traffic
signs in the display of the instrument cluster
■
Speed warning:
» page 240 - Setting a warning when exceeding the speed
limit
■
Warning at over
- Setting warning timing with the option to exceed the speed
limit in a range from 0 to 20 km / h
■ Trailer recognition
■
Show road signs relevant to trailers
- Activating / deactivating display of road
signs relevant to trailers
■
Use for route calculation
- Activation / deactivation of taking the trailer into ac-
count for route calculation in navigation
■
Maximum speed for trailer
- Set the top speed for towing a trailer
OperationFig. 306
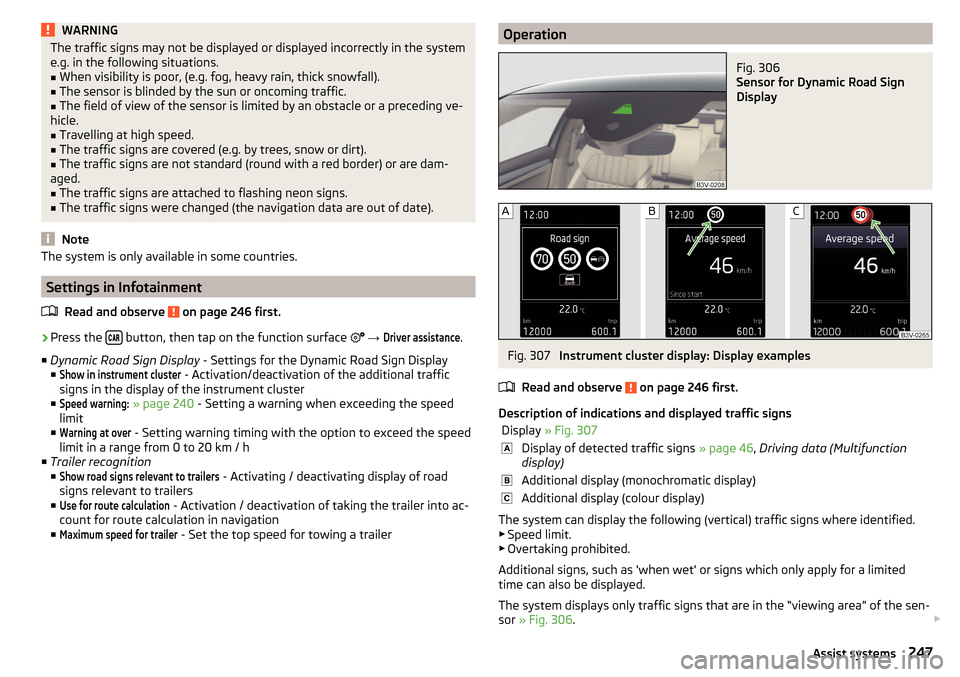
Sensor for Dynamic Road Sign
Display
Fig. 307
Instrument cluster display: Display examples
Read and observe
on page 246 first.
Description of indications and displayed traffic signs
Display » Fig. 307Display of detected traffic signs » page 46, Driving data (Multifunction
display)Additional display (monochromatic display)Additional display (colour display)
The system can display the following (vertical) traffic signs where identified. ▶ Speed limit.
▶ Overtaking prohibited.
Additional signs, such as 'when wet' or signs which only apply for a limited
time can also be displayed.
The system displays only traffic signs that are in the “viewing area” of the sen-
sor » Fig. 306 .
247Assist systems
Page 250 of 336
Data from the sensor is supplemented by information from the Infotainment
Navigation. This is the reason why traffic signs with maximum speeds can also
be shown on sections of roads which do not have any traffic signs.
Warning when exceeding the speed limit
The warning when exceeding the permissible speed (based on the detected
traffic sign) can be activated and set in Infotainment » page 247.
Mode when towing a trailer
For vehicles with a factory-fitted towing device, in the Infotainment it is possi- ble to enable or disable the relevant traffic signs for trailer operation and the
top speed for towing a trailer » page 247, Settings in Infotainment .
Additional display
Read and observe
on page 246 first.
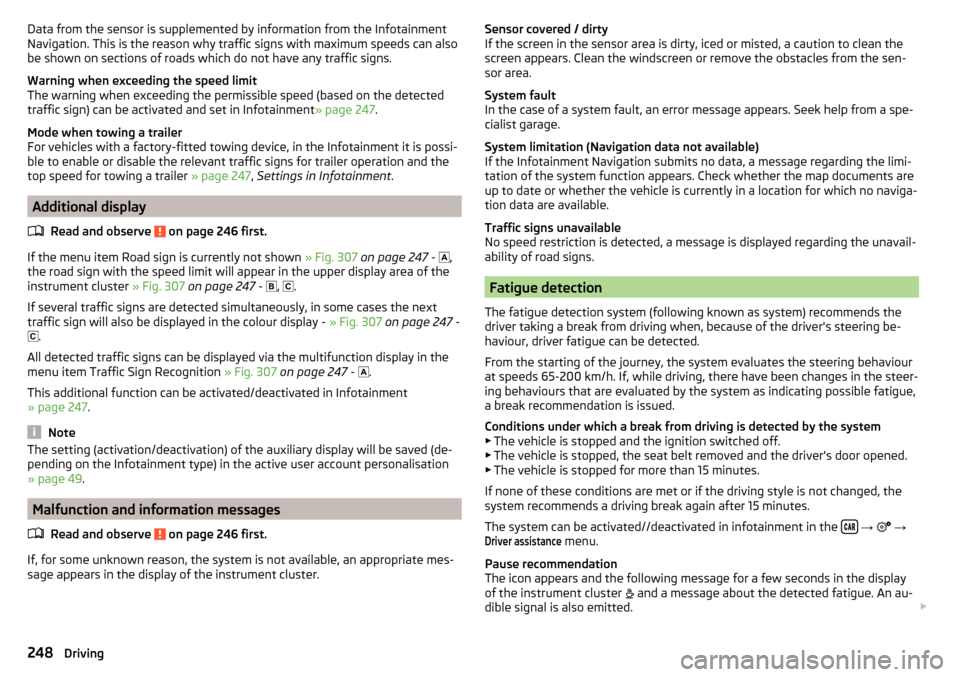
If the menu item Road sign is currently not shown » Fig. 307 on page 247 -
,
the road sign with the speed limit will appear in the upper display area of the
instrument cluster » Fig. 307 on page 247 -
,
.
If several traffic signs are detected simultaneously, in some cases the next
traffic sign will also be displayed in the colour display - » Fig. 307 on page 247 -
.
All detected traffic signs can be displayed via the multifunction display in the
menu item Traffic Sign Recognition » Fig. 307 on page 247 -
.
This additional function can be activated/deactivated in Infotainment
» page 247 .
Note
The setting (activation/deactivation) of the auxiliary display will be saved (de-
pending on the Infotainment type) in the active user account personalisation
» page 49 .
Malfunction and information messages
Read and observe
on page 246 first.
If, for some unknown reason, the system is not available, an appropriate mes-
sage appears in the display of the instrument cluster.
Sensor covered / dirty
If the screen in the sensor area is dirty, iced or misted, a caution to clean the
screen appears. Clean the windscreen or remove the obstacles from the sen-
sor area.
System fault
In the case of a system fault, an error message appears. Seek help from a spe-
cialist garage.
System limitation (Navigation data not available)
If the Infotainment Navigation submits no data, a message regarding the limi- tation of the system function appears. Check whether the map documents are
up to date or whether the vehicle is currently in a location for which no naviga-
tion data are available.
Traffic signs unavailable
No speed restriction is detected, a message is displayed regarding the unavail-
ability of road signs.
Fatigue detection
The fatigue detection system (following known as system) recommends the
driver taking a break from driving when, because of the driver's steering be-
haviour, driver fatigue can be detected.
From the starting of the journey, the system evaluates the steering behaviour
at speeds 65-200 km/h. If, while driving, there have been changes in the steer-
ing behaviours that are evaluated by the system as indicating possible fatigue,
a break recommendation is issued.
Conditions under which a break from driving is detected by the system ▶ The vehicle is stopped and the ignition switched off.
▶ The vehicle is stopped, the seat belt removed and the driver's door opened.
▶ The vehicle is stopped for more than 15 minutes.
If none of these conditions are met or if the driving style is not changed, the
system recommends a driving break again after 15 minutes.
The system can be activated//deactivated in infotainment in the
→
→
Driver assistance
menu.
Pause recommendation
The icon appears and the following message for a few seconds in the display
of the instrument cluster and a message about the detected fatigue. An au-
dible signal is also emitted.
248Driving
Page 321 of 336
Hazard warning light system70
Headlight assistant71
Headlight cleaning system77
Parking light70
Replacing bulbs299
Turn signal/main beam68
Xenon headlight69
Light Assist71
Lighting Entry space
71
Interior lighting72
Luggage compartment101
Lights Automatic driving light control
68
Dipped beam67
Driving abroad71
Headlight range control67
Parking lights67
Switching on and off67
Warning lights33
List of available stations
143
of available stations (TV tuner)157
of telephone contacts169
With folder / track list148
List of paired external devices164
List of traffic reports196
Load305
Lock Individual settings
56
KESSY55
Locking Central locking button
55
in case of emergency293
Remote control54
Lock steering lock199
Long cargo channel95
Longitude180
Luggage compartment101
Cover104
Fastening elements101
Fastening the flooring103
Fixing nets102
Floor covering on both sides103
foldable hook103
Lighting101
Net on the luggage compartment cover103
Net partition111
Removable light109
Roll-up cover105
Side pockets106
Storage compartments under the floor cover- ing
107
tray with cargo element106
unlock manually293
Unlock the boot lid293
Variable loading floor109
Luggage compartment cover104
Roll-up cover105
Luggage storage Multi-function pocket
108
M
Main beam
68
Warning light39
Main menu Android Auto
177
Apple CarPlay178
CAR198
Images153
Media146
Media Command158
MirrorLink®179
Navigation181
Radio142
SmartLink176
SMS172
TV tuner156
Video DVD155
Waypoint mode194
Manage favourites141
Manage Favourites136
Manage memory137
Managing paired devices164
Managing saved routes194
Manoeuvre Graphical driving recommendations
191
Nav. announcements192
Manoeuvring216
Manual air conditioning Air distribution control
117
Controls114
Manual gear changing See Gear changing
206
Map automatic scale
188
Display181
Display of road signs137
Display options187
Display options in the split screen189
Fast Map188
Lane recommendation137
Main menu181
Manual scale188
Map alignment189
Operation181
POI display137
Road sign189
Show POI187
|Alignment188
MAXI DOT See MAXI DOT display
48
MAXI DOT display Assist systems menu item
48
Audio menu item48
Main menu48
319Index
Page 322 of 336
Navigation menu item48
Operation45
Telephone menu item48
Maximum speed309
MCB215
Media Audio source
149
AUX90, 150
Bluetooth Audio151
Browser148
CD / DVD149
Compatible sources152, 153
File formats152, 153
Foreword146
Jukebox151
List148
Main menu146
Multimedia database148
Operation146
Playback operation147
Requirements and Restrictions152, 153
safe removal of the data source133
Safe removal of the data source140
SD card150
Select audio source146
Settings135
Set to141
USB90, 150
Voice control128
WLAN151
Media Command Control
159
Main menu158
Supported formats160
Memory47
Memory Function for the seat81
Menu Setup
131, 139
Mirror77
Vanity75
MirrorLink®178
Connection establishment179
Disconnection179
Function issues179
Main menu179
Operation179
MODE button See driving mode
240
Modes of the automatic transmission207
Modifications and technical alterations256
Most common routes192
MSR213
Multi-function pocket108
Multi-media AUX
150
Multicollision brake (MCB)215
Multifunction display Functions
46
Information46
Memory47
Multifunction steering wheel45
Multimedia USB
150
Multimedia database148
Mute127
My destinations186
My POIs186
N
N1
109
navigation Destination on the map
184
Map orientation188
Navigation Abort route guidance
192
Additional windows182
Advanced settings138
Alternative route137
Contacts185
Demo mode138, 191
Destination address183
Destination details190
destination memory185
Destination presentation in the split screen189
Destination representation187
Dynamic route137
Edit route192
Favourites185
Final destinations184
Finish route guidance192
Foreword180
GPS180
Graphical driving recommendations191
Home address185
Image with GPS187
Import destination186
Imported destinations137
Intermediate target190
Main menu181
Manage memory137
Map137
Map alignment189
Map scale188
Most common routes192
My destinations186
Navigation data181
Nav. announcements138, 192
Options for map display187
Options for map display in the split screen189
Preferred route type137
Route190
Route calculation190
Route change193
Route display187
Route display in the split screen189
Route guidance190
Route information192
Route list194
Route options137
320Index
Page 323 of 336
Route schedule192
Search for destination182
Set to137
Start the route guidance190
Status line138
Tank options138
Top speeds138
Traffic jam ahead197
Traffic reports (TMC)196
Trailer towing191
Transit point193
Update navigation data181
Update the navigation data138
Version information138
Voice control128
Waypoint mode194
Navigation data181
Nav. announcements138, 192
Net partition111
Nets102, 103
Network Data connection
133
Data roaming133
Set133
set to136
Values of the downloaded data133
New route194
O
oil see Engine oil
271
Oil Information messages
40
Oil changing Engine oil
270
On-board computer see multifunction display
46
Online Owner's Manual8
Operating weight304
Operation Media146
MirrorLink®179
Radio142
Telephone162, 163
Original accessories257
Overhang angle308
Overview Cockpit
31
Engine compartment269
Fuses295
Warning lights33
Own POI categories186
P
Pairing process
164
Park216
Rear traffic alert218
Park assist Parking
227
Park Assist225
Automatic brake assist229
Departing from a parallel parking space229
Malfunctions229
Operation226
Parking228
Parking space search227
Switch to park mode227
Parking205
Park Assist225
Parking sensors215
Reversing camera221
Parking aid automatic system activation when moving for- ward
218
Display in Infotainment screen217
Operation216
Parking assistance Activation / deactivation
217
Parking brake203
Warning light34
Parking lights67
Parking sensors215
Settings in Infotainment216
Parking the vehicle see Parking
205
Parking ticket holder88
Park pilot215
ParkPilot Settings in Infotainment
216
Part replacement256
Passive safety Before setting off
12
Driving safety12
Passive Safety12
Pedals206
Floor mats206
Personalisation49
Configuration wizard127
Personal POIs186
Petrol265
Petrol station184
Petrol station logo137
Phonebox89
Pictures Compatible sources
154
File formats154
Requirements and restrictions154
Supported file formats154
Pin code set to
136
Pockets94
POI186
Choose in the map187
Import186
My POIs186
Tap in the map187
321Index