USB SKODA SUPERB 2016 3.G / (B8/3V) Owner's Manual
[x] Cancel search | Manufacturer: SKODA, Model Year: 2016, Model line: SUPERB, Model: SKODA SUPERB 2016 3.G / (B8/3V)Pages: 336, PDF Size: 53.89 MB
Page 33 of 336
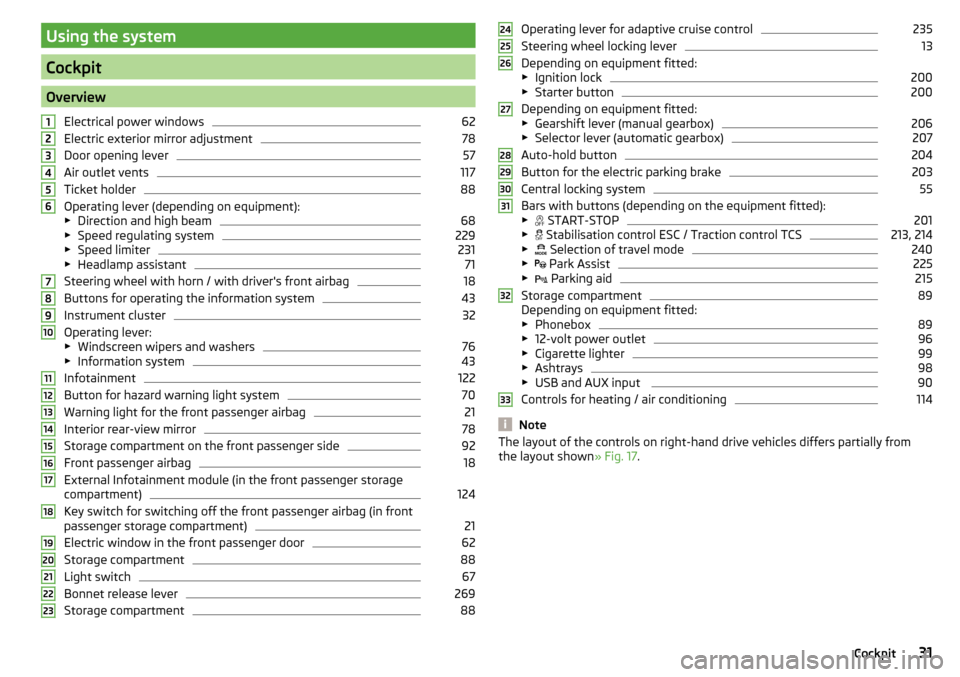
Using the system
Cockpit
OverviewElectrical power windows
62
Electric exterior mirror adjustment
78
Door opening lever
57
Air outlet vents
117
Ticket holder
88
Operating lever (depending on equipment):
▶ Direction and high beam
68
▶Speed regulating system
229
▶Speed limiter
231
▶Headlamp assistant
71
Steering wheel with horn / with driver's front airbag
18
Buttons for operating the information system
43
Instrument cluster
32
Operating lever:
▶ Windscreen wipers and washers
76
▶Information system
43
Infotainment
122
Button for hazard warning light system
70
Warning light for the front passenger airbag
21
Interior rear-view mirror
78
Storage compartment on the front passenger side
92
Front passenger airbag
18
External Infotainment module (in the front passenger storage
compartment)
124
Key switch for switching off the front passenger airbag (in front
passenger storage compartment)
21
Electric window in the front passenger door
62
Storage compartment
88
Light switch
67
Bonnet release lever
269
Storage compartment
881234567891011121314151617181920212223Operating lever for adaptive cruise control235
Steering wheel locking lever
13
Depending on equipment fitted:
▶ Ignition lock
200
▶Starter button
200
Depending on equipment fitted:
▶ Gearshift lever (manual gearbox)
206
▶Selector lever (automatic gearbox)
207
Auto-hold button
204
Button for the electric parking brake
203
Central locking system
55
Bars with buttons (depending on the equipment fitted):
▶ START-STOP
201
▶
Stabilisation control ESC / Traction control TCS
213, 214
▶
Selection of travel mode
240
▶
Park Assist
225
▶
Parking aid
215
Storage compartment
89
Depending on equipment fitted:
▶ Phonebox
89
▶12-volt power outlet
96
▶Cigarette lighter
99
▶Ashtrays
98
▶USB and AUX input
90
Controls for heating / air conditioning
114
Note
The layout of the controls on right-hand drive vehicles differs partially from
the layout shown » Fig. 17.2425262728293031323331Cockpit
Page 89 of 336

Heated steering wheel, along with the driver's seat heating›To activate / deactivate the heated steering wheel with the driver's seat
heating, press the button
on the Climatronic, then tap on the function
surface
→
Link seats and steering wheel heating
in the Infotainment screen.
›
To switch on / off the heated steering wheel, press the button for the driver
seat heating.
Setting the heat output of the steering wheel heater
›
Press the button
on the Climatronic, then tap the function surface
→
intensity
on the Infotainment screen.
›
Select one of the three heating levels (this remains stored even after switch-
ing off the engine).
The selected heat output of the heated steering wheel is shown on the Info- tainment screen
B
» Fig. 84 ,
Note
■
The heated steering wheel only works when the engine is running.■If the on-board voltage decreases, the heated steering wheel switches off
automatically.Practical features
Interior equipment
Introduction
This chapter contains information on the following subjects:
Parking ticket holder
88
Storage compartment on the driver's side
88
stowage compartments in the doors
88
Storage compartment in the front centre console
89
Phonebox
89
USB and AUX inputs
90
Cup holders
90
Waste container
91
Storage compartment under the front arm rest
91
Glasses compartment
92
Storage compartment on the front passenger side
92
Storage compartment under the front passenger seat
93
Storage compartments for umbrella
93
Clothes hook
93
Storage pockets on the backs of the front seats
94
Storage pockets at the inner sides of the front seats
94
Storage compartment in the rear centre console
94
Storage compartment in the rear armrest
94
Long cargo channel
95
Removable through-loading bag
95WARNING■ Do not place anything on the dashboard. These objects might slide or fall
down when driving and may distract you from concentrating on the traffic –
risk of accident!■
Make sure that while driving no objects can enter the driver's footwell -
cause an accident!
■
Do not carry any objects on the front passenger seat except objects de-
signed for this purpose (e.g. child seats) – risk of accident!
87Practical features
Page 91 of 336
WARNINGThe storage compartmentA » Fig. 87 is to be used exclusively for storing
objects which do not stick out - danger of restricting the effectiveness of
the side airbags.
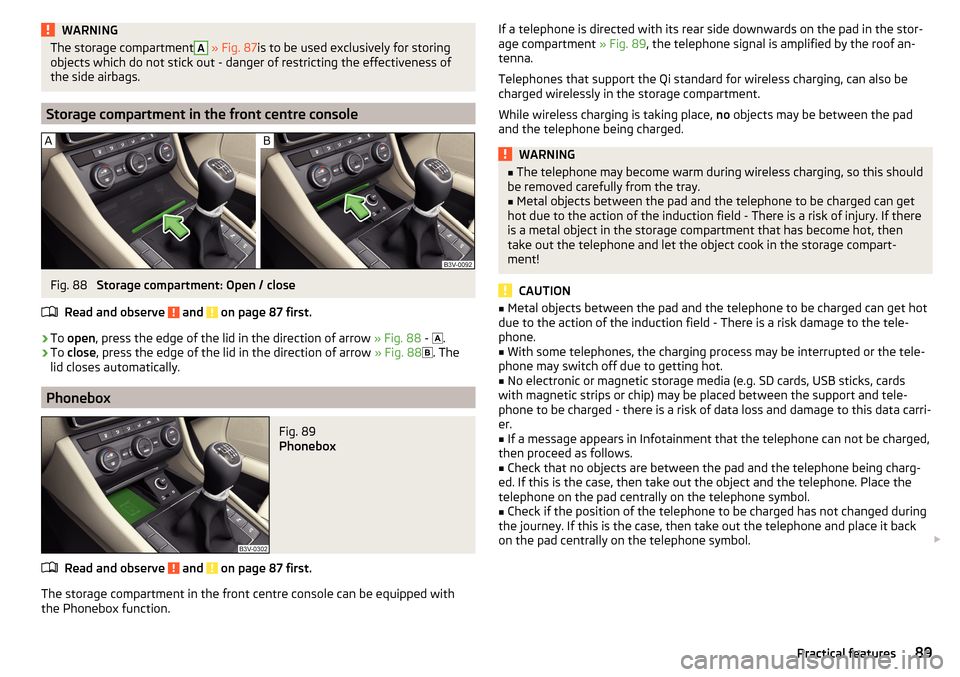
Storage compartment in the front centre console
Fig. 88
Storage compartment: Open / close
Read and observe
and on page 87 first.
›
To open , press the edge of the lid in the direction of arrow » Fig. 88 -
.
›
To close , press the edge of the lid in the direction of arrow » Fig. 88
. The
lid closes automatically.
Phonebox
Fig. 89
Phonebox
Read and observe and on page 87 first.
The storage compartment in the front centre console can be equipped with
the Phonebox function.
If a telephone is directed with its rear side downwards on the pad in the stor-
age compartment » Fig. 89, the telephone signal is amplified by the roof an-
tenna.
Telephones that support the Qi standard for wireless charging, can also be
charged wirelessly in the storage compartment.
While wireless charging is taking place, no objects may be between the pad
and the telephone being charged.WARNING■ The telephone may become warm during wireless charging, so this should
be removed carefully from the tray.■
Metal objects between the pad and the telephone to be charged can get
hot due to the action of the induction field - There is a risk of injury. If there
is a metal object in the storage compartment that has become hot, then
take out the telephone and let the object cook in the storage compart-
ment!
CAUTION
■ Metal objects between the pad and the telephone to be charged can get hot
due to the action of the induction field - There is a risk damage to the tele-
phone.■
With some telephones, the charging process may be interrupted or the tele-
phone may switch off due to getting hot.
■
No electronic or magnetic storage media (e.g. SD cards, USB sticks, cards
with magnetic strips or chip) may be placed between the support and tele-
phone to be charged - there is a risk of data loss and damage to this data carri-
er.
■
If a message appears in Infotainment that the telephone can not be charged,
then proceed as follows.
■
Check that no objects are between the pad and the telephone being charg-
ed. If this is the case, then take out the object and the telephone. Place the
telephone on the pad centrally on the telephone symbol.
■
Check if the position of the telephone to be charged has not changed during
the journey. If this is the case, then take out the telephone and place it back
on the pad centrally on the telephone symbol.
89Practical features
Page 92 of 336
Note■At the start of the wireless charging process, the appropriate message ap-
pears on the Infotainment screen.■
For the optimum telephone signal strength and uninterrupted wireless
charging, we recommend position the telephone in the storage compartment
without the protective sleeve, if possible.
■
Place a max. 146x80 telephone in the storage compartment.
USB and AUX inputs
Fig. 90
Front USB and AUX input / rear USB input
Read and observe
and on page 87 first.
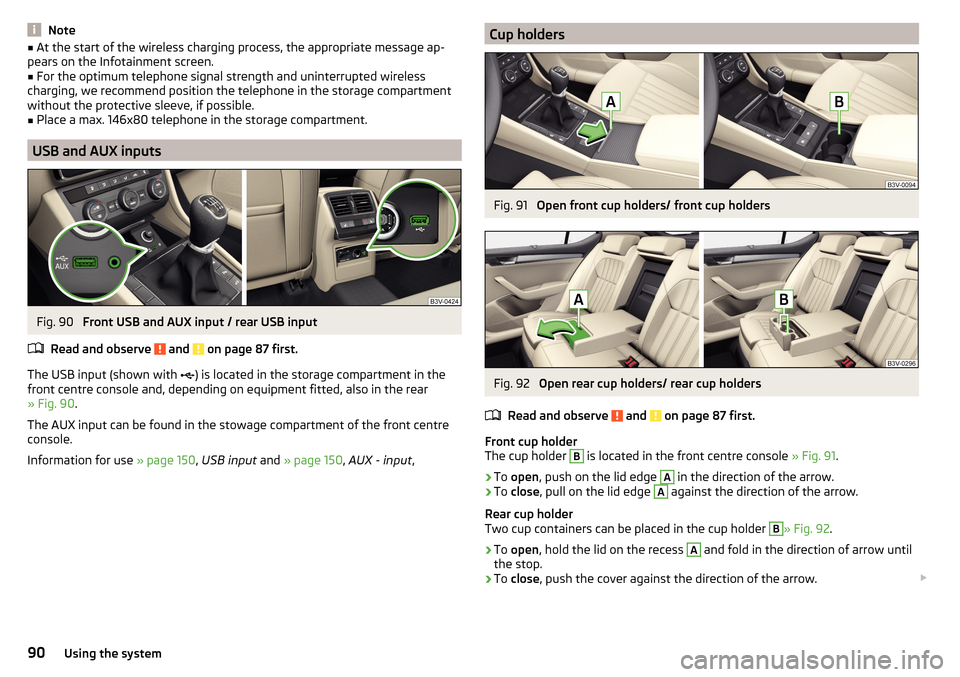
The USB input (shown with ) is located in the storage compartment in the
front centre console and, depending on equipment fitted, also in the rear
» Fig. 90 .
The AUX input can be found in the stowage compartment of the front centre
console.
Information for use » page 150, USB input and » page 150 , AUX - input ,
Cup holdersFig. 91
Open front cup holders/ front cup holders
Fig. 92
Open rear cup holders/ rear cup holders
Read and observe
and on page 87 first.
Front cup holder
The cup holder
B
is located in the front centre console » Fig. 91.
›
To open , push on the lid edge
A
in the direction of the arrow.
›
To close , pull on the lid edge
A
against the direction of the arrow.
Rear cup holder
Two cup containers can be placed in the cup holder
B
» Fig. 92 .
›
To open , hold the lid on the recess
A
and fold in the direction of arrow until
the stop.
›
To close , push the cover against the direction of the arrow.
90Using the system
Page 140 of 336
■Sort Contacts: - Setting the arrangement of the Telephonebook
■By surname
- Sorting by the contact surname
■
By first name
- Sorting by the contact first name
■
Define home address
- Enter the home address
■
Delete My POIs
- Deleting own POI categories (Personal POI)
■
Update "My POIs" (SD/USB)
- Import / update your own POI categories (Personal
POI)
■
Import objectives (SD / USB)
- Import destinations in vCard format
■
Delete user data
- Delete user data (by pressing the function surface
Delete
and
confirm the deletion) ■
Last destinations
- Delete the last destinations
■
Dest. memory
- Delete the stored destinations
■
Routes
- Delete saved routes
■
My points of interest (Personal POI)
- Delete the custom POIs
■
Entered cities
- Delete the history of places already entered via the address
■
Home address
- Delete the stored home address
■
Flagged destination
- Delete the flagged destination
■
Waypoint tour
- Delete items in the Waypoint mode menu (Applies to Info-
tainment Columbus)
■
Most frequent routes
- Deletion of the most travelled routes
Nav. announcements
›
In the Navigation main menu, tap the functional surface
Tap
→
Nav. an-nouncements
.
■
Volume
- Volume control of the nav. announcements
■
Entertainment fading (nav. announce.)
- Setting the fading of the audio volume (e.g.
radio nav. announcements
■
Nav. announcements:
- Setting the playback method of nav. announcements
■
Comprehensive
- All nav. announcements
■
Brief
- Short nav. announcements
■
Congestion only
- Only nav. announcements when a route is changed
■
No navigation sound during call
- Enable / disable non-playback of nav. announce-
ments during a telephone call
■
Note: “My POIs”
- Turn on/off an audible indication when approaching a custom
POI (if supported by the imported custom POI) (applies to Infotainment Co-
lumbus)
Top speeds
›
In the Navigation main menu, tap the functional surface
→
Top speeds
.
The speed limits in the current country are displayed.
With the Note: National border crossed
function switched on, the country-specific
speed limits » page 138, Advanced settings when crossing international bor-
ders are displayed.
Tank options
›
In the Navigation main menu, tap the functional surface
Tap →
Fuel op-tions
.
■
Select preferred fuel station
- Select your preferred fuel station brand (the selec-
ted station brand will be displayed in the first three positions of the list)
■
Fuel warning
-Turn on- / Off the display of a warning message with the option
to visit the nearest petrol station when the fuel level reaches the reserve
area
Version information
›
In the Navigation main menu, tap the function surface
→
Version informa-tion
.
A list of countries shown, for whom navigation data exists, together with the
date of the last update.
An update of the navigation data can be carried out is by tapping the function-
al surface
Update (SD / USB)
.
The information on updating the navigation data is to be obtained from a
ŠKODA partner or on the following ŠKODA Internet pages.
http://go.skoda.eu/updateportal
Advanced settings
›
In the Navigation main menu, tap the functional surface
→
Advanced set-tings
.
■
Time display:
- Select the time display in the status line
■ - Estimated arrival time at destination
■ - Estimated travelling time to the destination
■
Status line
- Selection of the target type, for which the status line, the route
and travel time are displayed (Here it is also determined which destination
type after selecting
→
is displayed in the map)
■ - Route destination
■ - Next waypoint
138Infotainment
Page 142 of 336
■Automatic summer time - switch on/off the automatic daylight savings time
change
■Date:
- Date settings
■
Date format:
- Setting the date format
Setting the Infotainment language
›
Press the button, then tap the function surface
Language
.
›
Select the Infotainment language.
Additional keypad language settings
›
Press the
button, then tap the function surface
Additional keypad languages
.
In this menu, a keyboard language set can be added to allow the entering of
characters other than those in the currently selected language.
Unit settings
›
Press the button, then tap the function surface
Units
.
■
Distance:
- Distance units
■
Speed:
- Speed units
■
Temperature:
- Temperature units
■
Volume:
- Volume units
■
Consumption:
- Fuel consumption units
■
CNG consump.:
- CNG consumption units
■
Pressure:
- Pressure units for tire pressure
Safe removal of the data source
›
Press the button, then tap the function surface
Remove SD card safely
/
Re-move USB Safely
.
The appropriate message concerning the safe removal of the source is dis-
played in the screen.
Now the external source can be removed or separated.
Restore factory settings
›
Press the button, then tap the function surface
Factory settings
.
In this menu individual settings or all settings can be restored at the same
time.
Bluetooth ®
settings›
Press the button, then tap the function surface
Bluetooth
.
■
Bluetooth
- Switch on/off Bluetooth ®
function
■
Visibility:
- Switch on/off the visibility of the Bluetooth ®
device for other Blue-
tooth ®
devices
■
1st name
- Changing the name of the Bluetooth ®
unit
■
Paired devices
- Display the list of coupled Bluetooth ®
Devices
■
Find devices
- Searches for available Bluetooth ®
devices
■
BT audio (A2DP/AVRCP)
- Turn on/off the ability to connect a Bluetooth ®
audio
device (e.g. MP3 player, tablet etc...)
System information
›
Press the button, then tap the function surface
System information
.
■
Update software
- Update software (e.g. Bluetooth ®
)
■ Bluetooth: ... - version number of the Bluetooth ®
software
■ Device part number: ... - Infotainment part number
■ Hardware: ... - Hardware version
■ Software: ... - Software version
The information on available software updates is obtained from a ŠKODA Part-
ner or from the following ŠKODA Internet pages.
http://go.skoda.eu/infotainment
Radio menu settings
Settings for all broadcasting areas
›
Tap the Radio main menu function
surface.
■
Scan
- Automatically play short portions of all available stations of the current
frequency range
■
Arrow buttons:
- Setting the function of the function surfaces
■
Presets
- Change between stations stored under the preset buttons
■
Stations
- Change between all available stations of the selected broadcast-
ing range
■
Traffic program (TP)
- Switches traffic programme on/off
■
Radio text
- Switching the text display radio (FM and DAB) on and off
140Infotainment
Page 143 of 336
■Kind of stat. list:- Sort types of radio stations in the station list (DAB)
■Global
- alphanumeric station sorting with the filtering ability according to
the transmitted program type
■
Hierarchical
- station sorting according to their assigned parent station
groups (Ensemble) - Tree structure of the list
■
Station logos
- manual management of station logos
■
Delete presets
- Delete the stations stored under preset buttons
■
Advanced settings
- further settings that are different depending on the selec-
ted broadcasting range(FM and DAB)
Advanced Settings (FM)
›
Select the FM band in the Radio main menu and tap on the function surface
→
Advanced settings
.
■
RDS regional:
- Switch on/off the automatic tracking of related regional stations
■
Automatic
- auto-selects the station with the best reception at the moment.
If you lose reception in the given region, Infotainment will automatically set
another available region.
■
Fixed
- Maintains the selected regional station continuously. When the sig-
nal is lost, another station must be set manually.
■
Alternative frequency (AF)
- Search for alternative frequencies of the station cur-
rently being played to on/off
■
Radio Data System (RDS)
- enable/disable RDS function (receiving additional in-
formation from the station) 1)
■
Sort stations:
- Sort types of radio stations in the station list (FM)
■
Group
- Sort by transmitted program type
■
ABC
- Alphabetical order according to station name
Advanced Settings (DAB)
›
In the Radio main menu, select the DAB range and tap on the function sur-
face
→
Advanced settings
.
■
DAB traffic announcements
- Turn on / off DAB announcements
■
Other DAB messages
- Switch on/off other announcements (e.g., warnings, re-
gional weather, sports reports, financial news)
■DAB station tracking - Switch on/off automatic DAB station tracking on another
frequency or in other station groups
■Auto. DAB - FM switching
- switches on/off auto-switching from DAB to the FM
frequency band if the DAB signal is lost
Automatic change from DAB to FM
If DAB reception is poor, the device tries to find an FM station.
The station name is followed by (
) while the station is being received on the
FM band. When the corresponding DAB station is can be received again, the
system automatically switches from FM to DAB.
If a DAB station is also not available in the FM band due to poor reception, In-
fotainment will be switched to mute.
Media menu settings
›
Tap on the function surface in the Media main menu
.
■
Sound
- sound settings
■
Mix/repeat inc. subfolders
- Switch on/off the title display including subfolders
■
Bluetooth
- Settings for the Bluetooth ®
function
■
Traffic program (TP)
- Switches traffic programme on/off
■
Activate AUX
- Enables / disables the AUX input
■
Remove SD card safely
- Safe removal of the inserted SD storage card
■
Remove USB safely
- safe removal of external device connected to the USB in-
put
Telephone menu settings
›
In the Telephone main menu, tap on the function surface
.
■
Hands-free
- Switching a call to the Telephone / back to Infotainment (the
menu item is displayed during a call)
■
Select telephone
- Search for available telephones/list of paired telephones/se-
lect telephone
■
Find
- search for available Telephones
■
Bluetooth
- Bluetooth ®
settings
1)
Only valid for some countries.
141Infotainment settings - Swing
Page 147 of 336
Radio station logos - Columbus, Amundsen, Bolero
Station logos are stored in the Infotainment memory which are assigned auto-
matically when storing the stations under preset buttons.
Assign station logo automatically›
to Disable / Enable in the radio main menu, tap on the function surface
→
Advanced settings
→
Automatic storage station logos
.
Assign station logo manually
›
Tap the Radio main menu function
→
Station logos
.
›
Tap on an occupied station button and select the data carrier (SD card, USB).
›
Search for and select the desired station logo on the respective data carrier.
Remove station logo manually
›
Tap the Radio main menu function
→
Station logos
.
›
Tap on the station button from which you want to remove a logo.
Note
■
The following image formats are supported: jpg, gif, png, bmp.■We recommend a resolution of up to 500x500 pixels.
Station logos - Swing
The station key of a preferred station can contain the name and the station
logo.
Assign a station logo
›
Tap on the Radio main menu function
→
Station logos
.
›
Tap on an occupied station button and select the data carrier (SD card, USB).
›
Search for and select the desired station logo on the respective data carrier.
Remove station logo
›
Tap on the Radio main menu function
→
Station logos
.
›
Tap on the station button from which you want to remove a logo.
›
Or: : tap on the function surface
All
to delete the logos of all the station
buttons simultaneously.
›
Confirm / cancel the removal.
Note
■ The following image formats are supported: jpg, gif, png, bmp (we recom-
mend using the png format).■
Maximum resolution 400x240 pixels.
Traffic program (TP)›
To switch on/off the traffic monitoring in the main menu Radio, tap on the
function surface
→
Traffic program (TP)
.
During a traffic announcement, it is possible to cancel the current announce-
ment if necessary by deactivating the traffic monitoring.
Note
■ Should this station not transmit traffic reports or the signal is not available,
then Infotainment automatically searches in the background for another TP
station.■
During playback in menu Media or a station in the AM radio range, traffic
news is received from the previously selected FM radio range.
145Radio
Page 152 of 336
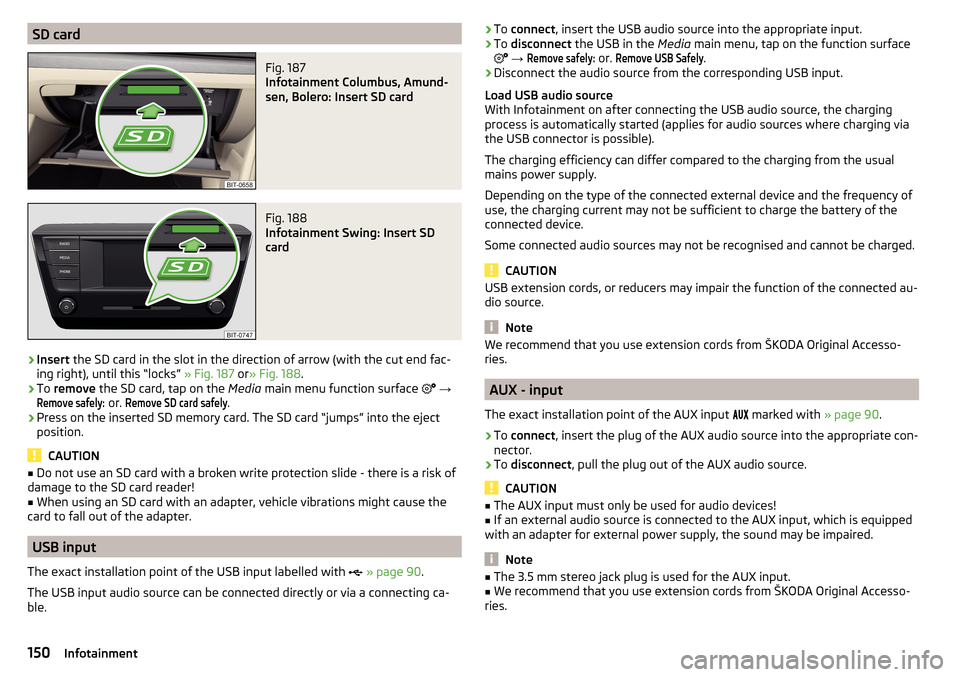
SD cardFig. 187
Infotainment Columbus, Amund-
sen, Bolero: Insert SD card
Fig. 188
Infotainment Swing: Insert SD
card
›
Insert the SD card in the slot in the direction of arrow (with the cut end fac-
ing right), until this “locks” » Fig. 187 or» Fig. 188 .
›
To remove the SD card, tap on the Media main menu function surface
→
Remove safely:
or.
Remove SD card safely
.
›
Press on the inserted SD memory card. The SD card “jumps” into the eject
position.
CAUTION
■ Do not use an SD card with a broken write protection slide - there is a risk of
damage to the SD card reader!■
When using an SD card with an adapter, vehicle vibrations might cause the
card to fall out of the adapter.
USB input
The exact installation point of the USB input labelled with
» page 90 .
The USB input audio source can be connected directly or via a connecting ca-
ble.
› To
connect , insert the USB audio source into the appropriate input.›To disconnect the USB in the Media main menu, tap on the function surface
→
Remove safely:
or.
Remove USB Safely
.
›
Disconnect the audio source from the corresponding USB input.
Load USB audio source
With Infotainment on after connecting the USB audio source, the charging
process is automatically started (applies for audio sources where charging via
the USB connector is possible).
The charging efficiency can differ compared to the charging from the usual
mains power supply.
Depending on the type of the connected external device and the frequency of
use, the charging current may not be sufficient to charge the battery of the
connected device.
Some connected audio sources may not be recognised and cannot be charged.
CAUTION
USB extension cords, or reducers may impair the function of the connected au-
dio source.
Note
We recommend that you use extension cords from ŠKODA Original Accesso-
ries.
AUX - input
The exact installation point of the AUX input
marked with » page 90.
›
To connect , insert the plug of the AUX audio source into the appropriate con-
nector.
›
To disconnect , pull the plug out of the AUX audio source.
CAUTION
■
The AUX input must only be used for audio devices!■If an external audio source is connected to the AUX input, which is equipped
with an adapter for external power supply, the sound may be impaired.
Note
■ The 3.5 mm stereo jack plug is used for the AUX input.■We recommend that you use extension cords from ŠKODA Original Accesso-
ries.150Infotainment
Page 154 of 336
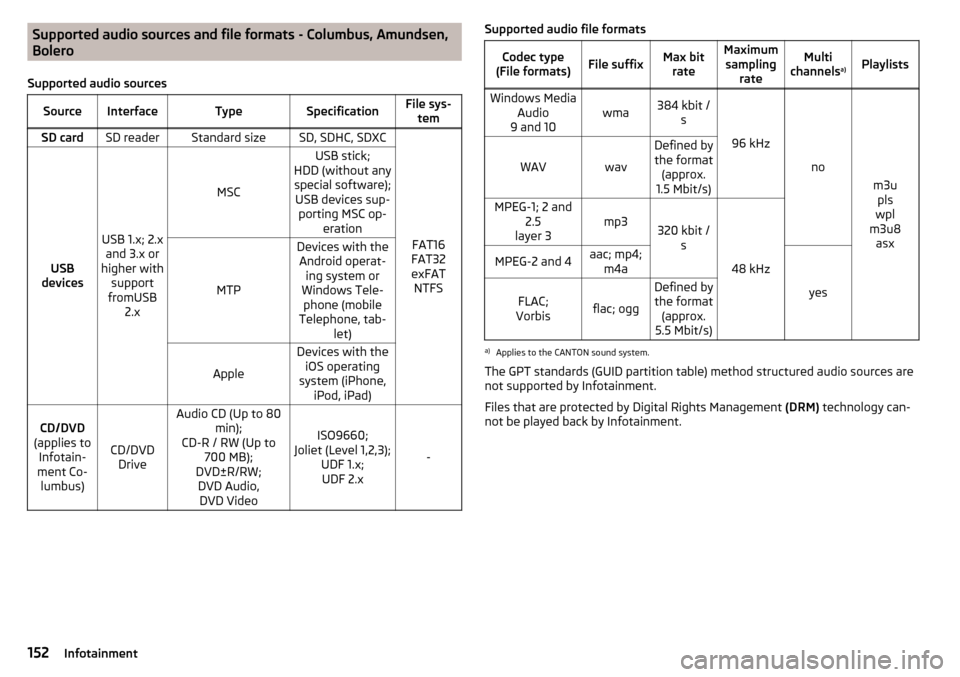
Supported audio sources and file formats - Columbus, Amundsen,
Bolero
Supported audio sourcesSourceInterfaceTypeSpecificationFile sys- temSD cardSD readerStandard sizeSD, SDHC, SDXC
FAT16
FAT32
exFAT NTFSUSB
devices
USB 1.x; 2.x and 3.x or
higher with support
fromUSB 2.x
MSC
USB stick;
HDD (without any special software); USB devices sup- porting MSC op- eration
MTP
Devices with theAndroid operat- ing system or
Windows Tele- phone (mobile
Telephone, tab- let)
Apple
Devices with theiOS operating
system (iPhone, iPod, iPad)CD/DVD
(applies to Infotain-
ment Co- lumbus)
CD/DVD Drive
Audio CD (Up to 80 min);
CD-R / RW (Up to 700 MB);
DVD±R/RW; DVD Audio,DVD Video
ISO9660;
Joliet (Level 1,2,3); UDF 1.x;UDF 2.x
-
Supported audio file formatsCodec type
(File formats)File suffixMax bit rateMaximumsampling rateMulti
channels a)PlaylistsWindows Media
Audio
9 and 10wma384 kbit / s
96 kHz
no
m3upls
wpl
m3u8 asx
WAVwav
Defined bythe format (approx.
1.5 Mbit/s)MPEG-1; 2 and 2.5
layer 3mp3320 kbit / s
48 kHz
MPEG-2 and 4aac; mp4;m4a
yes
FLAC;
Vorbisflac; ogg
Defined by the format (approx.
5.5 Mbit/s)a)
Applies to the CANTON sound system.
The GPT standards (GUID partition table) method structured audio sources are
not supported by Infotainment.
Files that are protected by Digital Rights Management (DRM) technology can-
not be played back by Infotainment.
152Infotainment