SKODA YETI 2009 1.G / 5L Owner's Manual
Manufacturer: SKODA, Model Year: 2009, Model line: YETI, Model: SKODA YETI 2009 1.G / 5LPages: 271, PDF Size: 16.24 MB
Page 241 of 271

Fuses and light bulbs
240
Removing the light bulb for the parking light (halogen headlight)– Switch the ignition and all lights off. – Turn the protective cap in direction of arrow
OPEN
and remove it
⇒page 239,
fig. 198
.
– Pull out the fixture in direction of arrow
⇒page 239, fig. 198
.
– Take the faulty bulb out of the fixture and insert a new one.– Insert the protective cap.Removing the light bulb for the parking light (Xenon headlight)– Switch the ignition and all lights off.– Remove the rubber protective cap
⇒page 239, fig. 197
.
– Pull out the fixture in direction of arrow
⇒fig. 199
.
– Take the faulty bulb out of the fixture and insert a new one. – Insert the protective cap.
Note
In order to facilitate the removal of the fi
xture with the bulb for the parking light
(halogen headlight), we recommend to remove first of all the connector of the bulb for the low beam light.
Main beam light and low beam light– Switch the ignition and all lights off. – Turn the protective cap in direction of arrow
OPEN
⇒page 239, fig. 198
and
remove it.
– Unplug plug .– Press the wire clamps down until they
are released from the secured position.
– Remove the light bulb and insert the new light bulb in such a way that the fixing
lugs of the light bulb socket fit
into the recesses at the reflector.
Installation takes place in the reverse order.Fog lights*
Fig. 199 Removing the fixture for the parking light (Xenon headlight)A1
A2
AB
A3
Fig. 200 Removing the bulb for the main beam light and low beam light
AA
ABAC
Fig. 201 Removing the bulb for the fog light
sgg.6.book Page 240 Thursday, September 24, 2009 2:32 PM
Page 242 of 271

Fuses and light bulbs
241
Using the system
Safety
Driving Tips
General Maintenance
Breakdown assistance
Technical Data
Removing the bulb for the fog light– Switch the ignition and all lights off. – Remove the rubber protective cap
⇒page 239, fig. 197
.
– Unplug plug . – Take the faulty bulb out of the fixture
by pressing the li
ght socket downwards
and insert a new one.
– Insert the protective cap.Daylight driving lightsRemove the bulb for daylight driving lights– Switch the ignition and all lights off. – Remove the rubber protective cap
⇒page 239, fig. 197
.
– Unplug plug .– Take the faulty bulb out of the fixture by turning in direction of arrow and insert
a new one in the reverse procedure.
– Insert the protective cap.
Rear light unitFig. 203 Removing the rear light unit
/ disconnecting the plug connection
– Open the boot lid. – Unscrew the light with the aid of the Torx
wrench from the vehicle tool kit. The
shorter side of the wrench is used for loosening the screws and the longer side for screwing the screws out completely
⇒fig. 203
.
– Grasp the light at the top and bottom part and pull it slightly to the rear.– Disconnect the plug connection by pressing the catches in direction of arrow
and by pulling them in direction of arrow
⇒fig. 203
.
Changing light bulbs in the rear light unitFig. 204 Remove the middle part
of the light / rear light unit:
Fitting position of the bulbs
AA
A1
A2
Fig. 202 Remove the bulb for daylight driving lights
AA
A1
A2
A1
A2
A3
sgg.6.book Page 241 Thursday, September 24, 2009 2:32 PM
Page 243 of 271

Fuses and light bulbs
242
– Unscrew the securing screw with the aid of the Torx wrench and press the three
catches in direction of arrow
⇒page 241, fig. 204
.
– Remove the plastic lamp holder.– Replace the defective light bulb. – In order to replace a bulb for the brake light, reversing light, rear fog or turn signal
light, turn the fixture of the bulb to the left up to the stop and take the bulb out of the housing or pull the bulb for the parking light out of the fixture
⇒page 241,
fig. 204
.
– Change the bulb, install again the fixture with
the bulb in the housing and turn it to
the right up to the stop or insert it.
– Insert the plastic lamp holder into the
illumination unit until the interlocks are
heard to engage and screw in the securing screw with the aid of the Torx wrench ⇒ page 241, fig. 204
.
– Reconnect the plug connector and insert
the bulb in the original position.
– Screw on the light
⇒page 241, fig. 203
on the left.
Fitting position of the light bulbs in the rear light unit
⇒page 241, fig. 204
- Brake lights - Reversing lights - Rear fog light - Turn signal lights - parking lights
Licence plate light– Unscrew the glass
cover of the light
⇒fig. 205
.
– Take the faulty bulb out of the holder and insert a new one.– Replace the the glass cover of the light and press it down to the stop - ensure that
the glass cover is correctly installed.
– Screw the glass cover tight.
AA
A1A2A3A4A5
Fig. 205 Licence plate light
sgg.6.book Page 242 Thursday, September 24, 2009 2:32 PM
Page 244 of 271

Technical Data
243
Using the system
Safety
Driving Tips
General Maintenance
Breakdown assistance
Technical Data
Te c h n i c a l D a t aTechnical DataGeneral informationThe details given in the official vehicle regi
stration documents always take precedence
over the details in the Owner's Manual. Please refer to the official vehicle registration documents or consult a specialist garage
concerning the engine with which your
vehicle is equipped.Used abbreviations
PerformancesThe listed performance values were de
termined without performance-reducing
equipment, e.g. air
conditioning system.
WeightThe loading capacity is reduced in line with the range of the special equipment. The unloaden weight contains a fuel tank topped
up to 90%. A driver with a weight of 75
kg is also includ
ed in the value.
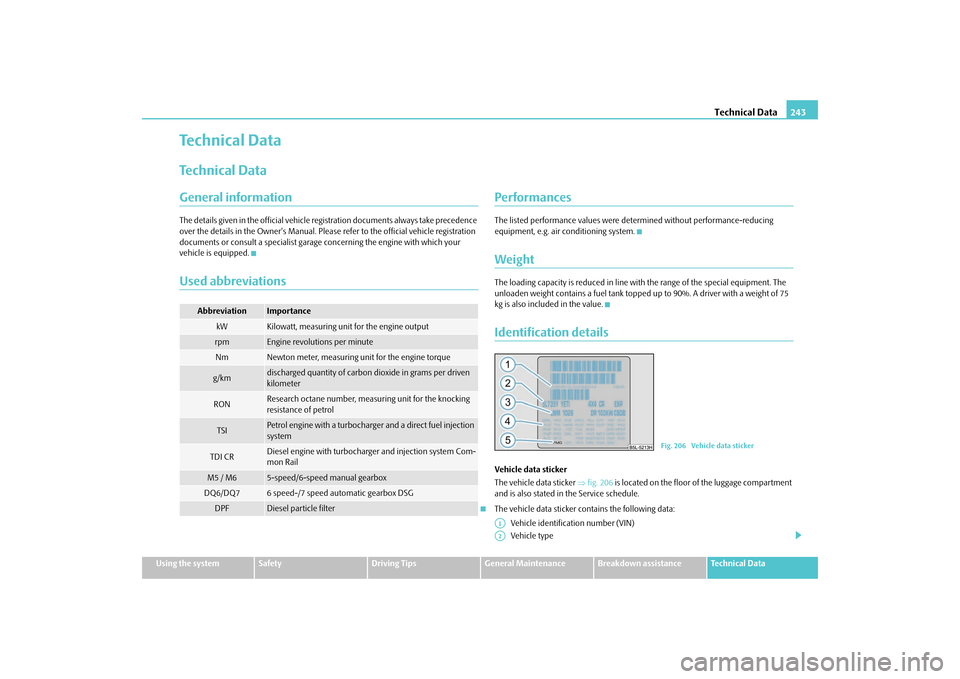
Identification detailsVehicle data sticker The vehicle data sticker
⇒fig. 206
is located on the floor of the luggage compartment
and is also stated in the Service schedule. The vehicle data sticker co
ntains the following data:
Vehicle identification number (VIN) Vehicle type
Abbreviation
Importance
kW
Kilowatt, measuring unit for the engine output
rpm
Engine revolutions per minute
Nm
Newton meter, measuring
unit for the engine torque
g/km
discharged quantity of carbon dioxide in grams per driven kilometer
RON
Research octane number, meas
uring unit for the knocking
resistance of petrol
TSI
Petrol engine with a turbocharger and a direct fuel injection system
TDI CR
Diesel engine with turbocharger and injection system Com- mon Rail
M5 / M6
5-speed/6-speed manual gearbox
DQ6/DQ7
6 speed-/7 speed automatic gearbox DSG
DPF
Diesel particle filter
Fig. 206 Vehicle data sticker
A1A2
sgg.6.book Page 243 Thursday, September 24, 2009 2:32 PM
Page 245 of 271

Technical Data
244
Gearbox code, paint number, interior eq
uipment number, engine output, engine
code Partial description of the vehicle 7GG, 7MB, 7MG - vehicles with DPF
⇒page 170
Vehicle identification number (VIN) The vehicle identification number - VIN (veh
icle body number) is stamped into the
engine compartment on the right hand sh
ock absorber dome. This number is also
located on a sign on the lower left hand edge below the windscreen. Engine number The engine number is stam
ped into the engine block.
Type plate (production plate) The type plate is located in the lowe
r area of the left centre column.
Homologation sign The homologation sign is located on the insi
de of the bonnet next to the lock. Vehicles
for certain countries do not
have an homologation sign.
Sticker on inside of fuel filler flap The stickers are affixed to the inside of the fuel filler flap and contain the following information:•
The prescribed types of fuel,
•
Ty re s i z e ,
•
Tyre pressure.
Fuel consumption according to the regulations (99/100/EU)Depending on the range of the special equipment, style of driving, traffic situation, weather influences and vehicl
e condition, the consumption
values which in practice
result when using the vehicle can deviate from the indicated values.
Urban traffic The consumption measurement in urban traffic
begins with starting of the cold engine.
Afterwards the normal urban traffic is simulated. Non-urban traffic For the consumption measurement in non-ur
ban traffic the vehicle, as in daily
motoring, is accelerated and braked severa
l times in all gears. The vehicle speed
changes within the range from 0 to 120 km/h. Combined traffic The consumption value in the combined traffic consists of 37% from the value for the urban traffic and of 63% from th
e value for the non-urban traffic.
A3A4A5sgg.6.book Page 244 Thursday, September 24, 2009 2:32 PM
Page 246 of 271

Technical Data
245
Using the system
Safety
Driving Tips
General Maintenance
Breakdown assistance
Technical Data
DimensionsDimensions (mm)Other informationAngle (in degree)Length
4223
Width
1793
Width including exterior mirror
1956
Height
1691
Clearance
180
Wheel base
2578
Track gauge front / rear
1541/1537
Front embankment angle
19
Rear embankment angle
26,7
Ramp angle
19,4
Slope angle (°)/ climbing ability (%)
1.2 ltr./77 kW TSI - M6
24/45
1.8 ltr./118 kW TSI - M6 4x4
29/55
2.0 ltr./81 kW TDI CR - M5
29/55
2.0 ltr./81 kW TDI CR - M6 4x4
31/60
2.0 ltr./103 kW TDI CR - M6 4x4
31/60
2.0 ltr./125 kW TDI CR - M6 4x4
31/60
sgg.6.book Page 245 Thursday, September 24, 2009 2:32 PM
Page 247 of 271

Technical Data
246
Engine oil specificationsThe grade of engine oil should be se
lected in accordance with precise
specifications.The engine of your vehicle has been factory-
filled with a high-grade oil which you can
use throughout the year - except in extreme climatic regions. You can mix various oils together with each other when refilling with oil. This does not, however, apply for models with flexible service intervals (QG1). Engine oils are, of course, undergoing co
ntinuous further deve
lopment. Thus the
information stated in this Owner's Manual is
only correct at the time of publication.
Specialist garages are informed by Škoda
Auto about current changes. We recommend
having this oil change undertaken by a specialist garage. The specifications (VW standards) stated in the following must be indicated separately or together with other specifications on the bottle. Engine oil specifications for models
with flexible service intervals (QG1)
Engine oil specifications for vehicles with fixed service intervals (QG2)
If the oils specified above are not available, oils according to ACEA A2 or ACEA A3 can be used once for refilling. If the oils specified above are not available,
oils according to ACEA B3 or ACEA B4 can
be used once for refilling.
Caution
Only the above-mentioned oils may be used on vehicles with flexible service intervals (QG1). We recommend always refilling with oi
l of the same specification since this will
maintain the properties of the oil. In exce
ptional cases, you must top up only once
engine oil complying with Specification VW 50
2 00 (only for petrol engines) or Specifi-
cation VW 505 01 (only for diesel engines) to maximum 0.5 litres. You must not use other engine oils - risk of engine damage!
Note
•
Before a long drive we recommend that
you purchase and carry with you engine
oil which complies with the specification for your vehicle. Consequently, you will always have the correct engine oil for refilling.•
We recommend using a preservative from the Škoda original accessories offered
by your Škoda dealer.•
For further information - see Service shedule.
Petrol engines
Engine oil specifications
1.2 ltr./77 kW TSI - EU5
VW 504 00
1.8 ltr./118 (112) kW TSI - EU5
VW 504 00
Diesel engines
Engine oil specifications
2.0 ltr./81 kW TDI CR DPF - EU5
VW 507 00
2.0 ltr./103 kW TDI CR DPF - EU5
VW 507 00
2.0 ltr./125 kW TDI CR DPF - EU5
VW 507 00
Petrol engines
Engine oil specifications
1.2 ltr./77 kW TSI - EU5
VW 502 00
1.8 ltr./118 kW TSI - EU5
VW 502 00
Diesel engines
Engine oil specifications
2.0 ltr./81 kW TDI CR DPF - EU5
VW 507 00
2.0 ltr./103 kW TDI CR DPF - EU5
VW 507 00
2.0 ltr./125 kW TDI CR DPF - EU5
VW 507 00
sgg.6.book Page 246 Thursday, September 24, 2009 2:32 PM
Page 248 of 271

Technical Data
247
Using the system
Safety
Driving Tips
General Maintenance
Breakdown assistance
Technical Data
1.2 ltr./77 kW TSI - EU°5Engine Performances Fuel consumption (in ltr./100 km) and CO
2 emission (in g/km)
Power output
kW per rpm
77/5000
Maximum torque
Nm per rpm
175/1500-3500
Number of cylinders/Displacement (cm
3)
4/1197
Fuel - unleaded petrol min. RON
95M6
Maximum speed
km/h
175
Acceleration 0 - 100 km/h
s
11,8M6
Urban
7,6a)/7,9
b)
a)Unloaden weight with special equipment up to 1505 kg.b)Unloaden weight with special equipment more than 1505 kg.Non-urban
5,9a)/5,9
b)
Combination
6,4a)/6,6
b)
CO2 emission - combination
149
a)/154
b)
sgg.6.book Page 247 Thursday, September 24, 2009 2:32 PM
Page 249 of 271

Technical Data
248
Capacities (in liter) Weight (in kg)Fuel tank capaci
ty/of which spare
60/10,5
Reservoir for windscreen washer system/ wi
th headlight cleaning
system/with auxil-
iary heating
3/5,5/4,5
Engine oil
a)
a)Oil capacity with oil filter change. Inspec
t oil level when filling; do not fill up too much. The oil level must be between the
markings
⇒page 205, “Check engine oil level”.
3,6
Cooling system of the vehicle
b)
b)On vehicles which are fitted with an independent auxiliary heatin
g and ventilation, the volume of the coolant is greater by app
rox. 1 ltr.
7,7M6
Permissible gross weight
1890
Unloaden weight ready for work
1345
Loading capacity
545
Loading capacity when using the TLC
465
Permissible front axle load
1100
Permissible rear axle load
1160
Permissible trailer loads, trailer braked
1200
a)
1200
b)
a)Uphills up to 12 %b)Uphills up to 8%Permissible trailer loads, trailer unbraked
600
sgg.6.book Page 248 Thursday, September 24, 2009 2:32 PM
Page 250 of 271

Technical Data
249
Using the system
Safety
Driving Tips
General Maintenance
Breakdown assistance
Technical Data
1.8 ltr./118 kW TSI - EU 5Engine Performances Fuel consumption (in ltr./100 km) and CO
2 emission (in g/km)
Power output
kW per rpm
118/4500-6200
Maximum torque
Nm per rpm
250/1500-4500
Number of cylinders/Displacement (cm
3)
4/1798
Fuel - unleaded petrol min. RON
954x4 M6
Maximum speed
km/h
200
Acceleration 0 - 100 km/h
s
8,44x4 M6
Urban
10,1
Non-urban
6,9
Combination
8,0
CO2 emission - combination
189
sgg.6.book Page 249 Thursday, September 24, 2009 2:32 PM