buttons SKODA YETI 2011 1.G / 5L User Guide
[x] Cancel search | Manufacturer: SKODA, Model Year: 2011, Model line: YETI, Model: SKODA YETI 2011 1.G / 5LPages: 252, PDF Size: 3.61 MB
Page 94 of 252
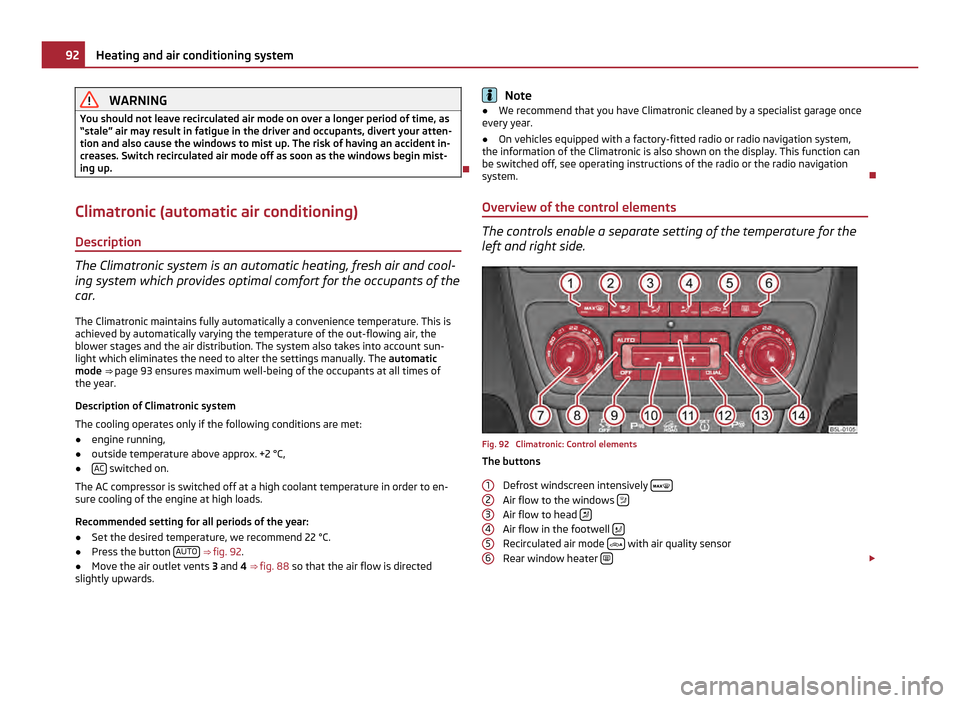
WARNING
You should not leave recirculated air mode on over a longer period of time, as
“stale ” air may result in fatigue in the driver and occupants, divert your atten-
tion and also cause the windows to mist up. The risk of having an accident in-
creases. Switch recirculated air mode off as soon as the windows begin mist-
ing up.
Climatronic (automatic air conditioning) Description The Climatronic system is an automatic heating, fresh air and cool-
ing system which provides optimal comfort for the occupants of the
car.
The Climatronic maintains fully automatically a convenience temperature. This is
achieved by automatically varying the temperature of the out-flowing air, the
blower stages and the air distribution. The system also takes into account sun-
light which eliminates the need to alter the settings manually. The automatic
mode
⇒
page 93 ensures maximum well-being of the occupants at all times of
the year.
Description of Climatronic system
The cooling operates only if the following conditions are met:
● engine running,
● outside temperature above approx. +2 °C,
● AC switched on.
The AC compressor is switched off at a high coolant temperature in order to en-
sure cooling of the engine at high loads.
Recommended setting for all periods of the year:
● Set the desired temperature, we recommend 22 °C.
● Press the button AUTO
⇒ fig. 92 .
● Move the air outlet vents 3 and 4 ⇒
fig. 88 so that the air flow is directed
slightly upwards. Note
● We recommend that you have Climatronic cleaned by a specialist garage once
every year.
● On vehicles equipped with a factory-fitted radio or radio navigation system,
the information of the Climatronic is also shown on the display. This function can
be switched off, see operating instructions of the radio or the radio navigation
system.
Overview of the control elements The controls enable a separate setting of the temperature for the
left and right side.
Fig. 92 Climatronic: Control elements
The buttons
Defrost windscreen intensively Air flow to the windows
Air flow to head
Air flow in the footwell
Recirculated air mode
with air quality sensor
Rear window heater £
1 2
3
4
5
692
Heating and air conditioning system
Page 95 of 252
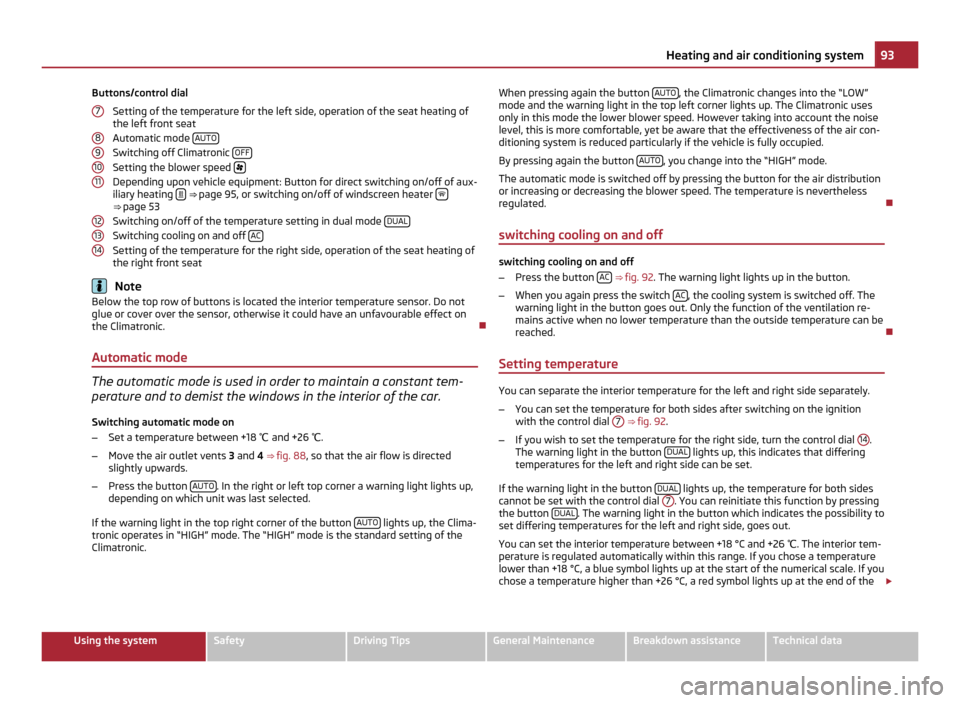
Buttons/control dial
Setting of the temperature for the left side, operation of the seat heating of
the left front seat
Automatic mode AUTOSwitching off Climatronic
OFFSetting the blower speed
Depending upon vehicle equipment: Button for direct switching on/off of aux-
iliary heating ⇒
page 95, or switching on/off of windscreen heater ⇒ page 53
Switching on/off of the temperature setting in dual mode
DUALSwitching cooling on and off
ACSetting of the temperature for the right side, operation of the seat heating of
the right front seat
Note
Below the top row of buttons is located the interior temperature sensor. Do not
glue or cover over the sensor, otherwise it could have an unfavourable effect on
the Climatronic.
Automatic mode The automatic mode is used in order to maintain a constant tem-
perature and to demist the windows in the interior of the car.
Switching automatic mode on
– Set a temperature between +18 ℃ and +26 ℃.
– Move the air outlet vents 3 and 4 ⇒
fig. 88 , so that the air flow is directed
slightly upwards.
– Press the button AUTO . In the right or left top corner a warning light lights up,
depending on which unit was last selected.
If the warning light in the top right corner of the button AUTO lights up, the Clima-
tronic operates in
“HIGH” mode. The “HIGH” mode is the standard setting of the
Climatronic. 7 8
9
10
11
12
13
14 When pressing again the button
AUTO , the Climatronic changes into the “LOW”
mode and the warning light in the top left corner lights up. The Climatronic uses
only in this mode the lower blower speed. However taking into account the noise
level, this is more comfortable, yet be aware that the effectiveness of the air con-
ditioning system is reduced particularly if the vehicle is fully occupied.
By pressing again the button AUTO , you change into the “HIGH” mode.
The automatic mode is switched off by pressing the button for the air distribution
or increasing or decreasing the blower speed. The temperature is nevertheless
regulated.
switching cooling on and off switching cooling on and off
–
Press the button AC
⇒
fig. 92 . The warning light lights up in the button.
– When you again press the switch AC , the cooling system is switched off. The
warning light in the button goes out. Only the function of the ventilation re-
mains active when no lower temperature than the outside temperature can be
reached.
Setting temperature You can separate the interior temperature for the left and right side separately.
–
You can set the temperature for both sides after switching on the ignition
with the control dial 7
⇒ fig. 92 .
– If you wish to set the temperature for the right side, turn the control dial 14 .
The warning light in the button DUAL lights up, this indicates that differing
temperatures for the left and right side can be set.
If the warning light in the button DUAL lights up, the temperature for both sides
cannot be set with the control dial 7 . You can reinitiate this function by pressing
the button DUAL . The warning light in the button which indicates the possibility to
set differing temperatures for the left and right side, goes out.
You can set the interior temperature between +18 °C and +26 ℃. The interior tem-
perature is regulated automatically within this range. If you chose a temperature
lower than +18 °C, a blue symbol lights up at the start of the numerical scale. If you
chose a temperature higher than +26 °C, a red symbol lights up at the end of the £ 93
Heating and air conditioning system Using the system Safety Driving Tips General Maintenance Breakdown assistance Technical data
Page 119 of 252
Communication
Multifunction steering wheel
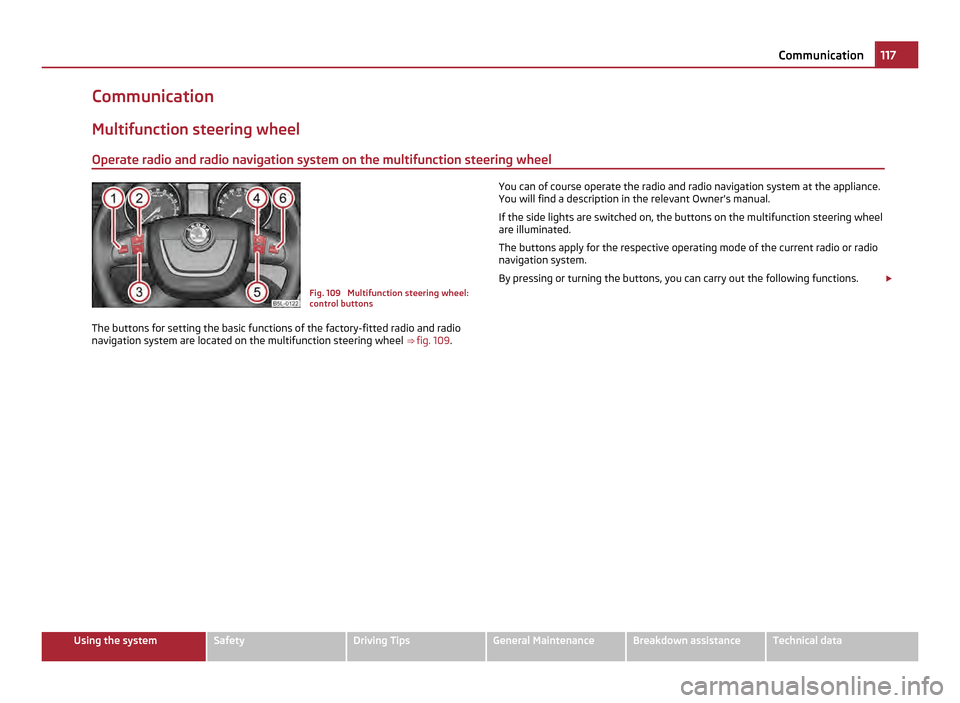
Operate radio and radio navigation system on the multifunction steering wheel Fig. 109 Multifunction steering wheel:
control buttons
The buttons for setting the basic functions of the factory-fitted radio and radio
navigation system are located on the multifunction steering wheel ⇒ fig. 109 . You can of course operate the radio and radio navigation system at the appliance.
You will find a description in the relevant Owner's manual.
If the side lights are switched on, the buttons on the multifunction steering wheel
are illuminated.
The buttons apply for the respective operating mode of the current radio or radio
navigation system.
By pressing or turning the buttons, you can carry out the following functions. £ 117
Communication Using the system Safety Driving Tips General Maintenance Breakdown assistance Technical data
Page 123 of 252
●
Inserting the mobile phone into the adapter ensures an optimal sending and
receiving power and offers at the same time the advantage of the battery charg-
ing.
● The range of the Bluetooth ®
connection to the hands-free system is restricted
to the vehicle interior. The range is dependent on local factors, e.g. obstacles be-
tween the devices and mutual interferences with other devices. If your mobile
phone is e.g. in a jacket pocket, this can lead to difficulties when establishing the
Bluetooth ®
connection with the hands-free system or the data transfer.
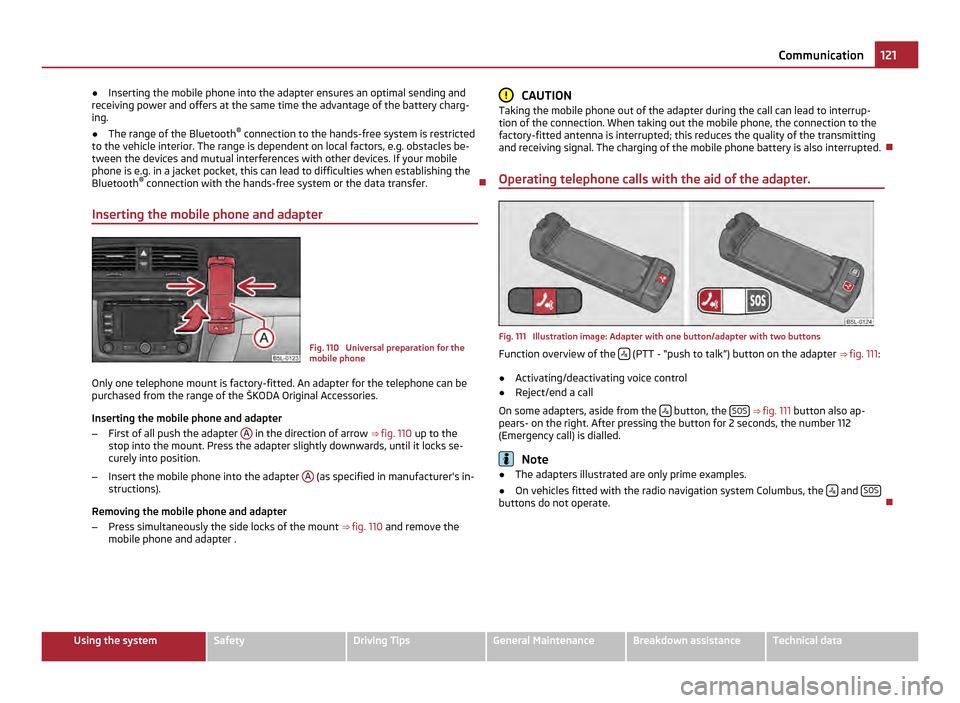
Inserting the mobile phone and adapter Fig. 110 Universal preparation for the
mobile phone
Only one telephone mount is factory-fitted. An adapter for the telephone can be
purchased from the range of the ŠKODA Original Accessories.
Inserting the mobile phone and adapter
– First of all push the adapter A in the direction of arrow
⇒ fig. 110 up to the
stop into the mount. Press the adapter slightly downwards, until it locks se-
curely into position.
– Insert the mobile phone into the adapter A (as specified in manufacturer's in-
structions).
Removing the mobile phone and adapter
– Press simultaneously the side locks of the mount ⇒ fig. 110 and remove the
mobile phone and adapter . CAUTION
Taking the mobile phone out of the adapter during the call can lead to interrup-
tion of the connection. When taking out the mobile phone, the connection to the
factory-fitted antenna is interrupted; this reduces the quality of the transmitting
and receiving signal. The charging of the mobile phone battery is also interrupted.
Operating telephone calls with the aid of the adapter. Fig. 111 Illustration image: Adapter with one button/adapter with two buttons
Function overview of the
(PTT - “push to talk”) button on the adapter
⇒
fig. 111 :
● Activating/deactivating voice control
● Reject/end a call
On some adapters, aside from the button, the
SOS
⇒ fig. 111 button also ap-
pears- on the right. After pressing the button for 2 seconds, the number 112
(Emergency call) is dialled. Note
● The adapters illustrated are only prime examples.
● On vehicles fitted with the radio navigation system Columbus, the and
SOS buttons do not operate.
121
Communication Using the system Safety Driving Tips General Maintenance Breakdown assistance Technical data
Page 124 of 252
Operation of the telephone on the multifunction steering wheel
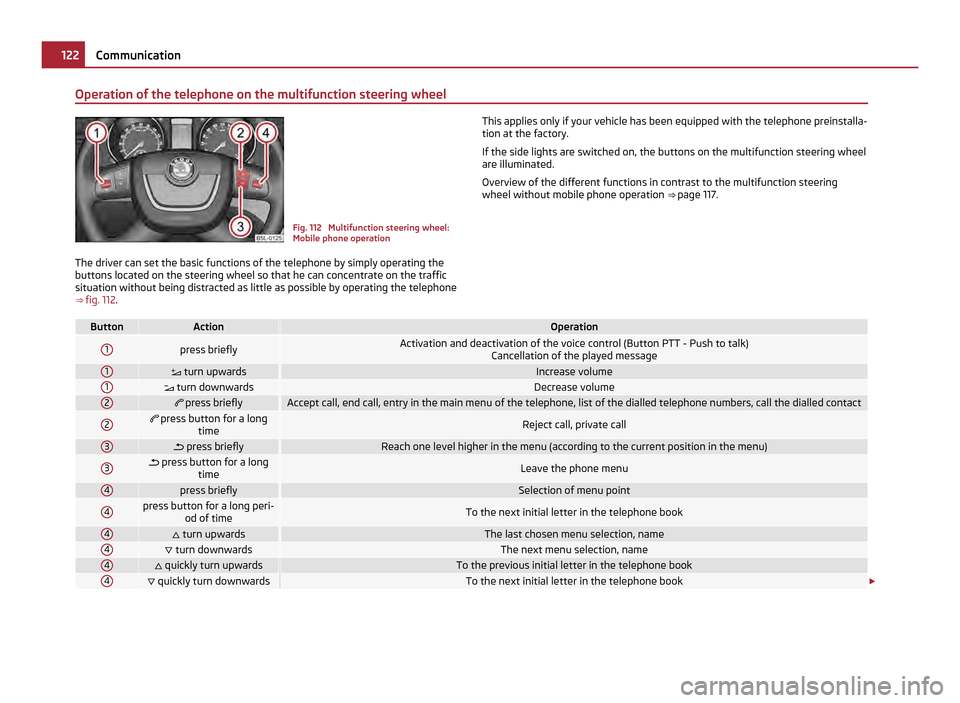
Fig. 112 Multifunction steering wheel:
Mobile phone operation
The driver can set the basic functions of the telephone by simply operating the
buttons located on the steering wheel so that he can concentrate on the traffic
situation without being distracted as little as possible by operating the telephone
⇒ fig. 112. This applies only if your vehicle has been equipped with the telephone preinstalla-
tion at the factory.
If the side lights are switched on, the buttons on the multifunction steering wheel
are illuminated.
Overview of the different functions in contrast to the multifunction steering
wheel without mobile phone operation ⇒
page 117. Button Action Operation
1
press briefly
Activation and deactivation of the voice control (Button PTT - Push to talk)
Cancellation of the played message1
turn upwards Increase volume
1
turn downwards Decrease volume
2
press briefly Accept call, end call, entry in the main menu of the telephone, list of the dialled telephone numbers, call the dialled contact
2
press button for a long
time Reject call, private call
3
press briefly Reach one level higher in the menu (according to the current position in the menu)
3
press button for a long
time Leave the phone menu
4
press briefly Selection of menu point
4 press button for a long peri-
od of time To the next initial letter in the telephone book
4
turn upwards The last chosen menu selection, name
4
turn downwards The next menu selection, name
4
quickly turn upwards To the previous initial letter in the telephone book
4
quickly turn downwards To the next initial letter in the telephone book
£122
Communication
Page 125 of 252
The buttons operate the functions for the operating mode of the current tele-
phone.
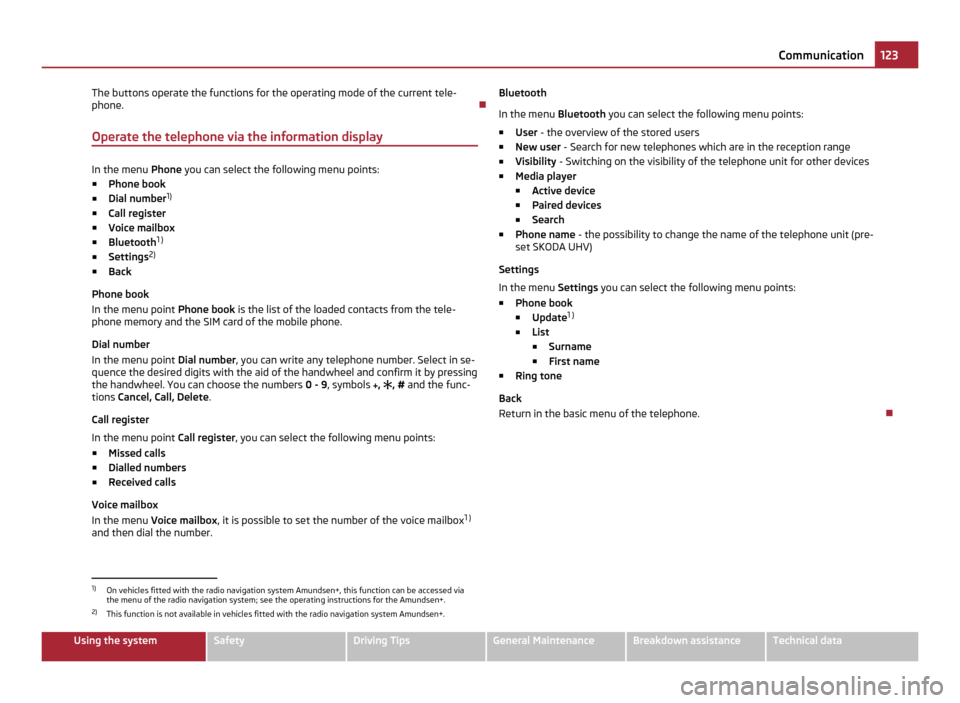
Operate the telephone via the information display In the menu
Phone you can select the following menu points:
■ Phone book
■ Dial number 1)
■ Call register
■ Voice mailbox
■ Bluetooth 1
)
■ Settings 2)
■ Back
Phone book
In the menu point Phone book is the list of the loaded contacts from the tele-
phone memory and the SIM card of the mobile phone.
Dial number
In the menu point Dial number, you can write any telephone number. Select in se-
quence the desired digits with the aid of the handwheel and confirm it by pressing
the handwheel. You can choose the numbers 0 - 9, symbols , , # and the func-
tions Cancel, Call, Delete .
Call register
In the menu point Call register, you can select the following menu points:
■ Missed calls
■ Dialled numbers
■ Received calls
Voice mailbox
In the menu Voice mailbox , it is possible to set the number of the voice mailbox 1 )
and then dial the number. Bluetooth
In the menu
Bluetooth you can select the following menu points:
■ User - the overview of the stored users
■ New user - Search for new telephones which are in the reception range
■ Visibility - Switching on the visibility of the telephone unit for other devices
■ Media player
■ Active device
■ Paired devices
■ Search
■ Phone name - the possibility to change the name of the telephone unit (pre-
set SKODA UHV)
Settings
In the menu Settings you can select the following menu points:
■ Phone book
■ Update 1
)
■ List
■ Surname
■ First name
■ Ring tone
Back
Return in the basic menu of the telephone. 1)
On vehicles fitted with the radio navigation system Amundsen+, this function can be accessed via
the menu of the radio navigation system; see the operating instructions for the Amundsen+.
2) This function is not available in vehicles fitted with the radio navigation system Amundsen+. 123
Communication Using the system Safety Driving Tips General Maintenance Breakdown assistance Technical data
Page 128 of 252
CD change
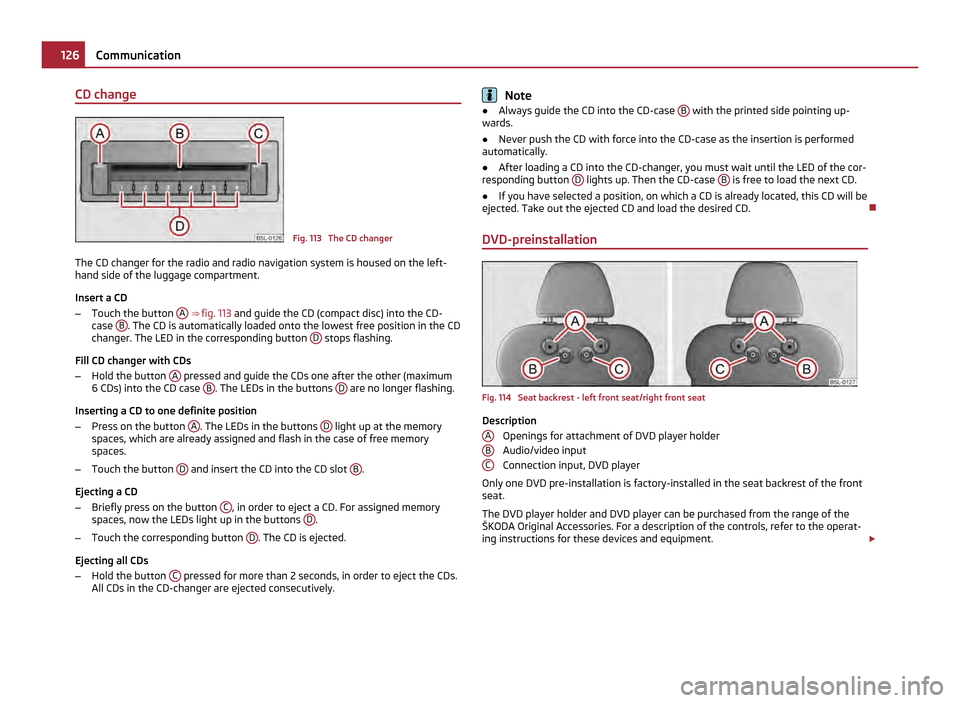
Fig. 113 The CD changer
The CD changer for the radio and radio navigation system is housed on the left-
hand side of the luggage compartment.
Insert a CD
– Touch the button A
⇒ fig. 113 and guide the CD (compact disc) into the CD-
case B . The CD is automatically loaded onto the lowest free position in the CD
changer. The LED in the corresponding button D stops flashing.
Fill CD changer with CDs
– Hold the button A pressed and guide the CDs one after the other (maximum
6
CDs) into the CD case B . The LEDs in the buttons
D are no longer flashing.
Inserting a CD to one definite position
– Press on the button A . The LEDs in the buttons
D light up at the memory
spaces, which are already assigned and flash in the case of free memory
spaces.
– Touch the button D and insert the CD into the CD slot
B .
Ejecting a CD
– Briefly press on the button C , in order to eject a CD. For assigned memory
spaces, now the LEDs light up in the buttons D .
– Touch the corresponding button D . The CD is ejected.
Ejecting all CDs
– Hold the button C pressed for more than 2 seconds, in order to eject the CDs.
All CDs in the CD-changer are ejected consecutively. Note
● Always guide the CD into the CD-case B with the printed side pointing up-
wards.
● Never push the CD with force into the CD-case as the insertion is performed
automatically.
● After loading a CD into the CD-changer, you must wait until the LED of the cor-
responding button D lights up. Then the CD-case
B is free to load the next CD.
● If you have selected a position, on which a CD is already located, this CD will be
ejected. Take out the ejected CD and load the desired CD.
DVD-preinstallation Fig. 114 Seat backrest - left front seat/right front seat
Description
Openings for attachment of DVD player holder
Audio/video input
Connection input, DVD player
Only one DVD pre-installation is factory-installed in the seat backrest of the front
seat.
The DVD player holder and DVD player can be purchased from the range of the
ŠKODA Original Accessories. For a description of the controls, refer to the operat-
ing instructions for these devices and equipment. £
A B
C126
Communication
Page 242 of 252
Index
A
Abroad . . . . . . . . . . . . . . . . . . . . . . . . . . . . . . . . . . . . . . 167
ABS . . . . . . . . . . . . . . . . . . . . . . . . . . . . . . . . . . . . . . . . . 157 Warning light . . . . . . . . . . . . . . . . . . . . . . . . . . . . . . . 28
Accessories . . . . . . . . . . . . . . . . . . . . . . . . . . . . . . . . . . 207
Active driver-steering recommendation . . . . . . . . 155
Adjusting seats . . . . . . . . . . . . . . . . . . . . . . . . 61, 68, 129 electrically . . . . . . . . . . . . . . . . . . . . . . . . . . . . . . . . . . 63
Adjusting the seat backrest . . . . . . . . . . . . . . . . . . . . 67
Adjusting the steering wheel . . . . . . . . . . . . . . . . . . 99
Airbag . . . . . . . . . . . . . . . . . . . . . . . . . . . . . . . . . . . . . . 137 Deployment . . . . . . . . . . . . . . . . . . . . . . . . . . . . . . . . 137
Front airbag . . . . . . . . . . . . . . . . . . . . . . . . . . . . . . . . 138
Head airbag . . . . . . . . . . . . . . . . . . . . . . . . . . . . . . . . . 143
Knee airbag . . . . . . . . . . . . . . . . . . . . . . . . . . . . . . . . . 140
Side airbag . . . . . . . . . . . . . . . . . . . . . . . . . . . . . . . . . 141
Warning light . . . . . . . . . . . . . . . . . . . . . . . . . . . . . . . . 24
Airbag system . . . . . . . . . . . . . . . . . . . . . . . . . . . . . . . 137 Warning light . . . . . . . . . . . . . . . . . . . . . . . . . . . . . . . . 24
Air conditioning system . . . . . . . . . . . . . . . . . . . . . . . 89 Air outlet vents . . . . . . . . . . . . . . . . . . . . . . . . . . . . . . 87
Recirculated air mode . . . . . . . . . . . . . . . . . . . . . . . . 91
Alarm . . . . . . . . . . . . . . . . . . . . . . . . . . . . . . . . . . . . . . . . 38
Alternator Warning light . . . . . . . . . . . . . . . . . . . . . . . . . . . . . . . 29
Anti-theft alarm system . . . . . . . . . . . . . . . . . . . . . . . 38
Antilock brake system . . . . . . . . . . . . . . . . . . . . . . . . 157
Antilock brake system (ABS) Warning light . . . . . . . . . . . . . . . . . . . . . . . . . . . . . . . 28
Ashtray . . . . . . . . . . . . . . . . . . . . . . . . . . . . . . . . . . . . . . 78
Assigning the remote control key to the memory buttons . . . . . . . . . . . . . . . . . . . . . . . . . . . . . . . . . . . . 64
Auto Check Control . . . . . . . . . . . . . . . . . . . . . . . . . . . . 19
Auto Computer . . . . . . . . . . . . . . . . . . . . . . . . . . . . . . . 14
Automatic driving lamp control . . . . . . . . . . . . . . . . . 46 Automatic gearbox
Emergency programme . . . . . . . . . . . . . . . . . . . . . . 115
Kickdown . . . . . . . . . . . . . . . . . . . . . . . . . . . . . . . . . . . 114
Selector lever-emergency unlocking . . . . . . . . . . 116
Tiptronic . . . . . . . . . . . . . . . . . . . . . . . . . . . . . . . . . . . . 115
Automatic gearbox DSG . . . . . . . . . . . . . . . . . . . . . . . 112
Automatic rear window wiper . . . . . . . . . . . . . . . . . . 56
Automatic seat adjustment . . . . . . . . . . . . . . . . . . . . 64
Automatic vehicle wash systems . . . . . . . . . . . . . . . 181
Automatic wiper/washer system . . . . . . . . . . . . . . . 54
AUX-IN . . . . . . . . . . . . . . . . . . . . . . . . . . . . . . . . . . . . . . 125
Avoiding damage to your vehicle . . . . . . . . . . . . . . 167
B Battery . . . . . . . . . . . . . . . . . . . . . . . . . . . . . . . . . . 29, 196 change . . . . . . . . . . . . . . . . . . . . . . . . . . . . . . . . . . . . . 199
Charge . . . . . . . . . . . . . . . . . . . . . . . . . . . . . . . . . . . . . 198
Operation in winter . . . . . . . . . . . . . . . . . . . . . . . . . 198
Before setting off . . . . . . . . . . . . . . . . . . . . . . . . . . . . 128
Belt Warning light . . . . . . . . . . . . . . . . . . . . . . . . . . . . . . . 28
Belts . . . . . . . . . . . . . . . . . . . . . . . . . . . . . . . . . . . . . . . . 132
Belt tensioners . . . . . . . . . . . . . . . . . . . . . . . . . . . . . . 135
Bonnet . . . . . . . . . . . . . . . . . . . . . . . . . . . . . . . . . . . . . . 189
Boot lid . . . . . . . . . . . . . . . . . . . . . . . . . . . . . . . . . . . . . . 36 Warning light . . . . . . . . . . . . . . . . . . . . . . . . . . . . . . . 28
Brake Handbrake . . . . . . . . . . . . . . . . . . . . . . . . . . . . . . . . . . 102
Warning light . . . . . . . . . . . . . . . . . . . . . . . . . . . . . . . 29
Brake Assist . . . . . . . . . . . . . . . . . . . . . . . . . . . . . . . . . 157
Brake booster . . . . . . . . . . . . . . . . . . . . . . . . . . . . . . . 156
Brake fluid . . . . . . . . . . . . . . . . . . . . . . . . . . . . . . . . . . 195
Brakes . . . . . . . . . . . . . . . . . . . . . . . . . . . . . . . . . . . . . . 155
Bulbs Warning light . . . . . . . . . . . . . . . . . . . . . . . . . . . . . . . . 24
Button for the central locking system . . . . . . . . . . . 35 Button in the driver's door
Power windows . . . . . . . . . . . . . . . . . . . . . . . . . . . . . 39
C Car jack . . . . . . . . . . . . . . . . . . . . . . . . . . . . . . . . . 208, 212
Car state . . . . . . . . . . . . . . . . . . . . . . . . . . . . . . . . . . . . . 19
Catalytic converter . . . . . . . . . . . . . . . . . . . . . . . . . . . 162
CD changer . . . . . . . . . . . . . . . . . . . . . . . . . . . . . . . . . . 126
Central locking system . . . . . . . . . . . . . . . . . . . . . . . . 33 lock . . . . . . . . . . . . . . . . . . . . . . . . . . . . . . . . . . . . . . . . 34
unlock . . . . . . . . . . . . . . . . . . . . . . . . . . . . . . . . . . . . . . 34
Changes . . . . . . . . . . . . . . . . . . . . . . . . . . . . . . . . . . . . 207
Changing a wheel . . . . . . . . . . . . . . . . . . . . . . . . . . . . 209
Changing bulbs . . . . . . . . . . . . . . . . . . . . . . . . . . . . . . 223
Changing wheels around . . . . . . . . . . . . . . . . . . . . . 203
Charging the battery . . . . . . . . . . . . . . . . . . . . . . . . . 198 Warning light . . . . . . . . . . . . . . . . . . . . . . . . . . . . . . . 29
Check engine oil level . . . . . . . . . . . . . . . . . . . . . . . . . 191
Child safety . . . . . . . . . . . . . . . . . . . . . . . . . . . . . . . . . . 146 Side airbag . . . . . . . . . . . . . . . . . . . . . . . . . . . . . . . . . 148
Child safety lock . . . . . . . . . . . . . . . . . . . . . . . . . . . . . . 32
Child safety seat on the front passenger seat . . . . . . . . . . . . . . . . . 147
Safety information . . . . . . . . . . . . . . . . . . . . . . . . . . 146
Child seat . . . . . . . . . . . . . . . . . . . . . . . . . . . . . . . . . . . 148 Classification into groups . . . . . . . . . . . . . . . . . . . . 148
ISOFIX system . . . . . . . . . . . . . . . . . . . . . . . . . . . . . . 151
Use of child safety seats . . . . . . . . . . . . . . . . . . . . . 149
Chrome parts . . . . . . . . . . . . . . . . . . . . . . . . . . . . . . . . 182
Cigarette lighter . . . . . . . . . . . . . . . . . . . . . . . . . . . . . . 79
Cleaning . . . . . . . . . . . . . . . . . . . . . . . . . . . . . . . . . . . . 180
Climatronic Defrosting windows . . . . . . . . . . . . . . . . . . . . . . . . . 95
Recirculated air mode . . . . . . . . . . . . . . . . . . . . . . . 94
Climatronic (automatic air conditioning) . . . . . . . . . 92
Clock . . . . . . . . . . . . . . . . . . . . . . . . . . . . . . . . . . . . . . . . . 13 240
Index