warning lights SKODA YETI 2011 1.G / 5L Repair Manual
[x] Cancel search | Manufacturer: SKODA, Model Year: 2011, Model line: YETI, Model: SKODA YETI 2011 1.G / 5LPages: 252, PDF Size: 3.61 MB
Page 162 of 252
WARNING
● The diesel particle filter achieves very high temperatures. Therefore do not
park at points where the hot filter comes into direct contact with dry grass or
other combustible materials - risk of fire!
● Never use additional underbody protection or corrosion-protection agents
for the exhaust pipes, catalytic converters, diesel particle filter or heat shields.
When the engine reaches its operating temperature, these materials might ig-
nite – risk of fire. Note
When using diesel fuel with high sulphur content the life of the diesel particle fil-
ter is clearly reduced. A specialist garage will be able to tell you which countries
use only diesel fuel with high sulphur content.
Off-road General Fig. 141 Off-road switch
The Off-road mode comprises functions which assist off-road driving.
The following functions are integrated in the Off-road mode:
● Start-Off Assist ⇒ page 160,
● Downhill Drive Support ⇒ page 161 ,
● EDL Off-road ⇒ page 154,
● TCS Off-road ⇒ page 154,
● ABS Off-road ⇒ page 156. Switch on Off-road
The Off-road mode is switched on by pressing the button
⇒
fig. 141. The warning
light in the button lights up. The warning light lights up in the instrument cluster
if the system is switched on ⇒ page 30.
Switch off Off-road
The Off-road mode is switched off by repeated pressing of the button. The warn-
ing light in the button goes out. When switching off the ignition, the Off-road
mode is also switched off and can be switched on again, if necessary, after
switching on the ignition. If the engine is switched off by accident and restarted
within 30 seconds, the Off-road mode remains switched on.
All four wheels must be fitted with the same tyres in order to achieve proper op-
eration of the Off-road mode. Differing rolling circumferences of the tyres can lead
to an undesirable reduction in the engine output. WARNING
● Always adjust your speed to suit weather, road and traffic conditions. The
increased safety must not tempt you to take a greater safety risk than other-
wise - risk of accident!
● The Off-road equipment can also not overcome the physical limits of your
vehicle.
● The effect of the Off-road equipment depends as well on the tyres.
● The Off-road equipment is not designed for the use on common roads.
Start-Off Assist The Start-Off Assist enhances the driving comfort and can be used when starting
off, in particular on a slope. When the vehicle is stationary, the Start-Off Assist is
activated after switching it on using the button for the Off-road mode ⇒
fig. 141
.
Operating principle
When depressing the accelerator pedal fully, the engine speed required for the
start-up procedure of the stationary vehicle is restricted. The overspeed trip unit
is automatically deactivated after terminating the start-up procedure. As part of
the Assist System, the accelerator pedal is adapted in its characteristics for an
easier start-off on slippery and loose soil. 160
Intelligent technology
Page 163 of 252
Downhill Drive Support
Operating principle
The Downhill Drive Support maintains a constant speed on a steep downhill sec-
tion when driving forwards and backwards by automatically intervening in the
brake system of all wheels. It prevents the wheels locking because the ABS re-
mains active. The warning light in the instrument cluster indicates that the
Downhill Drive Support is available ⇒ page 30.
The vehicle speed, which is maintained by the Assist System, is selected by the
driver while driving on a downhill section as of the moment the first intervention
of the Assist System is performed or else, while driving on a downhill section, the
driver must control the vehicle speed until the Assist System intervenes for the
first time. When the Assist System actively intervenes, this is indicated by the
warning light flashing or by a pulsating movement of the brake pedal, similar to
the intervention of the ABS.
You can increase or reduce the speed, even when no gear is engaged, by operat-
ing the accelerator or brake pedal. Thus the function is always interrupted and is
reactivated afterwards.
The Downhill Drive Support is activated automatically if the following conditions
are met:
● the Off-road mode is switched on and the warning light lights up in the in-
strument cluster,
● the engine of the vehicle is running and either the 1st, 2nd, 3rd gear, the re-
verse gear or no gear is engaged,
● the engine of the vehicle is running, the selector lever of the automatic gear-
box is in the position R, N, D, S or Tiptronic,
● the speed is less than 30 km/h,
● the downhill gradient is at least 10 % (when driving over sleepers the limit can
briefly drop to 8 %),
● neither the accelerator nor the brake pedal is operated.
It is however a requirement that the vehicle has sufficient grip on the soil. The
Downhill Drive Support cannot properly fulfil its function on slushy soil due to
physical reasons (ice or mud).
The Downhill Drive Support is deactivated when braking or accelerating or if the
downhill gradient is less than 8 %. Manual gearbox
The vehicle speed is steadily regulated by the Assist System depending on the
type of gearbox or engine:
● 1. gear - approx. 8 1)
- 30 km/h
● 2. gear - approx. 13 1 )
- 30 km/h
● 3. gear - approx. 22 1 )
- 30 km/h
● Reverse gear - approx. 9 1 )
- 30 km/h
● Neutral for driving forwards - as well as driving backwards - approx. 2 1 )
- 30
km/h
Automatic gearbox
● Selector lever in the position D, S or Tiptronic (for the 1st, 2nd, 3rd gear) for
driving forwards - approx. 2 - 30
km/h
● Selector lever in the position R for driving backwards - approx. 2 - 30 km/h
● Selector lever in the position N for driving forwards as well as backwards - ap-
prox. 2 - 30
km/h Note
● During an intervention of the Downhill Drive Support, the brake lights do not
light up.
● Do not switch off the Off-road mode during an intervention of the Assist Sys-
tem. 1)
The indicated values represent the average of the lower speed limits if a gear is engaged (depending
on the type of gearbox or engine). 161
Intelligent technology Using the system Safety Driving Tips General Maintenance Breakdown assistance Technical data
Page 165 of 252
–
For vehicles with petrol engine only refuel with unleaded petrol ⇒ page 186,
Fuel.
– Never run the fuel tank completely empty.
– Do not switch off the ignition while you are driving the vehicle.
– Do not pour too much oil into the engine ⇒
page 192, Replenishing engine oil.
If you drive your vehicle in a country in which unleaded petrol is not available, you
must have the catalytic converter replaced later when driving the vehicle into a
country in which use of a catalytic converter is mandatory. WARNING
● In view of the high temperatures which may be produced in the catalytic
converter, one should always park a vehicle in such a way that the catalytic
converter cannot come into contact with easily flammable materials below the
vehicle - a risk of fire!
● Never use additional underbody protection or corrosion-protection agents
for the exhaust pipes, catalytic converters or heat shields. Such substances
might ignite when driving - risk of fire! CAUTION
● On vehicles fitted with a catalytic converter, never let the fuel tank run com-
pletely empty. An irregular fuel supply can result in poor ignition or misfiring. Un-
burnt fuel may get into the exhaust system and damage the catalytic converter.
● Filling the tank even only once with leaded petrol will result in the catalytic
converter being destroyed.
● If you detect misfiring, a drop in performance or irregular engine running when
driving, reduce your speed immediately and have the vehicle inspected by the
nearest specialist garage. The symptoms described may be caused by a fault in
the ignition system. Unburnt fuel may get into the exhaust system and damage
the catalytic converter. For the sake of the environment
Even if the exhaust system is operating properly, a sulphur-like exhaust odour
may be produced under certain operating conditions of the engine. This depends
on the sulphur content of the fuel. It is often sufficient to refuel with unleaded
premium-grade petrol of a different brand or at a different filling station. Driving in an economical and environmentally
conscious manner
General Your personal style of driving is a major factor.
Your fuel consumption, any pollution of the environmental and the wear-and-tear
to the engine, brakes and tyres, depend essentially on three factors:
● your personal style of driving,
● the conditions under which your vehicle is operated,
● technical aspects.
You can easily improve your fuel economy by 10 - 15 percent by driving in an eco-
nomical way with foresight. This section is intended to provide you with a number
of tips on how to protect the environment and at the same time save money.
The fuel consumption can naturally also be influenced by factors which are be-
yond the driver's control. It is, for example, normal for the fuel consumption to in-
crease in winter and under worsened conditions such as poor road conditions,
towing a trailer, etc.
The technical requirements for low fuel usage and economic efficiency of the ve-
hicle have already been built into the vehicle at the works. Special attention has
been given to minimising negative effects on the environment. It is necessary to
take note of the guidelines given in this chapter in order to make best use of
these characteristics and to maintain their effectiveness.
The optimal engine speed should be obtained when accelerating, in order to avoid
a high fuel consumption and resonance of the vehicle.
Looking ahead when driving A vehicle's highest fuel consumption occurs it accelerates.
Avoid accelerating and braking unnecessarily. If you drive with foresight you will
not need to brake so often and will also then not have to accelerate so much. Let
your vehicle coast to a stop, for example, if this is possible, when you see that the
next set of traffic lights is at red. 163
Driving and the environment Using the system Safety Driving Tips General Maintenance Breakdown assistance Technical data
Page 178 of 252
Driving through sand
Do not reduce
the tyre inflation pressure. If you nevertheless reduce the inflation
pressure, do not forget to re-establish the correct tyre inflation pressure level be-
fore you continue driving. Driving with a reduced tyre inflation pressure increases
the risk that you lose control over your vehicle and that the vehicle rolls over.
Driving through mud
Do not change speed or direction when you drive through the mud. The tyres can
lose their grip in the mud. If the vehicle slides, you must steer in the appropriate
direction in order to regain control over the vehicle. WARNING
● Driving through mud can be dangerous. The vehicle can slide uncontrolla-
bly which causes an increased risk of injury. Adopt a particularly cautious style
of driving. Pay attention to the information and warning notes.
● An incorrect tyre inflation pressure may cause a major or fatal accident! An
incorrect tyre inflation pressure may result in bursting of a tyre, which causes
the vehicle to get out of control.
● Observe the important guidelines ⇒ page 168.
Stuck vehicle If you can no longer drive on ...
–
Carefully dig out all the wheels and make sure that no other parts of the vehi-
cle are stuck in the sand.
– Engage reverse gear.
– Gently depress the accelerator and try to drive backwards in your own track.
– Place scrub, footmats or a sackcloth directly in front of the tyres in order to im-
prove the road adherence and thus achieve an improved traction to drive out.
Rocking out vehicle
– Switch off the TCS ⇒ page 155.
– Set the steering wheel straight.
– Drive so far back until the wheels just begin to spin.
– Quickly shift into first gear and drive forwards until the wheels begin to spin. –
Drive back and forth repeatedly until the momentum is sufficient to free the
vehicle.
– Switch on the TCS.
A few tips
– Ensure that the Off-road mode is switched on ⇒ page 160.
– Avoid prolonged spinning of the wheels, otherwise the vehicle would still sink
deeper into the ground.
– Remove mud, dirt and stones from the tread of the tyre.
You need training and experience if you wish to rock out a vehicle. If you make a
mistake, the vehicle can still sink in further and you can only free it with the help
of others. WARNING
Observe the important guidelines ⇒
page 168.
After driving off-road Check the vehicle for damage after driving off-road - especially on the underside
of the vehicle.
–
Switch off the Off-road mode
⇒
page 160.
– Check the tyres and the axles for damage and remove coarse dirt, stones and
foreign bodies from the tyre tread.
– Clean the turn signal lights, the headlights, the number plate and the win-
dows.
– Check the underbody of the vehicle and remove trapped objects, such as scrub
or wood pieces.
– Contact your specialist garage if you detect any damage.
– In case of thick layers of dirt, clean the radiator grille, the engine compartment
and the underbody of the vehicle. £176
Driving and the environment
Page 180 of 252
Towing a trailer
Towing a trailer
Technical requirements Your vehicle is designed primarily for transporting persons and luggage. It can,
however, also be used for towing a trailer - provided certain technical equipment
is fitted.
If your vehicle has been
factory-fitted with a towing device or has a towing device
from
ŠKODA Original Accessories, the towing device satisfies all technical and le-
gal requirements.
Your vehicle is fitted with a 13-pin power socket for the electrical connection be-
tween the vehicle and trailer. If the trailer which you wish to tow has a 7-pin con-
nector , you can use a suitable adapter from ŠKODA Original Accessories.
This work must be carried out in accordance with the manufacturer's specifica-
tions if a towing device is retrofitted.
Authorised ŠKODA Service Partners can provide detailed information about retro-
fitting a towing device and for any necessary modifications to the cooling system. WARNING
We recommend that you have the towing device from ŠKODA Original Acces-
sories installed by an authorised
ŠKODA Service Partner. He is familiar with all
the relevant details relating to retrofitting such equipment. There is a risk of
an accident if the towing device is not properly fitted!
General Maintenance Trailer load
The permissible trailer load must on no account be exceeded.
You can negotiate appropriately steeper inclines and descents if you do not make
full use of the permissible trailer load.
The trailer loads specified only apply for
altitudes up to 1000 metres above mean
sea level. The fact that the engine power output drops with increasing height due
to a lowering of air pressure and thus the ability to climb, means that the towed
weight must be reduced by 10 % for every further increase of 1 000 metres in height above sea level. The towed weight is the weight of the (laden) vehicle and
the (laden) trailer together. One should take this into account before driving up to
higher altitudes.
The trailer and drawbar load information on the type plate of the towing device
are merely test data for the towing device The data relating to your vehicle,
which is often less than this test data, can be found in your vehicle registration
documents.
Distribution of the load
Distribute the load in the trailer in such a way that any heavy items are located as
close as possible to the axle. Secure the items to prevent them slipping.
Tyre pressure
Correct the tyre inflation pressure on your vehicle for that of
“fully laden”
⇒ page 201. The inflation pressure of the tyres fitted to the trailer adjust in ac-
cordance with the manufacturer's recommendation.
Exterior mirrors
You have to have additional exterior mirrors fitted if you are not able to see the
traffic behind the trailer with the standard rear-view mirrors. Both exterior mirrors
should be attached to folding arms. Adjust the mirrors so that they provide you
with an adequate field of view to the rear.
Headlights
Before starting off with a hitched trailer, also check the setting of the headlights.
Alter the setting as necessary with the aid of the headlight beam adjuster
⇒ page 50.
Detachable ball head
The ball head is detachable on vehicles with towing device and can be obtained
from ŠKODA Original Accessories. It is stowed together with separate fitting in-
structions in the spare wheel well in the luggage compartment of the vehicle. Note
● We recommend that you also have your vehicle inspected between service in-
tervals if you tow a trailer frequently.
● The handbrake on the towing vehicle must be put on when coupling and de-
coupling the trailer. 178
Towing a trailer
Page 185 of 252
The headlight lenses
Please do not use any aggressive cleaning or chemical solvent products for clean-
ing the front headlights - risk of damage to the plastic lenses. Please use soap
and clean warm water. CAUTION
Never wipe the headlights dry and do not use any sharp objects for cleaning the
plastic lenses, this may result in damage to the protective paintwork and conse-
quently in formation of cracks on the headlight lenses, e.g. through effect of
chemical products.
Door and window seals The rubber seals on the doors, boot lid, bonnet, roof window and windows remain
supple and last longer if you treat them from time to time with a rubber care prod-
uct (e.g. with a spray with silicone-free oil). You also avoid premature wear of the
seals and prevent leakages in this way. It is also easier to open the doors. Rubber
seals which are well cared for also do not stick together in cold winter weather.
Locking cylinder Use specific products for de-icing locking cylinders.
Note
When washing your vehicle, ensure that as little water as possible gets into the
locking cylinders.
Wheels Steel wheels
You should also thoroughly wash the wheels and wheel trims when giving your
vehicle its regular wash. This prevents any brake dust, dirt and road salt from
sticking to the wheel hubs. You can remove stubborn brake abrasion adhering to
the wheels with an industrial cleaner. Touch up any damage to the paintwork on
the wheels before rust is able to form. Light alloy wheels
Regular care of light alloy wheels is necessary in order to retain their decorative
appearance over long periods. It is particularly important to remove regularly any
road salt and brake abrasion from light alloy wheels, otherwise the light metal will
suffer. Wash thoroughly and then treat the wheels with a protective product for
light alloy wheels which does not contain any acidic components. We recommend
to apply a hard wax layer onto the wheel hubs every three months. You must not
use any products which cause abrasion when treating the wheel hubs. Any dam-
age to the paint layer on the wheel hubs must be touched up immediately. WARNING
One should remember when cleaning the wheels that moisture, ice and road
salt may adversely affect braking efficiency - risk of an accident! Note
Severe layers of dirt on the wheels can also result in wheel imbalance. This may
show itself in the form of a wheel vibration which is transmitted to the steering
wheel which, in certain circumstances, can cause premature wear of the steering.
This means it is necessary to remove the dirt.
Underbody protection The underside of your vehicle is protected for life against chemical and mechanical
influences.
One cannot, however, completely rule out damage to the protective layer
when
driving so we recommend that you inspect the protective layer on the underside
of your vehicle and on the chassis at certain intervals - this is best done at the be-
ginning and end of the winter - and to touch up any damaged areas.
The authorised ŠKODA Service Partners have suitable spray products available as
well as the necessary equipment and are familiar with the instructions for use.
Therefore, we recommend you have such touch-up work or additional corrosion
protection measures carried out by an authorised ŠKODA Service Partner. WARNING
Never use additional underbody protection or corrosion-protection agents for
the exhaust pipes, catalytic converters, diesel particle filter or heat shields.
When the engine reaches its operating temperature, these substances might
ignite - risk of fire! 183
Taking care of your vehicle and cleaning the vehicle Using the system Safety Driving Tips General Maintenance Breakdown assistance Technical data
Page 201 of 252
Replacing the battery
When replacing a battery, the new new battery must have the same capacity,
voltage (12
V), amperage and be the same size. Suitable types of vehicle battery
are available from an authorised ŠKODA Service Partner.
We recommend you have a battery change carried out by an authorised ŠKODA
Service Partner, who will properly install the new battery and dispose of the origi-
nal one. CAUTION
Vehicles with a “START-STOP” system are fitted with a special battery type which
allows the battery control unit to check the energy level for recurring engine start.
This battery must only be replaced by a battery of the same type. For the sake of the environment
Batteries contain poisonous substances such as sulphuric acid and lead. For this
reason, it must be disposed of properly. Under no circumstances must it be dis-
posed of in the communal rubbish.
Automatic consumer shut-off Under heavy load on the vehicle battery, the vehicle electrical system manage-
ment automatically takes various measures to avoid draining the vehicle battery.
●
The idling speed is raised to allow the generator to deliver more electricity to
the electrical system.
● If necessary, some electrical consumers are limited in their performance or are
temporarily switched off completely. Note
Despite such intervention by the vehicle electric system management, the vehicle
battery may be drained. For example, when the ignition is switched on a long time
with the engine turned off or the side or parking lights are turned on during lon-
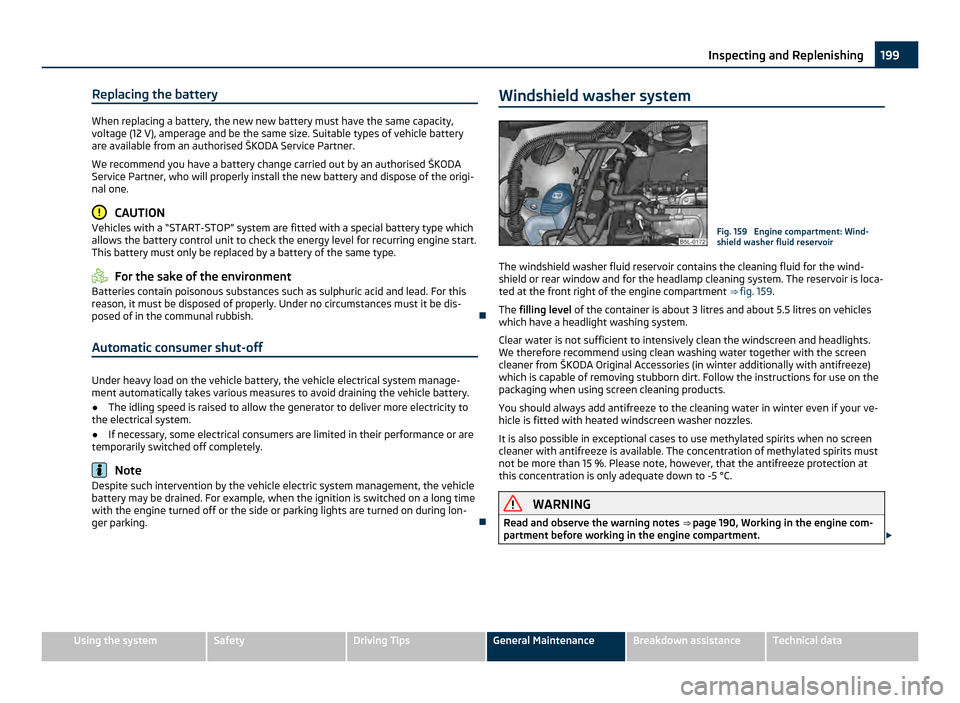
ger parking. Windshield washer system Fig. 159 Engine compartment: Wind-
shield washer fluid reservoir
The windshield washer fluid reservoir contains the cleaning fluid for the wind-
shield or rear window and for the headlamp cleaning system. The reservoir is loca-
ted at the front right of the engine compartment ⇒ fig. 159 .
The filling level of the container is about 3 litres and about 5.5 litres on vehicles
which have a headlight washing system.
Clear water is not sufficient to intensively clean the windscreen and headlights.
We therefore recommend using clean washing water together with the screen
cleaner from
ŠKODA Original Accessories (in winter additionally with antifreeze)
which is capable of removing stubborn dirt. Follow the instructions for use on the
packaging when using screen cleaning products.
You should always add antifreeze to the cleaning water in winter even if your ve-
hicle is fitted with heated windscreen washer nozzles.
It is also possible in exceptional cases to use methylated spirits when no screen
cleaner with antifreeze is available. The concentration of methylated spirits must
not be more than 15 %. Please note, however, that the antifreeze protection at
this concentration is only adequate down to -5 °C. WARNING
Read and observe the warning notes ⇒ page 190
, Working in the engine com-
partment before working in the engine compartment. £ 199
Inspecting and Replenishing Using the system Safety Driving Tips General Maintenance Breakdown assistance Technical data
Page 212 of 252
WARNING
● If you find yourself in flowing traffic switch on the hazard warning lights
system and place the warning triangle on the side of the road at the prescri-
bed distance from your vehicle. Comply with the national legal regulations. In
this way you are protecting not only yourself but also other road users.
● Never start the engine with the vehicle sitting on the raised jack - danger
of suffering injury. CAUTION
If you have to change a wheel on a slope first block the opposite wheel with a
stone or similar object in order to secure the vehicle from unexpectedly rolling
away. Note
Comply with the national legal regulations.
Changing a wheel Always change a wheel on a level surface as far as possible.
–
Take off the full wheel trim ⇒ page 210 or the wheel trim cap ⇒ page 211 or
the caps ⇒ page 211.
– In the case of light alloy wheels remove the wheel trim cap ⇒
page 211.
– First of all slacken the safety wheel bolt and afterwards the other wheel bolts
⇒ page 211.
– Jack up the vehicle until the wheel to be changed is clear of the ground
⇒ page 212.
– Unscrew the wheel bolts and place them on a clean surface (cloth, paper etc.).
– Take off the wheel.
– Fit on the spare wheel and tighten the wheel bolts slightly.
– Lower the car.
– Tighten the wheel bolts firmly, alternately and diagonally using the wheel
wrench (crosswise) and lastly the wheel safety bolt ⇒
page 211.
– Mount the full wheel trim/wheel trim cap or the caps. Note
● All bolts must be clean and must turn easily.
● You must never grease or oil the wheel bolts!
● When fitting on unidirectional tyres, ensure that the tyres rotate in the correct
direction ⇒ page 201
.
Subsequent steps After changing the wheel, you must perform the following steps.
–
Stow and attach the replaced wheel in the spare wheel well using a special
screw ⇒ fig. 165 .
– Stow the vehicle tool kit in the space provided.
– Check the tyre pressure on the spare wheel just mounted as soon as possible.
– Have the tightening torque of the wheel bolts checked with a torque wrench
as soon as possible. Steel and light alloy wheels must be tightened to a tight-
ening torque of 120
Nm.
– Change the damaged wheel or consult a specialist garage about possibilities
for getting repairs done. WARNING
It is necessary to observe the guidelines given on ⇒
page 203 if the vehicle is
subsequently fitted with tyres which are different to those it was fitted with
at the works. Note
● If you find, when changing the wheel, that the wheel bolts are corroded and
difficult to turn, the bolts must be replaced before checking the tightening torque.
● Drive cautiously and only at a moderate speed to a workshop where the tight-
ening torque can be checked.
Full wheel trim Pulling off
–
Hook the clamp found in the vehicle tool kit into the reinforced edge of the full
wheel trim. £210
Breakdown assistance
Page 216 of 252
WARNING
● If you find yourself in flowing traffic switch on the hazard warning lights
system and place the warning triangle on the side of the road at the prescri-
bed distance from your vehicle. Comply with the national legal regulations. In
this way you are protecting not only yourself but also other road users.
● Park the vehicle as far away as possible from the traffic flow. Park on as
flat and firm a surface as possible.
● A tyre filled with sealant has the same driving characteristics as a standard
tyre.
● Do not drive faster than 80 km/h, 50 mph.
● Avoid accelerating at full throttle, sharp braking and fast cornering.
● Check the tyre inflation pressure after driving 10 minutes.
● Sealant is hazardous to heath. Remove immediately if it comes into con-
tact with the skin. For the sake of the environment
Used sealant or sealant whose expiry date has passed must be disposed of in ac-
cordance with environmental protection regulations. Note
● Observe the manufacturer's usage instructions for the tyre repair kit.
● You can purchase a new bottle of sealant from the range of the ŠKODA Origi-
nal Accessories.
● Change the wheel that was repaired using the tyre repair kit or consult a spe-
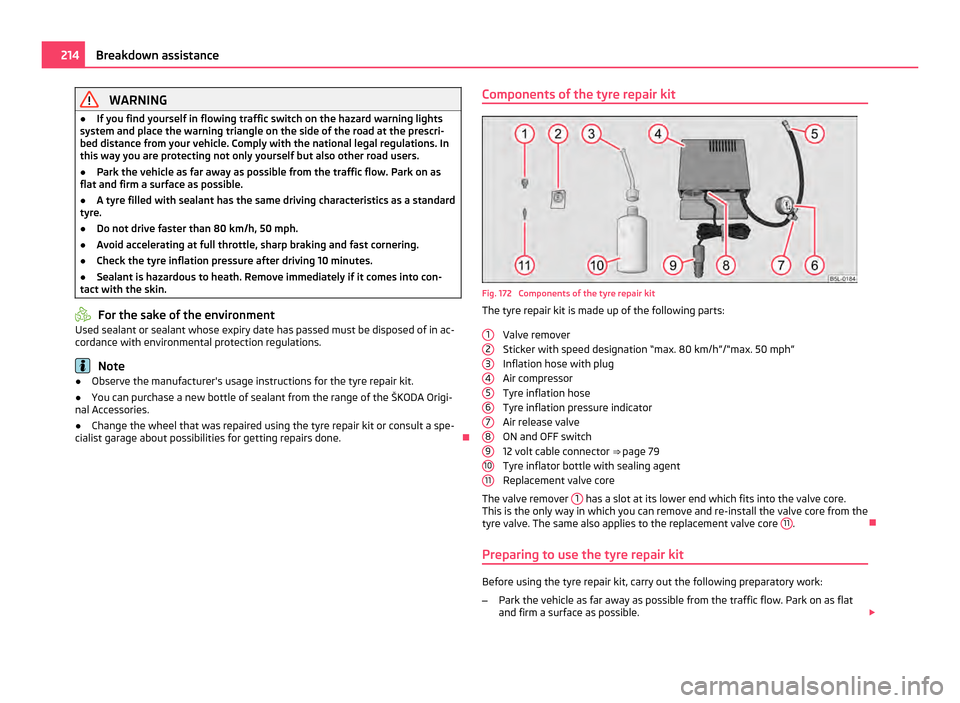
cialist garage about possibilities for getting repairs done. Components of the tyre repair kit Fig. 172 Components of the tyre repair kit
The tyre repair kit is made up of the following parts:
Valve remover
Sticker with speed designation
“max. 80 km/h”/“max. 50 mph”
Inflation hose with plug
Air compressor
Tyre inflation hose
Tyre inflation pressure indicator
Air release valve
ON and OFF switch
12 volt cable connector ⇒ page 79
Tyre inflator bottle with sealing agent
Replacement valve core
The valve remover 1 has a slot at its lower end which fits into the valve core.
This is the only way in which you can remove and re-install the valve core from the
tyre valve. The same also applies to the replacement valve core 11 .
Preparing to use the tyre repair kit Before using the tyre repair kit, carry out the following preparatory work:
–
Park the vehicle as far away as possible from the traffic flow. Park on as flat
and firm a surface as possible. £
1 2
3
4
5
6
7
8
9
10
11214
Breakdown assistance
Page 225 of 252
Bulbs
Changing bulbs The relevant lamp must always be switched off before a light bulb is replaced.
Defect light bulbs should only be replaced with light bulbs of the same type. The
designation is located on the light socket or the glass bulb.
Changing certain bulbs is not something which you can do yourself, but requires
to be done by a specialist. Other parts of the vehicle must be removed in order to
change the light bulbs. This applies, in particular, to bulbs which can only be
reached from the engine compartment.
We therefore recommend that you have any bulbs changed by an authorised
ŠKODA Service Partner or, in exceptional cases, by calling on other professional
assistance.
Please note that the engine compartment is a hazardous area ⇒
page 190, Work-
ing in the engine compartment.
We recommend that you always have a small box of replacement bulbs in your ve-
hicle. You can purchase replacement bulbs from the range of the ŠKODA Original
Accessories 1)
.
The set of light bulbs can be stowed in the box in the luggage compartment.
Fitted with a xenon headlight
Change of bulbs on vehicles with Xenon lights (low beam lights, parking lights and
main beam lights) should be undertaken by a specialist garage.
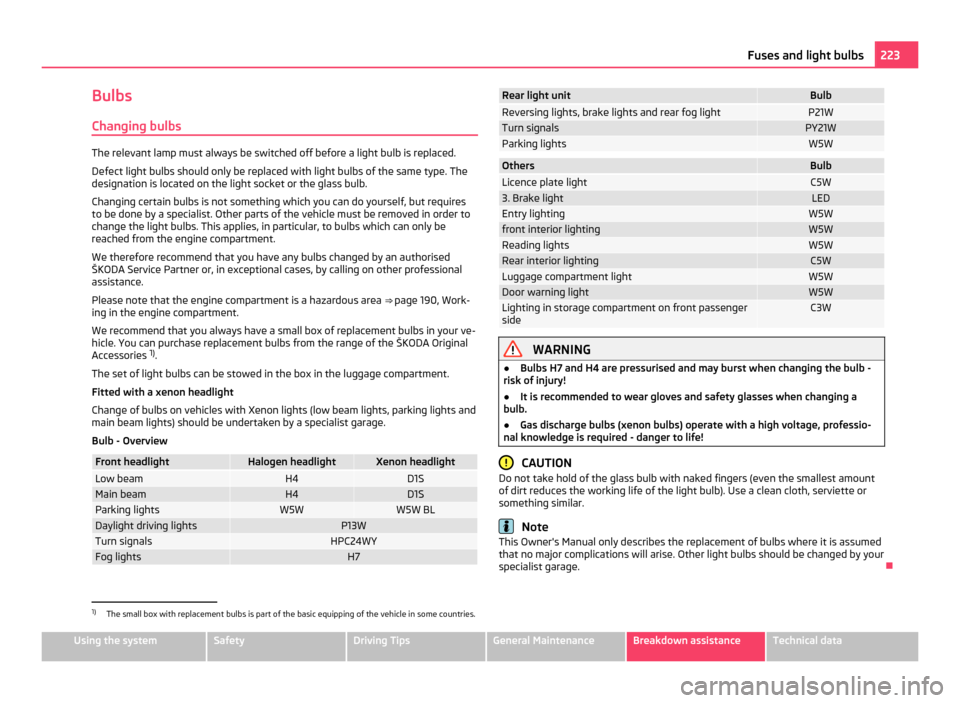
Bulb - Overview Front headlight Halogen headlight Xenon headlight
Low beam H4 D1S
Main beam H4 D1S
Parking lights W5W W5W BL
Daylight driving lights P13W
Turn signals HPC24WY
Fog lights H7 Rear light unit Bulb
Reversing lights, brake lights and rear fog light P21W
Turn signals PY21W
Parking lights W5W
Others Bulb
Licence plate light C5W
3. Brake light LED
Entry lighting W5W
front interior lighting W5W
Reading lights W5W
Rear interior lighting C5W
Luggage compartment light W5W
Door warning light W5W
Lighting in storage compartment on front passenger
side C3W
WARNING
● Bulbs H7 and H4 are pressurised and may burst when changing the bulb -
risk of injury!
● It is recommended to wear gloves and safety glasses when changing a
bulb.
● Gas discharge bulbs (xenon bulbs) operate with a high voltage, professio-
nal knowledge is required - danger to life! CAUTION
Do not take hold of the glass bulb with naked fingers (even the smallest amount
of dirt reduces the working life of the light bulb). Use a clean cloth, serviette or
something similar. Note
This Owner's Manual only describes the replacement of bulbs where it is assumed
that no major complications will arise. Other light bulbs should be changed by your
specialist garage. 1)
The small box with replacement bulbs is part of the basic equipping of the vehicle in some countries. 223
Fuses and light bulbs Using the system Safety Driving Tips General Maintenance Breakdown assistance Technical data