CD player SKODA YETI 2011 1.G / 5L Owner's Manual
[x] Cancel search | Manufacturer: SKODA, Model Year: 2011, Model line: YETI, Model: SKODA YETI 2011 1.G / 5LPages: 252, PDF Size: 3.61 MB
Page 125 of 252
The buttons operate the functions for the operating mode of the current tele-
phone.
Operate the telephone via the information display In the menu
Phone you can select the following menu points:
■ Phone book
■ Dial number 1)
■ Call register
■ Voice mailbox
■ Bluetooth 1
)
■ Settings 2)
■ Back
Phone book
In the menu point Phone book is the list of the loaded contacts from the tele-
phone memory and the SIM card of the mobile phone.
Dial number
In the menu point Dial number, you can write any telephone number. Select in se-
quence the desired digits with the aid of the handwheel and confirm it by pressing
the handwheel. You can choose the numbers 0 - 9, symbols , , # and the func-
tions Cancel, Call, Delete .
Call register
In the menu point Call register, you can select the following menu points:
■ Missed calls
■ Dialled numbers
■ Received calls
Voice mailbox
In the menu Voice mailbox , it is possible to set the number of the voice mailbox 1 )
and then dial the number. Bluetooth
In the menu
Bluetooth you can select the following menu points:
■ User - the overview of the stored users
■ New user - Search for new telephones which are in the reception range
■ Visibility - Switching on the visibility of the telephone unit for other devices
■ Media player
■ Active device
■ Paired devices
■ Search
■ Phone name - the possibility to change the name of the telephone unit (pre-
set SKODA UHV)
Settings
In the menu Settings you can select the following menu points:
■ Phone book
■ Update 1
)
■ List
■ Surname
■ First name
■ Ring tone
Back
Return in the basic menu of the telephone. 1)
On vehicles fitted with the radio navigation system Amundsen+, this function can be accessed via
the menu of the radio navigation system; see the operating instructions for the Amundsen+.
2) This function is not available in vehicles fitted with the radio navigation system Amundsen+. 123
Communication Using the system Safety Driving Tips General Maintenance Breakdown assistance Technical data
Page 127 of 252
Voice command Action
MUSIC
a) Play music from the mobile phone or another paired
device.
FURTHER OPTIONS After this command the system offers additional con-
text-dependent commands. SETTINGS Selection for setting Bluetooth
®
, dialogue etc. CANCEL The dialogue is ended.
a)
On vehicles fitted with the radio navigation system Amundsen+, this function can be accessed via
the menu of the radio navigation system; see the operating instructions for the Amundsen+.
After giving the command DIAL NUMBER, the system requests the entry of a tele-
phone number. The telephone number can be entered as an interconnected spo-
ken row of digits (complete number), in the form of order of digits (separation
through a brief voice pause) or through individually spoken digits. After each order
of digits (separation through brief voice pause) all of the digits detected up to now
are repeated by the system.
The digits 0 - 9, symbols +, , # are permitted. The system detects no continuous
digit combinations such as twenty-three, but only individually spoken digits (two,
three).
Call name –
Switch on the voice operation ⇒ page 124, Voice control.
– Give the command CALL XYZ after the signal tone.
Example for calling the name from the phone book Voice command Announcement
CALL XYZ “Say home, work, mobile
”e.g.
WORK “XYZ work is dialed.
”CALL XYZ WORK “XYZ work is dialed.
”Store voice recording of a contact
If automatic name recognition does not work reliably for some contacts, you will
can choose to save your own voice entry for the contact in the menu point
Phone
book - Voice Tag - Record.
You can also store your own voice entry using voice control in the menu FURTHER
OPTIONS . Music playback via Bluetooth
® The universal telephone preinstallation GSM IIl makes it possible to play back mu-
sic via Bluetooth ®
from the devices such as MP3 player, mobile phone or note-
book.
In order to enable the music playback via Bluetooth ®
, it is necessary to connect
the terminal device with the hands-free system in the menu Phone - Bluetooth -
Media player .
The operation of the music playback from the connected device can be performed
via the hands-free system with the voice control ⇒ page 124, Voice commands or
directly via the connected device. Note
● The device to be connected must support the Bluetooth ®
profile A2DP, see
Owner's manual of the device to be coupled.
● This function is not available in vehicles fitted with the car radio Blues.
Multimedia Inputs AUX-IN and MDI The input AUX-IN is located below the armrest of the front seats and is marked
with
.
The input MDI is located in the front centre console.
The inputs AUX-IN and MDI are used to connect external audio sources (e.g. iPod
or MP3 player) and play back music from these devices via your factory-fitted radio
or radio navigation system.
The description of the operation can be found in the relevant Owner's Manual of
your radio or your radio navigation system. Note
● The loudspeakers in the vehicle are matched to a power output of the radio
and radio navigation system of 4x 20 W.
● For the equipment sound system, the loudspeakers are matched to a power
output of the amplifier of 4x40°W + 6x20
W. 125
Communication Using the system Safety Driving Tips General Maintenance Breakdown assistance Technical data
Page 128 of 252
CD change
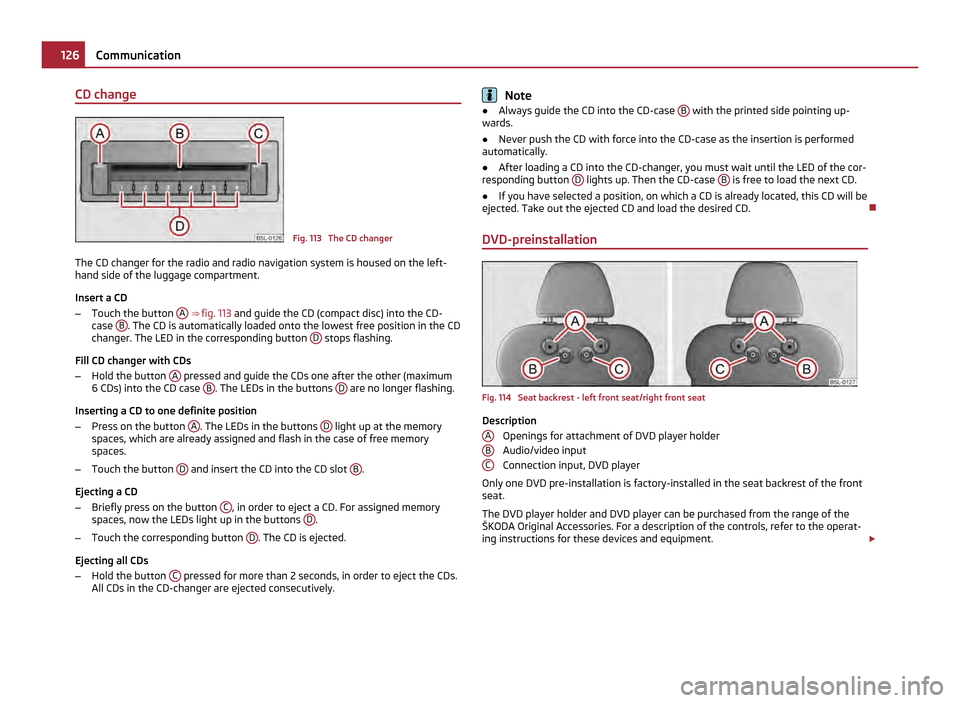
Fig. 113 The CD changer
The CD changer for the radio and radio navigation system is housed on the left-
hand side of the luggage compartment.
Insert a CD
– Touch the button A
⇒ fig. 113 and guide the CD (compact disc) into the CD-
case B . The CD is automatically loaded onto the lowest free position in the CD
changer. The LED in the corresponding button D stops flashing.
Fill CD changer with CDs
– Hold the button A pressed and guide the CDs one after the other (maximum
6
CDs) into the CD case B . The LEDs in the buttons
D are no longer flashing.
Inserting a CD to one definite position
– Press on the button A . The LEDs in the buttons
D light up at the memory
spaces, which are already assigned and flash in the case of free memory
spaces.
– Touch the button D and insert the CD into the CD slot
B .
Ejecting a CD
– Briefly press on the button C , in order to eject a CD. For assigned memory
spaces, now the LEDs light up in the buttons D .
– Touch the corresponding button D . The CD is ejected.
Ejecting all CDs
– Hold the button C pressed for more than 2 seconds, in order to eject the CDs.
All CDs in the CD-changer are ejected consecutively. Note
● Always guide the CD into the CD-case B with the printed side pointing up-
wards.
● Never push the CD with force into the CD-case as the insertion is performed
automatically.
● After loading a CD into the CD-changer, you must wait until the LED of the cor-
responding button D lights up. Then the CD-case
B is free to load the next CD.
● If you have selected a position, on which a CD is already located, this CD will be
ejected. Take out the ejected CD and load the desired CD.
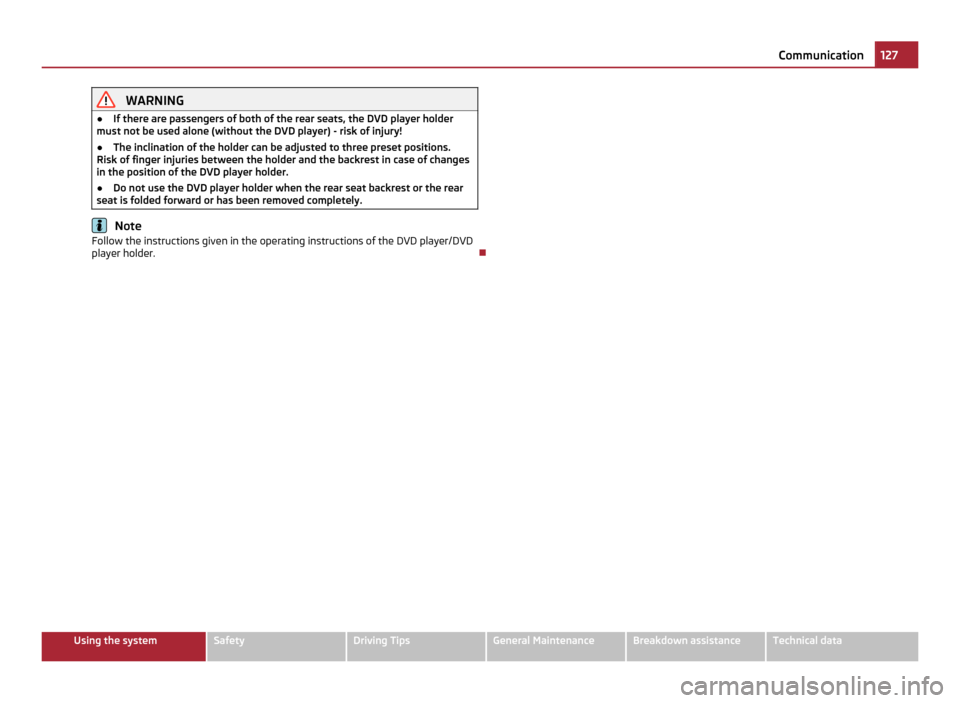
DVD-preinstallation Fig. 114 Seat backrest - left front seat/right front seat
Description
Openings for attachment of DVD player holder
Audio/video input
Connection input, DVD player
Only one DVD pre-installation is factory-installed in the seat backrest of the front
seat.
The DVD player holder and DVD player can be purchased from the range of the
ŠKODA Original Accessories. For a description of the controls, refer to the operat-
ing instructions for these devices and equipment. £
A B
C126
Communication
Page 129 of 252
WARNING
● If there are passengers of both of the rear seats, the DVD player holder
must not be used alone (without the DVD player) - risk of injury!
● The inclination of the holder can be adjusted to three preset positions.
Risk of finger injuries between the holder and the backrest in case of changes
in the position of the DVD player holder.
● Do not use the DVD player holder when the rear seat backrest or the rear
seat is folded forward or has been removed completely. Note
Follow the instructions given in the operating instructions of the DVD player/DVD
player holder. 127
Communication Using the system Safety Driving Tips General Maintenance Breakdown assistance Technical data
Page 224 of 252
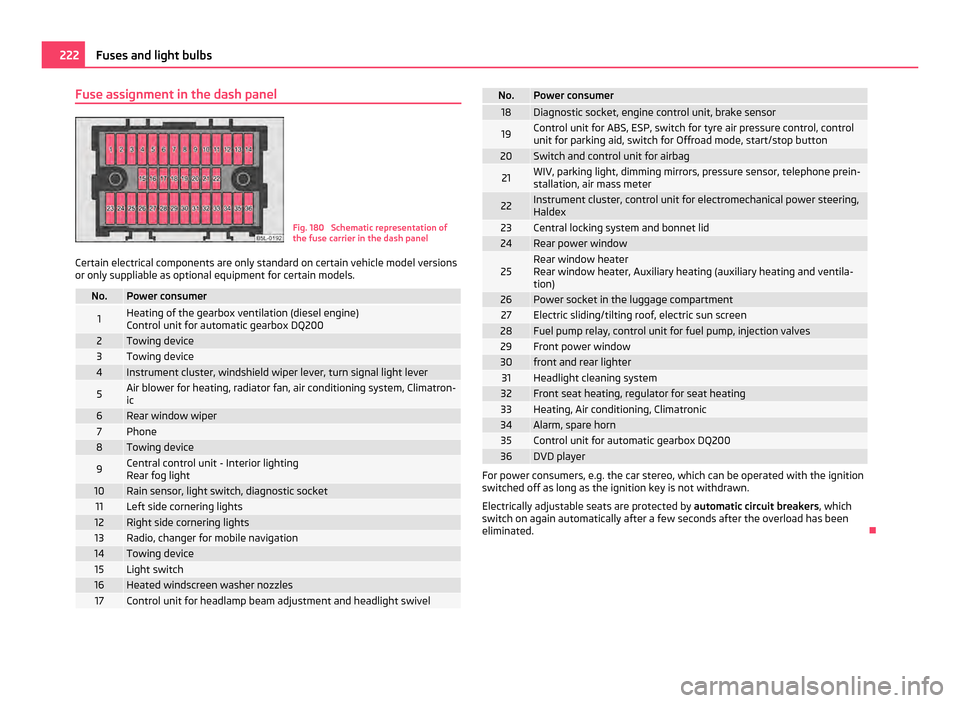
Fuse assignment in the dash panel
Fig. 180 Schematic representation of
the fuse carrier in the dash panel
Certain electrical components are only standard on certain vehicle model versions
or only suppliable as optional equipment for certain models. No. Power consumer
1 Heating of the gearbox ventilation (diesel engine)
Control unit for automatic gearbox DQ200 2 Towing device
3 Towing device
4 Instrument cluster, windshield wiper lever, turn signal light lever
5 Air blower for heating, radiator fan, air conditioning system, Climatron-
ic 6 Rear window wiper
7 Phone
8 Towing device
9 Central control unit - Interior lighting
Rear fog light
10 Rain sensor, light switch, diagnostic socket
11 Left side cornering lights
12 Right side cornering lights
13 Radio, changer for mobile navigation
14 Towing device
15 Light switch
16 Heated windscreen washer nozzles
17 Control unit for headlamp beam adjustment and headlight swivel No. Power consumer
18 Diagnostic socket, engine control unit, brake sensor
19 Control unit for ABS, ESP, switch for tyre air pressure control, control
unit for parking aid, switch for Offroad mode, start/stop button 20 Switch and control unit for airbag
21 WIV, parking light, dimming mirrors, pressure sensor, telephone prein-
stallation, air mass meter
22 Instrument cluster, control unit for electromechanical power steering,
Haldex 23 Central locking system and bonnet lid
24 Rear power window
25 Rear window heater
Rear window heater, Auxiliary heating (auxiliary heating and ventila-
tion)
26 Power socket in the luggage compartment
27 Electric sliding/tilting roof, electric sun screen
28 Fuel pump relay, control unit for fuel pump, injection valves
29 Front power window
30 front and rear lighter
31 Headlight cleaning system
32 Front seat heating, regulator for seat heating
33 Heating, Air conditioning, Climatronic
34 Alarm, spare horn
35 Control unit for automatic gearbox DQ200
36 DVD player
For power consumers, e.g. the car stereo, which can be operated with the ignition
switched off as long as the ignition key is not withdrawn.
Electrically adjustable seats are protected by
automatic circuit breakers, which
switch on again automatically after a few seconds after the overload has been
eliminated. 222
Fuses and light bulbs