audio SKODA YETI 2011 1.G / 5L Owner's Manual
[x] Cancel search | Manufacturer: SKODA, Model Year: 2011, Model line: YETI, Model: SKODA YETI 2011 1.G / 5LPages: 252, PDF Size: 3.61 MB
Page 20 of 252
MAXI DOT display (information display)
Introduction The information display provides you with information in a convenient way con-
cerning the
current operating state of your vehicle . The information system also
provides you with data (depending on the equipment installed in the vehicle) re-
lating to the radio, mobile phone, multi-functional indicator, radio navigation sys-
tem, the unit connected to the MDI input and the automatic gearbox.
Certain functions and operating conditions are always being checked on the vehi-
cle when the ignition is switched on and also while driving.
Functional faults, if required repair work and other information are indicated by
red symbols ⇒ page 19 and yellow symbols ⇒
page 20.
Lighting up of certain symbols is combined with an acoustic warning signal.
Information and texts giving warnings are also shown in the display ⇒ page 22.
The following information can be shown in the display (depending on the equip-
ment installed on the vehicle): Main menu ⇒ page 18
Door, luggage compartment door and bonnet ajar
warning ⇒
page 19 Service Interval Display ⇒
page 12 Selector lever positions for the automatic gearbox DSG ⇒ page 113
CAUTION
Pull out the ignition key while having contact with the display (for example when
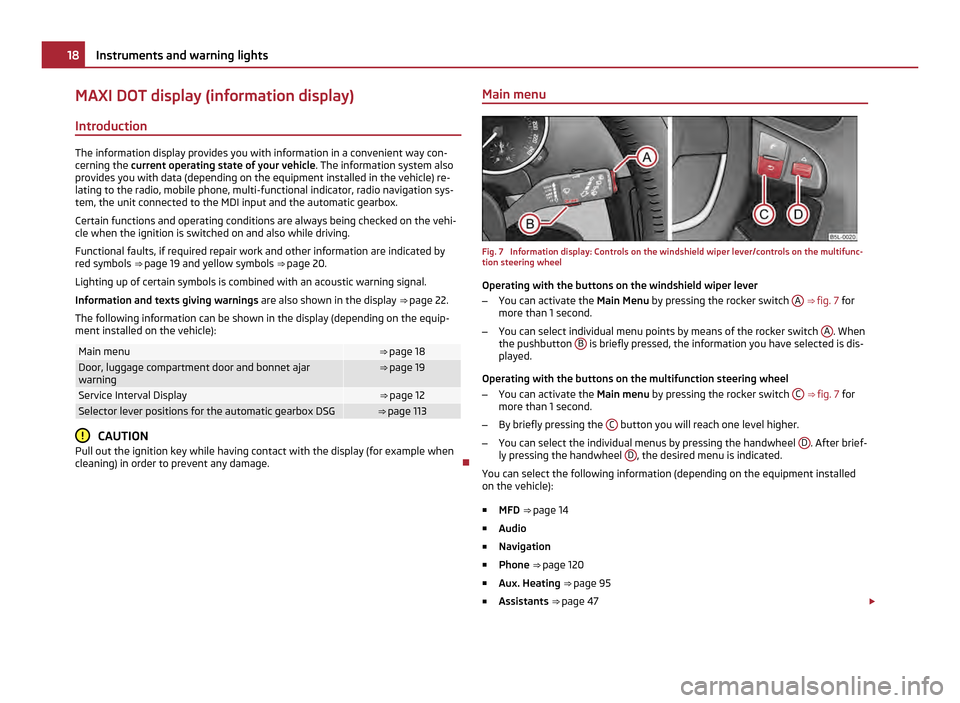
cleaning) in order to prevent any damage. Main menu Fig. 7 Information display: Controls on the windshield wiper lever/controls on the multifunc-
tion steering wheel
Operating with the buttons on the windshield wiper lever
– You can activate the Main Menu by pressing the rocker switch A
⇒ fig. 7 for
more than 1
second.
– You can select individual menu points by means of the rocker switch A . When
the pushbutton B is briefly pressed, the information you have selected is dis-
played.
Operating with the buttons on the multifunction steering wheel
– You can activate the Main menu by pressing the rocker switch C
⇒ fig. 7
for
more than 1 second.
– By briefly pressing the C button you will reach one level higher.
– You can select the individual menus by pressing the handwheel D . After brief-
ly pressing the handwheel D , the desired menu is indicated.
You can select the following information (depending on the equipment installed
on the vehicle):
■ MFD ⇒
page 14
■ Audio
■ Navigation
■ Phone ⇒ page 120
■ Aux. Heating ⇒ page 95
■ Assistants ⇒ page 47 £18
Instruments and warning lights
Page 21 of 252
■
Vehicle status ⇒ page 19
■ Settings ⇒ page 20
The menu point Audio is only then displayed when the factory-fitted car radio is
switched on.
The menu point Navigation is only then displayed when the factory-fitted radio
navigation system is switched on.
The menu point Aux.
heating is only then displayed, if the vehicle is factory-fitted
with auxiliary heating.
The menu point Assistants is only then displayed, if the vehicle is fitted with cor-
nering lights. Note
● If warning messages are shown in the information display, these messages
can be confirmed with the button B on the windshield wiper lever or with the
button D on the multifunction steering wheel in order to call up the main menu.
● If you do not activate the information display at that moment, the menu shifts
to one level higher every 10 seconds.
● The operation of the factory-fitted car stereo or radio navigation system is de-
scribed in separate operating instructions to be found in the on-board literature.
Door, luggage compartment door and bonnet ajar warning The door, luggage compartment and bonnet ajar warning lights up if at least one
door, the luggage compartment or bonnet are not closed. The symbol indicates
which door is still open or whether the luggage compartment door or bonnet is
not closed
.
The symbol goes out as soon as the doors, luggage compartment door and bonnet
are completely closed.
A warning signal sounds if the car is driven at a speed of more than 6km/hour and
if the engine or the luggage compartment door is open. Auto Check Control
Car state The Auto Check Control carries out a check of certain functions and vehicle com-
ponents. The check is performed constantly when the ignition is switched on,
both when the vehicle is stationary, as well as when driving.
Some operational faults, urgent repairs, service work or other information appear
in the display of the instrument cluster. The displays are shown with a red or yel-
low light symbol depending on the priority of the message.
The red symbols indicate danger (priority 1) while the yellow symbols indicate a
warning (priority 2). Information for the driver may also appear in addition to the
symbols ⇒
page 22.
There is at least one error message when the term Vehicle status is displayed in
the menu. After selecting this menu the first of the error messages is displayed.
Several error messages are shown on the display under the message e.g. 1/3. This
indicates that the first of a total of three error messages is displayed. Investigate
the displayed faults as soon as possible.
As long as the operational faults are not rectified, the symbols are always indica-
ted again. After the first display, the symbols are indicated without information for
the driver.
If a fault occurs, a warning signal will also sound in addition to the symbol and
text in the display:
● Priority 1 - three warning signals
● Priority 2 - one warning signal
Red symbols A red symbol signals danger.
– Bring the vehicle to a stop.
– Switch the engine off.
– Investigate the function indicated.
– Obtain professional assistance.
Meaning of the red symbols: £ 19
Instruments and warning lights Using the system Safety Driving Tips General Maintenance Breakdown assistance Technical data
Page 120 of 252
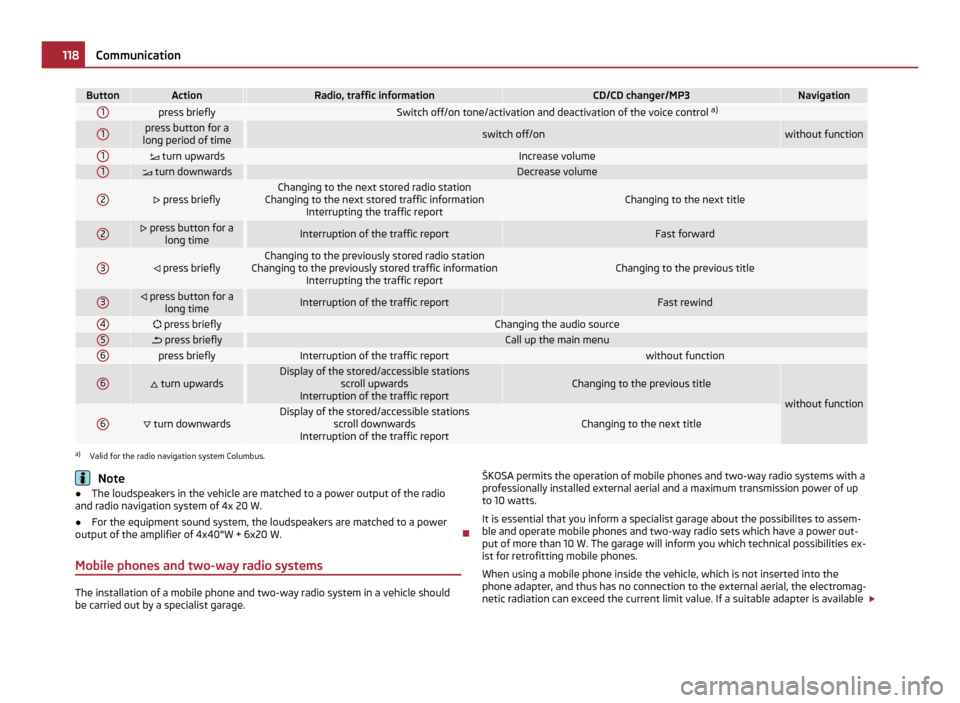
Button Action Radio, traffic information CD/CD changer/MP3 Navigation
1
press briefly
Switch off/on tone/activation and deactivation of the voice control
a)1 press button for a
long period of time switch off/on without function
1
turn upwards Increase volume
1
turn downwards Decrease volume
2
press briefly Changing to the next stored radio station
Changing to the next stored traffic information Interrupting the traffic report Changing to the next title
2 press button for a
long time Interruption of the traffic report Fast forward
3
press briefly Changing to the previously stored radio station
Changing to the previously stored traffic information Interrupting the traffic report Changing to the previous title
3
press button for a
long time Interruption of the traffic report Fast rewind
4
press briefly Changing the audio source
5
press briefly Call up the main menu
6
press briefly Interruption of the traffic report without function
6
turn upwards Display of the stored/accessible stations
scroll upwards
Interruption of the traffic report Changing to the previous title
without function
6
turn downwards Display of the stored/accessible stations
scroll downwards
Interruption of the traffic report Changing to the next title
a)
Valid for the radio navigation system Columbus. Note
● The loudspeakers in the vehicle are matched to a power output of the radio
and radio navigation system of 4x 20 W.
● For the equipment sound system, the loudspeakers are matched to a power
output of the amplifier of 4x40°W + 6x20
W.
Mobile phones and two-way radio systems The installation of a mobile phone and two-way radio system in a vehicle should
be carried out by a specialist garage. ŠKOSA permits the operation of mobile phones and two-way radio systems with a
professionally installed external aerial and a maximum transmission power of up
to 10 watts.
It is essential that you inform a specialist garage about the possibilites to assem-
ble and operate mobile phones and two-way radio sets which have a power out-
put of more than 10 W. The garage will inform you which technical possibilities ex-
ist for retrofitting mobile phones.
When using a mobile phone inside the vehicle, which is not inserted into the
phone adapter, and thus has no connection to the external aerial, the electromag-
netic radiation can exceed the current limit value. If a suitable adapter is available £118
Communication
Page 127 of 252
Voice command Action
MUSIC
a) Play music from the mobile phone or another paired
device.
FURTHER OPTIONS After this command the system offers additional con-
text-dependent commands. SETTINGS Selection for setting Bluetooth
®
, dialogue etc. CANCEL The dialogue is ended.
a)
On vehicles fitted with the radio navigation system Amundsen+, this function can be accessed via
the menu of the radio navigation system; see the operating instructions for the Amundsen+.
After giving the command DIAL NUMBER, the system requests the entry of a tele-
phone number. The telephone number can be entered as an interconnected spo-
ken row of digits (complete number), in the form of order of digits (separation
through a brief voice pause) or through individually spoken digits. After each order
of digits (separation through brief voice pause) all of the digits detected up to now
are repeated by the system.
The digits 0 - 9, symbols +, , # are permitted. The system detects no continuous
digit combinations such as twenty-three, but only individually spoken digits (two,
three).
Call name –
Switch on the voice operation ⇒ page 124, Voice control.
– Give the command CALL XYZ after the signal tone.
Example for calling the name from the phone book Voice command Announcement
CALL XYZ “Say home, work, mobile
”e.g.
WORK “XYZ work is dialed.
”CALL XYZ WORK “XYZ work is dialed.
”Store voice recording of a contact
If automatic name recognition does not work reliably for some contacts, you will
can choose to save your own voice entry for the contact in the menu point
Phone
book - Voice Tag - Record.
You can also store your own voice entry using voice control in the menu FURTHER
OPTIONS . Music playback via Bluetooth
® The universal telephone preinstallation GSM IIl makes it possible to play back mu-
sic via Bluetooth ®
from the devices such as MP3 player, mobile phone or note-
book.
In order to enable the music playback via Bluetooth ®
, it is necessary to connect
the terminal device with the hands-free system in the menu Phone - Bluetooth -
Media player .
The operation of the music playback from the connected device can be performed
via the hands-free system with the voice control ⇒ page 124, Voice commands or
directly via the connected device. Note
● The device to be connected must support the Bluetooth ®
profile A2DP, see
Owner's manual of the device to be coupled.
● This function is not available in vehicles fitted with the car radio Blues.
Multimedia Inputs AUX-IN and MDI The input AUX-IN is located below the armrest of the front seats and is marked
with
.
The input MDI is located in the front centre console.
The inputs AUX-IN and MDI are used to connect external audio sources (e.g. iPod
or MP3 player) and play back music from these devices via your factory-fitted radio
or radio navigation system.
The description of the operation can be found in the relevant Owner's Manual of
your radio or your radio navigation system. Note
● The loudspeakers in the vehicle are matched to a power output of the radio
and radio navigation system of 4x 20 W.
● For the equipment sound system, the loudspeakers are matched to a power
output of the amplifier of 4x40°W + 6x20
W. 125
Communication Using the system Safety Driving Tips General Maintenance Breakdown assistance Technical data
Page 128 of 252
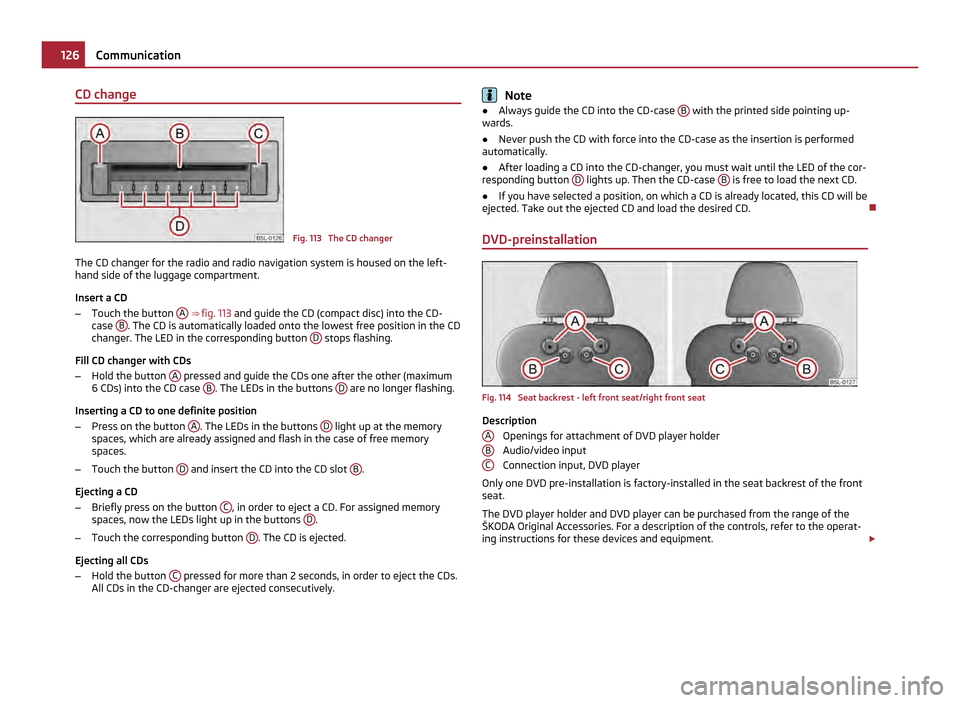
CD change
Fig. 113 The CD changer
The CD changer for the radio and radio navigation system is housed on the left-
hand side of the luggage compartment.
Insert a CD
– Touch the button A
⇒ fig. 113 and guide the CD (compact disc) into the CD-
case B . The CD is automatically loaded onto the lowest free position in the CD
changer. The LED in the corresponding button D stops flashing.
Fill CD changer with CDs
– Hold the button A pressed and guide the CDs one after the other (maximum
6
CDs) into the CD case B . The LEDs in the buttons
D are no longer flashing.
Inserting a CD to one definite position
– Press on the button A . The LEDs in the buttons
D light up at the memory
spaces, which are already assigned and flash in the case of free memory
spaces.
– Touch the button D and insert the CD into the CD slot
B .
Ejecting a CD
– Briefly press on the button C , in order to eject a CD. For assigned memory
spaces, now the LEDs light up in the buttons D .
– Touch the corresponding button D . The CD is ejected.
Ejecting all CDs
– Hold the button C pressed for more than 2 seconds, in order to eject the CDs.
All CDs in the CD-changer are ejected consecutively. Note
● Always guide the CD into the CD-case B with the printed side pointing up-
wards.
● Never push the CD with force into the CD-case as the insertion is performed
automatically.
● After loading a CD into the CD-changer, you must wait until the LED of the cor-
responding button D lights up. Then the CD-case
B is free to load the next CD.
● If you have selected a position, on which a CD is already located, this CD will be
ejected. Take out the ejected CD and load the desired CD.
DVD-preinstallation Fig. 114 Seat backrest - left front seat/right front seat
Description
Openings for attachment of DVD player holder
Audio/video input
Connection input, DVD player
Only one DVD pre-installation is factory-installed in the seat backrest of the front
seat.
The DVD player holder and DVD player can be purchased from the range of the
ŠKODA Original Accessories. For a description of the controls, refer to the operat-
ing instructions for these devices and equipment. £
A B
C126
Communication