phone SKODA YETI 2011 1.G / 5L Owner's Manual
[x] Cancel search | Manufacturer: SKODA, Model Year: 2011, Model line: YETI, Model: SKODA YETI 2011 1.G / 5LPages: 252, PDF Size: 3.61 MB
Page 4 of 252
On-board literature
The on-board literature for your vehicle consists of this
“Owner's Man-
ual ” as well as a “Service schedule” and a “ Help on the road”. There can
also be a variety of other additional operating manuals and instructions
on-board (e.g. an operating manual for the radio) depending on the ve-
hicle model and equipment.
If one of the publications listed above is missing, please contact a spe-
cialist garage immediately, where one will be glad to assist you in such
matters.
One should note that the details given in the vehicle's technical docu-
mentation always take precedence over those in the Owner's Manual.
Owner's Manual
This Owner's manual describes all possible equipment variants without
identifying them as special equipment, model variants or market-de-
pendent equipment.
Consequently, this vehicle does not need to contain all of the equip-
ment components described in this Owner's manual.
The scope of equipment for your vehicle is described in the sales docu-
mentation you were given when purchasing the car. For more informa-
tion, contact your local ŠKODA retailer.
The illustrations can differ in minor details from your vehicle; they are
only intended for general information.
In addition to information regarding all the controls and equipment, the
Owner's Manual also contains important information regarding care and
operation for your safety and also to retain the value of your vehicle. To
provide you with valuable tips and aids. You will learn how you can op-
erate your vehicle safely, economically and in an environmentally con-
scious way.
For safety reasons, please also pay attention to the information on ac-
cessories, modifications and replacement of parts ⇒ page 207. The other chapters of the Owner's Manual are also important, however,
for proper treatment of your car - in addition to regular care and main-
tenance - helps to retain its value and in many cases is also one of the
conditions for possible warranty claims.
The Service schedule
contains:
● Vehicle data;
● Service intervals;
● Overview of the service work;
● Service proof;
● Confirmation of mobility warranty (only valid in certain countries);
● important information on the warranty.
The confirmations of the carried out service work are one of the condi-
tions for possible warranty claims.
Please always present the Service schedule when you take your car to a
specialist garage.
If the Service schedule is missing or worn, please contact the specialist
garage where your car is serviced regularly. You will receive a duplicate,
in which the previously carried out service work are confirmed.
Help on the road
Contains the most important telephone numbers in individual countries
as well as the addresses and telephone numbers of
ŠKODA importers.2
Introduction
Page 5 of 252
Table of Contents
Layout of this Owner's Manual
(explanations)
. . . . . . . . . . . . . . . . . . . . . . . . . . . . . . . 6
Using the system . . . . . . . . . . . . . . . . . . . . . . . . . . 9
Cockpit . . . . . . . . . . . . . . . . . . . . . . . . . . . . . . . . . . . . . . . . . . . . . 9
Overview . . . . . . . . . . . . . . . . . . . . . . . . . . . . . . . . . . . . . . . . . . 8
Instruments and warning lights . . . . . . . . . . . . . . . . . . 10
General information . . . . . . . . . . . . . . . . . . . . . . . . . . . . . . . 10
Overview of the instrument cluster . . . . . . . . . . . . . . . . . 10
Engine revolutions counter . . . . . . . . . . . . . . . . . . . . . . . . . 11
Speedometer . . . . . . . . . . . . . . . . . . . . . . . . . . . . . . . . . . . . . . 11
Coolant temperature gauge . . . . . . . . . . . . . . . . . . . . . . . . 11
Fuel gauge . . . . . . . . . . . . . . . . . . . . . . . . . . . . . . . . . . . . . . . . 11
Counter for distance driven . . . . . . . . . . . . . . . . . . . . . . . . 12
Service reminder indicator . . . . . . . . . . . . . . . . . . . . . . . . . 12
Digital clock . . . . . . . . . . . . . . . . . . . . . . . . . . . . . . . . . . . . . . . 13
Shift recommendation for changing gears . . . . . . . . . . . 14
Multi-functional indicator (onboard computer) . . . . . . . 14
MAXI DOT display (information display) . . . . . . . . . . . . . . 18
Auto Check Control . . . . . . . . . . . . . . . . . . . . . . . . . . . . . . . . 19
Warning lights . . . . . . . . . . . . . . . . . . . . . . . . . . . . . . . . . . . . . 22
Locking and Unlocking . . . . . . . . . . . . . . . . . . . . . . . . . . . . 31
Vehicle key . . . . . . . . . . . . . . . . . . . . . . . . . . . . . . . . . . . . . . . . 31
Child safety lock . . . . . . . . . . . . . . . . . . . . . . . . . . . . . . . . . . . 32
Central locking system . . . . . . . . . . . . . . . . . . . . . . . . . . . . . 33
Remote control . . . . . . . . . . . . . . . . . . . . . . . . . . . . . . . . . . . . 37
Synchonisation of the remote control . . . . . . . . . . . . . . . 38
Anti-theft alarm system . . . . . . . . . . . . . . . . . . . . . . . . . . . . 38
Power windows . . . . . . . . . . . . . . . . . . . . . . . . . . . . . . . . . . . 39
Panoramic sliding roof . . . . . . . . . . . . . . . . . . . . . . . . . . . . . 42
Lights and Visibility . . . . . . . . . . . . . . . . . . . . . . . . . . . . . . . . 45
Lights . . . . . . . . . . . . . . . . . . . . . . . . . . . . . . . . . . . . . . . . . . . . . 45
Interior lighting . . . . . . . . . . . . . . . . . . . . . . . . . . . . . . . . . . . . 52
Visibility . . . . . . . . . . . . . . . . . . . . . . . . . . . . . . . . . . . . . . . . . . 53
Windshield wiper and wash system . . . . . . . . . . . . . . . . . 54
Rear-view mirror . . . . . . . . . . . . . . . . . . . . . . . . . . . . . . . . . . 58 Seats and Stowage
. . . . . . . . . . . . . . . . . . . . . . . . . . . . . . . . 61
Front seats . . . . . . . . . . . . . . . . . . . . . . . . . . . . . . . . . . . . . . . . 61
Adjusting front seats electrically . . . . . . . . . . . . . . . . . . . . 63
Head restraints . . . . . . . . . . . . . . . . . . . . . . . . . . . . . . . . . . . . 65
Middle rear head restraint . . . . . . . . . . . . . . . . . . . . . . . . . . 66
Rear seats . . . . . . . . . . . . . . . . . . . . . . . . . . . . . . . . . . . . . . . . 66
Pedals . . . . . . . . . . . . . . . . . . . . . . . . . . . . . . . . . . . . . . . . . . . . 70
luggage compartment . . . . . . . . . . . . . . . . . . . . . . . . . . . . . 70
Variable loading floor in the luggage compartment . . 74
Variable loading floor with spare wheel . . . . . . . . . . . . . 75
Roof rack . . . . . . . . . . . . . . . . . . . . . . . . . . . . . . . . . . . . . . . . . 76
Cup holder . . . . . . . . . . . . . . . . . . . . . . . . . . . . . . . . . . . . . . . . 77
Note holder . . . . . . . . . . . . . . . . . . . . . . . . . . . . . . . . . . . . . . . 78
Ashtray . . . . . . . . . . . . . . . . . . . . . . . . . . . . . . . . . . . . . . . . . . . 78
Cigarette lighter, power sockets . . . . . . . . . . . . . . . . . . . . 79
Storage compartments . . . . . . . . . . . . . . . . . . . . . . . . . . . . 80
Overview . . . . . . . . . . . . . . . . . . . . . . . . . . . . . . . . . . . . . . . . . . 80
Storage compartment on the front passenger side . . 80
Cooling of storage compartment on front passenger
side . . . . . . . . . . . . . . . . . . . . . . . . . . . . . . . . . . . . . . . . . . . . . . . 81
Storage compartment on the dash panel . . . . . . . . . . . . 81
Stowage compartment in front centre console . . . . . . 82
Stowage compartment for spectacles . . . . . . . . . . . . . . . 82
Storage compartment in the front and rear doors . . . . 82
Stowage compartment below front passenger seat . . 83
Front seat armrest with storage compartment . . . . . . 83
Stowage compartment in rear centre console . . . . . . . 84
Storage compartments in the luggage compartment . 84
Flexible storage compartment . . . . . . . . . . . . . . . . . . . . . . 84
Removable through-loading bag . . . . . . . . . . . . . . . . . . . . 85
Clothes hooks . . . . . . . . . . . . . . . . . . . . . . . . . . . . . . . . . . . . . 85
Heating and air conditioning system . . . . . . . . . . . . . 86
Introduction . . . . . . . . . . . . . . . . . . . . . . . . . . . . . . . . . . . . . . . 86
Air outlet vents . . . . . . . . . . . . . . . . . . . . . . . . . . . . . . . . . . . . 87
Heating . . . . . . . . . . . . . . . . . . . . . . . . . . . . . . . . . . . . . . . . . . . 88
Air conditioning system (manual air conditioning
system)
. . . . . . . . . . . . . . . . . . . . . . . . . . . . . . . . . . . . . . . . . . . 89
Climatronic (automatic air conditioning) . . . . . . . . . . . . . 92
Auxiliary heating (auxiliary heating and ventilation) . . 95 Starting-off and Driving
. . . . . . . . . . . . . . . . . . . . . . . . . . . 99
Setting steering wheel position . . . . . . . . . . . . . . . . . . . . 99
Ignition lock . . . . . . . . . . . . . . . . . . . . . . . . . . . . . . . . . . . . . . . 99
Starting the engine . . . . . . . . . . . . . . . . . . . . . . . . . . . . . . . . 100
Pedals . . . . . . . . . . . . . . . . . . . . . . . . . . . . . . . . . . . . . . . . . . . . 102
Handbrake . . . . . . . . . . . . . . . . . . . . . . . . . . . . . . . . . . . . . . . . 102
Rear parking aid . . . . . . . . . . . . . . . . . . . . . . . . . . . . . . . . . . . 103
Front and rear parking aid . . . . . . . . . . . . . . . . . . . . . . . . . . 104
Park Assist . . . . . . . . . . . . . . . . . . . . . . . . . . . . . . . . . . . . . . . . 105
Cruise control system (CCS) . . . . . . . . . . . . . . . . . . . . . . . . 108
“(START-STOP)” . . . . . . . . . . . . . . . . . . . . . . . . . . . . . . . . . . . 110
Automatic gearbox DSG . . . . . . . . . . . . . . . . . . . . . . . . . . . 112
Automatic gearbox DSG . . . . . . . . . . . . . . . . . . . . . . . . . . . . 112
Communication . . . . . . . . . . . . . . . . . . . . . . . . . . . . . . . . . . . . 117
Multifunction steering wheel . . . . . . . . . . . . . . . . . . . . . . . 117
Universal telephone preinstallation GSM II . . . . . . . . . . 119
Voice control . . . . . . . . . . . . . . . . . . . . . . . . . . . . . . . . . . . . . . 124
Music playback via Bluetooth ®
. . . . . . . . . . . . . . . . . . . . . . 125
Multimedia . . . . . . . . . . . . . . . . . . . . . . . . . . . . . . . . . . . . . . . . 125
Safety . . . . . . . . . . . . . . . . . . . . . . . . . . . . . . . . . . . . . . . . . . . 128
Passive Safety . . . . . . . . . . . . . . . . . . . . . . . . . . . . . . . . . . . . . 128
Basic information . . . . . . . . . . . . . . . . . . . . . . . . . . . . . . . . . . 128
Correct seated position . . . . . . . . . . . . . . . . . . . . . . . . . . . . 129
Seat belts . . . . . . . . . . . . . . . . . . . . . . . . . . . . . . . . . . . . . . . . . . 132
Why seat belts? . . . . . . . . . . . . . . . . . . . . . . . . . . . . . . . . . . . 132
The physical principle of a frontal collision . . . . . . . . . . 132
Important safety information regarding the use of
seat belts
. . . . . . . . . . . . . . . . . . . . . . . . . . . . . . . . . . . . . . . . . 133
How are seat belts correctly fastened? . . . . . . . . . . . . . . 134
Airbag system . . . . . . . . . . . . . . . . . . . . . . . . . . . . . . . . . . . . . . 137
Description of the airbag system . . . . . . . . . . . . . . . . . . . 137
Front airbags . . . . . . . . . . . . . . . . . . . . . . . . . . . . . . . . . . . . . . 138
Driver's knee airbag . . . . . . . . . . . . . . . . . . . . . . . . . . . . . . . 140
Side airbags . . . . . . . . . . . . . . . . . . . . . . . . . . . . . . . . . . . . . . . 141 3
Table of Contents Using the system Safety Driving Tips General Maintenance Breakdown assistance Technical data
Page 11 of 252
Using the system
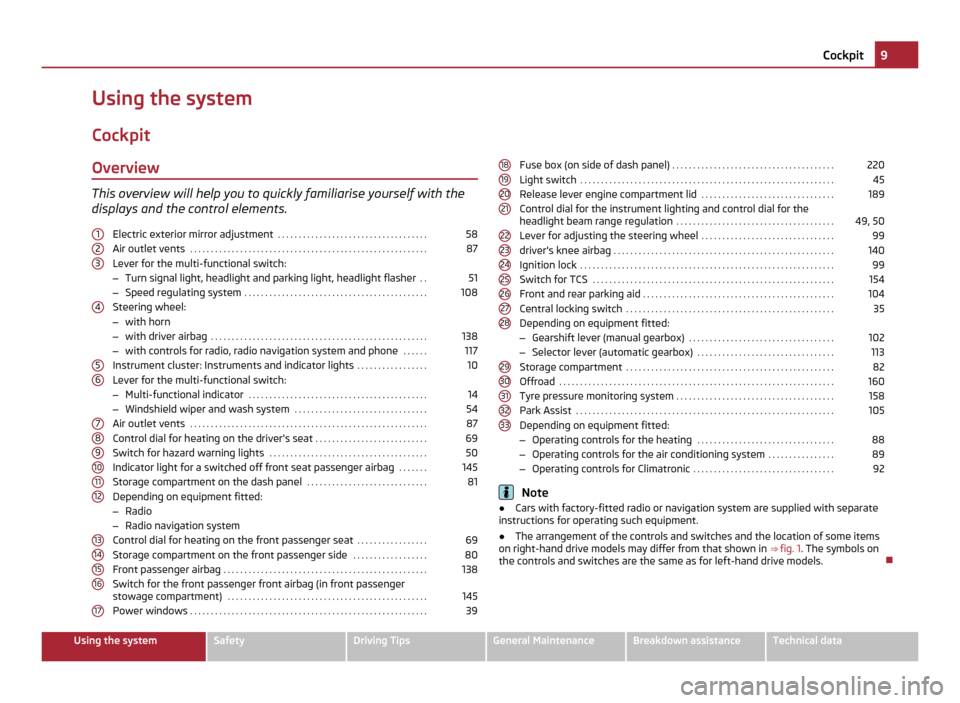
Cockpit Overview This overview will help you to quickly familiarise yourself with the
displays and the control elements.
Electric exterior mirror adjustment . . . . . . . . . . . . . . . . . . . . . . . . . . . . . . . . . . . . 58
Air outlet vents . . . . . . . . . . . . . . . . . . . . . . . . . . . . . . . . . . . . . . . . . . . . . . . . . . . . . . . . . 87
Lever for the multi-functional switch:
– Turn signal light, headlight and parking light, headlight flasher . .51
– Speed regulating system . . . . . . . . . . . . . . . . . . . . . . . . . . . . . . . . . . . . . . . . . . . . 108
Steering wheel:
– with horn
– with driver airbag . . . . . . . . . . . . . . . . . . . . . . . . . . . . . . . . . . . . . . . . . . . . . . . . . . . . 138
– with controls for radio, radio navigation system and phone . . . . . .117
Instrument cluster: Instruments and indicator lights . . . . . . . . . . . . . . . . .10
Lever for the multi-functional switch:
– Multi-functional indicator . . . . . . . . . . . . . . . . . . . . . . . . . . . . . . . . . . . . . . . . . . . 14
– Windshield wiper and wash system . . . . . . . . . . . . . . . . . . . . . . . . . . . . . . . . 54
Air outlet vents . . . . . . . . . . . . . . . . . . . . . . . . . . . . . . . . . . . . . . . . . . . . . . . . . . . . . . . . . 87
Control dial for heating on the driver's seat . . . . . . . . . . . . . . . . . . . . . . . . . . .69
Switch for hazard warning lights . . . . . . . . . . . . . . . . . . . . . . . . . . . . . . . . . . . . . . 50
Indicator light for a switched off front seat passenger airbag . . . . . . .145
Storage compartment on the dash panel . . . . . . . . . . . . . . . . . . . . . . . . . . . . .81
Depending on equipment fitted:
– Radio
– Radio navigation system
Control dial for heating on the front passenger seat . . . . . . . . . . . . . . . . .
69
Storage compartment on the front passenger side . . . . . . . . . . . . . . . . . .80
Front passenger airbag . . . . . . . . . . . . . . . . . . . . . . . . . . . . . . . . . . . . . . . . . . . . . . . . . 138
Switch for the front passenger front airbag (in front passenger
stowage compartment) . . . . . . . . . . . . . . . . . . . . . . . . . . . . . . . . . . . . . . . . . . . . . . . . 145
Power windows . . . . . . . . . . . . . . . . . . . . . . . . . . . . . . . . . . . . . . . . . . . . . . . . . . . . . . . . . 39
1 2
3
4
5
6
7
8
9
10
11
12
13
14
15
16
17 Fuse box (on side of dash panel)
. . . . . . . . . . . . . . . . . . . . . . . . . . . . . . . . . . . . . . . 220
Light switch . . . . . . . . . . . . . . . . . . . . . . . . . . . . . . . . . . . . . . . . . . . . . . . . . . . . . . . . . . . . . 45
Release lever engine compartment lid . . . . . . . . . . . . . . . . . . . . . . . . . . . . . . . .189
Control dial for the instrument lighting and control dial for the
headlight beam range regulation . . . . . . . . . . . . . . . . . . . . . . . . . . . . . . . . . . . . . . 49, 50
Lever for adjusting the steering wheel . . . . . . . . . . . . . . . . . . . . . . . . . . . . . . . .99
driver's knee airbag . . . . . . . . . . . . . . . . . . . . . . . . . . . . . . . . . . . . . . . . . . . . . . . . . . . . . 140
Ignition lock . . . . . . . . . . . . . . . . . . . . . . . . . . . . . . . . . . . . . . . . . . . . . . . . . . . . . . . . . . . . . 99
Switch for TCS . . . . . . . . . . . . . . . . . . . . . . . . . . . . . . . . . . . . . . . . . . . . . . . . . . . . . . . . . . 154
Front and rear parking aid . . . . . . . . . . . . . . . . . . . . . . . . . . . . . . . . . . . . . . . . . . . . . . 104
Central locking switch . . . . . . . . . . . . . . . . . . . . . . . . . . . . . . . . . . . . . . . . . . . . . . . . . . 35
Depending on equipment fitted:
– Gearshift lever (manual gearbox) . . . . . . . . . . . . . . . . . . . . . . . . . . . . . . . . . . . 102
– Selector lever (automatic gearbox) . . . . . . . . . . . . . . . . . . . . . . . . . . . . . . . . . 113
Storage compartment . . . . . . . . . . . . . . . . . . . . . . . . . . . . . . . . . . . . . . . . . . . . . . . . . . 82
Offroad . . . . . . . . . . . . . . . . . . . . . . . . . . . . . . . . . . . . . . . . . . . . . . . . . . . . . . . . . . . . . . . . . . 160
Tyre pressure monitoring system . . . . . . . . . . . . . . . . . . . . . . . . . . . . . . . . . . . . . . 158
Park Assist . . . . . . . . . . . . . . . . . . . . . . . . . . . . . . . . . . . . . . . . . . . . . . . . . . . . . . . . . . . . . . 105
Depending on equipment fitted:
– Operating controls for the heating . . . . . . . . . . . . . . . . . . . . . . . . . . . . . . . . . 88
– Operating controls for the air conditioning system . . . . . . . . . . . . . . . .89
– Operating controls for Climatronic . . . . . . . . . . . . . . . . . . . . . . . . . . . . . . . . . . 92 Note
● Cars with factory-fitted radio or navigation system are supplied with separate
instructions for operating such equipment.
● The arrangement of the controls and switches and the location of some items
on right-hand drive models may differ from that shown in ⇒
fig. 1. The symbols on
the controls and switches are the same as for left-hand drive models. 18
19
20
21
22
23
24
25
26
27
28
29
30
31
32
33 9
Cockpit Using the system Safety Driving Tips General Maintenance Breakdown assistance Technical data
Page 20 of 252
MAXI DOT display (information display)
Introduction The information display provides you with information in a convenient way con-
cerning the
current operating state of your vehicle . The information system also
provides you with data (depending on the equipment installed in the vehicle) re-
lating to the radio, mobile phone, multi-functional indicator, radio navigation sys-
tem, the unit connected to the MDI input and the automatic gearbox.
Certain functions and operating conditions are always being checked on the vehi-
cle when the ignition is switched on and also while driving.
Functional faults, if required repair work and other information are indicated by
red symbols ⇒ page 19 and yellow symbols ⇒
page 20.
Lighting up of certain symbols is combined with an acoustic warning signal.
Information and texts giving warnings are also shown in the display ⇒ page 22.
The following information can be shown in the display (depending on the equip-
ment installed on the vehicle): Main menu ⇒ page 18
Door, luggage compartment door and bonnet ajar
warning ⇒
page 19 Service Interval Display ⇒
page 12 Selector lever positions for the automatic gearbox DSG ⇒ page 113
CAUTION
Pull out the ignition key while having contact with the display (for example when
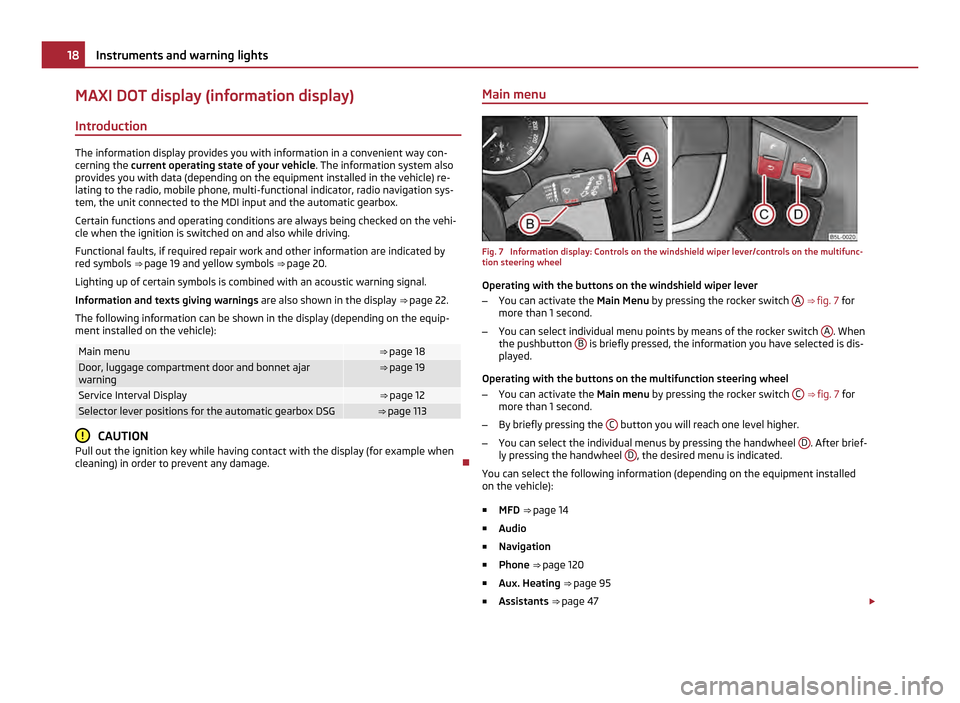
cleaning) in order to prevent any damage. Main menu Fig. 7 Information display: Controls on the windshield wiper lever/controls on the multifunc-
tion steering wheel
Operating with the buttons on the windshield wiper lever
– You can activate the Main Menu by pressing the rocker switch A
⇒ fig. 7 for
more than 1
second.
– You can select individual menu points by means of the rocker switch A . When
the pushbutton B is briefly pressed, the information you have selected is dis-
played.
Operating with the buttons on the multifunction steering wheel
– You can activate the Main menu by pressing the rocker switch C
⇒ fig. 7
for
more than 1 second.
– By briefly pressing the C button you will reach one level higher.
– You can select the individual menus by pressing the handwheel D . After brief-
ly pressing the handwheel D , the desired menu is indicated.
You can select the following information (depending on the equipment installed
on the vehicle):
■ MFD ⇒
page 14
■ Audio
■ Navigation
■ Phone ⇒ page 120
■ Aux. Heating ⇒ page 95
■ Assistants ⇒ page 47 £18
Instruments and warning lights
Page 39 of 252
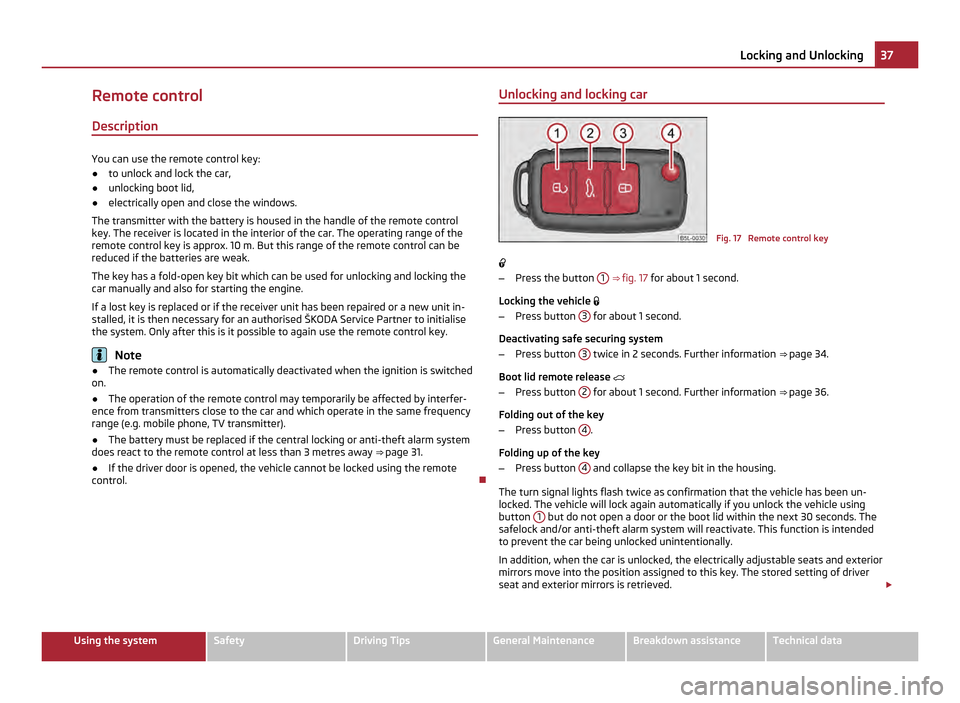
Remote control
Description You can use the remote control key:
●
to unlock and lock the car,
● unlocking boot lid,
● electrically open and close the windows.
The transmitter with the battery is housed in the handle of the remote control
key. The receiver is located in the interior of the car. The operating range of the
remote control key is approx. 10 m. But this range of the remote control can be
reduced if the batteries are weak.
The key has a fold-open key bit which can be used for unlocking and locking the
car manually and also for starting the engine.
If a lost key is replaced or if the receiver unit has been repaired or a new unit in-
stalled, it is then necessary for an authorised
ŠKODA Service Partner to initialise
the system. Only after this is it possible to again use the remote control key. Note
● The remote control is automatically deactivated when the ignition is switched
on.
● The operation of the remote control may temporarily be affected by interfer-
ence from transmitters close to the car and which operate in the same frequency
range (e.g. mobile phone, TV transmitter).
● The battery must be replaced if the central locking or anti-theft alarm system
does react to the remote control at less than 3
metres away ⇒ page 31.
● If the driver door is opened, the vehicle cannot be locked using the remote
control. Unlocking and locking car Fig. 17 Remote control key
– Press the button 1
⇒ fig. 17 for about 1 second.
Locking the vehicle
– Press button 3 for about 1 second.
Deactivating safe securing system
– Press button 3 twice in 2 seconds. Further information
⇒
page 34.
Boot lid remote release
– Press button 2 for about 1 second. Further information
⇒
page 36.
Folding out of the key
– Press button 4 .
Folding up of the key
– Press button 4 and collapse the key bit in the housing.
The turn signal lights flash twice as confirmation that the vehicle has been un-
locked. The vehicle will lock again automatically if you unlock the vehicle using
button 1 but do not open a door or the boot lid within the next 30 seconds. The
safelock and/or anti-theft alarm system will reactivate. This function is intended
to prevent the car being unlocked unintentionally.
In addition, when the car is unlocked, the electrically adjustable seats and exterior
mirrors move into the position assigned to this key. The stored setting of driver
seat and exterior mirrors is retrieved. £ 37
Locking and Unlocking Using the system Safety Driving Tips General Maintenance Breakdown assistance Technical data
Page 120 of 252
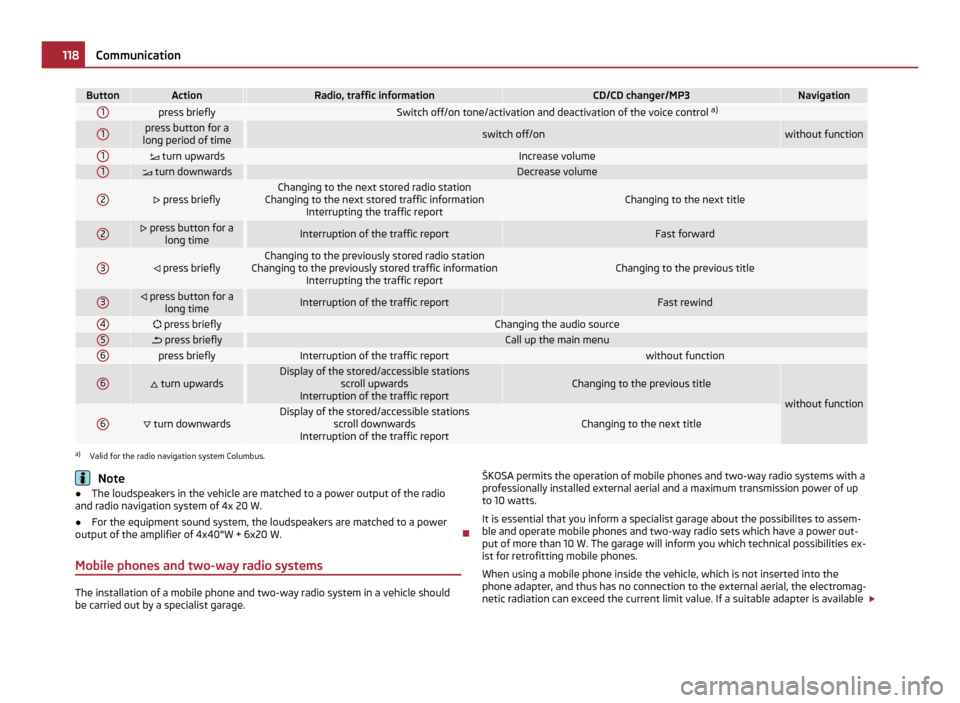
Button Action Radio, traffic information CD/CD changer/MP3 Navigation
1
press briefly
Switch off/on tone/activation and deactivation of the voice control
a)1 press button for a
long period of time switch off/on without function
1
turn upwards Increase volume
1
turn downwards Decrease volume
2
press briefly Changing to the next stored radio station
Changing to the next stored traffic information Interrupting the traffic report Changing to the next title
2 press button for a
long time Interruption of the traffic report Fast forward
3
press briefly Changing to the previously stored radio station
Changing to the previously stored traffic information Interrupting the traffic report Changing to the previous title
3
press button for a
long time Interruption of the traffic report Fast rewind
4
press briefly Changing the audio source
5
press briefly Call up the main menu
6
press briefly Interruption of the traffic report without function
6
turn upwards Display of the stored/accessible stations
scroll upwards
Interruption of the traffic report Changing to the previous title
without function
6
turn downwards Display of the stored/accessible stations
scroll downwards
Interruption of the traffic report Changing to the next title
a)
Valid for the radio navigation system Columbus. Note
● The loudspeakers in the vehicle are matched to a power output of the radio
and radio navigation system of 4x 20 W.
● For the equipment sound system, the loudspeakers are matched to a power
output of the amplifier of 4x40°W + 6x20
W.
Mobile phones and two-way radio systems The installation of a mobile phone and two-way radio system in a vehicle should
be carried out by a specialist garage. ŠKOSA permits the operation of mobile phones and two-way radio systems with a
professionally installed external aerial and a maximum transmission power of up
to 10 watts.
It is essential that you inform a specialist garage about the possibilites to assem-
ble and operate mobile phones and two-way radio sets which have a power out-
put of more than 10 W. The garage will inform you which technical possibilities ex-
ist for retrofitting mobile phones.
When using a mobile phone inside the vehicle, which is not inserted into the
phone adapter, and thus has no connection to the external aerial, the electromag-
netic radiation can exceed the current limit value. If a suitable adapter is available £118
Communication
Page 121 of 252
for your mobile phone, use your mobile phone exclusively in the adapter so that
the radiation in the vehicle drops to a minimum. This also improves the quality of
the connection.
Operation of mobile phones or two-way radio systems may interfere with func-
tioning of the electronic systems of your vehicle. The reasons for this may be:
● no external aerial,
● external aerial incorrectly installed,
● transmission power greater than 10 watts. WARNING
● If a mobile phone or a two-way radio system is operated in the vehicle
without using an external aerial or an external aerial which has been incor-
rectly installed, this can increase the strength of the electromagnetic field in
the interior of the vehicle.
● Please concentrate fully at all times on your driving!
● You must not install two-way radio systems, mobile phones or mounts on
the covers of the airbags or within the immediate deployment range of air-
bags. This might result in injuries to the occupants in the event of an accident.
● Never leave a mobile phone on a seat, on the dash panel or in another
area, from which it can be thrown during a sudden braking manoeuvre, an ac-
cident or a collision. In this case, the occupants of the vehicle might be injured. Note
Observe the country-specific regulations for the use of mobile phones in vehicles.
Universal telephone preinstallation GSM II Introduction The universal telephone preinstallation GSM II has a built-in “speakerphone”. It
provides convenient operation by voice, via the multifunction steering wheel or
radio-navigation system.
All communication between a telephone and the hands-free system of your vehi-
cle can only be established with the help of the Bluetooth ®
technology. The
adapter serves only for charging the telephone and for transmitting the signal to
the external aerial of the vehicle. To ensure an optimum signal transmission, always leave the telephone with the
adapter in the telephone mount.
Furthermore the volume can be changed individually during the call at any time
with the button for setting the radio or radio navigation system or with the but-
tons on the multifunction steering wheel.
WARNING
Pay attention primarily to the traffic situation! As the driver you are fully re-
sponsible for road safety. Use the telephone system only to such an extent
that you are in full control of your vehicle at any time. Note
● Please refer to the following guidelines ⇒ page 118, Mobile phones and two-
way radio systems.
● Should you have any questions, please contact an authorised ŠKODA Service
Partner.
Phone Phonebook A phone phonebook is part of the mobile phone preinstallation with voice control.
In the phone phonebook there are 2,500 free memory locations available. Each
contact can contain up to 4 telephone numbers. This phone phonebook can be
used in line with the mobile telephone.
On vehicles fitted with the radio navigation system Columbus, a maximum of 1200
telephone contacts are shown in the display of this appliance.
After the first connection of the telephone, the system begins to load the phone
book from the phone and the SIM card into the memory of the control unit.
Each time the telephone has established a new connection with the hands-free
system, an update of the relevant phone book is performed. The updating can
take a few minutes. During this time the phone book, which was stored after the
last update was completed, is available. Newly stored telephone numbers are only
shown after the updating has ended.
If the number of contacts loaded exceeds 2 500, the phone book is not complete.
If a telephone event (e.g. incoming or outgoing call, dialogue of the voice control)
occurs during the updating procedure, the updating is interrupted. After the tele-
phone event has ended, the updating starts anew. 119
Communication Using the system Safety Driving Tips General Maintenance Breakdown assistance Technical data
Page 122 of 252
Connection of the mobile phone with the hands-free system
In order to connect a mobile phone with the hands-free system, it is necessary to
connect the telephone to the hands-free system. Detailed information on this is
provided in the operating instructions of your mobile phone. The following steps
must be carried out for the connection:
– Activate Bluetooth ®
in your telephone and the visibility of the mobile phone.
– Switch on the ignition.
– Select the menu Phone - Phone search in the information display and wait un-
til the control unit has ended the search.
– Select your mobile phone in the menu of the units found.
– Confirm the PIN (as standard 1234).
– If the hands-free system announces (as standard Skoda UHV) on the display of
the mobile phone, enter the PIN (as standard 1234) within 30 seconds and wait
until the connection is established. 1)
– After ending the connection, confirm in the information display that a new
user profile was created.
If no more free space is available for creating a new user profile, delete an existing
user profile.
If you have not managed to connect your mobile phone with the hands-free sys-
tem within 3 minutes after switching on the ignition, switch the ignition off and
then again on. The visibility of the hands-free system is established again for 3
minutes. The visibility of the Bluetooth ®
device is automatically switched off if the
vehicle starts off or if the mobile phone connects to the device.
During the connecting procedure, no other mobile phone may be connected with
the hands-free system.
Up to four mobile phones can be paired to the hands-free system, whereby only
one mobile phone can communicate with the hands-free system. Connection with an already paired mobile phone
After switching on the ignition, the connection is automatically established for the
already paired mobile phone
1)
. Check on the mobile unit if the automatic connec-
tion was established.
Disconnecting the connection
● By withdrawing the ignition key.
● By disconnecting the device in the information display.
● By disconnecting the mobile phone.
Solving connection problems
If the system announces No paired phone found, check the operating state of the
telephone:
● Is the telephone switched on?
● Is the PIN code entered?
● Is Bluetooth ®
active?
● Is the visibility of the mobile phone active?
● Was the telephone already paired with the hands-free system? WARNING
In the event of air transport, the Bluetooth ®
function of the hands-free sys-
tem must be switched off by a specialist garage! Note
● Not valid for all mobile phones which enable a communication via Bluetooth ®
.
You can ask at an authorised ŠKODA Service Partner if your telephone is compati-
ble with the universal telephone preinstallation GSM II.
● If a suitable adapter is available for your mobile phone, use your mobile phone
exclusively in the adapter so that the radiation in the vehicle drops to a minimum. £1)
Some mobile phones have a menu, in which the authorization for establishing a Bluetooth ®
connec-
tion is performed via the input of a code. If the input for the authorization is necessary, it must al-
ways be performed when re-establishing the Bluetooth connection. 120
Communication
Page 123 of 252
●
Inserting the mobile phone into the adapter ensures an optimal sending and
receiving power and offers at the same time the advantage of the battery charg-
ing.
● The range of the Bluetooth ®
connection to the hands-free system is restricted
to the vehicle interior. The range is dependent on local factors, e.g. obstacles be-
tween the devices and mutual interferences with other devices. If your mobile
phone is e.g. in a jacket pocket, this can lead to difficulties when establishing the
Bluetooth ®
connection with the hands-free system or the data transfer.
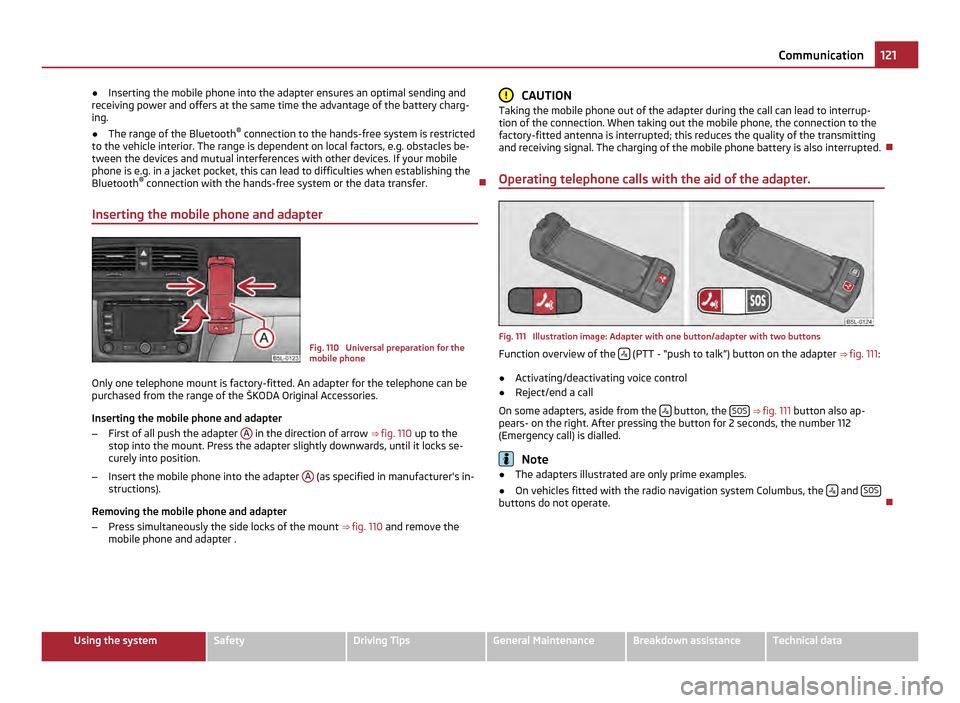
Inserting the mobile phone and adapter Fig. 110 Universal preparation for the
mobile phone
Only one telephone mount is factory-fitted. An adapter for the telephone can be
purchased from the range of the ŠKODA Original Accessories.
Inserting the mobile phone and adapter
– First of all push the adapter A in the direction of arrow
⇒ fig. 110 up to the
stop into the mount. Press the adapter slightly downwards, until it locks se-
curely into position.
– Insert the mobile phone into the adapter A (as specified in manufacturer's in-
structions).
Removing the mobile phone and adapter
– Press simultaneously the side locks of the mount ⇒ fig. 110 and remove the
mobile phone and adapter . CAUTION
Taking the mobile phone out of the adapter during the call can lead to interrup-
tion of the connection. When taking out the mobile phone, the connection to the
factory-fitted antenna is interrupted; this reduces the quality of the transmitting
and receiving signal. The charging of the mobile phone battery is also interrupted.
Operating telephone calls with the aid of the adapter. Fig. 111 Illustration image: Adapter with one button/adapter with two buttons
Function overview of the
(PTT - “push to talk”) button on the adapter
⇒
fig. 111 :
● Activating/deactivating voice control
● Reject/end a call
On some adapters, aside from the button, the
SOS
⇒ fig. 111 button also ap-
pears- on the right. After pressing the button for 2 seconds, the number 112
(Emergency call) is dialled. Note
● The adapters illustrated are only prime examples.
● On vehicles fitted with the radio navigation system Columbus, the and
SOS buttons do not operate.
121
Communication Using the system Safety Driving Tips General Maintenance Breakdown assistance Technical data
Page 124 of 252
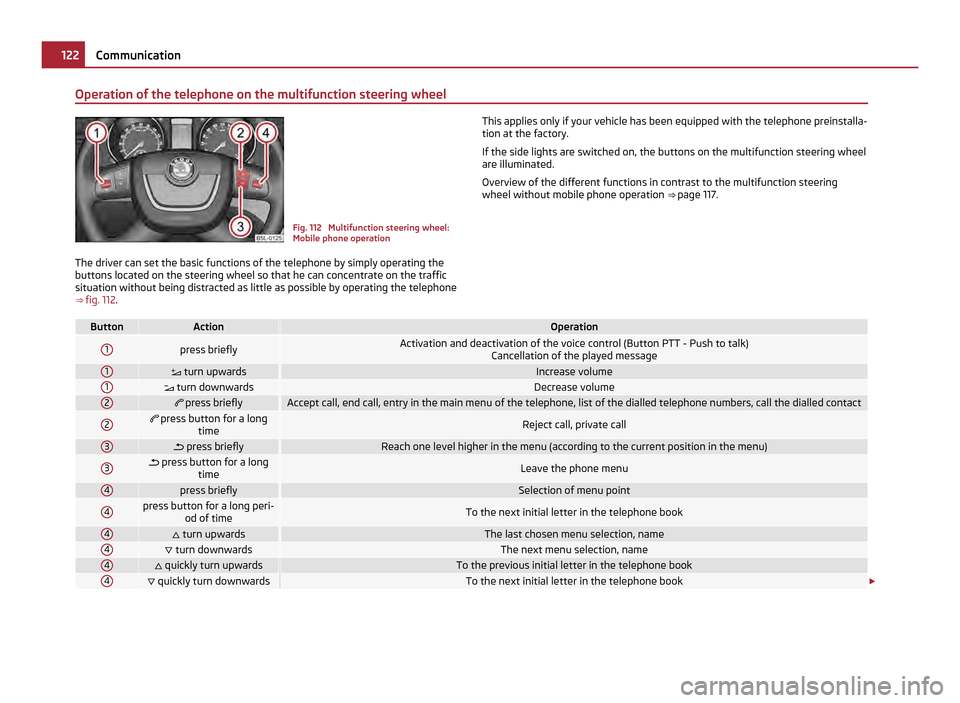
Operation of the telephone on the multifunction steering wheel
Fig. 112 Multifunction steering wheel:
Mobile phone operation
The driver can set the basic functions of the telephone by simply operating the
buttons located on the steering wheel so that he can concentrate on the traffic
situation without being distracted as little as possible by operating the telephone
⇒ fig. 112. This applies only if your vehicle has been equipped with the telephone preinstalla-
tion at the factory.
If the side lights are switched on, the buttons on the multifunction steering wheel
are illuminated.
Overview of the different functions in contrast to the multifunction steering
wheel without mobile phone operation ⇒
page 117. Button Action Operation
1
press briefly
Activation and deactivation of the voice control (Button PTT - Push to talk)
Cancellation of the played message1
turn upwards Increase volume
1
turn downwards Decrease volume
2
press briefly Accept call, end call, entry in the main menu of the telephone, list of the dialled telephone numbers, call the dialled contact
2
press button for a long
time Reject call, private call
3
press briefly Reach one level higher in the menu (according to the current position in the menu)
3
press button for a long
time Leave the phone menu
4
press briefly Selection of menu point
4 press button for a long peri-
od of time To the next initial letter in the telephone book
4
turn upwards The last chosen menu selection, name
4
turn downwards The next menu selection, name
4
quickly turn upwards To the previous initial letter in the telephone book
4
quickly turn downwards To the next initial letter in the telephone book
£122
Communication