radio antenna SKODA YETI 2011 1.G / 5L Owner's Manual
[x] Cancel search | Manufacturer: SKODA, Model Year: 2011, Model line: YETI, Model: SKODA YETI 2011 1.G / 5LPages: 252, PDF Size: 3.61 MB
Page 99 of 252

If the system is running, a warning light in the button for direct switching on/off
of the auxiliary heating
lights up.
The running system deactivates after expiration of the operating period or is de-
activated earlier by pressing the button for direct switching on/off of the auxiliary
heating ⇒
page 96.
A random pre-set time can be deactivated by selecting the menu point Deactivate
in the menu Activate.
After selecting the menu Factory setting in the menu Aux. heating, it is possible
to return to the factory setting.
Radio remote control The auxiliary heating (auxiliary heating and ventilation) can be
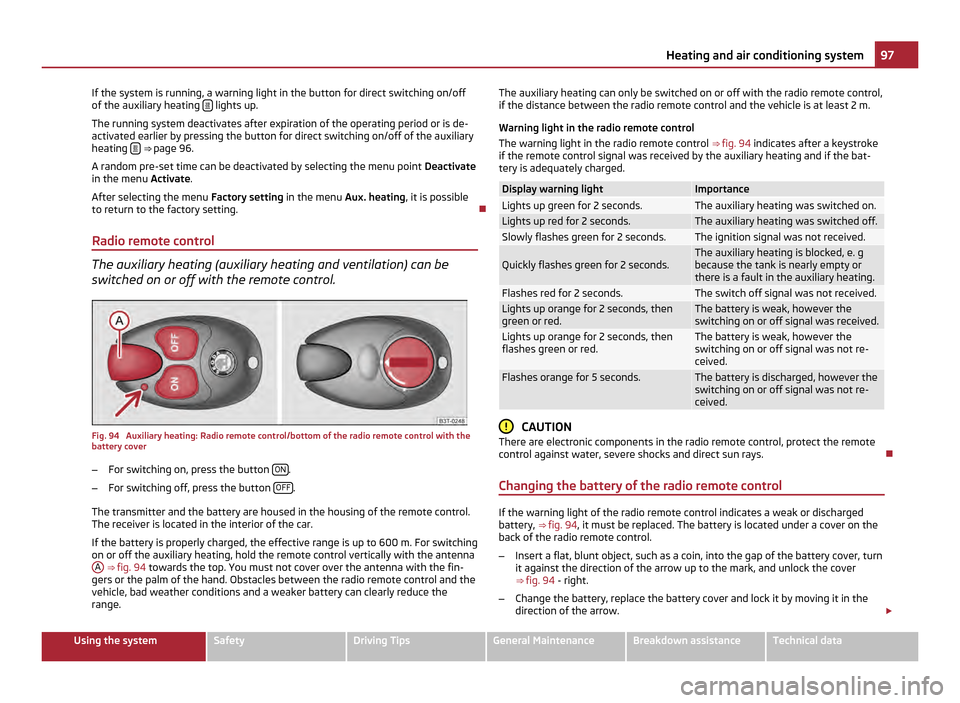
switched on or off with the remote control. Fig. 94 Auxiliary heating: Radio remote control/bottom of the radio remote control with the
battery cover
–
For switching on, press the button ON .
– For switching off, press the button OFF .
The transmitter and the battery are housed in the housing of the remote control.
The receiver is located in the interior of the car.
If the battery is properly charged, the effective range is up to 600
m. For switching
on or off the auxiliary heating, hold the remote control vertically with the antenna A
⇒ fig. 94 towards the top. You must not cover over the antenna with the fin-
gers or the palm of the hand. Obstacles between the radio remote control and the
vehicle, bad weather conditions and a weaker battery can clearly reduce the
range. The auxiliary heating can only be switched on or off with the radio remote control,
if the distance between the radio remote control and the vehicle is at least 2 m.
Warning light in the radio remote control
The warning light in the radio remote control ⇒ fig. 94 indicates after a keystroke
if the remote control signal was received by the auxiliary heating and if the bat-
tery is adequately charged. Display warning light Importance
Lights up green for 2 seconds. The auxiliary heating was switched on.
Lights up red for 2 seconds. The auxiliary heating was switched off.
Slowly flashes green for 2 seconds. The ignition signal was not received.
Quickly flashes green for 2 seconds. The auxiliary heating is blocked, e. g
because the tank is nearly empty or
there is a fault in the auxiliary heating.
Flashes red for 2 seconds. The switch off signal was not received.
Lights up orange for 2 seconds, then
green or red. The battery is weak, however the
switching on or off signal was received.
Lights up orange for 2 seconds, then
flashes green or red. The battery is weak, however the
switching on or off signal was not re-
ceived.
Flashes orange for 5 seconds. The battery is discharged, however the
switching on or off signal was not re-
ceived. CAUTION
There are electronic components in the radio remote control, protect the remote
control against water, severe shocks and direct sun rays.
Changing the battery of the radio remote control If the warning light of the radio remote control indicates a weak or discharged
battery,
⇒ fig. 94 , it must be replaced. The battery is located under a cover on the
back of the radio remote control.
– Insert a flat, blunt object, such as a coin, into the gap of the battery cover, turn
it against the direction of the arrow up to the mark, and unlock the cover
⇒ fig. 94 - right.
– Change the battery, replace the battery cover and lock it by moving it in the
direction of the arrow. £ 97
Heating and air conditioning system Using the system Safety Driving Tips General Maintenance Breakdown assistance Technical data
Page 123 of 252

●
Inserting the mobile phone into the adapter ensures an optimal sending and
receiving power and offers at the same time the advantage of the battery charg-
ing.
● The range of the Bluetooth ®
connection to the hands-free system is restricted
to the vehicle interior. The range is dependent on local factors, e.g. obstacles be-
tween the devices and mutual interferences with other devices. If your mobile
phone is e.g. in a jacket pocket, this can lead to difficulties when establishing the
Bluetooth ®
connection with the hands-free system or the data transfer.
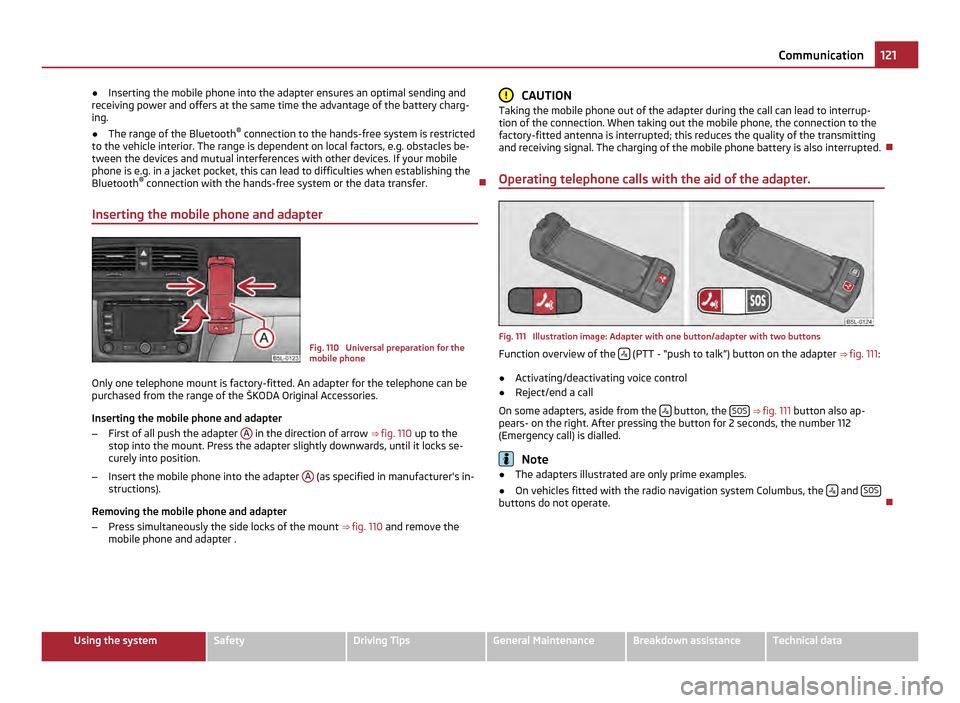
Inserting the mobile phone and adapter Fig. 110 Universal preparation for the
mobile phone
Only one telephone mount is factory-fitted. An adapter for the telephone can be
purchased from the range of the ŠKODA Original Accessories.
Inserting the mobile phone and adapter
– First of all push the adapter A in the direction of arrow
⇒ fig. 110 up to the
stop into the mount. Press the adapter slightly downwards, until it locks se-
curely into position.
– Insert the mobile phone into the adapter A (as specified in manufacturer's in-
structions).
Removing the mobile phone and adapter
– Press simultaneously the side locks of the mount ⇒ fig. 110 and remove the
mobile phone and adapter . CAUTION
Taking the mobile phone out of the adapter during the call can lead to interrup-
tion of the connection. When taking out the mobile phone, the connection to the
factory-fitted antenna is interrupted; this reduces the quality of the transmitting
and receiving signal. The charging of the mobile phone battery is also interrupted.
Operating telephone calls with the aid of the adapter. Fig. 111 Illustration image: Adapter with one button/adapter with two buttons
Function overview of the
(PTT - “push to talk”) button on the adapter
⇒
fig. 111 :
● Activating/deactivating voice control
● Reject/end a call
On some adapters, aside from the button, the
SOS
⇒ fig. 111 button also ap-
pears- on the right. After pressing the button for 2 seconds, the number 112
(Emergency call) is dialled. Note
● The adapters illustrated are only prime examples.
● On vehicles fitted with the radio navigation system Columbus, the and
SOS buttons do not operate.
121
Communication Using the system Safety Driving Tips General Maintenance Breakdown assistance Technical data
Page 183 of 252

Automatic vehicle wash systems
The paintwork of the vehicle is sufficiently resistant that the vehicle can be wash-
ed normally in automatic vehicle wash plants without any problem. The actual
stress to which the paintwork is subjected, however, depends greatly on the de-
sign of the vehicle wash system, the filtering of the water and the type of wash-
ing and care products used. If the paintwork of your vehicle appears mat after be-
ing washed or even has scratches, point this out to the operator of the vehicle
wash plant. Use a different vehicle wash plant, if necessary.
There are no particular points to note before washing your vehicle in an automatic
vehicle wash system other than the usual precautionary measures (closing the
windows including the sliding/tilting roof, removing the external antenna, etc.).
If you have any particular attached parts fitted to your car - such as spoiler, roof
rack system, two-way radio aerial - it is best to first of all consult the operator of
the car wash plant.
It is important to degrease the lips of the windscreen wiper rubbers after passing
through the automatic vehicle wash system.
Washing vehicle by hand It is important to first soften the dirt with plenty of water and rinse it off as thor-
oughly as possible before washing your vehicle by hand.
One should then clean the vehicle using a soft
washing sponge, washing glove or
a washing brush and only slight pressure. Work from the top to the bottom - be-
ginning with the roof. Only place slight pressure on the vehicle paintwork during
cleaning Only use a car shampoo for stubborn dirt.
Wash out the sponge or washing glove thoroughly at short intervals.
Clean wheels, door sills and similar parts last. Use a second sponge for such areas.
Rinse off the vehicle well after giving it a wash and dry it off using a chamois
leather. WARNING
● The ignition should always be switched off when you wash your vehicle -
risk of accident!
● Protect your hands and arms from sharp-edged metal parts when you are
cleaning the underfloor, the inside of the wheel housings or the wheel trims -
risk of cuts. CAUTION
● Do not wash your vehicle in bright sunlight - risk of paint damage.
● Ensure that the jet of water is not aimed directly at the locking cylinders or at
the door and panel joints if you spray your vehicle in winter down with a hose -
risk of freezing.
● Do not use any insect sponges, rough kitchen sponges or similar cleaning
products - risk of damage to the surface of paintwork. For the sake of the environment
Only wash your vehicle at washing bays specifically reserved for this purpose. This
ensures that no water which may be contaminated by oil flows into the sewage
system. It is not even permitted to wash your vehicle in certain areas except at
such specific washing bays.
Washing with a high-pressure cleaner When you wash your vehicle with a high-pressure cleaner, it is essential to comply
with the instructions for use of the cleaning equipment. This applies in particular
to the pressure
used and to the spraying distance. Maintain a sufficiently large
distance to soft materials such as rubber hoses or insulation material.
On no account use circular spray nozzles or so-called dirt cutters! WARNING
It is particularly important that you do not clean tyres with circular spray jets.
Visible but also invisible damage to tyres may occur even at a relatively large
spraying distance and if sprayed only for a short time - risk of accident! CAUTION
The wash water must be no hotter than 60 °C, otherwise the vehicle can be dam-
aged.
Wax treatment Good wax treatment is an effective way of protecting the paintwork from harmful
environmental influences and minor mechanical damage.
The vehicle must be treated with a high-quality hard wax polish at the latest,
when no more drops form on the clean paintwork. £ 181
Taking care of your vehicle and cleaning the vehicle Using the system Safety Driving Tips General Maintenance Breakdown assistance Technical data