SKODA YETI 2012 1.G / 5L Owner's Guide
Manufacturer: SKODA, Model Year: 2012, Model line: YETI, Model: SKODA YETI 2012 1.G / 5LPages: 225, PDF Size: 5.47 MB
Page 31 of 225
ŌĆ║
All the doors (only the driver's door on vehicles with anti-theft alarm system)
and the fuel filler flap are unlocked.
ŌĆ║ The boot lid is then unlocked.
ŌĆ║ The switched on interior lights come on over the door contact.
ŌĆ║ The safe securing system is deactivated.
ŌĆ║ The windows open while the key
is held in the unlock position.
ŌĆ║ The indicator light in the driver door stops flashing if the car is not fitted with an
anti-theft alarm system ┬╗ page 31.Note
If the vehicle is equipped with an anti-theft alarm system, you must insert the key
into the ignition lock and switch the ignition on within 15 seconds after unlocking
the door in order to deactivate the anti-theft alarm system. The alarm is trig-
gered if the ignition is not switched on within 15 seconds. ÐLocking the vehicle with the key
ŌĆ║ Turn the key in the locking cylinder of the driver's door in the opposite direction
of travel (lock position) B
┬╗ Fig. 11
on page 28.
ŌĆ║ The doors, the boot lid and the fuel filler flap are locked.
ŌĆ║ The switched on interior lights will switch off over the door contact.
ŌĆ║ The windows and the panoramic sliding roof close while the key
is held in the
lock position.
ŌĆ║ The safe securing system is immediately activated.
ŌĆ║ The indicator light in the driver door begins flashing. Note
If the driver's door has been opened, the vehicle cannot be locked. Ð Vehicle locking/unlocking from the inside
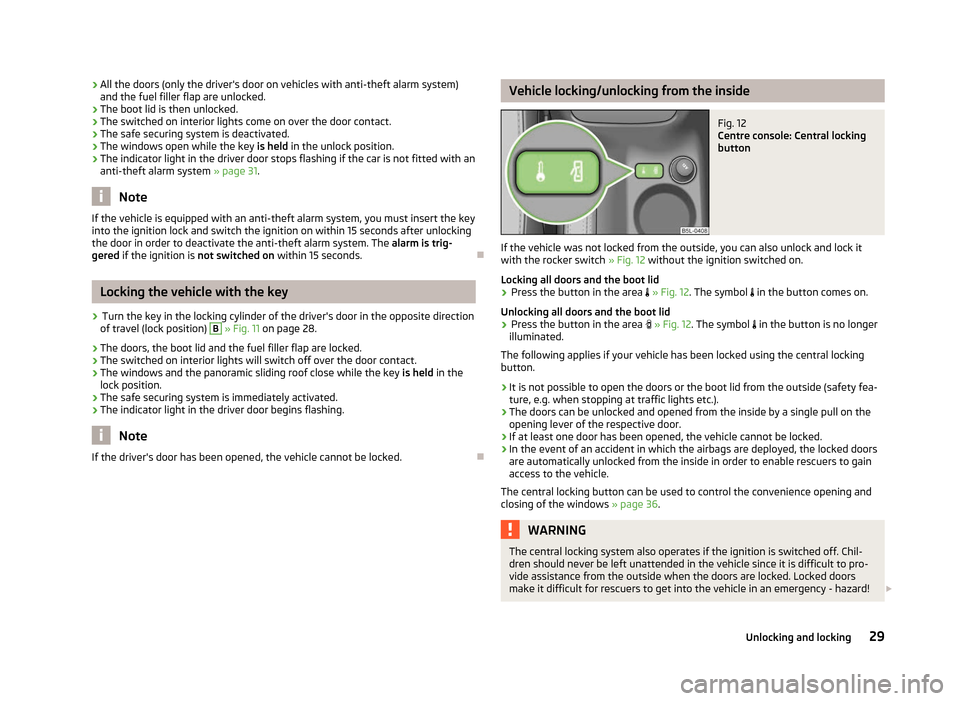
Fig. 12
Centre console: Central locking
button
If the vehicle was not locked from the outside, you can also unlock and lock it
with the rocker switch ┬╗ Fig. 12 without the ignition switched on.
Locking all doors and the boot lid ŌĆ║ Press the button in the area
’ĆŁ ┬╗ Fig. 12. The symbol ’ĆŁ in the button comes on.
Unlocking all doors and the boot lid
ŌĆ║ Press the button in the area
’üé ┬╗ Fig. 12. The symbol ’ĆŁ in the button is no longer
illuminated.
The following applies if your vehicle has been locked using the central locking
button.
ŌĆ║ It is not possible to open the doors or the boot lid from the outside (safety fea-
ture, e.g. when stopping at traffic lights etc.).
ŌĆ║ The doors can be unlocked and opened from the inside by a single pull on the
opening lever of the respective door.
ŌĆ║ If at least one door has been opened, the vehicle cannot be locked.
ŌĆ║ In the event of an accident in which the airbags are deployed, the locked doors
are automatically unlocked from the inside in order to enable rescuers to gain
access to the vehicle.
The central locking button can be used to control the convenience opening and
closing of the windows ┬╗ page 36. WARNING
The central locking system also operates if the ignition is switched off. Chil-
dren should never be left unattended in the vehicle since it is difficult to pro-
vide assistance from the outside when the doors are locked. Locked doors
make it difficult for rescuers to get into the vehicle in an emergency - hazard! ┬Ż
29
Unlocking and locking
Page 32 of 225
Note
If the safe securing system is activated ┬╗ page 28, the door opening lever and the
central locking buttons do not operate. ÐRemote control
Introductory information
You can use the remote control key to:
ŌĆ║ unlock and lock the vehicle,
ŌĆ║ unlocking boot lid;
ŌĆ║ open and close the windows
┬╗ page 36, Window convenience operation .
The transmitter with the battery is housed in the handle of the remote control
key. The receiver is located in the interior of the vehicle. The operating range of
the remote control key is approx. 30 m. But this range of the remote control can
be reduced if the batteries are weak.
The key has a fold-open key bit which can be used for unlocking and locking the
car manually and also for starting the engine.
If a lost key is replaced or if the receiver unit has been repaired or replaced, the
system must be initialised by a ┼ĀKODA Service Partner. Only then can the remote
control key be used again. Note
Ō¢Ā The remote control is automatically deactivated when the ignition is switched
on. Ō¢Ā The operation of the remote control may temporarily be affected by interfer-
ence from transmitters close to the car and which operate in the same frequency
range (e.g. mobile phone, TV transmitter).
Ō¢Ā The battery must be replaced if the central locking or anti-theft alarm system
does react to the remote control at less than 3 metres away ┬╗ page 26.
Ō¢Ā If the driver door is open, the vehicle cannot be locked using the remote control
key. Ð Locking/unlocking
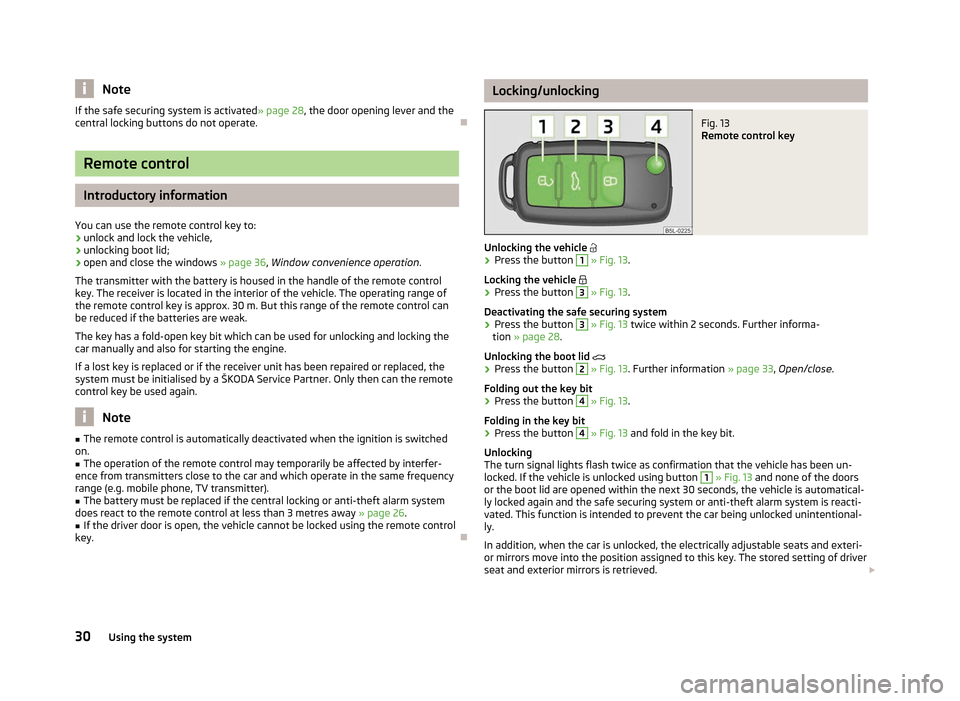
Fig. 13
Remote control key
Unlocking the vehicle ’ā”
ŌĆ║ Press the button 1
┬╗ Fig. 13.
Locking the vehicle ’ā¦
ŌĆ║ Press the button 3
┬╗ Fig. 13.
Deactivating the safe securing system
ŌĆ║ Press the button 3
┬╗ Fig. 13
twice within 2 seconds. Further informa-
tion ┬╗ page 28.
Unlocking the boot lid ’üō
ŌĆ║ Press the button 2
┬╗ Fig. 13. Further information
┬╗ page 33, Open/close.
Folding out the key bit
ŌĆ║ Press the button 4
┬╗ Fig. 13.
Folding in the key bit
ŌĆ║ Press the button 4
┬╗ Fig. 13
and fold in the key bit.
Unlocking
The turn signal lights flash twice as confirmation that the vehicle has been un-
locked. If the vehicle is unlocked using button 1
┬╗ Fig. 13 and none of the doors
or the boot lid are opened within the next 30 seconds, the vehicle is automatical-
ly locked again and the safe securing system or anti-theft alarm system is reacti-
vated. This function is intended to prevent the car being unlocked unintentional-
ly.
In addition, when the car is unlocked, the electrically adjustable seats and exteri-
or mirrors move into the position assigned to this key. The stored setting of driver
seat and exterior mirrors is retrieved. ┬Ż
30 Using the system
Page 33 of 225
Locking
The turn signal lights flash once to confirm that the vehicle has been correctly
locked.
If the doors or the boot lid remain open after the vehicle has been locked, the
turn signal lights do not flash until they have been closed.
WARNING
If the car is locked from the outside and the safe securing system is activated,
there must not be any person in the car as it is then not possible to open ei-
ther a door or a window from the inside. The locked doors make it more diffi-
cult for rescuers to get into the vehicle in an emergency - hazard! Note
Ō¢Ā Only operate the remote control when the doors and boot lid are closed and the
vehicle is in your line of sight. Ō¢Ā To avoid the car being locked inadvertently once in the car, the lock button ’ā¦of the remote control must not be pressed before the key is inserted into the ig-
nition lock. Should this happen, press the unlock button
’ā” of the remote control.
ÐSynchronisation
If the vehicle cannot be unlocked by actuating the remote control system then it
is possible that the code in the key and the control unit in the vehicle are no lon-
ger synchronised. This can occur when the buttons on the radio-operated key are
actuated a number of times outside of the operative range of the equipment or
the battery on the remote control was replaced.
This means it is necessary to synchronise the code as follows:
ŌĆ║ press any button on the remote control key;
ŌĆ║ pressing of the button means that the door will unlock with the key within 1 mi-
nute. Ð Anti-theft alarm system
Introductory information
The anti-theft alarm system increases the level of protection against people
seeking to break into the vehicle. The system triggers audible and visual warning
signals if an attempt is made to break into the vehicle.
How is the alarm system activated?
The anti-theft alarm system is activated when the vehicle is locked with the radio
remote control or the key in the driver's door . It is activated 30 seconds after
locking the door.
How is the alarm system deactivated?
The alarm system is deactivated by pressing the unlock button on the radio re-
mote control. The anti-theft alarm system is reactivated if the vehicle is not
opened within 30 seconds after transmitting the radio signal.
The alarm system is also deactivated if you unlock the driver door using the key
within 45 seconds of locking the vehicle.
If the vehicle is unlocked by inserting the key into the driver door, the key must
be inserted into the ignition lock and the ignition switched on within 15
seconds
of unlocking the door to deactivate the alarm system. The alarm is triggered if
the ignition is not switched on within 15 seconds.
When is the alarm triggered?
The following security areas of the locked vehicle are monitored: ŌĆ║ bonnet;
ŌĆ║ boot lid;
ŌĆ║ doors;
ŌĆ║ ignition lock;
ŌĆ║ Vehicle inclination
┬╗ page 32;
ŌĆ║ Interior of the vehicle
┬╗ page 32;
ŌĆ║ A drop in voltage of the on-board power supply;
ŌĆ║ Socket of the factory-fitted towing device.
An alarm is immediately triggered if either of the two battery terminals is discon-
nected while the anti-theft alarm system is activated.
How is the alarm switched off?
The alarm is switched off by unlocking the vehicle with the radio remote control
or switching on the ignition. ┬Ż
31
Unlocking and locking
Page 34 of 225
Note
Ō¢Ā The working life of the alarm siren is 5 years.
Ō¢Ā Before leaving the vehicle, check that all the windows, doors and the panoramic
sliding roof are closed in order to ensure that the anti-theft alarm system is fully
operational. Ō¢Ā Coding of the radio remote control and the receiver unit precludes the use of
the radio remote control from other vehicles. ÐInterior monitor and towing protection
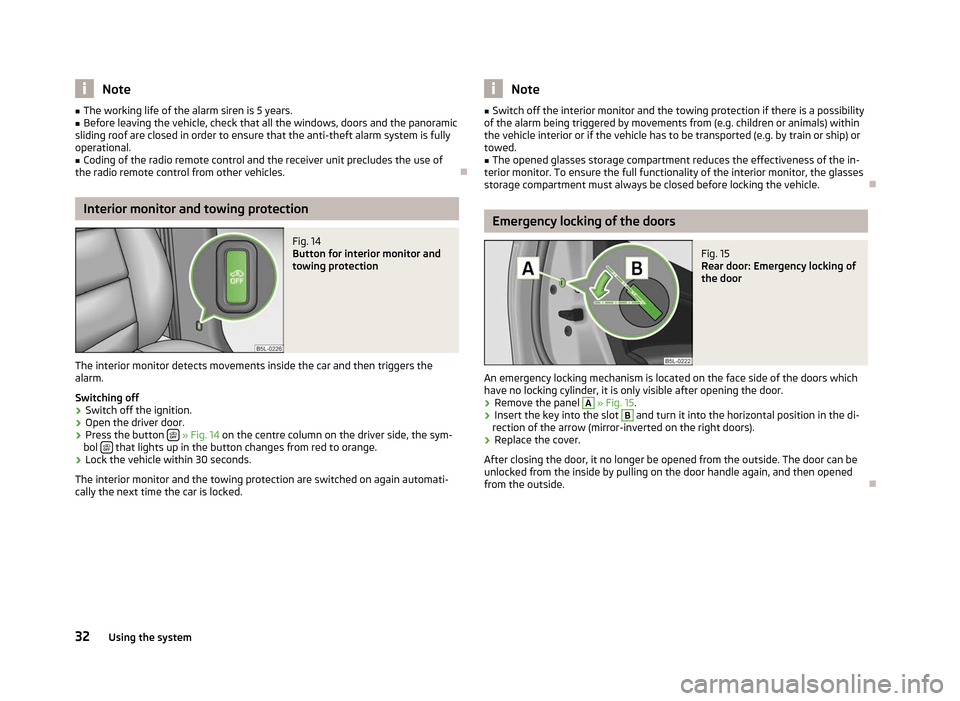
Fig. 14
Button for interior monitor and
towing protection
The interior monitor detects movements inside the car and then triggers the
alarm.
Switching off
ŌĆ║ Switch off the ignition.
ŌĆ║ Open the driver door.
ŌĆ║ Press the button
’āī ┬╗ Fig. 14 on the centre column on the driver side, the sym-
bol ’āī that lights up in the button changes from red to orange.
ŌĆ║ Lock the vehicle within 30 seconds.
The interior monitor and the towing protection are switched on again automati-
cally the next time the car is locked. Note
Ō¢Ā Switch off the interior monitor and the towing protection if there is a possibility
of the alarm being triggered by movements from (e.g. children or animals) within
the vehicle interior or if the vehicle has to be transported (e.g. by train or ship) or
towed. Ō¢Ā The opened glasses storage compartment reduces the effectiveness of the in-
terior monitor. To ensure the full functionality of the interior monitor, the glasses
storage compartment must always be closed before locking the vehicle. Ð Emergency locking of the doors
Fig. 15
Rear door: Emergency locking of
the door
An emergency locking mechanism is located on the face side of the doors which
have no locking cylinder, it is only visible after opening the door. ŌĆ║ Remove the panel A
┬╗ Fig. 15.
ŌĆ║ Insert the key into the slot B
and turn it into the horizontal position in the di-
rection of the arrow (mirror-inverted on the right doors).
ŌĆ║ Replace the cover.
After closing the door, it no longer be opened from the outside. The door can be
unlocked from the inside by pulling on the door handle again, and then opened
from the outside. Ð
32 Using the system
Page 35 of 225

Boot lid
├ż
Introduction
This chapter contains information on the following subjects:
Open/close 33
Automatic locking 33
Emergency unlocking 34
WARNING
Ō¢Ā Ensure that the lock is properly engaged after closing the boot lid. Other-
wise, the boot lid might open suddenly when driving even if the boot lid lock
was closed - risk of accident!
Ō¢Ā Never drive with the boot lid fully opened or slightly ajar otherwise exhaust
gases may get into the interior of the vehicle - risk of poisoning!
Ō¢Ā Do not press on the rear window when closing the boot lid, it could crack -
risk of injury! Note
Ō¢Ā After closing the boot lid, it is automatically locked within 1 second and the
anti-theft alarm system is activated. This applies only if the vehicle was locked
before closing the boot lid. Ō¢Ā The function of the handle above the licence plate is deactivated when starting
off or at a speed of 5
km/hour or more for vehicles with central locking. The func-
tion of the handle is activated again when the vehicle has stopped and a door is
opened. Ð Open/close
Fig. 16
Handle of boot lid
First read and observe the introductory information and safety warn-
ings on page 33.
After unlocking the vehicle, you can open the lid by pushing the handle located
above the licence plate.
Opening
ŌĆ║
Press the handle and simultaneously lift up the boot lid
┬╗
Fig. 16.
Closing
ŌĆ║ Pull down the boot lid and close it with a slight swing. ├É Automatic locking
First read and observe the introductory information and safety warn-
ings on page 33.
If the vehicle was locked with the button
’ā¦ on the remote control key before the
boot lid was closed, the lid is automatically locked as soon as it is closed.
The delayed automatic locking function of the boot lid can be activated on your
vehicle. The following applies following activation of this function: If the boot lid
was locked with the button ’üō on the remote control key 2
┬╗ page 30, then it is
possible to open the lid within a limited period of it being closed.
If you wish, a
┼ĀKODA Service Partner can activate or deactivate the delayed auto-
matic locking of the boot lid. The Service Partner will also provide any further in-
formation that is required. ┬Ż
├ż
├ż
33
Unlocking and locking
Page 36 of 225
There is a risk of unwanted entry into the vehicle before the boot lid is locked au-
tomatically. Always lock the vehicle using the button ’ā¦ on the remote control or
with the key if no remote control is available » page 29 .ÐEmergency unlocking
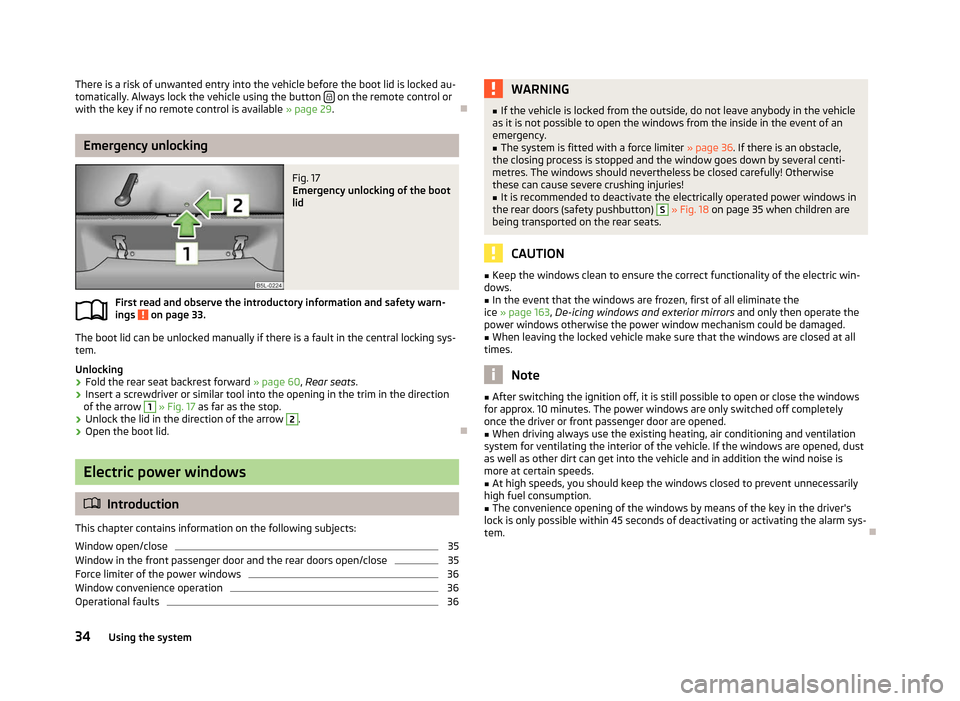
Fig. 17
Emergency unlocking of the boot
lid
First read and observe the introductory information and safety warn-
ings on page 33.
The boot lid can be unlocked manually if there is a fault in the central locking sys-
tem.
Unlocking
ŌĆ║
Fold the rear seat backrest forward
┬╗ page 60, Rear seats.
ŌĆ║ Insert a screwdriver or similar tool into the opening in the trim in the direction
of the arrow 1
┬╗ Fig. 17
as far as the stop.
ŌĆ║ Unlock the lid in the direction of the arrow 2
.
ŌĆ║ Open the boot lid. ├ÉElectric power windows
├ż
Introduction
This chapter contains information on the following subjects:
Window open/close 35
Window in the front passenger door and the rear doors open/close 35
Force limiter of the power windows 36
Window convenience operation 36
Operational faults 36
├ż WARNING
Ō¢Ā If the vehicle is locked from the outside, do not leave anybody in the vehicle
as it is not possible to open the windows from the inside in the event of an
emergency.
Ō¢Ā The system is fitted with a force limiter ┬╗ page 36. If there is an obstacle,
the closing process is stopped and the window goes down by several centi-
metres. The windows should nevertheless be closed carefully! Otherwise
these can cause severe crushing injuries!
Ō¢Ā It is recommended to deactivate the electrically operated power windows in
the rear doors (safety pushbutton) S
┬╗ Fig. 18 on page 35 when children are
being transported on the rear seats. CAUTION
Ō¢Ā Keep the windows clean to ensure the correct functionality of the electric win-
dows. Ō¢Ā In the event that the windows are frozen, first of all eliminate the
ice ┬╗ page 163, De-icing windows and exterior mirrors and only then operate the
power windows otherwise the power window mechanism could be damaged. Ō¢Ā When leaving the locked vehicle make sure that the windows are closed at all
times. Note
Ō¢Ā After switching the ignition off, it is still possible to open or close the windows
for approx. 10
minutes. The power windows are only switched off completely
once the driver or front passenger door are opened. Ō¢Ā When driving always use the existing heating, air conditioning and ventilation
system for ventilating the interior of the vehicle. If the windows are opened, dust
as well as other dirt can get into the vehicle and in addition the wind noise is
more at certain speeds.
Ō¢Ā At high speeds, you should keep the windows closed to prevent unnecessarily
high fuel consumption.
Ō¢Ā The convenience opening of the windows by means of the key in the driver's
lock is only possible within 45
seconds of deactivating or activating the alarm sys-
tem. Ð
34 Using the system
Page 37 of 225
Window open/close
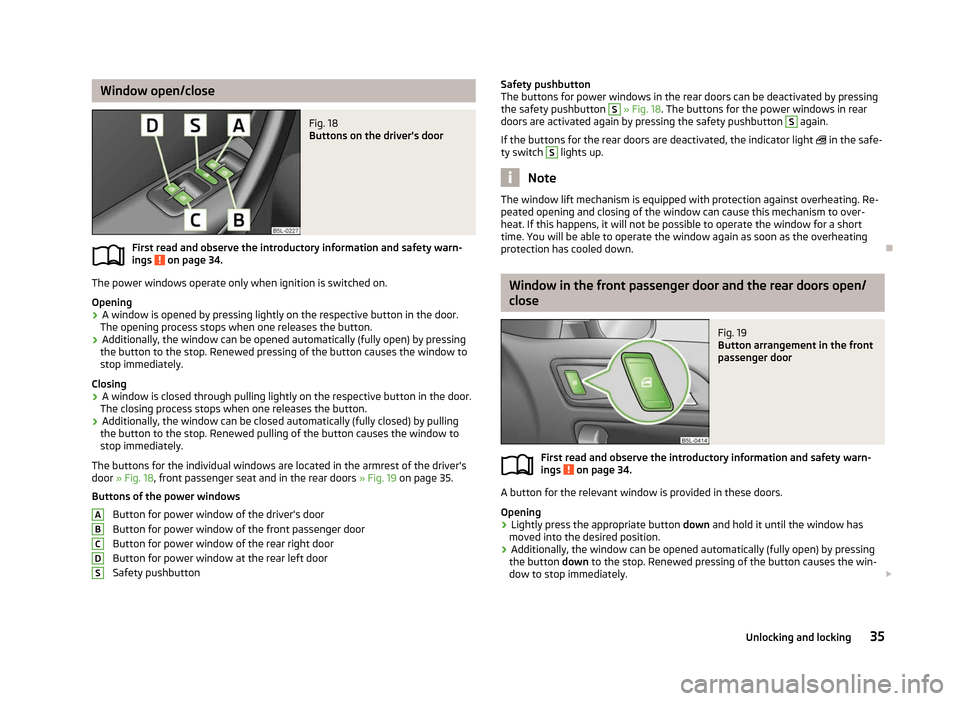
Fig. 18
Buttons on the driver's door
First read and observe the introductory information and safety warn-
ings on page 34.
The power windows operate only when ignition is switched on.
Opening
ŌĆ║
A window is opened by pressing lightly on the respective button in the door.
The opening process stops when one releases the button.
ŌĆ║ Additionally, the window can be opened automatically (fully open) by pressing
the button to the stop. Renewed pressing of the button causes the window to
stop immediately.
Closing
ŌĆ║ A window is closed through pulling lightly on the respective button in the door.
The closing process stops when one releases the button.
ŌĆ║ Additionally, the window can be closed automatically (fully closed) by pulling
the button to the stop. Renewed pulling of the button causes the window to
stop immediately.
The buttons for the individual windows are located in the armrest of the driver's
door ┬╗ Fig. 18, front passenger seat and in the rear doors ┬╗ Fig. 19 on page
35.
Buttons of the power windows Button for power window of the driver's door
Button for power window of the front passenger door
Button for power window of the rear right door
Button for power window at the rear left door
Safety pushbutton
├ż
A
B
C
D
S Safety pushbutton
The buttons for power windows in the rear doors can be deactivated by pressing
the safety pushbutton
S
┬╗ Fig. 18. The buttons for the power windows in rear
doors are activated again by pressing the safety pushbutton S
again.
If the buttons for the rear doors are deactivated, the indicator light ’é” in the safe-
ty switch S
lights up.
Note
The window lift mechanism is equipped with protection against overheating. Re-
peated opening and closing of the window can cause this mechanism to over-
heat. If this happens, it will not be possible to operate the window for a short
time. You will be able to operate the window again as soon as the overheating
protection has cooled down. Ð Window in the front passenger door and the rear doors open/
close
Fig. 19
Button arrangement in the front
passenger door
First read and observe the introductory information and safety warn-
ings on page 34.
A button for the relevant window is provided in these doors.
Opening
ŌĆ║
Lightly press the appropriate button
down and hold it until the window has
moved into the desired position.
ŌĆ║ Additionally, the window can be opened automatically (fully open) by pressing
the button down to the stop. Renewed pressing of the button causes the win-
dow to stop immediately. ┬Ż
├ż
35
Unlocking and locking
Page 38 of 225

Closing
ŌĆ║
Lightly press the appropriate button
up and hold it until the window has moved
into the desired position.
ŌĆ║ Additionally, the window can be closed automatically (fully closed) by pulling
the button upwards to the stop. Renewed pressing of the button causes the
window to stop immediately. ÐForce limiter of the power windows
First read and observe the introductory information and safety warn-
ings on page 34.
The electrically operated power windows are fitted with a force limiter. It reduces
the risk of bruises or injuries when closing the windows.
If there is an obstacle, the closing process is stopped and the window goes down
by several centimetres.
If the obstacle prevents the window from being closed during the next 10 sec-
onds, the closing process is interrupted once again and the window goes down by
several centimetres.
If you attempt to close the window again within 10
seconds of the window being
moved down for the second time, even though the obstacle was not yet been re-
moved, the closing process is only stopped. During this time it is not possible to
automatically close the window. The force limiter is still switched on.
The force limiter is only switched off if you attempt to close the window again
within the next 10 seconds - the window will now close with full force!
If you wait longer than 10 seconds, the force limiter is switched on again. ÐWindow convenience operation
First read and observe the introductory information and safety warn-
ings on page 34.
The electrically powered windows can be opened and closed as follows when un-
locking and locking the vehicle.
Opening
ŌĆ║
Press and hold the unlock button
’ā” on the remote control key.
ŌĆ║ Hold the key in the driver's lock in the unlock position.
ŌĆ║ Press and hold he central locking button in the area of the symbol
’üé.
├ż
├ż Closing
ŌĆ║ Press and hold the lock button
’ā¦ on the remote control key.
ŌĆ║ Hold the key in the driver's lock in the lock position.
ŌĆ║ Press and hold he central locking button in the area of the symbol
’ĆŁ.
You can interrupt the opening or closing process for the windows immediately by
releasing the key or the lock button. Ð Operational faults
First read and observe the introductory information and safety warn-
ings on page 34.
Electrically operated power windows do not operate
If the battery has been disconnected and then reconnected while the window
was opened, the electrically operated power windows do not operate. The system
must be activated. Proceed as follows in order to re-establish the function:
ŌĆ║ switch on the ignition;
ŌĆ║ pull the top edge of the button in the driver's door to close the window;
ŌĆ║ release the button;
ŌĆ║ pull the relevant button upwards again for approx. 3
seconds.
Operation in winter
In the winter, ice accumulating on the surface of the window may cause there to
be more resistance when closing the window. The window will stop and move
back several centimetres.
It is necessary to deactivate the force limiter to close the window » page 36.Ð Panoramic sliding roof
Introductory information
The panoramic sliding roof with sun screen can only be operated with the rotary
switch when the ignition is switched on ┬╗ Fig. 20 on page 37
. The control dial
has several positions.
The panoramic sliding roof or sun screen can still be opened, closed and tilted for
approx. 10 minutes after switching the ignition off. However, as soon as one of
the front doors is opened it is no longer possible to operate the panoramic sliding
roof and sun screen. ┬Ż
├ż
36 Using the system
Page 39 of 225

Note
If the battery has been disconnected and reconnected, it is possible that the slid-
ing/tilting roof does not close fully. This is why the rotary switch must be set to
the switch position A
┬╗ Fig. 20 on page 37
and pressed forward for about
10 seconds. ÐUsing the system
Fig. 20
Control dial for the panoramic
sliding roof
Comfort position
ŌĆ║ Turn the switch to position C
┬╗ Fig. 20.
Open partially
ŌĆ║ Turn the switch to a position in area D
┬╗ Fig. 20.
Open fully
ŌĆ║ Turn the switch to position B
┬╗ Fig. 20 and hold it in this position (spring-ten-
sioned position).
Tilting and closing
ŌĆ║ To tilt, press the switch on the recess in the direction of the roof.
ŌĆ║ To close, press the switch on the recess down and then push it forwards.
Closing
ŌĆ║ Turn the switch to position A
┬╗ Fig. 20.
Force limiter
The panoramic sliding roof is fitted with a force limiter. The panoramic sliding roof
stops and moves back several centimetres when it cannot be closed because
there is something in the way (e.g. ice). The panoramic sliding roof can be fully
closed without a force limiter by pressing the switch on the recess down and then
pushing it forward until the panoramic sliding roof is fully closed ┬╗ . WARNING
Close the panoramic sliding roof carefully - risk of injury! CAUTION
During the winter it may be necessary to remove any ice and snow in the vicinity
of the panoramic sliding roof before opening it to prevent any damage to the
opening mechanism. Note
When the panoramic sliding roof is in the comfort position, the intensity of the
wind noise is reduced. Ð Sunshade open/close
Fig. 21
Buttons for sun screen
The sun screen can be closed or opened separately using the buttons ┬╗ Fig. 21.
Opening
ŌĆ║ Briefly press the button E
┬╗ Fig. 21 to open fully.
ŌĆ║ Press and hold the button E
to open in the desired position. The opening proc-
ess stops when one releases the button.
Closing
ŌĆ║ Briefly press the button F
┬╗ Fig. 21 to close fully.
ŌĆ║ Press and hold the button F
to close in the desired position. The closing proc-
ess stops when one releases the button. Ð
37
Unlocking and locking
Page 40 of 225

Convenience operation
You can also operate the panoramic sliding roof and the sun screen from the out-
side using the remote control key.
Closing
ŌĆ║ Press and hold the lock button
’ā¦ on the remote control key.
The closing process stops immediately when one releases the button.
Tilting roof
ŌĆ║ Press and hold the unlock button
’ā” on the remote control key.
When closing or tilting the panoramic sliding roof, the sun screen is closed or
opened at the same time. Note
Ō¢Ā The force limiter also operates for convenience closing.
Ō¢Ā The panoramic sliding roof can only be tilted and not opened with the conven-
ience operating feature. ÐEmergency operation
Fig. 22
Point for positioning screwdriver/opening for positioning the key
The panoramic sliding roof can be closed or opened manually if the system is faul-
ty. The emergency operation of the panoramic sliding roof is located underneath
the glasses storage box 1
┬╗ page 74,
Glasses storage box .
ŌĆ║ Open the glasses storage box.
ŌĆ║ Carefully insert an approximately 5 mm wide screwdriver into the slot in the po-
sitions shown by the arrows 1
┬╗ Fig. 22
. ŌĆ║
Carefully fold the glasses storage box downwards by gently pressing down and
turning the screwdriver.
ŌĆ║ Insert an Allen key, SW 4, up to the stop into the opening 2
and close or open
the panoramic sliding roof.
ŌĆ║ Reinstall the glasses storage box by first inserting the plastic plugs and then
pushing the entire part upwards.
Have the fault rectified by a
┼ĀKODA specialist garage. Note
After each emergency operation, it is necessary to activate the roof » page 38.Ð Activation after the disconnecting and reconnecting the
battery
After disconnecting and reconnecting the battery, the panoramic sliding roof and
the sun screen must be activated.
To activate the panoramic sliding roof, press the switch on the recess down and
push it forward for approx. 10
seconds.
To activate the sun screen, press and hold the switch F
┬╗ Fig. 21 on page
37 for
approx. 10 seconds.
If the panoramic sliding roof or sun screen is not fully closed when disconnecting
and reconnecting the battery, they must first be closed ┬╗ page 37 or pushed
shut » page 37 . Only then is it possible to perform the activation. Ð38
Using the system