spare wheel SKODA YETI 2013 1.G / 5L User Guide
[x] Cancel search | Manufacturer: SKODA, Model Year: 2013, Model line: YETI, Model: SKODA YETI 2013 1.G / 5LPages: 266, PDF Size: 26.71 MB
Page 225 of 266
PreparationFirst read and observe the introductory information and safety warn-
ings
on page 221.
Always change a wheel on a level surface as far as possible.
The following steps must be carried out before actually changing the wheel:
›
Have all of the occupants get out of the vehicle. While changing a tyre, the oc-
cupants of the vehicle should not stand on the road (they should instead remain
behind a crash barrier).
›
Switch off the engine.
›
Move the gearshift lever into Neutral or move the selector lever for the auto-
matic gearbox into position P.
›
Firmly apply the handbrake.
›
Uncouple any trailers.
›
Remove the vehicle tool kit » page 220 and the spare wheel » page 216 from
the boot.
Changing a wheel
First read and observe the introductory information and safety warn-
ings
on page 221.
›
Remove the full wheel trim » page 217 or caps » page 217 .
›
First of all slacken the anti-theft wheel bolt and then the other wheel
bolts » page 224 .
›
Jack up the vehicle until the wheel that needs changing is clear of the
ground » page 223 .
›
Unscrew the wheel bolts and place them on a clean surface (cloth, paper, etc.).
›
Remove the wheel carefully.
›
Attach the spare wheel and slightly screw on the wheel bolts.
›
Lower the vehicle.
›
Tighten the wheel bolts opposite each other using the wheel wrench (alternat-
ing crosswise). Tighten the anti-theft wheel bolt last » page 224.
›
Replace the wheel trim or the caps.
Note■
All bolts must be clean and must turn easily.■Under no circumstances grease or oil the wheel bolts!■
When fitting unidirectional tyres, ensure that the direction of rotation is cor-
rect » page 212 .
Follow-up tasks
First read and observe the introductory information and safety warn-
ings
on page 221.
The following steps must also be performed after changing the wheel.
›
Stow and attach the replaced wheel in the spare wheel well using a special bolt » page 216 .
›
Stow the tool kit in the space provided and secure using the band.
›
Check the tyre pressure on the installed spare wheel as soon as possible.
›
Have the tightening torque of the wheel bolts checked with a torque wrench
as soon as possible.
›
Replace the damaged wheel or consult a specialist garage about repair options.
Note
■ If it is determined that the wheel bolts are corroded and difficult to turn when
changing the wheel, the bolts must be replaced before checking the tightening
torque.■
Drive cautiously and only at a moderate speed until the tightening torque has
been checked.
222Do-it-yourself
Page 240 of 266
›Insert a new fuse.›Replace the bracket at the original position.›
Re-insert the cover of the fuse box .
Fuse assignment in the dash panel
No.Power consumer1Heating of the gearbox ventilation (diesel engine)
Control unit for automatic gearbox DSG2-3Tow hitch4Instrument cluster, windshield wiper lever, turn signal light lever,
camera5Air blower for heating, radiator fan, air conditioning system, Clima-
tronic6Rear window wiper7Phone8Tow hitch9Vehicle voltage control unit - interior lights
Rear fog light10Rain sensor, light switch, diagnosis connector, removable light11Left side cornering lights12Right side cornering lights13Radio, DVD14Central control unit, engine control unit15Light switch16Haldex17KESSY controller, steering wheel locking18Diagnostic socket, engine control unit, brake sensor, Haldex19Control unit for ABS, ESP, switch for tyre air pressure control, control
unit for parking aid, switch for OFF ROAD mode, START STOP button20Switch and airbag control unit21WIV, tail lamp, dimming mirror, pressure sensor, telephone prepara- tion, air mass sensor, control unit for headlight range control and
headlight tilt22Instrument cluster controller for electro-mechanical power steering, control unit for data bus23Central locking system and bonnet lidNo.Power consumer24Rear power window25Rear window heater, auxiliary heating and ventilation26Power socket in the boot27Electric sliding/tilting roof, electric sun screen28Fuel pump, injection valves29Front power window30front and rear lighter31Headlight cleaning system32Front seat heating, regulator for seat heating33Heating, air conditioning, Climatronic, remote control for auxiliary
heating34Alarm, spare horn35Control unit for automatic gearbox DSG36Tow hitch
Fuses in the engine compartment
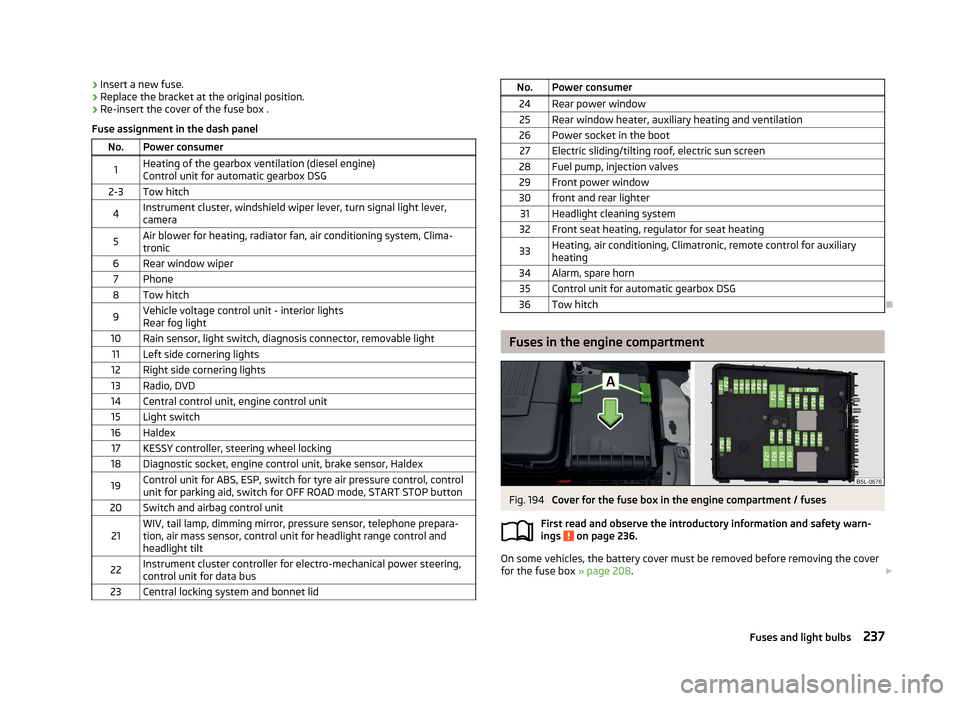
Fig. 194
Cover for the fuse box in the engine compartment / fuses
First read and observe the introductory information and safety warn-
ings
on page 236.
On some vehicles, the battery cover must be removed before removing the cover
for the fuse box » page 208.
237Fuses and light bulbs
Page 247 of 266
Technical data
Technical data
Vehicle data
Introduction
This chapter contains information on the following subjects:
Vehicle identification data
244
Dimensions
245
angle and gradeability
246
Vehicle-specific details per engine type
247
The details given in the vehicle's technical documentation always take prece-
dence over the details in the Owner's Manual.
The listed performance values were determined without performance-reducing
equipment, e.g. air conditioning system.
Vehicle identification data
Fig. 206
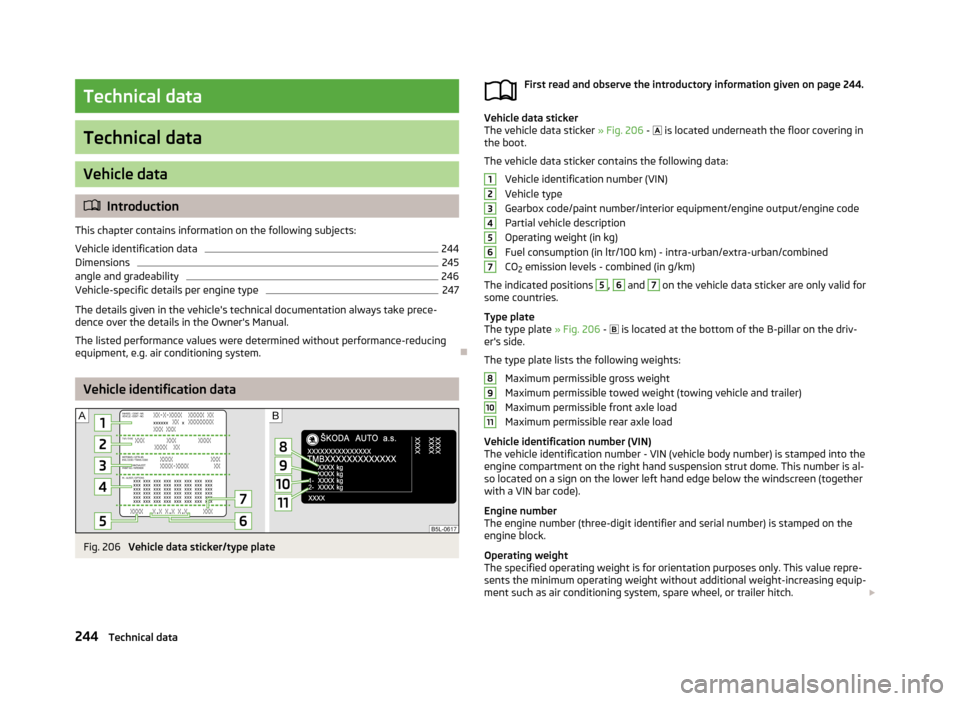
Vehicle data sticker/type plate
First read and observe the introductory information given on page 244.
Vehicle data sticker
The vehicle data sticker » Fig. 206 - is located underneath the floor covering in
the boot.
The vehicle data sticker contains the following data: Vehicle identification number (VIN)
Vehicle type
Gearbox code/paint number/interior equipment/engine output/engine code Partial vehicle description
Operating weight (in kg) Fuel consumption (in ltr/100 km) - intra-urban/extra-urban/combined
CO 2 emission levels - combined (in g/km)
The indicated positions
5
,
6
and
7
on the vehicle data sticker are only valid for
some countries.
Type plate
The type plate » Fig. 206 -
is located at the bottom of the B-pillar on the driv-
er's side.
The type plate lists the following weights: Maximum permissible gross weight
Maximum permissible towed weight (towing vehicle and trailer)
Maximum permissible front axle load
Maximum permissible rear axle load
Vehicle identification number (VIN)
The vehicle identification number - VIN (vehicle body number) is stamped into the
engine compartment on the right hand suspension strut dome. This number is al-so located on a sign on the lower left hand edge below the windscreen (together
with a VIN bar code).
Engine number
The engine number (three-digit identifier and serial number) is stamped on the
engine block.
Operating weight
The specified operating weight is for orientation purposes only. This value repre- sents the minimum operating weight without additional weight-increasing equip-
ment such as air conditioning system, spare wheel, or trailer hitch.
1234567891011244Technical data
Page 261 of 266
Heating64
Manually adjusting62
Memory Function of the electrically adjustable seat
63
Removing seats69
Storing in memory of remote control key63
Seats and practical equipment Setting front seats
61
Seats and useful equipment61
Securing the variable load floor in the raised position
89
Selector lever see Using the selector lever
127
Selector lever lock Warning light
22
Service185
Service interval display30
Service intervals182
Setting13
Setting the13
Shelves70
Shifting gears Driving and saving energy
131
Side airbag173
Side lights47
ski bag81
Sliding/tilting roof Closing
45
Closing the sun screen45
Emergency operation234
Opening/closing the sun screen45
Opening and tilting45
Operation45
Snow chains218
Spare wheel216
Speedometer11
see speedometer11
Speed symbol see Wheels
215
Spoiler186
START-STOP149
Manually activating/deactivating the system150
Operating conditions of the system150
Starting/shutting down the engine149
Starting and stopping the engine - KESSY120
Starting and stopping the engine using the key118
Starting engine Jump-starting
226
Starting the engine Jump-starting
227
Key119
see KESSY122
START STOP Information messages
151
Jump-starting228
Steering force assistance118
Steering lock / unlock see KESSY
121
Steering wheel117
Stopping the engine Key
120
Storage box87
Storage compartment in the rear central console79
Storage compartment on the passenger side78
Storage compartments70
Compartment for glasses77
Storage compartment in the front central con- sole
72
Storage compartment in the rear central console 79
Storage compartment on the dashboard
71
Storage compartment on the passenger side78
Storage compartments in the doors72
Storage compartment under the passenger seat78
Storage pockets on the front seats79
Storage compartment under the pasenger seat78
Storage pockets on the front seats79
Storing seats
63
Sun visors55
Switch See Ignition119
Switching off the engine see KESSY
123
Switching off the ignition see KESSY
123
Switching on the ignition see KESSY
122
Switch off ASR warning light
19
Synchronous adjustment of the rear-view mirrors 59
T
Taking care of the vehicle Natural leather
193
Seat belts195
Taking care of your vehicle Automatic car wash system
188
Cavity protection192
Chrome parts190
Cleaning the wheels192
Decorative films190
Door lock cylinders191
Headlight lenses191
High-pressure cleaner188
Plastic parts190
Polishing the paintwork189
Rubber seals190
Taking care of the interior192
Taking care of your vehicle exterior189
Washing187
Washing by hand188
Wash system188
Wax treatment189
Taking care of your vehicles Fabric covers
194
TCS Operation
137
Technical data244
Telephone103, 105
258Index
Page 262 of 266
Temporary spare wheel216
the rear seats fold down seat backrest and fold seat fully for- ward
68
Tiptronic127
Tools220
TOP TETHER181
Towing228
Towing a trailer152
Towing device Description
152
Drawbar load152
Use and care156
Towing eye front
229
Rear229
Towing protection40
Traction Control System (TCS)137
Trailer152, 156
13-pin power socket157
driving with a trailer157
loading156
Safety eye157
Trailer stabilisation158
Transport Luggage compartment
81
Roof rack system90
Transporting children safely177
TSA158
Turn signal49
Turn signal system Warning light
21
Two-way radio systems100
Type plate244
Tyre inflation pressure Warning light
21
Tyre load-bearing capacity see Wheels
214
Tyre pressure monitor Setting
215
Tyre repairCheck pressure226
Preparations225
Sealing and inflating the tyre226
Tyres212
Inflation pressure213
New214
See Wheels214
Sizes213
Tyre wear indicator213
U
Underbody protection
192
Unleaded petrol135
Unlocking Individual settings
36
KESSY35
Key33
Remote control34
Vehicle key33
Unlocking and locking32
Useful equipment 12-volt power outlet
75
Ashtray74
Car park ticket holder71
Cigarette lighter74
Clothes hook79
Cupholders73
Removable ski bag81
Storage compartment under the front armrest76
Using the information system23
Using the selector lever127
Using the variable loading floor with a spare wheel
90
V
Variable loading floor
88
Removing and fitting carrier rails89
Variable loading floor with spare wheel Removable storage box87
Vehicle battery Automatic load deactivation
210
charging209
Checking the battery electrolyte level209
Cover208
Operation in winter209
Replacing210
Safety instructions207
Vehicle care182
Alcantara194
Artificial leather194
Cloths194
Vehicle Condition See Auto Check Control
13
Vehicle data sticker244
Vehicle dimensions245
Vehicle key Locking
33
Unlocking33
Vehicle tool kit220
vest holder for reflective vest
219
Visibility55
Visors see Sun visors
55
W
Warning at excessive speeds
28
Warning lights14
warning messages Diesel particulate filter
20
Warning symbols see Warning lights
14
Warning triangle219
Warranty5
259Index
Page 263 of 266
Washing182
Automatic car wash system188
by hand188
Chrome parts190
High-pressure cleaner188
Waste container76
water Crossing
134
Wax treatment See Taking care of your vehicle
189
Weights244
Wheel bolts Anti-theft wheel bolt
224
Caps217
Loosening and tightening223
Wheel rims212
Wheels Bolts
217
Changing221
Full trim217
General information212
Load index214
Replacing wheels213
Service life of tyres213
Snow chains218
Spare wheel216
Speed symbol215
Storing wheels213
Temporary spare wheel216
Tyre pressure213
Tyre sizes213
Tyre wear indicator213
unidirectional tyres215
Winter tyres218
Wi-Fi109
Windows191
Deicing191
See electric power windows41
Windscreen Deicing
191
Heater55
Windscreen washer fluid Checking201
Replenishing201
Warning light21
Winter201
Windscreen washer system201
Windscreen washers57
Windscreen wiper Replacing the rear window wiper blade
235
Windscreen wipers automatic rear window wipers
57
Cleaning windscreen wipers235
Replacing the front windscreen wipers235
Service position of windscreen wiper arms235
Windscreen washer fluid201
Windscreen wipers and washers56
Winter Deicing windows
191
Winter operation217
Snow chains218
Winter tyres218
Winter tyres See Wheels
218
Wiping interval57
WLAN109
MAXI DOT110
Network connection109
Switching off109
Switching on109
260Index