key SKODA YETI 2014 1.G / 5L Amundsen Infotainment Navigation System Manual
[x] Cancel search | Manufacturer: SKODA, Model Year: 2014, Model line: YETI, Model: SKODA YETI 2014 1.G / 5LPages: 88, PDF Size: 8.18 MB
Page 62 of 88
If no scale change occurs then above the scale function key the symbol with
mediated elevation 1)
appears.
Map Orientation
Read and observe
and on page 57 first.
The 2D map can be oriented to the north or in relation to the direction of trav-
el.
The 3D map is always aligned with respect to the direction of travel.
A change of map orientation is only possible when the map is centred on the
vehicle position (the function key or
is not displayed).
›
Press the function key
- one of the following types of 2D map orientations
is displayed.
Map orientation towards the north
› The map is oriented towards north and the Arrow
A
» Fig. 32
on
page 58 shows the direction of travel.
If the scale of the 2D Map or 3D Map is greater than 10 km (5 miles), then the
map is automatically displayed as 2D and aligned in the direction of north.
Map orientation with respect to the direction
› The map rotates and the direction of travel arrow
A
» Fig. 32
on
page 58 points to the top of the screen.
Map scale
Read and observe
and on page 57 first.
It is possible to change the map scale manually or to turn on the automatic
change of scale.
Symbols of the scale function keys
The map type can be changed by pressing a function key depending on the
context in
G
» Fig. 32 on page 58 .
manual scale is active automatic scale is active
Turn on / off the automatic scale
fast map
manual scale
The manual scale is turned on when the function key G
and the symbol
» Fig. 32 on page 58 is displayed.
Map scale can be change in the following ways.
› Turning the right control
2
» Fig. 1
on page 7 .
› Touching the device screen with two fingers and pulling them apart or clos-
ing them together.
The map is moved by touching the device screen with one finger and moving it
in the desired direction. If the automatic scale is on then it changes to manual
scale. The symbol in the function key changes to .
Turn on the automatic scale
The automatic scale can be turned on by pressing the function key
→
.
The function key is highlighted in green and the function of the automatic
scale is turned on. The symbol in the function key changes to .
The automatic scale will only be active as long as the map is centred on the
vehicle position (the function key or
is not displayed).
If the automatic scale is active, the map scale will change automatically de-
pending on the route travelled (motorway - smaller map scale / town larger
map scale).
Turning off the automatic scale
The automatic scale can be turned off by pressing the function key
→
or by manually changing the map scale. The symbol in the function key
changes to .
Fast map
› Press the function key
or
→
.
The map scale is reduced for a few seconds and then restored.
1)
Display of elevation requires the reception of signals from at least five satellites. Route guidance must
not be running in demo mode.
59Description of the navigation system
Page 63 of 88
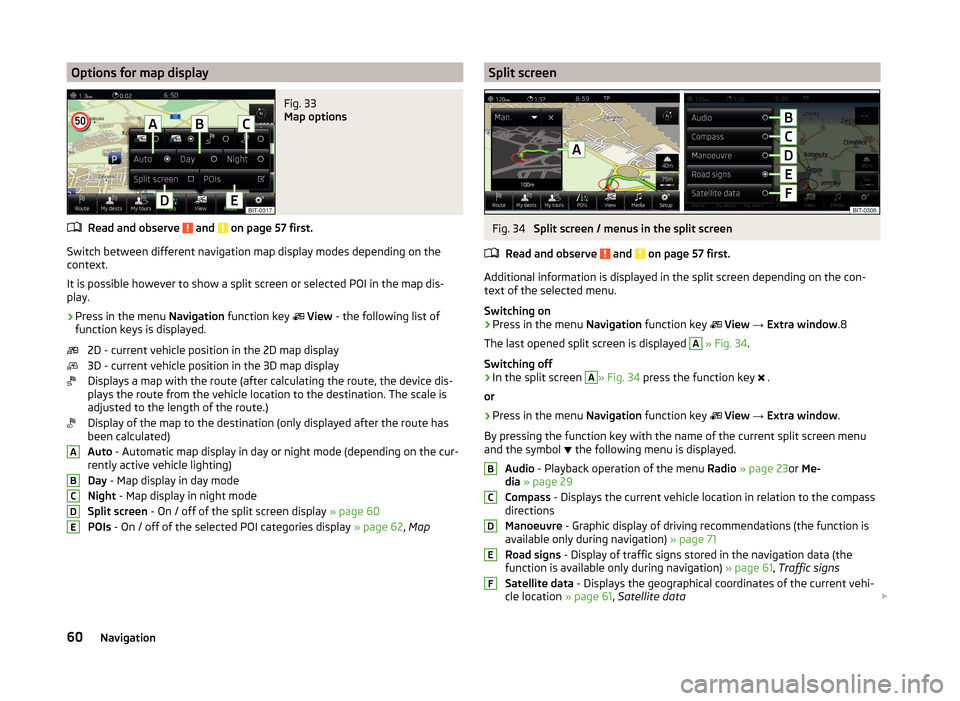
Options for map displayFig. 33
Map options
Read and observe and on page 57 first.
Switch between different navigation map display modes depending on the
context.
It is possible however to show a split screen or selected POI in the map dis-
play.
›
Press in the menu Navigation function key
View - the following list of
function keys is displayed.
2D - current vehicle position in the 2D map display
3D - current vehicle position in the 3D map display
Displays a map with the route (after calculating the route, the device dis-
plays the route from the vehicle location to the destination. The scale is
adjusted to the length of the route.)
Display of the map to the destination (only displayed after the route has
been calculated)
Auto - Automatic map display in day or night mode (depending on the cur-
rently active vehicle lighting)
Day - Map display in day mode
Night - Map display in night mode
Split screen - On / off of the split screen display » page 60
POIs - On / off of the selected POI categories display » page 62, Map
ABCDESplit screenFig. 34
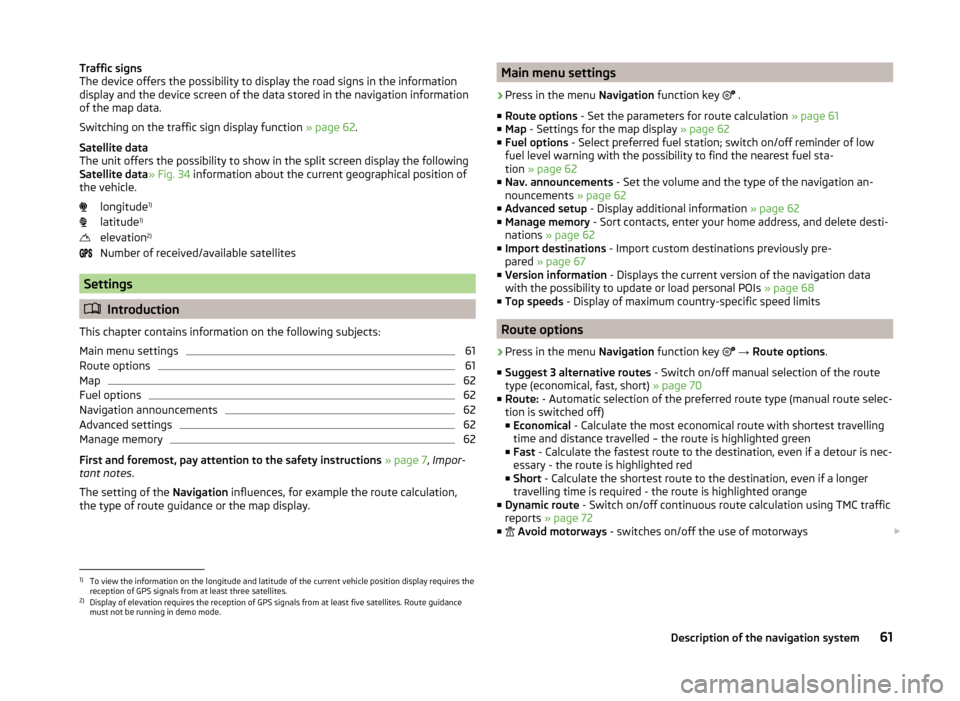
Split screen / menus in the split screen
Read and observe
and on page 57 first.
Additional information is displayed in the split screen depending on the con- text of the selected menu.
Switching on
›
Press in the menu Navigation function key
View → Extra window .8
The last opened split screen is displayed
A
» Fig. 34 .
Switching off
›
In the split screen
A
» Fig. 34 press the function key
.
or
›
Press in the menu Navigation function key
View → Extra window .
By pressing the function key with the name of the current split screen menu
and the symbol the following menu is displayed.
Audio - Playback operation of the menu Radio » page 23 or Me-
dia » page 29
Compass - Displays the current vehicle location in relation to the compass
directions
Manoeuvre - Graphic display of driving recommendations (the function is
available only during navigation) » page 71
Road signs - Display of traffic signs stored in the navigation data (the
function is available only during navigation) » page 61, Traffic signs
Satellite data - Displays the geographical coordinates of the current vehi-
cle location » page 61, Satellite data
BCDEF60Navigation
Page 64 of 88
Traffic signs
The device offers the possibility to display the road signs in the information
display and the device screen of the data stored in the navigation information
of the map data.
Switching on the traffic sign display function » page 62.
Satellite data
The unit offers the possibility to show in the split screen display the following
Satellite data » Fig. 34 information about the current geographical position of
the vehicle.
longitude 1)
latitude 1)
elevation 2)
Number of received/available satellites
Settings
Introduction
This chapter contains information on the following subjects:
Main menu settings
61
Route options
61
Map
62
Fuel options
62
Navigation announcements
62
Advanced settings
62
Manage memory
62
First and foremost, pay attention to the safety instructions » page 7 , Impor-
tant notes .
The setting of the Navigation influences, for example the route calculation,
the type of route guidance or the map display.
Main menu settings›
Press in the menu Navigation function key
.
■ Route options - Set the parameters for route calculation » page 61
■ Map - Settings for the map display » page 62
■ Fuel options - Select preferred fuel station; switch on/off reminder of low
fuel level warning with the possibility to find the nearest fuel sta-
tion » page 62
■ Nav. announcements - Set the volume and the type of the navigation an-
nouncements » page 62
■ Advanced setup - Display additional information » page 62
■ Manage memory - Sort contacts, enter your home address, and delete desti-
nations » page 62
■ Import destinations - Import custom destinations previously pre-
pared » page 67
■ Version information - Displays the current version of the navigation data
with the possibility to update or load personal POIs » page 68
■ Top speeds - Display of maximum country-specific speed limits
Route options
›
Press in the menu Navigation function key
→ Route options .
■ Suggest 3 alternative routes - Switch on/off manual selection of the route
type (economical, fast, short) » page 70
■ Route: - Automatic selection of the preferred route type (manual route selec-
tion is switched off)
■ Economical - Calculate the most economical route with shortest travelling
time and distance travelled – the route is highlighted green
■ Fast - Calculate the fastest route to the destination, even if a detour is nec-
essary - the route is highlighted red
■ Short - Calculate the shortest route to the destination, even if a longer
travelling time is required - the route is highlighted orange
■ Dynamic route - Switch on/off continuous route calculation using TMC traffic
reports » page 72
■
Avoid motorways - switches on/off the use of motorways
1)
To view the information on the longitude and latitude of the current vehicle position display requires the
reception of GPS signals from at least three satellites.
2)
Display of elevation requires the reception of GPS signals from at least five satellites. Route guidance
must not be running in demo mode.
61Description of the navigation system
Page 65 of 88
■ Avoid ferries and motorail trains - Switch use of ferries and motorail
trains on/off
■ Avoid toll roads - Switch on/off use of toll roads
■ Avoid tunnels - Switch use of tunnels on/off
■ Avoid routes requiring toll stickers - Switch use of routes requiring toll
stickers on/off
■ Available toll stickers - Choose the use of toll roads for respective countries
(the choice is only available when the function Avoid routes requiring toll
stickers is on)
Map
›
Press in the menu Navigation function key
→ Map .
■ Lane guidance - Switch on/off the display with the recommended lane for
complicated intersections » page 71
■ Show favourites - Switch on/off the display of favourites
■ Show road signs - Switch on/off the display of traffic signs
■ Show POIs - Switch on / off the display of POIs (additional menu items ap-
pear only when this function is turned off)
■ Select categories for POIs - Select POIs that can be displayed on the map
from a list of available POIs (max. 10 POI categories) » page 69
■ Show brands for POIs - Switch on/off the display company logos at the POIs
Fuel options
›
Press in the menu Navigation function key
→ Fuel options .
■ Select preferred fuel station - Setting for the preferred fuel station brand
(the selected markers appear in the search on the first three positions of the
list, even if a different, non-preferred brand fuel station is closer)
■ Fuel warning - Switch on / off the display of the warning (when the pointer
of the fuel gauge reaches the reserve area)
When the pointer of the fuel gauge reaches the reserve area, a screen appears
when the function Fuel warning is switched on with the warning message
Warning: fuel tank almost empty. Would you like to find a fuel station near-
by? with the following menu items.
› Cancel
- Close the window with the warning
› Search
- Search for the nearest fuel station; when you select the fuel station,
the new route will be calculated from your current position
Navigation announcements›
Press in the menu Navigation function key
→ Navigation announce-
ments .
■ Volume - Volume control of the navigation announcements
■ No voice guidance during call - Enable / disable the navigation prompts dur-
ing a telephone conversation
Advanced settings
›
Press in the menu Navigation function key
→ Advanced setup .
■ Time display: - Select the time to be displayed in the status line
■ Time of arrival - displays the expected time to destination
■ Travelling time - Display the expected travelling time to the destination
■ Status line: Status line - Display information about your selected destination
in the status line ■ Destination - Display information about the distance and duration of the
guidance to the destination
■ Next stopover - Display information about the distance and duration of the
guidance to the stopover
■ Note: national border crossed - Switch on/off the display of the information
window with speed limits when crossing the national border
■ Demo mode - Switch on/off guidance in demo mode
■ Define demo mode starting point - Enter the start point of the route guid-
ance for the demo mode ■ Cancel - Cancel the entry
■ Position - Select the current vehicle position as the starting point
■ Address - Select an address as the starting point
Manage memory
›
Press in the menu Navigation function key
→ Manage memory .
■ Sort by: - Sort contacts imported from a connected telephone
■ Name - according to contact surname
■ Name - according to contact first name
■ Define home address - Enter / show / edit the home address » page 67,
Home address
■ Delete my POIs - Delete saved personal points of interest
■ Update my POIs (SD card) - Update / import personal POIs
62Navigation
Page 66 of 88
■Delete user data - Selection of data to be deleted (by pressing the function
key Delete the list of selected menu item is deleted)
■ Last destinations - Delete the last destinations
■ Dest. memory - Delete the stored destinations
■ Tour memory - Deletes the stored tours
■ My points of interest (Personal POI) - Delete the personal POIs
■ Entered cities - Delete the history of entered towns
■ Home address - Delete the entered home address
■ Flagged destination - Delete the flagged destinationroute guidance
Enter new destination
Introduction
This chapter contains information on the following subjects:
Options of the destination entry
63
Destination input via the address
64
Destination input via the map point / using the GPS coordinates
65
First and foremost, pay attention to the safety instructions » page 7 , Impor-
tant notes .
This chapter discusses the options for entering the destination and the indi-
vidual input types.
Options of the destination entry
Fig. 35
Menu with the destination entry
options
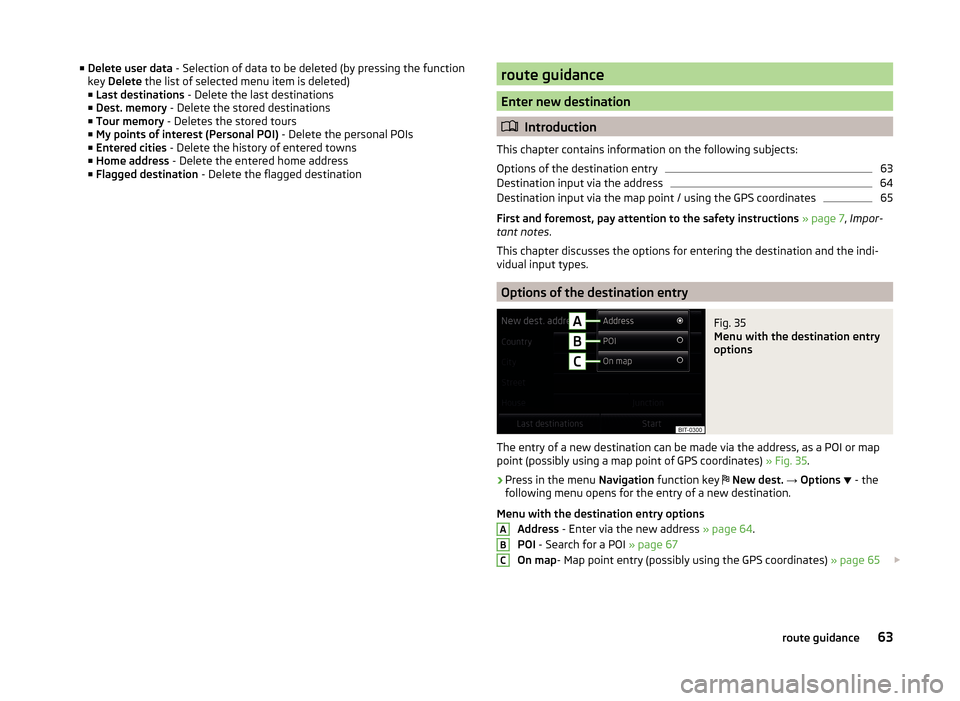
The entry of a new destination can be made via the address, as a POI or map
point (possibly using a map point of GPS coordinates) » Fig. 35.
›
Press in the menu Navigation function key
New dest. → Options
- the
following menu opens for the entry of a new destination.
Menu with the destination entry options Address - Enter via the new address » page 64.
POI - Search for a POI » page 67
On map - Map point entry (possibly using the GPS coordinates) » page 65
ABC63route guidance
Page 67 of 88
More options for calling the destination entry menu
› Press in the menu
Navigation function key Route → New dest. / stopover
→ Options
.
› Press in the menu
Navigation function key
POIs → Other POIs → Options
.
› Press in the menu
Navigation function key
My tours → New dest. → Op-
tions
.
Destination input via the address
Fig. 36
Destination entry by address / house number
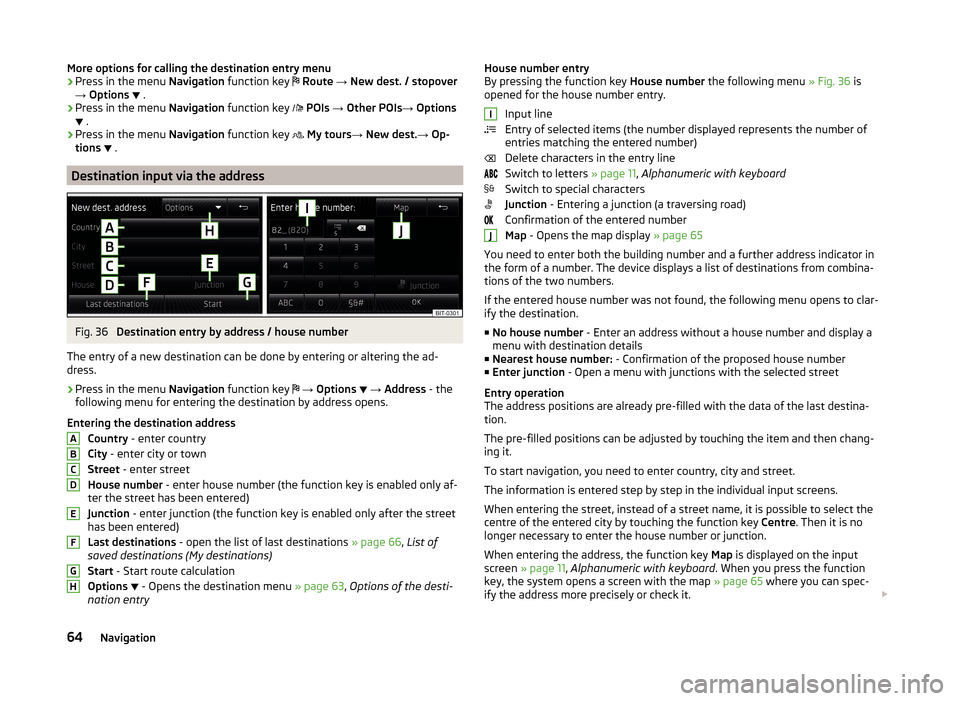
The entry of a new destination can be done by entering or altering the ad-
dress.
›
Press in the menu Navigation function key
→ Options
→ Address - the
following menu for entering the destination by address opens.
Entering the destination address Country - enter country
City - enter city or town
Street - enter street
House number - enter house number (the function key is enabled only af-
ter the street has been entered)
Junction - enter junction (the function key is enabled only after the street
has been entered)
Last destinations - open the list of last destinations » page 66, List of
saved destinations (My destinations)
Start - Start route calculation
Options
- Opens the destination menu
» page 63, Options of the desti-
nation entry
ABCDEFGHHouse number entry
By pressing the function key House number the following menu » Fig. 36 is
opened for the house number entry.
Input line
Entry of selected items (the number displayed represents the number of
entries matching the entered number)
Delete characters in the entry line
Switch to letters » page 11, Alphanumeric with keyboard
Switch to special characters
Junction - Entering a junction (a traversing road)
Confirmation of the entered number
Map - Opens the map display » page 65
You need to enter both the building number and a further address indicator in
the form of a number. The device displays a list of destinations from combina-
tions of the two numbers.
If the entered house number was not found, the following menu opens to clar-
ify the destination.
■ No house number - Enter an address without a house number and display a
menu with destination details
■ Nearest house number: - Confirmation of the proposed house number
■ Enter junction - Open a menu with junctions with the selected street
Entry operation
The address positions are already pre-filled with the data of the last destina-
tion.
The pre-filled positions can be adjusted by touching the item and then chang-
ing it.
To start navigation, you need to enter country, city and street.
The information is entered step by step in the individual input screens.
When entering the street, instead of a street name, it is possible to select the centre of the entered city by touching the function key Centre. Then it is no
longer necessary to enter the house number or junction.
When entering the address, the function key Map is displayed on the input
screen » page 11 , Alphanumeric with keyboard . When you press the function
key, the system opens a screen with the map » page 65 where you can spec-
ify the address more precisely or check it. IJ64Navigation
Page 68 of 88
After entering the destination check whether the entered destination is cor-
rect, for example by pressing the function key J» Fig. 36 and viewing on the
map. Some place names can be found in several locations.
If the address is entered correctly, destination details are dis-
played » page 75 .
More options for calling the menu
› Press in the menu
Navigation function key
→ New dest./stopover → Op-
tions
→ Street address .
› Press in the menu
Navigation function key
→ Other POIs → Options
→
Street address .
Destination input via the map point / using the GPS coordinates
Fig. 37
Destination input via the map point / using the GPS coordinates
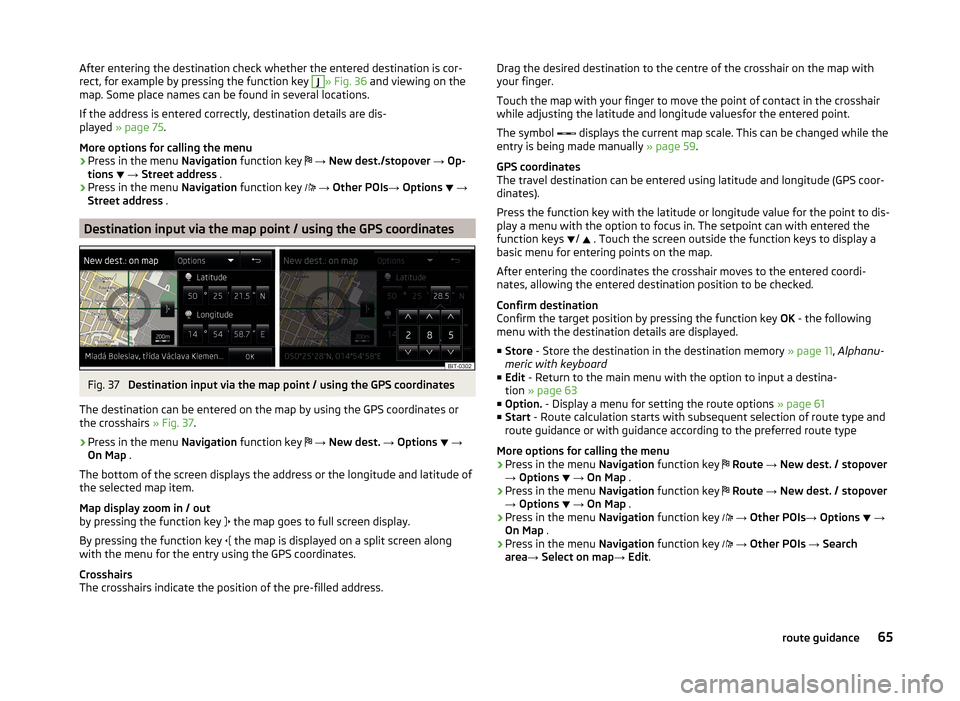
The destination can be entered on the map by using the GPS coordinates or
the crosshairs » Fig. 37.
›
Press in the menu Navigation function key
→ New dest. → Options
→
On Map .
The bottom of the screen displays the address or the longitude and latitude of
the selected map item.
Map display zoom in / out
by pressing the function key the map goes to full screen display.
By pressing the function key the map is displayed on a split screen along
with the menu for the entry using the GPS coordinates.
Crosshairs
The crosshairs indicate the position of the pre-filled address.
Drag the desired destination to the centre of the crosshair on the map with
your finger.
Touch the map with your finger to move the point of contact in the crosshair
while adjusting the latitude and longitude valuesfor the entered point.
The symbol
displays the current map scale. This can be changed while the
entry is being made manually » page 59.
GPS coordinates
The travel destination can be entered using latitude and longitude (GPS coor- dinates).
Press the function key with the latitude or longitude value for the point to dis-
play a menu with the option to focus in. The setpoint can with entered the
function keys /
. Touch the screen outside the function keys to display a
basic menu for entering points on the map.
After entering the coordinates the crosshair moves to the entered coordi-nates, allowing the entered destination position to be checked.
Confirm destination
Confirm the target position by pressing the function key OK - the following
menu with the destination details are displayed.
■ Store - Store the destination in the destination memory » page 11, Alphanu-
meric with keyboard
■ Edit - Return to the main menu with the option to input a destina-
tion » page 63
■ Option. - Display a menu for setting the route options » page 61
■ Start - Route calculation starts with subsequent selection of route type and
route guidance or with guidance according to the preferred route type
More options for calling the menu › Press in the menu
Navigation function key
Route → New dest. / stopover
→ Options
→ On Map .
› Press in the menu
Navigation function key
Route → New dest. / stopover
→ Options
→ On Map .
› Press in the menu
Navigation function key
→ Other POIs → Options
→
On Map .
› Press in the menu
Navigation function key
→ Other POIs → Search
area → Select on map → Edit .65route guidance
Page 69 of 88
Destination entry by means of saved destinations
Introduction
This chapter contains information on the following subjects:
List of saved destinations (My destinations)
66
Flagged destination (current vehicle position)
66
Home address
67
Custom destination (vCard)
67
Image with GPS coordinates
67
First and foremost, pay attention to the safety instructions » page 7 , Impor-
tant notes .
This chapter discusses the entry options and using the destinations saved in
the device memory.
List of saved destinations (My destinations)
Fig. 38
My destinations menu
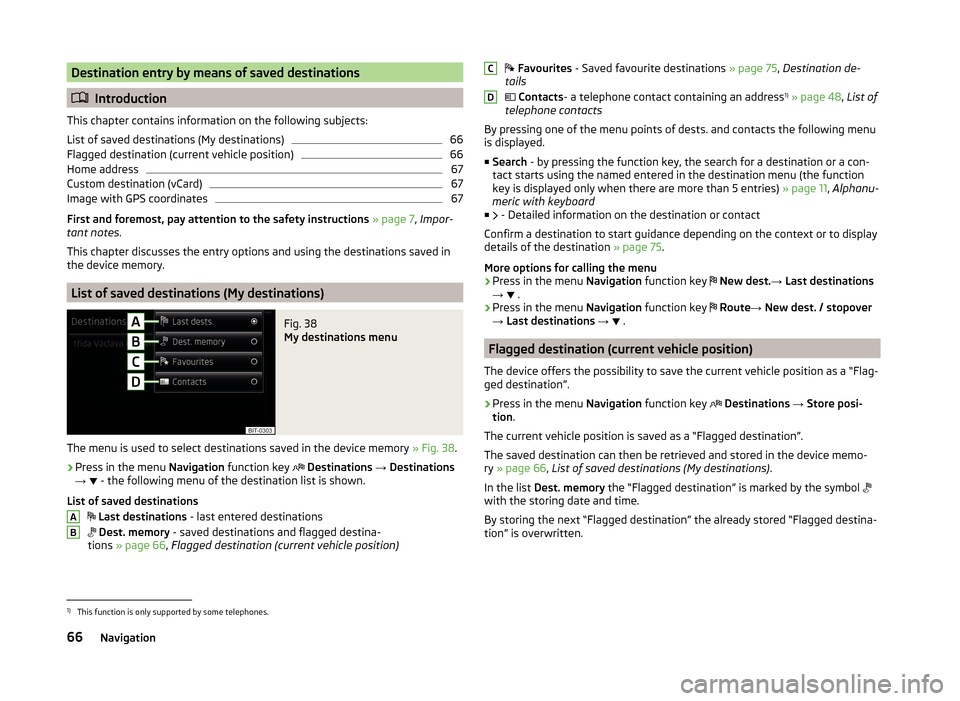
The menu is used to select destinations saved in the device memory » Fig. 38.
›
Press in the menu Navigation function key
Destinations → Destinations
→ - the following menu of the destination list is shown.
List of saved destinations
Last destinations - last entered destinations
Dest. memory - saved destinations and flagged destina-
tions » page 66 , Flagged destination (current vehicle position)
AB Favourites - Saved favourite destinations » page 75, Destination de-
tails
Contacts - a telephone contact containing an address 1)
» page 48 , List of
telephone contacts
By pressing one of the menu points of dests. and contacts the following menu is displayed.
■ Search - by pressing the function key, the search for a destination or a con-
tact starts using the named entered in the destination menu (the function
key is displayed only when there are more than 5 entries) » page 11, Alphanu-
meric with keyboard
■ - Detailed information on the destination or contact
Confirm a destination to start guidance depending on the context or to display
details of the destination » page 75.
More options for calling the menu
› Press in the menu
Navigation function key
New dest. → Last destinations
→ .
› Press in the menu
Navigation function key
Route → New dest. / stopover
→ Last destinations →
.
Flagged destination (current vehicle position)
The device offers the possibility to save the current vehicle position as a “Flag-
ged destination”.
›
Press in the menu Navigation function key
Destinations → Store posi-
tion .
The current vehicle position is saved as a “Flagged destination”.
The saved destination can then be retrieved and stored in the device memo-
ry » page 66 , List of saved destinations (My destinations) .
In the list Dest. memory the “Flagged destination” is marked by the symbol
with the storing date and time.
By storing the next “Flagged destination” the already stored “Flagged destina-
tion” is overwritten.
CD1)
This function is only supported by some telephones.
66Navigation
Page 70 of 88
Home address
The menu provides a quick destination guide to a stored home address.›
Press in the menu Navigation function key
Destinations → Home address .
The route calculation and the route guidance is started or after the route cal-
culation the route type can be selected then the route guidance starts.
If the home address has not been entered, a message with the following menu
is displayed.
Please select as your home address: your current position or a new address.
› Position
- Entry of the home address through taking the current position of
the vehicle;
› Address
- Enter the home address in writing.
The position of the “Home address”is displayed in the map by the symbol -
D
» Fig. 32 on page 58 .
The home address is also available in the menu Navigation, by pressing the
symbol key
→ Manage memory → Define home address .
Custom destination (vCard)
Custom destinations can be loaded onto the device from an SD memory card or
a USB flash drive in vCard format.
›
Press in the menu Navigation function key
→ Import destinations .
A list of possible data import sources is displayed.
After selecting the source and confirming the menu item Import all vCards
from this folder the importing the data stored in vCard format into the device
memory begins.
For more information on creating and importing your custom destination see
the ŠKODA Web pages www.infotainment.skoda-auto.com .
Image with GPS coordinates
If an image contains the GPS coordinates, viewing causes the function key
» Fig. 21 on page 36 to be shown.
›
Press the function key
and the destination details opens
» page 75.
POI
Introduction
This chapter contains information on the following subjects:
Entering a new POI
67
Search area for POI
68
Search and selecting a POI
68
Quick search and selecting a POI
68
Personal POI
68
First and foremost, pay attention to the safety instructions » page 7 , Impor-
tant notes .
This chapter covers the search and entry options of a POI.
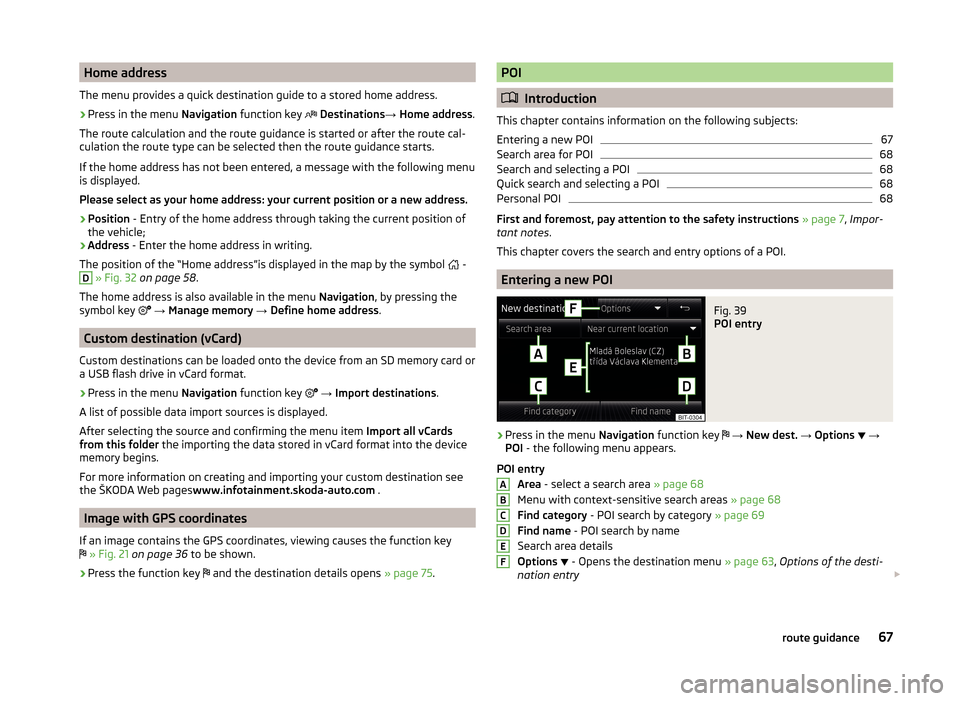
Entering a new POI
Fig. 39
POI entry
›
Press in the menu Navigation function key
→ New dest. → Options
→
POI - the following menu appears.
POI entry Area - select a search area » page 68
Menu with context-sensitive search areas » page 68
Find category - POI search by category » page 69
Find name - POI search by name
Search area details
Options
- Opens the destination menu
» page 63, Options of the desti-
nation entry
ABCDEF67route guidance
Page 71 of 88
More options for calling the menu
› Press in the menu
Navigation function key Route → New dest. / stopover
→ Options
→ POI .
› Press in the menu
Navigation function key
Other POIs .
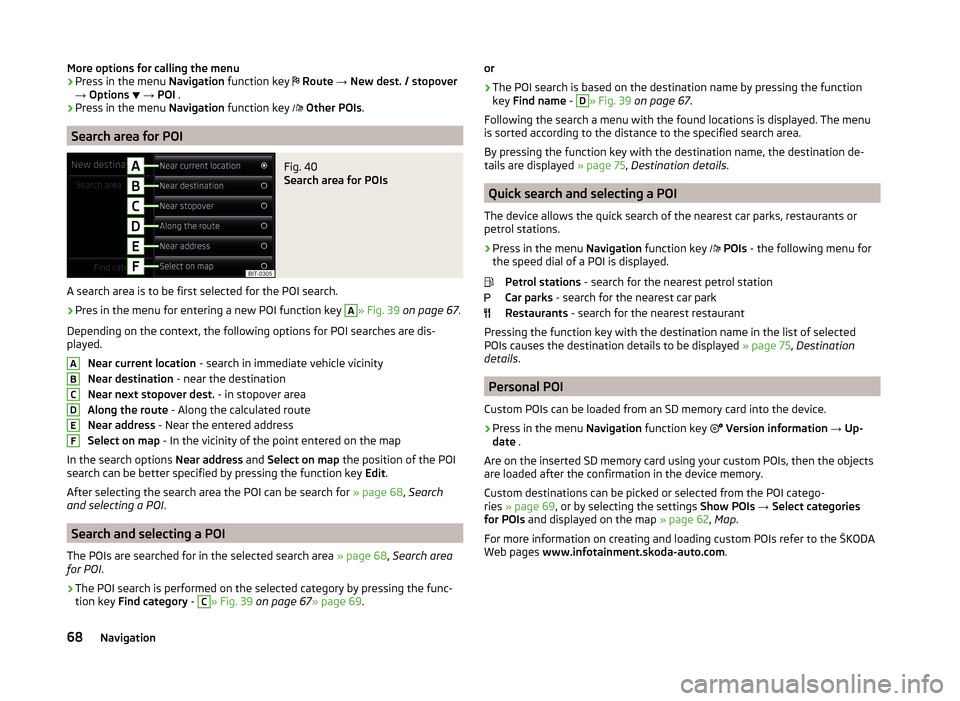
Search area for POI
Fig. 40
Search area for POIs
A search area is to be first selected for the POI search.
›
Pres in the menu for entering a new POI function key
A
» Fig. 39 on page 67 .
Depending on the context, the following options for POI searches are dis-
played.
Near current location - search in immediate vehicle vicinity
Near destination - near the destination
Near next stopover dest. - in stopover area
Along the route - Along the calculated route
Near address - Near the entered address
Select on map - In the vicinity of the point entered on the map
In the search options Near address and Select on map the position of the POI
search can be better specified by pressing the function key Edit.
After selecting the search area the POI can be search for » page 68, Search
and selecting a POI .
Search and selecting a POI
The POIs are searched for in the selected search area » page 68, Search area
for POI .
›
The POI search is performed on the selected category by pressing the func-
tion key Find category -
C
» Fig. 39 on page 67 » page 69.
ABCDEFor›
The POI search is based on the destination name by pressing the function
key Find name -
D
» Fig. 39 on page 67 .
Following the search a menu with the found locations is displayed. The menu
is sorted according to the distance to the specified search area.
By pressing the function key with the destination name, the destination de-
tails are displayed » page 75, Destination details .
Quick search and selecting a POI
The device allows the quick search of the nearest car parks, restaurants or
petrol stations.
›
Press in the menu Navigation function key
POIs - the following menu for
the speed dial of a POI is displayed.
Petrol stations - search for the nearest petrol station
Car parks - search for the nearest car park
Restaurants - search for the nearest restaurant
Pressing the function key with the destination name in the list of selected
POIs causes the destination details to be displayed » page 75, Destination
details .
Personal POI
Custom POIs can be loaded from an SD memory card into the device.
›
Press in the menu Navigation function key
Version information → Up-
date .
Are on the inserted SD memory card using your custom POIs, then the objects
are loaded after the confirmation in the device memory.
Custom destinations can be picked or selected from the POI catego-
ries » page 69 , or by selecting the settings Show POIs → Select categories
for POIs and displayed on the map » page 62, Map .
For more information on creating and loading custom POIs refer to the ŠKODA
Web pages www.infotainment.skoda-auto.com .
68Navigation