key SMART FORTWO 2016 Owner's Manual
[x] Cancel search | Manufacturer: SMART, Model Year: 2016, Model line: FORTWO, Model: SMART FORTWO 2016Pages: 214, PDF Size: 4.93 MB
Page 60 of 214
Side window reversing feature
In vehicles with the convenience feature, theside windows are equipped with an automatic
reversing feature. If a solid object blocks or
restricts a side window from traveling
upwards during the automatic closing proc-
ess, the side window opens again automati-
cally. During the manual closing process, the side window only opens again automatically
after the corresponding switch is released.
The automatic reversing feature is only an
aid and is no substitute for your attention
when closing a side window.
GWARNING
The reversing feature does not react:
Rto soft, light and thin objects, e.g. small
fingers
Rwhile resetting
This means that the reversing feature can-
not prevent someone being trapped in these
situations. There is a risk of injury.
Make sure that no body parts are in close
proximity during the closing procedure. If
someone becomes trapped, press the switch
to open the side window again.
GWARNING
If you close a side window again immedi-
ately after it has been blocked or reset, the
side window closes with increased or max-
imum force. The reversing feature is then
not active. Parts of the body could be trap-
ped in the closing area in the process. This
poses an increased risk of injury or even
fatal injury.
Make sure that no parts of the body are in
the closing area. To stop the closing proc- ess, release the switch or push the switch
again to reopen the side window.
Opening or closing the side windows
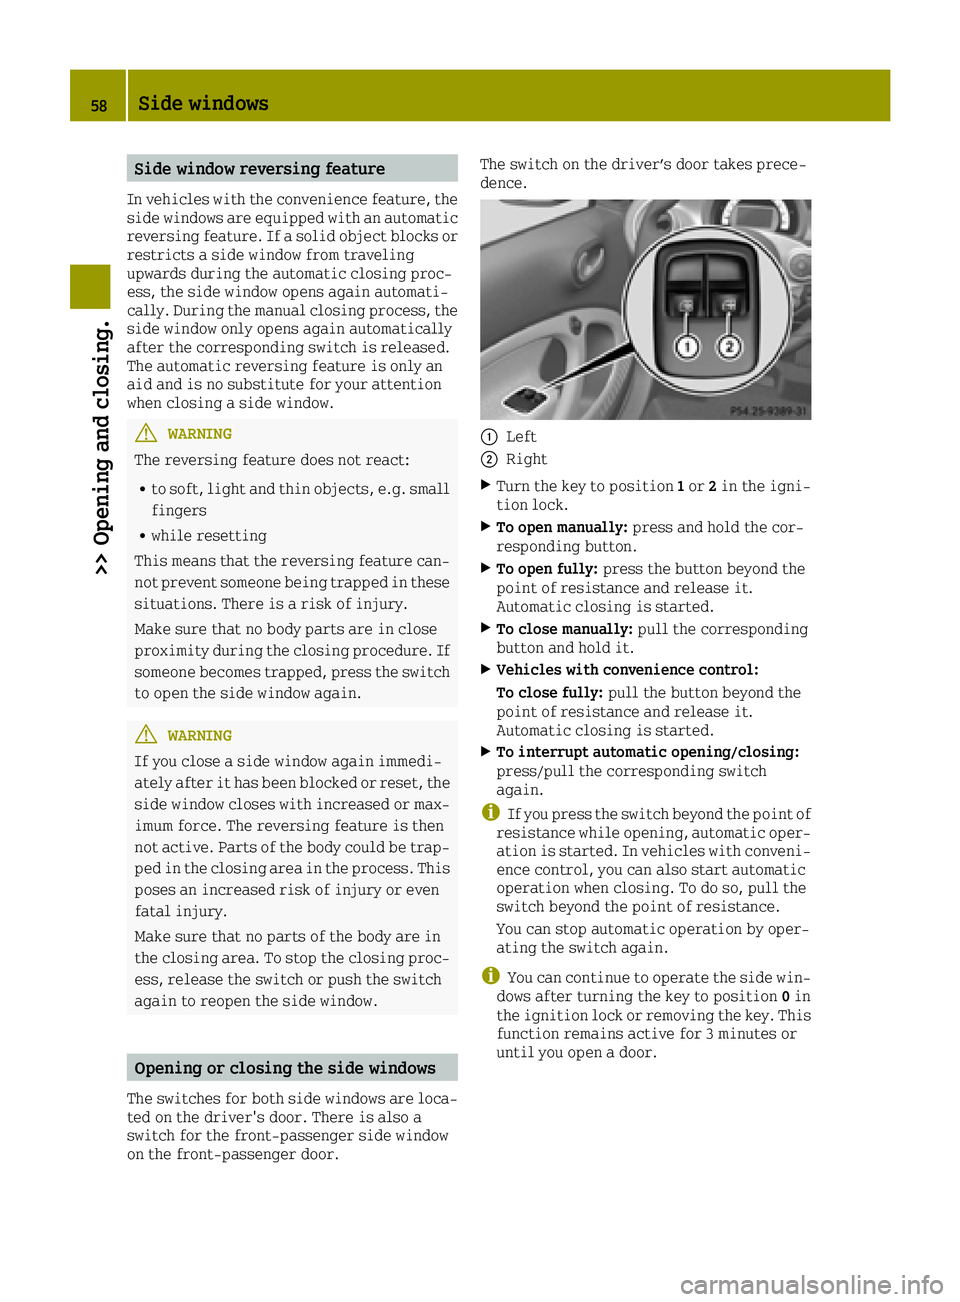
The switches for both side windows are loca-
ted on the driver's door. There is also a
switch for the front-passenger side window
on the front-passenger door. The switch on the driver’s door takes prece-
dence.
0043Left
0044Right
XTurn the key to position
1or 2in the igni-
tion lock.
XTo open manually: press and hold the cor-
responding button.
XTo open fully: press the button beyond the
point of resistance and release it.
Automatic closing is started.
XTo close manually: pull the corresponding
button and hold it.
XVehicles with convenience control:
To close fully: pull the button beyond the
point of resistance and release it.
Automatic closing is started.
XTo interrupt automatic opening/closing:
press/pull the corresponding switch
again.
iIf you press the switch beyond the point of
resistance while opening, automatic oper-
ation is started. In vehicles with conveni-
ence control, you can also start automatic
operation when closing. To do so, pull the
switch beyond the point of resistance.
You can stop automatic operation by oper-
ating the switch again.
iYou can continue to operate the side win-
dows after turning the key to position 0in
the ignition lock or removing the key. This
function remains active for 3 minutes or
until you open a door.
58Side windows
>> Opening and closing.
Page 61 of 214
Resetting the side windows
You must reset each side window if:
Rthe side window opens again slightly after
being closed fully.
Rthe side window can no longer be fully
opened or closed.
XClose all the doors.
XTurn the SmartKey to position2in the igni-
tion lock.
XPull the corresponding switch on the door
control panel until the side window is com- pletely closed (
Ypage 58).
XHold the switch for an additional second.
If the side window opens again slightly:
XImmediately pull the corresponding switch
on the door control panel until the side
window is completely closed (
Ypage 58).
XHold the switch for an additional second.
XIf the respective side window remains
closed after the button is released, then it
has been set correctly. If this is not the
case, repeat the steps above again.
Side windows59
>> Opening and closing.
Z
Page 64 of 214
When leaving the vehicle, always take the
SmartKey with you and lock the vehicle.
Never leave children unsupervised in the
vehicle.
GWARNING
If the driver's seat is not engaged, it could move unexpectedly while the vehicle is in
motion. This could cause you to lose control
of the vehicle. There is a risk of an acci-
dent.
Always make sure that the driver's seat is
engaged before starting the vehicle.
GWARNING
You could lose control of your vehicle if you
do the following while driving:
Radjust the driver's seat, steering wheel
or mirrors
Rfasten the seat belt
There is a risk of an accident.
Adjust the driver's seat, steering wheel or
mirrors and fasten your seat belt before
starting the engine.
GWARNING
When you adjust a seat, you or other vehicle occupants could become trapped, e.g. on the
seat guide rail. There is a risk of injury.
Make sure when adjusting a seat that no one
has any body parts in the sweep of the seat.
GWARNING
The seat belt does not offer the intended
level of protection if you have not moved
the backrest to an almost vertical position.
When braking or in the event of an accident,
you could slide underneath the seat belt and
sustain abdomen or neck injuries, for
example. This poses an increased risk of
injury or even fatal injury.
Adjust the seat properly before beginning
your journey. Always ensure that the back-
rest is in an almost vertical position and
that the shoulder section of your seat belt
is routed across the center of your shoul-
der.
Observe the safety notes on "Airbags"
(
Ypage 34) and "Children in the vehicle"
(Ypage 42).
!To avoid damage to the seats and the seat
heating, observe the following informa-
tion:
Rkeep liquids from spilling on the seats.
If liquid is spilled on the seats, dry them
as soon as possible.
Rif the seat covers are damp or wet, do not
switch on the seat heating. The seat heat- ing should also not be used to dry the
seats.
Rclean the seat covers as recommended;
see the "Interior care" section.
Rdo not transport heavy loads on the seats.
Do not place sharp objects on the seat
cushions, e.g. knives, nails or tools. The seats should only be occupied by passen-
gers, if possible.
Rwhen the seat heating is in operation, do
not cover the seats with insulating mate-
rials, e.g. blankets, coats, bags, seat
covers, child seats or booster seats.
!Make sure that there are no objects in the
footwell under or behind the seats when
moving the seats back. There is a risk that
the seats and/or the objects could be dam-
aged.
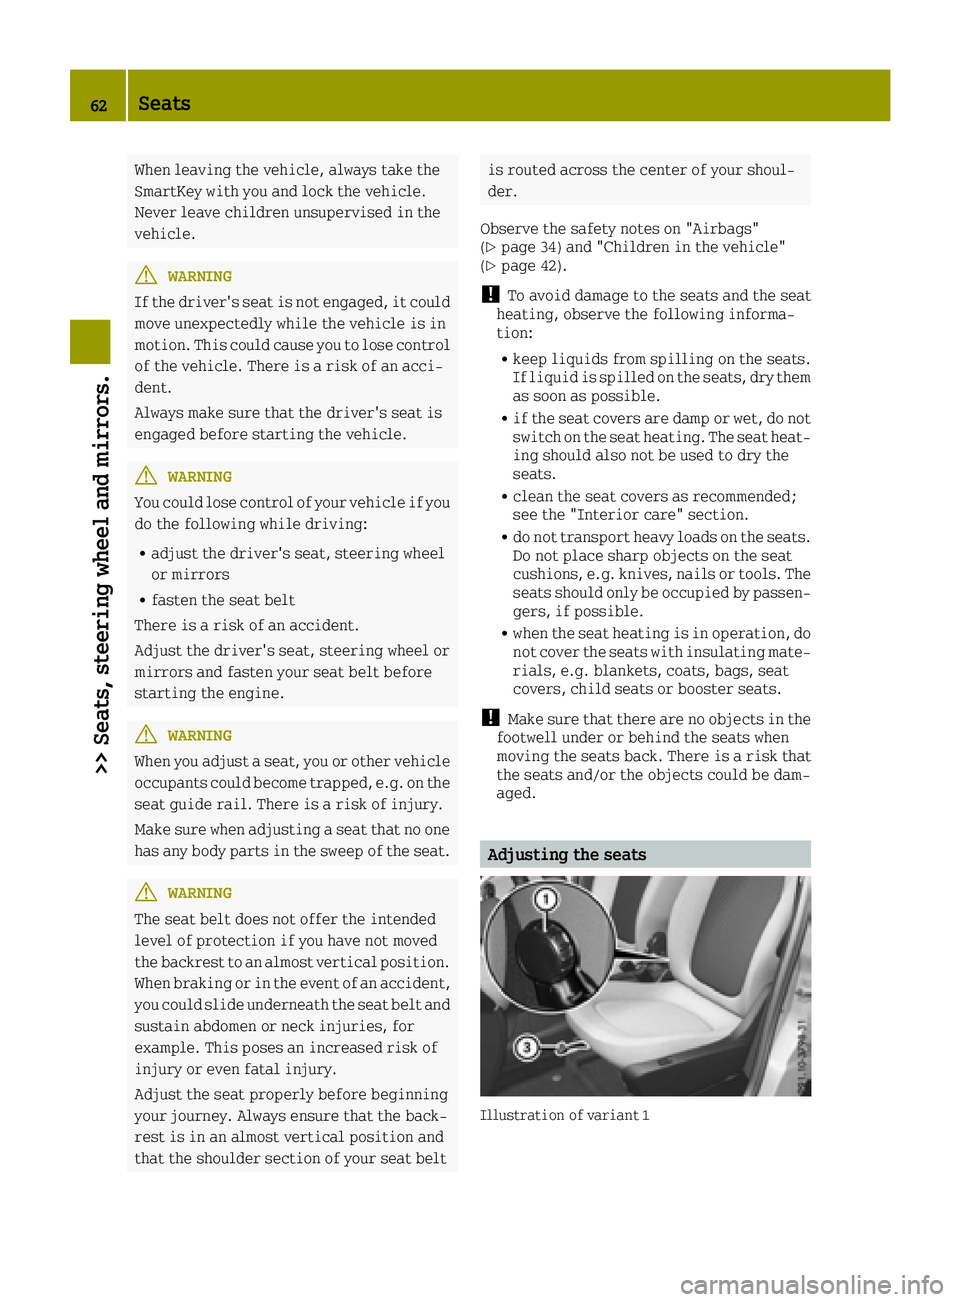
Adjusting the seats
Illustration of variant 1
62Seats
>> Seats, steering wheel and mirrors.
Page 66 of 214
Folding back
GWARNING
If the seat backrest is not engaged, it may
fold forwards, e.g. during braking or in the event of an accident.
RAs a result, a backrest which is not
engaged would press you into the seat
belt. The seat belt can no longer offer the
intended level of protection and can even
cause injuries.
RThe backrest cannot restrain objects or
loads in the trunk.
There is an increased risk of injury.
Before every journey, make sure that the
backrest is engaged as described.
Variant 1:
XTurn handwheel 0043back until the desired
seat backrest position is achieved
Variant 2:
XPull release lever 0043.
The backrest is released.
XFold the backrest backwards.
XEnsure that the seat backrest is engaged
again.
Switching the seat heating on/off
Activating/deactivating
GWARNING
Repeatedly switching on the seat heating
can cause the seat cushion and backrest
pads to become very hot. The health of per- sons with limited temperature sensitivity
or a limited ability to react to excessively
high temperatures may be affected or they
may even suffer burn-like injuries. There
is a risk of injury.
Therefore, do not switch the seat heating on
repeatedly.
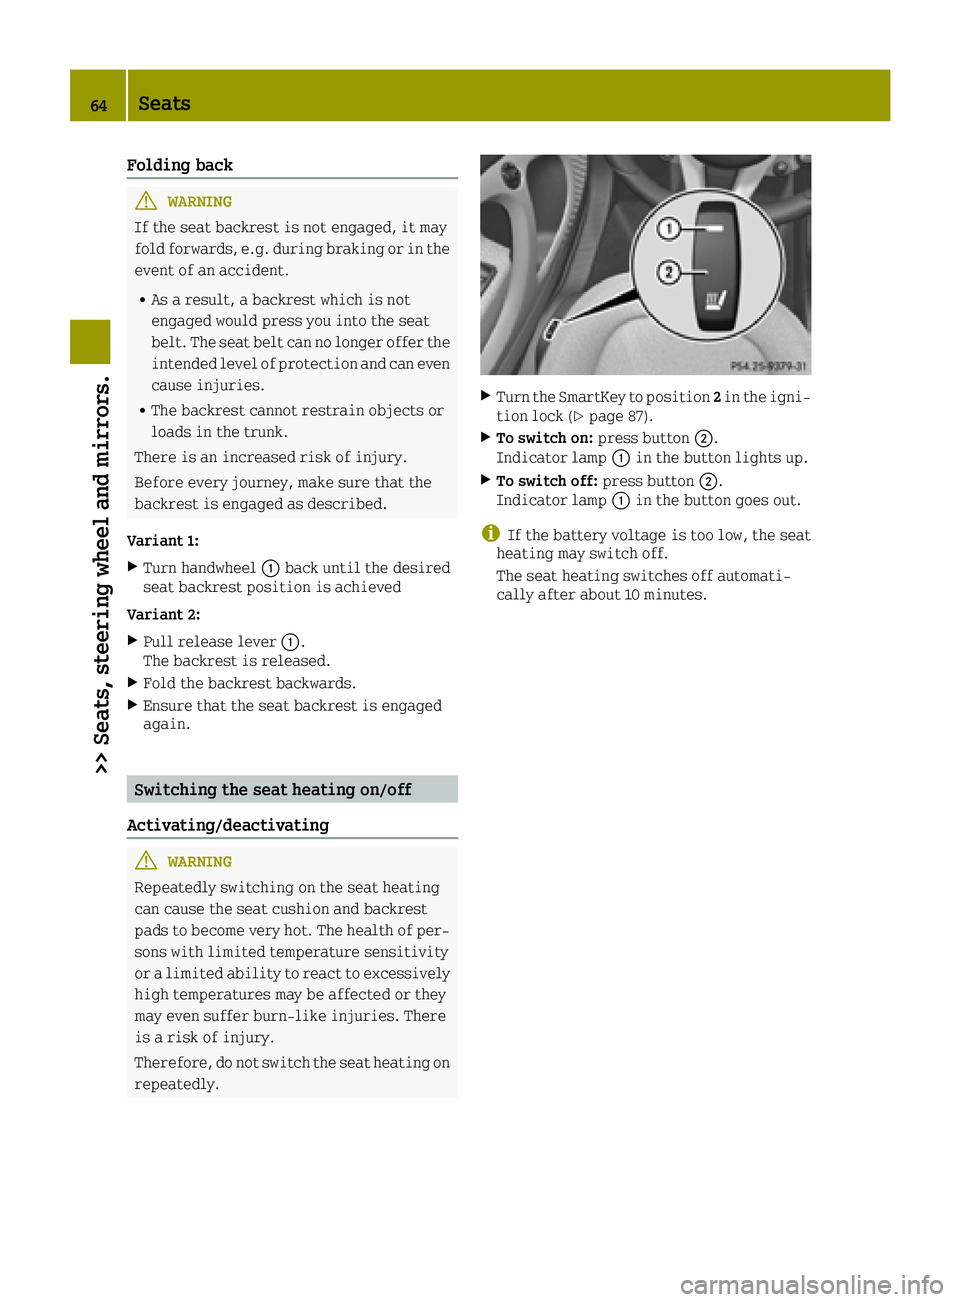
XTurn the SmartKey to position 2in the igni-
tion lock (Ypage 87).
XTo switch on: press button0044.
Indicator lamp 0043in the button lights up.
XTo switch off: press button0044.
Indicator lamp 0043in the button goes out.
iIf the battery voltage is too low, the seat
heating may switch off.
The seat heating switches off automati-
cally after about 10 minutes.
64Seats
>> Seats, steering wheel and mirrors.
Page 67 of 214
Problems with the seat heating
ProblemPossible causes/consequences and0050Solutions
The seat heating has
switched off prema-
turely or cannot be
switched on.The on-board voltage is too low because too many electrical con-
sumers are switched on.
XSwitch off electrical consumers that you do not need, such as the
rear window defroster or interior lighting.
Once the battery is sufficiently charged, the seat heating will
switch back on automatically.
Steering wheel
Important safety notes
GWARNING
You could lose control of your vehicle if you
do the following while driving:
Radjust the driver's seat, steering wheel
or mirrors
Rfasten the seat belt
There is a risk of an accident.
Adjust the driver's seat, steering wheel or
mirrors and fasten your seat belt before
starting the engine.
GWARNING
Children could injure themselves if they
adjust the steering wheel. There is a risk of
injury.
When leaving the vehicle, always take the
SmartKey with you and lock the vehicle.
Never leave children unsupervised in the
vehicle.
Adjusting the steering wheel
GWARNING
If the steering wheel is unlocked while the
vehicle is in motion, it could change posi-
tion unexpectedly. This could cause you to
lose control of the vehicle. There is a risk
of an accident.
Before starting off, make sure the steering wheel is locked. Never unlock the steering
wheel while the vehicle is in motion.
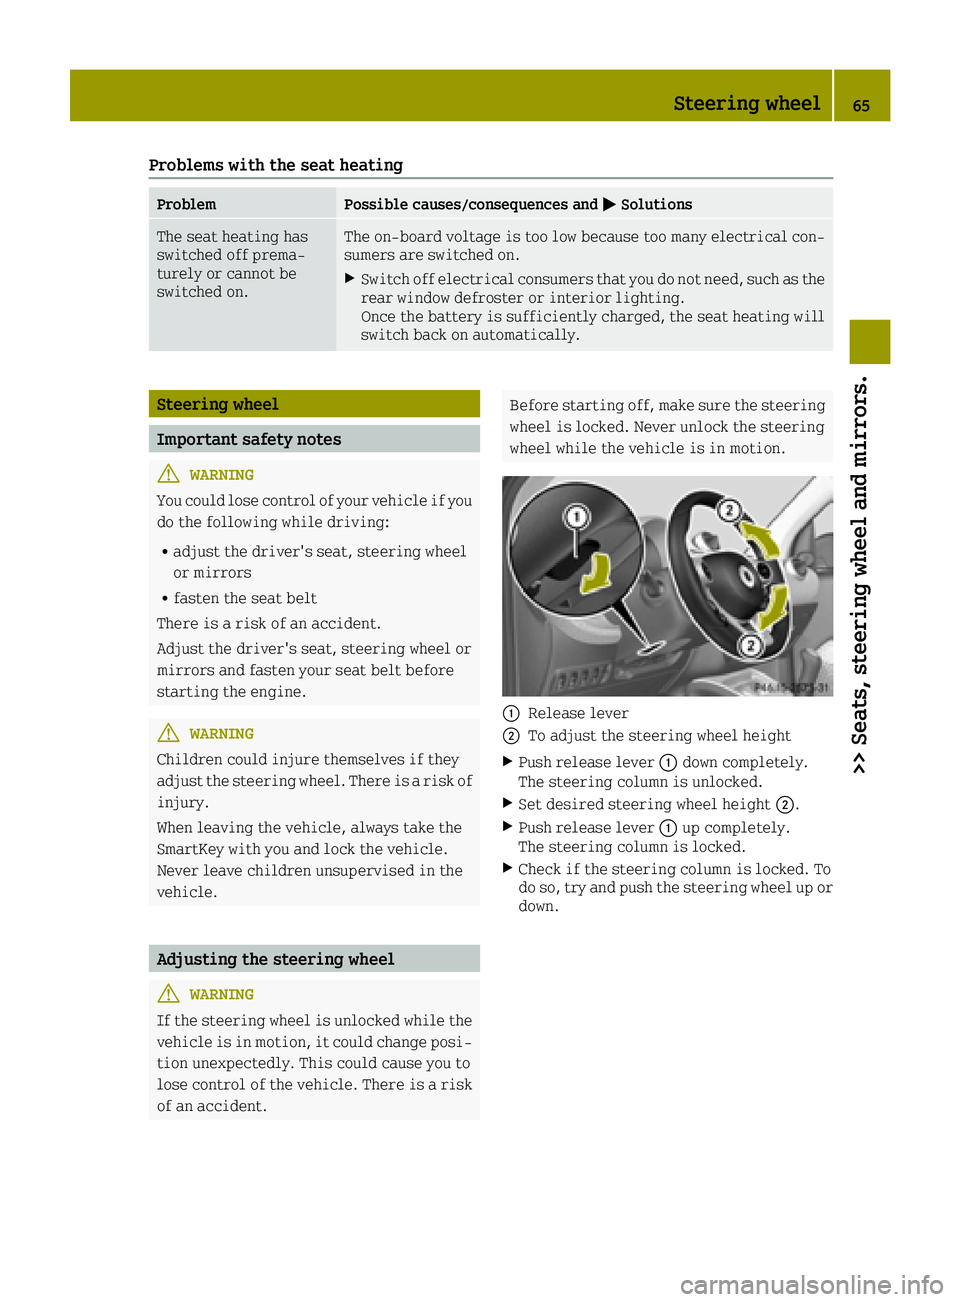
0043Release lever
0044To adjust the steering wheel height
XPush release lever 0043down completely.
The steering column is unlocked.
XSet desired steering wheel height 0044.
XPush release lever0043up completely.
The steering column is locked.
XCheck if the steering column is locked. To
do so, try and push the steering wheel up or down.
Steering wheel65
>> Seats, steering wheel and mirrors.
Z
Page 68 of 214
Mirrors
Rear-view mirror
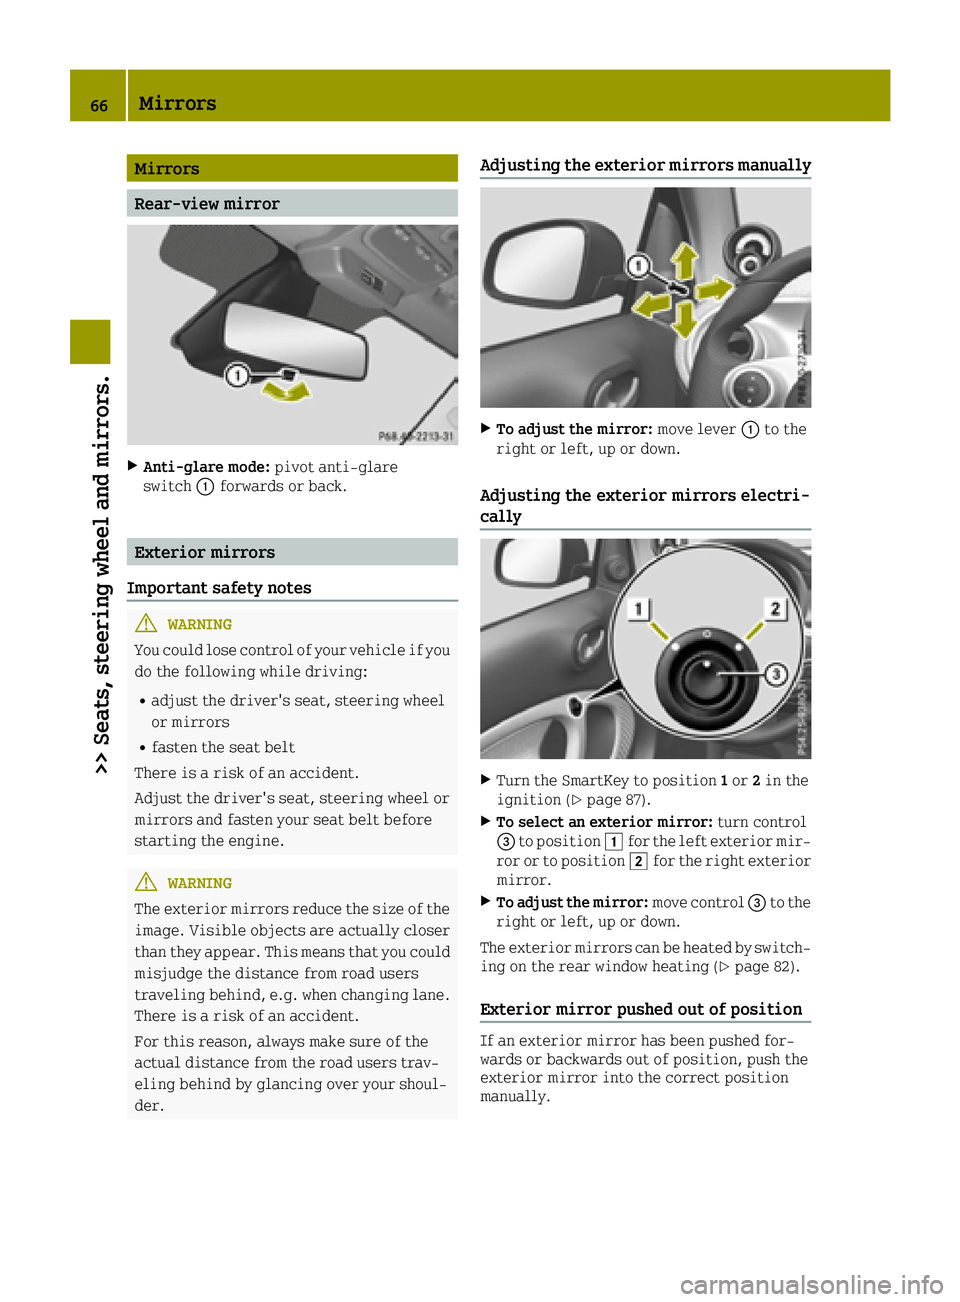
XAnti-glare mode:pivot anti-glare
switch 0043forwards or back.
Exterior mirrors
Important safety notes
GWARNING
You could lose control of your vehicle if you
do the following while driving:
Radjust the driver's seat, steering wheel
or mirrors
Rfasten the seat belt
There is a risk of an accident.
Adjust the driver's seat, steering wheel or
mirrors and fasten your seat belt before
starting the engine.
GWARNING
The exterior mirrors reduce the size of the
image. Visible objects are actually closer
than they appear. This means that you could
misjudge the distance from road users
traveling behind, e.g. when changing lane.
There is a risk of an accident.
For this reason, always make sure of the
actual distance from the road users trav-
eling behind by glancing over your shoul-
der.
Adjusting the exterior mirrors manually
XTo adjust the mirror: move lever0043to the
right or left, up or down.
Adjusting the exterior mirrors electri-
cally
XTurn the SmartKey to position 1or 2in the
ignition (Ypage 87).
XTo select an exterior mirror: turn control
0087 to position 0047for the left exterior mir-
ror or to position 0048for the right exterior
mirror.
XTo adjust the mirror: move control0087to the
right or left, up or down.
The exterior mirrors can be heated by switch- ing on the rear window heating (
Ypage 82).
Exterior mirror pushed out of position
If an exterior mirror has been pushed for-
wards or backwards out of position, push the
exterior mirror into the correct position
manually.
66Mirrors
>> Seats, steering wheel and mirrors.
Page 77 of 214
Combination switch
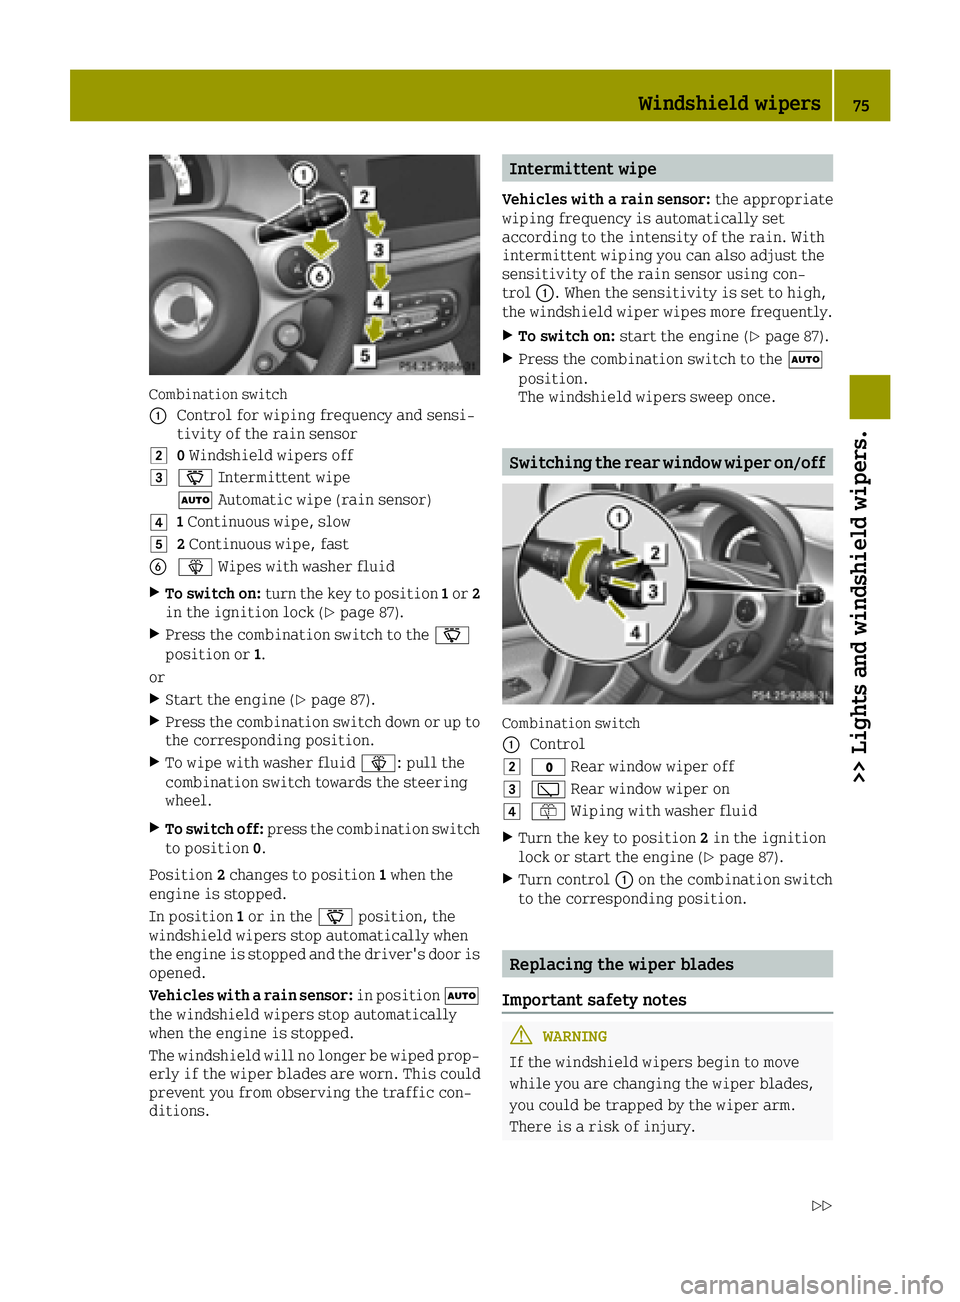
0043
Control for wiping frequency and sensi-
tivity of the rain sensor
00480Windshield wipers off
004900AE Intermittent wipe
0058 Automatic wipe (rain sensor)
004A1Continuous wipe, slow
004B2 Continuous wipe, fast
008400D4 Wipes with washer fluid
XTo switch on: turn the key to position 1or 2
in the ignition lock (Ypage 87).
XPress the combination switch to the 00AE
position or 1.
or
XStart the engine (Ypage 87).
XPress the combination switch down or up to
the corresponding position.
XTo wipe with washer fluid 00D4: pull the
combination switch towards the steering
wheel.
XTo switch off: press the combination switch
to position 0.
Position 2changes to position 1when the
engine is stopped.
In position 1or in the 00AEposition, the
windshield wipers stop automatically when
the engine is stopped and the driver's door is
opened.
Vehicles with a rain sensor: in position0058
the windshield wipers stop automatically
when the engine is stopped.
The windshield will no longer be wiped prop- erly if the wiper blades are worn. This could
prevent you from observing the traffic con-
ditions.
Intermittent wipe
Vehicles with a rain sensor: the appropriate
wiping frequency is automatically set
according to the intensity of the rain. With
intermittent wiping you can also adjust the
sensitivity of the rain sensor using con-
trol 0043. When the sensitivity is set to high,
the windshield wiper wipes more frequently.
XTo switch on: start the engine (Ypage 87).
XPress the combination switch to the 0058
position.
The windshield wipers sweep once.
Switching the rear window wiper on/off
Combination switch
0043
Control
0048003F Rear window wiper off
004900C5Rear window wiper on
004A00E2Wiping with washer fluid
XTurn the key to position 2in the ignition
lock or start the engine (Ypage 87).
XTurn control 0043on the combination switch
to the corresponding position.
Replacing the wiper blades
Important safety notes
GWARNING
If the windshield wipers begin to move
while you are changing the wiper blades,
you could be trapped by the wiper arm.
There is a risk of injury.
Windshield wipers75
>> Lights and windshield wipers.
Z
Page 78 of 214
Always switch off the windshield wipers
and ignition before changing the wiper
blades.
!To avoid damaging the wiper blades, make
sure that you touch only the wiper arm of the
wiper.
!Never open the service cover/tailgate if a
windshield wiper arm has been folded away
from the windshield/rear window.
Never fold a windshield wiper arm without
a wiper blade back onto the windshield/
rear window.
Hold the windshield wiper arm firmly when
you change the wiper blade. If you release
the wiper arm without a wiper blade and it
falls onto the windshield/rear window, the
windshield/rear window may be damaged by
the force of the impact.
smart recommends that you have the wiper
blades changed at a qualified specialist
workshop.
Changing the windshield wiper blades
Removing the wiper blades
XTurn the key to position 1or 2in the igni-
tion lock (Ypage 87).
XPress the combination switch to the 004B
position (Ypage 74).
The wiper arms move slowly upwards.
XWhen the wiper arms are vertical in rela-
tion to the service cover, turn the key to
position 0and remove it from the ignition
lock.
XFold the wiper arm away from the wind-
shield.
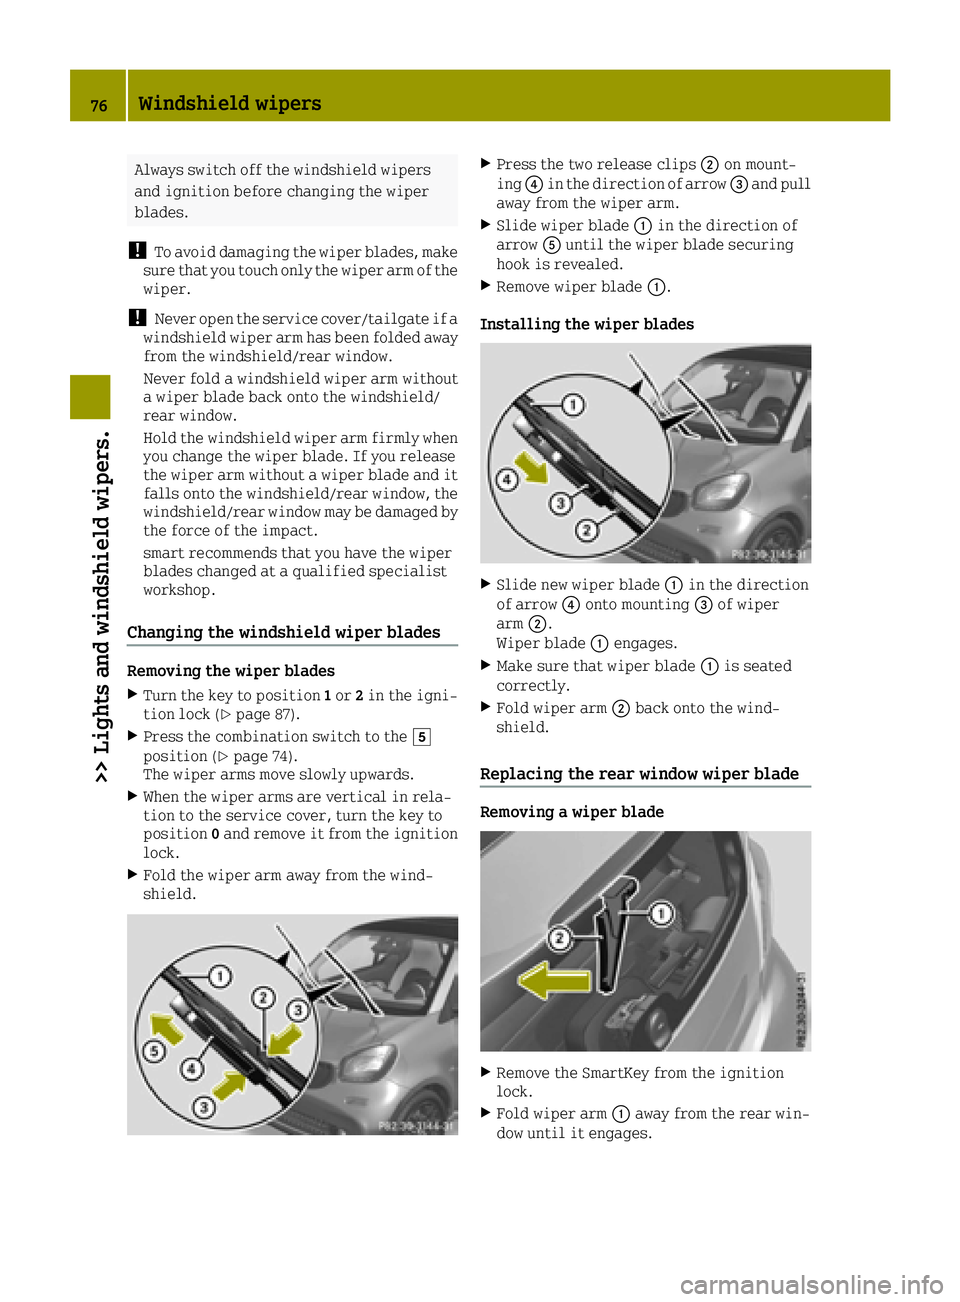
XPress the two release clips 0044on mount-
ing 0085in the direction of arrow 0087and pull
away from the wiper arm.
XSlide wiper blade 0043in the direction of
arrow 0083until the wiper blade securing
hook is revealed.
XRemove wiper blade 0043.
Installing the wiper blades
XSlide new wiper blade 0043in the direction
of arrow 0085onto mounting 0087of wiper
arm 0044.
Wiper blade 0043engages.
XMake sure that wiper blade 0043is seated
correctly.
XFold wiper arm 0044back onto the wind-
shield.
Replacing the rear window wiper blade
Removing a wiper blade
XRemove the SmartKey from the ignition
lock.
XFold wiper arm 0043away from the rear win-
dow until it engages.
76Windshield wipers
>> Lights and windshield wipers.
Page 80 of 214
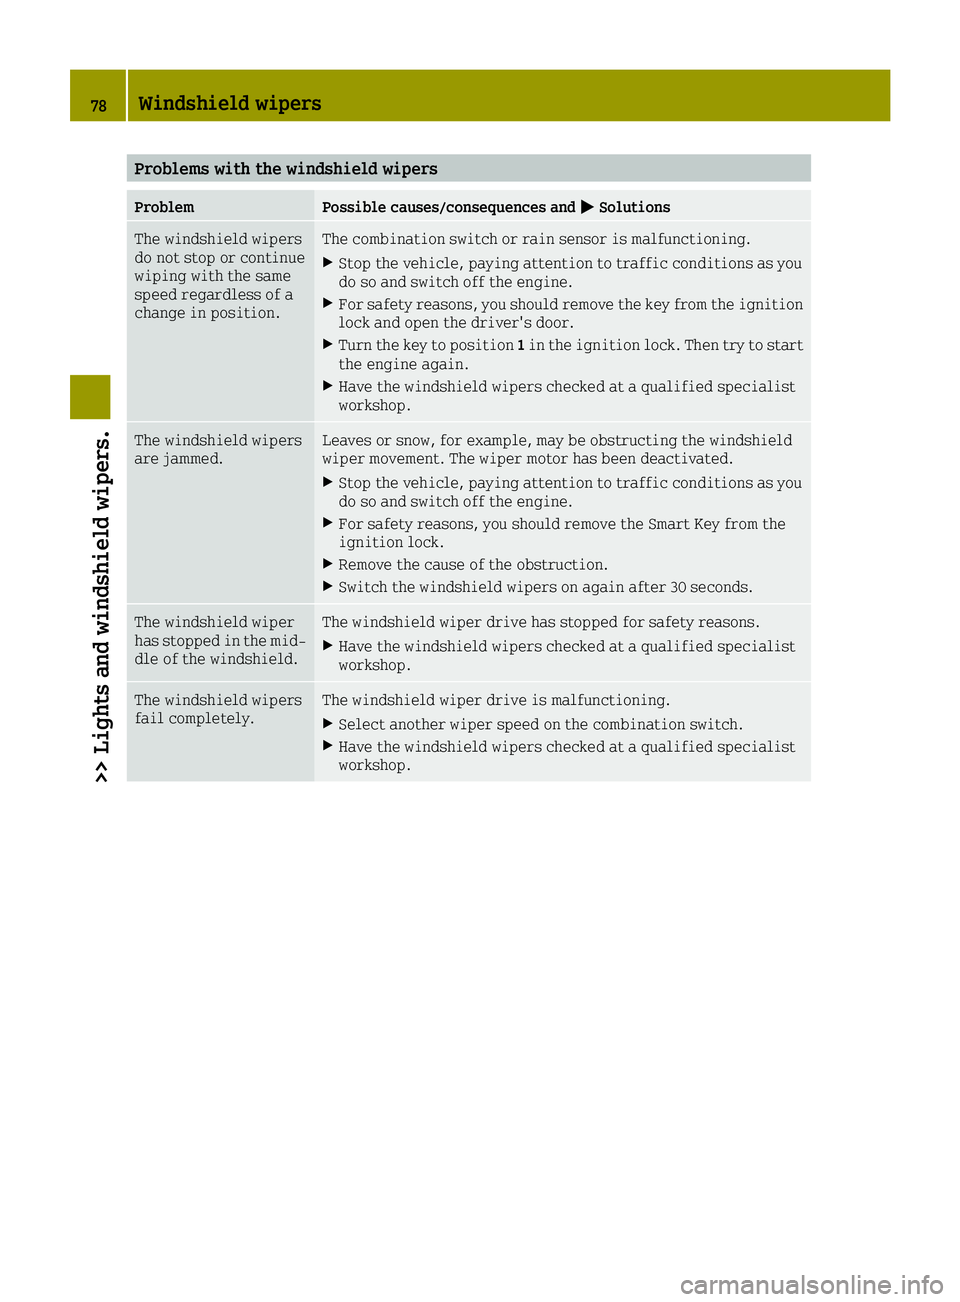
Problems with the windshield wipers
ProblemPossible causes/consequences and0050Solutions
The windshield wipers
do not stop or continue
wiping with the same
speed regardless of a
change in position.The combination switch or rain sensor is malfunctioning.
XStop the vehicle, paying attention to traffic conditions as you
do so and switch off the engine.
XFor safety reasons, you should remove the key from the ignition
lock and open the driver's door.
XTurn the key to position1in the ignition lock. Then try to start
the engine again.
XHave the windshield wipers checked at a qualified specialist
workshop.
The windshield wipers
are jammed.Leaves or snow, for example, may be obstructing the windshield
wiper movement. The wiper motor has been deactivated.
XStop the vehicle, paying attention to traffic conditions as you
do so and switch off the engine.
XFor safety reasons, you should remove the Smart Key from the
ignition lock.
XRemove the cause of the obstruction.
XSwitch the windshield wipers on again after 30 seconds.
The windshield wiper
has stopped in the mid-
dle of the windshield.The windshield wiper drive has stopped for safety reasons.
XHave the windshield wipers checked at a qualified specialist
workshop.
The windshield wipers
fail completely.The windshield wiper drive is malfunctioning.
XSelect another wiper speed on the combination switch.
XHave the windshield wipers checked at a qualified specialist
workshop.
78Windshield wipers
>> Lights and windshield wipers.
Page 82 of 214
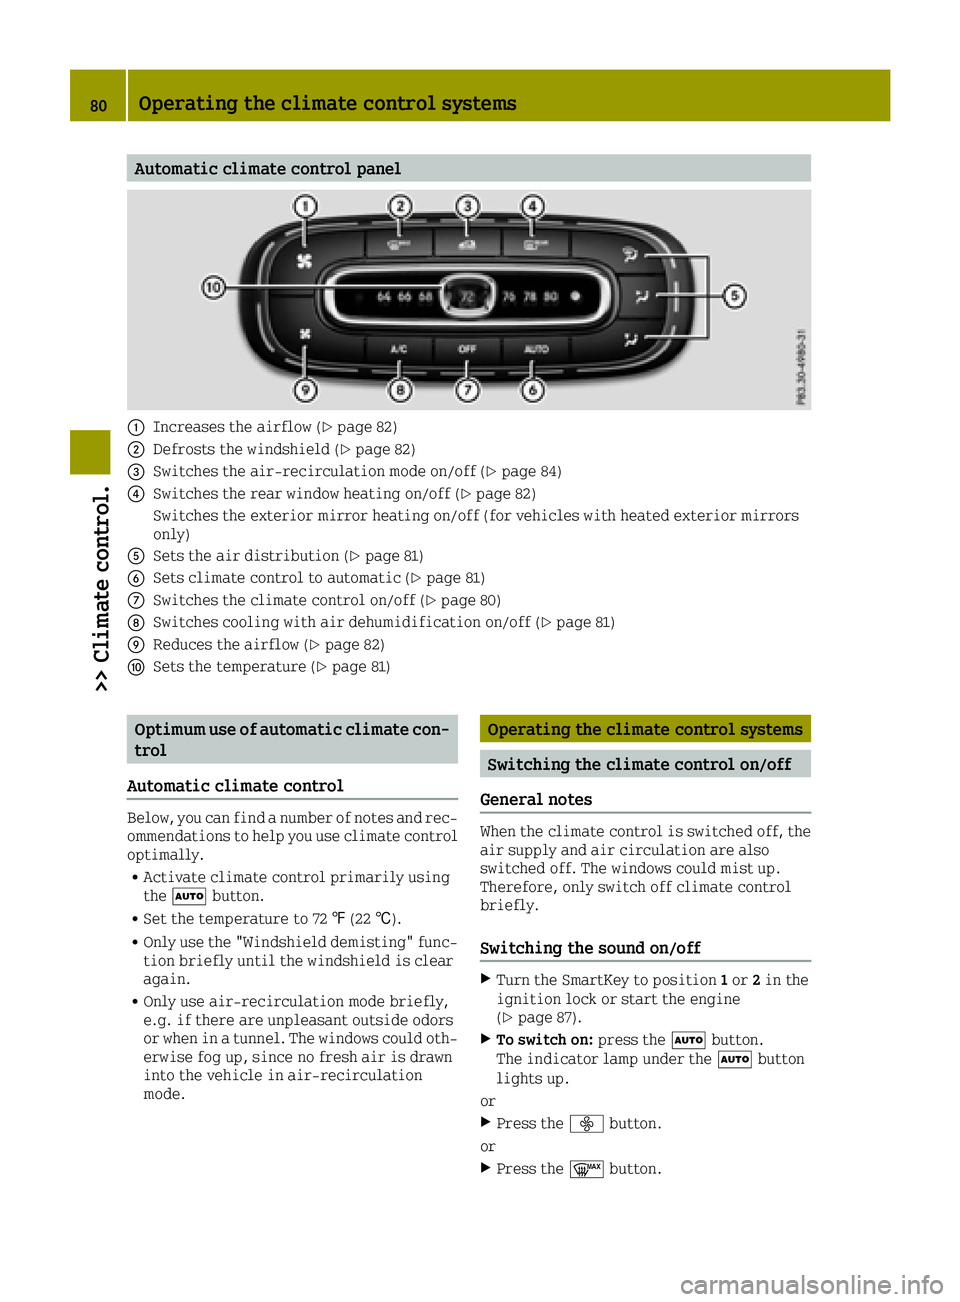
Automatic climate control panel
0043Increases the airflow (Ypage 82)
0044Defrosts the windshield (Ypage 82)
0087Switches the air-recirculation mode on/off (Ypage 84)
0085Switches the rear window heating on/off (Ypage 82)
Switches the exterior mirror heating on/off (for vehicles with heated exterior mirrors
only)
0083Sets the air distribution (Ypage 81)
0084Sets climate control to automatic (Ypage 81)
006BSwitches the climate control on/off (Ypage 80)
006CSwitches cooling with air dehumidification on/off (Ypage 81)
006DReduces the airflow (Ypage 82)
006ESets the temperature (Ypage 81)
Optimum use of automatic climate con-
trol
Automatic climate control
Below, you can find a number of notes and rec-
ommendations to help you use climate control optimally.
RActivate climate control primarily using
the 0058 button.
RSet the temperature to 72 ‡(22 †).
ROnly use the "Windshield demisting" func-
tion briefly until the windshield is clear
again.
ROnly use air-recirculation mode briefly,
e.g. if there are unpleasant outside odors
or when in a tunnel. The windows could oth-
erwise fog up, since no fresh air is drawn
into the vehicle in air-recirculation
mode.
Operating the climate control systems
Switching the climate control on/off
General notes
When the climate control is switched off, the air supply and air circulation are also
switched off. The windows could mist up.
Therefore, only switch off climate control
briefly.
Switching the sound on/off
XTurn the SmartKey to position 1or 2in the
ignition lock or start the engine
(
Ypage 87).
XTo switch on: press the0058button.
The indicator lamp under the 0058button
lights up.
or
XPress the 00F2button.
or
XPress the 0064button.
80Operating the climate control systems
>> Climate control.