SMART FORTWO COUPE 2011 Owners Manual
Manufacturer: SMART, Model Year: 2011, Model line: FORTWO COUPE, Model: SMART FORTWO COUPE 2011Pages: 228, PDF Size: 11.48 MB
Page 181 of 228
Replacing transmitter battery
Notes
The remote control’s transmitter battery is
almost spent when the turn signals flash
rapidly nine times in a row when locking
the vehicle.
iIf you do not replace the transmitter
battery, after about 100 more times you
will no longer be able to lock or unlock
the vehicle using the remote control.
XReplace the transmitter battery.
or
XHave the transmitter battery replaced at
an smart center.
GWarning!
Batteries contain poisonous and corrosive
substances. Therefore keep the batteries
out of reach of children.
If a battery is swallowed, seek medical help
immediately.
Batteries contain materials that can harm
the environment if disposed of improperly.
Recycling of batteries is the preferred
method of disposal. Many states/provinces
require sellers of batteries to accept old
batteries for recycling.
Replacing battery
Replacement battery: CR 2016 button cell
! Replace the remote control’s
transmitter battery every two years at
the latest. Otherwise there is a danger of
leakage. The remote control could be
damaged.
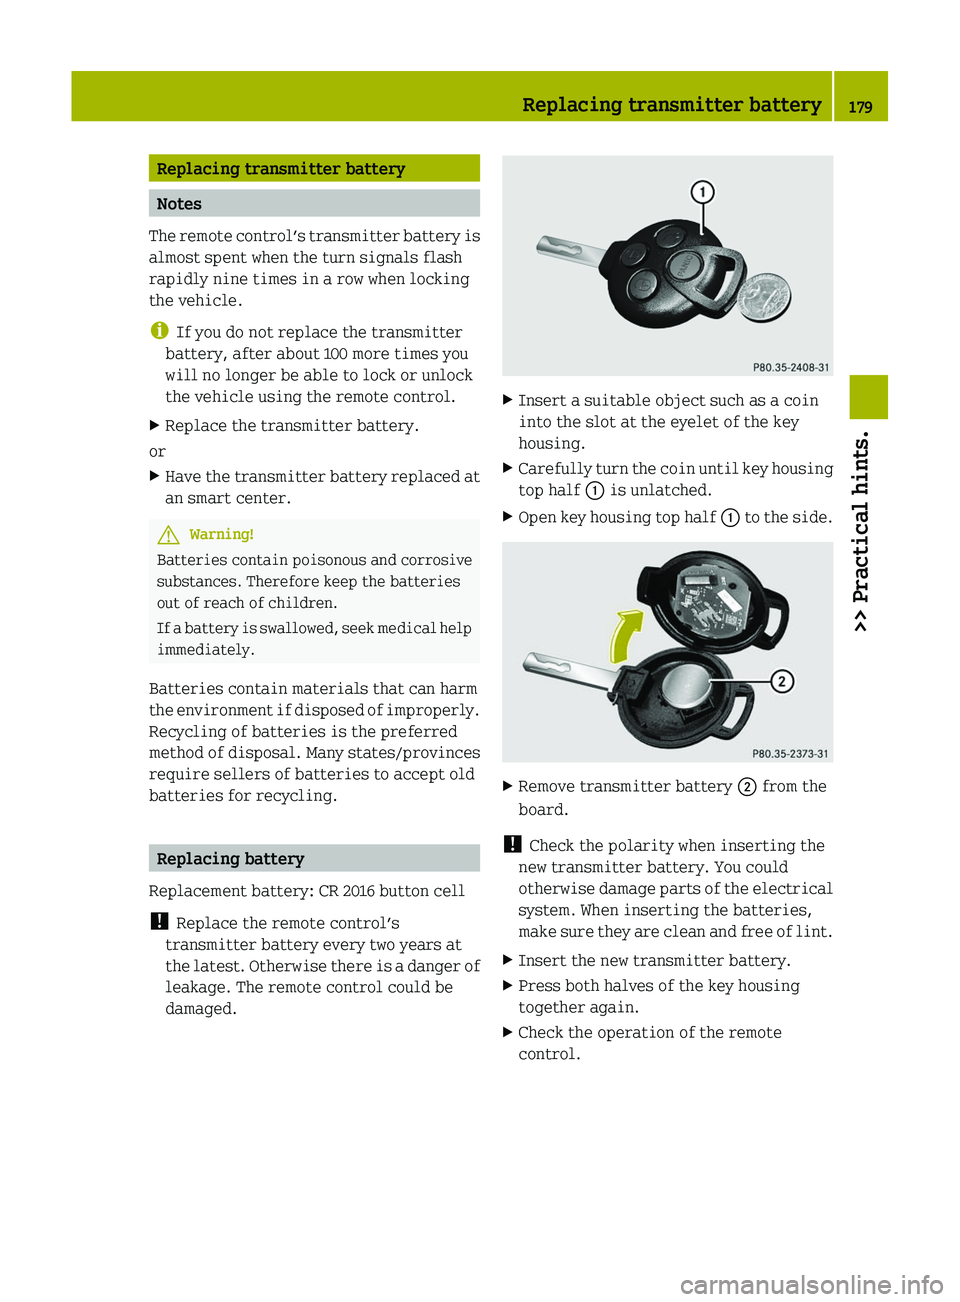
XInsert a suitable object such as a coin
into the slot at the eyelet of the key
housing.
XCarefully turn the coin until key housing
top half \000F is unlatched.
XOpen key housing top half \000F to the side.XRemove transmitter battery \000G from the
board.
! Check the polarity when inserting the
new transmitter battery. You could
otherwise damage parts of the electrical
system. When inserting the batteries,
make sure they are clean and free of lint.
XInsert the new transmitter battery.XPress both halves of the key housing
together again.
XCheck the operation of the remote
control.
Replacing transmitter battery179>> Practical hints.BA 451 USA, CA Edition A 2011; 1; 4, en-UShereepeVersion: 3.0.3.62010-05-11T15:12:26+02:00 - Seite 179Z
Page 182 of 228
Replacing bulbs
About replacing bulbs
Safe vehicle operation depends on proper
exterior lighting and signaling. It is
therefore essential that all bulbs and lamp
assemblies are in good working order at all
times.
Correct headlamp adjustment is extremely
important. Have headlamps checked and
readjusted at regular intervals and when a
bulb has been replaced. Contact an
authorized smart center for headlamp
adjustment.
GWarning!
Bulbs and bulb sockets can be very hot.
Allow the lamp to cool down before changing
a bulb. Otherwise you could be burned if you
touch them.
Keep bulbs out of the reach of children.
Halogen lamps contain pressurized gas. A
bulb can explode if you:
R touch or move it when hot
R drop the bulb
R scratch the bulb
Wear eye and hand protection.
i If the headlamps or front fog lamps* are
fogged up on the inside as a result of
high humidity, driving the vehicle a
distance with the lights on should clear
up the fogging.
Notes on bulb replacement:
R Only use bulbs of the same type and with
the specified watt rating.
R Switch the lights off before replacing a
bulb to prevent short circuits.
R Always use a clean lint-free cloth when
handling bulbs.
R Your hands should be dry and free of oil
and grease.
R Avoid touching the glass of the bulb with
bare fingers.
R If the newly installed bulb does not come
on, contact an authorized smart center.
R Have the bulbs for the front fog lamps*
replaced at an authorized smart center.180Replacing bulbs>> Practical hints.* optionalBA 451 USA, CA Edition A 2011; 1; 4, en-UShereepeVersion: 3.0.3.62010-05-11T15:12:26+02:00 - Seite 180
Page 183 of 228
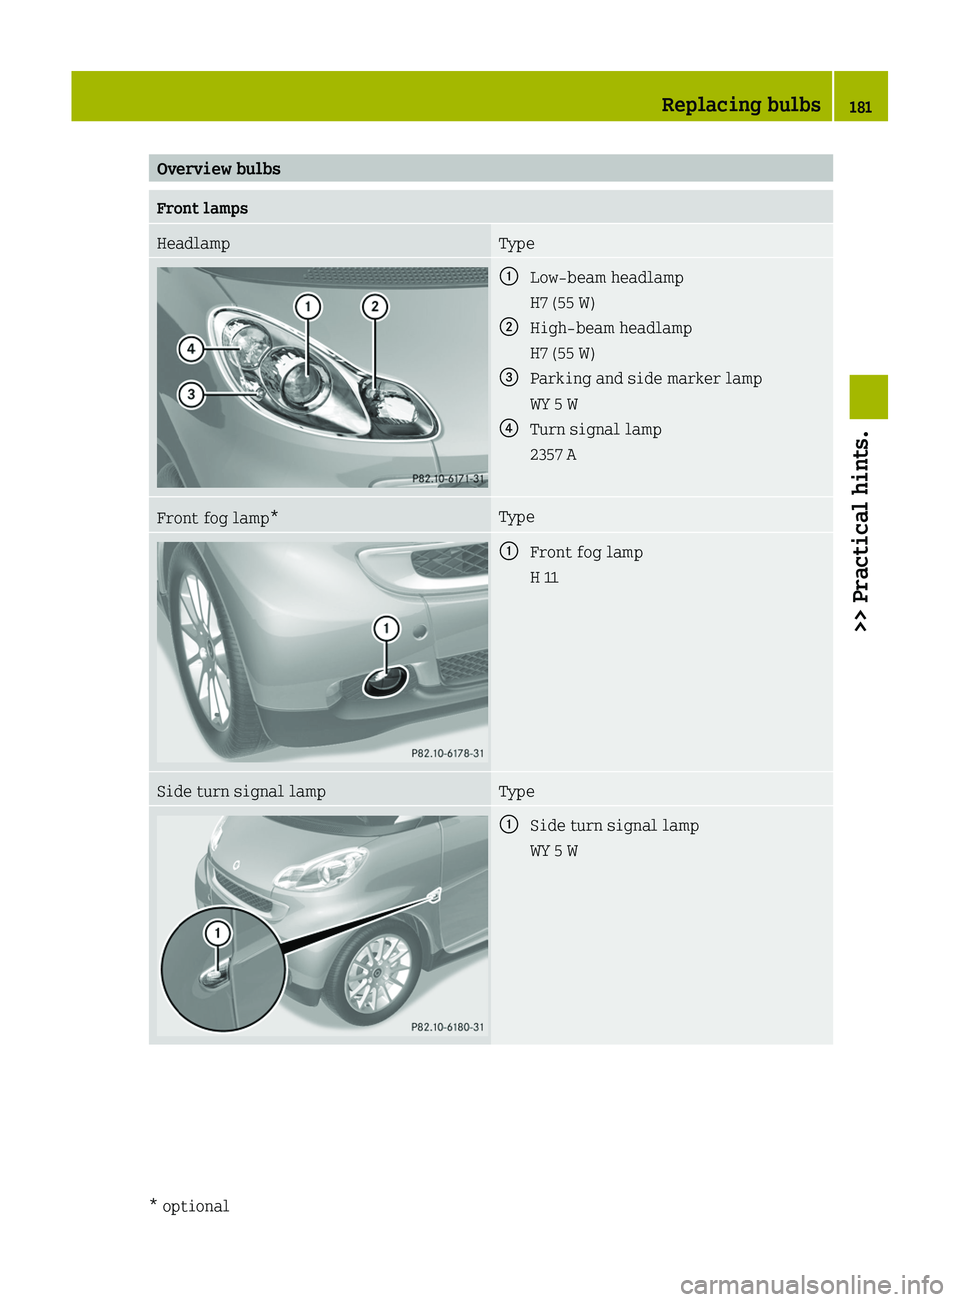
Overview bulbsFront lamps Headlamp Type\000FLow‑beam headlamp
H7 (55 W)
\000GHigh‑beam headlamp
H7 (55 W)
\000
Page 184 of 228
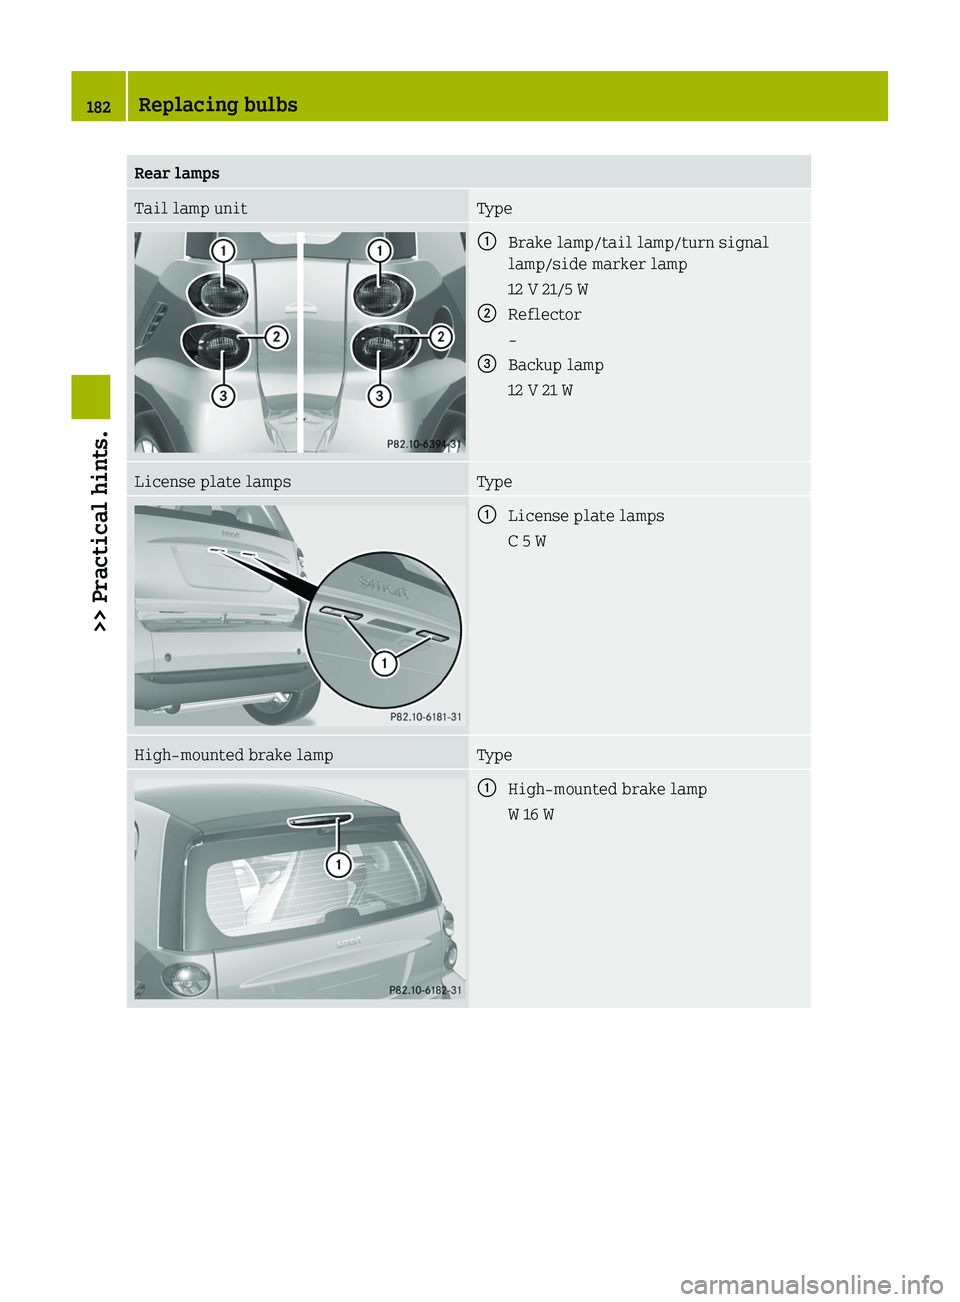
Rear lamps Tail lamp unit Type\000FBrake lamp/tail lamp/turn signal
lamp/side marker lamp
12 V 21/5 W
\000GReflector
-
\000
Page 185 of 228
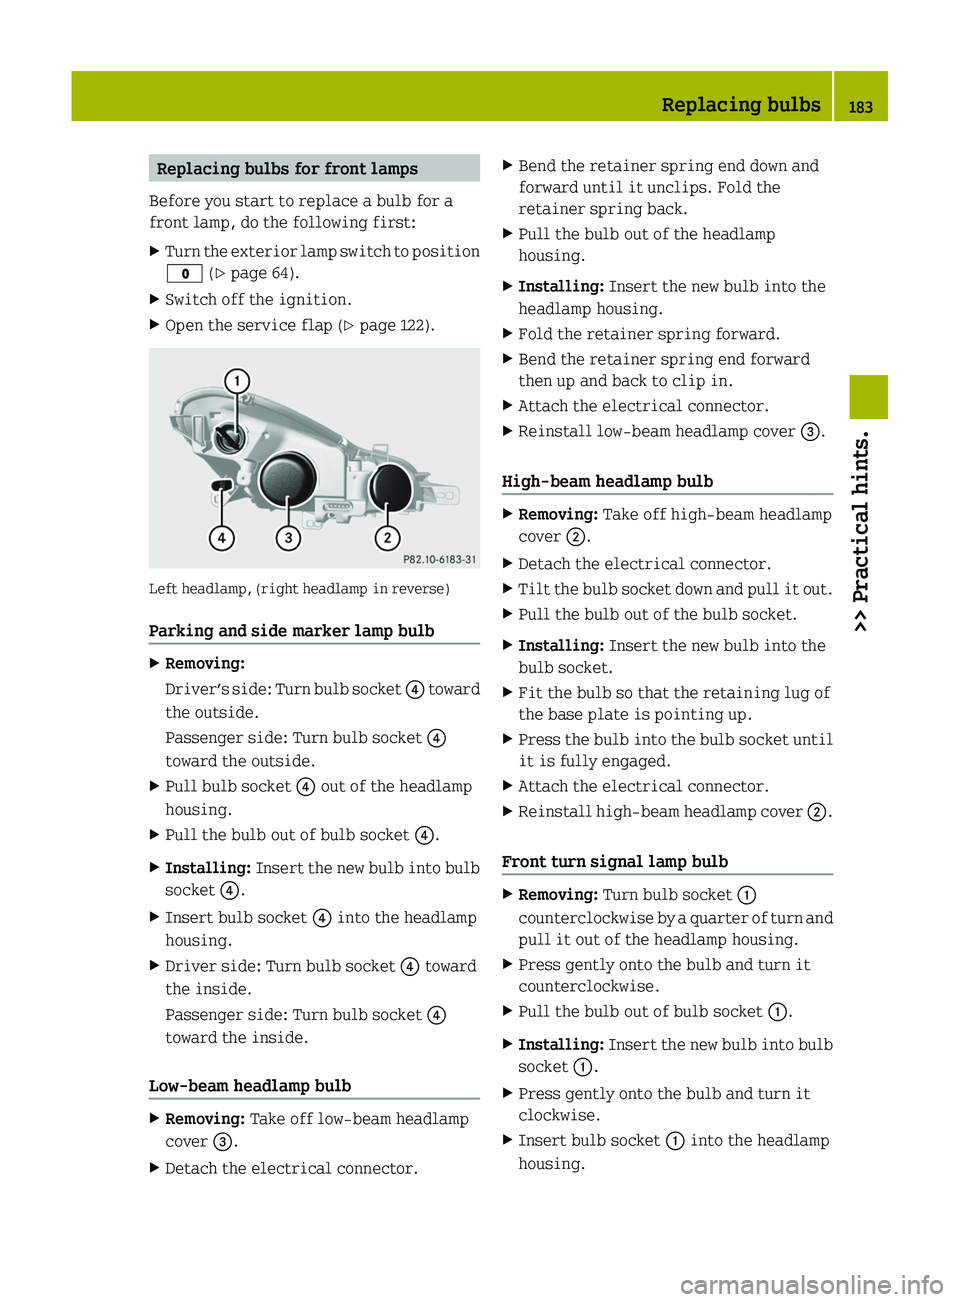
Replacing bulbs for front lamps
Before you start to replace a bulb for a
front lamp, do the following first:
XTurn the exterior lamp switch to position
\000' (Y page 64).
XSwitch off the ignition.XOpen the service flap (Y page 122).
Left headlamp, (right headlamp in reverse)
Parking and side marker lamp bulb
XRemoving:
Driver’s side: Turn bulb socket \000
Page 186 of 228
The arrow on bulb socket \000F must be in
line with the line on the headlamp
housing.
XTurn bulb socket \000F clockwise by a
quarter of turn.
Side turn signal lamp bulb
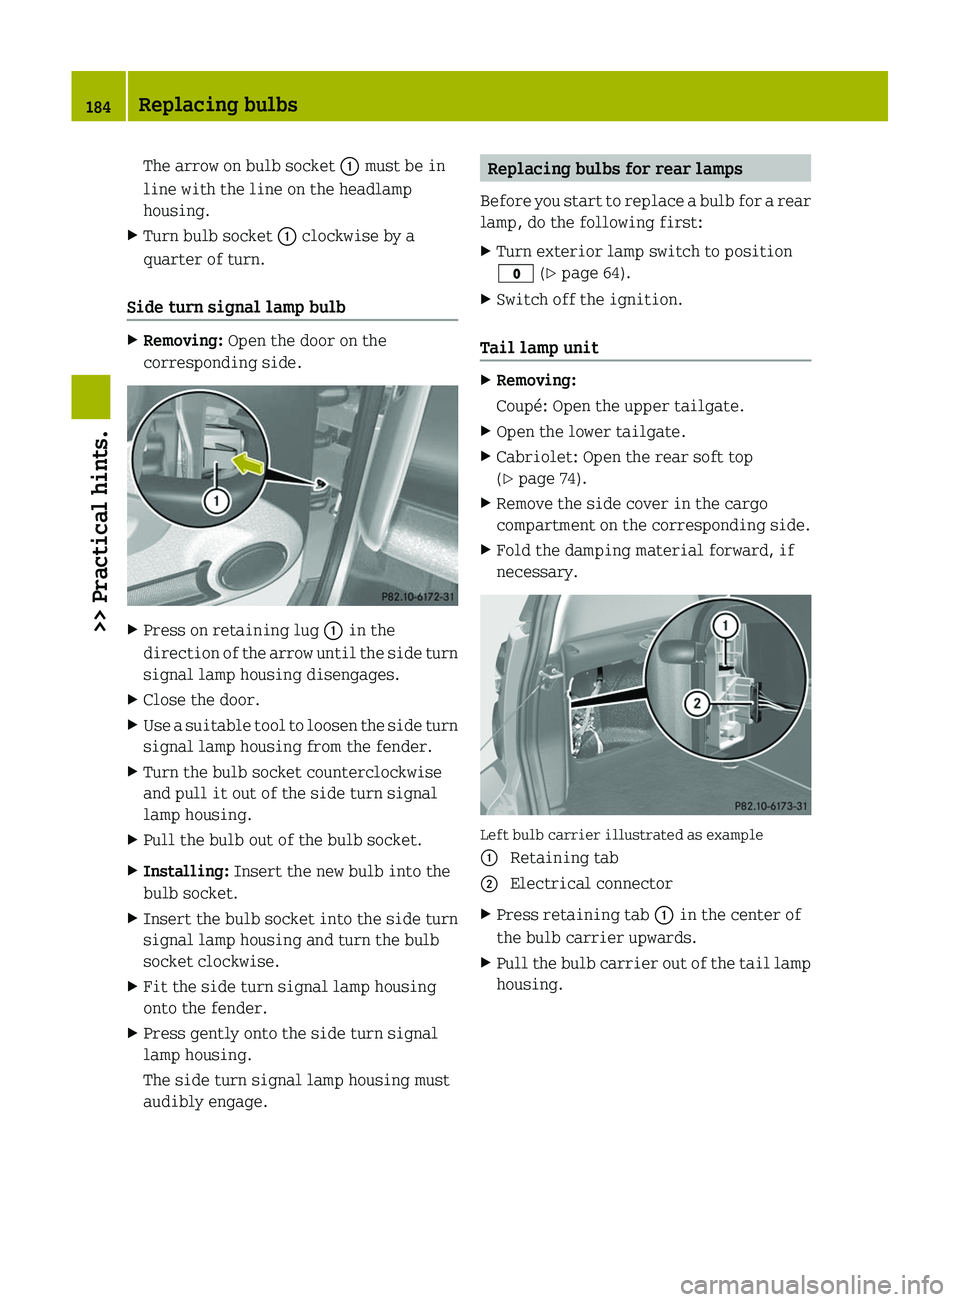
XRemoving: Open the door on the
corresponding side.
XPress on retaining lug \000F in the
direction of the arrow until the side turn
signal lamp housing disengages.
XClose the door.XUse a suitable tool to loosen the side turn
signal lamp housing from the fender.
XTurn the bulb socket counterclockwise
and pull it out of the side turn signal
lamp housing.
XPull the bulb out of the bulb socket.XInstalling: Insert the new bulb into the
bulb socket.
XInsert the bulb socket into the side turn
signal lamp housing and turn the bulb
socket clockwise.
XFit the side turn signal lamp housing
onto the fender.
XPress gently onto the side turn signal
lamp housing.
The side turn signal lamp housing must
audibly engage.
Replacing bulbs for rear lamps
Before you start to replace a bulb for a rear
lamp, do the following first:
XTurn exterior lamp switch to position
\000' (Y page 64).
XSwitch off the ignition.
Tail lamp unit
XRemoving:
Coupé: Open the upper tailgate.
XOpen the lower tailgate.XCabriolet: Open the rear soft top
(Y page 74).
XRemove the side cover in the cargo
compartment on the corresponding side.
XFold the damping material forward, if
necessary.
Left bulb carrier illustrated as example
\000F Retaining tab\000G Electrical connectorXPress retaining tab \000F in the center of
the bulb carrier upwards.
XPull the bulb carrier out of the tail lamp
housing.
184Replacing bulbs>> Practical hints.
BA 451 USA, CA Edition A 2011; 1; 4, en-UShereepeVersion: 3.0.3.62010-05-11T15:12:26+02:00 - Seite 184
Page 187 of 228
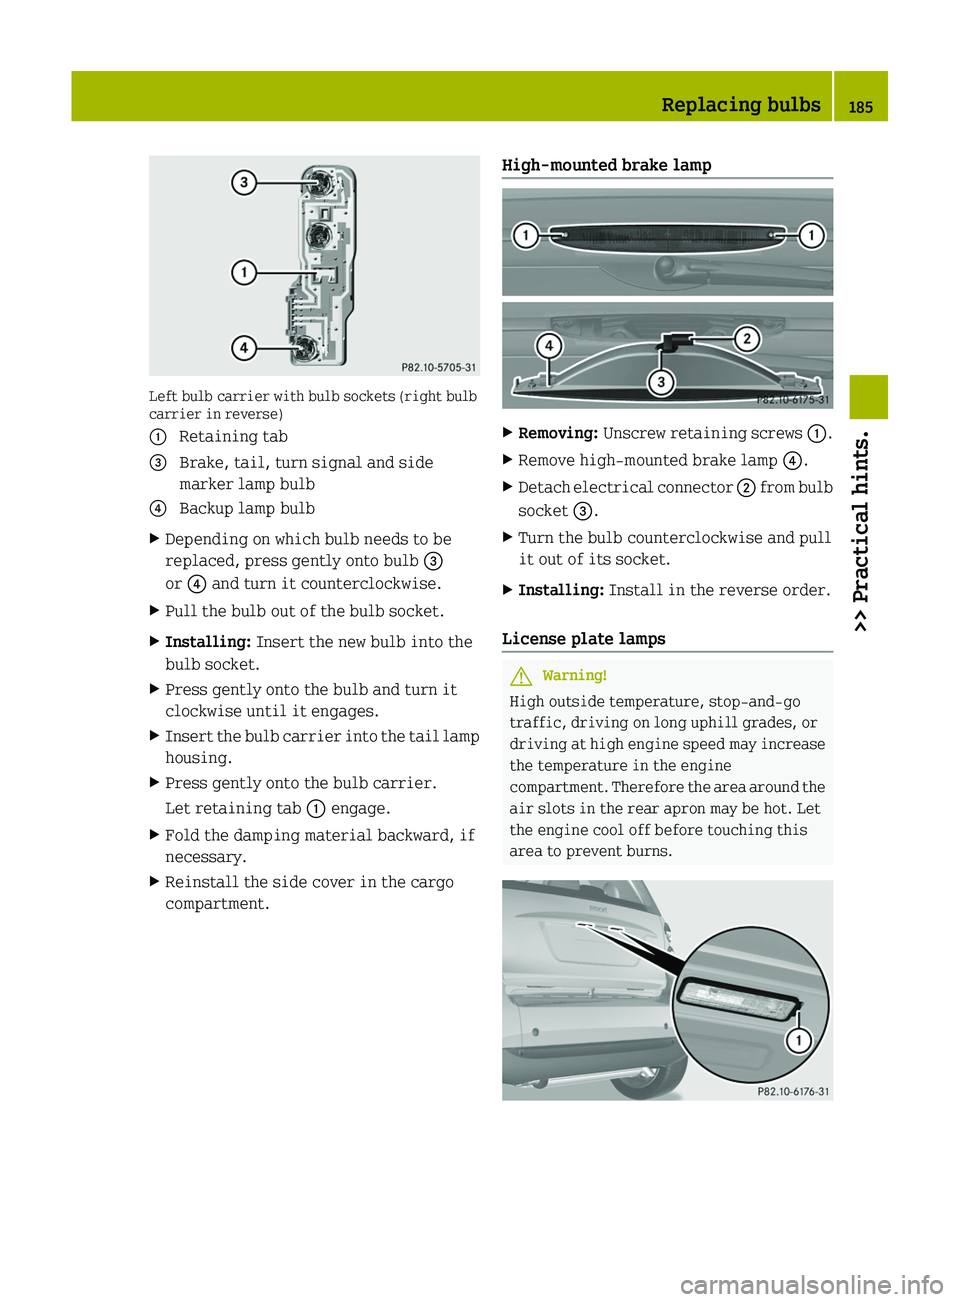
Left bulb carrier with bulb sockets (right bulbcarrier in reverse)
\000F Retaining tab\000
Page 188 of 228
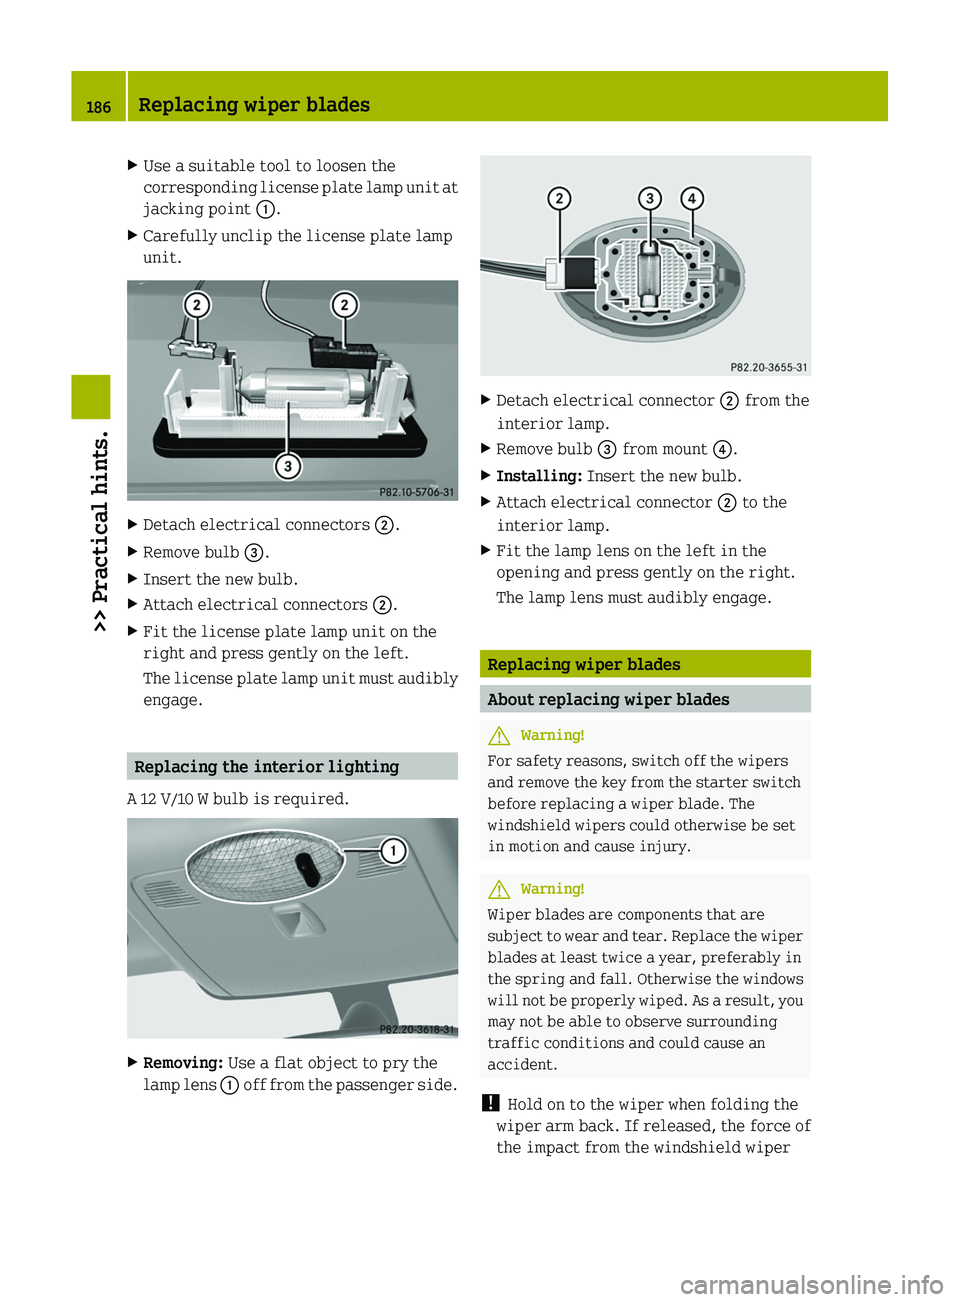
XUse a suitable tool to loosen the
corresponding license plate lamp unit at
jacking point \000F.
XCarefully unclip the license plate lamp
unit.
XDetach electrical connectors \000G.XRemove bulb \000
Page 189 of 228
tensioning spring could crack the
windshield.
Do not allow the wiper arms to contact the
windshield glass without a wiper blade
inserted.
We recommend that you have this work
carried out at an authorized smart
center.
To ensure proper visibility
Rit is vital that you have wiper blades that
are in perfect shape
Rclean the wiper blades regularly with a
cleaning agent
Rremove any tough dirt stains with a
sponge or brush
Windshield wiper blades
! Do not pull on the wiper blade inserts.
They could tear.
Removing
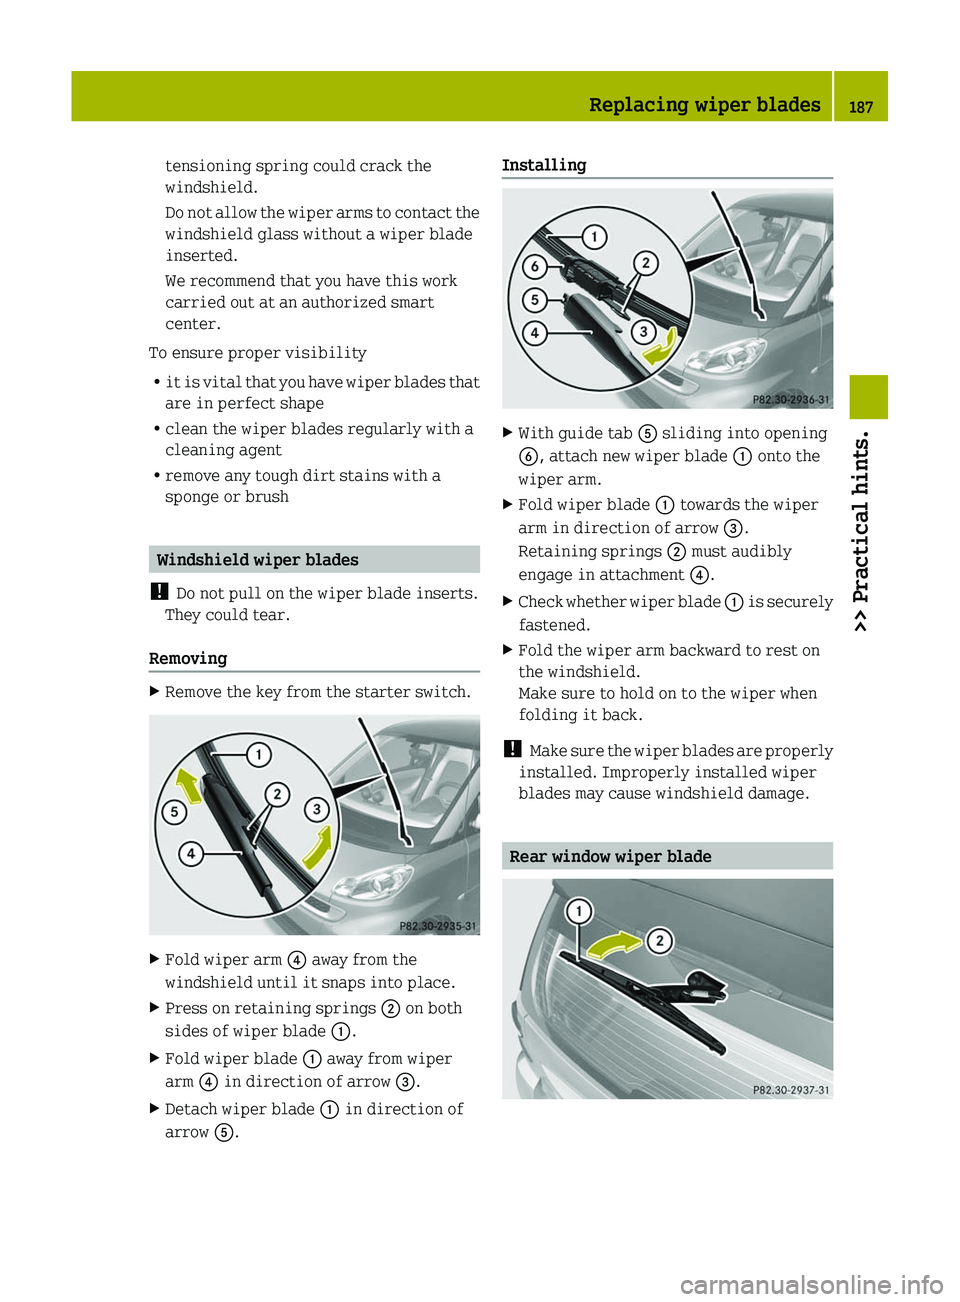
XRemove the key from the starter switch.XFold wiper arm \000
Page 190 of 228
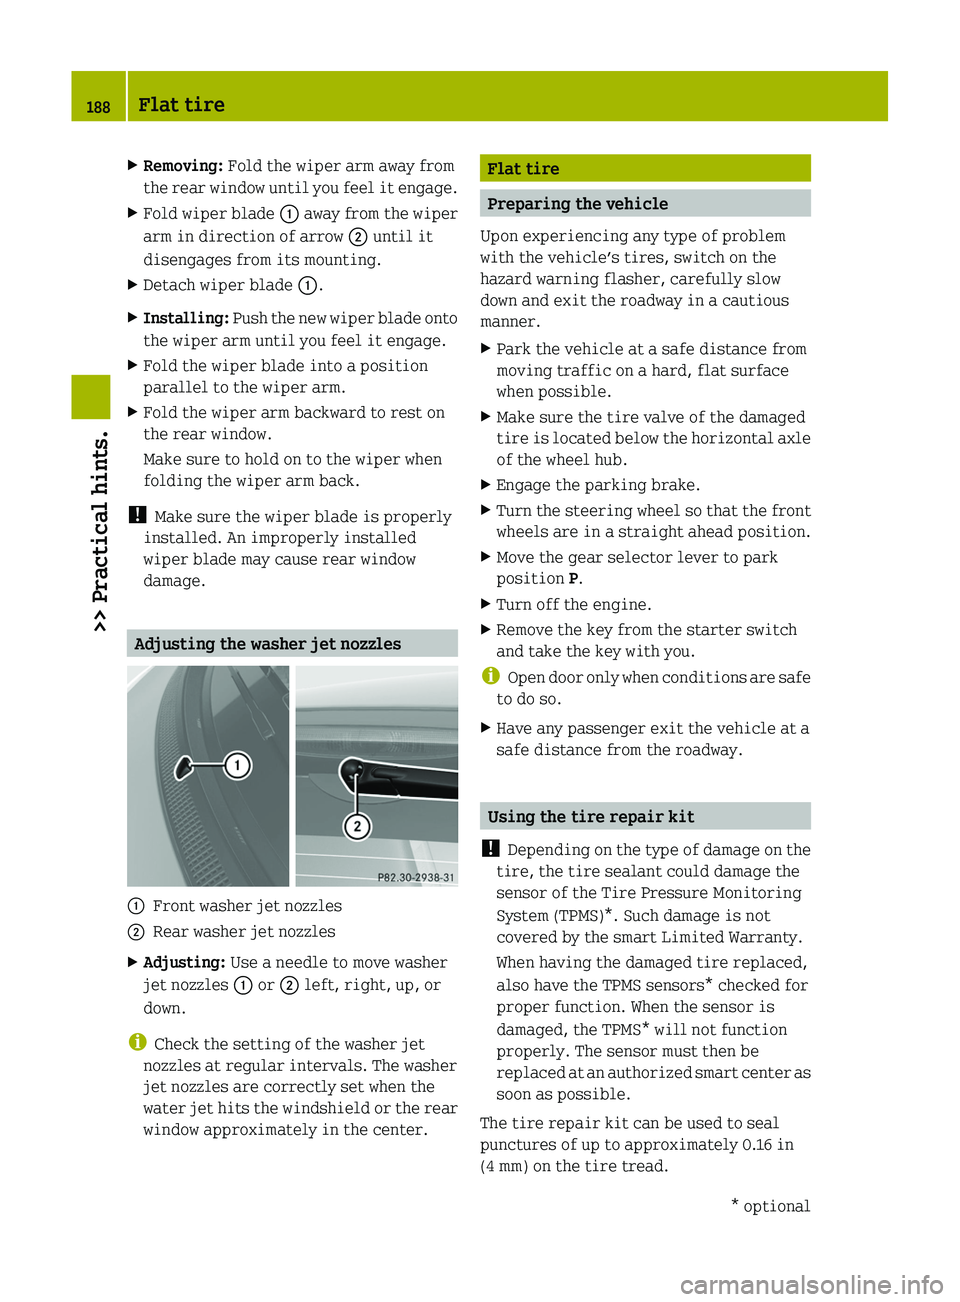
XRemoving: Fold the wiper arm away from
the rear window until you feel it engage.
XFold wiper blade \000F away from the wiper
arm in direction of arrow \000G until it
disengages from its mounting.
XDetach wiper blade \000F.XInstalling: Push the new wiper blade onto
the wiper arm until you feel it engage.
XFold the wiper blade into a position
parallel to the wiper arm.
XFold the wiper arm backward to rest on
the rear window.
Make sure to hold on to the wiper when
folding the wiper arm back.
! Make sure the wiper blade is properly
installed. An improperly installed
wiper blade may cause rear window
damage.
Adjusting the washer jet nozzles
\000FFront washer jet nozzles\000GRear washer jet nozzlesXAdjusting: Use a needle to move washer
jet nozzles \000F or \000G left, right, up, or
down.
iCheck the setting of the washer jet
nozzles at regular intervals. The washer
jet nozzles are correctly set when the
water jet hits the windshield or the rear
window approximately in the center.
Flat tire
Preparing the vehicle
Upon experiencing any type of problem
with the vehicle’s tires, switch on the
hazard warning flasher, carefully slow
down and exit the roadway in a cautious
manner.
XPark the vehicle at a safe distance from
moving traffic on a hard, flat surface
when possible.
XMake sure the tire valve of the damaged
tire is located below the horizontal axle
of the wheel hub.
XEngage the parking brake.XTurn the steering wheel so that the front
wheels are in a straight ahead position.
XMove the gear selector lever to park
position P.
XTurn off the engine.XRemove the key from the starter switch
and take the key with you.
iOpen door only when conditions are safe
to do so.
XHave any passenger exit the vehicle at a
safe distance from the roadway.
Using the tire repair kit
! Depending on the type of damage on the
tire, the tire sealant could damage the
sensor of the Tire Pressure Monitoring
System (TPMS)*. Such damage is not
covered by the smart Limited Warranty.
When having the damaged tire replaced,
also have the TPMS sensors* checked for
proper function. When the sensor is
damaged, the TPMS* will not function
properly. The sensor must then be
replaced at an authorized smart center as
soon as possible.
The tire repair kit can be used to seal
punctures of up to approximately 0.16 in
(4 mm) on the tire tread.
188Flat tire>> Practical hints.* optionalBA 451 USA, CA Edition A 2011; 1; 4, en-UShereepeVersion: 3.0.3.62010-05-11T15:12:26+02:00 - Seite 188