SMART FORTWO COUPE ELECTRIC DRIVE 2013 Manual Online
Manufacturer: SMART, Model Year: 2013, Model line: FORTWO COUPE ELECTRIC DRIVE, Model: SMART FORTWO COUPE ELECTRIC DRIVE 2013Pages: 218, PDF Size: 2.69 MB
Page 81 of 218

!
When the hill‑start assist system stops
braking the vehicle, it can roll
backwards.
If you open the driver’s door, the
hill‑start assist system is deactivated
and a warning signal sounds.
Your vehicle has a hill‑start assist system.
On uphill grades the hill‑start assist
system maintains the pressure in the brake
system for approximately one second after
you have released the brake pedal.
Therefore, you can start off smoothly
without the vehicle moving immediately
after releasing the brake pedal.
X Release the brake pedal.
X Apply sufficient pressure to the
accelerator pedal to drive off.
On uphill grades with higher inclination,
the hill-start assist system will release
the pressure in the brake system after
approximately two seconds. A warning
signal sounds and the transmission
position indicator shows a flashing N in
order to warn you of the vehicle rolling
backwards.
X Press the brake pedal.
X Release the brake pedal.
X Apply sufficient pressure to the
accelerator pedal to drive off.
i The hill‑start assist system is inactive
if you start off with the parking brake
engaged. Instrument cluster
Charge level and power gauges
0002
Charge level gauge
0003 Power gauge
The gauges can be turned by approximately
90°.
The illumination for both gauges comes on
when you switch on the ignition and the
exterior lighting.
Charge level gauge !
Do not hang any objects on the charge
level gauge.
This could cause the charge level gauge
to be torn from its mountings and be
damaged.
The charge level gauge 0002displays charge
status of the high-voltage battery as a
percentage.
When the High-voltage Battery at Reserve Level message appears in the
multifunction display while the drive
system is in operation, the high-voltage
battery has reached the reserve level.
i If the charge level of the high-voltage
battery has dropped below 20 %, recharge
it at:
R an AC power socket (Y page 112)
R a private wall box (Y page 112)
R a public charging station
(Y page 114) Instrument cluster
79>> Controls. Z
Page 82 of 218

influences the braking effect of the
electric motor.
In overr")
Power gauge
G
WARNING
The operating condition of the high-
voltage battery (e.g. not yet at normal
operating temperature or fully charged)
influences the braking effect of the
electric motor.
In overrun or braking mode, the motor's
braking effect may therefore be reduced or
may not be present at all.
As a result of the reduced engine braking
effect, you may cause an accident and
injure yourself or others.
Compensate for the reduced engine braking
effect by pressing the brake pedal
accordingly, as required.
! Do not hang any objects on the power
gauge.
This could cause the power gauge to be
torn from its mountings and be damaged.
Power gauge 0003contains two segments:
R Section right of 0
Power gauge 0003indicates the current
power that the drive system delivers to
the rear wheels. 100 % correspond to
55 kW peak power.
R Section left of 0
When you release the accelerator pedal
or when you depress the brake pedal, the
electric motor operates as a generator.
Electric current is produced and stored
in the high-voltage battery. As long as
the high-voltage battery is being
charged, the electric motor simulates an
engine brake.
When the pointer of power gauge 0003is in
the "OFF “position, the vehicle is not ready
to drive, because:
R the drive system has not been started
R the gear selector lever has not been
moved to position Nor Pwhen starting
the drive system R
the charging cable is connected to the
vehicle
R there is not enough power from the high-
voltage battery
R a problem occured in the high-voltage
system
After the drive system has been started, the
pointer of power gauge 0003moves to
position 0.READY appears in the
multifunction display (Y page 82). The
vehicle is ready to drive. Adjusting instrument cluster
illumination
You can adjust the illumination of
R the switches and dials in the instrument
cluster
R the radio
R the climate control panel
R the charge level and power gauges
Five illumination levels are available. X
Make sure the key is in starter switch
position 1.
X Switch on the parking lamps.
X To brighten or dim illumination: Press
button 0002on the instrument cluster
repeatedly until the desired setting is
reached.
The current setting is stored. 80
Instrument cluster>> Controls.
Page 83 of 218

Control system
Introduction
The control system is activated when you
turn the key in the starter switch to
position 1. G
WARNING
Ad river’s attention to the road and traffic
conditions must always be his/her primary
focus when driving.
In order to avoid distraction which could
lead to an accident, the driver should
select features and change settings in the
control system only vehicle at a standstill
or when traffic and road conditions permit
it to be done safely.
Bear in mind that at a speed of just 30 mph
(approximately 50 km/h ), your vehicle is
covering adistance of 44 feet
(approximately 14 m) every second. Control lever
You can select the displays in the
multifunction display and change settings
in the control system with the control
lever. 0002
Control switch
Pressing up selects a menu.
0003
OK button
Confirming a selection.
Scrolling through stored messages
in the
Messages menu
002B
Control switch
Pressing down selects a menu.
Multifunction display
The multifunction display shows values and
settings as well as display messages.
X Activating the multifunction display:
Unlock the vehicle.
X Confirming messages: Press the OK
button on the control lever briefly
(Y page 81).
X Exiting menu: Press the control switch on
the control lever up or down until the
message Back appears in the
multifunction display.
X Press the OK button on the control lever
briefly. Transmission position indicator
The transmission position indicator
0002
displays the current gear selector lever
position. Display Function
P
Park position
R
Reverse gear Control system
81>> Controls. Z
Page 84 of 218

There is a parking lock
malfunction.
X
Move the gear selector
leve rslowly from
position Pto position R
and back to position P.
If Nremains flashing in
t")
Display Function
N
Neutral
D
Drive
N (flashes)
There is a parking lock
malfunction.
X
Move the gear selector
leve rslowly from
position Pto position R
and back to position P.
If Nremains flashing in
the multifunctio ndisplay:
X Move the gear selector
lever to position P. When
leaving the vehicle,
apply the parking brake
to secure the vehicle
from rolling away.
X Contact an authorized
electric drive smart
center. 0 X
Move the gear selector
lever to park position P
or neutral position N.
X Turn the key to starter
switch position 2
(Y page 55) and hold it in
position until READY appears in the
multifunction display
(Y
page 82). READY indicator
READY appears for two seconds in the
multifunction display, if: R
the key is turned to starter switch
position 2
R there is no malfunction in the drive
system
The vehicle is ready to drive. Maximum available power
G
WARNING
When the indicator for the maximum
available power is not at its maximal
range, the power output is reduced
noticeably. Adapt your speed and driving
accordingly. Otherwise, you could cause an
accident. Exercise particular care when
passing or accelerating. The indicator for the maximum available
power of the drive system contains three
segments
0002. The number of dark segments
indicates power that is currently
available.
R Three segments: maximum power is
available.
R Two segments: Less than 66 % amount of
power is available.
R One segment: Less than 33 % amount of
power is available.
Under normal operating conditions the
indicator for the maximum power is at the
maximum range 0002.
The available amount of power can vary
from the the maximum range due to:
R very high or low outside temperatures
R very high power demand over along time
period
R very low charge level of the high-voltage
battery 82
Control system>> Controls.
Page 85 of 218
. ECO indicator
ECO indicator
0002helps you to optimize
your driving style. The energy consumption
o")
By charging the high-voltage battery, the
reduced availability of power can be
improved (Y page 112). ECO indicator
ECO indicator
0002helps you to optimize
your driving style. The energy consumption
of your vehicle can be reduced and the
cruising range can be increased.
The calculated ECO value in percent
indicates if and how your driving style
differs from an ideal driving style (100 %).
This to provide you feedback to:
R your driving style when accelerating and
coasting
R the uniformity of your driving style
After aprolonged standstill of the vehicle,
ECO indicator display 0002always starts at
a value of 50 %.
The ECO-value is displayed:
R while driving
R if the key is in starter switch position
2. In place of the ECO display, battery charge
level 0002and charging time 0003appear , if:
R the high‑voltage battery is being
charged
R the key is in starter switch position 1. Charging mode display
When you switch off the ignition, you see
the display of the charging mode which is
currently set.
The charging mode is not changed after the
ignition has been switched off.
i If the multifunction display has
already gone out, you must turn the key to
starter switch position 1. Afterwards,
you can change the setting in the Charge and Depart menu (Y
page 86).
If you do not make a change, the last
selected entry is activated. If you have not
made any departure time settings in the
last 24 hours, the Instant Charge menu is
activated. Example illustration: Departure time selected
0002
Preset departure time
0003 Instant Charge menu
X To change the setting: press and hold the
control switch on the control lever up or
down until the desired mode is selected
in the multifunction display (Y page 81).
Additional information:
R Setting the departure time (Y page 86)
R Starting the charging process
immediately (Y page 88) Outside temperature
G
WARNING
The outside temperature display is not
designed as an ice-warning device and is
therefore unsuitable for that purpose.
Indicated temperatures just above the
freezing point do not guarantee that the Control system
83>> Controls.
Z
Page 86 of 218

road surface is free of ice. The road may
still be icy, especially in wooded areas or
on bridges. Your vehicle could start to skid
if you do not adjust your driving style
accordingly.
Therefore ,always adjust your driving style
to the prevailing road and weather
conditions. Example illustration (U.S. vehicles)
i
Canada vehicles: The outside
temperature display shows °C instead
of °F .
The outside temperature display 0002
appears in the multifunction display
continuously.
Ac hange of the outside temperature will be
displayed with delay.
Freeze warning (Canada vehicles only) When the outside temperature falls below
3¥, the multifunction display makes you
aware of the fact that the road may be icy.
An additional freeze warning, i.e. an ice
crystal symbol 0002, in the multifunction
display flashes. After 60 seconds, the
freeze warning stops flashing but
continues to be displayed. When the
outside temperature rises above 3 ¥, the
freeze warning goes out. Ac
hange of the outside temperature 0003will
be displayed with delay. 84
Control system>> Controls.
Page 87 of 218
 0003
0001START menu (trip statistics since start) (Y
page 86)002B
0001RESET menu (trip statistics since last reset) (Y
page 86)002A
Charge an")
Menus and submenus
Function
0002
Odometer menu (Y
page 85) 0003
0001START menu (trip statistics since start) (Y
page 86)002B
0001RESET menu (trip statistics since last reset) (Y
page 86)002A
Charge and depart menu (Y
page 86) 0028
Messages menu (Y
page 89) 0029
Settings menu (Y
page 89) 0018
Time menu (Y
page 90) Odometer menu
The Odometer menu shows you either the
main odometer and the trip odometer or the
trip odometer with the remaining cruise
range. 0002
Main odometer
0003 Trip odometer
002B Remaining cruise range
X Press the control switch on the control
lever (Y page 81) up or down until the Control system
85>> Controls. Z
Page 88 of 218

Odometer menu appears in the
multifunction display.
X To switch between submenus: Press the OK
button on the control lever briefly.
X To reset the trip odometer: Select the
trip odometer display.
X Press button 0029on the instrument cluster
until the trip odometer is reset to 0
(Y page 21).
If the remaining cruise range of the charge
level of the high-voltage battery has
dropped below 10 %, Low Battery is
displayed on position 002B.Start menu
The 0001START menu shows you the trip
statistics since start. 0002
Average speed since start
0003 Time elapsed since start
002B Distance driven since start
002A Average energy consumption
X Press the control switch on the control
lever (Y page 81) up or down until the
0001START menu appears in the
multifunction display.
X To reset: Press button 0029on the
instrument cluster until the 0001START menu
is reset to 0(Y page 21).
i The 0001START menu is reset to 0
automatically
R when the ignition has been switched
off for more than 4 hours
R after driving more than 9999 miles or
kilometers Reset menu
The 0001RESET menu menu shows you the trip
statistics since the last reset. 0002
Average speed since last reset
0003 Time elapsed since since last reset
002B Distance driven since last reset
002A Average energy consumption
X Press the control switch on the control
lever (Y page 81) up or down until the
0001RESET menu appears in the
multifunction display.
X To reset: Press button 0029on the
instrument cluster until the 0001RESET menu
is reset to 0(Y page 21). Charge and depart menu
In the Charge and Depart menu you can
change the following settings:
R set a departure time
R switch on/off the "Air conditioning
before start" function
R instant charge of the high‑voltage
battery
R set the maximum charge current.
X Press the control switch on the control
lever up or down until Charge and Depart appears in the multifunction
display.
X Press the OK button on the control lever
briefly.
Setting the departure time With this function, you can preset a
departure time.86
Control system>> Controls.
Page 89 of 218
This is useful:
R
if you wish to cool the interior of the
vehicle before driving
R if you wish to charge the vehicle at a
charging station/wallbox at the most
inexpensive electricity rate
With the "Air conditioning before start"
function, the vehicle interior is cooled
prior to a desired departure time.
Prerequisites:
R The doors and tailgate are closed.
R The charging cable for the high‑voltage
battery is connected to a power source
and inserted into the vehicle's power
socket.
R The high‑voltage battery has a
sufficient charge.
The maximum duration of "Air
conditioning before start" is 30 minutes.
Set the air distribution of your vehicle as
follows so that the "Air conditioning
before start" function has the greatest
effect:
R in summer, to the center and side vents
R in winter, onto the windshield and side
windows
Information on air distribution can be
found on (Y page 98).
The setting of the airflow regulator has no
influence on the "Air conditioning before
start" function.
i If the programmed time is too short, the
high‑voltage battery cannot be
completely charged. After setting the
departure time, the maximum charge
level which can be reached is then shown.
i If the high‑voltage battery is not
sufficiently charged and the "Air
conditioning before start" function is
activated, the high‑voltage battery is
charged first. When acharge level of at
least 20 % has been reached, the "Air
conditioning before start" function is
activated. This function then has priority over the charging of the
high‑voltage battery.
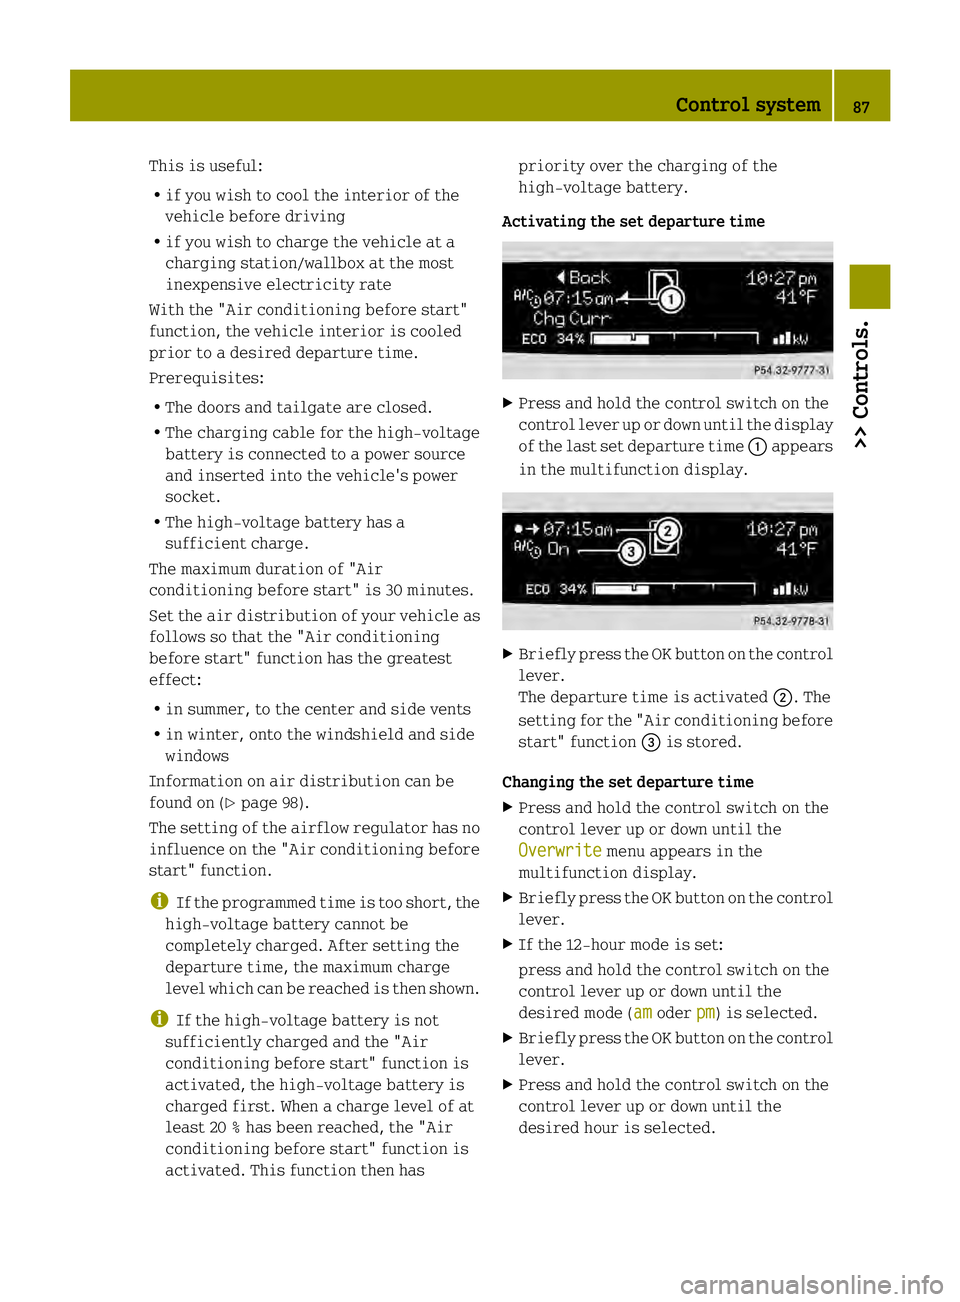
Activating the set departure time X
Press and hold the control switch on the
control lever up or down until the display
of the last set departure time 0002appears
in the multifunction display. X
Briefl ypress the OK button on the control
lever.
The departure time is activated 0003. The
setting for the "Air conditioning before
start" function 002Bis stored.
Changing the set departure time
X Press and hold the control switch on the
control lever up or down until the
Overwrite menu appears in the
multifunction display.
X Briefly press the OK button on the control
lever.
X If the 12-hour mode is set:
press and hold the control switch on the
control lever up or down until the
desired mode (am oder
pm ) is selected.
X Briefly press the OK button on the control
lever.
X Press and hold the control switch on the
control lever up or down until the
desired hour is selected. Control system
87>> Controls. Z
Page 90 of 218

X
Briefly press the OK button on the control
lever.
X Press and hold the control switch on the
control lever up or down until the "Air
conditioning before start" function is
activated or deactivated.
X Briefly press the OK button on the control
lever.
X Press and hold the control switch on the
control lever up or down until the "Air
conditioning before start" function is
activated or deactivated.
X Briefly press the OK button on the control
lever.
The new departure time is stored and
activated.
The "Air conditioning before start"
function is activated or deactivated.
Starting the charging process of the
high‑voltage battery immediately This function allows you to start the
charging process immediately. The
charging process begins as soon as the
charging cable is connected.
i The charging process also begins when
you insert the charging cable into the
vehicle's power socket. However, this is
only the case if you have not made any
departure time settings.
Information on the chargin gprocess can
be found on (Y page 112).
X Press and hold the control switch on the
control lever up or down until the
Instant Charge menu appears in the
multifunction display.
X Briefly press the OK button on the control
lever.
The charging process is started as soon
as the charging cable is connected.
i When you call up the Instant Chargemenu, the "Air conditioning before
start" function is not available. Setting the maximum charge current G
WARNING
When connected to a power supply socket, a
high electrical load during the charging
process can lead to overheating of the
external power supply. There is a risk of
fire.
Find out about the maximum permissible
current load of the external power supply
socket for the respective country at an
authorized electric drive smart center.
Check the maximum permissible charge
current on site before you begin the
charging process. Contact an authorized
electric drive smart center should you
require assistance. If necessary, adjust
the settings of your vehicle.
You can limit the charge current of the
high‑voltage battery. This can protect the
power supply from overloading. You can set
the limit either on the control unit of the
charging cable or via the control system.
The preset standard value is "Max". This
corresponds to the maximum available
charge current of the power supply.
Check the maximum permissible charge
current for the respective power supply
socket before charging the high‑voltage
battery.
The following values are available for
selection: 8 A, 10 A, 12 A, Max. The last value
set remains stored until a chang eis made.
X Press and hold the control switch on the
control lever up or down until the
Charge Current menu appears in the
multifunction display.
X Briefly press the OK button on the control
lever.
X Press and hold the control switch on the
control lever up or down until the
desired amperage is selected.
X Briefly press the OK button on the control
lever.
The selected amperage is set. 88
Control system>> Controls.