front side SMART FORTWO COUPE ELECTRIC DRIVE 2014 User Guide
[x] Cancel search | Manufacturer: SMART, Model Year: 2014, Model line: FORTWO COUPE ELECTRIC DRIVE, Model: SMART FORTWO COUPE ELECTRIC DRIVE 2014Pages: 222, PDF Size: 16.17 MB
Page 40 of 222
0043
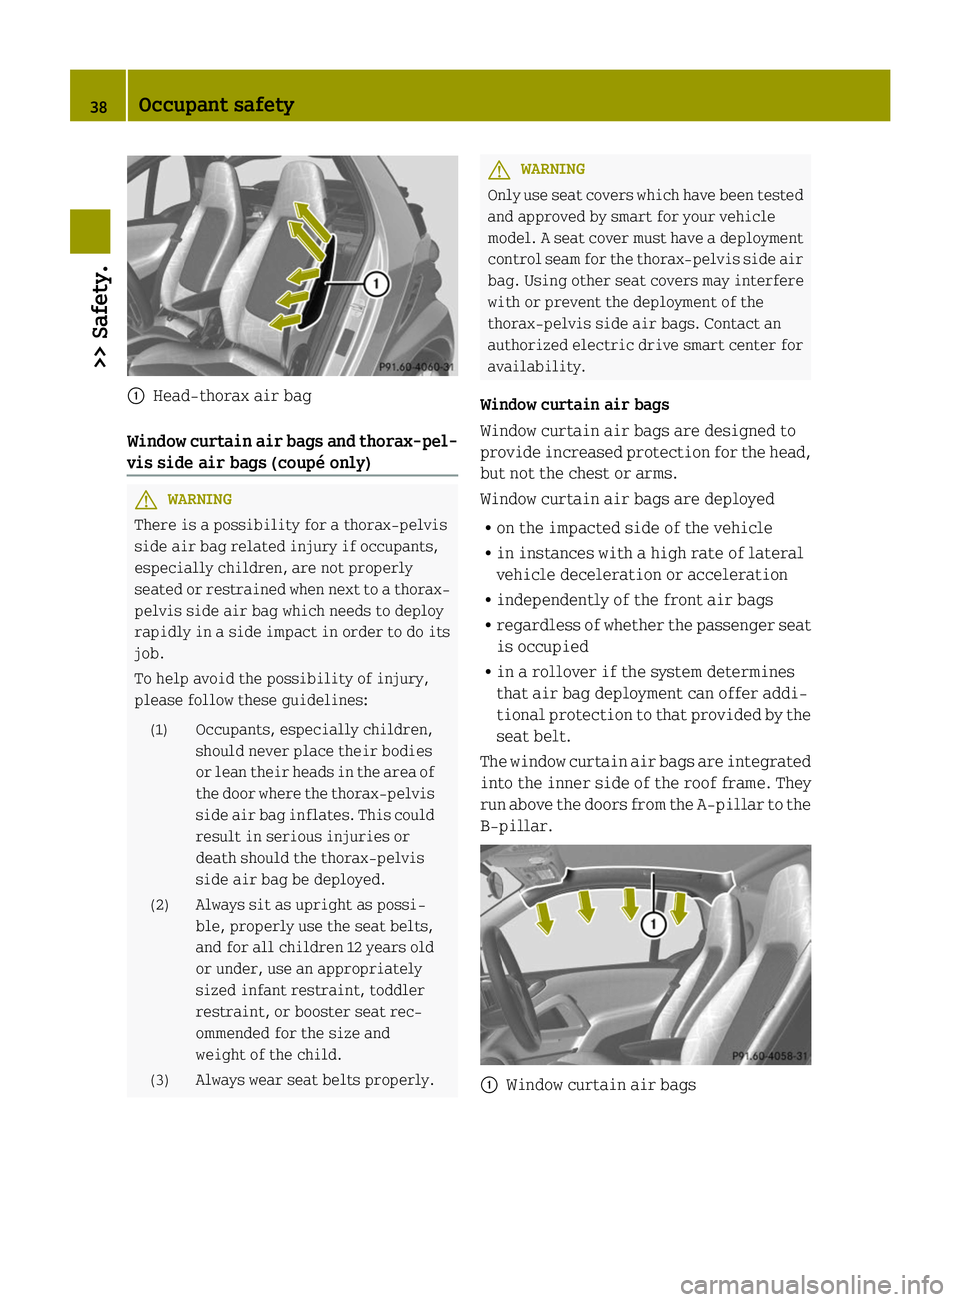
Head-thorax air bag
Window curtain air bags and thorax-pel-
vis side air bags (coupé only) G
WARNING
There is a possibility for a thorax-pelvis
side air bag related injury if occupants,
especially children, are not properly
seated or restrained when next to a thorax-
pelvis side air bag which needs to deploy
rapidly in a side impact in order to do its
job.
To help avoid the possibility of injury,
please follow these guidelines:
(1) Occupants, especially children, should never place their bodies
or lean their heads in the area of
the door where the thorax-pelvis
side air bag inflates. This could
result in serious injuries or
death should the thorax-pelvis
side air bag be deployed.
(2) Always sit as upright as possi- ble, properly use the seat belts,
and for all children 12 years old
or under, use an appropriately
sized infant restraint, toddler
restraint, or booster seat rec-
ommended for the size and
weight of the child.
(3) Always wear seat belts properly. G
WARNING
Only use seat covers which have been tested
and approved by smart for your vehicle
model. A seat cover must have a deployment
control seam for the thorax-pelvis side air
bag. Using other seat covers may interfere
with or prevent the deployment of the
thorax-pelvis side air bags. Contact an
authorized electric drive smart center for
availability.
Window curtain air bags
Window curtain air bags are designed to
provide increased protection for the head,
but not the chest or arms.
Window curtain air bags are deployed
R on the impacted side of the vehicle
R in instances with a high rate of lateral
vehicle deceleration or acceleration
R independently of the front air bags
R regardless of whether the passenger seat
is occupied
R in a rollover if the system determines
that air bag deployment can offer addi-
tional protection to that provided by the
seat belt.
The window curtain air bags are integrated
into the inner side of the roof frame. They
run above the doors from the A-pillar to the
B-pillar. 0043
Window curtain air bags 38
Occupant safety>> Safety.
Page 41 of 222
Thorax-pelvis side air bags
Thorax-pelvis side air bags are designed
to provide increased protection for the
thorax and pelvis, but not the arms.
Thorax-pelvis side air bags are deployed
R on the impacted side of the vehicle
R in instances with a high rate of lateral
vehicle deceleration or acceleration
R independently of the front air bags
R regardless of whether the seat belt on the
impacted side of the vehicle is in use
R independently of the ETDs.
Thorax-pelvis side air bags will generally
not deploy in a rollover.
The thorax-pelvis side air bags will
deploy, however, if the system detects
R a high rate of lateral vehicle decelera-
tion or acceleration, and
R that air bag deployment can offer addi-
tional protection to that provided by the
seat belt.
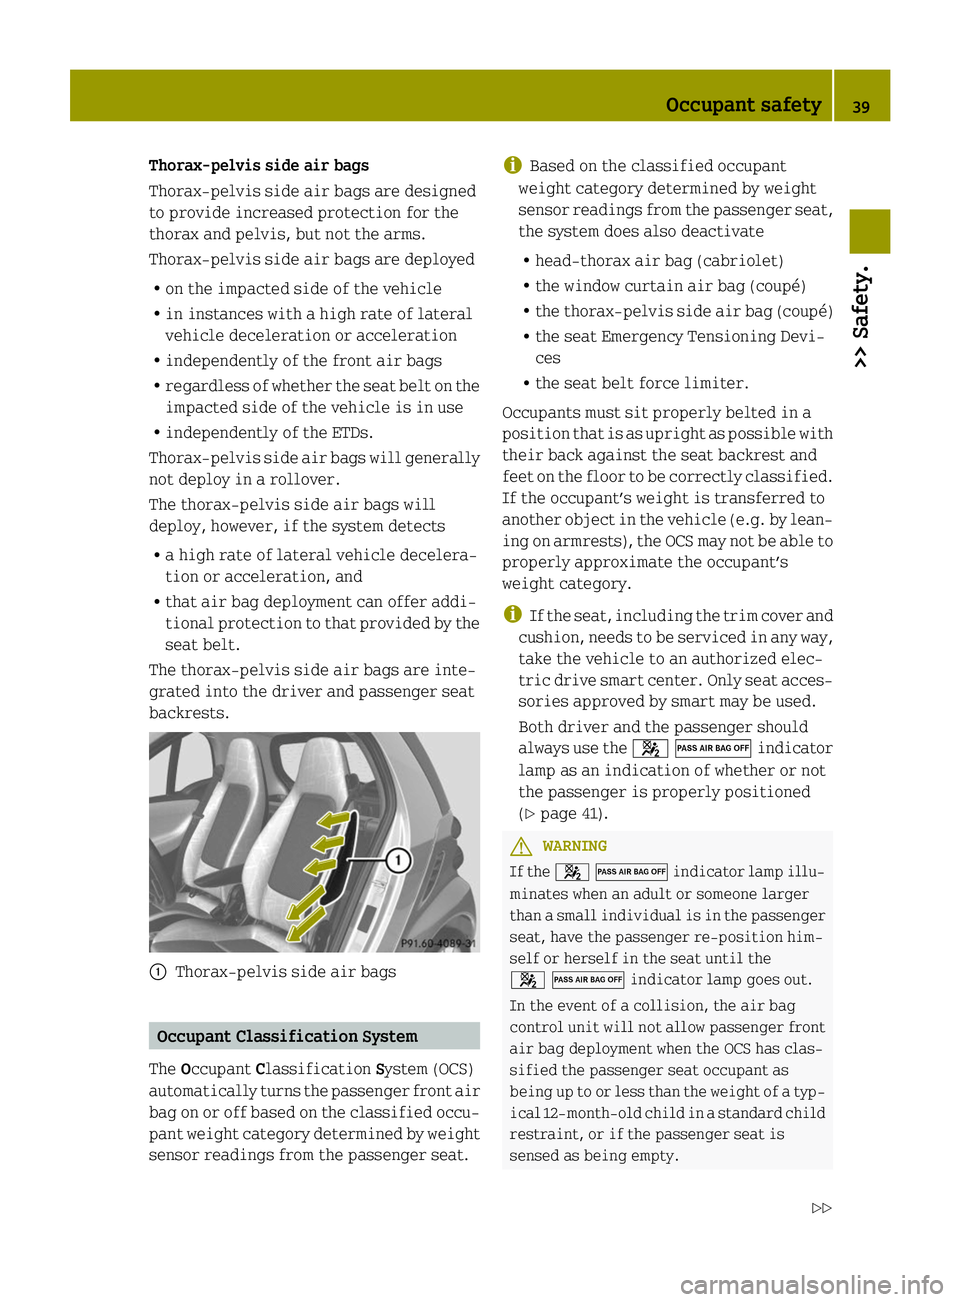
The thorax-pelvis side air bags are inte-
grated into the driver and passenger seat
backrests. 0043
Thorax-pelvis side air bags Occupant Classification System
The Occupant Classification System (OCS)
automatically turns the passenger front air
bag on or off based on the classified occu-
pant weight category determined by weight
sensor readings from the passenger seat. i
Based on the classified occupant
weight category determined by weight
sensor readings from the passenger seat,
the system does also deactivate
R head-thorax air bag (cabriolet)
R the window curtain air bag (coupé)
R the thorax-pelvis side air bag (coupé)
R the seat Emergency Tensioning Devi-
ces
R the seat belt force limiter.
Occupants must sit properly belted in a
position that is as upright as possible with
their back against the seat backrest and
feet on the floor to be correctly classified.
If the occupant’s weight is transferred to
another object in the vehicle (e.g. by lean-
ing on armrests), the OCS may not be able to
properly approximate the occupant’s
weight category.
i If the seat, including the trim cover and
cushion, needs to be serviced in any way,
take the vehicle to an authorized elec-
tric drive smart center. Only seat acces-
sories approved by smart may be used.
Both driver and the passenger should
always use the 0073006Findicator
lamp as an indication of whether or not
the passenger is properly positioned
(Y page 41). G
WARNING
If the 0073006Findicator lamp illu-
minates when an adult or someone larger
than a small individual is in the passenger
seat, have the passenger re-position him-
self or herself in the seat until the
0073006Findicator lamp goes out.
In the event of a collision, the air bag
control unit will not allow passenger front
air bag deployment when the OCS has clas-
sified the passenger seat occupant as
being up to or less than the weight of a typ-
ical 12‑month‑old child in a standard child
restraint, or if the passenger seat is
sensed as being empty. Occupant safety
39>> Safety.
Z
Page 69 of 222
When returning to the vehicle
X
Press button 0034on the key either once or
twice.
The vehicle is either selectively or
globally unlocked.
The interior lamps come on and then go
out again after 12 seconds. Ambient lighting*
The ambient lighting illuminates the
vehicle interior with 6 LEDs when the low-
beam headlamps are switched on. The LEDs
can be dimmed.
The LEDS are located
R in the overhead control panel
R in the door pockets, driver’s and
passenger side
R in the storage trays to the left and right
of the steering wheel
In addition to the ambient lighting, the
footwells on the driver’s and passenger
side are also illuminated by separate
lamps.
i When you open a door, the interior
lighting comes on and the brightness of
lamps in the footwells increases. X
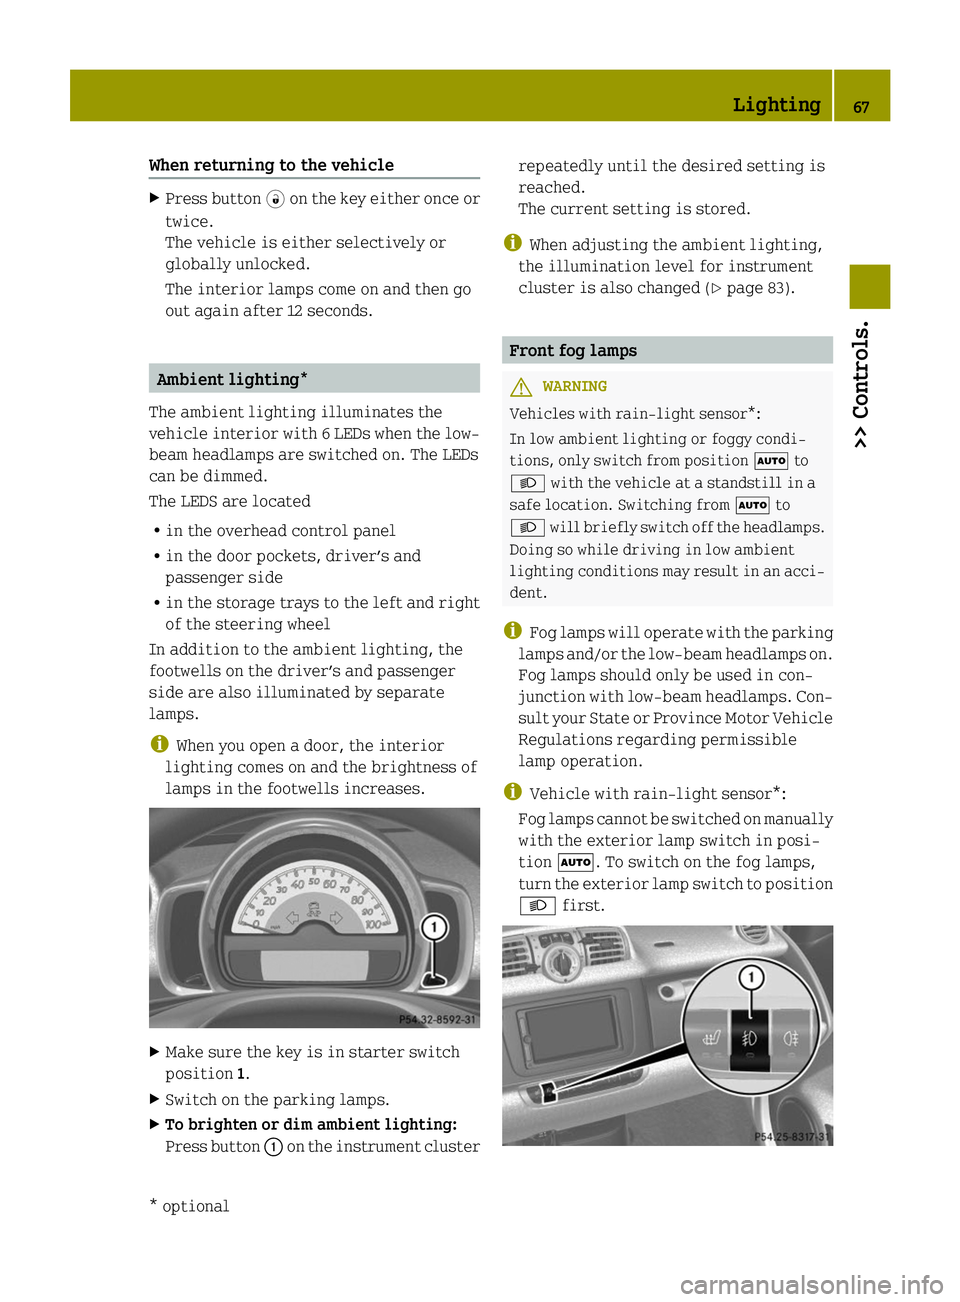
Make sure the key is in starter switch
position 1.
X Switch on the parking lamps.
X To brighten or dim ambient lighting:
Press button 0043on the instrument cluster repeatedly until the desired setting is
reached.
The current setting is stored.
i When adjusting the ambient lighting,
the illumination level for instrument
cluster is also changed (Y page 83). Front fog lamps
G
WARNING
Vehicles with rain-light sensor*:
In low ambient lighting or foggy condi-
tions, only switch from position 0058to
0058 with the vehicle at a standstill in a
safe location. Switching from 0058to
0058 will briefly switch off the headlamps.
Doing so while driving in low ambient
lighting conditions may result in an acci-
dent.
i Fog lamps will operate with the parking
lamps and/or the low‑beam headlamps on.
Fog lamps should only be used in con-
junction with low‑beam headlamps. Con-
sult your State or Province Motor Vehicle
Regulations regarding permissible
lamp operation.
i Vehicle with rain-light sensor*:
Fog lamps cannot be switched on manually
with the exterior lamp switch in posi-
tion 0058. To switch on the fog lamps,
turn the exterior lamp switch to position
0058 first. Lighting
67>> Controls.
* optional Z
Page 76 of 222
X
Carry out the following steps when con-
ditions are safe to do so.
X First lift the side rail at the rear end in
direction of arrows 0085.
X Then remove it in direction of
arrows 0083. Storing the side rails
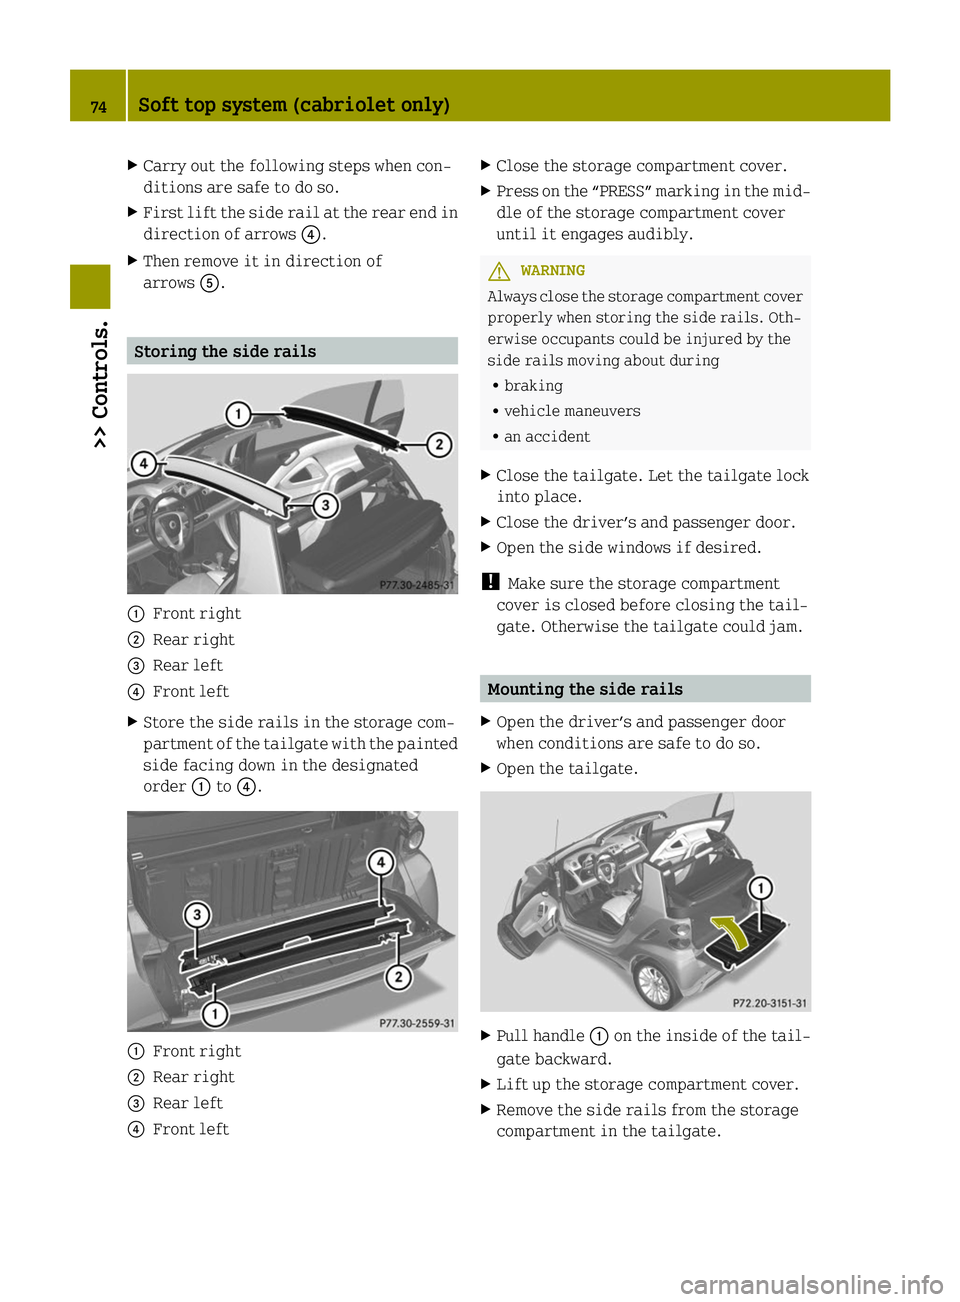
0043
Front right
0044 Rear right
0087 Rear left
0085 Front left
X Store the side rails in the storage com-
partment of the tailgate with the painted
side facing down in the designated
order 0043to0085. 0043
Front right
0044 Rear right
0087 Rear left
0085 Front left X
Close the storage compartment cover.
X Press on the “PRESS” marking in the mid-
dle of the storage compartment cover
until it engages audibly. G
WARNING
Always close the storage compartment cover
properly when storing the side rails. Oth-
erwise occupants could be injured by the
side rails moving about during
R braking
R vehicle maneuvers
R an accident
X Close the tailgate. Let the tailgate lock
into place.
X Close the driver’s and passenger door.
X Open the side windows if desired.
! Make sure the storage compartment
cover is closed before closing the tail-
gate. Otherwise the tailgate could jam. Mounting the side rails
X Open the driver’s and passenger door
when conditions are safe to do so.
X Open the tailgate. X
Pull handle 0043on the inside of the tail-
gate backward.
X Lift up the storage compartment cover.
X Remove the side rails from the storage
compartment in the tailgate. 74
Soft top system (cabriolet only)>> Controls.
Page 77 of 222
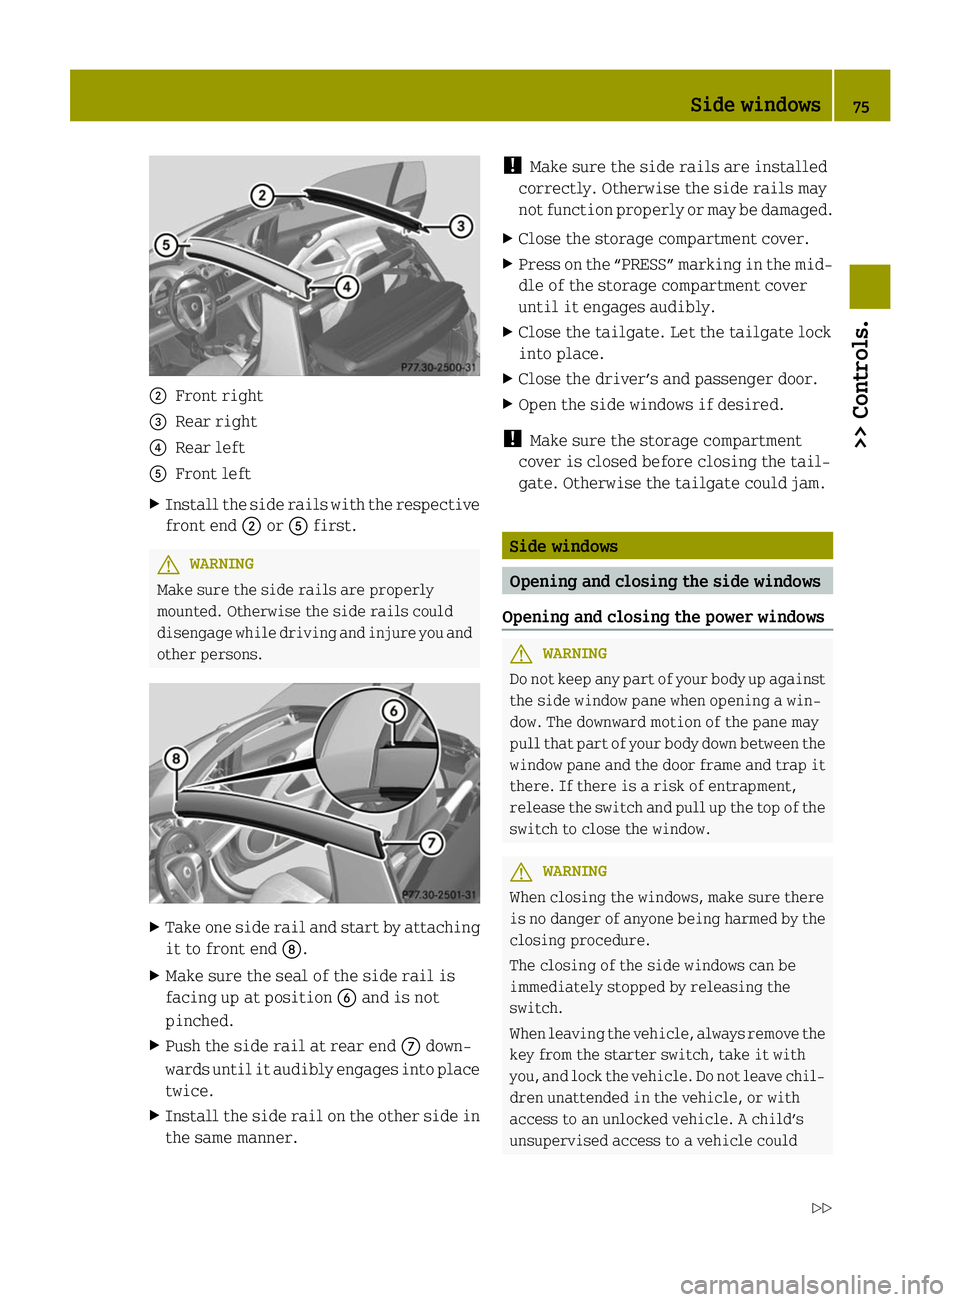
0044
Front right
0087 Rear right
0085 Rear left
0083 Front left
X Install the side rails with the respective
front end 0044or0083 first. G
WARNING
Make sure the side rails are properly
mounted. Otherwise the side rails could
disengage while driving and injure you and
other persons. X
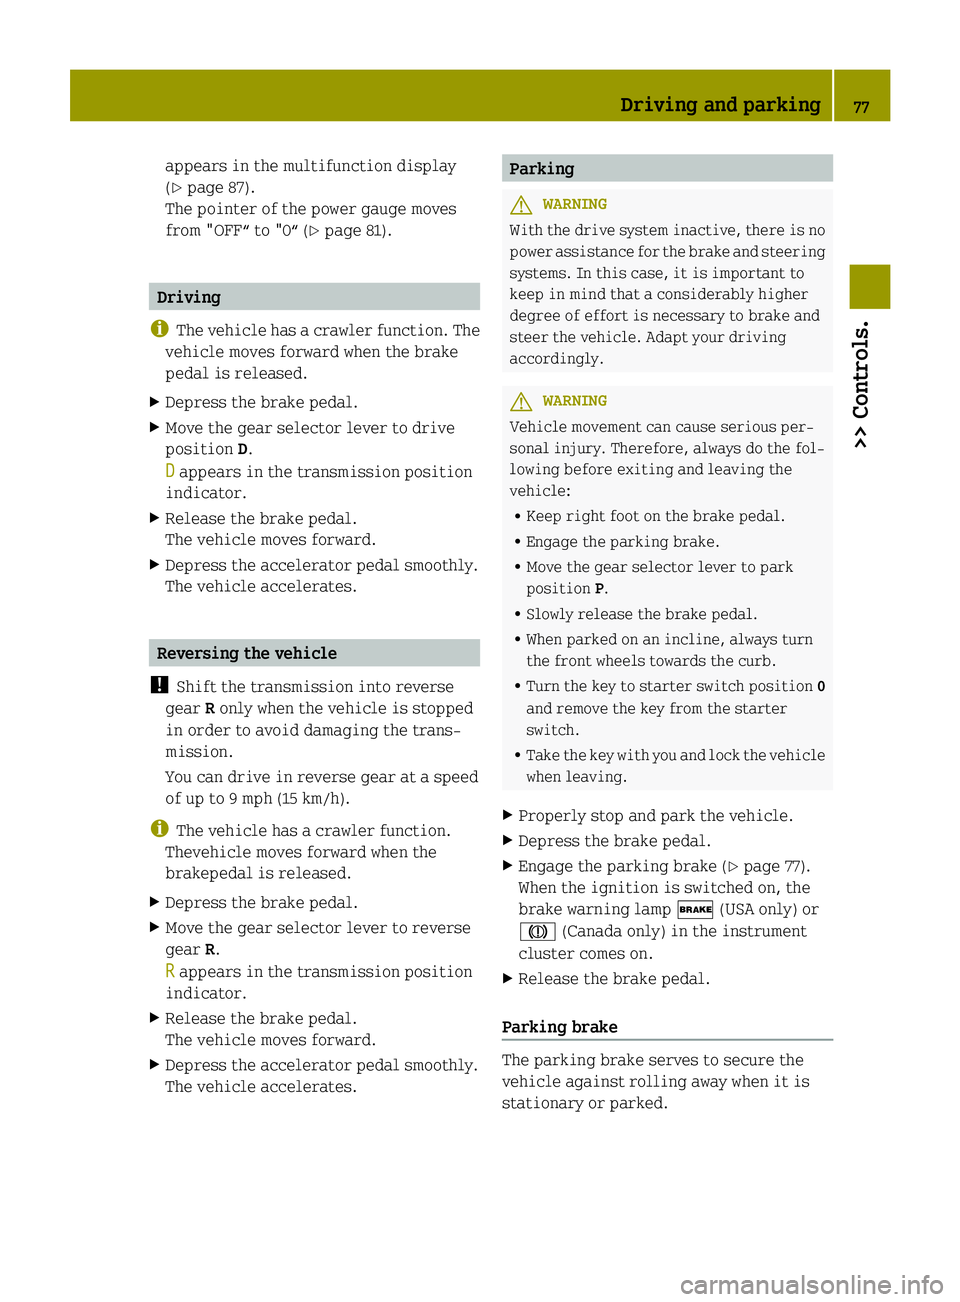
Take one side rail and start by attaching
it to front end 006C.
X Make sure the seal of the side rail is
facing up at position 0084and is not
pinched.
X Push the side rail at rear end 006Bdown-
wards until it audibly engages into place
twice.
X Install the side rail on the other side in
the same manner. !
Make sure the side rails are installed
correctly. Otherwise the side rails may
not function properly or may be damaged.
X Close the storage compartment cover.
X Press on the “PRESS” marking in the mid-
dle of the storage compartment cover
until it engages audibly.
X Close the tailgate. Let the tailgate lock
into place.
X Close the driver’s and passenger door.
X Open the side windows if desired.
! Make sure the storage compartment
cover is closed before closing the tail-
gate. Otherwise the tailgate could jam. Side windows
Opening and closing the side windows
Opening and closing the power windows G
WARNING
Do not keep any part of your body up against
the side window pane when opening a win-
dow. The downward motion of the pane may
pull that part of your body down between the
window pane and the door frame and trap it
there. If there is a risk of entrapment,
release the switch and pull up the top of the
switch to close the window. G
WARNING
When closing the windows, make sure there
is no danger of anyone being harmed by the
closing procedure.
The closing of the side windows can be
immediately stopped by releasing the
switch.
When leaving the vehicle, always remove the
key from the starter switch, take it with
you, and lock the vehicle. Do not leave chil-
dren unattended in the vehicle, or with
access to an unlocked vehicle. A child’s
unsupervised access to a vehicle could Side windows
75>> Controls.
Z
Page 79 of 222
appears in the multifunction display
(Y
page 87).
The pointer of the power gauge moves
from "OFF“ to "0“ (Y page 81).Driving
i The vehicle has a crawler function. The
vehicle moves forward when the brake
pedal is released.
X Depress the brake pedal.
X Move the gear selector lever to drive
position D.
D D appears in the transmission position
indicator.
X Release the brake pedal.
The vehicle moves forward.
X Depress the accelerator pedal smoothly.
The vehicle accelerates. Reversing the vehicle
! Shift the transmission into reverse
gear Ronly when the vehicle is stopped
in order to avoid damaging the trans-
mission.
You can drive in reverse gear at a speed
of up to 9 mph (15 km/h).
i The vehicle has a crawler function.
Thevehicle moves forward when the
brakepedal is released.
X Depress the brake pedal.
X Move the gear selector lever to reverse
gear R.
R R appears in the transmission position
indicator.
X Release the brake pedal.
The vehicle moves forward.
X Depress the accelerator pedal smoothly.
The vehicle accelerates. Parking
G
WARNING
With the drive system inactive, there is no
power assistance for the brake and steering
systems. In this case, it is important to
keep in mind that a considerably higher
degree of effort is necessary to brake and
steer the vehicle. Adapt your driving
accordingly. G
WARNING
Vehicle movement can cause serious per-
sonal injury. Therefore, always do the fol-
lowing before exiting and leaving the
vehicle:
R Keep right foot on the brake pedal.
R Engage the parking brake.
R Move the gear selector lever to park
position P.
R Slowly release the brake pedal.
R When parked on an incline, always turn
the front wheels towards the curb.
R Turn the key to starter switch position 0
and remove the key from the starter
switch.
R Take the key with you and lock the vehicle
when leaving.
X Properly stop and park the vehicle.
X Depress the brake pedal.
X Engage the parking brake (Y page 77).
When the ignition is switched on, the
brake warning lamp 0027(USA only) or
004D (Canada only) in the instrument
cluster comes on.
X Release the brake pedal.
Parking brake The parking brake serves to secure the
vehicle against rolling away when it is
stationary or parked. Driving and parking
77>> Controls. Z
Page 80 of 222
G
WARNING
Engaging the parking brake while the vehi-
cle is in motion can cause the rear wheels
to lock up. You could lose control of the
vehicle and cause an accident. In addition,
the vehicle’s brake lights do not light up
when the parking brake is engaged. X
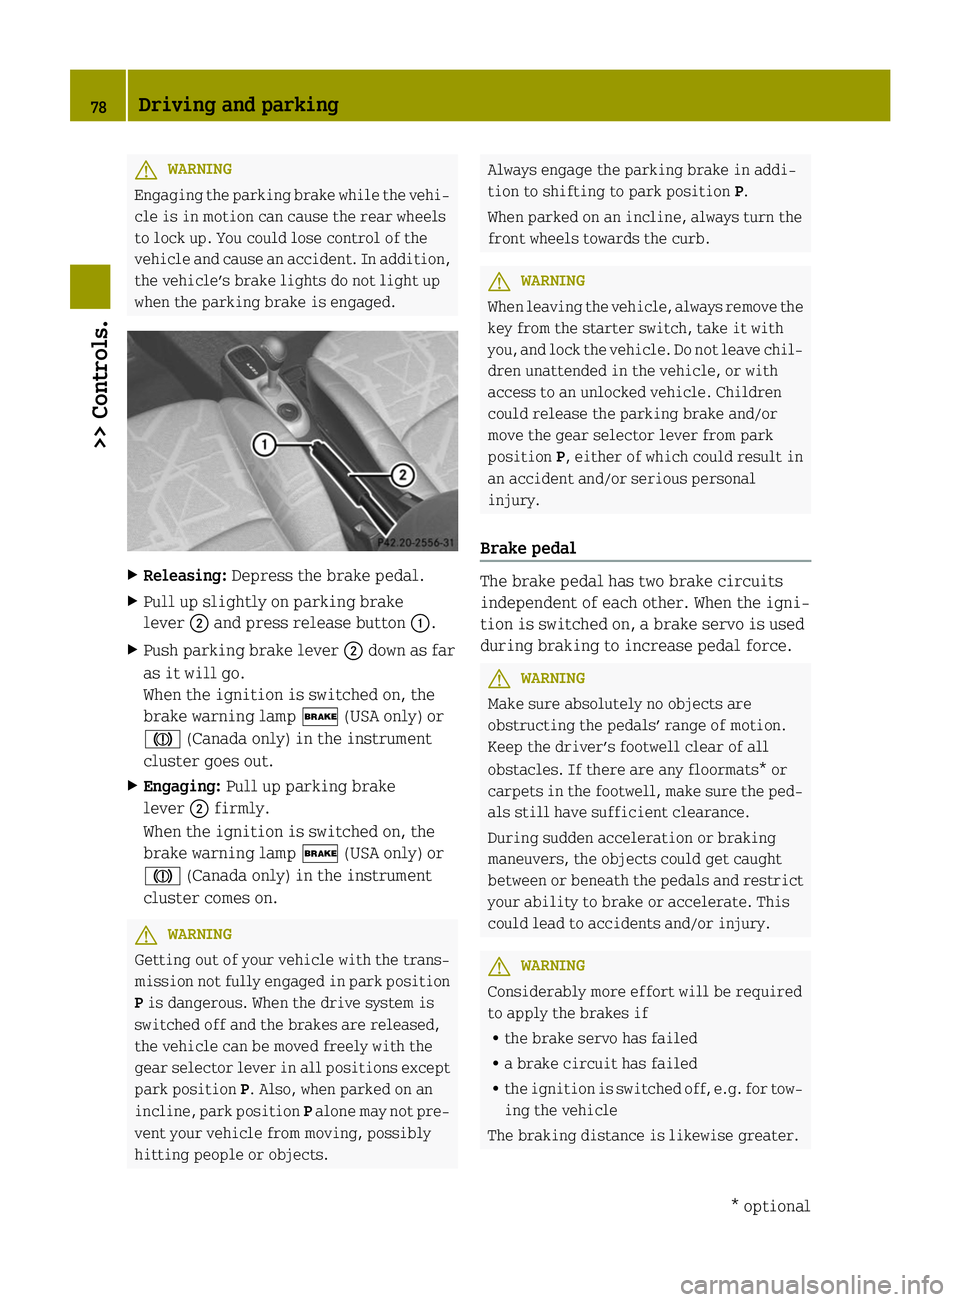
Releasing: Depress the brake pedal.
X Pull up slightly on parking brake
lever 0044and press release button 0043.
X Push parking brake lever 0044down as far
as it will go.
When the ignition is switched on, the
brake warning lamp 0027(USA only) or
004D (Canada only) in the instrument
cluster goes out.
X Engaging: Pull up parking brake
lever 0044firmly.
When the ignition is switched on, the
brake warning lamp 0027(USA only) or
004D (Canada only) in the instrument
cluster comes on. G
WARNING
Getting out of your vehicle with the trans-
mission not fully engaged in park position
P is dangerous. When the drive system is
switched off and the brakes are released,
the vehicle can be moved freely with the
gear selector lever in all positions except
park position P. Also, when parked on an
incline, park position Palone may not pre-
vent your vehicle from moving, possibly
hitting people or objects. Always engage the parking brake in addi-
tion to shifting to park position
P.
When parked on an incline, always turn the
front wheels towards the curb. G
WARNING
When leaving the vehicle, always remove the
key from the starter switch, take it with
you, and lock the vehicle. Do not leave chil-
dren unattended in the vehicle, or with
access to an unlocked vehicle. Children
could release the parking brake and/or
move the gear selector lever from park
position P, either of which could result in
an accident and/or serious personal
injury.
Brake pedal The brake pedal has two brake circuits
independent of each other. When the igni-
tion is switched on, a brake servo is used
during braking to increase pedal force.
G
WARNING
Make sure absolutely no objects are
obstructing the pedals’ range of motion.
Keep the driver’s footwell clear of all
obstacles. If there are any floormats* or
carpets in the footwell, make sure the ped-
als still have sufficient clearance.
During sudden acceleration or braking
maneuvers, the objects could get caught
between or beneath the pedals and restrict
your ability to brake or accelerate. This
could lead to accidents and/or injury. G
WARNING
Considerably more effort will be required
to apply the brakes if
R the brake servo has failed
R a brake circuit has failed
R the ignition is switched off, e.g. for tow-
ing the vehicle
The braking distance is likewise greater. 78
Driving and parking>> Controls.
* optional
Page 107 of 222
X
Open the tailgate.
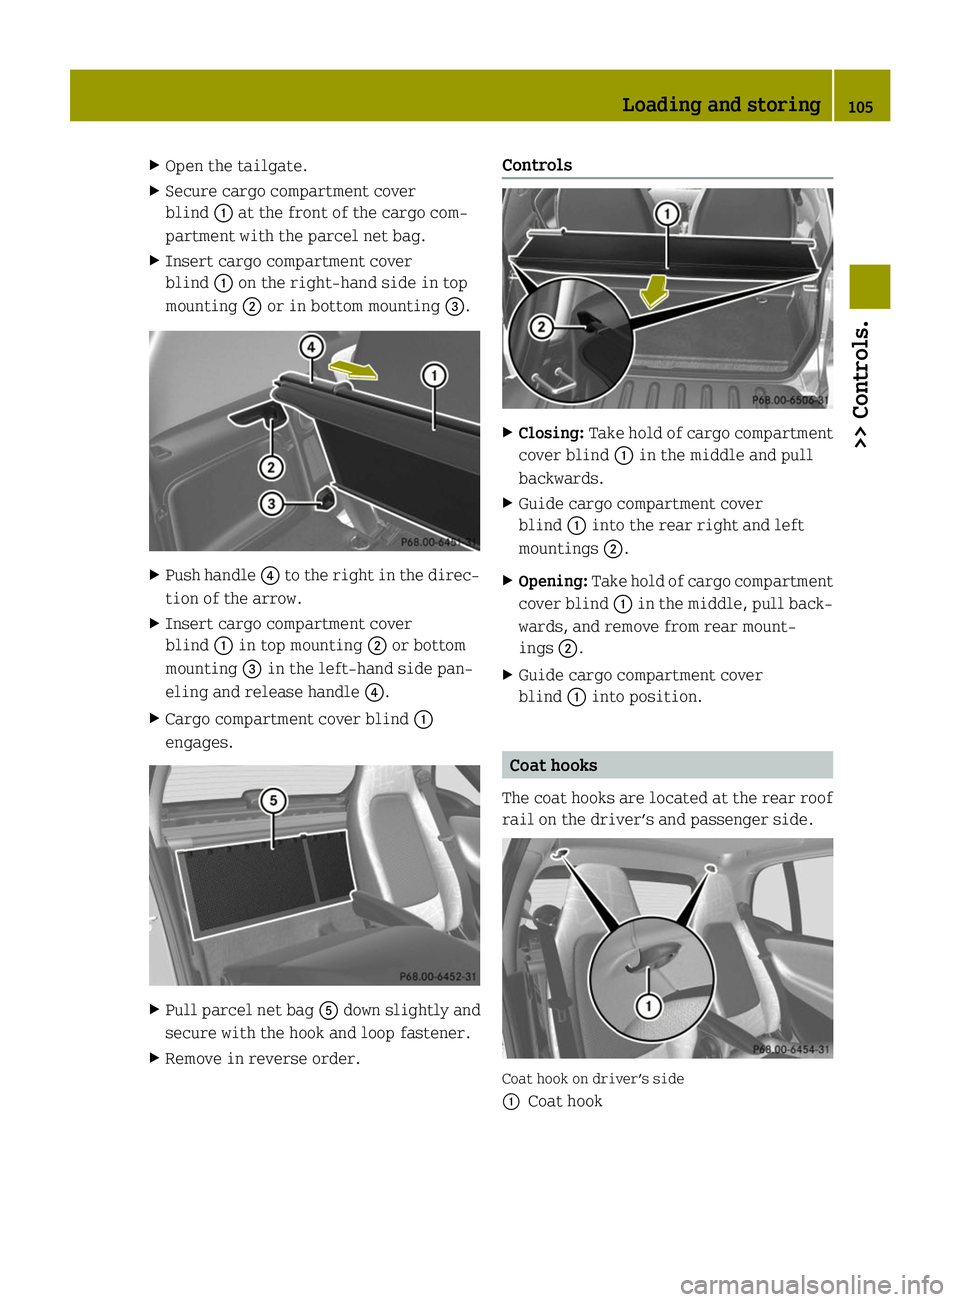
X Secure cargo compartment cover
blind 0043at the front of the cargo com-
partment with the parcel net bag.
X Insert cargo compartment cover
blind 0043on the right-hand side in top
mounting 0044or in bottom mounting 0087.X
Push handle 0085to the right in the direc-
tion of the arrow.
X Insert cargo compartment cover
blind 0043in top mounting 0044or bottom
mounting 0087in the left-hand side pan-
eling and release handle 0085.
X Cargo compartment cover blind 0043
engages. X
Pull parcel net bag 0083down slightly and
secure with the hook and loop fastener.
X Remove in reverse order. Controls
X
Closing: Take hold of cargo compartment
cover blind 0043in the middle and pull
backwards.
X Guide cargo compartment cover
blind 0043into the rear right and left
mountings 0044.
X Opening: Take hold of cargo compartment
cover blind 0043in the middle, pull back-
wards, and remove from rear mount-
ings 0044.
X Guide cargo compartment cover
blind 0043into position. Coat hooks
The coat hooks are located at the rear roof
rail on the driver’s and passenger side. Coat hook on driver’s side
0043
Coat hook Loading and storing
105>> Controls. Z
Page 108 of 222
Storage compartments
G
WARNING
To help avoid personal injury during a col-
lision or sudden maneuver, exercise care
when storing objects in the vehicle. Put
luggage or cargo in the cargo compartment
if possible. Do not pile luggage or cargo
higher than the seat backrests.
Keep compartment lids closed. This will
help to prevent stored objects from being
thrown about and injuring vehicle occu-
pants during
R hard braking
R a change of direction
R an accident
Do not store objects under the driver’s seat.
Objects stored under the driver’s seat can
slide forward into driver’s foot well during
braking and get caught between or beneath
the pedals. This could restrict your ability
to brake or accelerate and could lead to
accidents and injury.
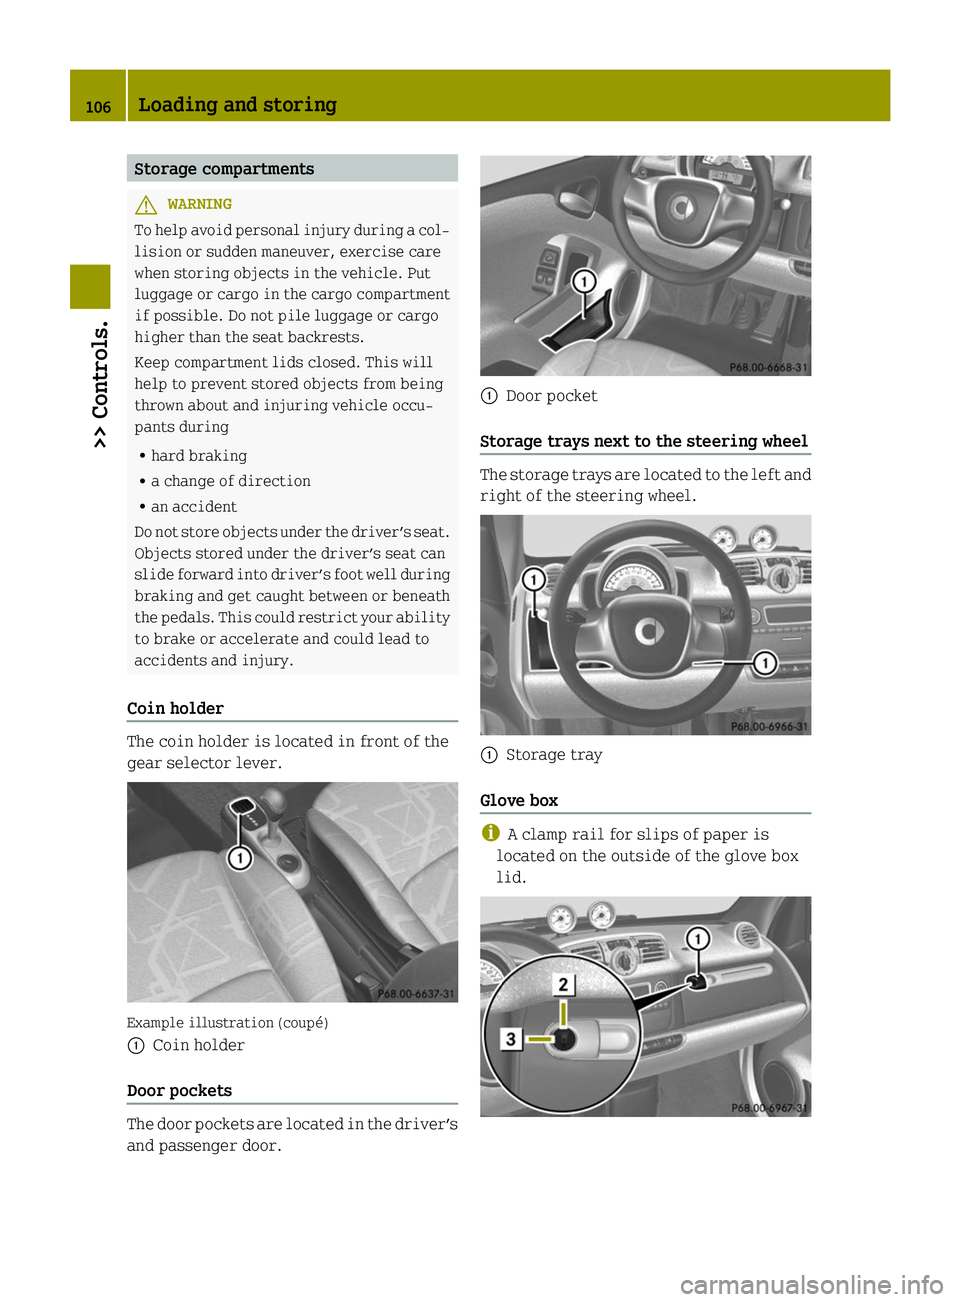
Coin holder The coin holder is located in front of the
gear selector lever. Example illustration (coupé)
0043 Coin holder
Door pockets The door pockets are located in the driver’s
and passenger door. 0043
Door pocket
Storage trays next to the steering wheel The storage trays are located to the left and
right of the steering wheel. 0043
Storage tray
Glove box i
A clamp rail for slips of paper is
located on the outside of the glove box
lid. 106
Loading and storing>> Controls.
Page 110 of 222
this reason, please make sure that the
charging cable is only stowed in the
intended location. X
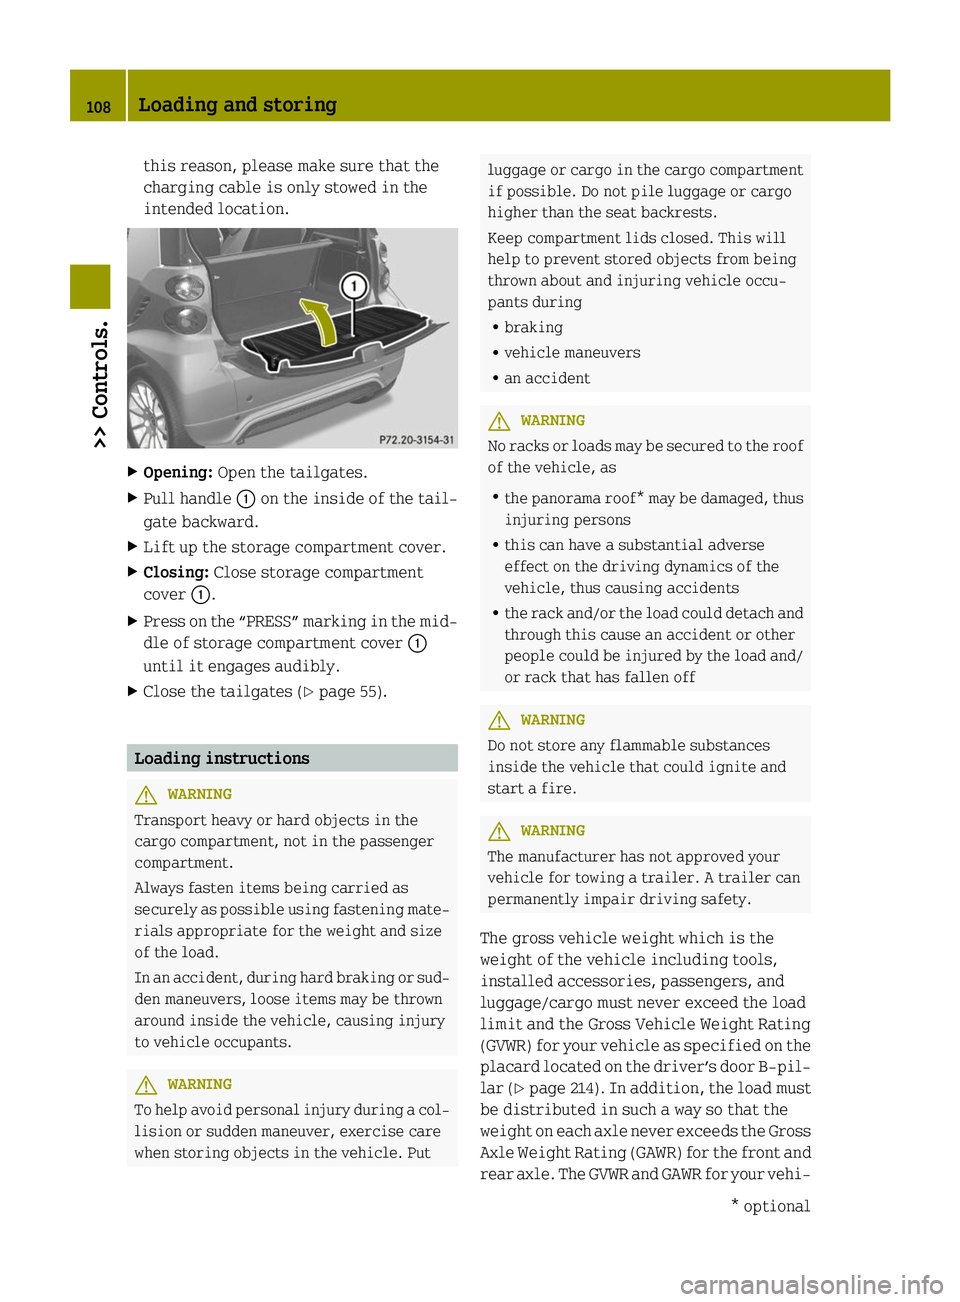
Opening: Open the tailgates.
X Pull handle 0043on the inside of the tail-
gate backward.
X Lift up the storage compartment cover.
X Closing: Close storage compartment
cover 0043.
X Press on the “PRESS” marking in the mid-
dle of storage compartment cover 0043
until it engages audibly.
X Close the tailgates (Y page 55).Loading instructions
G
WARNING
Transport heavy or hard objects in the
cargo compartment, not in the passenger
compartment.
Always fasten items being carried as
securely as possible using fastening mate-
rials appropriate for the weight and size
of the load.
In an accident, during hard braking or sud-
den maneuvers, loose items may be thrown
around inside the vehicle, causing injury
to vehicle occupants. G
WARNING
To help avoid personal injury during a col-
lision or sudden maneuver, exercise care
when storing objects in the vehicle. Put luggage or cargo in the cargo compartment
if possible. Do not pile luggage or cargo
higher than the seat backrests.
Keep compartment lids closed. This will
help to prevent stored objects from being
thrown about and injuring vehicle occu-
pants during
R braking
R vehicle maneuvers
R an accident G
WARNING
No racks or loads may be secured to the roof
of the vehicle, as
R the panorama roof* may be damaged, thus
injuring persons
R this can have a substantial adverse
effect on the driving dynamics of the
vehicle, thus causing accidents
R the rack and/or the load could detach and
through this cause an accident or other
people could be injured by the load and/
or rack that has fallen off G
WARNING
Do not store any flammable substances
inside the vehicle that could ignite and
start a fire. G
WARNING
The manufacturer has not approved your
vehicle for towing a trailer. A trailer can
permanently impair driving safety.
The gross vehicle weight which is the
weight of the vehicle including tools,
installed accessories, passengers, and
luggage/cargo must never exceed the load
limit and the Gross Vehicle Weight Rating
(GVWR) for your vehicle as specified on the
placard located on the driver’s door B‑pil-
lar (Y page 214). In addition, the load must
be distributed in such a way so that the
weight on each axle never exceeds the Gross
Axle Weight Rating (GAWR) for the front and
rear axle. The GVWR and GAWR for your vehi- 108
Loading and storing>> Controls.
* optional