automatic SSANGYONG KORANDO 2012 Owners Manual
[x] Cancel search | Manufacturer: SSANGYONG, Model Year: 2012, Model line: KORANDO, Model: SSANGYONG KORANDO 2012Pages: 1082, PDF Size: 96.1 MB
Page 1000 of 1082

15-6
1) Sectional Diagram and Bolts for Front Sub Frame
Mounting nut
29.4 to 39.2 Nm
Bolt9.4 to 39.2 Nm
Installation Sectional diagram
1. Front
2. Rear
Mounting bracket Mounting bolt
3. Transaxle mounting (Front)
For manual transaxle For automatic transaxle
(diesel)
4. Transaxle mounting (Rear)
Page 1002 of 1082

15-8
The front sub frame consists of 4 body bush mountings(A) and 2 engine bush mountings(B) which
reduce the vibration from the powertrain and road, and also control the torque. And the two engine bush
mountings consist of an engine mounting which supports the engine powertrain and a transmission
mounting.
The engine side and transmission side mountings are rubber mountings with brackets and insulators
while the body mounting is a rubber bush mounting which is fitted to the frame.
Installation of front sub
frame (4WD)The installation of the front sub frame is the same for both automatic
transmission and manual transmission. For 4WD, the PTU and the
propeller shaft are installed.
Installation of front sub
frame (2WD)The installation of the front sub frame is the same for both automatic
transmission and manual transmission.
PTU assembly
Page 1003 of 1082

15-94015-01
Installation of rear sub
frame (4WD)The installation of the rear sub frame is the same for both automatic
transmission and manual transmission. For 4WD, the E-coupling, propeller
shaft and rear axle are installed.
Installation of rear sub
frame (2WD) The installation of the rear sub frame is the same for both automatic
transmission and manual transmission.
The rear sub frame system consists of body bush mountings and direct mountings which reduce the
vibration transmitted from the powertrain and road to the vehicle body.
For 4WD, it consists of 4 body mountings (bush mountings) and 2 axle mountings (bush mountings) and
for 2WD, it consists of 4 body mountings (direct mountings).
Page 1009 of 1082

01-8
Recirculation switch Temperature dial
Mode dialFan speed dial
A/C switch
Recirculation switch
When you press this switch,
recirculation indicator comes on
and the system is changed into the
recirculation mode.
(However, under defroster mode or
defroster/floor mode, it stays in the
fresh air mode.) -
1) Full Automatic A/C Control
2. HEATER AND A/C CONTROL
To adjust the temperature, turn this
dial as required. Turning the dial to HI
increases the temperature and LO
decreases the temperature. - Temperature dial
Temperature dial ▶
Page 1010 of 1082

01-96810-00
Incar sensor
This sensor detects the inside temperature and
installed in PCB.Face-Level
(vent mode)Face/Foot-Level
(bi-level mode)Foot-Level
(foot mode)
Foot/Defrost-level
(foot/defrost mode)
Defroster switch
Use this switch to remove for or
ice from the windshield. When
choosing this mode, the airflow
direction will be changed to the
windshield and side glasses, the
air conditioner operates
automatically, and fresh air
comes in. The air flow direction can be controlled by turning the dial. -
Airflow is changed
automatically according to the
setting temperature.
Fan speed dial
Manual control
Fan speed is manually controlled b
y
this dial. The increment is 1℃.
Auto control
Fan speed is automatically
controlled by temperature setting.
The blower motor operates in a
stepless mode. -
-
A/C switch
When pressing this switch,
the air conditioner operates
in manual mode and A/C
ON indicator comes on.
Fan speed dial ▶Mode dial ▶
Page 1012 of 1082

01-116810-00
Face/Foot-Level
(bi-level mode)
Face-Level (vent mode)Foot-Level (foot mode)
Use this switch to remove fog or ice from
the windshield.
When pressing this switch, the airflow
direction will be changed to windshield
and door glasses, the A/C is operated
automatically and the air source mode is
set to fresh air mode. Defrost mode
Temperature dial ▶Mode dial ▶
Recirculation switch
When pressing this switch, the air is
recirculated in the vehicle and the
indicator on the switch comes on.
When pressing it again, the indicato
r
goes off and the fresh air comes in.
When it's rainy or humid, set this
switch to fresh air mode with the
defroster mode selected to clear the
fogged windshield.Foot/Defrost-level
(Foot & defrost mode)
Temperature dial
Rotate this dial to adjust the
temperature.
Turning this switch clockwise
(red side) increases the
temperature and
counterclockwise (blue side)
decreases the temperature.
Page 1036 of 1082

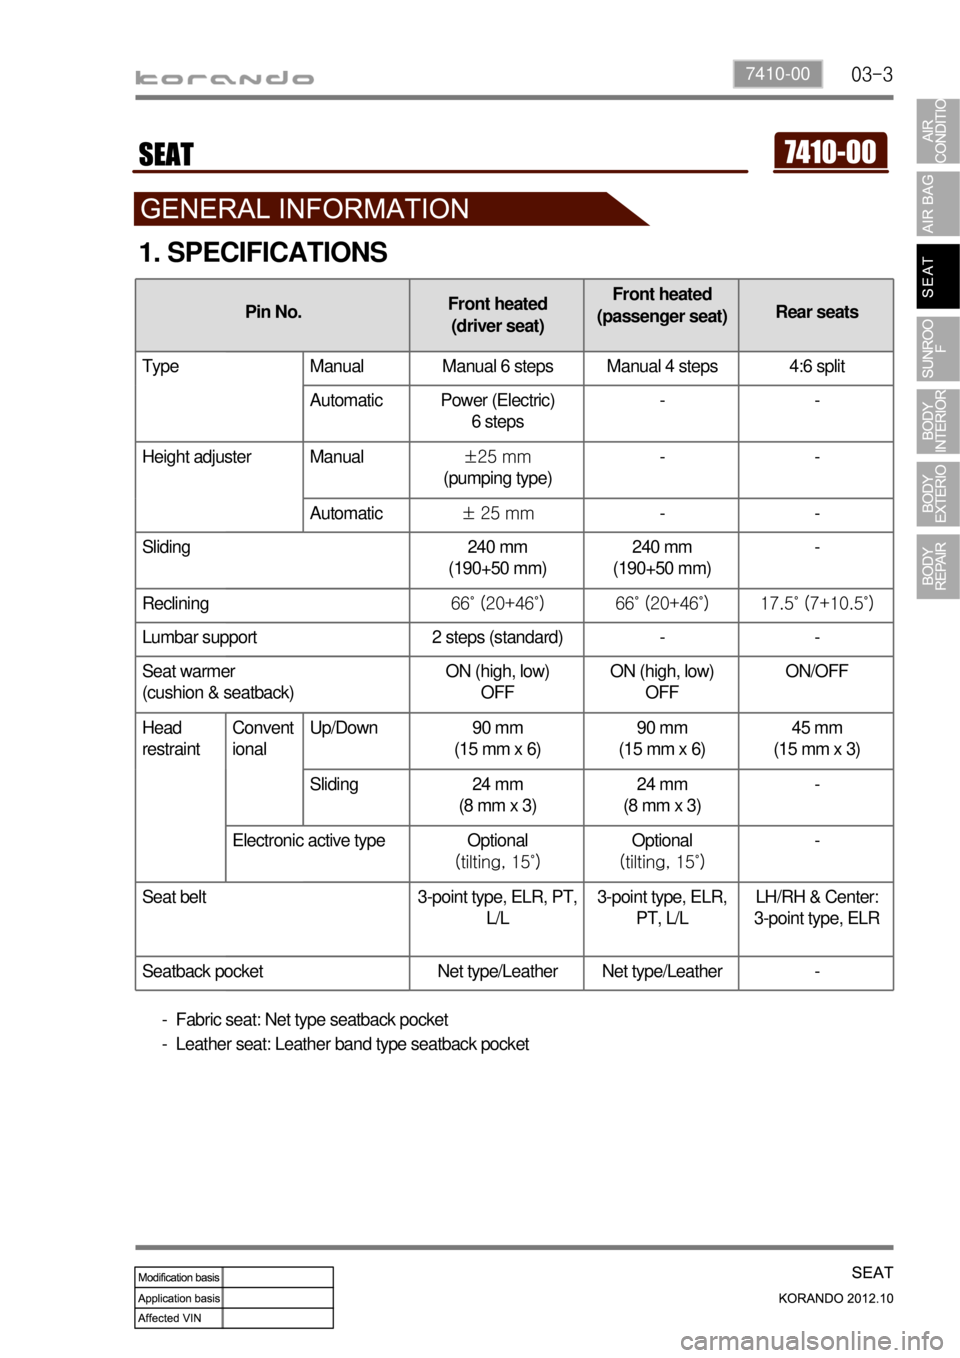
03-37410-00
Pin No.Front heated
(driver seat)Front heated
(passenger seat)Rear seats
Type Manual Manual 6 steps Manual 4 steps 4:6 split
Automatic Power (Electric)
6 steps--
Height adjuster Manual±25 mm
(pumping type)--
Automatic± 25 mm--
Sliding 240 mm
(190+50 mm)240 mm
(190+50 mm)-
Reclining66˚ (20+46˚) 66˚ (20+46˚) 17.5˚ (7+10.5˚)
Lumbar support 2 steps (standard) - -
Seat warmer
(cushion & seatback)ON (high, low)
OFFON (high, low)
OFFON/OFF
Head
restraintConvent
ional Up/Down 90 mm
(15 mm x 6)90 mm
(15 mm x 6)45 mm
(15 mm x 3)
Sliding 24 mm
(8 mm x 3)24 mm
(8 mm x 3)-
Electronic active type Optional
(tilting, 15˚)Optional
(tilting, 15˚)-
Seat belt 3-point type, ELR, PT,
L/L3-point type, ELR,
PT, L/LLH/RH & Center:
3-point type, ELR
Seatback pocket Net type/Leather Net type/Leather -
1. SPECIFICATIONS
Fabric seat: Net type seatback pocket
Leather seat: Leather band type seatback pocket -
-
Page 1043 of 1082

04-6
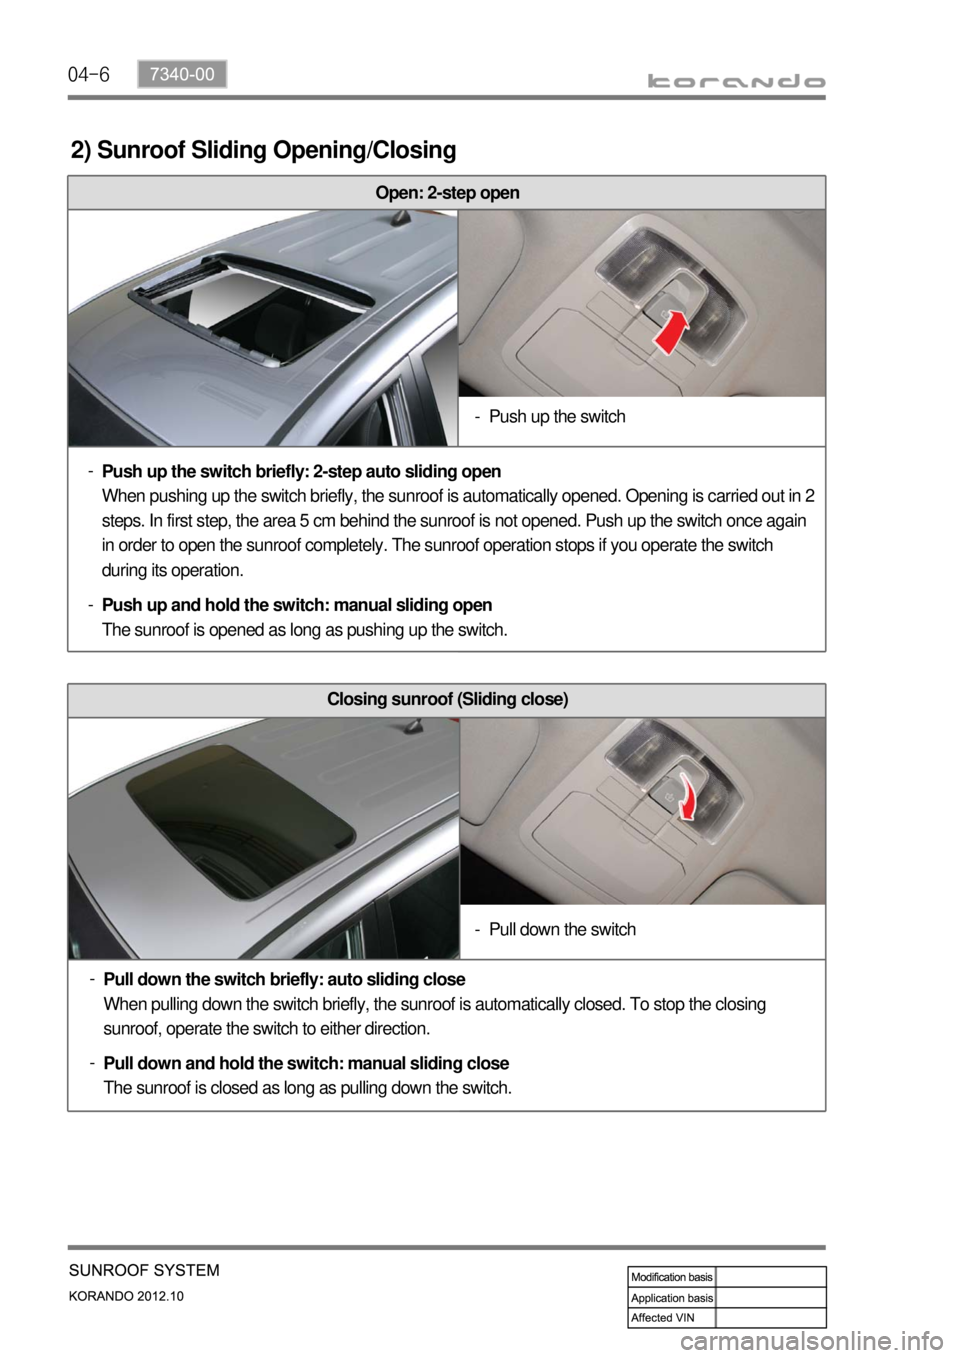
2) Sunroof Sliding Opening/Closing
Closing sunroof (Sliding close)
Pull down the switch briefly: auto sliding close
When pulling down the switch briefly, the sunroof is automatically closed. To stop the closing
sunroof, operate the switch to either direction. -
Pull down and hold the switch: manual sliding close
The sunroof is closed as long as pulling down the switch. -Pull down the switch -Push up the switch -
Open: 2-step open
Push up the switch briefly: 2-step auto sliding open
When pushing up the switch briefly, the sunroof is automatically opened. Opening is carried out in 2
steps. In first step, the area 5 cm behind the sunroof is not opened. Push up the switch once again
in order to open the sunroof completely. The sunroof operation stops if you operate the switch
during its operation. -
Push up and hold the switch: manual sliding open
The sunroof is opened as long as pushing up the switch. -
Page 1045 of 1082

04-8
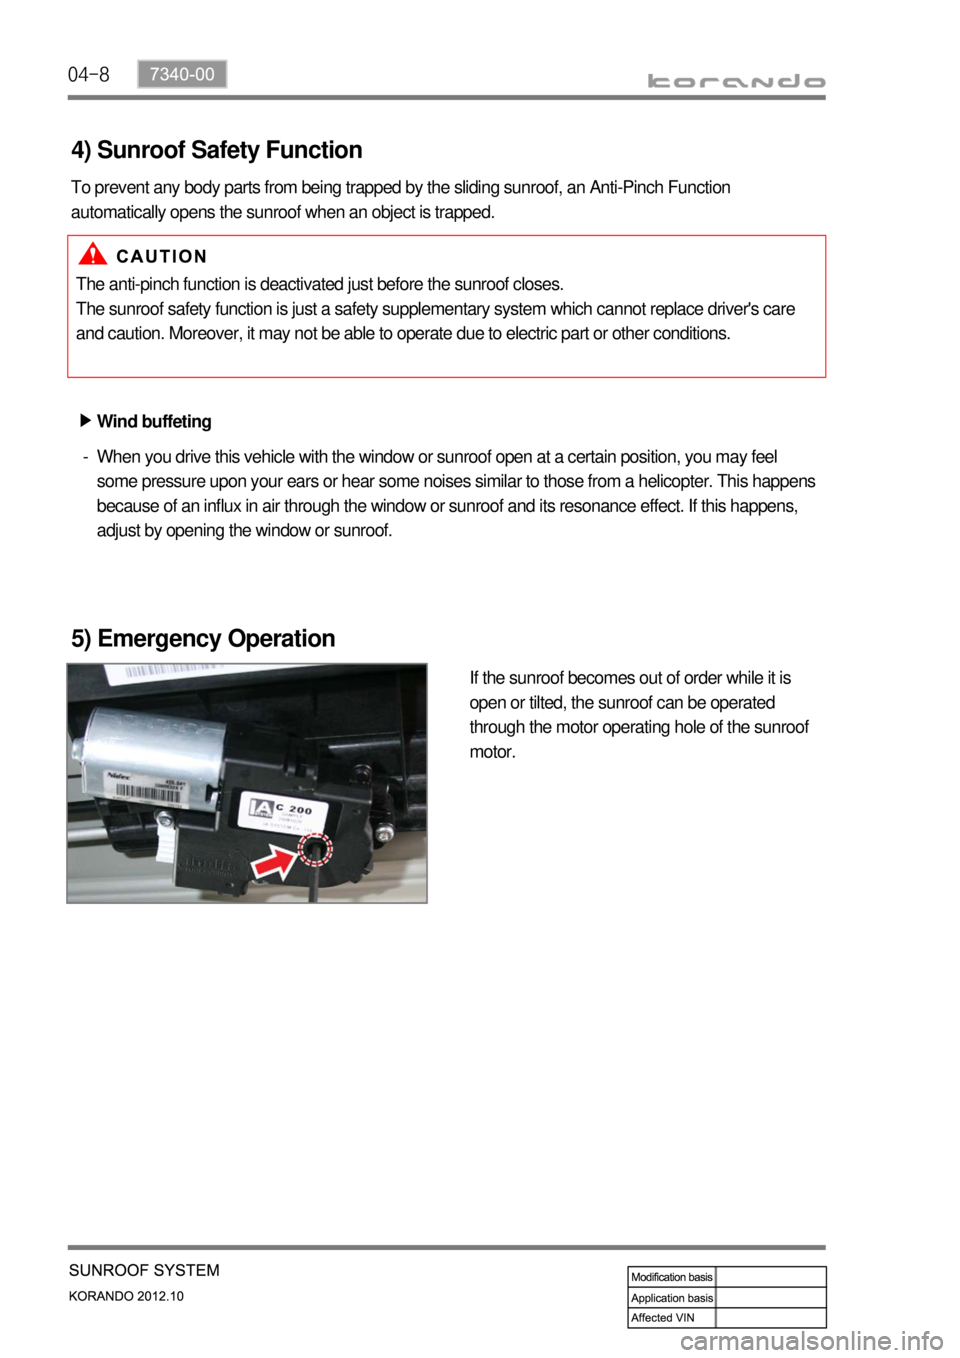
5) Emergency Operation
If the sunroof becomes out of order while it is
open or tilted, the sunroof can be operated
through the motor operating hole of the sunroof
motor.
When you drive this vehicle with the window or sunroof open at a certain position, you may feel
some pressure upon your ears or hear some noises similar to those from a helicopter. This happens
because of an influx in air through the window or sunroof and its resonance effect. If this happens,
adjust by opening the window or sunroof. - The anti-pinch function is deactivated just before the sunroof closes.
The sunroof safety function is just a safety supplementary system which cannot replace driver's care
and caution. Moreover, it may not be able to operate due to electric part or other conditions. To prevent any body parts from being trapped by the sliding sunroof, an Anti-Pinch Function
automatically opens the sunroof when an object is trapped.
4) Sunroof Safety Function
Wind buffeting ▶