engine SSANGYONG MUSSO 1998 Workshop Repair Manual
[x] Cancel search | Manufacturer: SSANGYONG, Model Year: 1998, Model line: MUSSO, Model: SSANGYONG MUSSO 1998Pages: 1463, PDF Size: 19.88 MB
Page 117 of 1463

1B1-44 M162 ENGINE MECHANICAL
Engine Lock 602 589 00 40 00
2. Remove the start motor and install the engine lock to the
flywheel ring gear.
3. Remove the center bolt.
Installation Notice
Tightening Torque1st step 200 - 220 Nm
2nd step 90° +10°
4. Remove the vibration damper assembly using the puller.
5. Installation should follow the removal procedure in the
reverse order.
Notice
If possible, don’t separate the vibration damper and the
pulley.
Page 118 of 1463

M162 ENGINE MECHANICAL 1B1-45
CRANKSHAFT FRONT RADIAL SEAL
Preceding Work : Removal of belt pulley and vibration damper
1 Center Bolt (M18 x 50)
................................ 1st step 200-220 Nm
2nd step 90° +10°
2 Center Bolt Washer
3 Sleeve (Special Tool)
4 Crankshaft Front Seal
5 Key
Tools Required
601 589 03 14 00 Sleeve
Replacement Procedure
1. Remove the radial seal with a screw driver.
Notice
Use a clean cloth not to damage the radial seal mounting
hole and the crankshaft.
5. Remove the sleeve and install the belt pulley and the
vibration damper.
6. Check for leaks while operating the engine. 2. Coat the radial sealing lip with engine oil.
3. Using the sleeve, assemble the radial seal .
4. Align the sleeve groove and the woodruff key and tighten
the center bolt until the center bolt and the damper disk
stop in the movement.
Installation Notice
Tightening Torque1st step 200 - 220Nm
2nd step 90° + 10°
Page 119 of 1463
1B1-46 M162 ENGINE MECHANICAL
CRANKSHAFT REAR RADIAL SEAL
Preceding Work : Removal of flywheel or drive plate
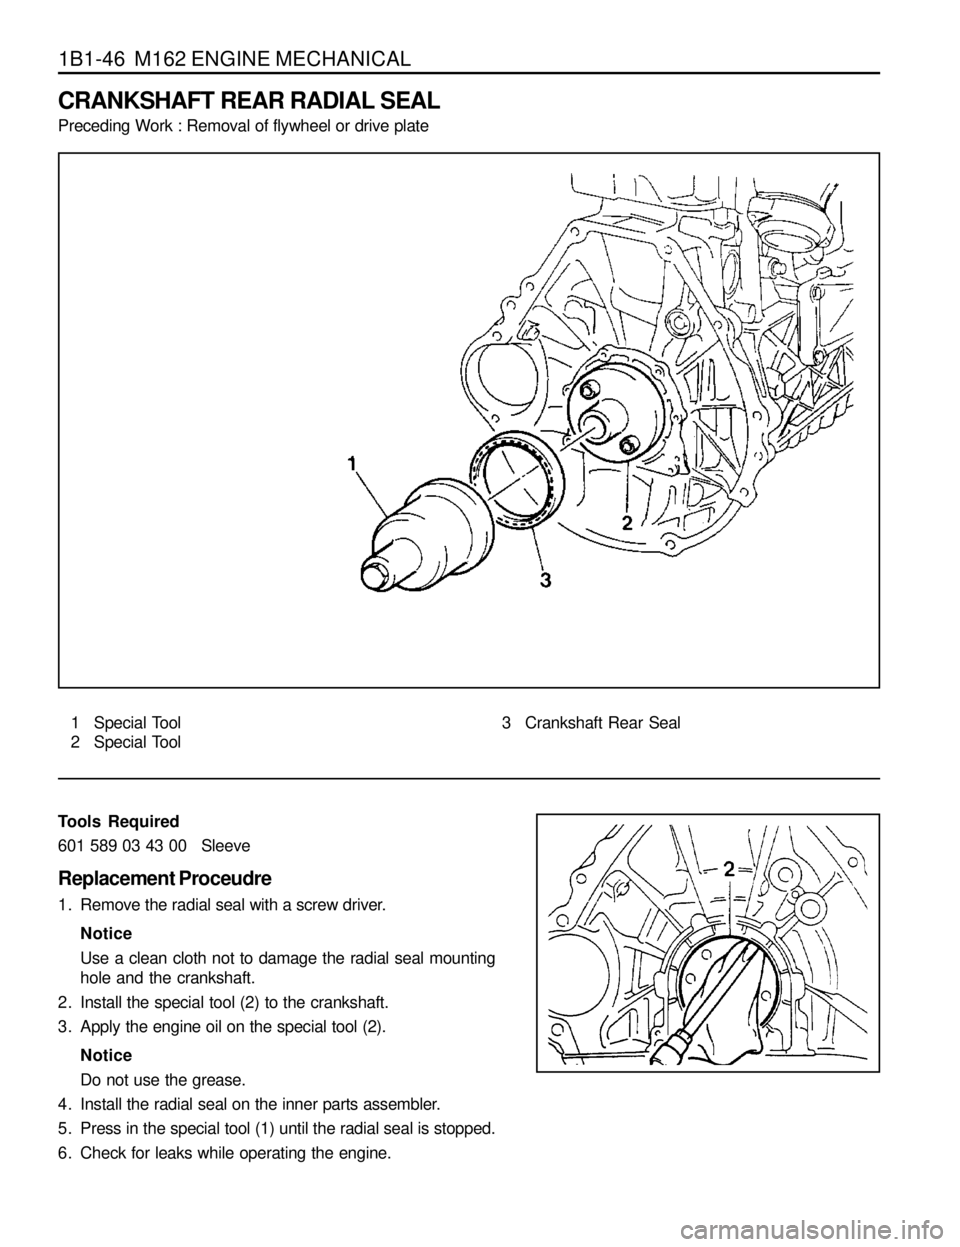
1 Special Tool
2 Special Tool3 Crankshaft Rear Seal
Tools Required
601 589 03 43 00 Sleeve
Replacement Proceudre
1. Remove the radial seal with a screw driver.
Notice
Use a clean cloth not to damage the radial seal mounting
hole and the crankshaft.
2. Install the special tool (2) to the crankshaft.
3. Apply the engine oil on the special tool (2).
Notice
Do not use the grease.
4. Install the radial seal on the inner parts assembler.
5. Press in the special tool (1) until the radial seal is stopped.
6. Check for leaks while operating the engine.
Page 120 of 1463
M162 ENGINE MECHANICAL 1B1-47
CRANKSHAFT
Preceding Work : Removal of engine assembly
Removal of timing gear case cover
Removal of cylinder head
Removal of oil pump
Removal of oil shield
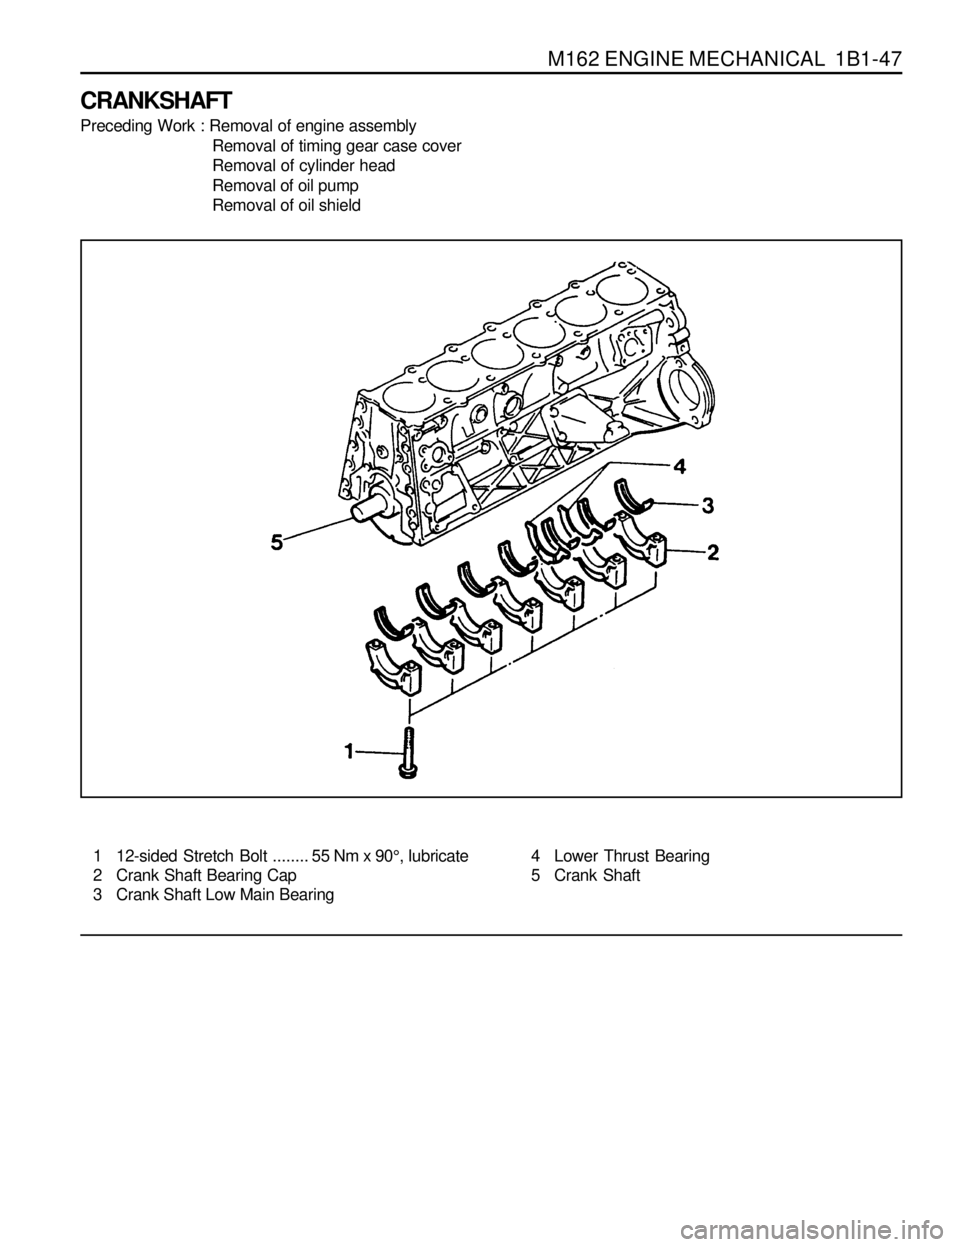
1 12-sided Stretch Bolt........ 55 Nm x 90°, Iubricate
2 Crank Shaft Bearing Cap
3 Crank Shaft Low Main Bearing
4 Lower Thrust Bearing
5 Crank Shaft
Page 121 of 1463

1B1-48 M162 ENGINE MECHANICAL
Arrangement of the Thrust Bearing and the Main Bearing
1 - 12 Weight Balance/Color Marking Point
j1 - j7 Journal Main Bearing #1 - #7
lColor Dot Marking
The color dot marking are put on the
1 , 2 , 4 , 6 , 8
,
10 ,12 and it indicates the diameter of crankshaft journal
by color as below.A Crankcase Side
B Bearing Cap Side (Oil Pan Side)
C Axial Fit Bearing (Number 5 Bearing Point)
D Radial Bearing
1 Upper Main Bearing
2 Upper Thrust Bearing
3 Crankshaft
4 Lower Main Bearing
5 Lower Thrust Bearing
Page 122 of 1463
M162 ENGINE MECHANICAL 1B1-49
Selection of Crankshaft Main Bearing
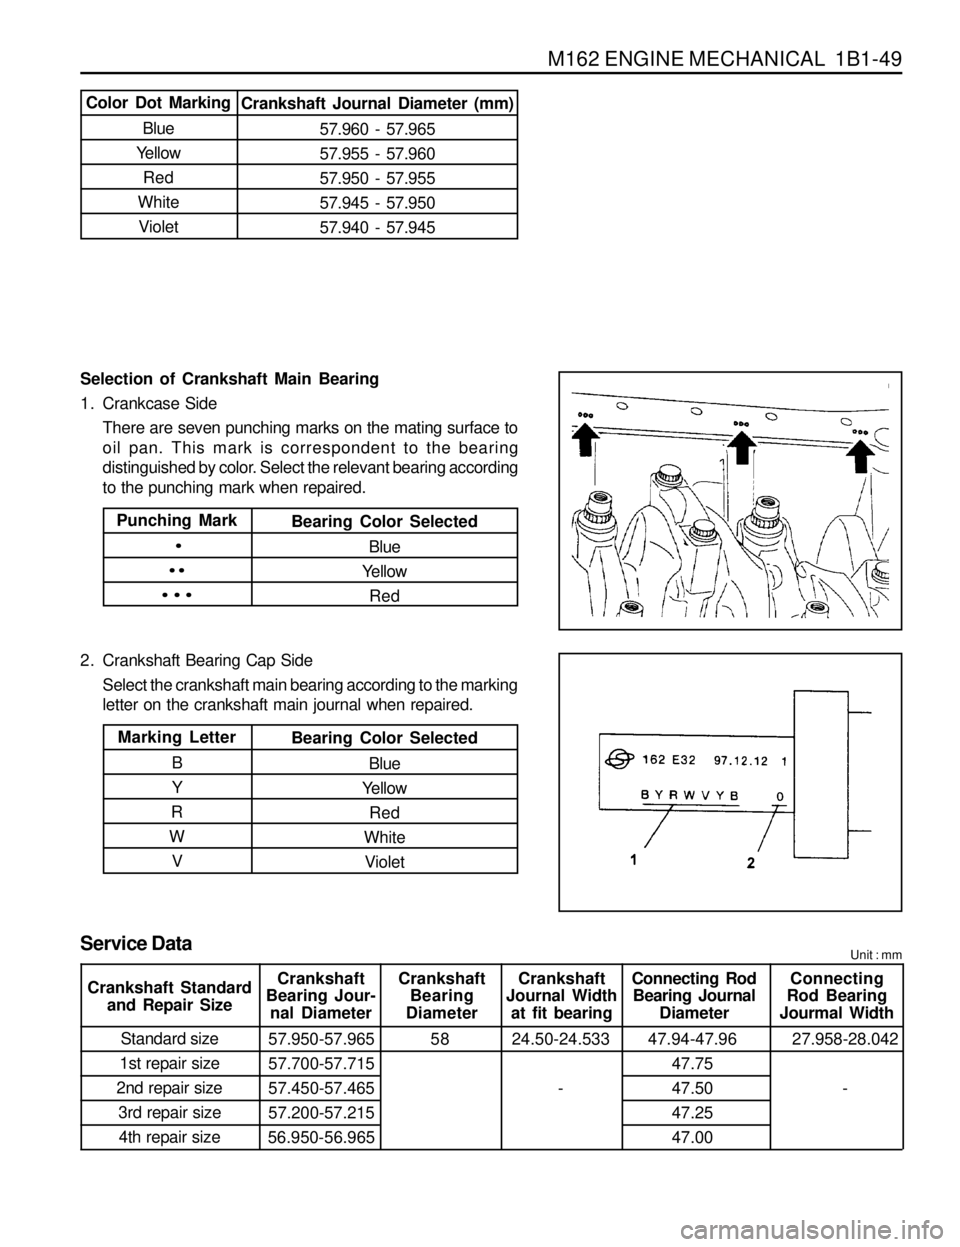
1. Crankcase Side
There are seven punching marks on the mating surface to
oil pan. This mark is correspondent to the bearing
distinguished by color. Select the relevant bearing according
to the punching mark when repaired.
2. Crankshaft Bearing Cap Side
Select the crankshaft main bearing according to the marking
letter on the crankshaft main journal when repaired.
Color Dot Marking
Blue
Yellow
Red
White
VioletCrankshaft Journal Diameter (mm)
57.960 - 57.965
57.955 - 57.960
57.950 - 57.955
57.945 - 57.950
57.940 - 57.945
Punching Mark
·
··
···
Bearing Color Selected
Blue
Yellow
Red
Marking Letter
B
Y
R
W
VBearing Color Selected
Blue
Yellow
Red
White
Violet
Service DataUnit : mm
Crankshaft
Bearing Jour-
nal DiameterCrankshaft
Bearing
DiameterCrankshaft
Journal Width
at fit bearingConnecting Rod
Bearing Journal
DiameterConnecting
Rod Bearing
Jourmal Width
Standard size
1st repair size
2nd repair size
3rd repair size
4th repair size57.950-57.965
57.700-57.715
57.450-57.465
57.200-57.215
56.950-56.96558 24.50-24.533
-47.94-47.96
47.75
47.50
47.25
47.0027.958-28.042
- Crankshaft Standard
and Repair Size
Page 123 of 1463

1B1-50 M162 ENGINE MECHANICAL
Installation Notice
lMake sure the crankshaft bearing cap properly seated
in place in the crankcase side. When perfectly installed,
the projected part (arrow) locates in the left side (intake
manifold side).
lAssemble so that the projected part of the cap and
crankcase face the same direction.
Removal & Installation Procedure
1. Unscrew the connecting rod bearing cap bolt and remove
the bearing cap.
Installation Notice
2. Unscrew the crankshaft bearing cap bolts and separate the
upper and lower bearing shells and thrust washers.
Installation Notice
lRemove the bearing cap from front (pulley side) to rear.
lMake sure that the upper and lower bearing shells do
not change each other and coat with engine oil.
lThe oil grooves (arrows) in the thrust washers must face
outward and insert the thrust bearing into the bearing
cap.
lThere are five kinds of thrust washers by thickness. Select
the proper washer when repaired.
3. Remove the crankshaft.
4. Installation should follow the removal procedure in the
reverse order.
5. After completion of the installation, check for the rotating
condition of the crankshaft.
lMake sure that the upper and lower bearing shells do
not change each other.
lCoat the bearing shell with engine oil.
lInstall the bearing cap according to the consecutive
number.
Part No. : 601 030 00 622.15 mm
Part No. : 601 030 01 622.20 mm
Part No. : 601 030 02 622.25 mm
Part No. : 601 030 03 622.30 mm
Part No. : 601 030 04 622.40 mm
Tightening Torque 40 Nm + 90°
Tightening Torque 55 Nm + 90°
Page 124 of 1463
M162 ENGINE MECHANICAL 1B1-51
Inspection
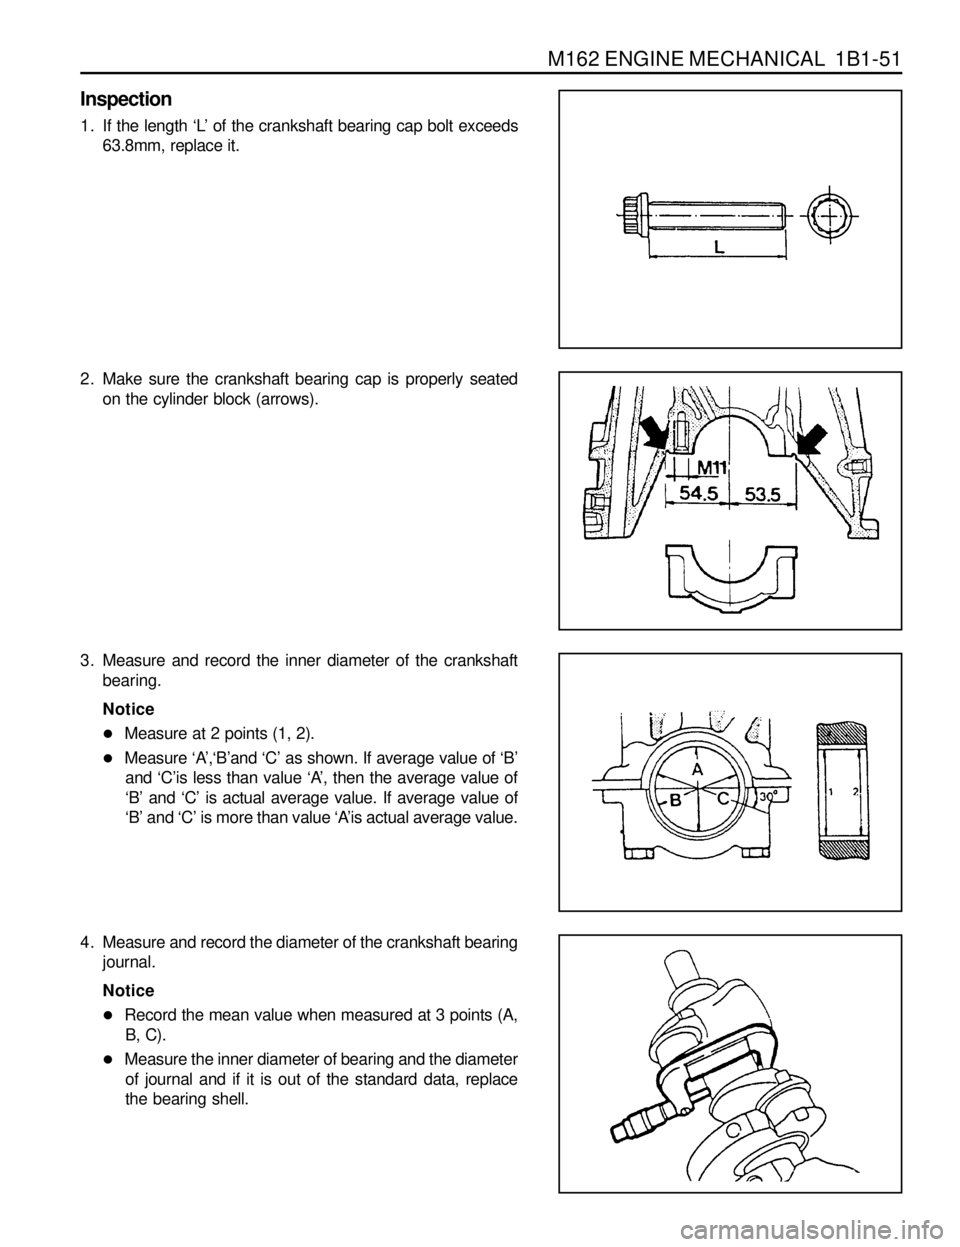
1. If the length ‘L’ of the crankshaft bearing cap bolt exceeds
63.8mm, replace it.
2. Make sure the crankshaft bearing cap is properly seated
on the cylinder block (arrows).
3. Measure and record the inner diameter of the crankshaft
bearing.
Notice
lMeasure at 2 points (1, 2).
lMeasure ‘A’,‘B’and ‘C’ as shown. If average value of ‘B’
and ‘C’is less than value ‘A’, then the average value of
‘B’ and ‘C’ is actual average value. If average value of
‘B’ and ‘C’ is more than value ‘A’is actual average value.
4. Measure and record the diameter of the crankshaft bearing
journal.
Notice
lRecord the mean value when measured at 3 points (A,
B, C).
lMeasure the inner diameter of bearing and the diameter
of journal and if it is out of the standard data, replace
the bearing shell.
Page 125 of 1463
1B1-52 M162 ENGINE MECHANICAL
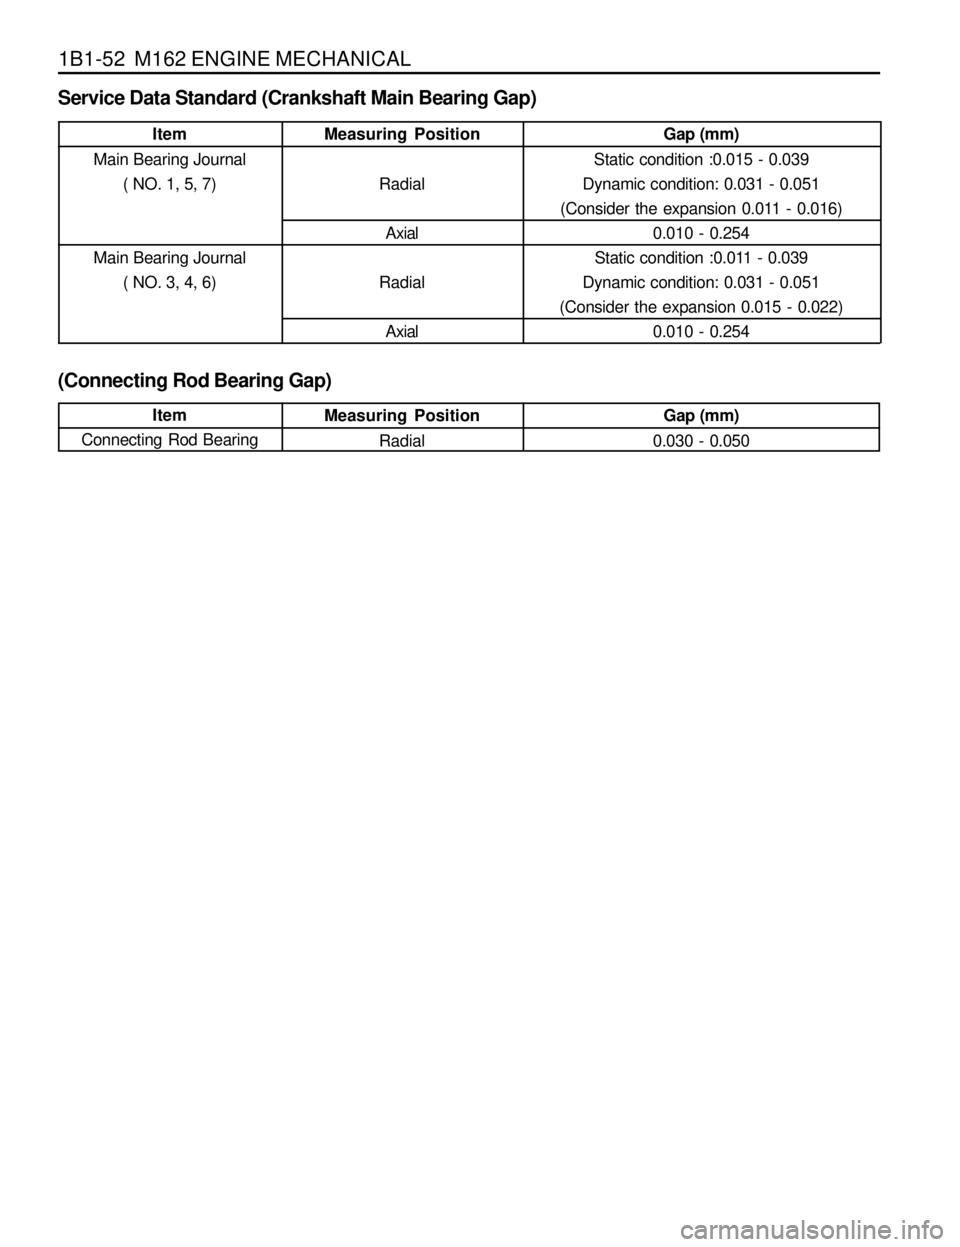
Service Data Standard (Crankshaft Main Bearing Gap)
(Connecting Rod Bearing Gap)
Item
Main Bearing Journal
( NO. 1, 5, 7)
Main Bearing Journal
( NO. 3, 4, 6)Measuring Position
Radial
Axial
Radial
AxialGap (mm)
Static condition :0.015 - 0.039
Dynamic condition: 0.031 - 0.051
(Consider the expansion 0.011 - 0.016)
0.010 - 0.254
Static condition :0.011 - 0.039
Dynamic condition: 0.031 - 0.051
(Consider the expansion 0.015 - 0.022)
0.010 - 0.254
Item
Connecting Rod BearingMeasuring Position
RadialGap (mm)
0.030 - 0.050
Page 126 of 1463
M162 ENGINE MECHANICAL 1B1-53
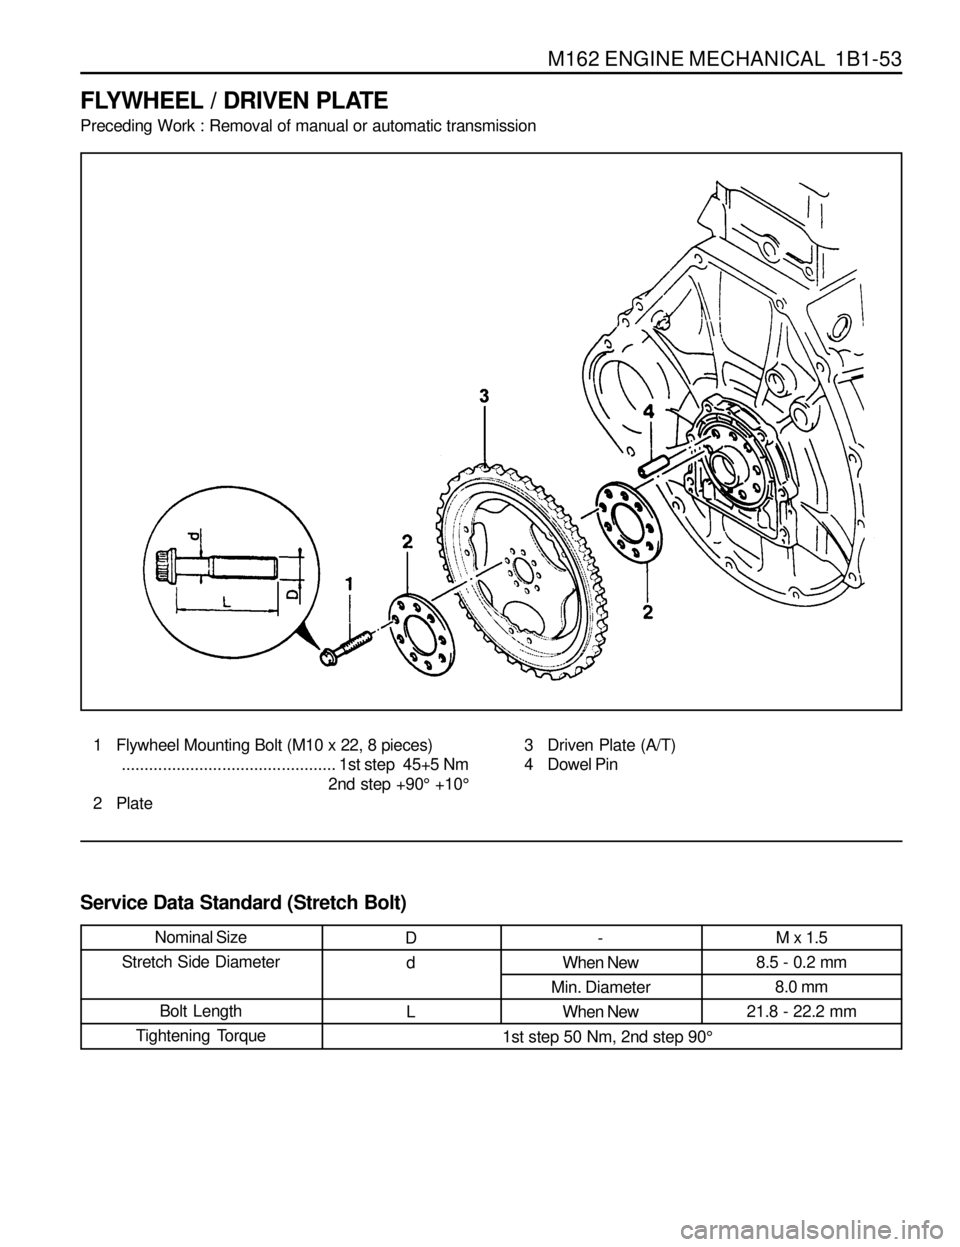
FLYWHEEL / DRIVEN PLATE
Preceding Work : Removal of manual or automatic transmission
1 Flywheel Mounting Bolt (M10 x 22, 8 pieces)
...............................................1st step 45+5 Nm
2nd step +90° +10°
2 Plate3 Driven Plate (A/T)
4 Dowel Pin
Service Data Standard (Stretch Bolt)
Nominal Size
Stretch Side Diameter
Bolt Length
Tightening TorqueM x 1.5
8.5 - 0.2 mm
8.0 mm
21.8 - 22.2 mm-
When New
Min. Diameter
When NewD
d
L
1st step 50 Nm, 2nd step 90°