SSANGYONG MUSSO 2003 Service Manual
Manufacturer: SSANGYONG, Model Year: 2003, Model line: MUSSO, Model: SSANGYONG MUSSO 2003Pages: 1574, PDF Size: 26.41 MB
Page 381 of 1574
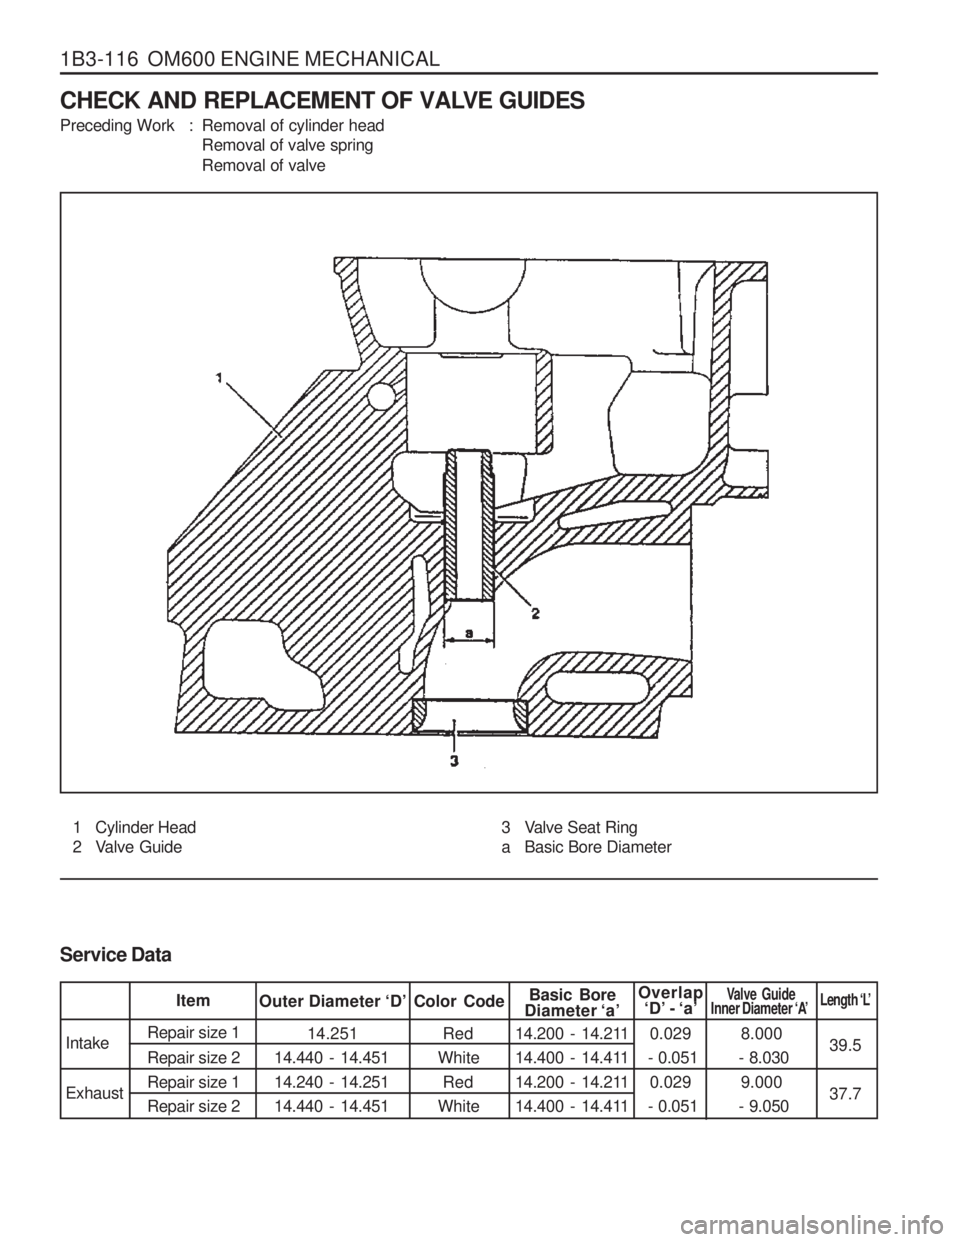
1B3-116 OM600 ENGINE MECHANICAL8.000
- 8.030 9.000
- 9.050 39.5
Intake Exhaust 0.029
- 0.051 0.029
- 0.051
Red
White Red
White
Diameter ‘a’
Service DataItemBasic Bore
Repair size 1 Repair size 2 Repair size 1Repair size 2Outer Diameter ‘D’
14.251
14.440 - 14.451 14.240 - 14.25114.440 - 14.451 Color Code
14.200 - 14.211
14.400 - 14.411
14.200 - 14.211
14.400 - 14.411Overlap‘D’ - ‘a’Valve Guide
Inner Diameter ‘A’
37.7
Length ‘L’
CHECK AND REPLACEMENT OF VALVE GUIDES
Preceding Work : Removal of cylinder head
Removal of valve spring
Removal of valve
1 Cylinder Head
2 Valve Guide 3 Valve Seat Ring
a Basic Bore Diameter
Page 382 of 1574
OM600 ENGINE MECHANICAL 1B3-117
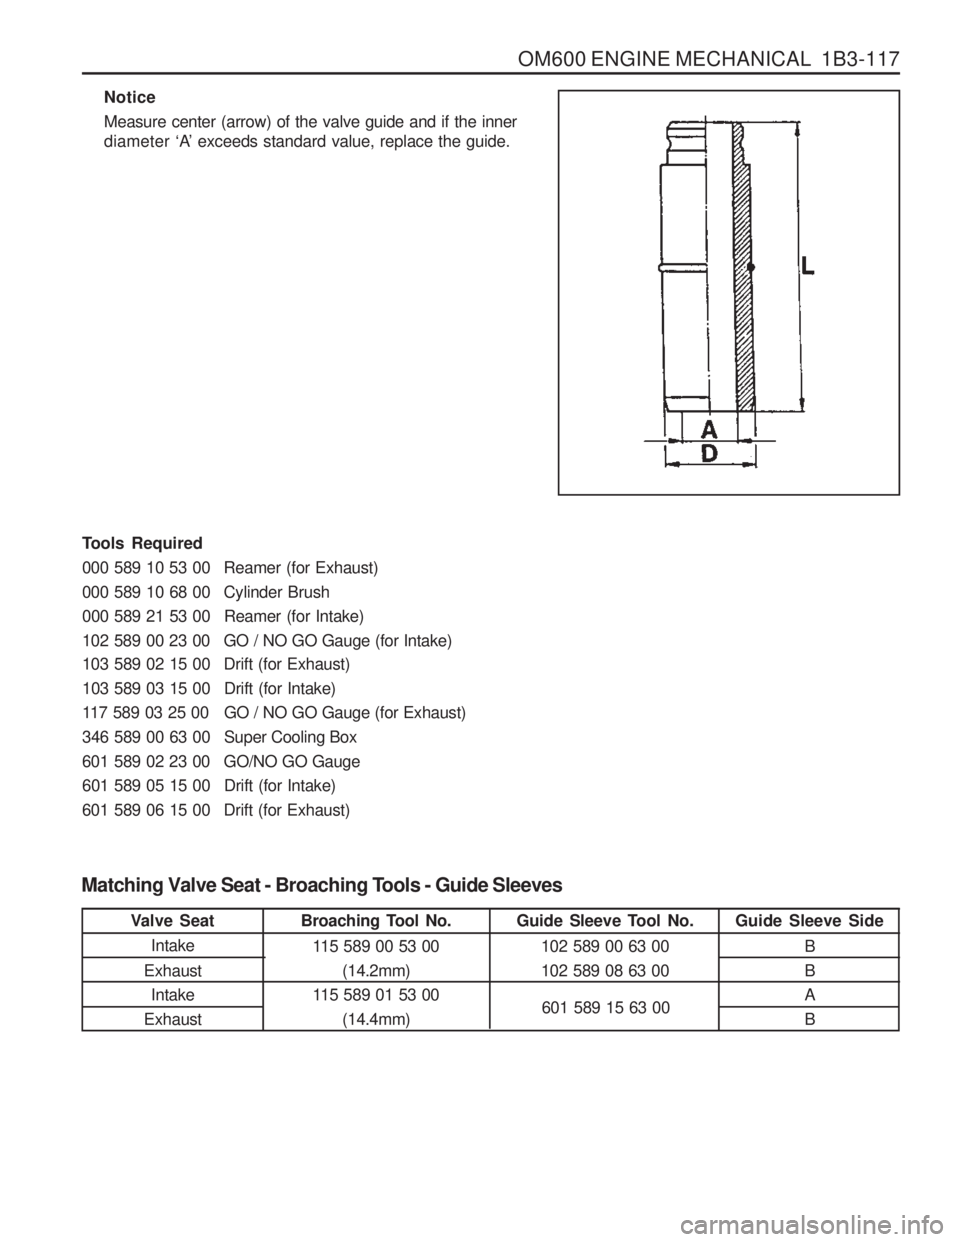
Tools Required
000 589 10 53 00 Reamer (for Exhaust)
000 589 10 68 00 Cylinder Brush
000 589 21 53 00 Reamer (for Intake)
102 589 00 23 00 GO / NO GO Gauge (for Intake)
103 589 02 15 00 Drift (for Exhaust)
103 589 03 15 00 Drift (for Intake)
117 589 03 25 00 GO / NO GO Gauge (for Exhaust)
346 589 00 63 00 Super Cooling Box
601 589 02 23 00 GO/NO GO Gauge
601 589 05 15 00 Drift (for Intake)
Notice Measure center (arrow) of the valve guide and if the inner diameter ‘A’ exceeds standard value, replace the guide.
601 589 06 15 00 Drift (for Exhaust)
Matching Valve Seat - Broaching Tools - Guide Sleeves Valve SeatIntake
Exhaust Intake
Exhaust Broaching Tool No.
115 589 00 53 00 (14.2mm)
115 589 01 53 00 (14.4mm) Guide Sleeve Tool No.
102 589 00 63 00 102 589 08 63 00 Guide Sleeve Side
BBAB
601 589 15 63 00
Page 383 of 1574
1B3-118 OM600 ENGINE MECHANICAL
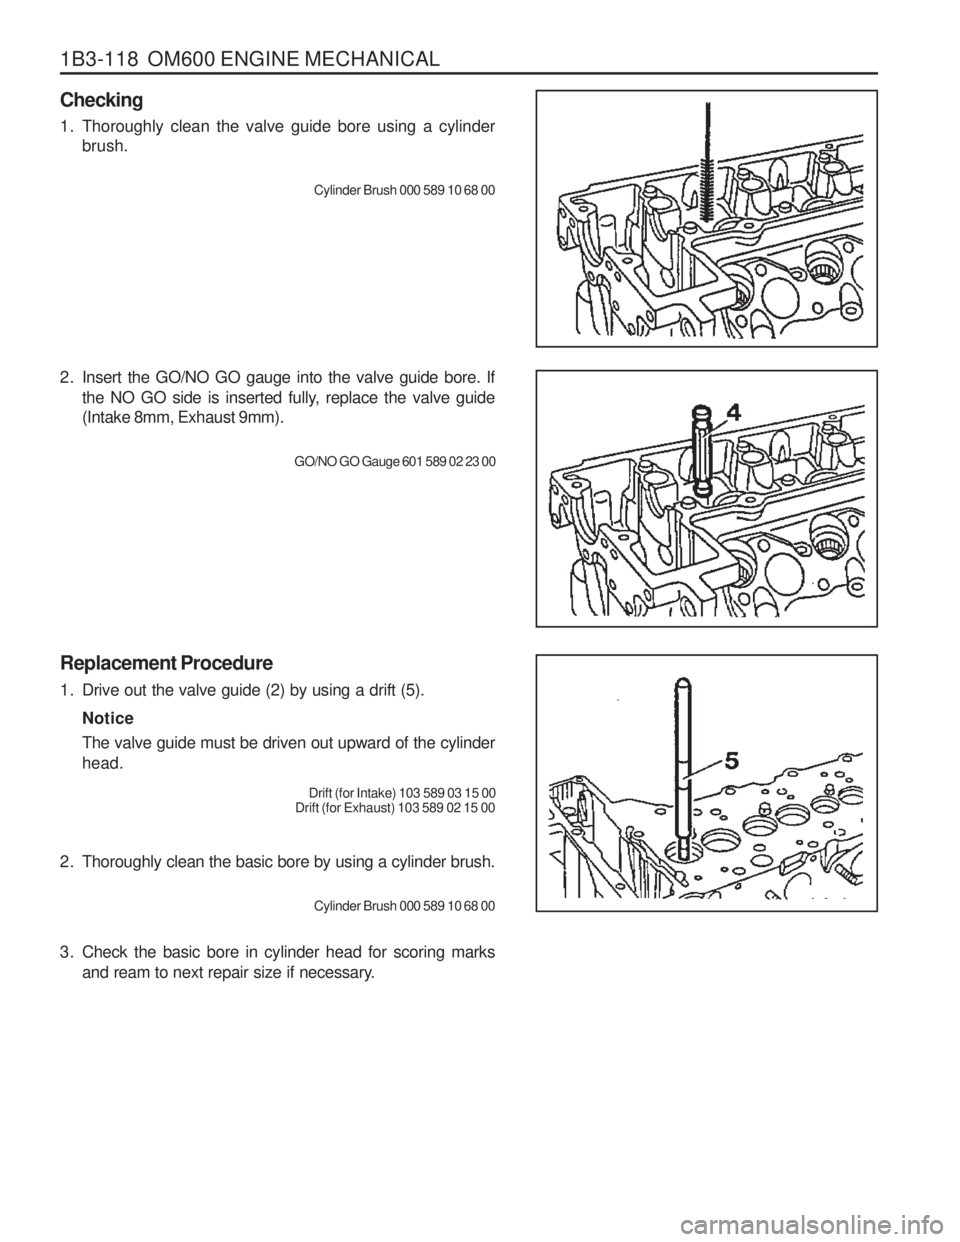
2. Thoroughly clean the basic bore by using a cylinder brush.Cylinder Brush 000 589 10 68 00
3. Check the basic bore in cylinder head for scoring marks and ream to next repair size if necessary.
2. Insert the GO/NO GO gauge into the valve guide bore. Ifthe NO GO side is inserted fully, replace the valve guide (Intake 8mm, Exhaust 9mm).
GO/NO GO Gauge 601 589 02 23 00
Replacement Procedure
1. Drive out the valve guide (2) by using a drift (5). Notice The valve guide must be driven out upward of the cylinder head.
Drift (for Intake) 103 589 03 15 00
Drift (for Exhaust) 103 589 02 15 00
Checking
1. Thoroughly clean the valve guide bore using a cylinder
brush.
Cylinder Brush 000 589 10 68 00
Page 384 of 1574
OM600 ENGINE MECHANICAL 1B3-119
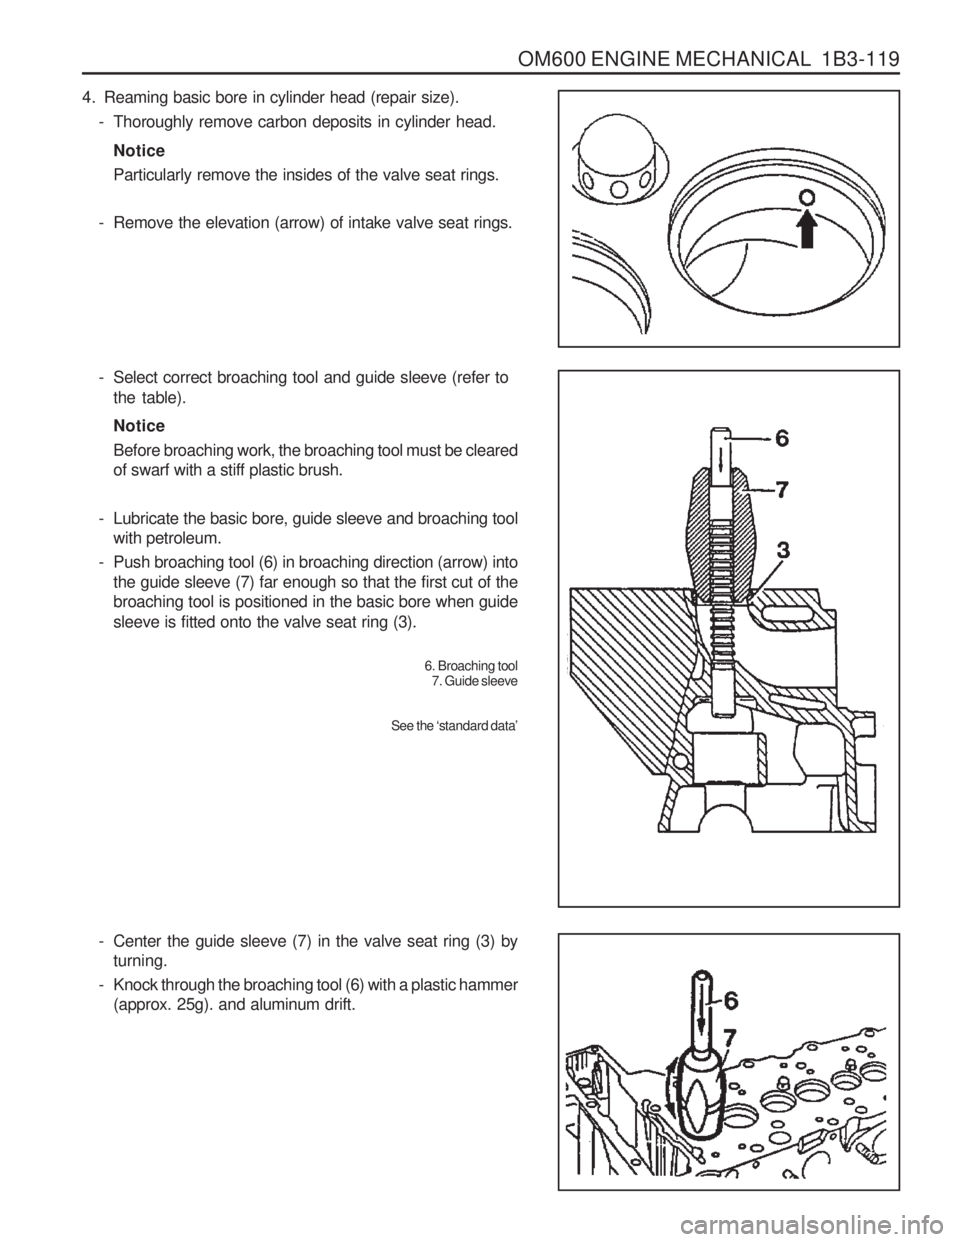
4. Reaming basic bore in cylinder head (repair size).- Thoroughly remove carbon deposits in cylinder head.
Notice Particularly remove the insides of the valve seat rings.
- Remove the elevation (arrow) of intake valve seat rings.
- Select correct broaching tool and guide sleeve (refer to the table). Notice Before broaching work, the broaching tool must be cleared of swarf with a stiff plastic brush.
- Lubricate the basic bore, guide sleeve and broaching tool with petroleum.
- Push broaching tool (6) in broaching direction (arrow) into the guide sleeve (7) far enough so that the first cut of thebroaching tool is positioned in the basic bore when guide sleeve is fitted onto the valve seat ring (3).
6. Broaching tool7. Guide sleeve
See the ‘standard data ’
- Center the guide sleeve (7) in the valve seat ring (3) by
turning.
- Knock through the broaching tool (6) with a plastic hammer (approx. 25g). and aluminum drift.
Page 385 of 1574
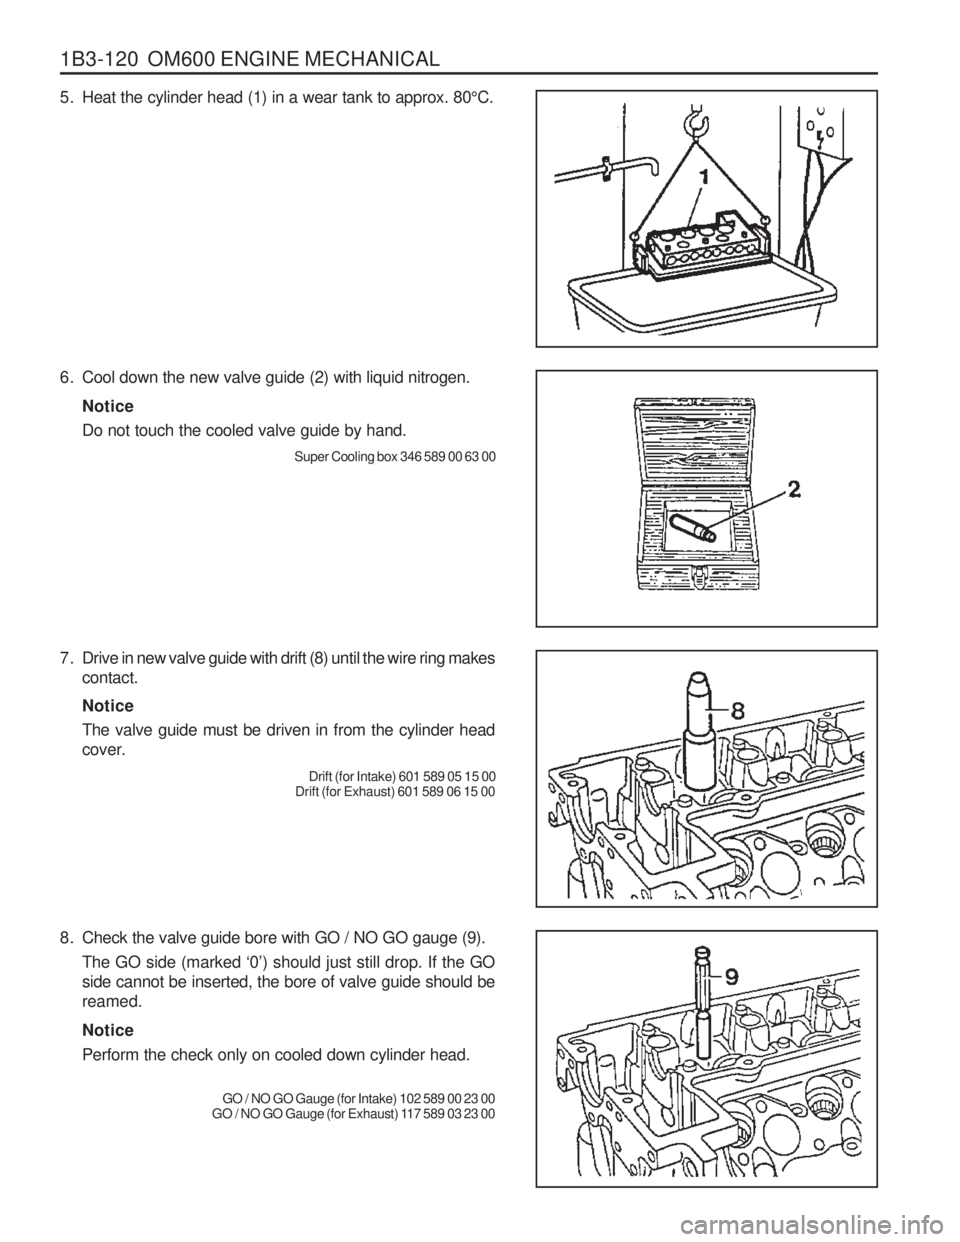
1B3-120 OM600 ENGINE MECHANICAL
8. Check the valve guide bore with GO / NO GO gauge (9).The GO side (marked ‘0’) should just still drop. If the GO
side cannot be inserted, the bore of valve guide should be reamed. Notice Perform the check only on cooled down cylinder head.
GO / NO GO Gauge (for Intake) 102 589 00 23 00
GO / NO GO Gauge (for Exhaust) 117 589 03 23 00
6. Cool down the new valve guide (2) with liquid nitrogen.
Notice Do not touch the cooled valve guide by hand.
Super Cooling box 346 589 00 63 00
7. Drive in new valve guide with drift (8) until the wire ring makes contact. Notice The valve guide must be driven in from the cylinder head
cover.
Drift (for Intake) 601 589 05 15 00
Drift (for Exhaust) 601 589 06 15 00
5. Heat the cylinder head (1) in a wear tank to approx. 80 °C.
Page 386 of 1574
OM600 ENGINE MECHANICAL 1B3-121
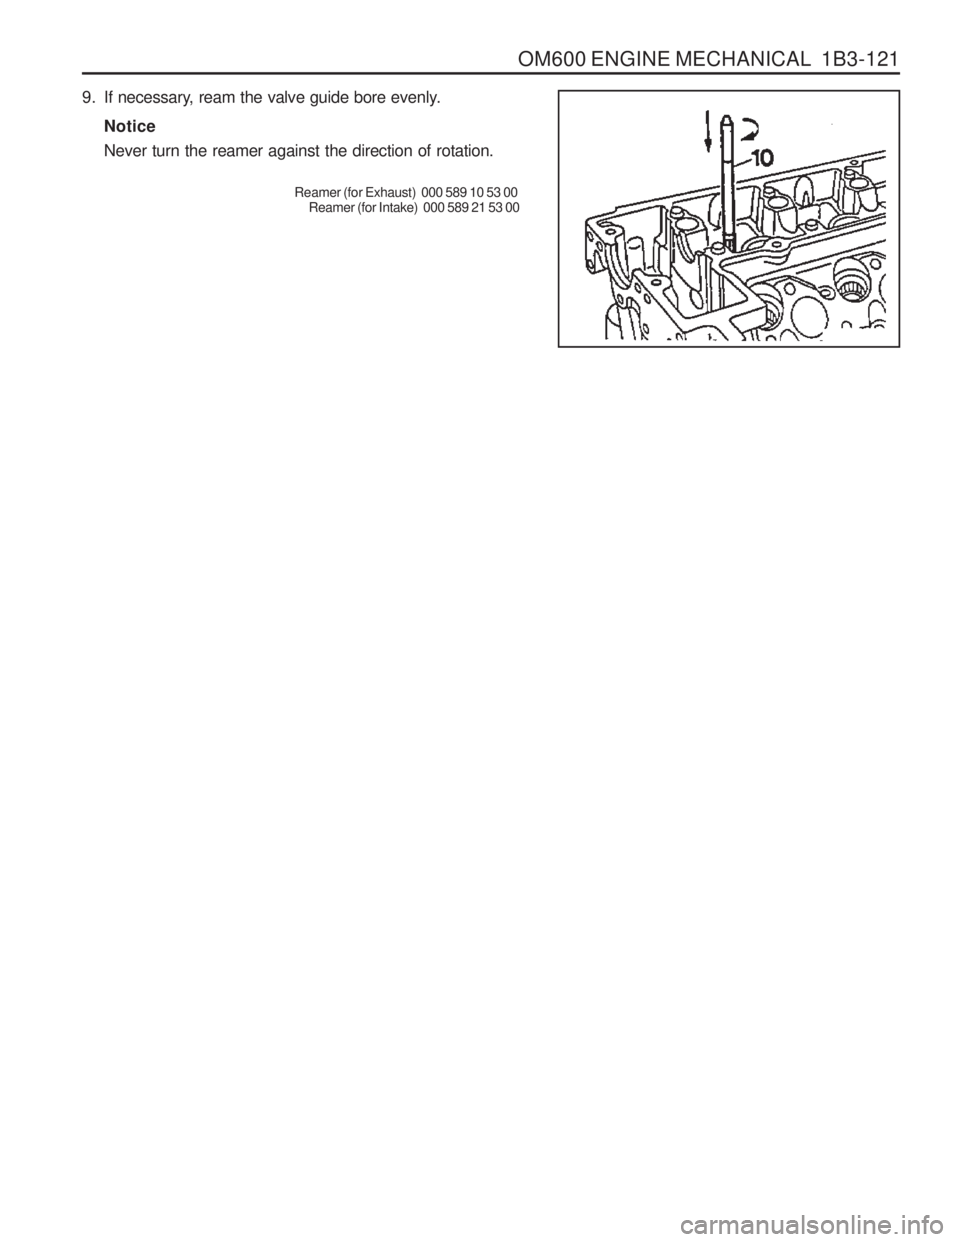
9. If necessary, ream the valve guide bore evenly.Notice Never turn the reamer against the direction of rotation.
Reamer (for Exhaust) 000 589 10 53 00Reamer (for Intake) 000 589 21 53 00
Page 387 of 1574
1B3-122 OM600 ENGINE MECHANICAL
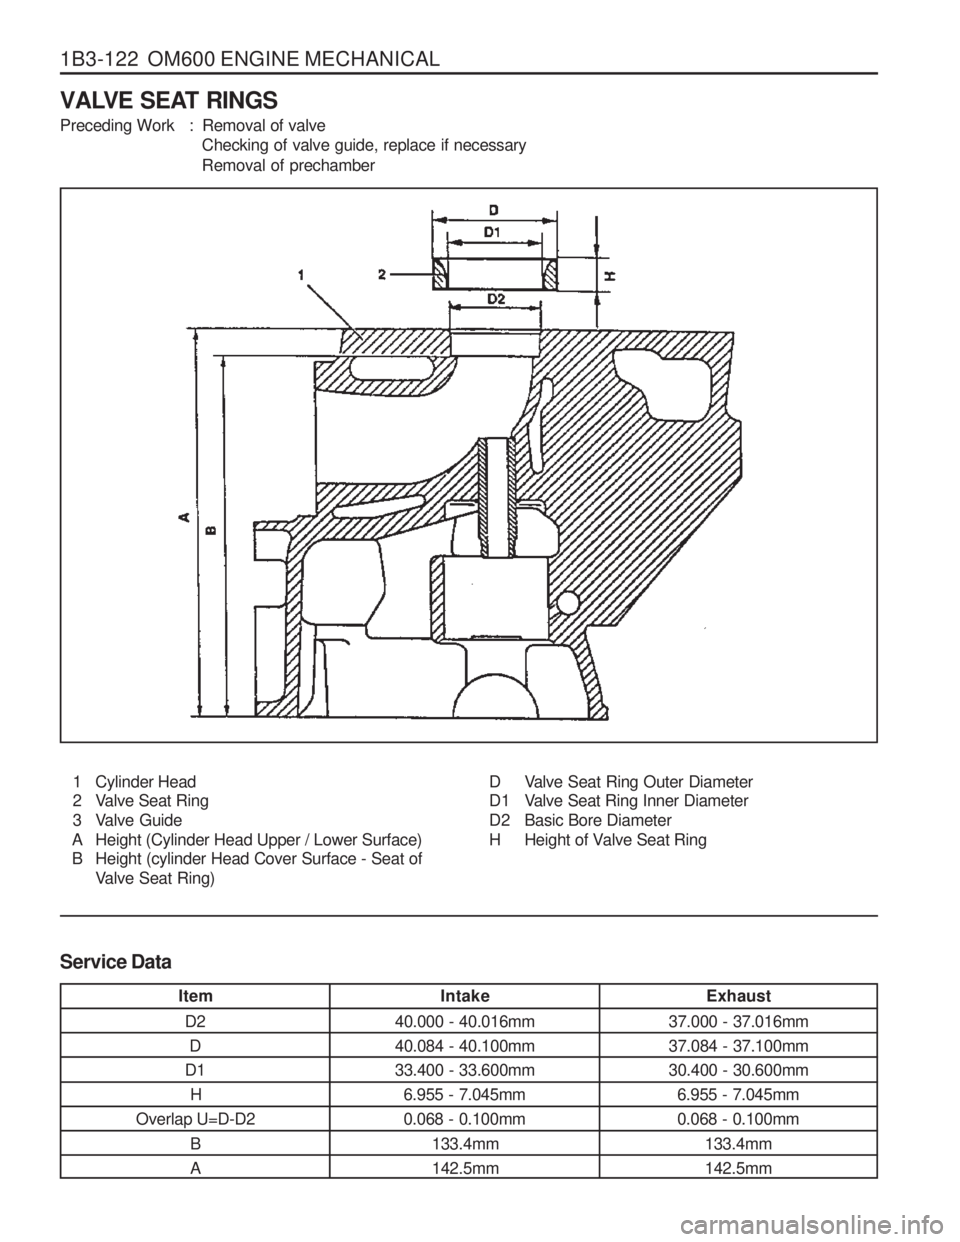
VALVE SEAT RINGS
Preceding Work : Removal of valveChecking of valve guide, replace if necessary
Removal of prechamber
1 Cylinder Head
2 Valve Seat Ring
3 Valve Guide
A Height (Cylinder Head Upper / Lower Surface)
B Height (cylinder Head Cover Surface - Seat of Valve Seat Ring) D Valve Seat Ring Outer Diameter
D1 Valve Seat Ring Inner Diameter
D2 Basic Bore Diameter
H Height of Valve Seat Ring
Service Data
Item D2D
D1 H
Overlap U=D-D2
B A Intake
40.000 - 40.016mm40.084 - 40.100mm33.400 - 33.600mm 6.955 - 7.045mm0.068 - 0.100mm
133.4mm142.5mm Exhaust
37.000 - 37.016mm37.084 - 37.100mm30.400 - 30.600mm 6.955 - 7.045mm0.068 - 0.100mm
133.4mm142.5mm
Page 388 of 1574
OM600 ENGINE MECHANICAL 1B3-123
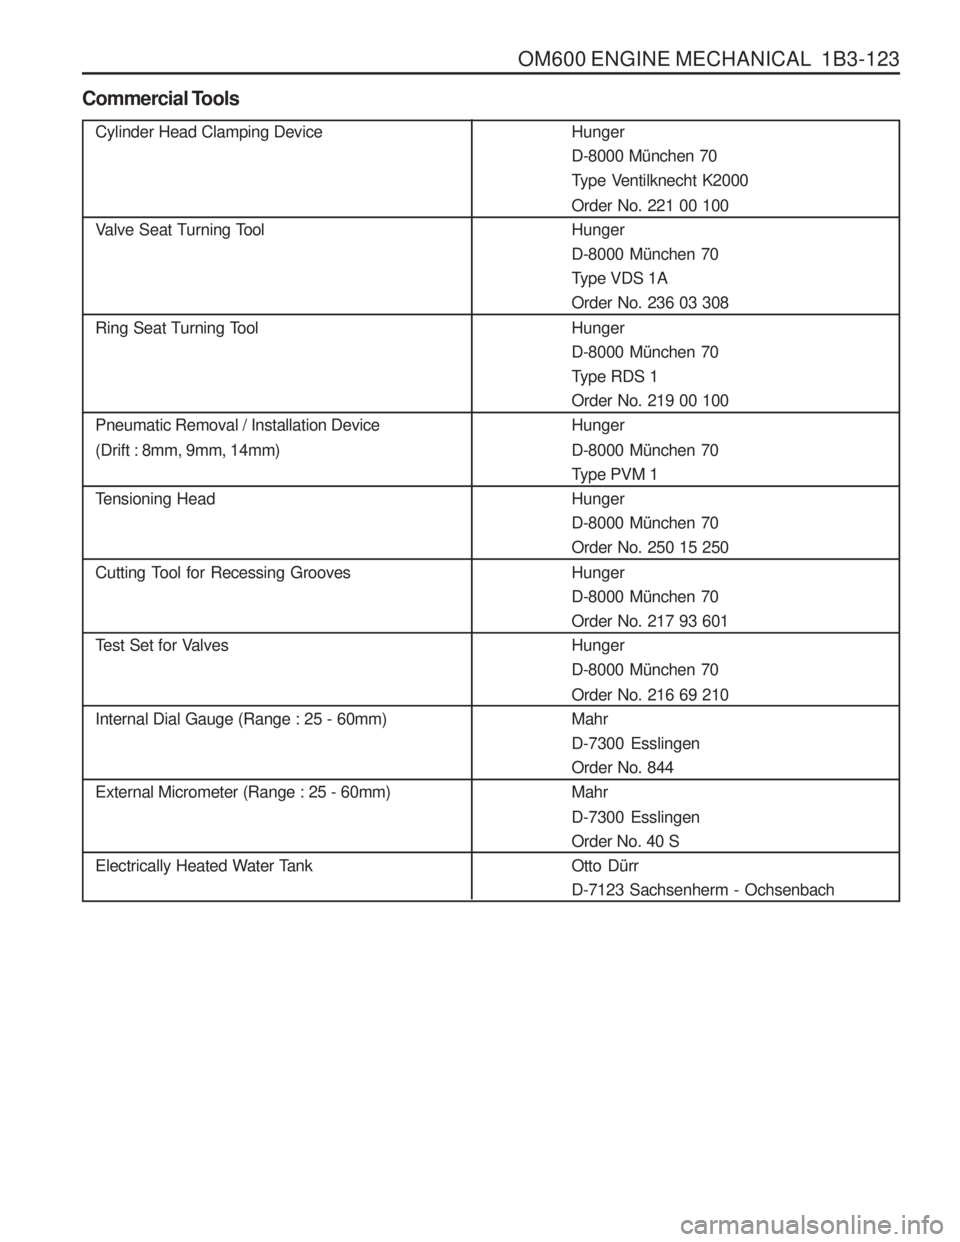
Cylinder Head Clamping Device
Valve Seat Turning Tool
Ring Seat Turning Tool Pneumatic Removal / Installation Device (Drift : 8mm, 9mm, 14mm)
Tensioning Head
Cutting Tool for Recessing Grooves
Test Set for Valves Internal Dial Gauge (Range : 25 - 60mm) External Micrometer (Range : 25 - 60mm)
Electrically Heated Water Tank
Commercial ToolsHunger D-8000 M
ünchen 70
Type Ventilknecht K2000 Order No. 221 00 100 HungerD-8000 M ünchen 70
Type VDS 1AOrder No. 236 03 308 Hunger D-8000 M ünchen 70
Type RDS 1Order No. 219 00 100Hunger D-8000 M ünchen 70
Type PVM 1 HungerD-8000 M ünchen 70
Order No. 250 15 250 Hunger D-8000 M ünchen 70
Order No. 217 93 601HungerD-8000 M ünchen 70
Order No. 216 69 210MahrD-7300 EsslingenOrder No. 844Mahr D-7300 Esslingen Order No. 40 SOtto D ürr
D-7123 Sachsenherm - Ochsenbach
Page 389 of 1574
1B3-124 OM600 ENGINE MECHANICAL
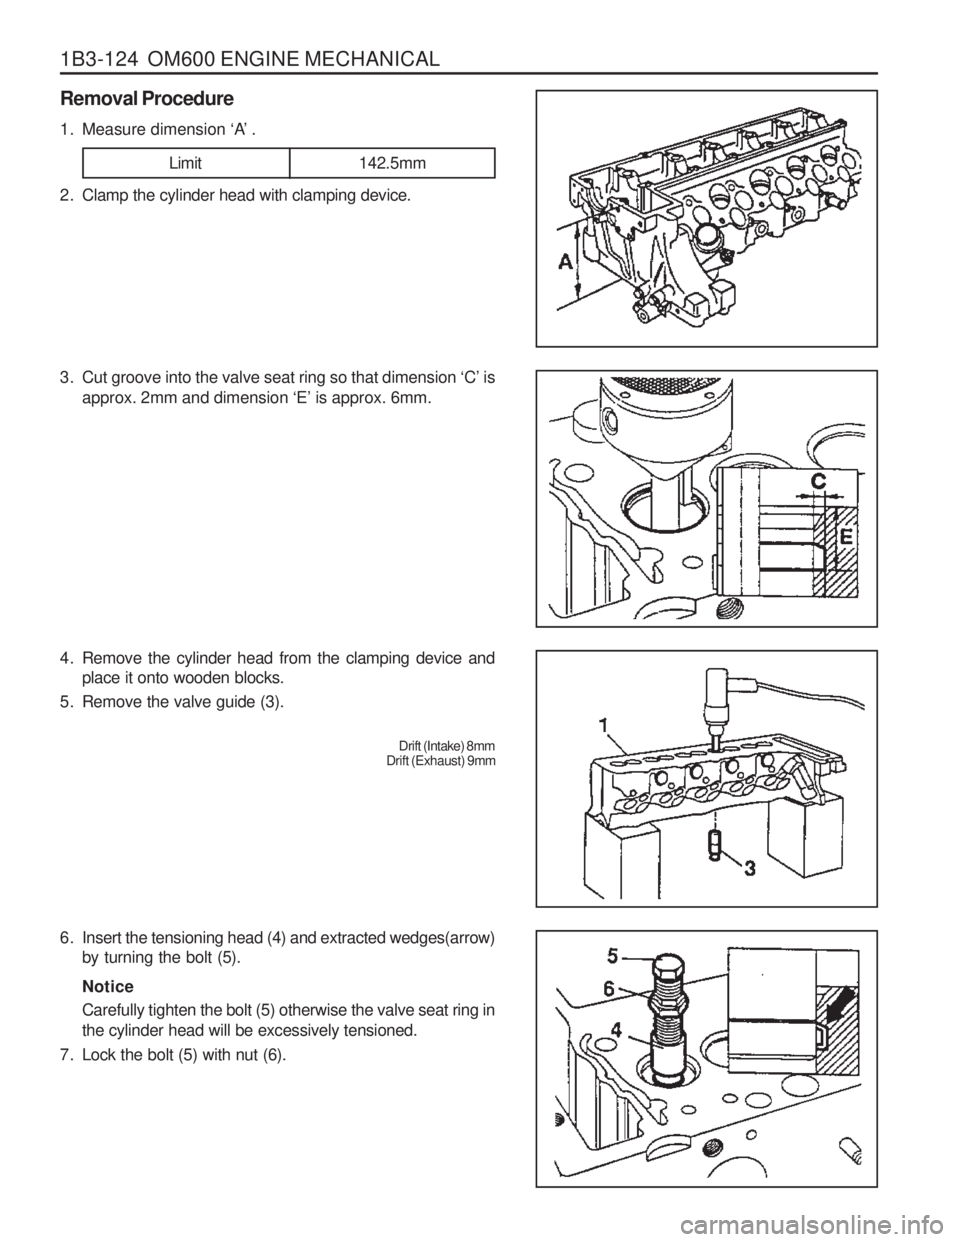
1. Measure dimension ‘A’ .
Removal Procedure
Limit
142.5mm
2. Clamp the cylinder head with clamping device.
3. Cut groove into the valve seat ring so that dimension ‘C’ is
approx. 2mm and dimension ‘E’ is approx. 6mm.
4. Remove the cylinder head from the clamping device and place it onto wooden blocks.
5. Remove the valve guide (3).
Drift (Intake) 8mm
Drift (Exhaust) 9mm
6. Insert the tensioning head (4) and extracted wedges(arrow) by turning the bolt (5). Notice Carefully tighten the bolt (5) otherwise the valve seat ring in the cylinder head will be excessively tensioned.
7. Lock the bolt (5) with nut (6).
Page 390 of 1574
OM600 ENGINE MECHANICAL 1B3-125
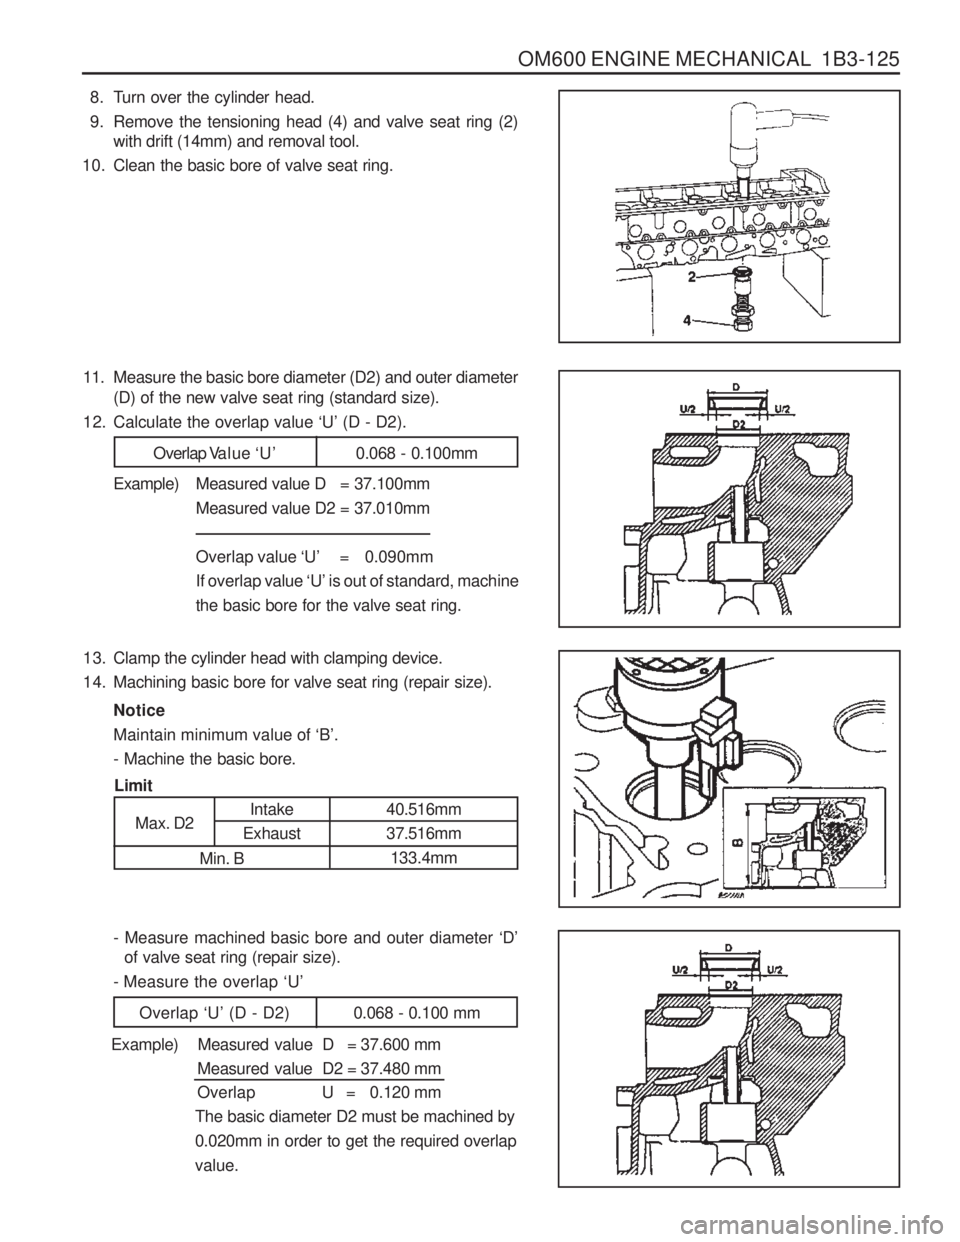
8. Turn over the cylinder head.
9. Remove the tensioning head (4) and valve seat ring (2)with drift (14mm) and removal tool.
10. Clean the basic bore of valve seat ring.
11. Measure the basic bore diameter (D2) and outer diameter (D) of the new valve seat ring (standard size).
12. Calculate the overlap value ‘U’ (D - D2).
Overlap V alue ‘U’ 0.068 - 0.100mm
Example) Measured value D = 37.100mm Measured value D2 = 37.010mm Overlap value ‘U’ = 0.090mm
If overlap value ‘U’ is out of standard, machine
the basic bore for the valve seat ring.
13. Clamp the cylinder head with clamping device.
14. Machining basic bore for valve seat ring (repair size).
NoticeMaintain minimum value of ‘B’.
- Machine the basic bore.
Limit Intake
Exhaust
Max. D2
Min. B40.516mm 37.516mm133.4mm
- Measure machined basic bore and outer diameter ‘D’
of valve seat ring (repair size).
- Measure the overlap ‘U’
Overlap ‘U’ (D - D2) 0.068 - 0.100 mm
Example) Measured value D = 37.600 mm Measured value D2 = 37.480 mm
Overlap U = 0.120 mm
The basic diameter D2 must be machined by 0.020mm in order to get the required overlapvalue.