radiator SSANGYONG MUSSO 2003 Service Manual
[x] Cancel search | Manufacturer: SSANGYONG, Model Year: 2003, Model line: MUSSO, Model: SSANGYONG MUSSO 2003Pages: 1574, PDF Size: 26.41 MB
Page 4 of 1574
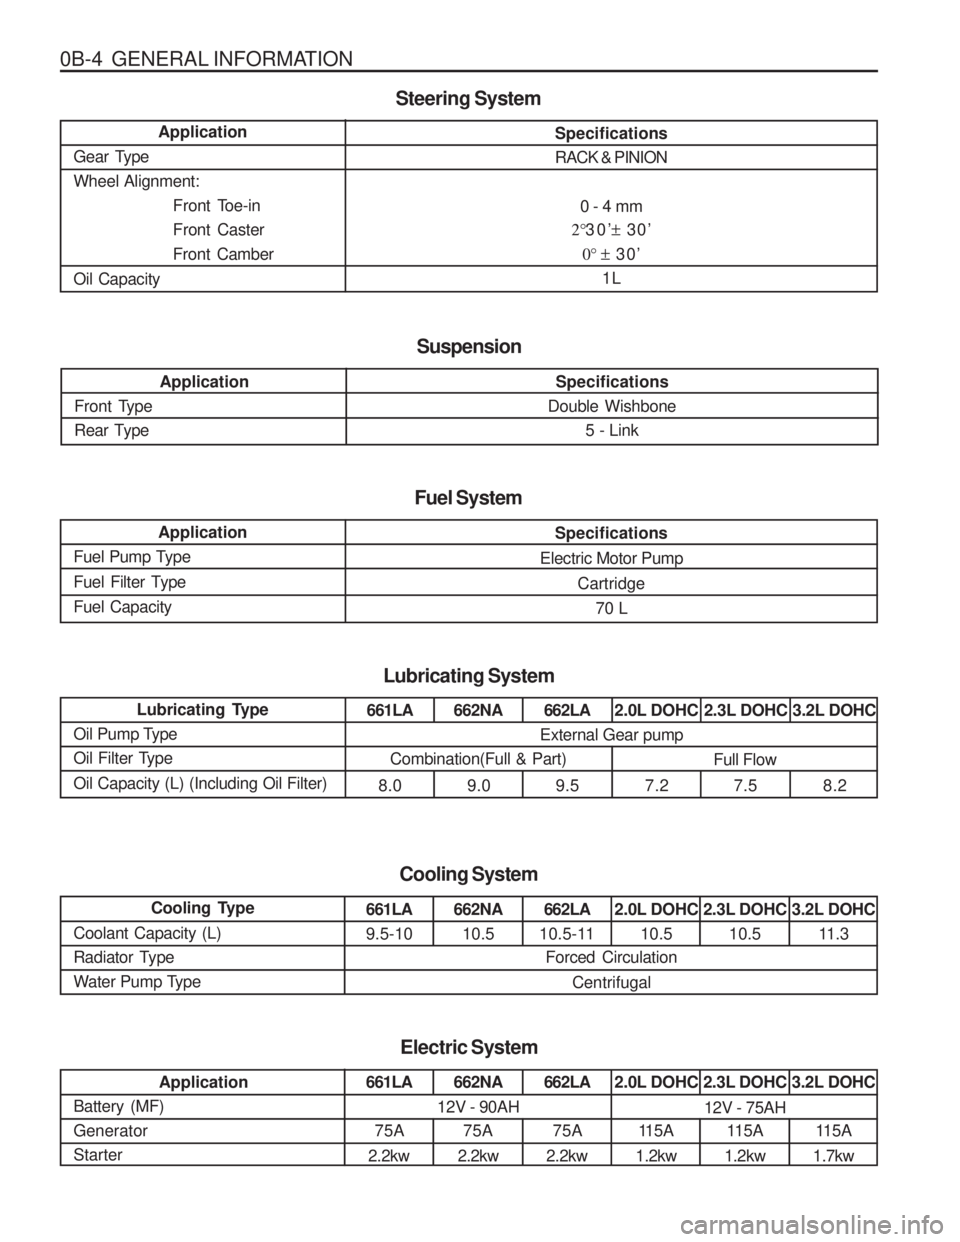
0B-4 GENERAL INFORMATIONSpecifications RACK & PINION0 - 4 mm
2° 30’ ± 30’
0° ± 30’
1L
Application
Gear TypeWheel Alignment: Front Toe-inFront CasterFront Camber
Oil Capacity
Steering System
Application
Front Type
Rear Type
Suspension
Specifications
Double Wishbone
5 - Link
Application
Fuel Pump Type
Fuel Filter TypeFuel Capacity
Specifications
Electric Motor Pump Cartridge70 L
Fuel System
Lubricating Type
Oil Pump Type
Oil Filter Type Oil Capacity (L) (Including Oil Filter)
Lubricating System
661LA
8.0662NA 9.0 662LA
9.5 2.0L DOHC
7.2 2.3L DOHC
7.5 3.2L DOHC
8.2
External Gear pump
Combination(Full & Part) Full Flow
Cooling Type
Coolant Capacity (L)
Radiator Type
Water Pump Type
Cooling System
661LA 9.5-10662NA 10.5 662LA
10.5-11 2.0L DOHC
10.5 2.3L DOHC
10.5 3.2L DOHC
11.3
Forced Circulation
Centrifugal
Application
Battery (MF) GeneratorStarter
Electric System
661LA
75A
2.2kw662NA
75A
2.2kw 662LA
75A
2.2kw 2.0L DOHC
11 5 A
1.2kw 2.3L DOHC
115A
1.2kw 3.2L DOHC
115A
1.7kw
12V - 90AH12V - 75AH
Page 13 of 1574
GENERAL INFORMATION 0B-13
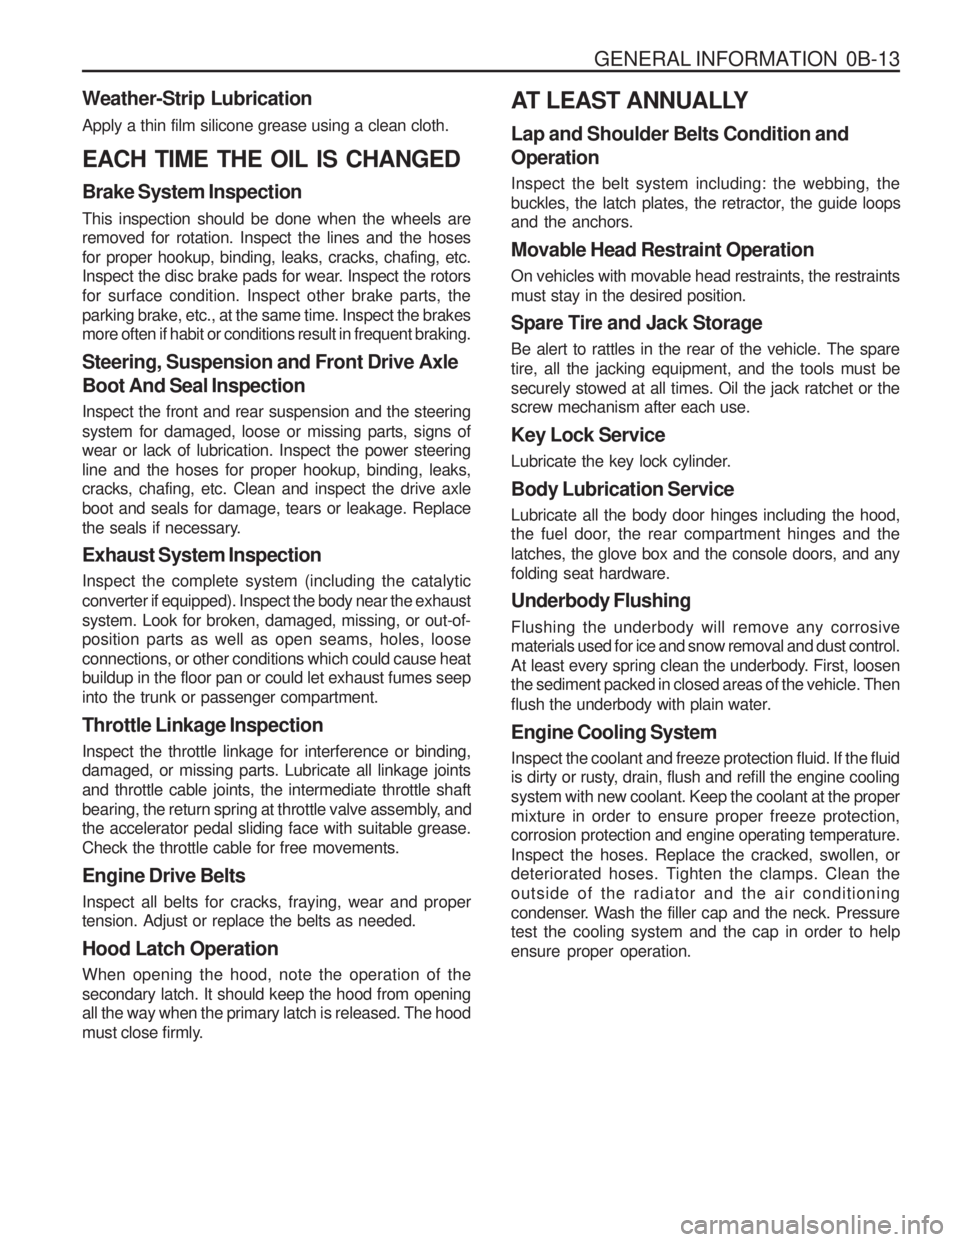
Weather-Strip Lubrication Apply a thin film silicone grease using a clean cloth. EACH TIME THE OIL IS CHANGED Brake System Inspection This inspection should be done when the wheels are removed for rotation. Inspect the lines and the hoses for proper hookup, binding, leaks, cracks, chafing, etc.
Inspect the disc brake pads for wear. Inspect the rotors for surface condition. Inspect other brake parts, theparking brake, etc., at the same time. Inspect the brakes more often if habit or conditions result in frequent braking. Steering, Suspension and Front Drive Axle Boot And Seal Inspection Inspect the front and rear suspension and the steering system for damaged, loose or missing parts, signs of wear or lack of lubrication. Inspect the power steering line and the hoses for proper hookup, binding, leaks, cracks, chafing, etc. Clean and inspect the drive axle boot and seals for damage, tears or leakage. Replace
the seals if necessary. Exhaust System Inspection Inspect the complete system (including the catalytic converter if equipped). Inspect the body near the exhaustsystem. Look for broken, damaged, missing, or out-of- position parts as well as open seams, holes, loose connections, or other conditions which could cause heat buildup in the floor pan or could let exhaust fumes seep into the trunk or passenger compartment. Throttle Linkage Inspection Inspect the throttle linkage for interference or binding, damaged, or missing parts. Lubricate all linkage joints and throttle cable joints, the intermediate throttle shaft
bearing, the return spring at throttle valve assembly, and the accelerator pedal sliding face with suitable grease. Check the throttle cable for free movements. Engine Drive Belts Inspect all belts for cracks, fraying, wear and proper tension. Adjust or replace the belts as needed. Hood Latch Operation When opening the hood, note the operation of the secondary latch. It should keep the hood from opening all the way when the primary latch is released. The hood
must close firmly. AT LEAST ANNUALLY Lap and Shoulder Belts Condition and Operation Inspect the belt system including: the webbing, the
buckles, the latch plates, the retractor, the guide loops and the anchors. Movable Head Restraint Operation On vehicles with movable head restraints, the restraints must stay in the desired position. Spare Tire and Jack Storage Be alert to rattles in the rear of the vehicle. The spare tire, all the jacking equipment, and the tools must besecurely stowed at all times. Oil the jack ratchet or the screw mechanism after each use. Key Lock Service
Lubricate the key lock cylinder. Body Lubrication Service Lubricate all the body door hinges including the hood,
the fuel door, the rear compartment hinges and the latches, the glove box and the console doors, and anyfolding seat hardware. Underbody Flushing Flushing the underbody will remove any corrosive materials used for ice and snow removal and dust control.
At least every spring clean the underbody. First, loosen the sediment packed in closed areas of the vehicle. Then
flush the underbody with plain water. Engine Cooling System Inspect the coolant and freeze protection fluid. If the fluid
is dirty or rusty, drain, flush and refill the engine cooling system with new coolant. Keep the coolant at the propermixture in order to ensure proper freeze protection, corrosion protection and engine operating temperature. Inspect the hoses. Replace the cracked, swollen, or
deteriorated hoses. Tighten the clamps. Clean the outside of the radiator and the air conditioning
condenser. Wash the filler cap and the neck. Pressure test the cooling system and the cap in order to help ensure proper operation.
Page 38 of 1574
1B1-2 M162 ENGINE MECHANICALSPECIFICATIONS
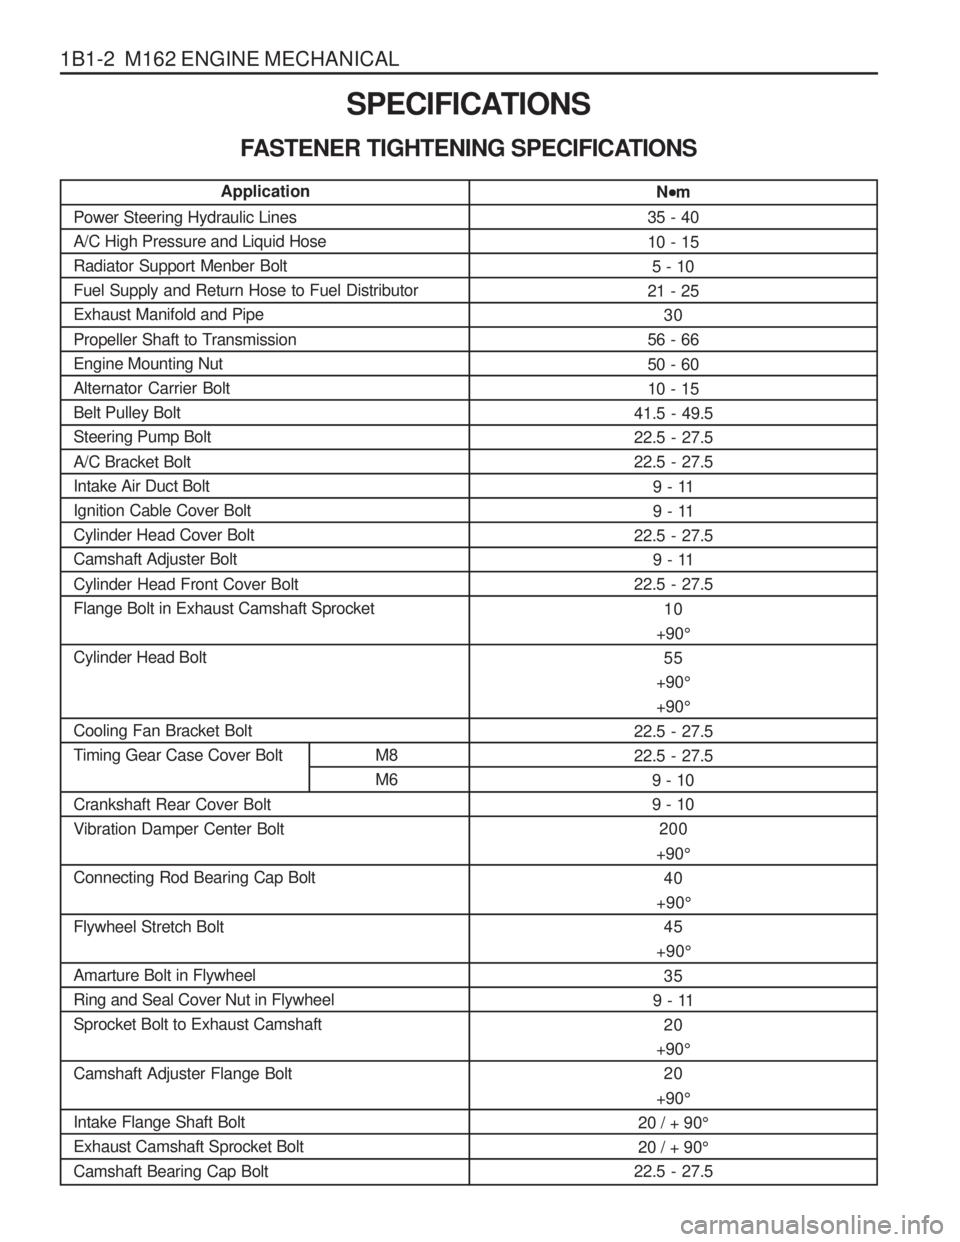
FASTENER TIGHTENING SPECIFICATIONS N
m
35 - 40 10 - 15 5 - 10
21 - 25 30
56 - 6650 - 60 10 - 15
41.5 - 49.522.5 - 27.522.5 - 27.5
9 - 11
9 - 11
22.5 - 27.5
9 - 11
22.5 - 27.5
10
+90 °
55
+90 °
+90 °
22.5 - 27.522.5 - 27.5 9 - 109 - 10200
+90 °
40
+90 °
45
+90 °
35
9 - 11 20
+90 °
20
+90 °
20 / + 90 °
20 / + 90 °
22.5 - 27.5
Application
Power Steering Hydraulic Lines A/C High Pressure and Liquid HoseRadiator Support Menber BoltFuel Supply and Return Hose to Fuel DistributorExhaust Manifold and Pipe
Propeller Shaft to Transmission Engine Mounting NutAlternator Carrier BoltBelt Pulley BoltSteering Pump Bolt A/C Bracket Bolt Intake Air Duct BoltIgnition Cable Cover BoltCylinder Head Cover BoltCamshaft Adjuster Bolt Cylinder Head Front Cover Bolt Flange Bolt in Exhaust Camshaft Sprocket Cylinder Head Bolt Cooling Fan Bracket Bolt
Timing Gear Case Cover Bolt M8 M6
Crankshaft Rear Cover BoltVibration Damper Center Bolt Connecting Rod Bearing Cap Bolt Flywheel Stretch Bolt Amarture Bolt in Flywheel Ring and Seal Cover Nut in FlywheelSprocket Bolt to Exhaust Camshaft Camshaft Adjuster Flange Bolt Intake Flange Shaft Bolt Exhaust Camshaft Sprocket Bolt Camshaft Bearing Cap Bolt
Page 40 of 1574
1B1-4 M162 ENGINE MECHANICALSPECIAL TOOLS
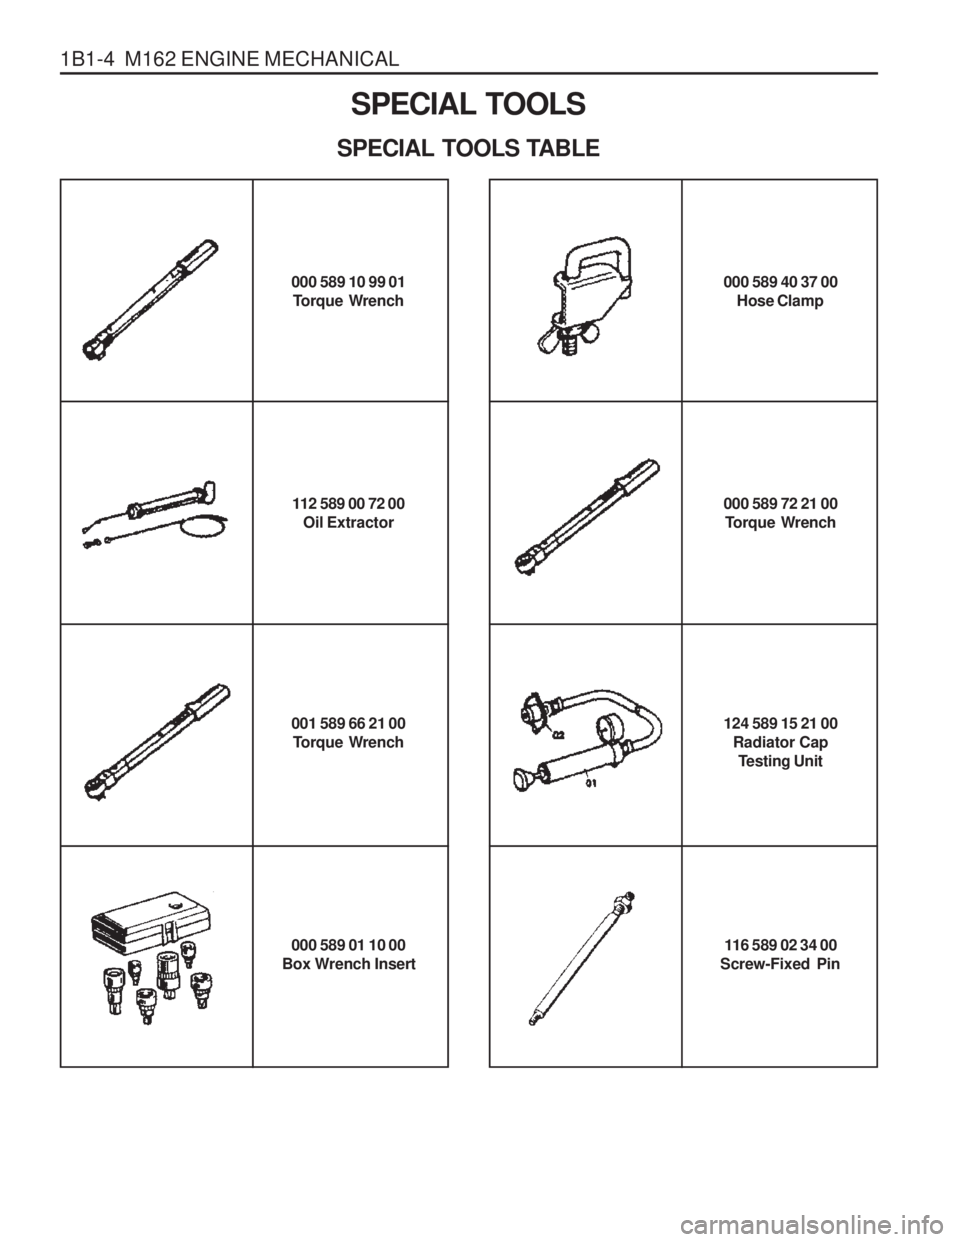
SPECIAL TOOLS TABLE
001 589 66 21 00 Torque Wrench
000 589 01 10 00
Box Wrench Insert 124 589 15 21 00
Radiator CapTesting Unit
116 589 02 34 00
Screw-Fixed Pin
000 589 10 99 01 Torque Wrench
112 589 00 72 00 Oil Extractor 000 589 72 21 00
Torque Wrench
000 589 40 37 00
Hose Clamp
Page 45 of 1574
M162 ENGINE MECHANICAL 1B1-9
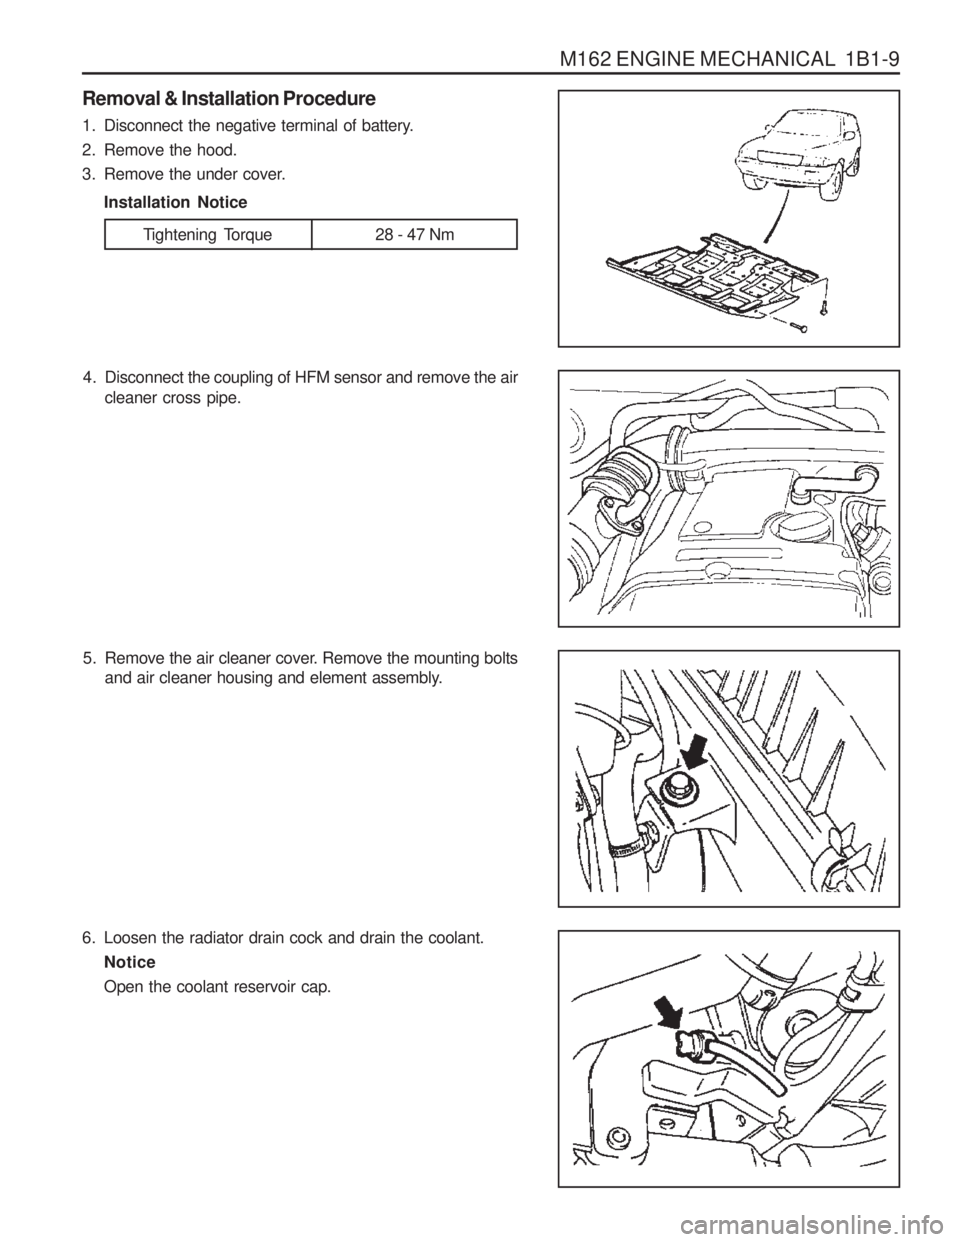
4. Disconnect the coupling of HFM sensor and remove the aircleaner cross pipe.
6. Loosen the radiator drain cock and drain the coolant. Notice Open the coolant reservoir cap.
5. Remove the air cleaner cover. Remove the mounting bolts
and air cleaner housing and element assembly.
Removal & Installation Procedure
1. Disconnect the negative terminal of battery.
2. Remove the hood.
3. Remove the under cover.
Installation Notice
Tightening Torque 28 - 47 Nm
Page 46 of 1574
1B1-10 M162 ENGINE MECHANICAL
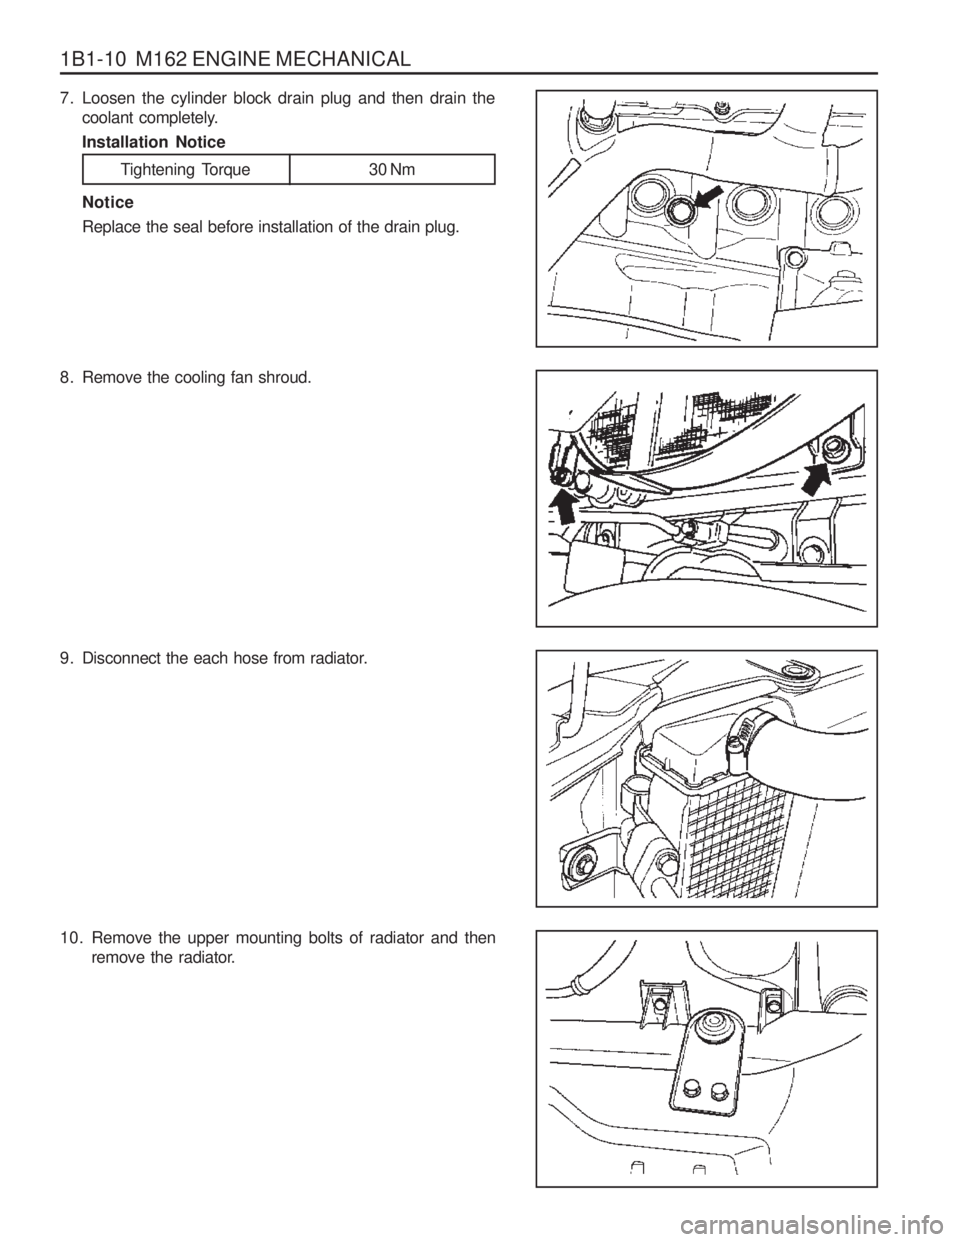
10. Remove the upper mounting bolts of radiator and thenremove the radiator.
7. Loosen the cylinder block drain plug and then drain thecoolant completely. Installation Notice
Tightening Torque 30 Nm
Notice Replace the seal before installation of the drain plug.
8. Remove the cooling fan shroud.
9. Disconnect the each hose from radiator.
Page 154 of 1574
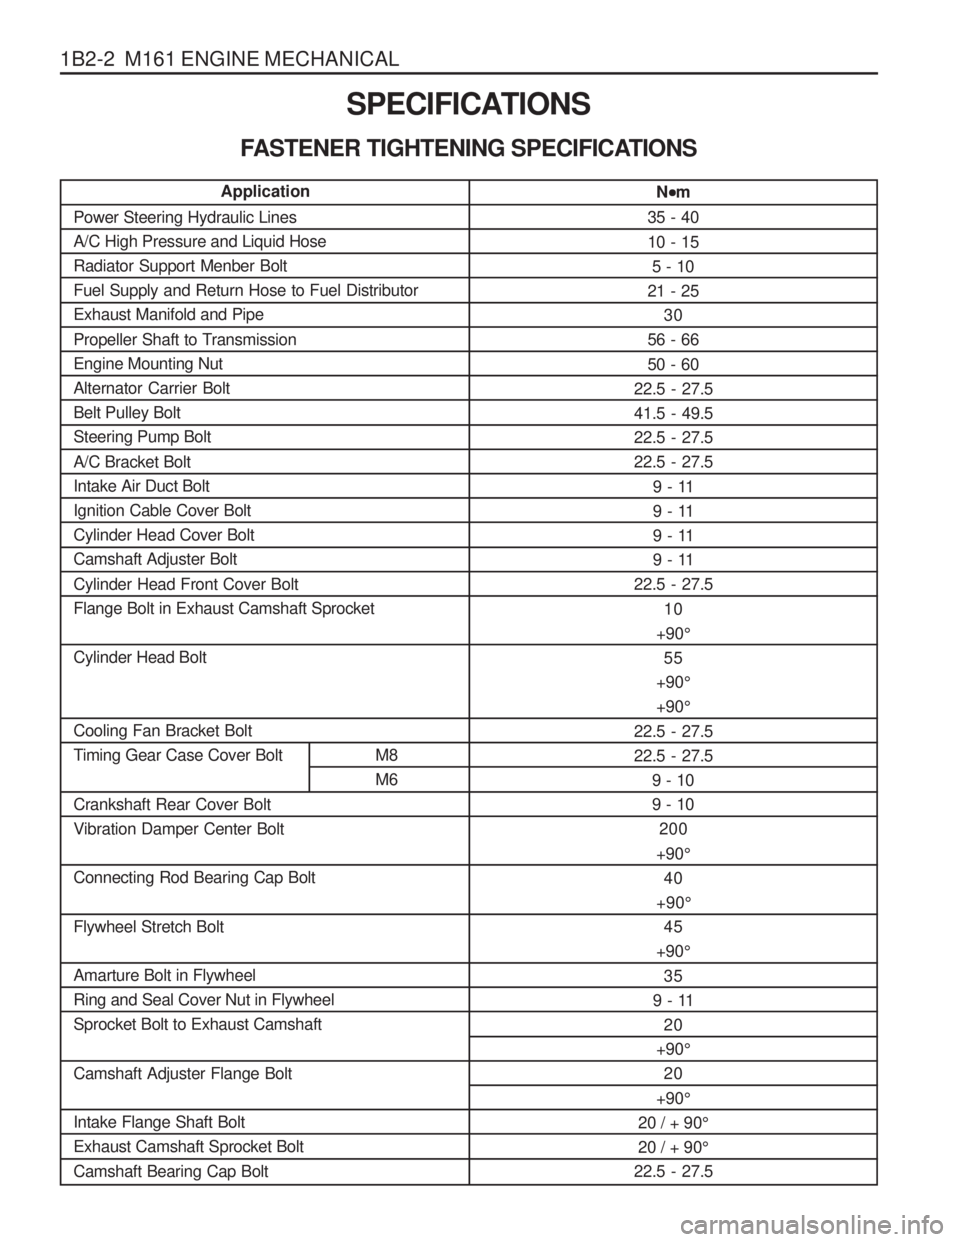
1B2-2 M161 ENGINE MECHANICALSPECIFICATIONS
FASTENER TIGHTENING SPECIFICATIONS N
m
35 - 40 10 - 15 5 - 10
21 - 25 30
56 - 6650 - 60
22.5 - 27.5 41.5 - 49.522.5 - 27.522.5 - 27.5
9 - 11
9 - 11
9 - 11
9 - 11
22.5 - 27.5
10
+90 °
55
+90 °
+90 °
22.5 - 27.522.5 - 27.5 9 - 109 - 10200
+90 °
40
+90 °
45
+90 °
35
9 - 11 20
+90 °
20
+90 °
20 / + 90 °
20 / + 90 °
22.5 - 27.5
Application
Power Steering Hydraulic Lines A/C High Pressure and Liquid HoseRadiator Support Menber BoltFuel Supply and Return Hose to Fuel DistributorExhaust Manifold and Pipe
Propeller Shaft to Transmission Engine Mounting NutAlternator Carrier BoltBelt Pulley BoltSteering Pump Bolt A/C Bracket Bolt Intake Air Duct BoltIgnition Cable Cover BoltCylinder Head Cover BoltCamshaft Adjuster Bolt Cylinder Head Front Cover Bolt Flange Bolt in Exhaust Camshaft Sprocket Cylinder Head Bolt Cooling Fan Bracket Bolt
Timing Gear Case Cover Bolt M8 M6
Crankshaft Rear Cover BoltVibration Damper Center Bolt Connecting Rod Bearing Cap Bolt Flywheel Stretch Bolt Amarture Bolt in Flywheel Ring and Seal Cover Nut in FlywheelSprocket Bolt to Exhaust Camshaft Camshaft Adjuster Flange Bolt Intake Flange Shaft Bolt Exhaust Camshaft Sprocket Bolt Camshaft Bearing Cap Bolt
Page 156 of 1574

1B2-4 M161 ENGINE MECHANICALSPECIAL TOOLS
SPECIAL TOOLS TABLE
000 589 10 99 01 Torque Wrench
112 589 00 72 00 Oil Extractor 000 589 72 21 00
Torque Wrench
001 589 66 21 00 Torque Wrench
000 589 01 10 00
Box Wrench Insert 124 589 15 21 00
Radiator CapTesting Unit
116 589 02 34 00
Screw-Fixed Pin 000 589 40 37 00
Hose Clamp
Page 162 of 1574
1B2-10 M161 ENGINE MECHANICAL
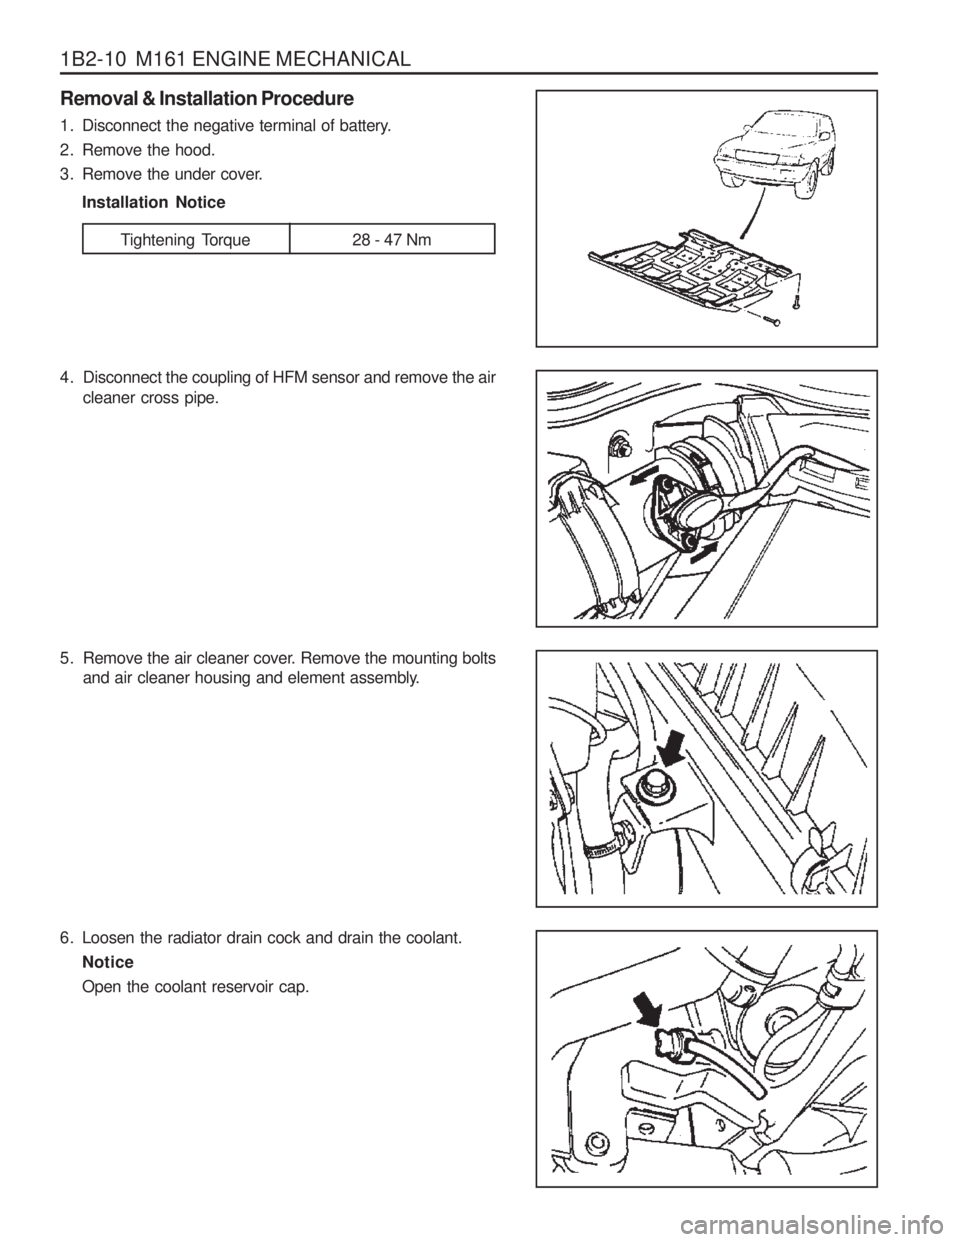
4. Disconnect the coupling of HFM sensor and remove the aircleaner cross pipe.
6. Loosen the radiator drain cock and drain the coolant. Notice Open the coolant reservoir cap.
5. Remove the air cleaner cover. Remove the mounting bolts
and air cleaner housing and element assembly.
Removal & Installation Procedure
1. Disconnect the negative terminal of battery.
2. Remove the hood.
3. Remove the under cover.
Installation Notice
Tightening Torque 28 - 47 Nm
Page 163 of 1574

M161 ENGINE MECHANICAL 1B2-11
10. Remove the upper mounting bolts of radiator and thenremove the radiator.
7. Loosen the cylinder block drain plug and then drain thecoolant completely. Installation Notice
Tightening Torque 30 Nm
Notice Replace the seal before installation of the drain plug.
8. Remove the cooling fan shroud.
9. Disconnect the each hose from radiator.