ECO mode SSANGYONG RODIUS 2005 User Guide
[x] Cancel search | Manufacturer: SSANGYONG, Model Year: 2005, Model line: RODIUS, Model: SSANGYONG RODIUS 2005Pages: 502, PDF Size: 70.43 MB
Page 351 of 502

0-38
RODIUS 2005.07
8710-01
STICS
14) Theft Deterrent
(1) Description of Burglar Alarm Function
Description of Burglar Alarm Function ▶
The “LOCK” output is “ON” when receiving the “LOCK” signal from transmitter while
the ignition key is removed and all doors are closed. The armed mode is activated when the
door lock switch is locked (theft deterrent horn output: once, hazard relay output: twice).
The theft deterrent horn and hazard relay outputs are “ON” when receiving the “LOCK”
signal from the remote control key again in armed mode (theft deterrent horn output: once,
hazard relay output: twice).
When receiving “LOCK” signal from the remote control key while any of doors is not
closed, only the “LOCK” output can be done and then activates the armed ready mode
(without theft deterrent horn and hazard warning flasher). At this moment, if the ignition key
is in the ignition switch, the door unlock switch is turned “ON” or the door lock switch
is unlocked (after 0.6 seconds), cancels the armed mode and activates the normal mode.
However, in these cases, if closing the door and locking the door lock switch, the theft
deterrent horn outputs once and the hazard warning flasher outputs twice and then activates
armed mode.
When the door is not opened or the ignition key is not inserted into ignition switch for 30
seconds after receiving “UNLOCK” signal, outputs “LOCK” and then activates armed
mode (RELOCK operation). Also, at this moment, the system outputs the theft deterrent
horn and hazard warning flasher.
The armed mode will not be activated except above conditions.
Ex) The armed mode will not be activated when the door is locked by the ignition key. 1.
2.
3.
4.
5.
Page 352 of 502

0-39
STICS
RODIUS 2005.07
8710-01
Armed mode cancellation requirements ▶
Unlocking by remote control key or engine starting. 1.
Warning operation requirements ▶
When opening the door in armed mode
When unlocking the door lock switch in armed mode
When closing and then opening the door after completion of warning (27 seconds) 1.
2.
3.
Warning operation ▶
The theft deterrent horn and hazard warning flasher output is “ON” for T3 (27
seconds) with the interval of T2 (1second). 1.
Warning cancellation requirements ▶
Cancels warning by using any signal from the remote control key (LOCK, UNLOCK,
START, STOP, PANIC, CHECK) during warning operation.
Cancels warning after 27 seconds (remaining period) while the ignition key is turned to
“ON” position. 1.
2.
Operation when warning is cancelled ▶
<007b008f008c0047009b008f008c008d009b0047008b008c009b008c00990099008c0095009b0047008f009600990095004700880095008b0047008f008800a100880099008b0047009e00880099009500900095008e0047008d00930088009a008f008c00
9900470096009c009b0097009c009b009a004700880099008c> “OFF”. 1.
Page 353 of 502

0-40
RODIUS 2005.07
8710-01
STICS
15) PANIC Warning
The PANIC warning output is “ON” (theft deterrent horn) when receiving the PANIC
signal from the remote control key (pressing PANIC button for less than 0.5 ~ 1.0 second).
The PANIC warning output is “OFF” when receiving any signal from the remote control
key during PANIC warning.
Followings are theft deterrent warnings: 1.
2.
3.
This function operates only in armed mode.
The system sends the current vehicle conditions (LOCK, engine running) when the PANIC
warning is turned off by the remote control key. 4.
5.The theft deterrent warning is canceled when receiving PANIC signal from the remote
control key during theft deterrent.
The theft deterrent warning output is “ON” when the theft deterrent conditions are
established during PANIC warning (PANIC output is “OFF”).
The PANIC warning output is “ON” when receiving the PANIC signal from the remote
control key in Armed Ready / Armed / Warning Completion / Relock Ready mode
(maintaining the theft deterrent mode). 1)
2)
3)
Page 384 of 502

0-7
RAIN SENSOR
RODIUS 2005.07
8610-11
4. FUNCTIONS OF RAIN SENSOR
1) Windshield Glass and Coupler Attachment
Check the outer windshield surface of sensing area for wear, damage and scratch. The sensor
is able to compensate the wear up to a specific level. Check the coupler attached surface of
windshield for porosity. If the porosity exists, the sensor cannot function properly.
2) Recognition of AUTO Mode
3) Instant Wipe Function
When the variable resistance knob on the multifunction wiper switch is turned by each 1 stage
from low sensitivity (Smark) to high sensitivity (F mark), the wiper operates one cycle.
And, the wiper also operates during raining up to 5 minutes after rain stops.When the engine is started with the wiper switch “AUTO” position, the wiper operates
one cycle to remind a driver that the wiper switch is in “AUTO” position.
When the wiper switch is turned to “AUTO” from OFF, the wiper operates one cycle. It
always operates one cycle for the initial operation, however, the wiper does not operate
afterwards to prevent the wiper blade wear if not raining when turning the wiper switch to
“AUTO” from “OFF”. However, the wiper operates up to 5 minutes after rain stops.
If this function does not occur, check No. 2 terminal on the rain sensor. If any defective
cannot be found, check the wiper relay (LOW) for defective. 1)
2)
3)If the installed wiper brushes are out of specification (size and length), the rain sensing
area cannot be fully wiped. In this case, the rain sensor’s sensitivity could be
decreased and the wipers are not properly operated -
As described, the STICS recognizes the wiper switch “AUTO” position. If there are not
any problem, go to diagnosis mode in STICS and check the terminal that receives signal
from wiper and communication lines between rain sensor unit and STICS. -
Page 387 of 502

0-10
RODIUS 2005.07
8610-11
RAIN SENSOR
6. RAIN SENSOR RELATED CIRCUIT
The rain sensor has one connector with 4 pins and each pin has following function as shown in
the circuit diagram.
However, in this vehicle, the terminal No. 1 and No. 2 are for communications between STICS
and the rain sensor; the No. 1 terminal sends the detected value from the rain sensor to STICS
then the STICS drives wiper motor.
to the rain sensor to recognize whether it is actual rain or it is in rain sensing wiper operation
mode.
No.2 terminal sends the wiper and washer operation information such as
washer operation mode,
MIST mode, or
AUTO wiper position -
-
-
Page 398 of 502

0-8
RODIUS 2005.07
8790-04
PARKING AID SYSTEM
3. OPERATIONS OF PARKING AID SYSTEM(PAS)
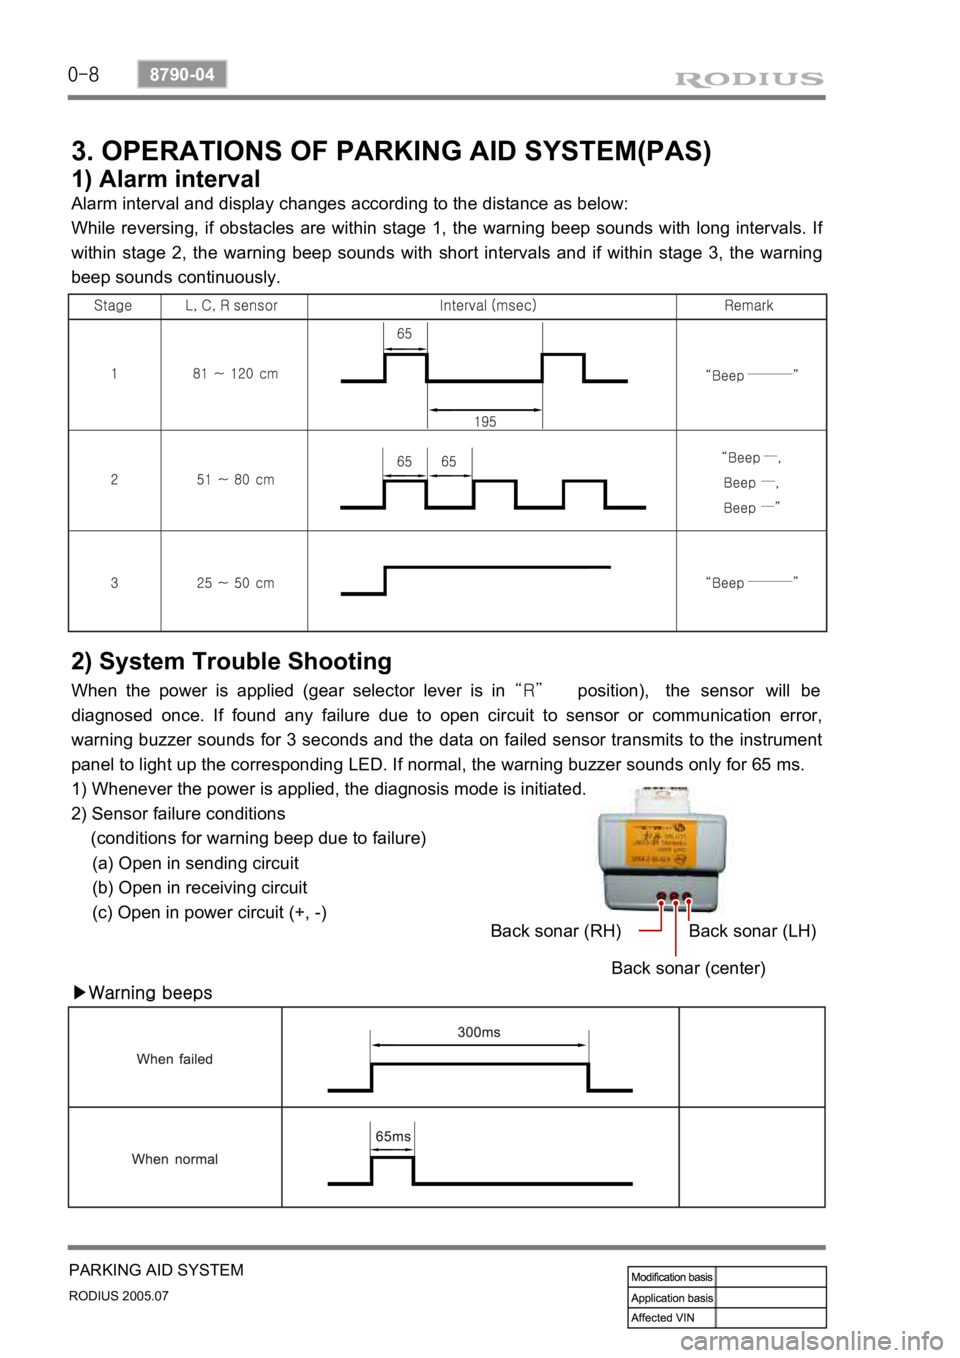
1) Alarm interval
Alarm interval and display changes according to the distance as below:
While reversing, if obstacles are within stage 1, the warning beep sounds with long intervals. I
f
within stage 2, the warning beep sounds with short intervals and if within stage 3, the warning
beep sounds continuously.
2) System Trouble Shooting
When the power is applied (gear selector lever is in “R” position), the sensor will be
diagnosed once. If found any failure due to open circuit to sensor or communication error,
warning buzzer sounds for 3 seconds and the data on failed sensor transmits to the instrument
panel to light up the corresponding LED. If normal, the warning buzzer sounds only for 65 ms.
1) Whenever the power is applied, the diagnosis mode is initiated.
2) Sensor failure conditions
(conditions for warning beep due to failure)
(a) Open in sending circuit
(b) Open in receiving circuit
(c) Open in power circuit (+, -)
▶Warning beepsBack sonar (RH)
Back sonar (center)Back sonar (LH)
Page 402 of 502

0-12
RODIUS 2005.07
8790-04
PARKING AID SYSTEM
6. OPERATIONAL PRINCIPLE OF REARVIEW CAMERA
In the rearview camera equipped vehicle, the monitors display when selecting “R”
position for safe parking. The operating conditions are as below:
1) General
When selecting R position while A/V system is in use:
The video mode in front A/V system is changed to rearview monitoring mode. However, the
audio mode stays on.
<007b008f008c0047009d0090008b008c0096004700940096008b008c0047009000950047008d009900960095009b004700680056007d0047009a00a0009a009b008c009400470099008c009a009c0094008c009a0047009e008f008c00950047009a008f00
90008d009b00900095008e00470096009c009b0047008d0099>om “R” position.
The audio and video mode in rear A/V system are not changed.
When selecting R position while A/V system is not in use:
Both monitors are automatically turned on to display rearview.
<00690096009b008f00470094009600950090009b00960099009a004700880099008c00470088009c009b009600940088009b0090008a00880093009300a00047009b009c00990095008c008b00470096008d008d0047009e008f008c00950047009a008f00
90008d009b00900095008e00470096009c009b0047008d0099>om “R” position. -
-
-
-
-
2) Operating Conditions and Modes of Rearview Camera
The rearview camera cannot operate alone. If the gear selector lever stays in “R” position
more than 3 seconds with the ignition key “ON” or engine running, the rearview appears
on the monitors automatically regardless of displays by head unit.
When the rearview mode is activated, the AV system doesn’t work even though the
buttons on the AV unit are pressed.
However, the monitor angle can be adjusted when the AV system is changed to the rearview
mode with the head unit turned off. And, the monitor angle and volume can be adjusted when
the AV system is changed to the rearview mode with the head unit turned on.
▶Auto mode
* Automatic operating mode
<004700470047007e008f008c00950047009a008c0093008c008a009b00900095008e00470079004700970096009a0090009b0090009600950047009e008f00900093008c004700680056007d0047009a00a0009a009b008c009400470090009a0047009500
96009b0047009000950047009c009a008c0047004f0070008e>nition switch “ON”, engine
running):
Both monitors are automatically turned on to display rearview.
<00690096009b008f00470094009600950090009b00960099009a004700880099008c00470088009c009b009600940088009b0090008a00880093009300a00047009b009c00990095008c008b00470096008d008d0047009e008f008c00950047009a008f00
90008d009b00900095008e00470096009c009b0047008d0099>om “R” position.
<007e008f008c00950047009a008c0093008c008a009b00900095008e00470079004700970096009a0090009b0090009600950047009e008f00900093008c004700680056007d0047009a00a0009a009b008c009400470090009a0047009000950047009c00
9a008c0047004f0070008e00950090009b0090009600950047>switch “ON”, engine
running):
The video mode in front A/V system is changed to rearview monitoring mode. However, the
audio mode stays on.
<007b008f008c0047009d0090008b008c0096004700940096008b008c0047009000950047008d009900960095009b004700680056007d0047009a00a0009a009b008c009400470099008c009a009c0094008c009a0047009e008f008c00950047009a008f00
90008d009b00900095008e00470096009c009b0047008d0099>om “R” position.
The audio and video mode in rear A/V system are not changed. -
-
-
-
-
The real distance is different from what you see in monitor because the camera uses wide-
angle lens.
Note that the display does not show everything in the rear area.
Keep the camera lens clean with a lens cleaner. -
-
-
Page 427 of 502

0-18
RODIUS 2005.07
6810-20
AIR CONDITIONING SYSTEM
2) AQS Operation
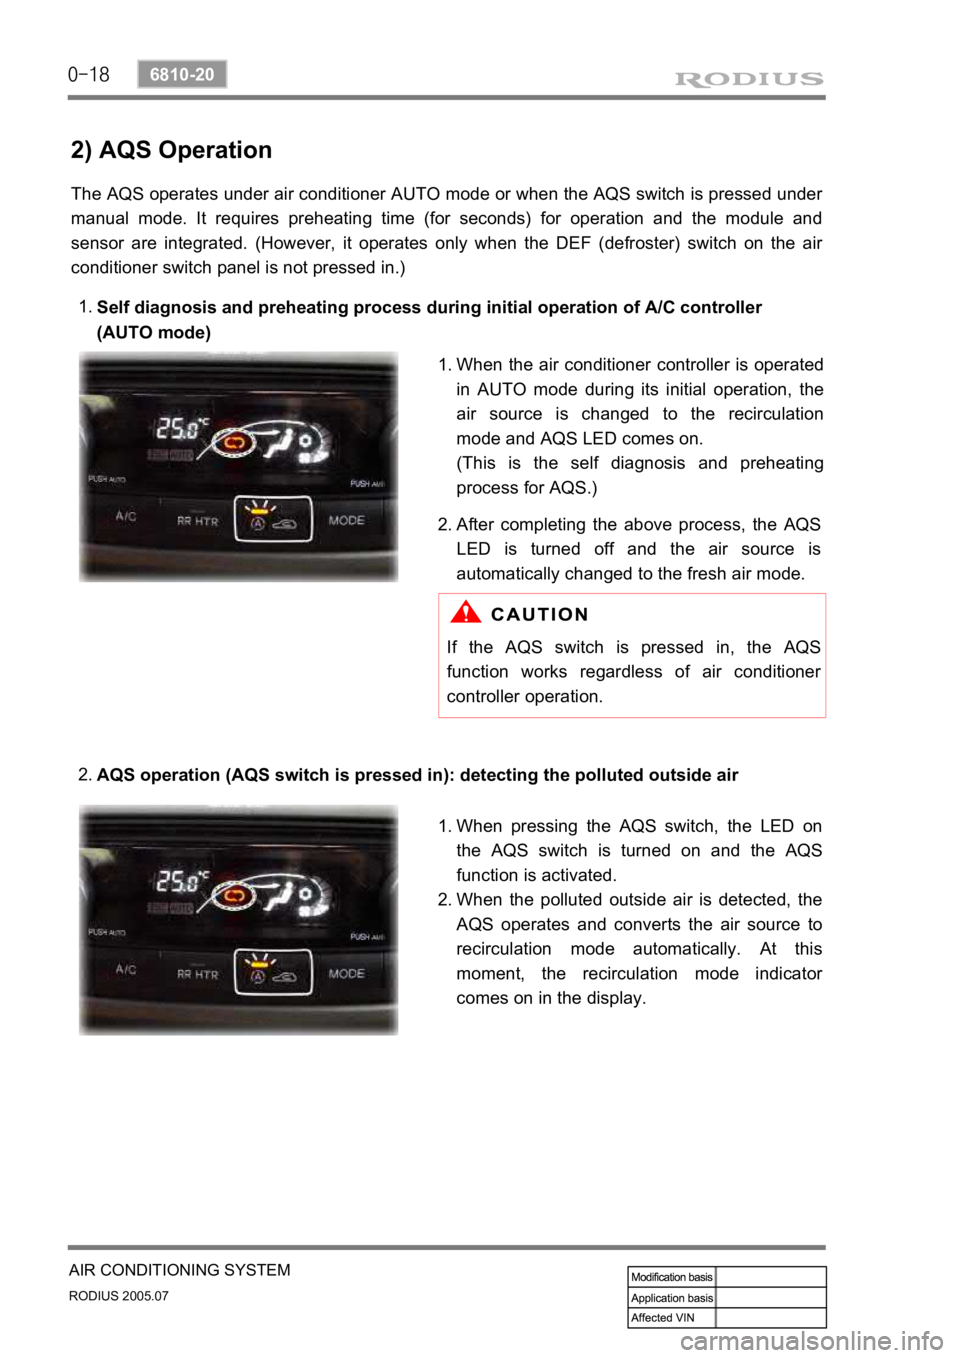
The AQS operates under air conditioner AUTO mode or when the AQS switch is pressed under
manual mode. It requires preheating time (for seconds) for operation and the module and
sensor are integrated. (However, it operates only when the DEF (defroster) switch on the ai
r
conditioner switch panel is not pressed in.)
Self diagnosis and preheating process during initial operation of A/C controller
(AUTO mode)
1.
AQS operation (AQS switch is pressed in): detecting the polluted outside air
2.
When the air conditioner controller is operated
in AUTO mode during its initial operation, the
air source is changed to the recirculation
mode and AQS LED comes on.
(This is the self diagnosis and preheating
process for AQS.)
1.
After completing the above process, the
AQS
LED is turned off and the air source is
automatically changed to the fresh air mode.
2.
If the AQS switch is pressed in, the AQS
function works regardless of air conditioner
controller operation.
When pressing the AQS switch, the LED on
the AQS switch is turned on and the
AQS
function is activated.
When the polluted outside air is detected, the
AQS operates and converts the air source to
recirculation mode automatically. At this
moment, the recirculation mode indicato
r
comes on in the display.
1.
2.