oil SSANGYONG RODIUS 2012 User Guide
[x] Cancel search | Manufacturer: SSANGYONG, Model Year: 2012, Model line: RODIUS, Model: SSANGYONG RODIUS 2012Pages: 715, PDF Size: 79.36 MB
Page 155 of 715

01-130000-00
T/C oil supply pipe M6(to block) 1 10±1.0Nm -
M6
(to turbocharger)1 17±2.0Nm-
T/C oil return pipeM6×16(to block)2 10±1Nm -
M6×16
(to turbocharger)210±1Nm -
EGR valveM8×223 25±2.5Nm -
EGR pipe bolt
(to exhaust manifold)M8×16 2 10±1Nm -
EGR pipe bolt
(to EGR cooler)M8×16 2 25±2.5Nm -
Name SizeNumbers of
fastenerTightening torque
(Nm)Note (total
tightening
torque)
Hot water inlet pipeM6×12210±1Nm-
AlternatorM10×901(LO) 25±2.5Nm -
M10×1161(HI) 46±4.6Nm -
Air conditioner
compressorM8×854 25~2.5Nm -
Air conditioner bracketM6×25410±1Nm-
Intake manifoldM8×35225±2.5Nm-
M8×110625±2.5Nm-
Oil filter moduleM8×40625±2.5Nm-
M8×20125±2.5Nm-
M8×140225±2.5Nm-
Knock sensorM8×28220±5Nm-
Camshaft position
sensorM8×141 10~14Nm -
T-T-MAP pressure
sensorM6×20110±1Nm-
Exhaust manifold M8 1040±4Nm-
Turbocharger M8 325±2.5Nm-
T/C support bolt M8 125±2.5Nm-
Page 156 of 715

01-14
Name SizeNumbers of
fastenerTightening
torque (Nm)Note (total
tightening
torque)
Idler pulley/tensioner
pulley1 45±4.5Nm -
Glow plug M5 4 20±2Nm -
Vacuum pumpM8×25 3 10±1Nm -
Timing gear case coverM6×40 7 10±1Nm -
M6×45 1 10±1Nm -
M6×50 3 10±1Nm -
Cylinder head coverM6×35 21 10±1Nm -
Oil dipstick gauge coverM6×16 1 10±1Nm -
Oil filter cap 1 25±2.5Nm -
Fuel railM8×25 2 25±2.5Nm -
Injector clamp boltM6×44 2 9±1.0Nm
130˚±10˚ -
High pressure pipe
(between high pressure
pump and fuel rail
assembly)M17 1 30±3Nm -
High pressure pipe
(between fuel rail
assembly and injector)M17 4 30±3Nm -
Crankshaft position sensorM5×14 1 8±0.4Nm -
Main wiringM6×16 5 10±1Nm -
Intake ductM8×25 3 25±2.5Nm -
Power steering pumpM8×100 3 25±2.5Nm -
Cylinder head front coverM6×10 5 10±1Nm -
Ladder frameM8×16 5 30±3Nm -
Page 161 of 715

02-4
2. TIGHTENING TORQUE
Component SizeBolt
QuantitySpecified torque
(Nm)Remark
(Total torque)
Main bearing capM12×82 10 55±5Nm,
180˚ Not re-usable
Connecting rod capM9×52 8 40±5Nm,
90˚+10˚ 50 to 80 Nm
Crankshaft rear sealM6×20 6 10±1Nm -
Oil pump M8x35 3 25±2.5Nm -
Drive plateM10×22 8 45±5Nm,
90˚+10˚ 60 to 100 Nm
Isolation damper center
boltM18x50 1 200±20Nm,
180˚+20˚660 to 720 Nm
Not re-usable
Oil panM6×20 18 10±1Nm -
M6×35 2 10±1Nm -
M6×85 2 10±1Nm -
M6×120 2 10±1Nm -
M8×40 2 25±2.5Nm -
HP pump main nutM14×1.5-8-1 1 65±5Nm -
HP pump bolt M8x30 3 25±2.5Nm -
Cylinder headM13×150 12 85Nm
270°±10° -
Camshaft capM6×30 16 10±1Nm -
M8×60 4 25±2.5Nm -
Exhaust stud bolt 10 15±1.5Nm -
Exhaust sprocket boltM11×40 1 30±3Nm -
Chain tensioner screw
plugM38×1.5 1 25±2.5Nm -
Coolant temperature
sensor1 20±2.0Nm
-
Auto tensionerM8×30(LOW) 1 25±2.5Nm -
M10×75(Upper)1 55±5.5Nm -
Coolant pumpM6×50 7 10±1.0Nm -
Page 162 of 715

02-50000-00
Component SizeBolt
QuantitySpecified torque
(Nm)Remark
(Total torque)
Hot water inlet pipeM6×12210±1Nm-
AlternatorM10×901(lower) 25±2.5Nm-
M10×1161(upper) 46±4.6Nm-
A/C compressorM8×85425±2.5Nm-
A/C bracketM6×25410±1Nm-
Intake manifoldM8×35225±2.5Nm-
M8×110625±2.5Nm-
Oil filter moduleM8×40625±2.5Nm-
M8×20125±2.5Nm-
M8×140225±2.5Nm-
Knock sensorM8×28220±5Nm-
Cam position sensorM8×141 10~14Nm -
T-MAP pressure
sensorM6×20110±1Nm-
Exhaust manifold M8 1040±4Nm-
Turbocharger M8 325±2.5Nm-
T/C support bolt 125±2.5Nm-
T/C support nut M8 125±2.5Nm-
T/C oil supply pipe M6(block side) 110±1.0Nm-
M6(turbo side) 117±2.0Nm-
T/C oil return pipeM6×16
(turbo side)210±1Nm-
M6×16
(block side)210±1Nm-
EGR valveM8×22325±2.5Nm-
EGR pipe bolt
(Intake side)M8×16210±1.0Nm-
EGR pipe bolt
(EGR cooler side)M8×16225±2.5Nm-
Idle pulley/Tensioner
pulley145±4.5Nm -
Page 163 of 715

02-6
Cylinder head coverM6×352110±1Nm-
Oil gauge tubeM6×16110±1Nm-
Oil filter cap 125±2.5Nm-
Fuel railM8×25225±2.5Nm-
Injector clamp boltM6×4429±1.0Nm
130˚±10˚-
High pressure pipe
(between HP pump and
fuel rail)M17 130±3Nm-
High pressure pipe
(between fuel rail and
injector)M17 430±3Nm-
Crank position sensorM5×1418±0.4Nm-
Main wiringM6×16510±1Nm-
Intake ductM8×25325±2.5Nm-
Power steering pumpM8×100325±2.5Nm-
Cylinder head front
coverM6×10510±1Nm-
Ladder frame M8x16 530±3Nm-
Component SizeBolt
QuantitySpecified torque
(Nm)Remark
(Total torque)
Glow plug M5 420±2Nm-
Vacuum pumpM8×25310±1Nm-
Timing gear case coverM6×40710±1Nm-
M6×45110±1Nm-
M6×50310±1Nm-
Page 165 of 715

02-8
(2) Cylinder pressure leakage test
If the measured value of the compression pressure test is not within the specifications, perform
the cylinder pressure leakage test.Specified value ▶
Perform this test in the sequence of firing order.
Do not test the cylinder pressure leakage with wet type test procedure. (do not inject the
engine oil into the combustion chamber) -
-
Test condition: normal engine operating
temperature (80˚C)Specified value
Whole engine below 25%
at valve and cylinder head gasket below 10%
at piston ring below 20%
Crank the engine for approx. 10 seconds
by using the start motor. 2.
Record the test result and measure the
compression pressure of other cylinders
with same manner. 3.
If the measured value is out of specified
value, perform the cylinder pressure
leakage test. 4.
Page 168 of 715

02-110000-00
4. GUIDELINES ON ENGINE SERVICE
To prevent personal injuries and vehicle damages that can be caused by mistakes during engine
and unit inspection/repair and to secure optimum engine performance and safety after service
works, basic cautions and service work guidelines that can be easily forgotten during engine
service works are described in.
Cautions before service works
For safe and correct works, you must observe the working procedures and instructions in this
manual. And, use the designated tools as follow:
Engine stand / Heavy duty engine jack
To prevent the engine from starting abruptly, do not allow anybody to get in the vehicle while
servicing in engine compartment.
Before work on engine and each electrical equipment, be sure to disconnect battery negative
(-) terminal.
Before service works, be sure to prepare the works by cleaning and aligning work areas.
Do not allow the foreign material get into the fuel injection system.
When removing the engine, use only the safety hook on engine and engine hanger. Do not
support the bottom of oil pan with a jack.
Engine and accessories
Completely drain the engine oil, coolant and fuel from engine before removal.
Before disassembling/assembling the engine components, carefully read the working
procedures in this manual.
Make sure to keep the specified tightening torques during installation.
Clean and properly lubricate the parts before reassembly.
Carefully check that there are not any interference while servicing. ▶
-
-
-
-
-
-
▶
-
-
-
-
-
Page 169 of 715

02-12
Electrical equipment ▶
Electric devices should be handled more carefully.
Currently, the engine has a lot of electric devices. there could be poor engine performance,
incomplete combustion and other abnormal symptoms due to short circuit or poor contact.
Before work on engine and each electrical equipment, be sure to disconnect battery negative
(-) terminal.
When replacing the electric device, use only genuine part and check the conditions of
connections and grounds. Loosened connection or ground make cause a fire and personal
injury. -
-Fuel and lubrication system ▶
Do not allow the fluid and engine oil to make contact with the body paintwork and hoses.
If work on the fluid system such as fuel and oil, working area should be well ventilated and
smoking should be prohibited.
Gasket or seal on the fuel/lubrication system should be replaced with new ones and bolts and
nuts should be tightened as specified.
After removal/installation works, be sure to check whether there is leak on the connecting
section. -
-
-
-
If fine dust or foreign material enters into DI engine's fuel system, there can be serious damages
in HP pump and injectors. Thus, be sure to plug the inlets of removed fuel line components with
cap and protect removed parts not to be contaminated with dirt. (Refer to cleanness in this
manual while working on DI engine fuel system)
Page 174 of 715

02-170000-00
Vacuum pump
Pump capacity: 210 cc/rev
Camshaft speed:
375 to 3,000 rpm
Lubrication temperature:
-40 to 155°C
Oil: 5W30
Drive type: Driven by exhaust
Camshaft sprocket
EGR cooler bypass valve
This valve is controlled by ECU. When the
engine is cooled, the exhaust gas goes to
combustion chamber without passing through
EGR cooler because the valve is closed by
vacuum pressure.
2. VACUUM PUMP
Vacuum pump generates the vacuum pressure and supplies it to EGR cooler bypass solenoid.
This pump is single vane type and displacement is 210 cc/rev. The lubrication oil is supplied
through the hole in hollow shaft.
Components ▶
Brake booster and naster
cylinder
Page 175 of 715

02-18
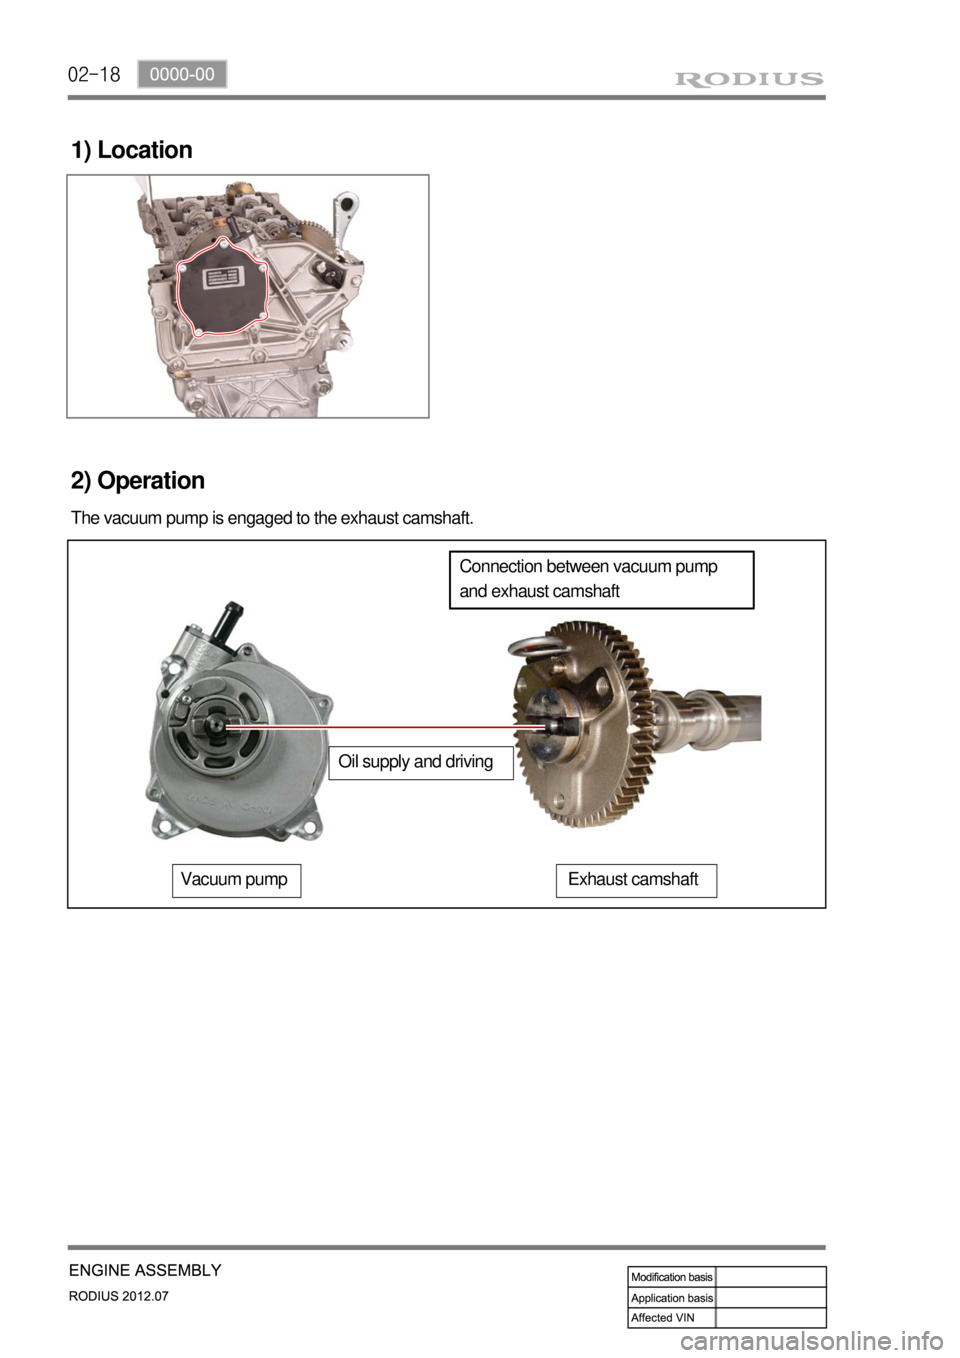
1) Location
2) Operation
The vacuum pump is engaged to the exhaust camshaft.
Connection between vacuum pump
and exhaust camshaft
Oil supply and driving
Vacuum pumpExhaust camshaft