SUBARU BRZ 2022 Getting Started Guide
Manufacturer: SUBARU, Model Year: 2022, Model line: BRZ, Model: SUBARU BRZ 2022Pages: 108, PDF Size: 29.44 MB
Page 11 of 108
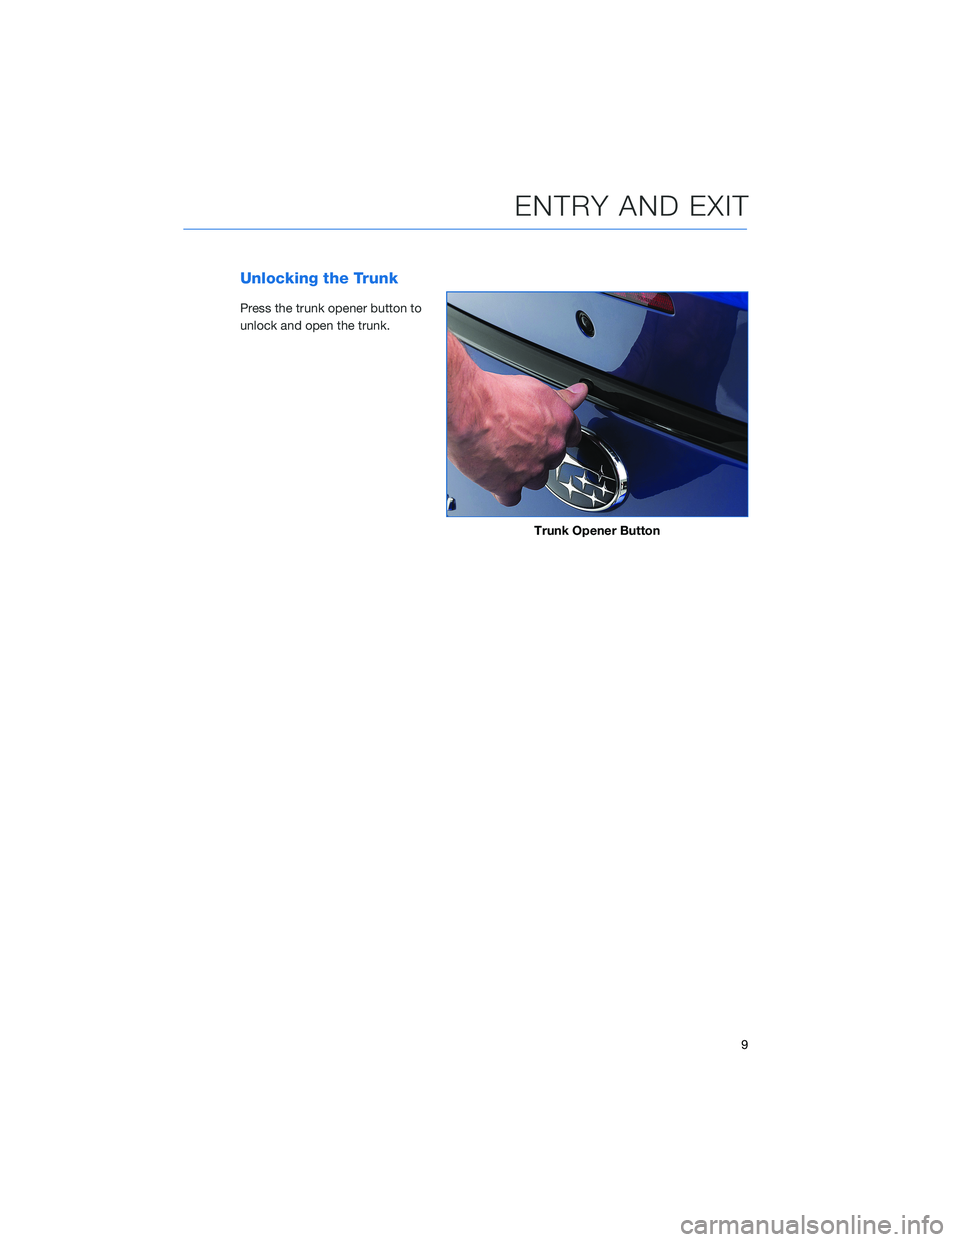
Unlocking the Trunk
Press the trunk opener button to
unlock and open the trunk.
Trunk Opener Button
ENTRY AND EXIT
9
Page 12 of 108
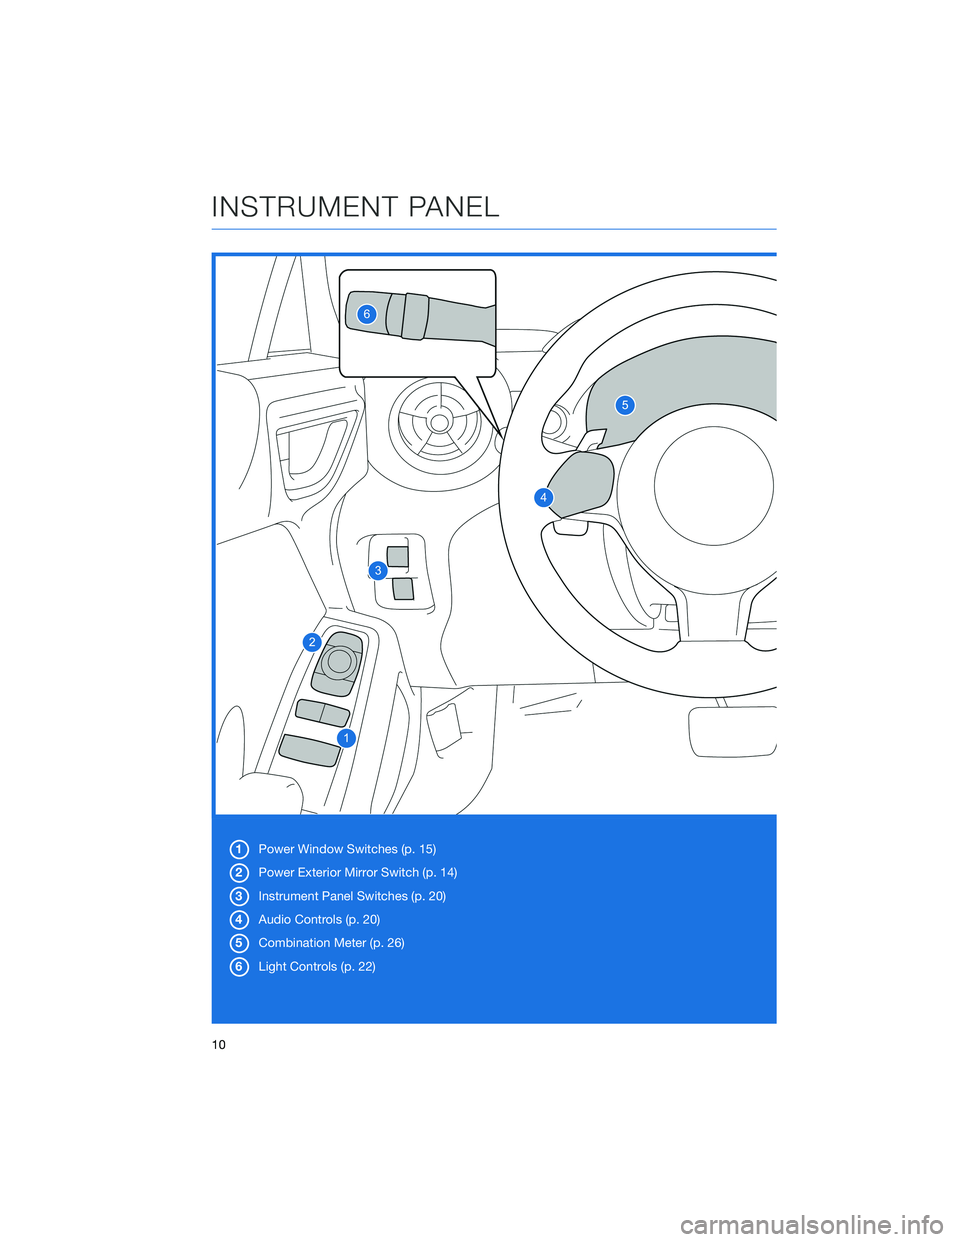
1Power Window Switches (p. 15)
2Power Exterior Mirror Switch (p. 14)
3Instrument Panel Switches (p. 20)
4Audio Controls (p. 20)
5Combination Meter (p. 26)
6Light Controls (p. 22)
INSTRUMENT PANEL
10
Page 13 of 108
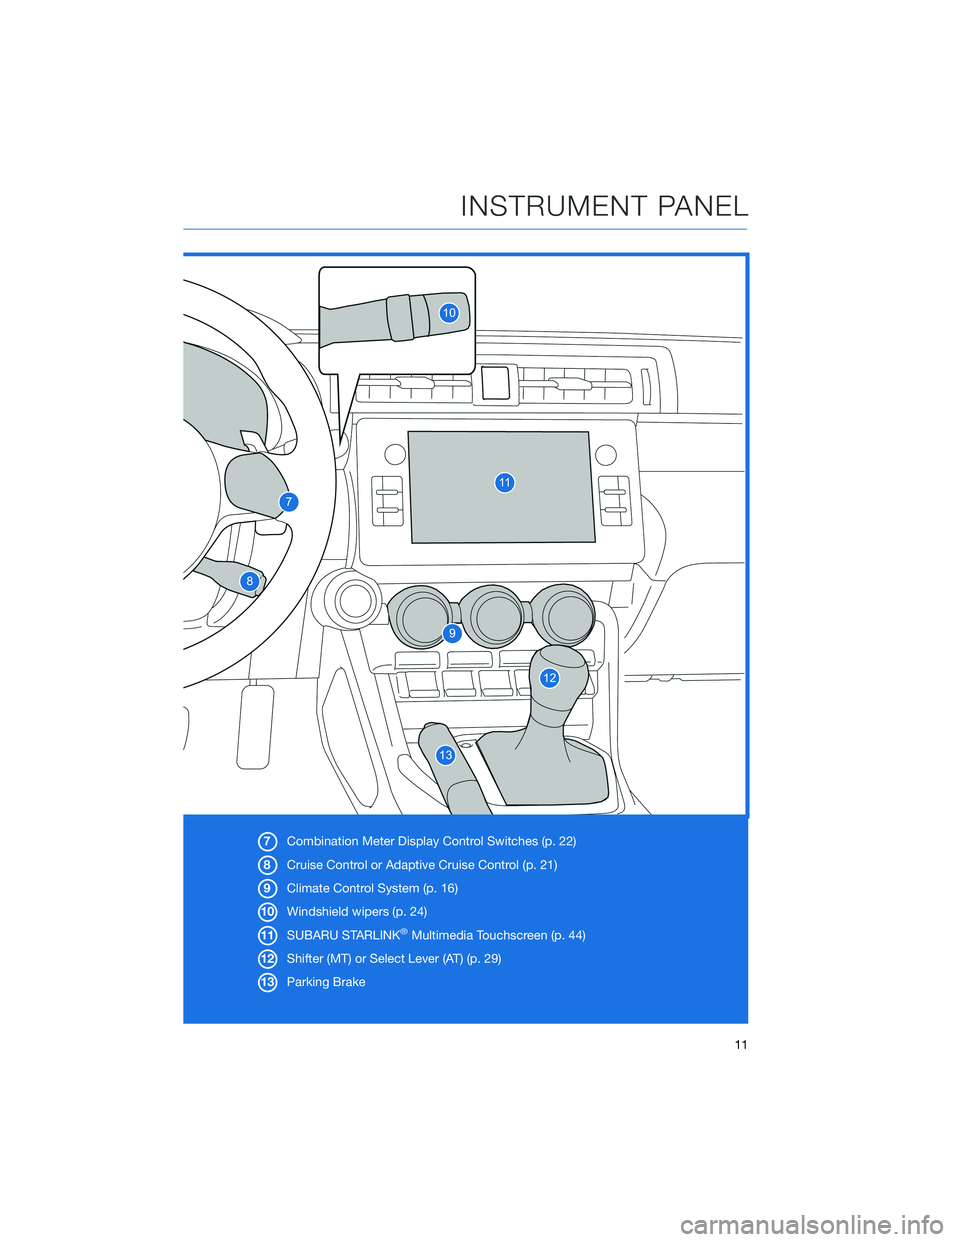
7Combination Meter Display Control Switches (p. 22)
8Cruise Control or Adaptive Cruise Control (p. 21)
9Climate Control System (p. 16)
10Windshield wipers (p. 24)
11SUBARU STARLINK
®Multimedia Touchscreen (p. 44)
12Shifter (MT) or Select Lever (AT) (p. 29)
13Parking Brake
INSTRUMENT PANEL
11
Page 14 of 108
SEATING
Manual Seats
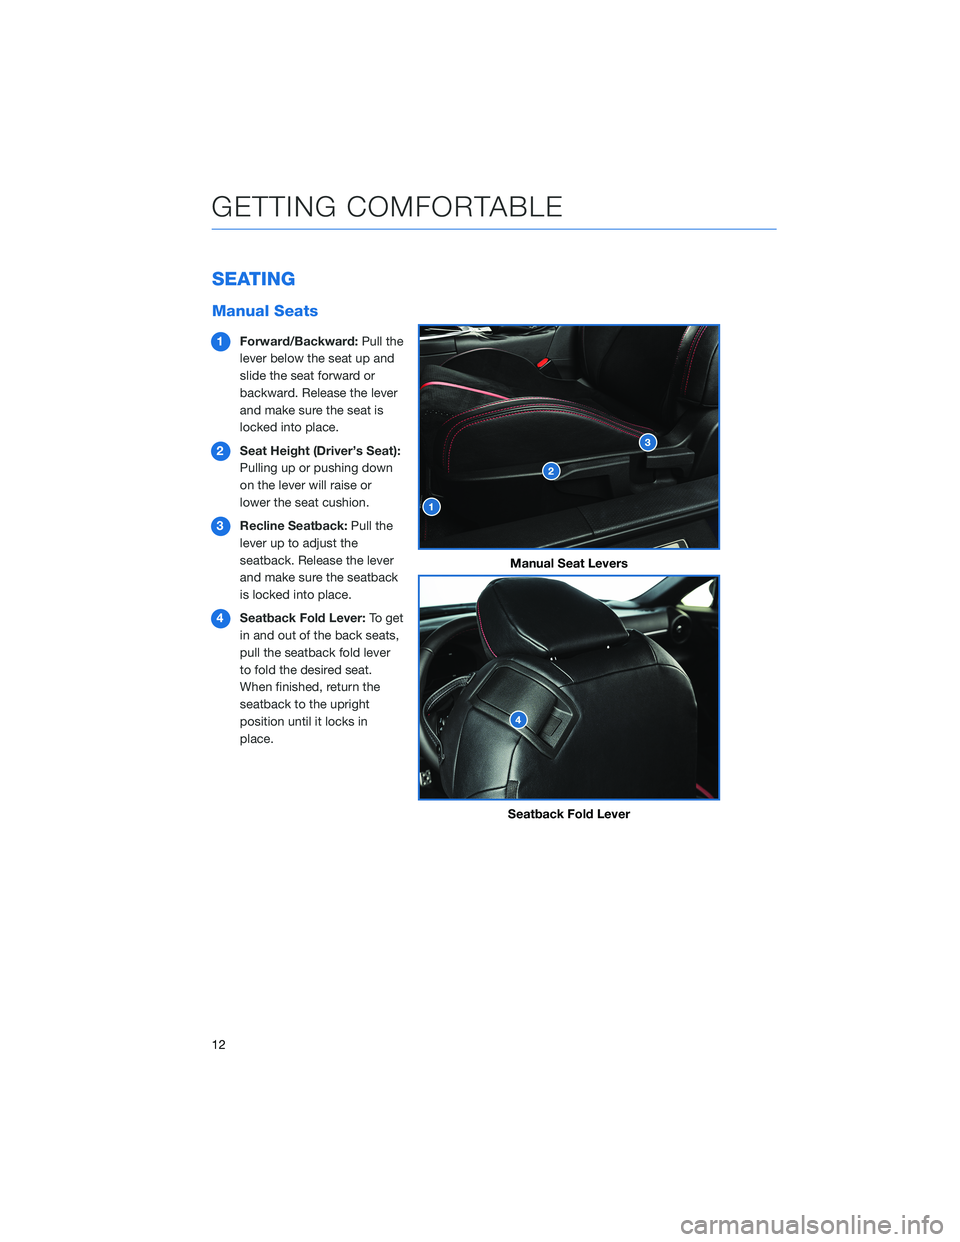
1Forward/Backward:Pull the
lever below the seat up and
slide the seat forward or
backward. Release the lever
and make sure the seat is
locked into place.
2Seat Height (Driver’s Seat):
Pulling up or pushing down
on the lever will raise or
lower the seat cushion.
3Recline Seatback:Pull the
lever up to adjust the
seatback. Release the lever
and make sure the seatback
is locked into place.
4Seatback Fold Lever:To get
in and out of the back seats,
pull the seatback fold lever
to fold the desired seat.
When finished, return the
seatback to the upright
position until it locks in
place.
Manual Seat Levers
Seatback Fold Lever
GETTING COMFORTABLE
12
Page 15 of 108
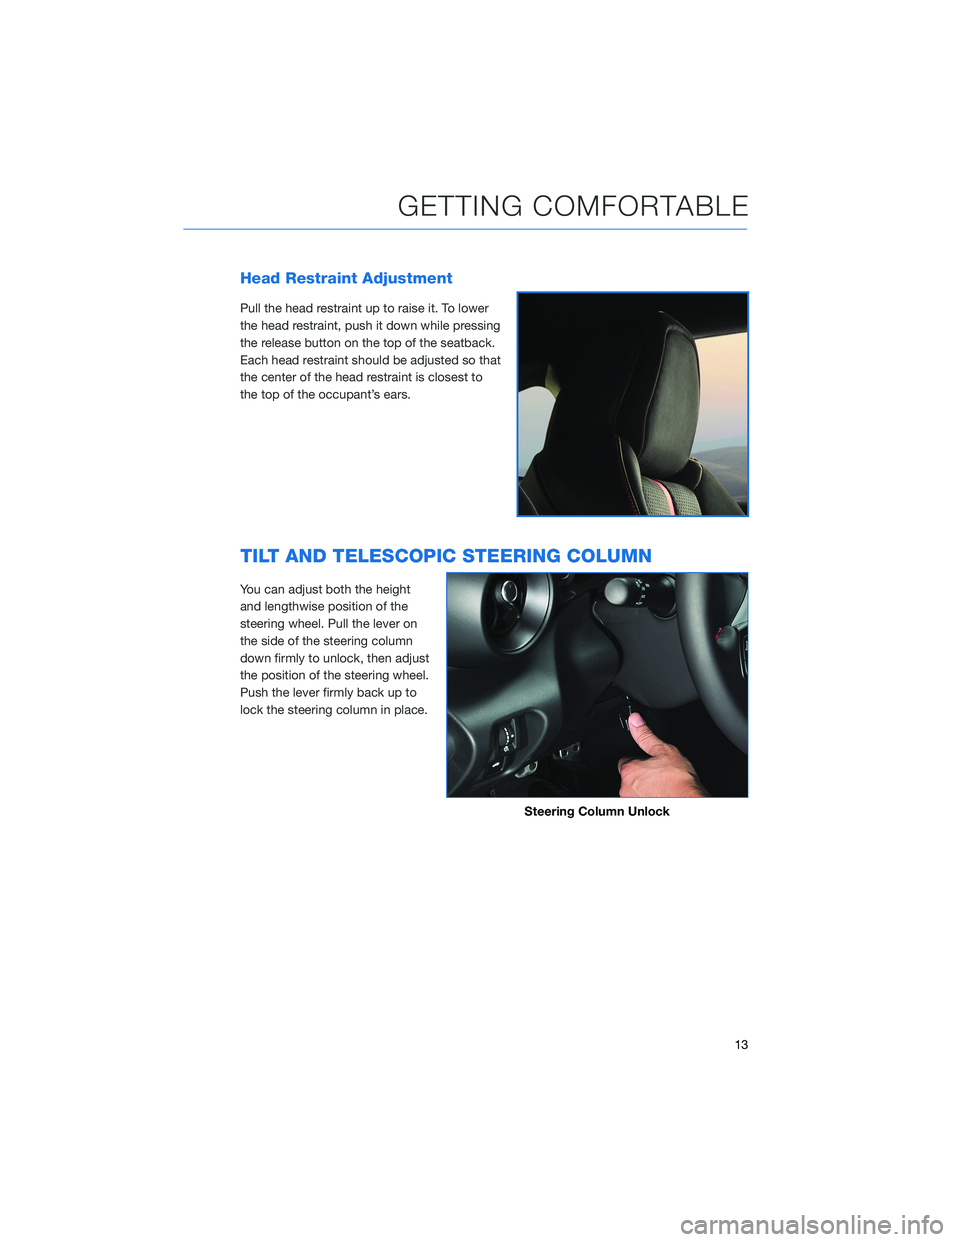
Head Restraint Adjustment
Pull the head restraint up to raise it. To lower
the head restraint, push it down while pressing
the release button on the top of the seatback.
Each head restraint should be adjusted so that
the center of the head restraint is closest to
the top of the occupant’s ears.
TILT AND TELESCOPIC STEERING COLUMN
You can adjust both the height
and lengthwise position of the
steering wheel. Pull the lever on
the side of the steering column
down firmly to unlock, then adjust
the position of the steering wheel.
Push the lever firmly back up to
lock the steering column in place.
Steering Column Unlock
GETTING COMFORTABLE
13
Page 16 of 108
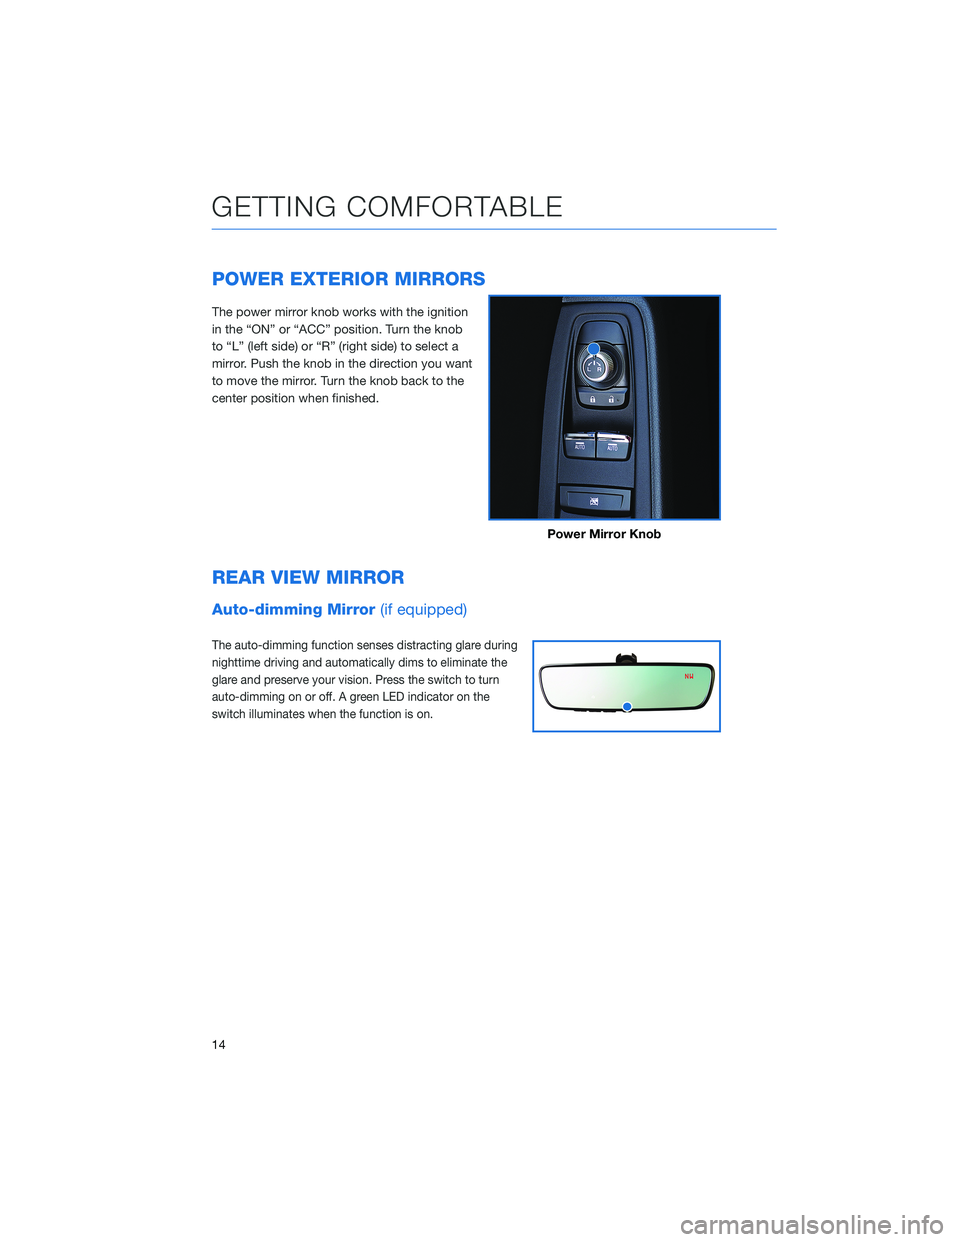
POWER EXTERIOR MIRRORS
The power mirror knob works with the ignition
in the “ON” or “ACC” position. Turn the knob
to “L” (left side) or “R” (right side) to select a
mirror. Push the knob in the direction you want
to move the mirror. Turn the knob back to the
center position when finished.
REAR VIEW MIRROR
Auto-dimming Mirror(if equipped)
The auto-dimming function senses distracting glare during
nighttime driving and automatically dims to eliminate the
glare and preserve your vision. Press the switch to turn
auto-dimming on or off. A green LED indicator on the
switch illuminates when the function is on.
Power Mirror Knob
GETTING COMFORTABLE
14
Page 17 of 108
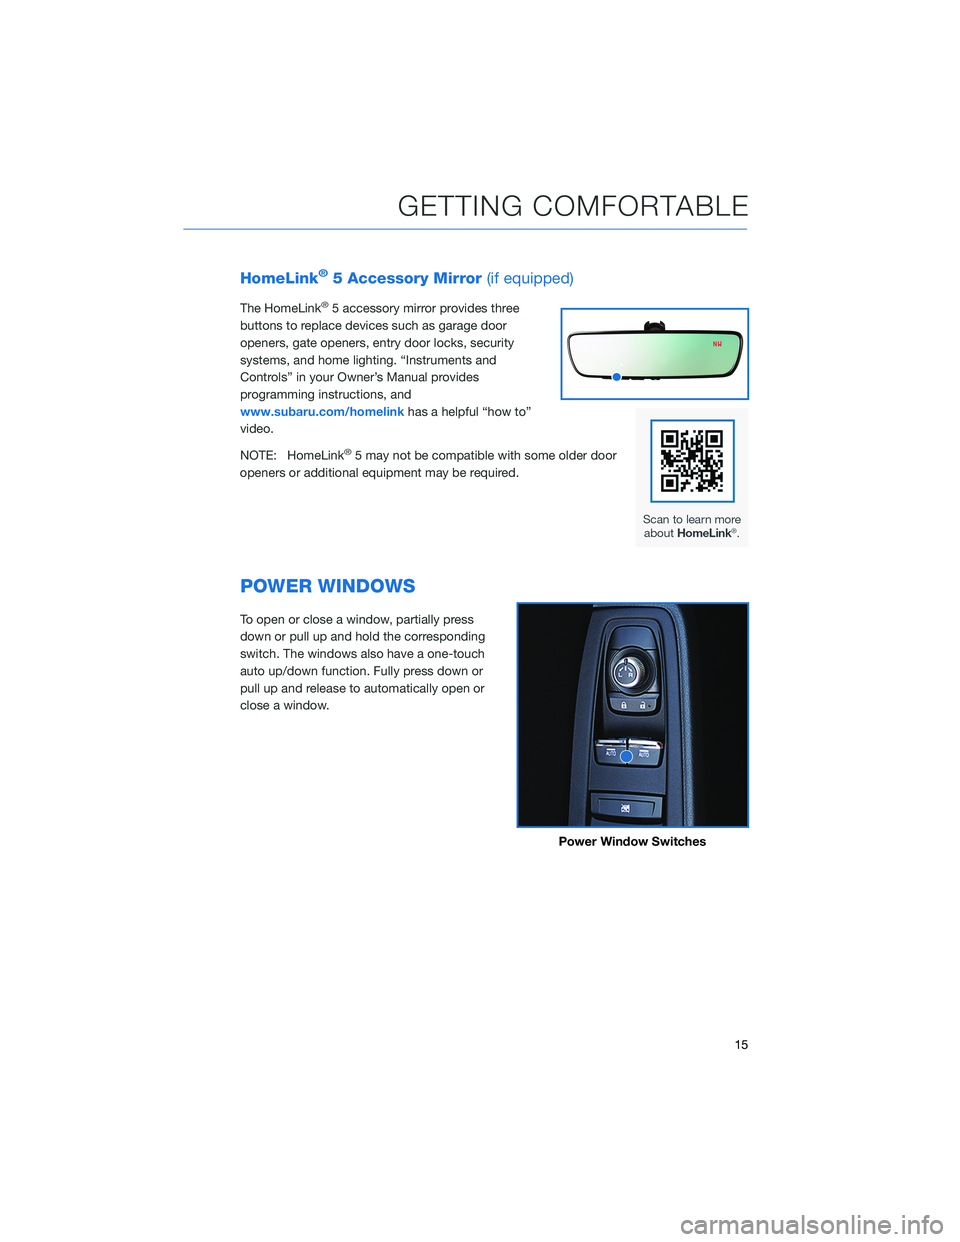
HomeLink®5 Accessory Mirror(if equipped)
The HomeLink®5 accessory mirror provides three
buttons to replace devices such as garage door
openers, gate openers, entry door locks, security
systems, and home lighting. “Instruments and
Controls” in your Owner’s Manual provides
programming instructions, and
www.subaru.com/homelinkhas a helpful “how to”
video.
NOTE: HomeLink
®5 may not be compatible with some older door
openers or additional equipment may be required.
POWER WINDOWS
To open or close a window, partially press
down or pull up and hold the corresponding
switch. The windows also have a one-touch
auto up/down function. Fully press down or
pull up and release to automatically open or
close a window.
Power Window Switches
GETTING COMFORTABLE
15
Page 18 of 108
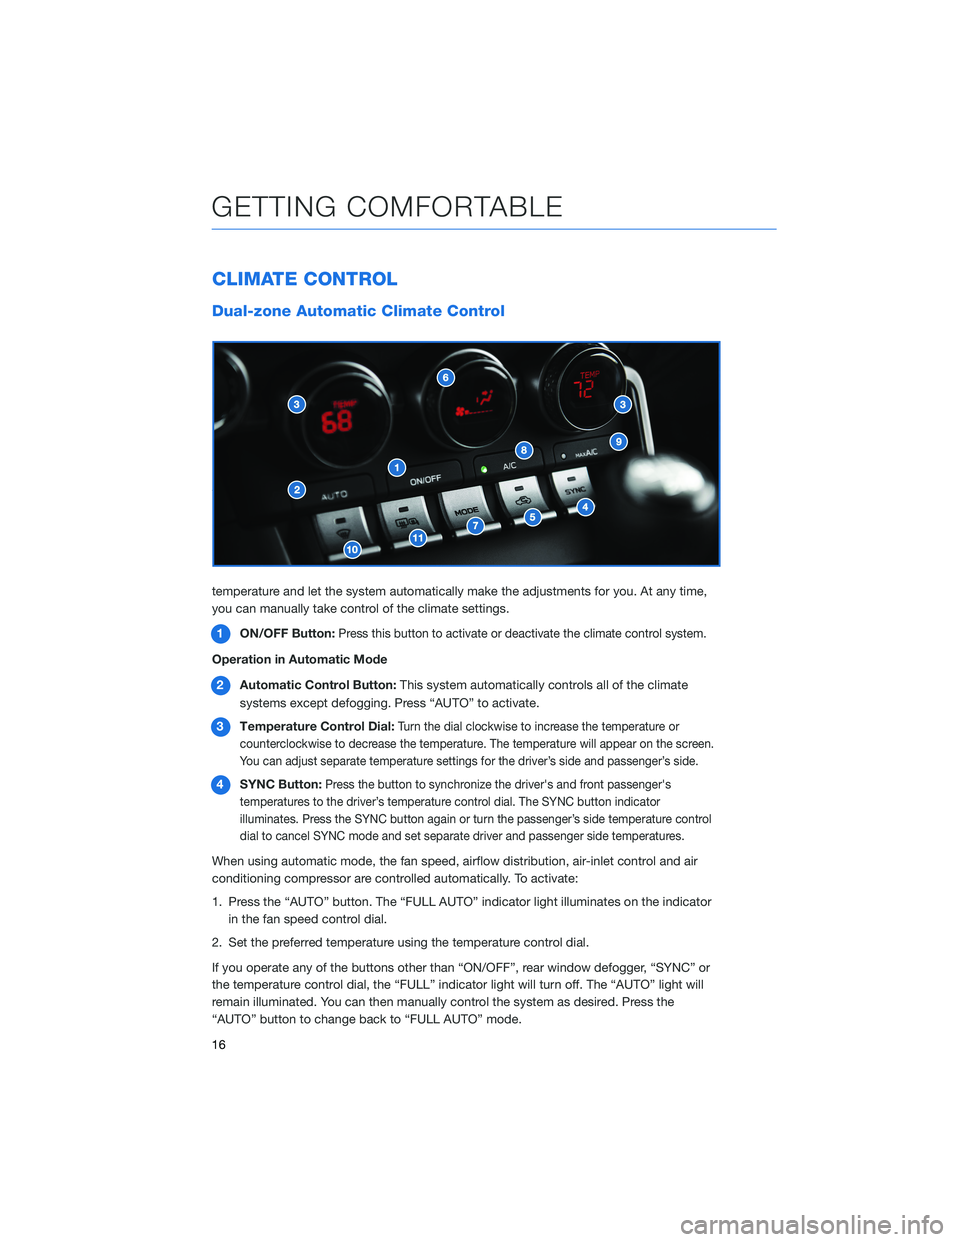
CLIMATE CONTROL
Dual-zone Automatic Climate Control
You can set separate temperatures for the driver and passenger seats. Set your desired
temperature and let the system automatically make the adjustments for you. At any time,
you can manually take control of the climate settings.
1ON/OFF Button:
Press this button to activate or deactivate the climate control system.
Operation in Automatic Mode
2Automatic Control Button:This system automatically controls all of the climate
systems except defogging. Press “AUTO” to activate.
3Temperature Control Dial:
Turn the dial clockwise to increase the temperature or
counterclockwise to decrease the temperature. The temperature will appear on the screen.
You can adjust separate temperature settings for the driver’s side and passenger’s side.
4SYNC Button:Press the button to synchronize the driver's and front passenger's
temperatures to the driver’s temperature control dial. The SYNC button indicator
illuminates. Press the SYNC button again or turn the passenger’s side temperature control
dial to cancel SYNC mode and set separate driver and passenger side temperatures.
When using automatic mode, the fan speed, airflow distribution, air-inlet control and air
conditioning compressor are controlled automatically. To activate:
1. Press the “AUTO” button. The “FULL AUTO” indicator light illuminates on the indicator
in the fan speed control dial.
2. Set the preferred temperature using the temperature control dial.
If you operate any of the buttons other than “ON/OFF”, rear window defogger, “SYNC” or
the temperature control dial, the “FULL” indicator light will turn off. The “AUTO” light will
remain illuminated. You can then manually control the system as desired. Press the
“AUTO” button to change back to “FULL AUTO” mode.
GETTING COMFORTABLE
16
Page 19 of 108
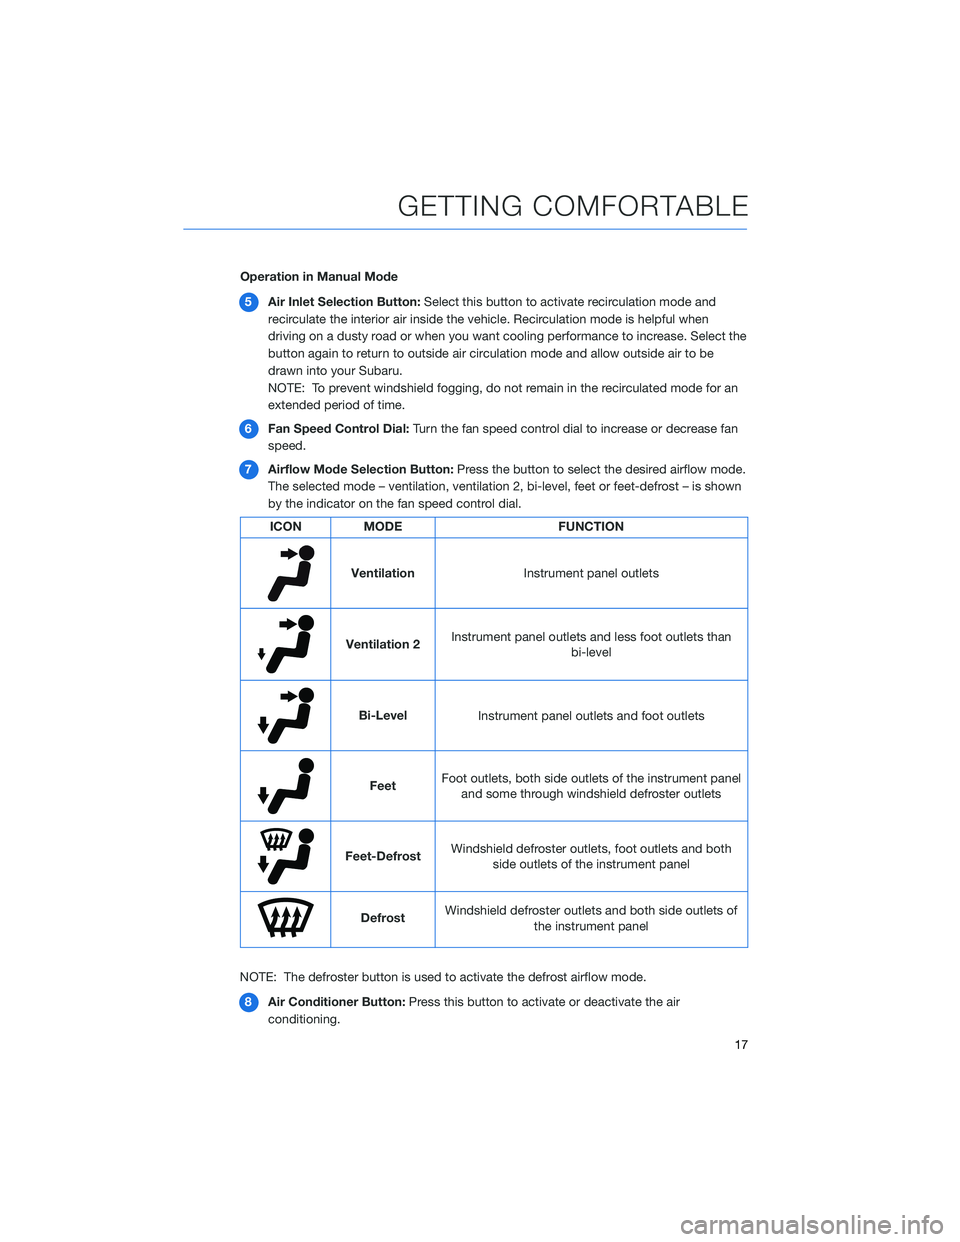
Operation in Manual Mode
5Air Inlet Selection Button:Select this button to activate recirculation mode and
recirculate the interior air inside the vehicle. Recirculation mode is helpful when
driving on a dusty road or when you want cooling performance to increase. Select the
button again to return to outside air circulation mode and allow outside air to be
drawn into your Subaru.
NOTE: To prevent windshield fogging, do not remain in the recirculated mode for an
extended period of time.
6Fan Speed Control Dial:Turn the fan speed control dial to increase or decrease fan
speed.
7Airflow Mode Selection Button:Press the button to select the desired airflow mode.
The selected mode – ventilation, ventilation 2, bi-level, feet or feet-defrost – is shown
by the indicator on the fan speed control dial.
ICON MODE FUNCTION
Ventilation
Instrument panel outlets
Ventilation 2Instrument panel outlets and less foot outlets than
bi-level
Bi-Level
Instrument panel outlets and foot outlets
FeetFoot outlets, both side outlets of the instrument panel
and some through windshield defroster outlets
Feet-DefrostWindshield defroster outlets, foot outlets and both
side outlets of the instrument panel
DefrostWindshield defroster outlets and both side outlets of
the instrument panel
NOTE: The defroster button is used to activate the defrost airflow mode.
8Air Conditioner Button:Press this button to activate or deactivate the air
conditioning.
GETTING COMFORTABLE
17
Page 20 of 108
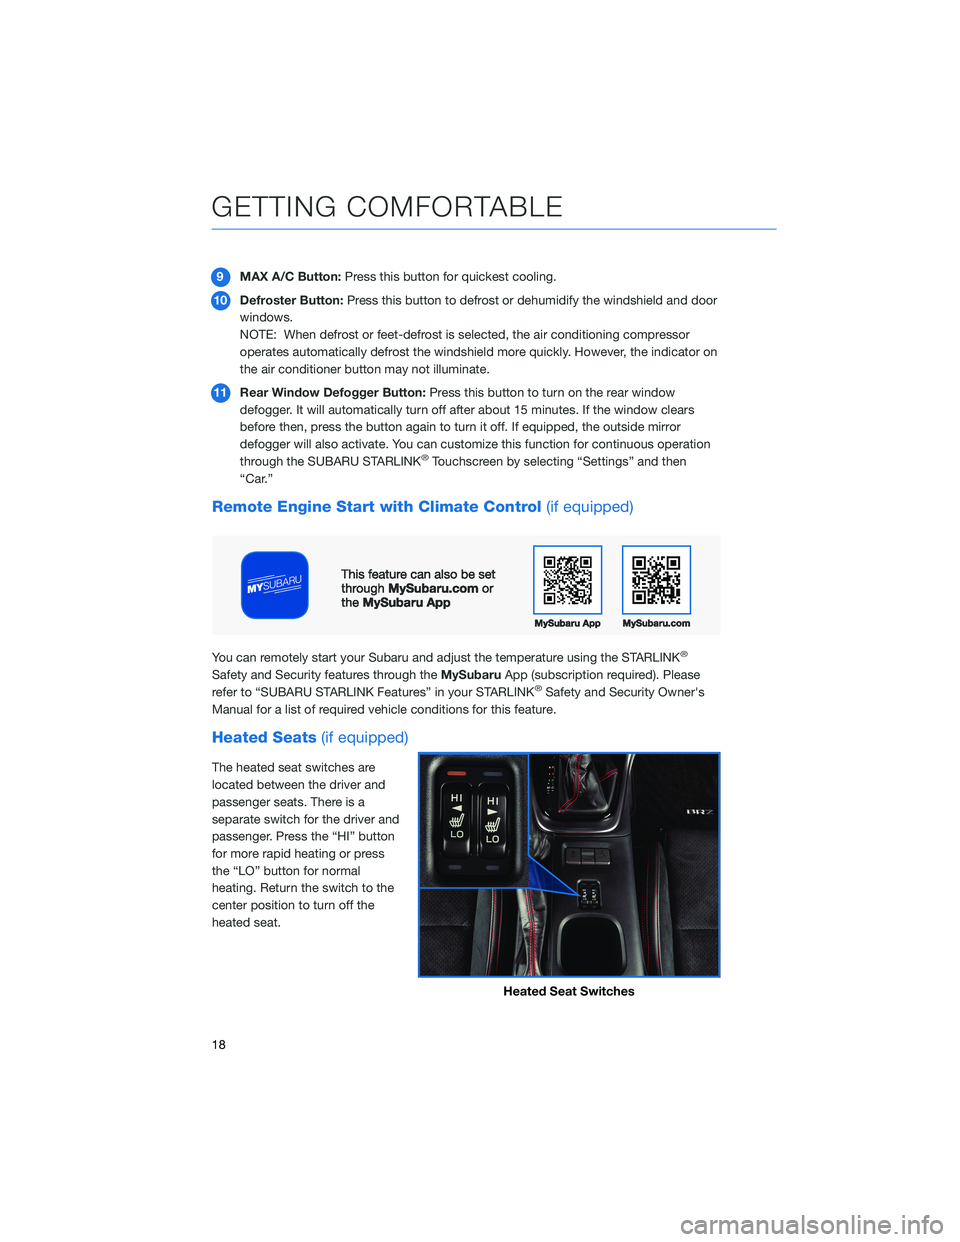
9MAX A/C Button:Press this button for quickest cooling.
10Defroster Button:Press this button to defrost or dehumidify the windshield and door
windows.
NOTE: When defrost or feet-defrost is selected, the air conditioning compressor
operates automatically defrost the windshield more quickly. However, the indicator on
the air conditioner button may not illuminate.
11Rear Window Defogger Button:Press this button to turn on the rear window
defogger. It will automatically turn off after about 15 minutes. If the window clears
before then, press the button again to turn it off. If equipped, the outside mirror
defogger will also activate. You can customize this function for continuous operation
through the SUBARU STARLINK
®Touchscreen by selecting “Settings” and then
“Car.”
Remote Engine Start with Climate Control(if equipped)
You can remotely start your Subaru and adjust the temperature using the STARLINK®
Safety and Security features through theMySubaruApp (subscription required). Please
refer to “SUBARU STARLINK Features” in your STARLINK®Safety and Security Owner's
Manual for a list of required vehicle conditions for this feature.
Heated Seats(if equipped)
The heated seat switches are
located between the driver and
passenger seats. There is a
separate switch for the driver and
passenger. Press the “HI” button
for more rapid heating or press
the “LO” button for normal
heating. Return the switch to the
center position to turn off the
heated seat.
Heated Seat Switches
GETTING COMFORTABLE
18