SUBARU BRZ 2022 Getting Started Guide
Manufacturer: SUBARU, Model Year: 2022, Model line: BRZ, Model: SUBARU BRZ 2022Pages: 108, PDF Size: 29.44 MB
Page 21 of 108
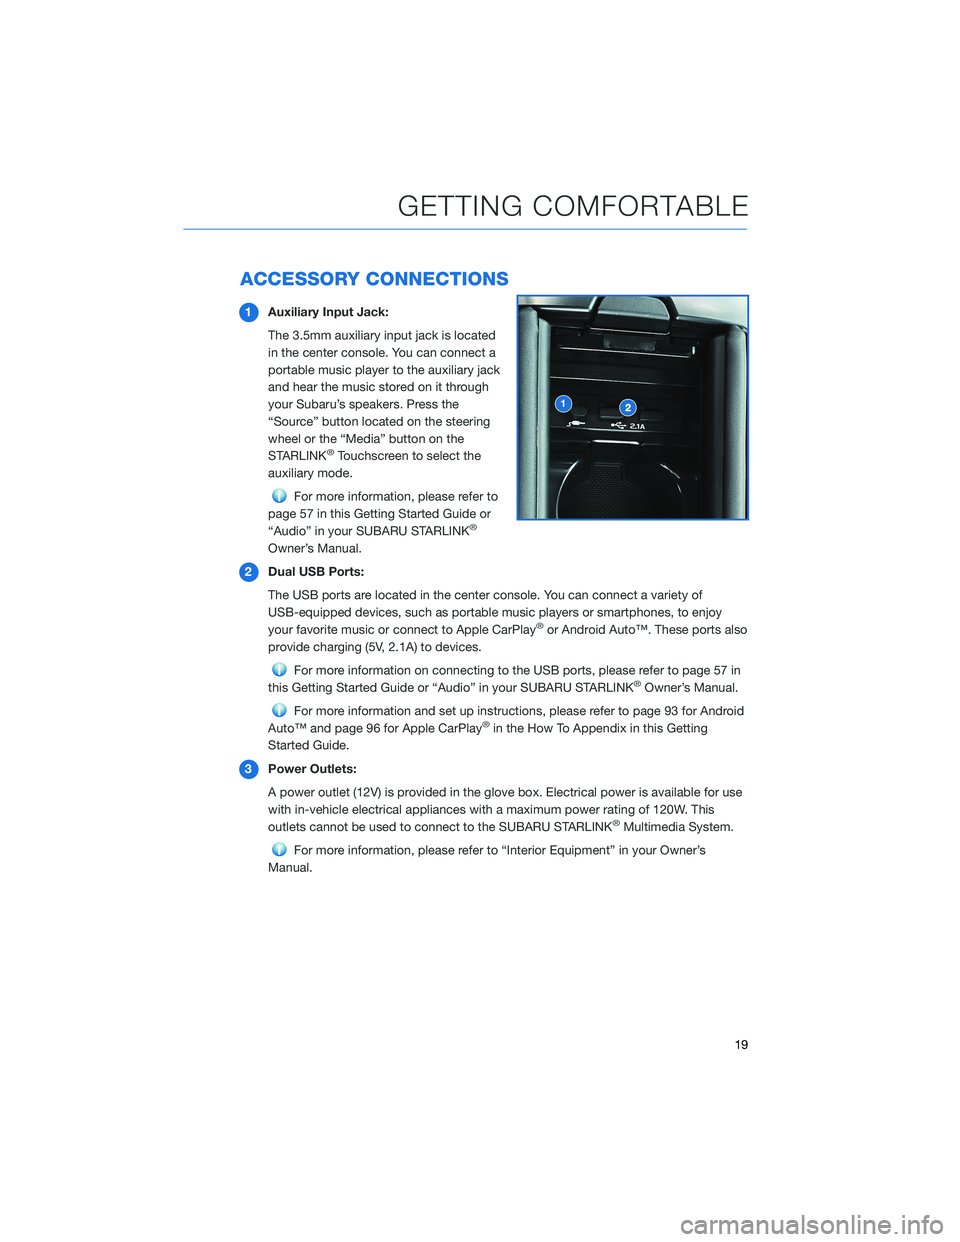
ACCESSORY CONNECTIONS
1Auxiliary Input Jack:
The 3.5mm auxiliary input jack is located
in the center console. You can connect a
portable music player to the auxiliary jack
and hear the music stored on it through
your Subaru’s speakers. Press the
“Source” button located on the steering
wheel or the “Media” button on the
STARLINK
®Touchscreen to select the
auxiliary mode.
For more information, please refer to
page 57 in this Getting Started Guide or
“Audio” in your SUBARU STARLINK
®
Owner’s Manual.
2Dual USB Ports:
The USB ports are located in the center console. You can connect a variety of
USB-equipped devices, such as portable music players or smartphones, to enjoy
your favorite music or connect to Apple CarPlay
®or Android Auto™. These ports also
provide charging (5V, 2.1A) to devices.
For more information on connecting to the USB ports, please refer to page 57 in
this Getting Started Guide or “Audio” in your SUBARU STARLINK®Owner’s Manual.
For more information and set up instructions, please refer to page 93 for Android
Auto™ and page 96 for Apple CarPlay®in the How To Appendix in this Getting
Started Guide.
3Power Outlets:
A power outlet (12V) is provided in the glove box. Electrical power is available for use
with in-vehicle electrical appliances with a maximum power rating of 120W. This
outlets cannot be used to connect to the SUBARU STARLINK
®Multimedia System.
For more information, please refer to “Interior Equipment” in your Owner’s
Manual.
GETTING COMFORTABLE
19
Page 22 of 108
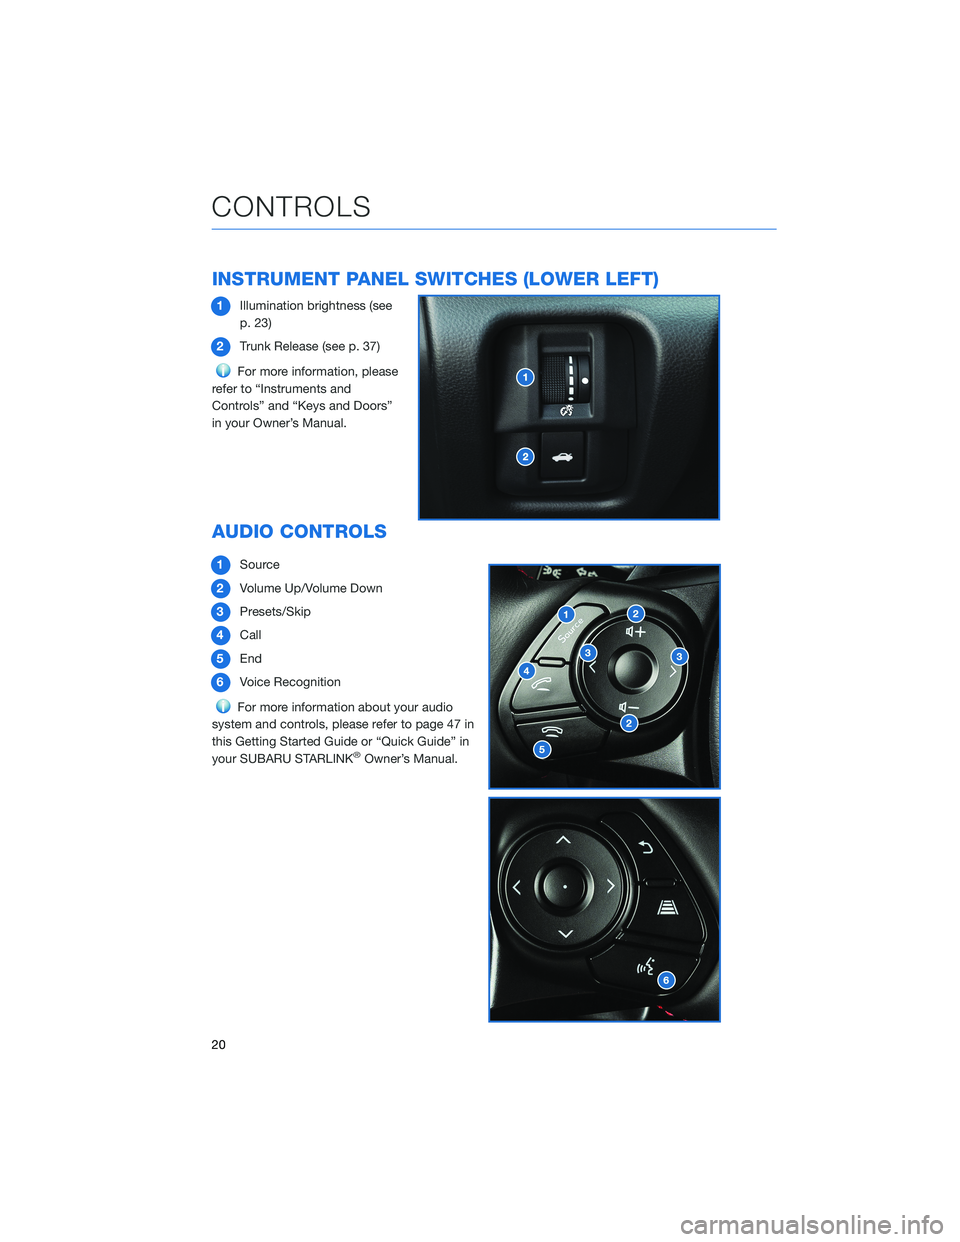
INSTRUMENT PANEL SWITCHES (LOWER LEFT)
1Illumination brightness (see
p. 23)
2Trunk Release (see p. 37)
For more information, please
refer to “Instruments and
Controls” and “Keys and Doors”
in your Owner’s Manual.
AUDIO CONTROLS
1Source
2Volume Up/Volume Down
3Presets/Skip
4Call
5End
6Voice Recognition
For more information about your audio
system and controls, please refer to page 47 in
this Getting Started Guide or “Quick Guide” in
your SUBARU STARLINK
®Owner’s Manual.
CONTROLS
20
Page 23 of 108

CRUISE CONTROL
1Cruise Control On/Off
2Resume (RES)/Increase Speed
3Set (SET)/Decrease Speed
4CANCEL
For more information, please refer to
“Starting and Operating” in your Owner’s
Manual.
ADAPTIVE CRUISE CONTROL(if equipped)
1Adaptive Cruise Control On/Off
2CANCEL
3Following Distance
4Resume (RES)/Increase Speed and Set
(SET)/Decrease Speed
For more information on Adaptive Cruise
Control, please refer to page 75 in this Getting
Started Guide or “Adaptive Cruise Control” in
your EyeSight
®Owner’s Manual.
CONTROLS
21
Page 24 of 108
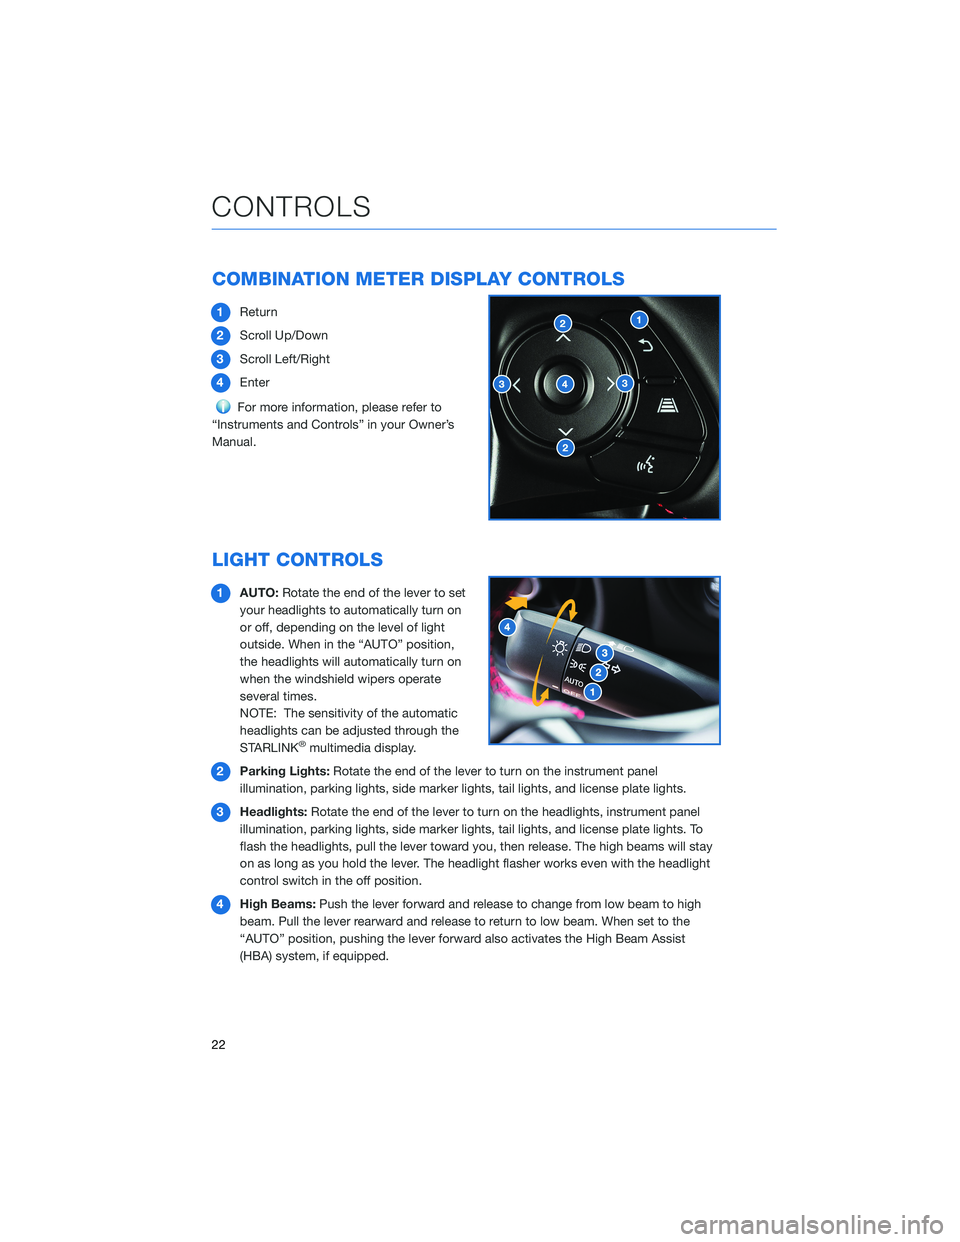
COMBINATION METER DISPLAY CONTROLS
1Return
2Scroll Up/Down
3Scroll Left/Right
4Enter
For more information, please refer to
“Instruments and Controls” in your Owner’s
Manual.
LIGHT CONTROLS
1AUTO:Rotate the end of the lever to set
your headlights to automatically turn on
or off, depending on the level of light
outside. When in the “AUTO” position,
the headlights will automatically turn on
when the windshield wipers operate
several times.
NOTE: The sensitivity of the automatic
headlights can be adjusted through the
STARLINK
®multimedia display.
2Parking Lights:Rotate the end of the lever to turn on the instrument panel
illumination, parking lights, side marker lights, tail lights, and license plate lights.
3Headlights:Rotate the end of the lever to turn on the headlights, instrument panel
illumination, parking lights, side marker lights, tail lights, and license plate lights. To
flash the headlights, pull the lever toward you, then release. The high beams will stay
on as long as you hold the lever. The headlight flasher works even with the headlight
control switch in the off position.
4High Beams:Push the lever forward and release to change from low beam to high
beam. Pull the lever rearward and release to return to low beam. When set to the
“AUTO” position, pushing the lever forward also activates the High Beam Assist
(HBA) system, if equipped.
CONTROLS
22
Page 25 of 108
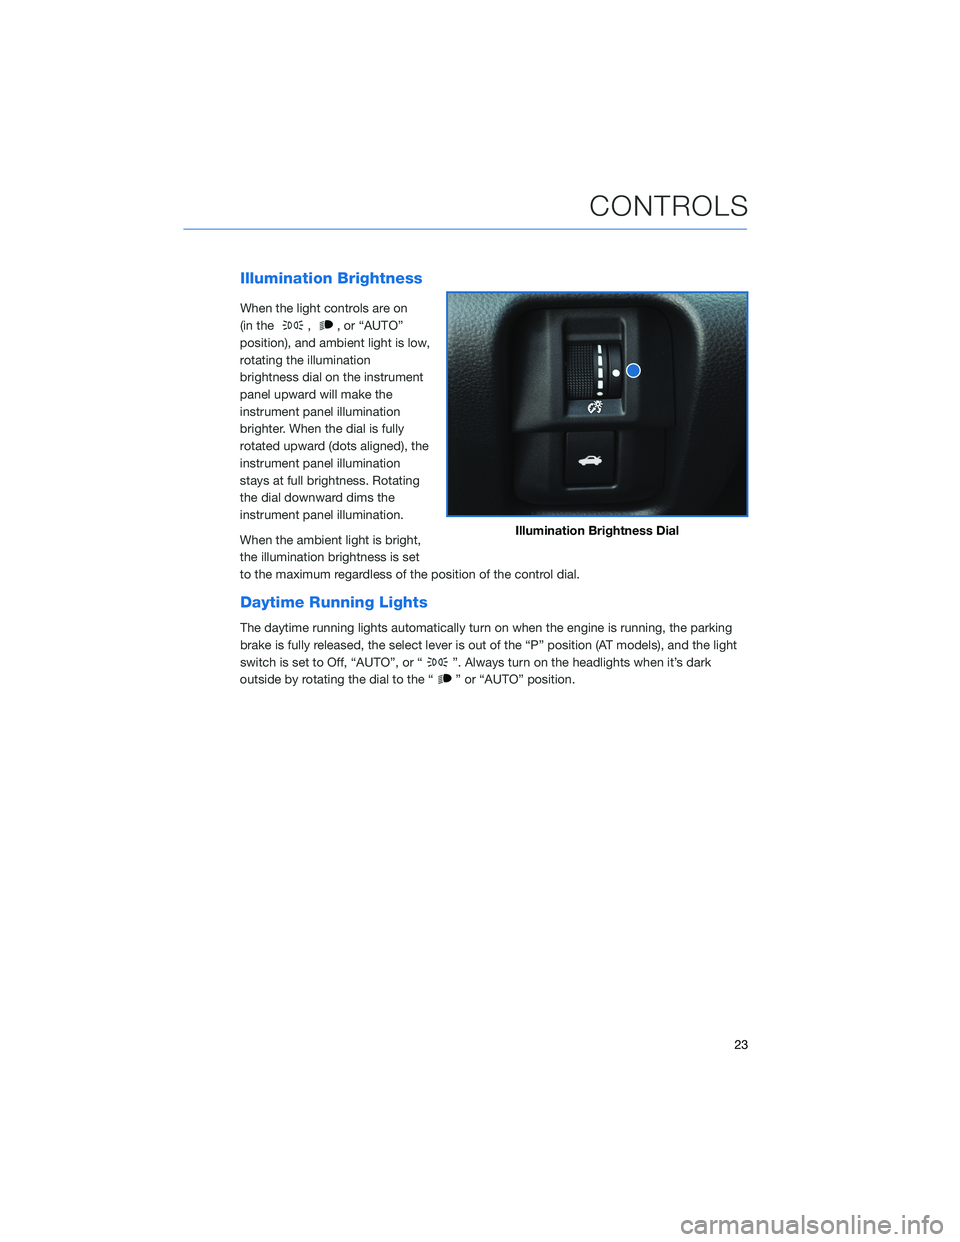
Illumination Brightness
When the light controls are on
(in the
,, or “AUTO”
position), and ambient light is low,
rotating the illumination
brightness dial on the instrument
panel upward will make the
instrument panel illumination
brighter. When the dial is fully
rotated upward (dots aligned), the
instrument panel illumination
stays at full brightness. Rotating
the dial downward dims the
instrument panel illumination.
When the ambient light is bright,
the illumination brightness is set
to the maximum regardless of the position of the control dial.
Daytime Running Lights
The daytime running lights automatically turn on when the engine is running, the parking
brake is fully released, the select lever is out of the “P” position (AT models), and the light
switch is set to Off, “AUTO”, or “
”. Always turn on the headlights when it’s dark
outside by rotating the dial to the “
” or “AUTO” position.
Illumination Brightness Dial
CONTROLS
23
Page 26 of 108
TURN SIGNALS
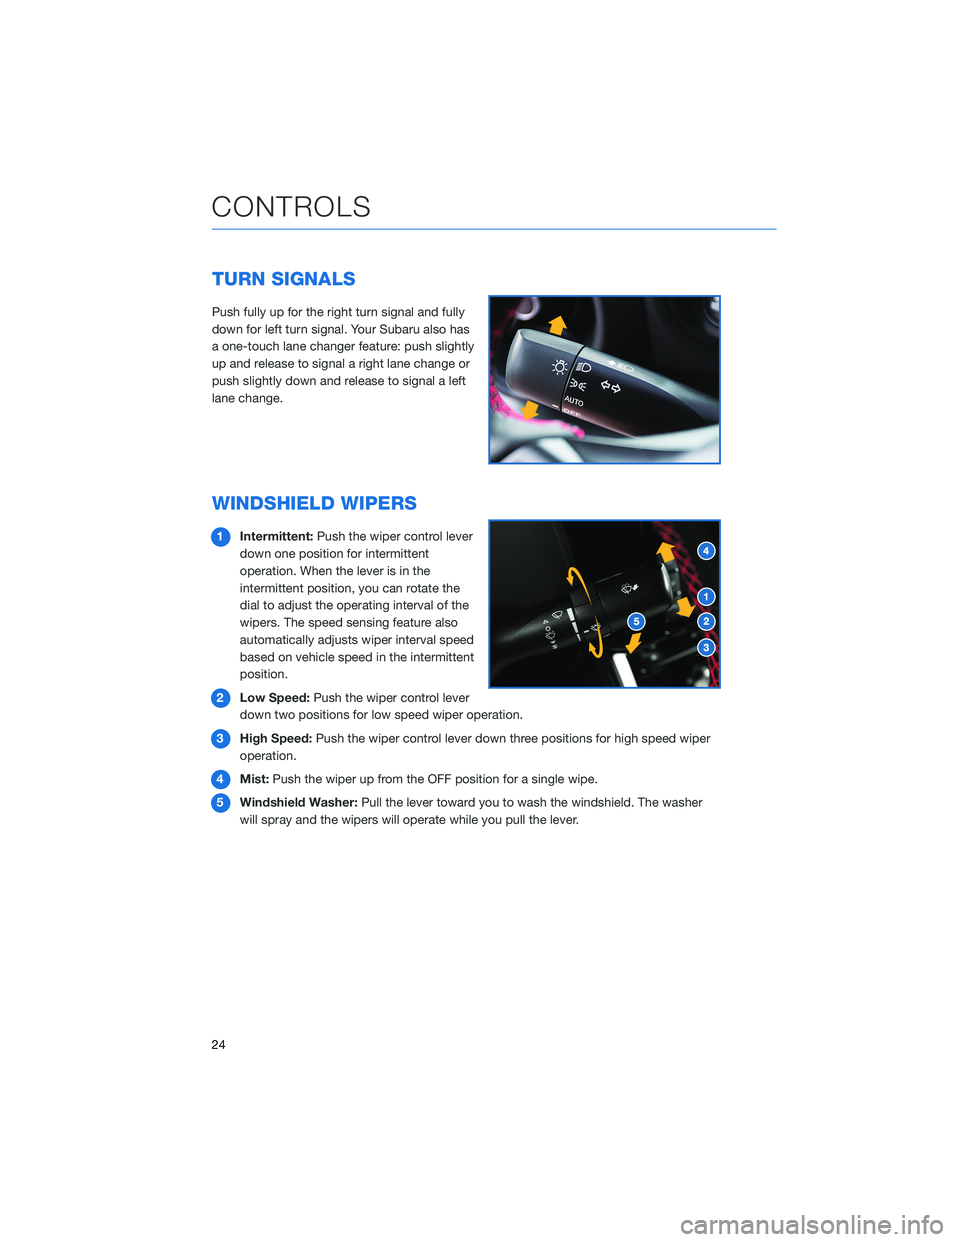
Push fully up for the right turn signal and fully
down for left turn signal. Your Subaru also has
a one-touch lane changer feature: push slightly
up and release to signal a right lane change or
push slightly down and release to signal a left
lane change.
WINDSHIELD WIPERS
1Intermittent:Push the wiper control lever
down one position for intermittent
operation. When the lever is in the
intermittent position, you can rotate the
dial to adjust the operating interval of the
wipers. The speed sensing feature also
automatically adjusts wiper interval speed
based on vehicle speed in the intermittent
position.
2Low Speed:Push the wiper control lever
down two positions for low speed wiper operation.
3High Speed:Push the wiper control lever down three positions for high speed wiper
operation.
4Mist:Push the wiper up from the OFF position for a single wipe.
5Windshield Washer:Pull the lever toward you to wash the windshield. The washer
will spray and the wipers will operate while you pull the lever.
CONTROLS
24
Page 27 of 108
OVERHEAD CONSOLE
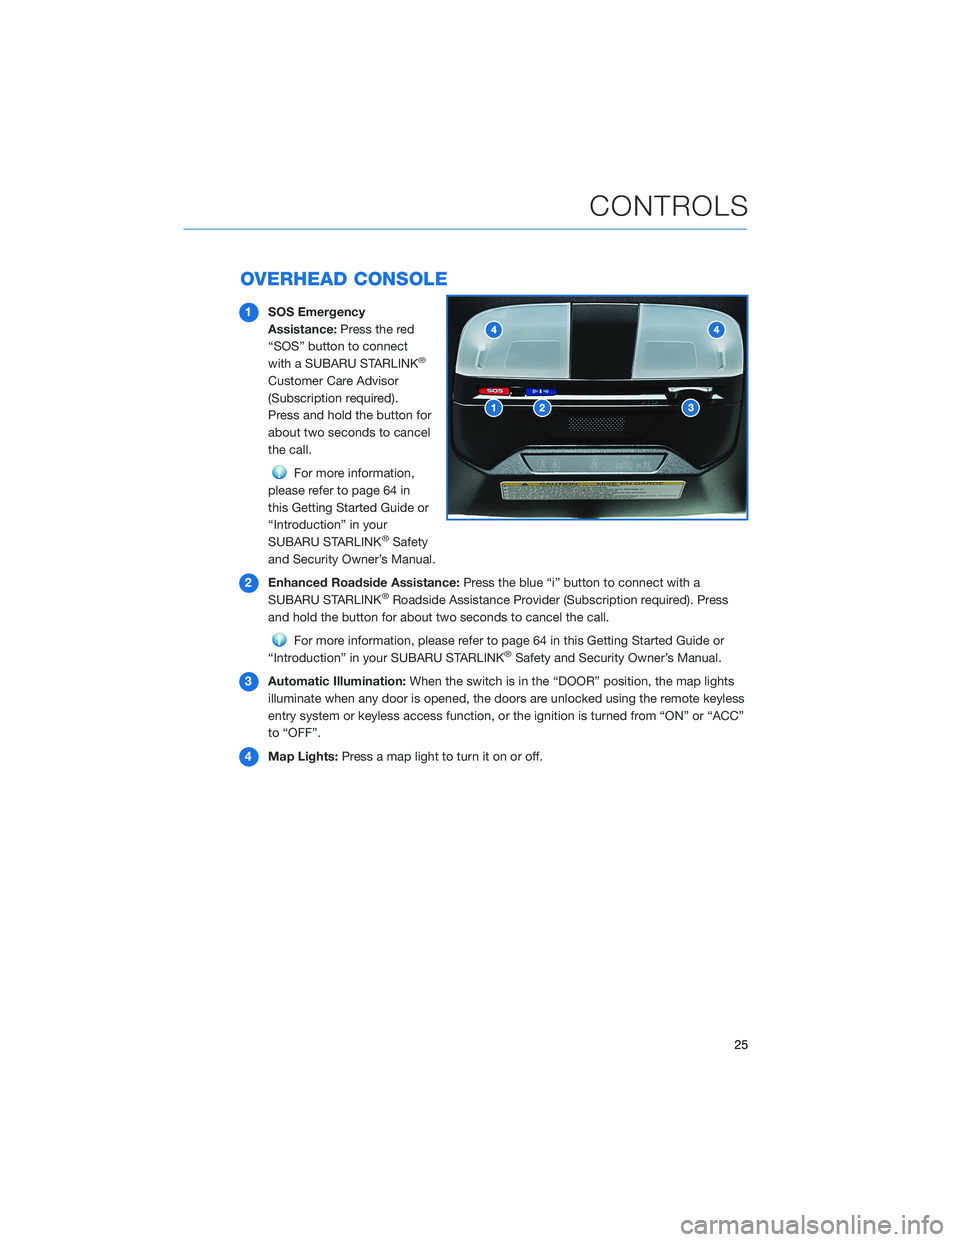
1SOS Emergency
Assistance:Press the red
“SOS” button to connect
with a SUBARU STARLINK
®
Customer Care Advisor
(Subscription required).
Press and hold the button for
about two seconds to cancel
the call.
For more information,
please refer to page 64 in
this Getting Started Guide or
“Introduction” in your
SUBARU STARLINK
®Safety
and Security Owner’s Manual.
2Enhanced Roadside Assistance:Press the blue “i” button to connect with a
SUBARU STARLINK
®Roadside Assistance Provider (Subscription required). Press
and hold the button for about two seconds to cancel the call.
For more information, please refer to page 64 in this Getting Started Guide or
“Introduction” in your SUBARU STARLINK®Safety and Security Owner’s Manual.
3Automatic Illumination:When the switch is in the “DOOR” position, the map lights
illuminate when any door is opened, the doors are unlocked using the remote keyless
entry system or keyless access function, or the ignition is turned from “ON” or “ACC”
to “OFF”.
4Map Lights:Press a map light to turn it on or off.
CONTROLS
25
Page 28 of 108
COMBINATION METER
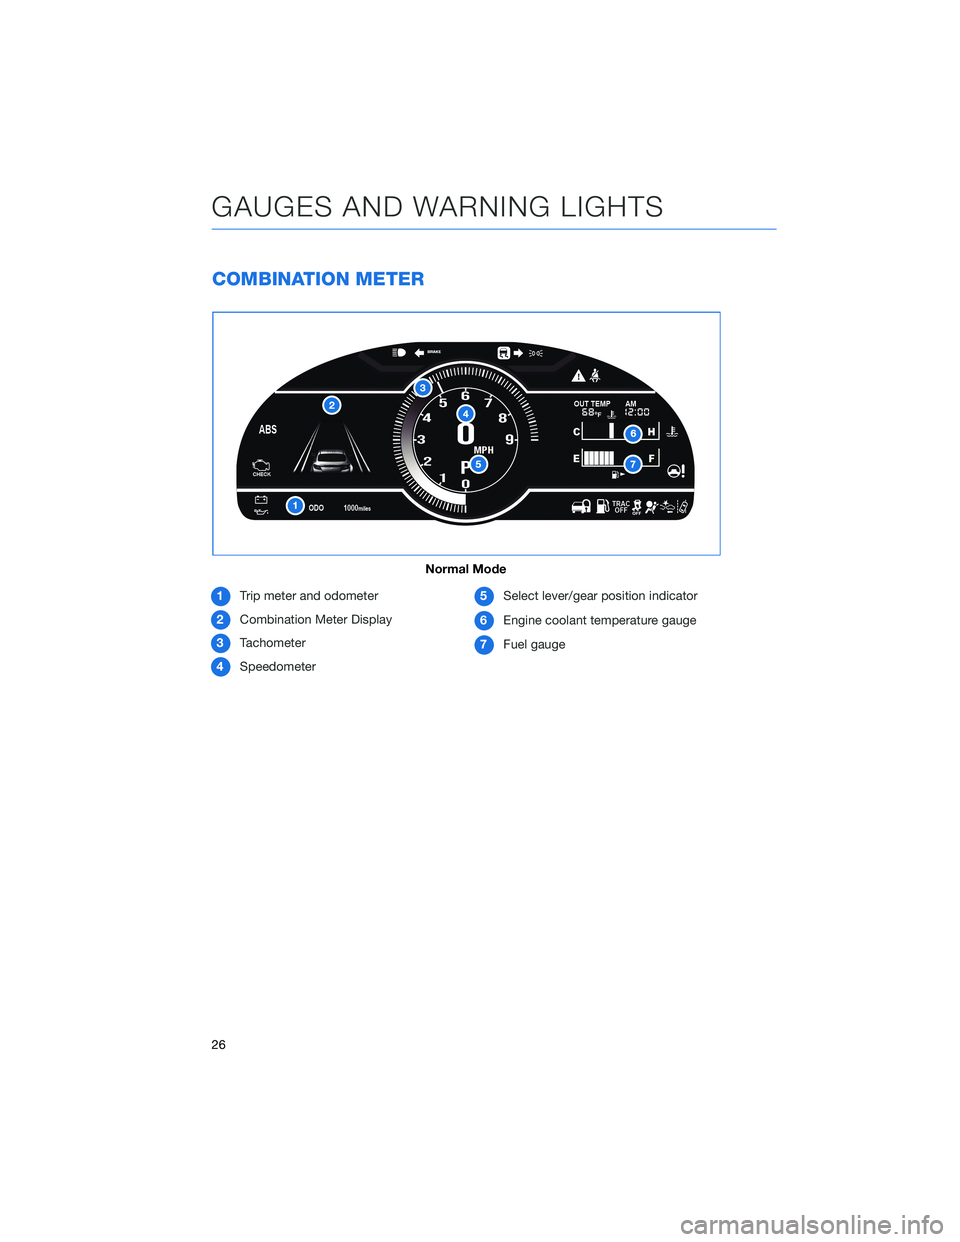
1Trip meter and odometer
2Combination Meter Display
3Tachometer
4Speedometer5Select lever/gear position indicator
6Engine coolant temperature gauge
7Fuel gauge
Normal Mode
GAUGES AND WARNING LIGHTS
26
Page 29 of 108
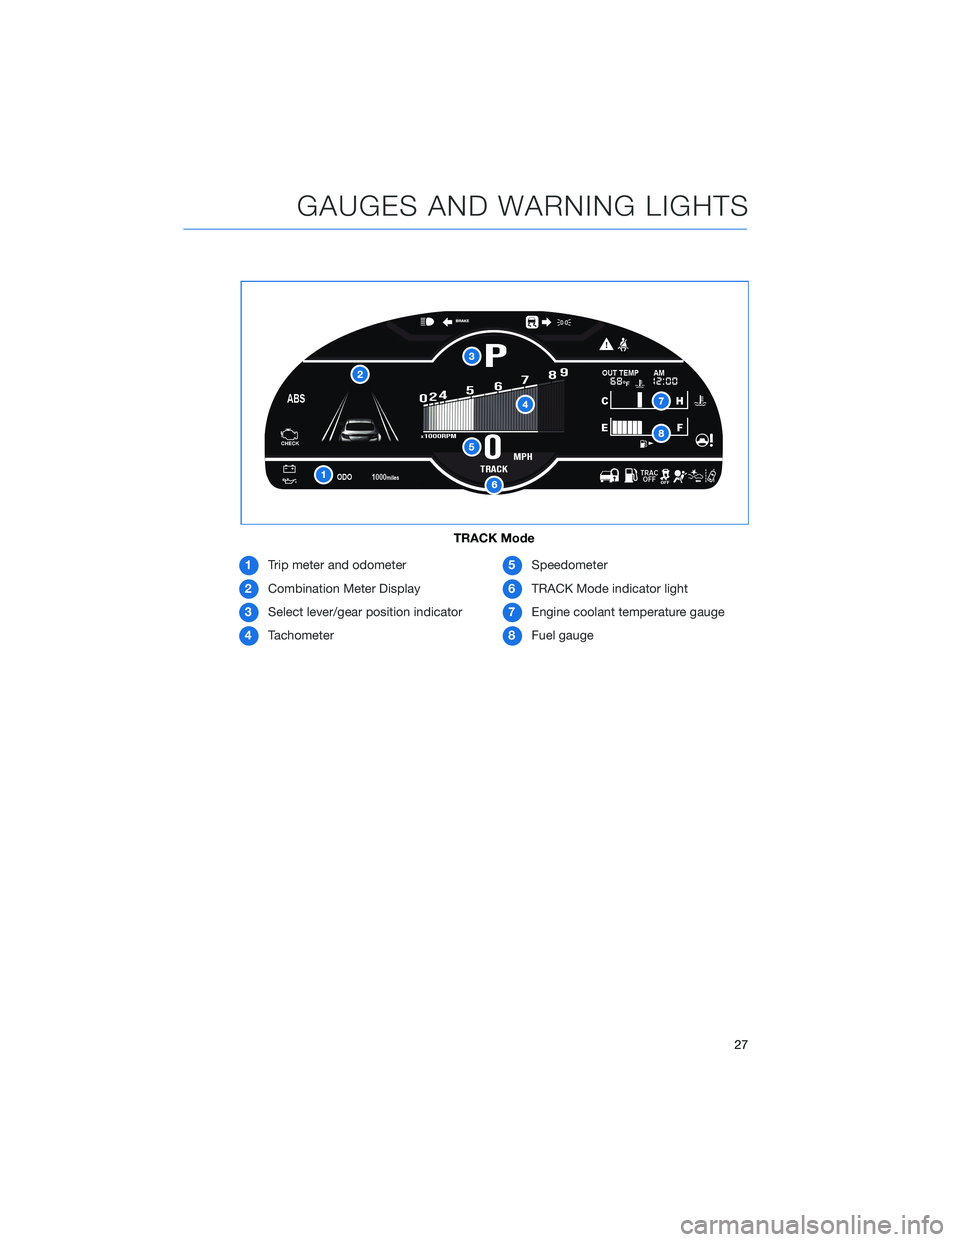
1Trip meter and odometer
2Combination Meter Display
3Select lever/gear position indicator
4Tachometer5Speedometer
6TRACK Mode indicator light
7Engine coolant temperature gauge
8Fuel gauge
TRACK Mode
GAUGES AND WARNING LIGHTS
27
Page 30 of 108
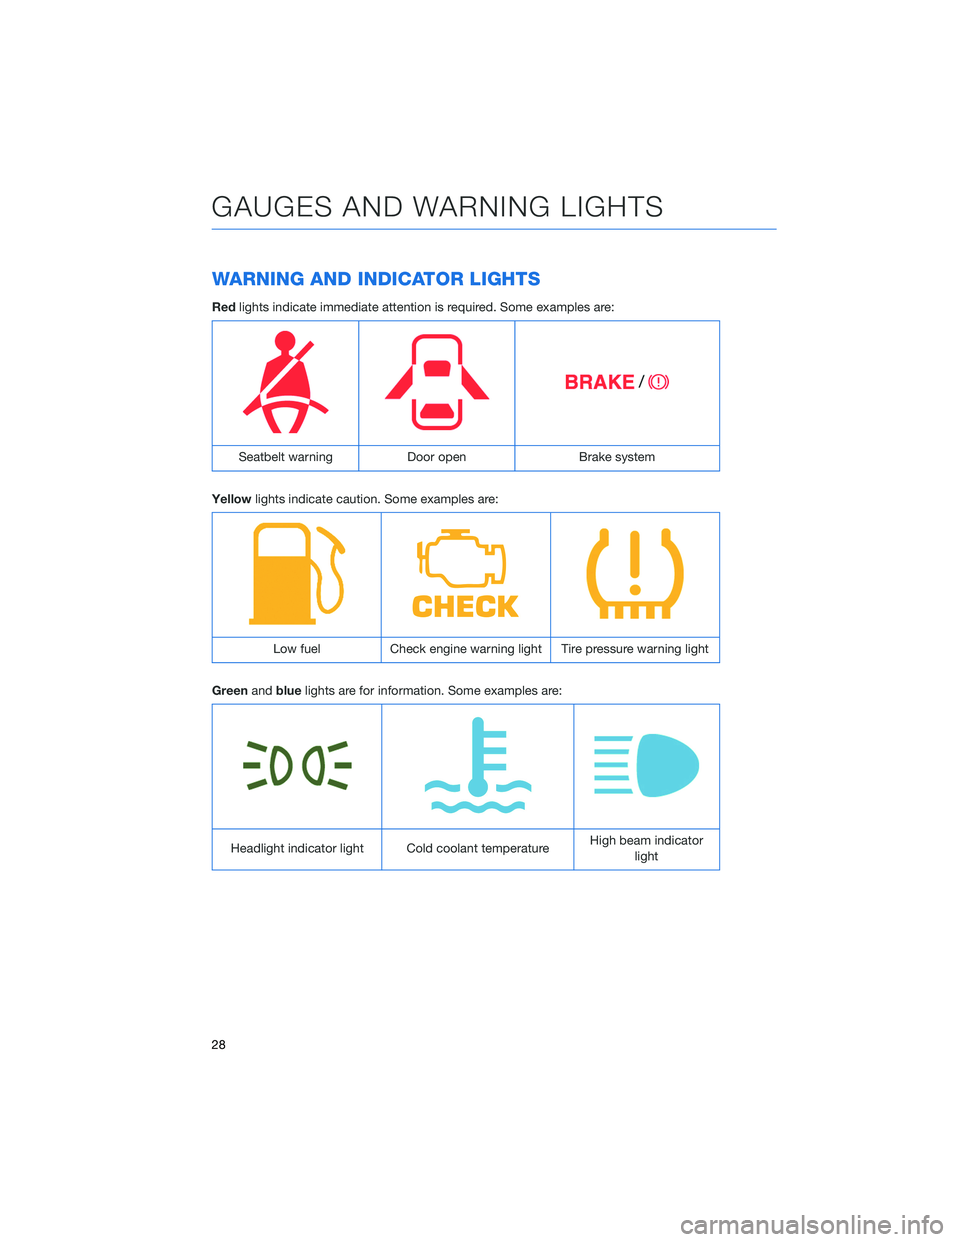
WARNING AND INDICATOR LIGHTS
Redlights indicate immediate attention is required. Some examples are:
Seatbelt warning Door open Brake system
Yellowlights indicate caution. Some examples are:
Low fuel Check engine warning light Tire pressure warning light
Greenandbluelights are for information. Some examples are:
Headlight indicator light Cold coolant temperatureHigh beam indicator
light
GAUGES AND WARNING LIGHTS
28