Passenger light SUBARU CROSSTREK 2017 1.G User Guide
[x] Cancel search | Manufacturer: SUBARU, Model Year: 2017, Model line: CROSSTREK, Model: SUBARU CROSSTREK 2017 1.GPages: 572, PDF Size: 41.52 MB
Page 58 of 572

Seat, seatbelt and SRS airbags/Child restraint systems
A: Front passenger’s seat
You should not install a child restraint
system (including a booster seat) due to
the hazard to children posed by the
passenger’s airbag.
B: Rear seat, window-side seating
positions
Recommended positions for all types of
child restraint systems.
In these positions, the following equip-
ment is provided for installing a child
restraint system.
.Automatic Locking Retractor/Emer-
gency Locking Retractor (ALR/ELR) seat-
belts
.Lower anchorages (bars)
.Upper anchorages (tether anchorages)
Some types of child restraints might not be
able to be secured firmly due to projection
of the seat cushion.
In this seating position, you should use
only a child restraint system that has a
bottom base that fits snugly against the
contours of the seat cushion and can be
securely retained using the seatbelt.
C: Rear seat, center seating position
The ALR/ELR seatbelt and an upper
anchorage (tether anchorage) are pro-
vided in this position.Some types of child restraints might not be
able to be secured firmly due to projection
of the seat cushion.
In this seating position, you should use
only a child restraint system that has a
bottom base that fits snugly against the
contours of the seat cushion and can be
securely retained using the seatbelt.
When you install a child restraint system in
the rear seat’s center seating position,
raise the center head restraint.
Lower anchorages (bars) for window-side
seating positions may be used for a seat
in the center seating position if a child
restraint system manufacturer’s instruc-
tions permit and specify using anchors as
far apart as those in this vehicle.
If a child restraint system is not correctly
fixed in place (for example, if a child
restraint system can be moved more than
1 inch (2.5 cm) from side to side), you
should install the child restraint system in
a rear seat, window-side seating position.
WARNING
.Even with advanced airbags, chil-
dren can be seriously injured by
the airbag. Place children in the
rear seat properly restrained at
all times. The SRS airbag de-
ploys with considerable speedand force and can injure or even
kill children, especially if they are
not restrained or improperly re-
strained. Because children are
lighter and weaker than adults,
their risk of being injured from
deployment is greater.
For that reason, be sure to se-
cure ALL types of child restraint
devices (including forward facing
child seats) in the REAR seats at
all times. You should choose a
restraint device which is appro-
priate for the child’s age, height
and weight. According to acci-
dent statistics, children are safer
when properly restrained in the
rear seating positions than in the
front seating positions.
.Do not use lower anchorages
(bars) for a seat in the center
seating position unless a child
restraint system manufacturer’s
instructions permit and specify
using anchors spaced as far
apart as those in this vehicle.
.Do not connect two or more
lower hooks onto the same an-
chorage (bar).
1-26
Page 61 of 572
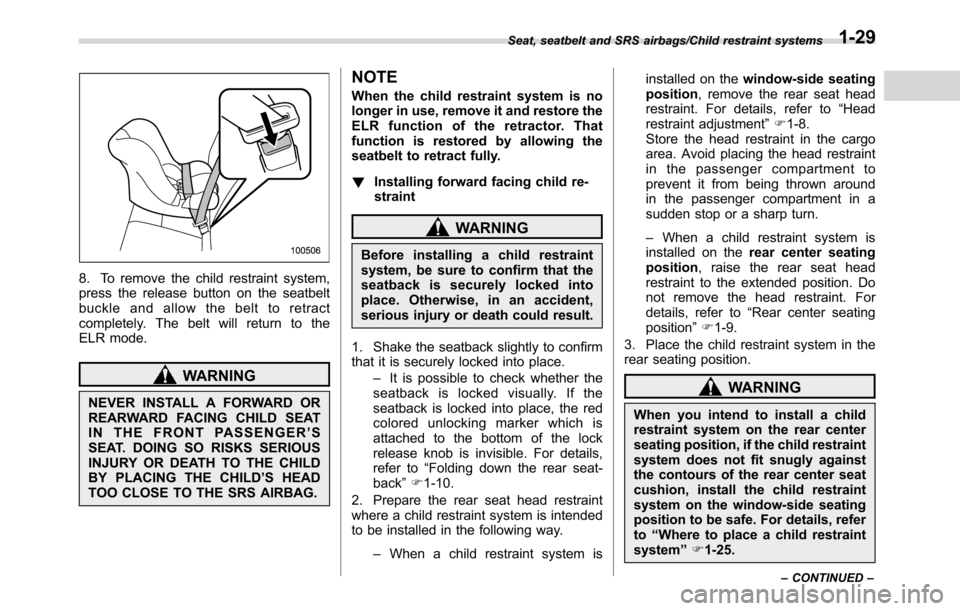
8. To remove the child restraint system,
press the release button on the seatbelt
buckle and allow the belt to retract
completely. The belt will return to the
ELR mode.
WARNING
NEVER INSTALL A FORWARD OR
REARWARD FACING CHILD SEAT
IN THE FRONT PASSENGER’S
SEAT. DOING SO RISKS SERIOUS
INJURY OR DEATH TO THE CHILD
BY PLACING THE CHILD’S HEAD
TOO CLOSE TO THE SRS AIRBAG.
NOTE
When the child restraint system is no
longer in use, remove it and restore the
ELR function of the retractor. That
function is restored by allowing the
seatbelt to retract fully.
!Installing forward facing child re-
straint
WARNING
Before installing a child restraint
system, be sure to confirm that the
seatback is securely locked into
place. Otherwise, in an accident,
serious injury or death could result.
1. Shake the seatback slightly to confirm
that it is securely locked into place.
–It is possible to check whether the
seatback is locked visually. If the
seatback is locked into place, the red
colored unlocking marker which is
attached to the bottom of the lock
release knob is invisible. For details,
refer to“Folding down the rear seat-
back”F1-10.
2. Prepare the rear seat head restraint
where a child restraint system is intended
to be installed in the following way.
–When a child restraint system isinstalled on thewindow-side seating
position, remove the rear seat head
restraint. For details, refer to“Head
restraint adjustment”F1-8.
Store the head restraint in the cargo
area. Avoid placing the head restraint
in the passenger compartment to
prevent it from being thrown around
in the passenger compartment in a
sudden stop or a sharp turn.
–When a child restraint system is
installed on therear center seating
position, raise the rear seat head
restraint to the extended position. Do
not remove the head restraint. For
details, refer to“Rear center seating
position”F1-9.
3. Place the child restraint system in the
rear seating position.
WARNING
When you intend to install a child
restraint system on the rear center
seating position, if the child restraint
system does not fit snugly against
the contours of the rear center seat
cushion, install the child restraint
system on the window-side seating
position to be safe. For details, refer
to“Where to place a child restraint
system”F1-25.
Seat, seatbelt and SRS airbags/Child restraint systems
–CONTINUED–1-29
Page 77 of 572

1) Airbag control module (including impact
sensor and rollover sensor)
2) Frontal airbag module (driver’s side)
3) Frontal airbag module (front passenger’s
side)
4) Front sub sensor (left-hand side)
5) Front sub sensor (right-hand side)6) Side airbag module (driver’s side)
7) Side airbag module (front passenger’s
side)
8) Side airbag sensor (center pillar left-hand
side)
9) Side airbag sensor (center pillar right-
hand side)
10) Airbag wiring11) Seatbelt pretensioner (driver’s side)
12) Seatbelt pretensioner (front passenger’s
side)
13) Curtain airbag sensor (rear wheel house
right-hand side)
14) Curtain airbag sensor (rear wheel house
left-hand side)
15) Curtain airbag module (right-hand side)
16) Curtain airbag module (left-hand side)
17) Seatbelt buckle switch (front passenger’s
side)
18) Knee airbag module (driver’s side)
19) Front passenger’s occupant detection
system sensor
20) Front passenger’s occupant detection
control module
21) Front passenger’s frontal airbag ON and
OFF indicator
22) SRS airbag system warning light
23) Satellite safing sensor (under the rear
center seat)
24) Front door impact sensor (left-hand side)
25) Front door impact sensor (right-hand
side)
26) Lap belt pretensioner (front passenger’s
side) Seat, seatbelt and SRS airbags/*SRS airbag (Supplemental Restraint System airbag)
–CONTINUED–
1-45
Page 78 of 572
Seat, seatbelt and SRS airbags/*SRS airbag (Supplemental Restraint System airbag)
&SUBARU advanced frontal
airbag system
Your vehicle is equipped with a SUBARU
advanced frontal airbag system that com-
plies with the new advanced frontal airbag
requirements in the amended Federal
Motor Vehicle Safety Standard (FMVSS)
No. 208.
The SUBARU advanced frontal airbag
system automatically determines the de-
ployment force of the driver’s SRS frontal
airbag at the time of deployment as well as
whether or not to activate the front
passenger’s SRS frontal airbag and, if
activated, the deployment force of the
SRS frontal airbag at the time of deploy-
ment.
Your vehicle has warning labels on the
driver’s and front passenger’s sun visors
beginning with the phrase“EVEN WITH
ADVANCED AIR BAGS”and a tag
attached to the glove box lid beginning
with the phrase“Even with Advanced Air
Bags”. Make sure that you carefully read
the instructions on the warning labels and
tag.
Always wear your seatbelt. The SUBARU
advanced frontal airbag system is a
supplemental restraint system and must
be used in combination with a seatbelt. All
occupants should wear a seatbelt or be
seated in an appropriate child restraintsystem.
For the locations of the SRS airbags, refer
to“Components”F1-44.
In a moderate to severe frontal collision,
the following components deploy.
.SRS frontal airbag for driver
.SRS frontal airbag for front passenger
.SRS knee airbag for driver
.SRS curtain airbag*
1
*1: When an offset frontal collision that is severe
enough to deploy the front airbag occurs.
These components supplement the seat-
belts by reducing the impact to the
occupant’s head, chest and knees.
!Driver’s SRS frontal airbag
The driver’s SRS frontal airbag uses a
dual stage inflator. The inflator operates in
different ways depending on the severity
of impact.
Have the system inspected by your
SUBARU dealer immediately if the SRS
airbag system warning light illuminates.
NOTE
The driver’s SRS side airbag and SRS
curtain airbag are not controlled by the
SUBARU advanced frontal airbag sys-
tem.!Front passenger’s SRS frontal air-
bag
The front passenger’s SRS frontal airbag
uses a dual stage inflator. The inflator
operates in different ways depending on
the severity of impact.
The occupant detection system sensor is
installed under the seat upholstery and
monitors the physique and posture of the
front passenger. Using this information,
the occupant detection system determines
whether the front passenger’s SRS frontal
airbag should be deployed or not.
The occupant detection system may not
inflate the front passenger’s SRS frontal
airbag even when the driver’s SRS frontal
airbag deploys. This is normal. In this
case, although the front passenger’s SRS
frontal airbag does not operate, the front
passenger’s seatbelt pretensioner oper-
ates with the driver’s seatbelt preten-
sioner. For details about the seatbelt
pretensioner, refer to“Front seatbelt pre-
tensioners”F1-20.
CAUTION
Observe the following precautions.
Failure to do so may prevent the
SUBARU advanced frontal airbag
system from functioning correctly
or cause the system to fail.
1-46
Page 79 of 572

.Do not apply any strong impact
to the front passenger’sseat
such as by kicking.
.Do not let rear passengers rest
their feet between the front seat-
back and seat cushion.
.Do not spill liquid on the front
passenger’s seat. If liquid is
spilled, wipe it off immediately.
.Do not remove or disassemble
the front passenger’s seat.
.Do not install any accessory
(such as an audio amplifier) other
than a genuine SUBARU acces-
sory under the front passenger’s
seat.
.Do not place anything (shoes,
umbrella, etc.) under the front
passenger’s seat.
.Do not use the front passenger’s
seat with the head restraint re-
moved.
.Do not leave any articles on the
front passenger’s seat or the
seatbelt tongue and buckle en-
gaged when you leave your ve-
hicle.
.Do not put sharp object(s) on the
seat or pierce the seat uphols-
tery..Do not place a magnet near the
seatbelt buckle and the seatbelt
retractor.
.Do not use front seats with their
forward-backward position and
seatback not being locked into
place securely. If any of them are
not locked securely, adjust them
again. For adjusting procedure,
refer to“Forward and backward
adjustment”F1-3 and“Reclining
the seatback”F1-4.
If the seatbelt buckle switch and/or front
passenger’s occupant detection system
have failed, the SRS airbag system
warning light will illuminate. Have the
system inspected by your SUBARU deal-
er immediately if the SRS airbag system
warning light illuminates.
If your vehicle has sustained impact, this
may affect the proper function of the
SUBARU advanced frontal airbag system.
Have your vehicle inspected at your
SUBARU dealer. Do not use the front
passenger’s seat while driving the vehicle
to your SUBARU dealer.
NOTE
The front passenger’s SRS side airbag
and SRS curtain airbag are not con-
trolled by the SUBARU advanced fron-tal airbag system.
!Passenger’s frontal airbag ON and
OFF indicators
Refer to“Front passenger’s frontal airbag
ON and OFF indicators”F3-16.
!Occupant detection system
The occupant detection system sensor is
installed under the seat upholstery and
monitors the physique and posture of the
front passenger. Using this information,
the occupant detection system determines
whether the front passenger’s SRS frontal
airbag should be deployed or not.
If the front passenger’s seat cushion is
wet, this may adversely affect the ability of
the system to determine deployment. If
the seat cushion is wet, the front passen-
ger should stop sitting on the front
passenger’s seat. Wipe off liquid from
the seat immediately, let the seat dry
naturally and then check the SRS airbag
system warning light as follows.
Seat, seatbelt and SRS airbags/*SRS airbag (Supplemental Restraint System airbag)
–CONTINUED–1-47
Page 80 of 572

Seat, seatbelt and SRS airbags/*SRS airbag (Supplemental Restraint System airbag)
SRS airbag system warning light (type A)
SRS airbag system warning light (type B)
.If the SRS airbag system warning light
illuminates, keep the seat dry until the
warning light turns off. If the SRS airbag
system warning light stays on even whenthe seat has dried, do not allow anyone to
sit on the front passenger’s seat and have
the system checked by your SUBARU
dealer.
.If the SRS airbag system warning light
does not illuminate, check that the front
passenger’s frontal airbag ON and OFF
indicators work properly. If the indicators
do not work properly, do not allow anyone
to sit on the front passenger’s seat and
have the system checked by your
SUBARU dealer.
ON /: Front passenger’s frontal airbag ON
indicator
/: Front passenger’s frontal airbag OFF
indicator
Also, if luggage or electronic devices are
placed on the front passenger’s seat, this
may adversely affect the ability of thesystem to determine deployment. This
may prevent the front passenger’s frontal
airbag ON and OFF indicators from work-
ing properly. Check that the indicators
work properly.
When the OFF indicator turns off and the
ON indicator illuminates, the front passen-
ger’s frontal airbag may deploy during a
collision. Remove luggage and electronic
devices from the front passenger’s seat.
CAUTION
Electrical devices, such as cell
phones, laptops, portable music
players, or electronic games, espe-
cially when connected to the acces-
sory power outlet and placed on the
front passenger’s seat or used by
the person sitting in the front pas-
senger’s seat, may affect the opera-
tion of the occupant detection sys-
tem. If either of the following situa-
tions occurs when using an electro-
nic device in the vehicle, at first try
to relocate that device to avoid it
creating any interference.
.The SRS airbag system warning
light illuminates.
.The front passenger’s frontal air-
bag ON and OFF indicators oper-
ate erratically.
1-48
Page 96 of 572

Seat, seatbelt and SRS airbags/*SRS airbag (Supplemental Restraint System airbag)
SRS airbag system warning light (type B)
A diagnostic system continually monitors
the readiness of the SRS airbag system
(including front seatbelt pretensioners)
while the vehicle is being driven. The
SRS airbag system warning light will show
normal system operation by illuminating
for approximately 6 seconds when the
ignition switch is turned to the“ON”
position.
The following components are monitored
by the indicator:
.Front sub sensor
–Right-hand side
–Left-hand side
.Airbag control module (including im-
pact sensor and rollover sensor)
.Frontal airbag module–Driver’s side
–Front passenger’s side
.Knee airbag module (driver’s side)
.Side airbag sensor
–Center pillar right-hand side
–Center pillar left-hand side
.Front door impact sensor
–Right-hand side
–Left-hand side
.Side airbag module
–Driver’s side
–Front passenger’s side
.Curtain airbag sensor
–Rear wheel house right-hand side
–Rear wheel house left-hand side
.Curtain airbag module
–Right-hand side
–Left-hand side
.Satellite safing sensor (under the rear
center seat)
.Seatbelt pretensioner
–Driver’s side
–Front passenger’s side
.Lap belt pretensioner (front passen-
ger’s side)
.Seatbelt buckle switch (front passen-
ger’s side)
.Front passenger’s occupant detection
system sensor
.Front passenger’s occupant detectioncontrol module
.
Front passenger’s frontal airbag ON
and OFF indicator
.All related wiring
WARNING
If the warning light exhibits any of
the following conditions, there may
be a malfunction in the seatbelt
pretensioners and/or SRS airbag
system.
.Flashing or flickering of the warn-
ing light
.No illumination of the warning
light when the ignition switch is
first turned to the“ON”position
.Continuous illumination of the
warning light
.Illumination of the warning light
while driving
Immediately take your vehicle to
your nearest SUBARU dealer to
have the system checked. Unless
checked and properly repaired, the
seatbelt pretensioners and/or SRS
airbag will not operate properly in
the event of a collision, which may
increase the risk of injury.
1-64
Page 99 of 572
Keys..................................................................... 2-3
Key number plate................................................ 2-3
Immobilizer.......................................................... 2-3Security indicator light........................................ 2-4
Key replacement................................................. 2-4
Certification for immobilizer system..................... 2-4
Door locks........................................................... 2-5Locking and unlocking from the outside .............. 2-5
Locking and unlocking from the inside................ 2-7
Battery drainage prevention function................... 2-7
Power door locking switches............................. 2-8Key lock-in prevention function........................... 2-9
Keyless access with push-button start
system (if equipped)........................................ 2-9
Access key........................................................ 2-10
Safety precautions............................................. 2-10
Locking and unlocking with“keyless access”
entry function................................................... 2-13
Selecting audible signal operation...................... 2-17
Warning chimes and warning indicator............... 2-17
Disabling keyless access function...................... 2-17
When access key does not operate properly....... 2-19
Replacing battery of access key......................... 2-19
Replacing access key......................................... 2-19
Certification for keyless access with push-button
start system..................................................... 2-19
PIN Code Access (models with“keyless
access with push-button start system”)........ 2-20
Registering a PIN code....................................... 2-21
Unlocking.......................................................... 2-22
Remote keyless entry system........................... 2-22
Locking the doors.............................................. 2-23
Unlocking the doors.......................................... 2-24
Unlocking the rear gate...................................... 2-24
Vehicle finder function....................................... 2-24
Sounding a panic alarm..................................... 2-24
Selecting audible signal operation (models
without“keyless access with push-button start
system”).......................................................... 2-24
Replacing the battery......................................... 2-25
Replacing lost transmitters................................ 2-25
Certification for remote keyless entry system..... 2-25
Alarm system..................................................... 2-26System operation............................................... 2-26
Activating and deactivating the alarm system..... 2-27
If you have accidentally triggered the alarm
system............................................................ 2-27
Arming the system............................................ 2-27
Disarming the system........................................ 2-30
Valet mode........................................................ 2-31
Passive arming (models without“keyless access
with push-button start system”) ....................... 2-31
Tripped sensor identification.............................. 2-32
Shock sensors (dealer option)............................ 2-33
Child safety locks.............................................. 2-33
Windows............................................................. 2-34
Power window operation by driver..................... 2-34
Power window operation by passengers............. 2-36
Initialization of power window ............................ 2-37
Keys and doors
2
Page 105 of 572
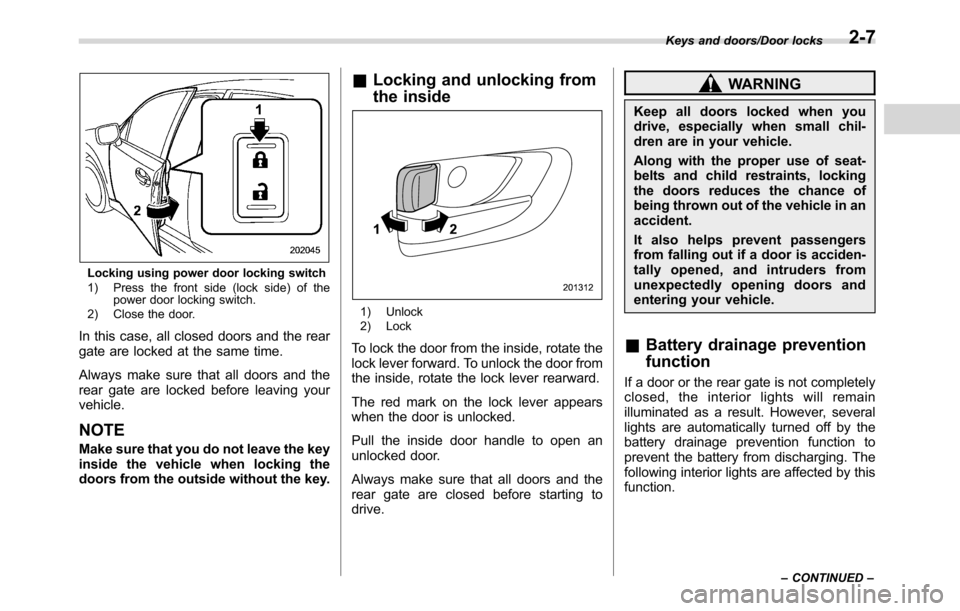
Locking using power door locking switch
1) Press the front side (lock side) of the
power door locking switch.
2) Close the door.
In this case, all closed doors and the rear
gate are locked at the same time.
Always make sure that all doors and the
rear gate are locked before leaving your
vehicle.
NOTE
Make sure that you do not leave the key
inside the vehicle when locking the
doors from the outside without the key.
&Locking and unlocking from
the inside
1) Unlock
2) Lock
To lock the door from the inside, rotate the
lock lever forward. To unlock the door from
the inside, rotate the lock lever rearward.
The red mark on the lock lever appears
when the door is unlocked.
Pull the inside door handle to open an
unlocked door.
Always make sure that all doors and the
rear gate are closed before starting to
drive.
WARNING
Keep all doors locked when you
drive, especially when small chil-
dren are in your vehicle.
Along with the proper use of seat-
belts and child restraints, locking
the doors reduces the chance of
being thrown out of the vehicle in an
accident.
It also helps prevent passengers
from falling out if a door is acciden-
tally opened, and intruders from
unexpectedly opening doors and
entering your vehicle.
&Battery drainage prevention
function
If a door or the rear gate is not completely
closed, the interior lights will remain
illuminated as a result. However, several
lights are automatically turned off by the
battery drainage prevention function to
prevent the battery from discharging. The
following interior lights are affected by this
function.
Keys and doors/Door locks
–CONTINUED–2-7
Page 106 of 572
Keys and doors/Power door locking switches
ItemSwitch
positionAutomatically turning
off
Map
lights
*1OFF*1Approximately 20
minutes later
Dome light DOORApproximately 20
minutes later
Ignition
switch light—Approximately 20
minutes later
Cargo area
lightDOORApproximately 20
minutes later
*1: The battery drainage prevention function
affects only the map lights on models with the
moonroof, and only when the map light
switches are in the OFF position. The map
lights on models without the moonroof do not
turn off automatically, so push the light switches
manually to turn them off.
The operational/non-operational setting of
this function can be changed by a
SUBARU dealer. Contact your SUBARU
dealer to change the setting.
NOTE
.The factory setting (default setting)
for this function is set as“operational”.
.When leaving the vehicle, please
make sure that all doors and the rear
gate are completely closed.
.The battery drainage prevention
function does not operate while the
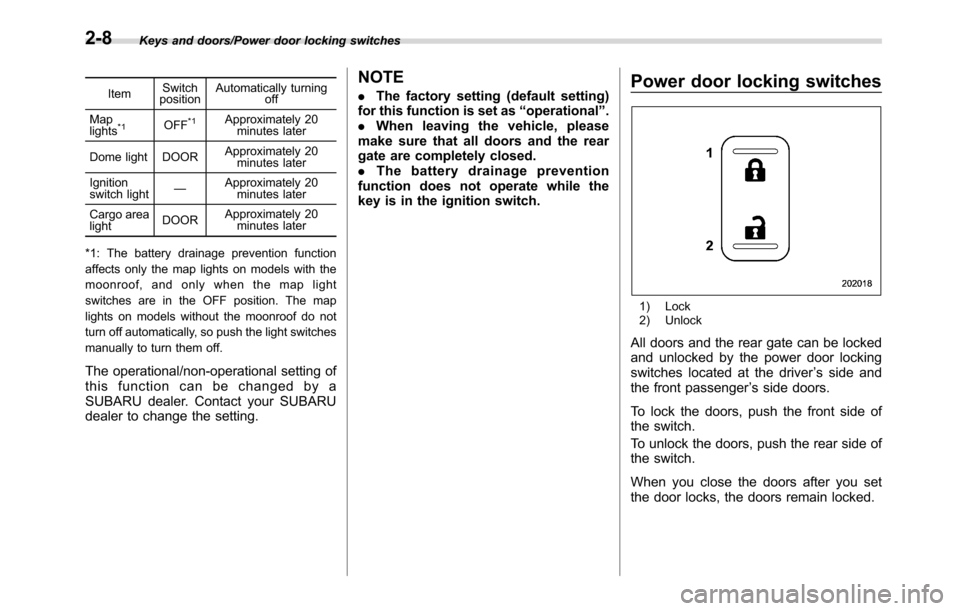
key is in the ignition switch.Power door locking switches
1) Lock
2) Unlock
All doors and the rear gate can be locked
and unlocked by the power door locking
switches located at the driver’s side and
the front passenger’s side doors.
To lock the doors, push the front side of
the switch.
To unlock the doors, push the rear side of
the switch.
When you close the doors after you set
the door locks, the doors remain locked.
2-8