change wheel SUBARU CROSSTREK 2017 1.G Owners Manual
[x] Cancel search | Manufacturer: SUBARU, Model Year: 2017, Model line: CROSSTREK, Model: SUBARU CROSSTREK 2017 1.GPages: 572, PDF Size: 41.52 MB
Page 158 of 572
Instruments and controls/Warning and indicator lights
Your vehicle has also been equipped with
a TPMS malfunction indicator to indicate
when the system is not operating properly.
The TPMS malfunction indicator is com-
bined with the low tire pressure telltale.
When the system detects a malfunction,
the telltale will flash for approximately one
minute and then remain continuously
illuminated. This sequence will continue
upon subsequent vehicle start-ups as long
as the malfunction exists. When the
malfunction indicator is illuminated, the
system may not be able to detect or signal
low tire pressure as intended. TPMS
malfunctions may occur for a variety of
reasons, including the installation of re-
placement or alternate tires or wheels on
the vehicle that prevent the TPMS from
functioning properly. Always check the
TPMS malfunction telltale after replacing
one or more tires or wheels on your
vehicle to ensure that the replacement or
alternate tires and wheels allow the TPMS
to continue to function properly.
Should the warning light illuminate stea-
dily after blinking for approximately one
minute, have the system inspected by
your nearest SUBARU dealer as soon as
possible.WARNING
If this light does not illuminate
briefly after the ignition switch is
turned ON or the light illuminates
steadily after blinking for approxi-
mately one minute, you should have
your Tire Pressure Monitoring Sys-
tem checked at a SUBARU dealer as
soon as possible.
If this light illuminates while driving,
never brake suddenly. Instead, per-
form the following procedure. Other-
wise an accident involving serious
vehicle damage and serious perso-
nal injury could occur.
1) Keep driving straight ahead while
gradually reducing speed.
2) Slowly pull off the road to a safe
place.
If this light still illuminates while
driving after adjusting the tire pres-
sure, a tire may have significant
damage and a fast leak that causes
the tire to lose air rapidly. If you have
a flat tire, replace it with a spare tire
as soon as possible.
When a spare tire is mounted or a
wheel rim is replaced without the
original pressure sensor/transmitter
being transferred, the Low tire pres-sure warning light will illuminate
steadily after blinking for approxi-
mately one minute. This indicates
the TPMS is unable to monitor all
four road wheels. Contact your
SUBARU dealer as soon as possible
for tire and sensor replacement and/
or system resetting.
If the light illuminates steadily after
blinking for approximately one min-
ute, promptly contact a SUBARU
dealer to have the system inspected.
CAUTION
The tire pressure monitoring system
is NOT a substitute for manually
checking tire pressure. The tire
pressure should be checked peri-
odically (at least monthly) using a
tire gauge. After any change to tire
pressure(s), the tire pressure mon-
itoring system will not re-check tire
inflation pressures until the vehicle
is first driven more than 20 mph (32
km/h). After adjusting the tire pres-
sures, increase the vehicle speed to
at least 20 mph (32 km/h) to start the
TPMS re-checking of the tire infla-
tion pressures. If the tire pressures
are now above the severe low
pressure threshold, the low tire
3-20
Page 177 of 572
&Basic operation
By operating“”or“”of the control
switch, the screens and selection items
can be switched. When the“
/SET”
switch is pulled toward you, the item can
be selected and set.
If there are some useful messages, such
as vehicle information, warning informa-
tion, etc., they will interrupt the current
screen, and appear on the display accom-
panied by a beep. If such a screen is
displayed, take proper action according to
the message shown on the screen.
The warning screen will return to the
original screen after a few seconds. While
the“
”information reminder is shown on
the display, it may be possible to display
the warning screen again. To recall the
message marked with“
”on the display,
pull the“/SET”switch on the steering
wheel toward you.
&Welcome screen and Good-
bye screen
When the driver’s door is opened and
closed after unlocking the door, the
welcome screen will appear on the multi
information display for approximately 20
seconds.
When the ignition switch is turned to the“LOCK”/“OFF”position, the multi informa-
tion display gradually turns off (Good-bye
screen).
NOTE
.The basic screen will be shown
when the ignition switch is turned to
the“ON”position while the welcome
screen is displayed.
.Once the welcome screen appears,
it takes a certain period of time to
display it again.
.If the ignition switch is operated
after unlocking the driver’s door, the
welcome screen will not appear even
when the driver’s door is opened and
closed.
.The welcome screen will disappear
when you lock the driver’s door by
using the remote keyless entry system
(all models) or the keyless access
function (if equipped) while the wel-
come screen is displayed.
.If any of the doors (including the
rear gate) is opened while the welcome
screen is displayed, the door ajar
warning will appear.
.The welcome screen can be set to
on or off. For details, refer to“Welcome
Good-bye Screen”F3-41.
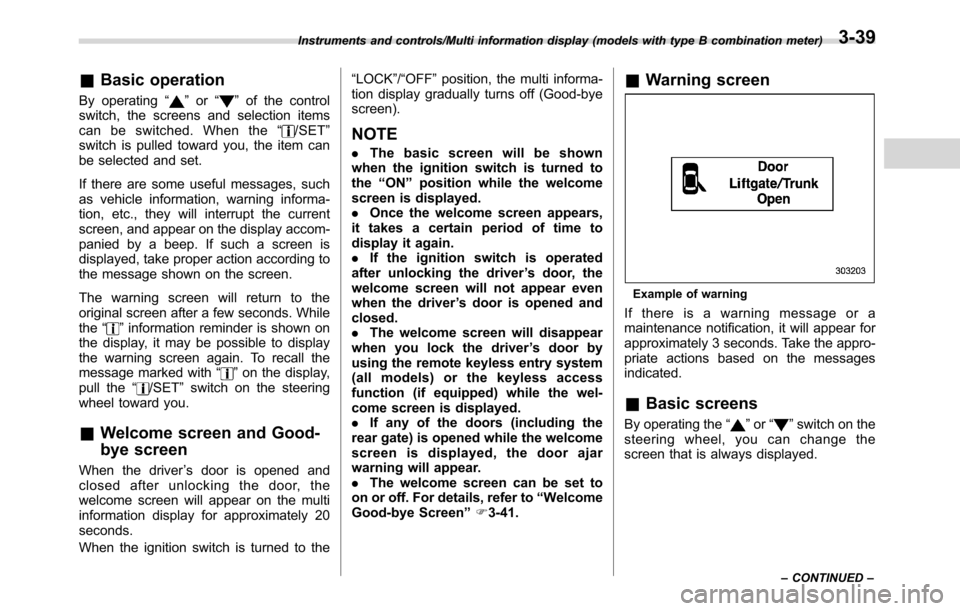
&Warning screen
Example of warning
If there is a warning message or a
maintenance notification, it will appear for
approximately 3 seconds. Take the appro-
priate actions based on the messages
indicated.
&Basic screens
By operating the“”or“”switch on the
steering wheel, you can change the
screen that is always displayed.
Instruments and controls/Multi information display (models with type B combination meter)
–CONTINUED–3-39
Page 327 of 572
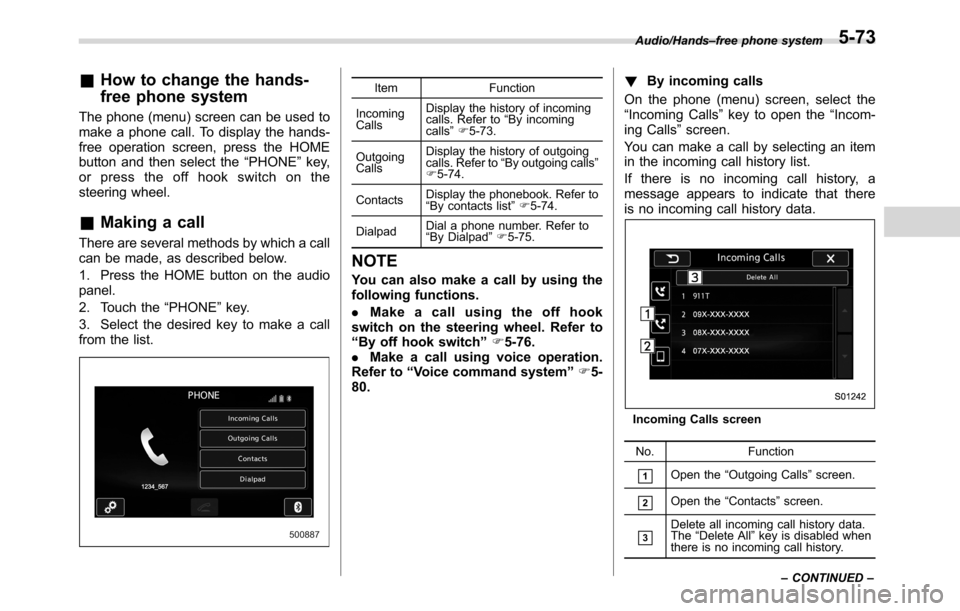
&How to change the hands-
free phone system
The phone (menu) screen can be used to
make a phone call. To display the hands-
free operation screen, press the HOME
button and then select the“PHONE”key,
or press the off hook switch on the
steering wheel.
&Making a call
There are several methods by which a call
can be made, as described below.
1. Press the HOME button on the audio
panel.
2. Touch the“PHONE”key.
3. Select the desired key to make a call
from the list.
Item Function
Incoming
CallsDisplay the history of incoming
calls. Refer to“By incoming
calls”F5-73.
Outgoing
CallsDisplay the history of outgoing
calls. Refer to“By outgoing calls”
F5-74.
ContactsDisplay the phonebook. Refer to
“By contacts list”F5-74.
DialpadDial a phone number. Refer to
“By Dialpad”F5-75.
NOTE
You can also make a call by using the
following functions.
.Make a call using the off hook
switch on the steering wheel. Refer to
“By off hook switch”F5-76.
.Make a call using voice operation.
Refer to“Voice command system”F5-
80.!By incoming calls
On the phone (menu) screen, select the
“Incoming Calls”key to open the“Incom-
ing Calls”screen.
You can make a call by selecting an item
in the incoming call history list.
If there is no incoming call history, a
message appears to indicate that there
is no incoming call history data.
Incoming Calls screen
No. Function
&1Open the“Outgoing Calls”screen.
&2Open the“Contacts”screen.
&3Delete all incoming call history data.
The“Delete All”key is disabled when
there is no incoming call history. Audio/Hands–free phone system
–CONTINUED–
5-73
Page 330 of 572
Audio/Hands–free phone system
No. Function
&3Switch the screen to the phone
(menu) screen.
&4
Open the“Outgoing Calls”screen and
dials the entered phone number. This
is the same as pressing the off hook
switch on the steering wheel. This key
is cross-hatched and cannot be se-
lected until the phone number is
entered.
&5Open the“Options”screen. Refer to
“Phone volume settings”F5-78.
&6Open the“BT Devices Connection”
screen. Refer to“Setting Bluetooth
details”F5-68.
When you enter a phone number on the
screen and select thekey, the“Out-
going Call”screen opens.
!By off hook switch
Calls can be made using the latest call
history item.
1. Press the off hook switch on the
steering wheel to display the phone
(menu) screen.
2. Check that the call screen is dis-
played.!Outgoing screen
Outgoing call screen
No. Function
&1Open the“Options”screen. Refer to
“Phone volume settings”F5-78.
&2
Abort the call. The screen returns to
the phone (menu) screen. This is the
same as pressing the on hook switch
on the steering wheel.
NOTE
.Depending on the type of Bluetooth
phone being connected, it may be
necessary to perform additional steps
on the phone.
.When you are on the outgoing call
screen, the screen changes to the call
screen when the other party answers
the call..The
,, andkeys are disabled
on the outgoing call screen.
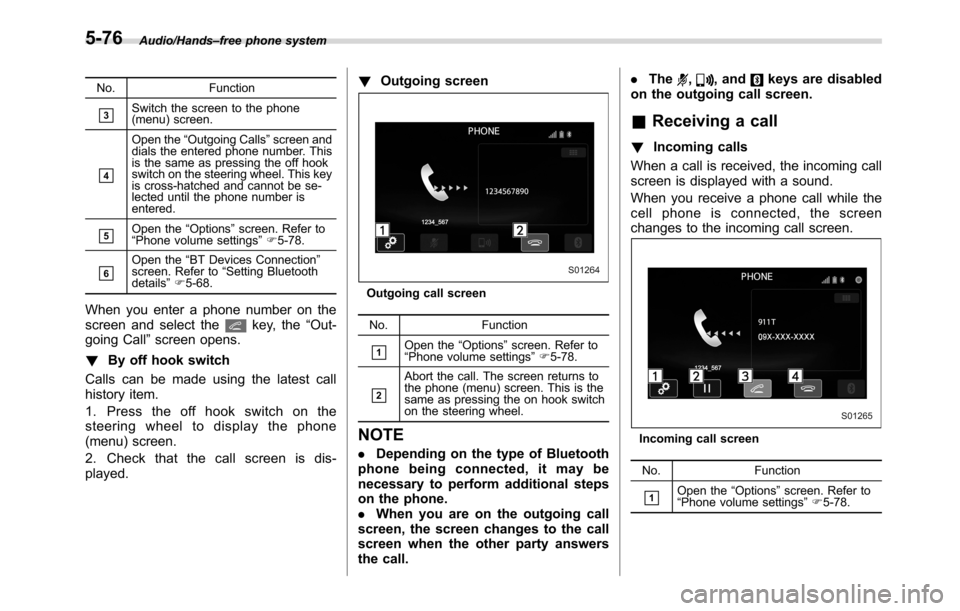
&Receiving a call
!Incoming calls
When a call is received, the incoming call
screen is displayed with a sound.
When you receive a phone call while the
cell phone is connected, the screen
changes to the incoming call screen.
Incoming call screen
No. Function
&1Open the“Options”screen. Refer to
“Phone volume settings”F5-78.
5-76
Page 331 of 572
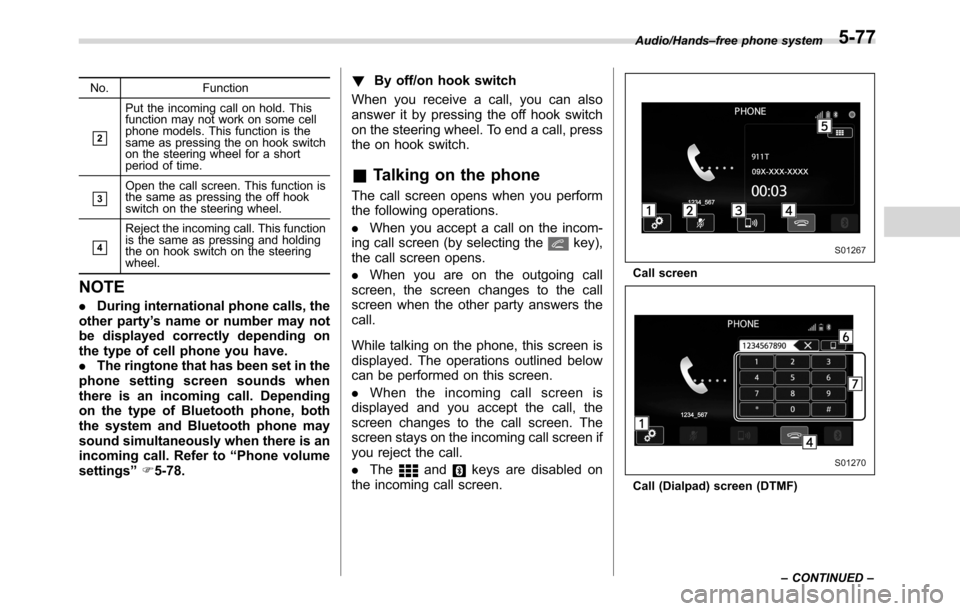
No. Function
&2
Put the incoming call on hold. This
function may not work on some cell
phone models. This function is the
same as pressing the on hook switch
on the steering wheel for a short
period of time.
&3Open the call screen. This function is
the same as pressing the off hook
switch on the steering wheel.
&4
Reject the incoming call. This function
is the same as pressing and holding
the on hook switch on the steering
wheel.
NOTE
.During international phone calls, the
other party’s name or number may not
be displayed correctly depending on
the type of cell phone you have.
.The ringtone that has been set in the
phone setting screen sounds when
there is an incoming call. Depending
on the type of Bluetooth phone, both
the system and Bluetooth phone may
sound simultaneously when there is an
incoming call. Refer to“Phone volume
settings”F5-78.!By off/on hook switch
When you receive a call, you can also
answer it by pressing the off hook switch
on the steering wheel. To end a call, press
the on hook switch.
&Talking on the phone
The call screen opens when you perform
the following operations.
.When you accept a call on the incom-
ing call screen (by selecting the
key),
the call screen opens.
.When you are on the outgoing call
screen, the screen changes to the call
screen when the other party answers the
call.
While talking on the phone, this screen is
displayed. The operations outlined below
can be performed on this screen.
.When the incoming call screen is
displayed and you accept the call, the
screen changes to the call screen. The
screen stays on the incoming call screen if
you reject the call.
.The
andkeys are disabled on
the incoming call screen.
Call screen
Call (Dialpad) screen (DTMF)Audio/Hands–free phone system
–CONTINUED–
5-77
Page 332 of 572
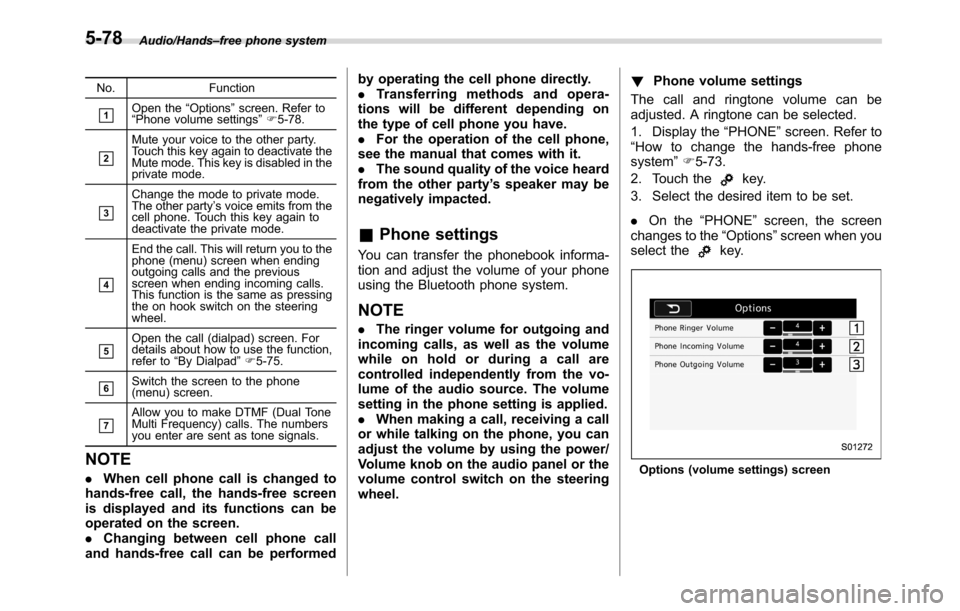
Audio/Hands–free phone system
No. Function
&1Open the“Options”screen. Refer to
“Phone volume settings”F5-78.
&2
Mute your voice to the other party.
Touch this key again to deactivate the
Mute mode. This key is disabled in the
private mode.
&3
Change the mode to private mode.
The other party’s voice emits from the
cell phone. Touch this key again to
deactivate the private mode.
&4
End the call. This will return you to the
phone (menu) screen when ending
outgoing calls and the previous
screen when ending incoming calls.
This function is the same as pressing
the on hook switch on the steering
wheel.
&5Open the call (dialpad) screen. For
details about how to use the function,
refer to“By Dialpad”F5-75.
&6Switch the screen to the phone
(menu) screen.
&7Allow you to make DTMF (Dual Tone
Multi Frequency) calls. The numbers
you enter are sent as tone signals.
NOTE
.When cell phone call is changed to
hands-free call, the hands-free screen
is displayed and its functions can be
operated on the screen.
.Changing between cell phone call
and hands-free call can be performedby operating the cell phone directly.
.Transferring methods and opera-
tions will be different depending on
the type of cell phone you have.
.For the operation of the cell phone,
see the manual that comes with it.
.The sound quality of the voice heard
from the other party’s speaker may be
negatively impacted.
&Phone settings
You can transfer the phonebook informa-
tion and adjust the volume of your phone
using the Bluetooth phone system.
NOTE
.The ringer volume for outgoing and
incoming calls, as well as the volume
while on hold or during a call are
controlled independently from the vo-
lume of the audio source. The volume
setting in the phone setting is applied.
.When making a call, receiving a call
or while talking on the phone, you can
adjust the volume by using the power/
Volume knob on the audio panel or the
volume control switch on the steering
wheel.!Phone volume settings
The call and ringtone volume can be
adjusted. A ringtone can be selected.
1. Display the“PHONE”screen. Refer to
“How to change the hands-free phone
system”F5-73.
2. Touch the
key.
3. Select the desired item to be set.
.On the“PHONE”screen, the screen
changes to the“Options”screen when you
select the
key.
Options (volume settings) screen
5-78
Page 336 of 572
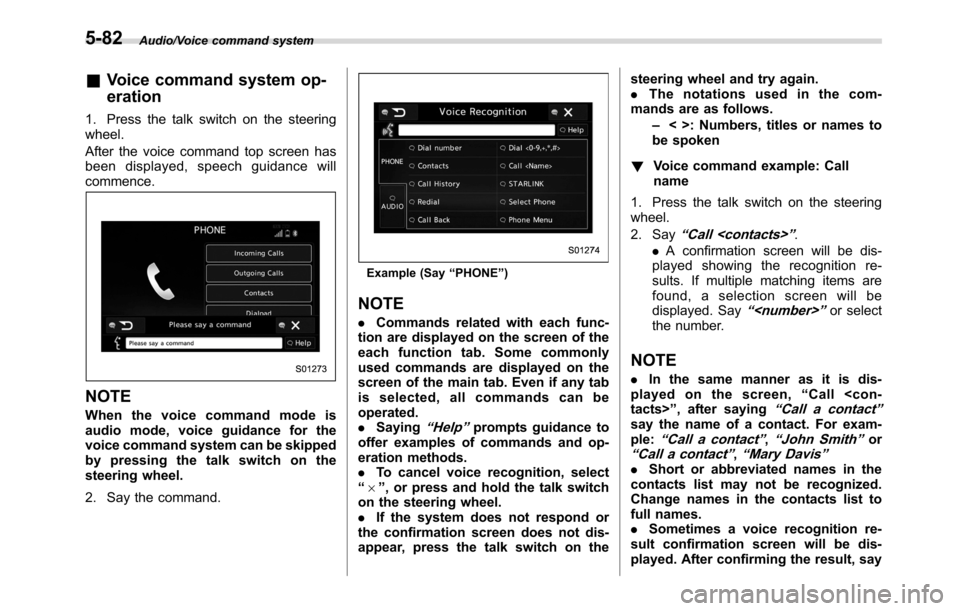
Audio/Voice command system
&Voice command system op-
eration
1. Press the talk switch on the steering
wheel.
After the voice command top screen has
been displayed, speech guidance will
commence.
NOTE
When the voice command mode is
audio mode, voice guidance for the
voice command system can be skipped
by pressing the talk switch on the
steering wheel.
2. Say the command.
Example (Say“PHONE”)
NOTE
.Commands related with each func-
tion are displayed on the screen of the
each function tab. Some commonly
used commands are displayed on the
screen of the main tab. Even if any tab
is selected, all commands can be
operated.
.Saying
“Help”prompts guidance to
offer examples of commands and op-
eration methods.
.To cancel voice recognition, select
“6”, or press and hold the talk switch
on the steering wheel.
.If the system does not respond or
the confirmation screen does not dis-
appear, press the talk switch on thesteering wheel and try again.
.The notations used in the com-
mands are as follows.
–< >: Numbers, titles or names to
be spoken
!Voice command example: Call
name
1. Press the talk switch on the steering
wheel.
2. Say
“Call
.A confirmation screen will be dis-
played showing the recognition re-
sults. If multiple matching items are
found, a selection screen will be
displayed. Say
“
the number.
NOTE
.In the same manner as it is dis-
played on the screen,“Call
“Call a contact”say the name of a contact. For exam-
ple:“Call a contact”,“John Smith”or“Call a contact”,“Mary Davis”.Short or abbreviated names in the
contacts list may not be recognized.
Change names in the contacts list to
full names.
.Sometimes a voice recognition re-
sult confirmation screen will be dis-
played. After confirming the result, say
5-82
Page 423 of 572
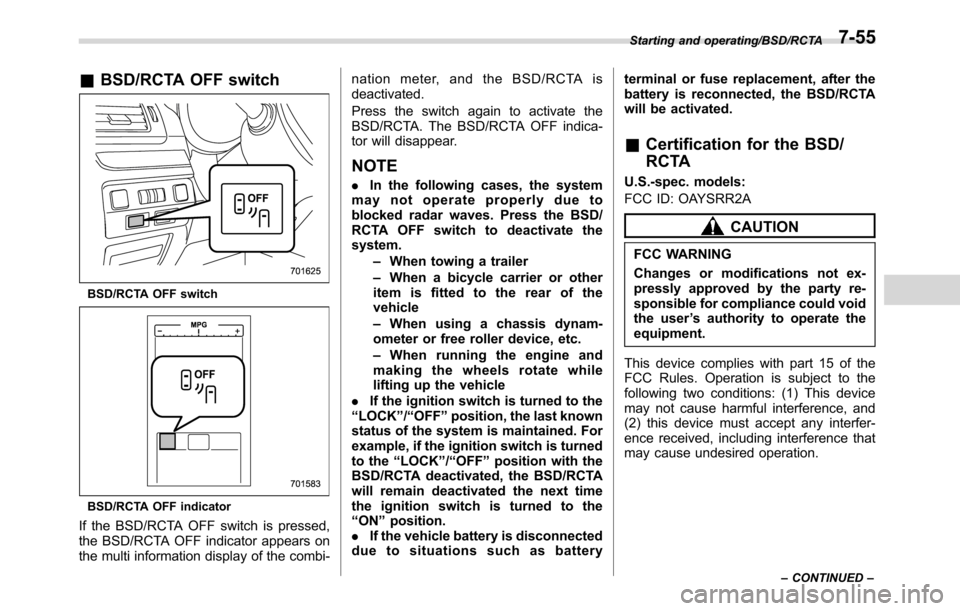
&BSD/RCTA OFF switch
BSD/RCTA OFF switch
BSD/RCTA OFF indicator
If the BSD/RCTA OFF switch is pressed,
the BSD/RCTA OFF indicator appears on
the multi information display of the combi-nation meter, and the BSD/RCTA is
deactivated.
Press the switch again to activate the
BSD/RCTA. The BSD/RCTA OFF indica-
tor will disappear.
NOTE
.In the following cases, the system
may not operate properly due to
blocked radar waves. Press the BSD/
RCTA OFF switch to deactivate the
system.
–When towing a trailer
–When a bicycle carrier or other
item is fitted to the rear of the
vehicle
–When using a chassis dynam-
ometer or free roller device, etc.
–When running the engine and
making the wheels rotate while
lifting up the vehicle
.If the ignition switch is turned to the
“LOCK”/“OFF”position, the last known
status of the system is maintained. For
example, if the ignition switch is turned
to the“LOCK”/“OFF”position with the
BSD/RCTA deactivated, the BSD/RCTA
will remain deactivated the next time
the ignition switch is turned to the
“ON”position.
.If the vehicle battery is disconnected
duetosituationssuchasbatteryterminal or fuse replacement, after the
battery is reconnected, the BSD/RCTA
will be activated.
&Certification for the BSD/
RCTA
U.S.-spec. models:
FCC ID: OAYSRR2A
CAUTION
FCC WARNING
Changes or modifications not ex-
pressly approved by the party re-
sponsible for compliance could void
the user’s authority to operate the
equipment.
This device complies with part 15 of the
FCC Rules. Operation is subject to the
following two conditions: (1) This device
may not cause harmful interference, and
(2) this device must accept any interfer-
ence received, including interference that
may cause undesired operation.
Starting and operating/BSD/RCTA
–CONTINUED–7-55
Page 438 of 572
Driving tips/Loading your vehicle
engine. For the best possible traction,
avoid spinning the wheels when trying to
free the vehicle.
When the road surface is extremely
slippery, you can obtain better traction by
starting the vehicle with the transmission
in 2nd than 1st (both for MT and CVT
models).
If your vehicle is a CVT model, for
information about holding the transmission
in the 2nd position, refer to“Selection of
manual mode”F7-26.Loading your vehicle
WARNING
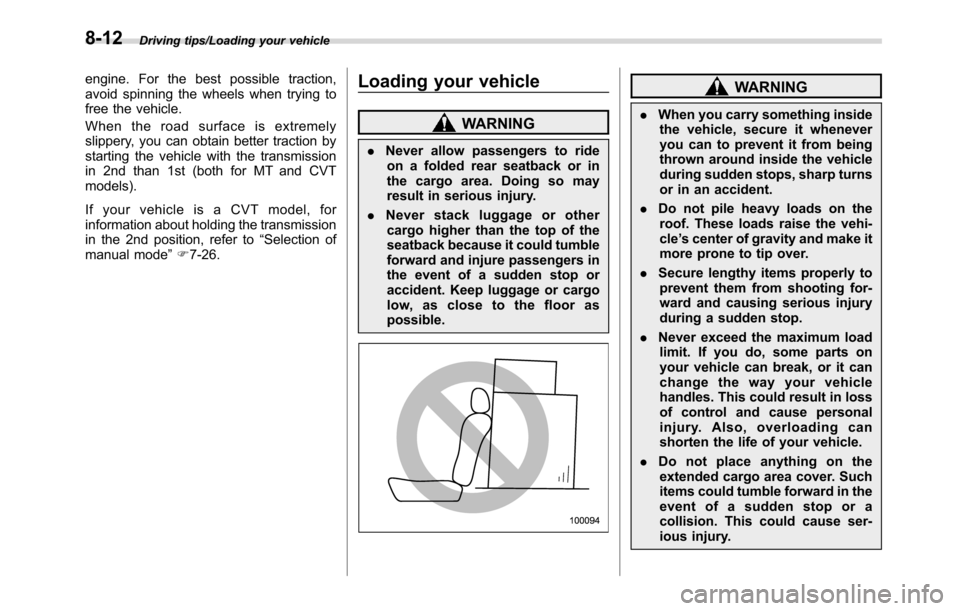
.Never allow passengers to ride
on a folded rear seatback or in
the cargo area. Doing so may
result in serious injury.
.Never stack luggage or other
cargo higher than the top of the
seatback because it could tumble
forward and injure passengers in
the event of a sudden stop or
accident. Keep luggage or cargo
low, as close to the floor as
possible.
WARNING
.When you carry something inside
the vehicle, secure it whenever
you can to prevent it from being
thrown around inside the vehicle
during sudden stops, sharp turns
or in an accident.
.Do not pile heavy loads on the
roof. These loads raise the vehi-
cle’s center of gravity and make it
more prone to tip over.
.Secure lengthy items properly to
prevent them from shooting for-
ward and causing serious injury
during a sudden stop.
.Never exceed the maximum load
limit. If you do, some parts on
your vehicle can break, or it can
change the way your vehicle
handles. This could result in loss
of control and cause personal
injury. Also, overloading can
shorten the life of your vehicle.
.Do not place anything on the
extended cargo area cover. Such
items could tumble forward in the
event of a sudden stop or a
collision. This could cause ser-
ious injury.
8-12
Page 447 of 572
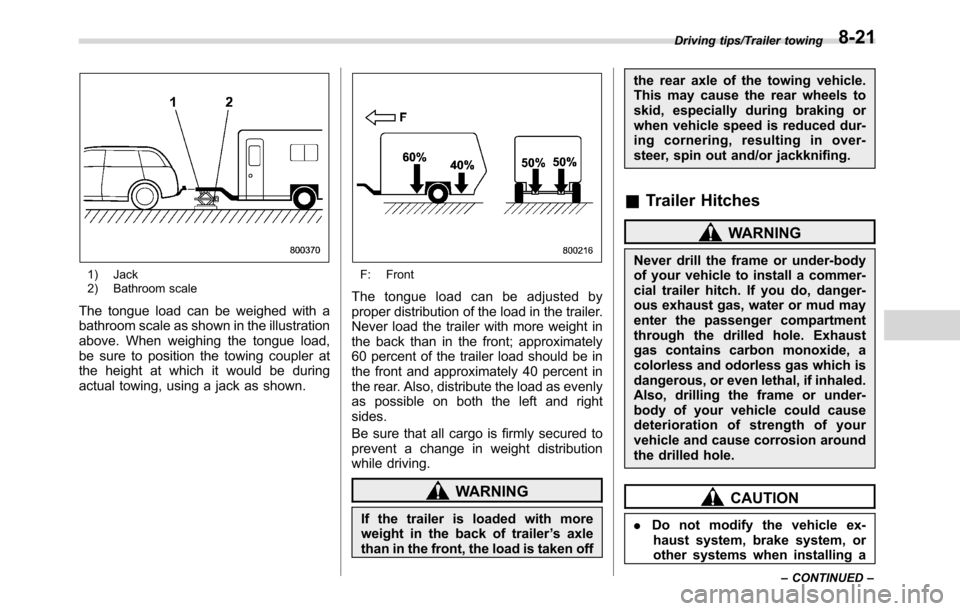
1) Jack
2) Bathroom scale
The tongue load can be weighed with a
bathroom scale as shown in the illustration
above. When weighing the tongue load,
be sure to position the towing coupler at
the height at which it would be during
actual towing, using a jack as shown.
F: Front
The tongue load can be adjusted by
proper distribution of the load in the trailer.
Never load the trailer with more weight in
the back than in the front; approximately
60 percent of the trailer load should be in
the front and approximately 40 percent in
the rear. Also, distribute the load as evenly
as possible on both the left and right
sides.
Be sure that all cargo is firmly secured to
prevent a change in weight distribution
while driving.
WARNING
If the trailer is loaded with more
weight in the back of trailer’s axle
than in the front, the load is taken offthe rear axle of the towing vehicle.
This may cause the rear wheels to
skid, especially during braking or
when vehicle speed is reduced dur-
ing cornering, resulting in over-
steer, spin out and/or jackknifing.
&Trailer Hitches
WARNING
Never drill the frame or under-body
of your vehicle to install a commer-
cial trailer hitch. If you do, danger-
ous exhaust gas, water or mud may
enter the passenger compartment
through the drilled hole. Exhaust
gas contains carbon monoxide, a
colorless and odorless gas which is
dangerous, or even lethal, if inhaled.
Also, drilling the frame or under-
body of your vehicle could cause
deterioration of strength of your
vehicle and cause corrosion around
the drilled hole.
CAUTION
.Do not modify the vehicle ex-
haust system, brake system, or
other systems when installing a
Driving tips/Trailer towing
–CONTINUED–8-21