SUBARU FORESTER 2004 Service Repair Manual
Manufacturer: SUBARU, Model Year: 2004, Model line: FORESTER, Model: SUBARU FORESTER 2004Pages: 2870, PDF Size: 38.67 MB
Page 1251 of 2870

EN(H4SO)-153
ENGINE (DIAGNOSTIC)
Diagnostic Procedure with Diagnostic Trouble Code (DTC)
Step Check Yes No
1 CHECK HARNESS BETWEEN CRANK-
SHAFT POSITION SENSOR AND ECM CON-
NECTOR.
1) Turn the ignition switch to OFF.
2) Disconnect the connector from the crank-
shaft position sensor.
3) Measure the resistance of harness
between crankshaft position sensor connector
and engine ground.
Connector & terminal
(E10) No. 1 — Engine ground:Is the resistance more than
100 kΩ?Repair harness
and connector.
N
OTE:
In this case repair
the following:
Open circuit in
harness between
crankshaft posi-
tion sensor and
ECM connector
Poor contact in
ECM connector.
Poor contact in
coupling connectorGo to step 2.
2 CHECK HARNESS BETWEEN CRANK-
SHAFT POSITION SENSOR AND ECM CON-
NECTOR.
Measure the resistance of harness between
crankshaft position sensor connector and
engine ground.
Connector & terminal
(E10) No. 1 — Engine ground:Is the resistance less than 10
Ω?Repair ground
short circuit in har-
ness between
crankshaft posi-
tion sensor and
ECM connector.
N
OTE:
The harness be-
tween both connec-
tors are shielded.
Repair ground short
circuit in harness to-
gether with shield.Go to step 3.
3 CHECK HARNESS BETWEEN CRANK-
SHAFT POSITION SENSOR AND ECM CON-
NECTOR.
Measure the resistance of harness between
crankshaft position sensor connector and
engine ground.
Connector & terminal
(E10) No. 2 — Engine ground:Is the resistance less than 5
Ω?Go to step 4.Repair harness
and connector.
NOTE:
In this case repair
the following:
Open circuit in
harness between
crankshaft posi-
tion sensor and
ECM connector
Poor contact in
ECM connector.
Poor contact in
coupling connector
4 CHECK CONDITION OF CRANKSHAFT PO-
SITION SENSOR.Is the crankshaft position sen-
sor installation bolt tightened
securely?Go to step 5.Tighten the crank-
shaft position sen-
sor installation bolt
securely.
5 CHECK CRANKSHAFT POSITION SENSOR.
1) Remove the crankshaft position sensor.
2) Measure the resistance between connector
terminals of crankshaft position sensor.
Te r m i n a l s
No. 1 — No. 2:Is the resistance 1 — 4 kΩ? Repair poor con-
tact in crankshaft
position sensor
connector.Replace the crank-
shaft position sen-
sor.
Crankshaft Posi-
tion Sensor.>
Page 1252 of 2870

EN(H4SO)-154
ENGINE (DIAGNOSTIC)
Diagnostic Procedure with Diagnostic Trouble Code (DTC)
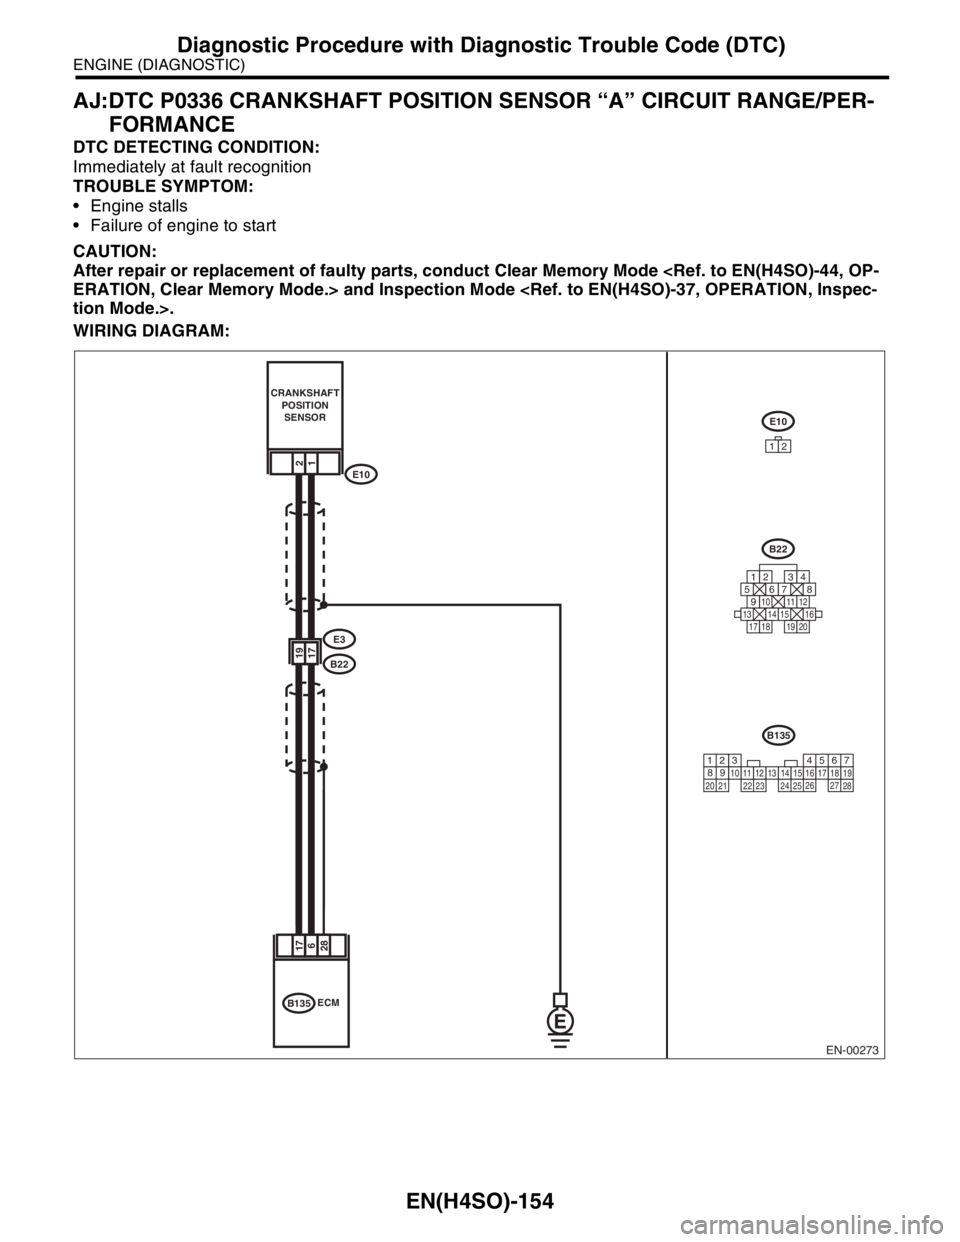
AJ:DTC P0336 CRANKSHAFT POSITION SENSOR “A” CIRCUIT RANGE/PER-
FORMANCE
DTC DETECTING CONDITION:
Immediately at fault recognition
TROUBLE SYMPTOM:
Engine stalls
Failure of engine to start
CAUTION:
After repair or replacement of faulty parts, conduct Clear Memory Mode
WIRING DIAGRAM:
EN-00273
12
1917
1728
B22
E3
E10
B22
E10
12
B135ECM CRANKSHAFT
POSITION
SENSOR
125678
131415169101112
34
17181920
6
B135
567
82 1
94
310
24 22 23 251112131415
26 27
281617181920 21
Page 1253 of 2870

EN(H4SO)-155
ENGINE (DIAGNOSTIC)
Diagnostic Procedure with Diagnostic Trouble Code (DTC)
Step Check Yes No
1 CHECK ANY OTHER DTC ON DISPLAY.Is any other DTC displayed? Inspect the DTC
using “List of Diag-
nostic Trouble
Code (DTC)”.
of Diagnostic Trou-
ble Code (DTC).>Go to step 2.
2 CHECK CONDITION OF CRANKSHAFT PO-
SITION SENSOR.
Turn the ignition switch to OFF.Is the crankshaft position sen-
sor installation bolt tightened
securely?Go to step 3.Tighten the crank-
shaft position sen-
sor installation bolt
securely.
3 CHECK CRANK SPROCKET.
Remove the front belt cover.Are crank sprocket teeth
cracked or damaged?Replace the crank
sprocket.
Crank Sprocket.>Go to step 4.
4 CHECK INSTALLATION CONDITION OF
TIMING BELT.
Turn the crankshaft using ST, and align align-
ment mark on crank sprocket with alignment
mark on cylinder block.
ST 499987500 CRANKSHAFT SOCKETIs the timing belt dislocated
from its proper position?Repair installation
condition of timing
belt.
Timing Belt.>Replace the crank-
shaft position sen-
sor.
Crankshaft Posi-
tion Sensor.>
Page 1254 of 2870

EN(H4SO)-156
ENGINE (DIAGNOSTIC)
Diagnostic Procedure with Diagnostic Trouble Code (DTC)
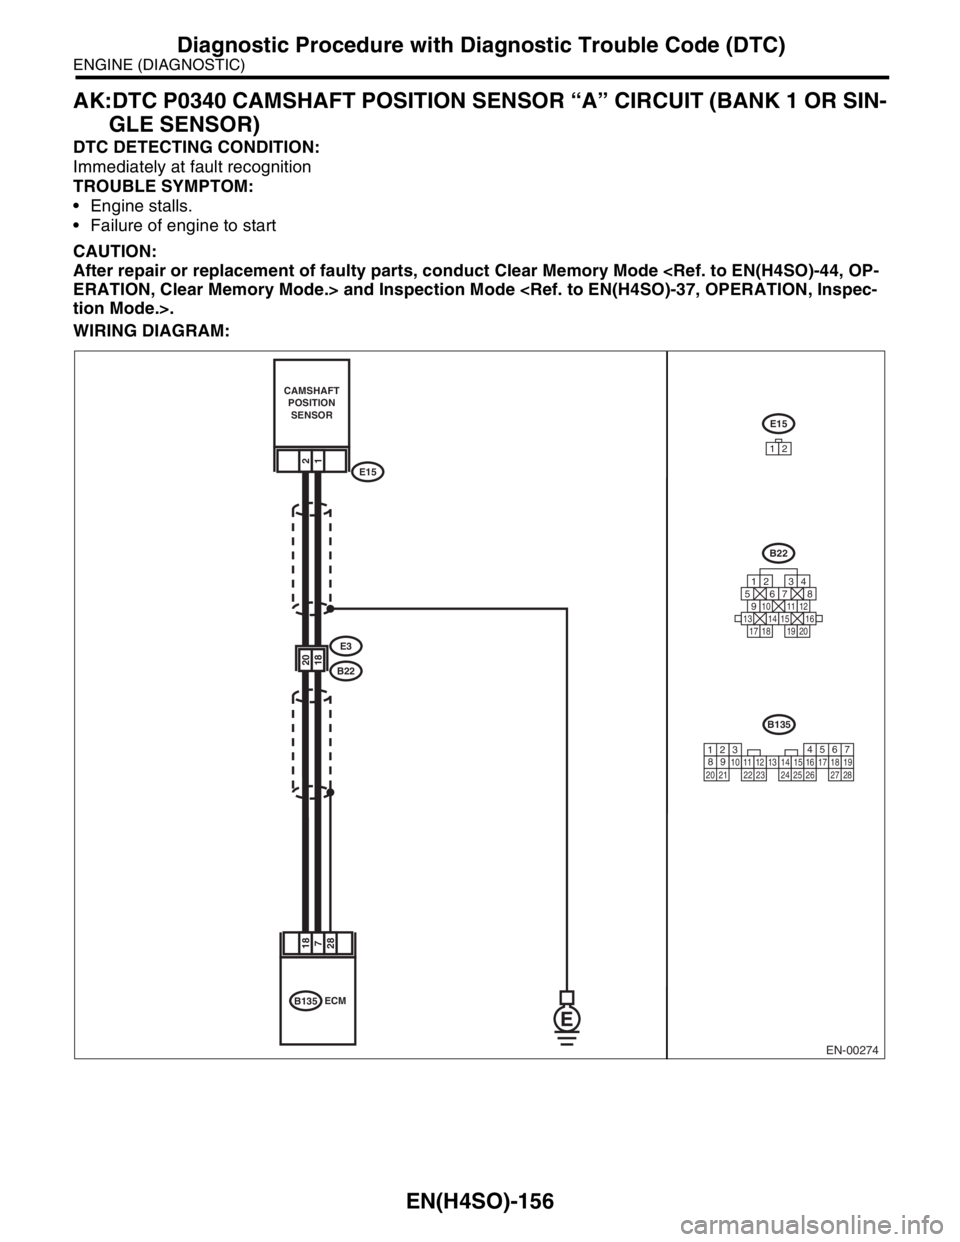
AK:DTC P0340 CAMSHAFT POSITION SENSOR “A” CIRCUIT (BANK 1 OR SIN-
GLE SENSOR)
DTC DETECTING CONDITION:
Immediately at fault recognition
TROUBLE SYMPTOM:
Engine stalls.
Failure of engine to start
CAUTION:
After repair or replacement of faulty parts, conduct Clear Memory Mode
WIRING DIAGRAM:
EN-00274
B22
E15
12
125678
131415169101112
34
17181920
12
2018
1828
B22
E3
E15
B135ECM CAMSHAFT
POSITION
SENSOR
7
B135
567
82 1
94
310
24 22 23 251112131415
26 27
281617181920 21
Page 1255 of 2870

EN(H4SO)-157
ENGINE (DIAGNOSTIC)
Diagnostic Procedure with Diagnostic Trouble Code (DTC)
Step Check Yes No
1 CHECK HARNESS BETWEEN CAMSHAFT
POSITION SENSOR AND ECM CONNEC-
TOR.
1) Turn the ignition switch to OFF.
2) Disconnect the connector from camshaft
position sensor.
3) Measure the resistance of harness
between camshaft position sensor connector
and engine ground.
Connector & terminal
(E15) No. 1 — Engine ground:Is the resistance more than
100 kΩ?Repair harness
and connector.
N
OTE:
In this case repair
the following:
Open circuit in
harness between
camshaft position
sensor and ECM
connector
Poor contact in
ECM connector.
Poor contact in
coupling connectorGo to step 2.
2 CHECK HARNESS BETWEEN CAMSHAFT
POSITION SENSOR AND ECM CONNEC-
TOR.
Measure the resistance of harness between
camshaft position sensor connector and
engine ground.
Connector & terminal
(E15) No. 1 — Engine ground:Is the resistance less than 10
Ω?Repair ground
short circuit in har-
ness between
camshaft position
sensor and ECM
connector.
N
OTE:
The harness be-
tween both connec-
tors are shielded.
Repair ground short
circuit in harness to-
gether with shield.Go to step 3.
3 CHECK HARNESS BETWEEN CAMSHAFT
POSITION SENSOR AND ECM CONNEC-
TOR.
Measure the resistance of harness between
camshaft position sensor connector and
engine ground.
Connector & terminal
(E15) No. 2 — Engine ground:Is the resistance less than 5
Ω?Go to step 4.Repair harness
and connector.
NOTE:
In this case repair
the following:
Open circuit in
harness between
camshaft position
sensor and ECM
connector
Poor contact in
ECM connector.
Poor contact in
coupling connector
4 CHECK CONDITION OF CAMSHAFT POSI-
TION SENSOR.Is the camshaft position sensor
installation bolt tightened
securely?Go to step 5.Tighten the cam-
shaft position sen-
sor installation bolt
securely.
5 CHECK CAMSHAFT POSITION SENSOR.
1) Remove the camshaft position sensor.
2) Measure the resistance between connector
terminals of camshaft position sensor.
Te r m i n a l s
No. 1 — No. 2:Is the resistance 1 — 4 kΩ? Repair poor con-
tact in camshaft
position sensor
connector.Replace the cam-
shaft position sen-
sor.
Camshaft Position
Sensor.>
Page 1256 of 2870

EN(H4SO)-158
ENGINE (DIAGNOSTIC)
Diagnostic Procedure with Diagnostic Trouble Code (DTC)
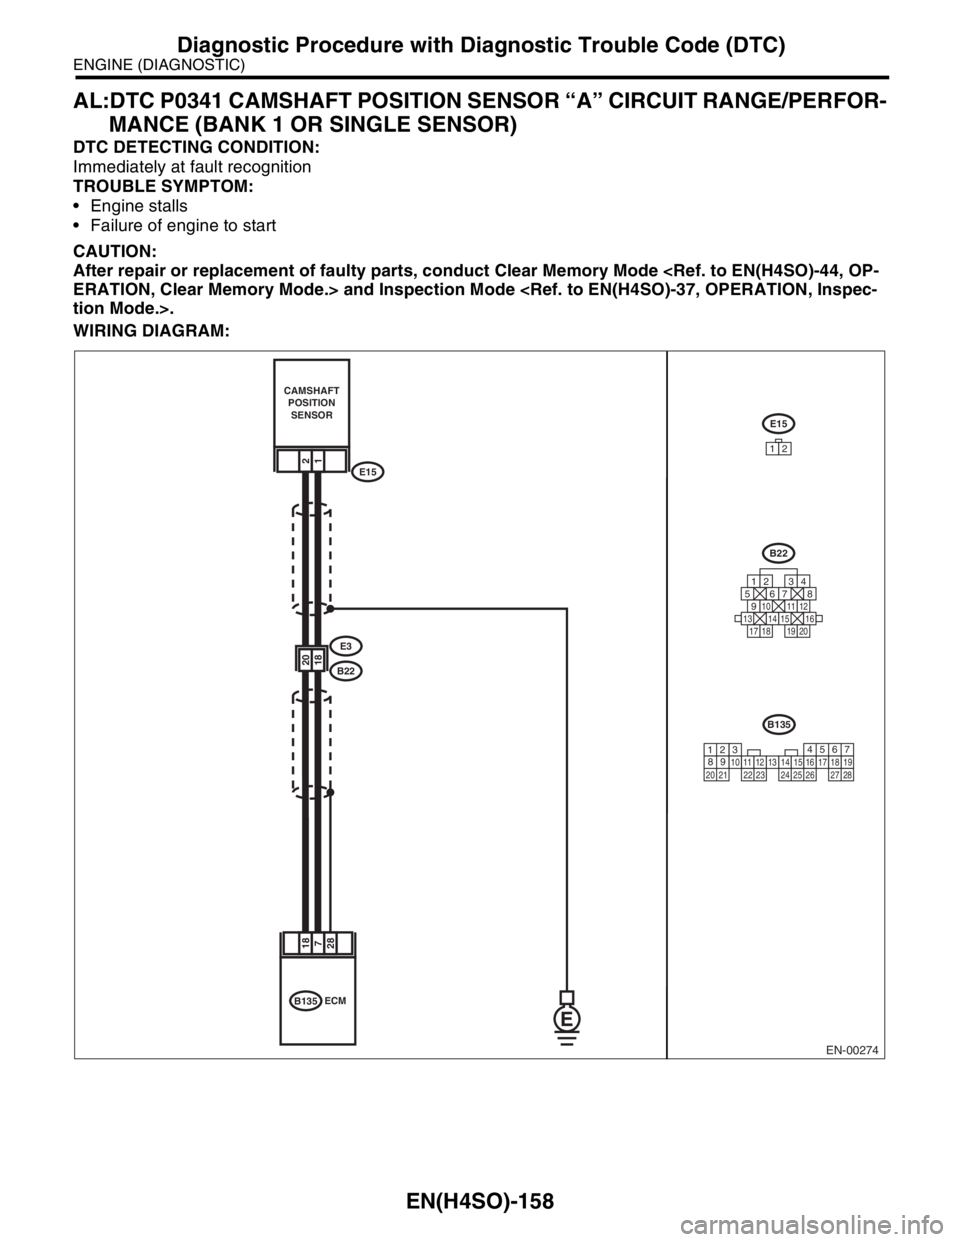
AL:DTC P0341 CAMSHAFT POSITION SENSOR “A” CIRCUIT RANGE/PERFOR-
MANCE (BANK 1 OR SINGLE SENSOR)
DTC DETECTING CONDITION:
Immediately at fault recognition
TROUBLE SYMPTOM:
Engine stalls
Failure of engine to start
CAUTION:
After repair or replacement of faulty parts, conduct Clear Memory Mode
WIRING DIAGRAM:
EN-00274
B22
E15
12
125678
131415169101112
34
17181920
12
2018
1828
B22
E3
E15
B135ECM CAMSHAFT
POSITION
SENSOR
7
B135
567
82 1
94
310
24 22 23 251112131415
26 27
281617181920 21
Page 1257 of 2870

EN(H4SO)-159
ENGINE (DIAGNOSTIC)
Diagnostic Procedure with Diagnostic Trouble Code (DTC)
Step Check Yes No
1 CHECK ANY OTHER DTC ON DISPLAY.Is any other DTC displayed? Inspect the DTC
using “List of Diag-
nostic Trouble
Code (DTC)”.
of Diagnostic Trou-
ble Code (DTC).>Go to step 2.
2 CHECK HARNESS BETWEEN CAMSHAFT
POSITION SENSOR AND ECM CONNEC-
TOR.
1) Turn the ignition switch to OFF.
2) Disconnect the connector from camshaft
position sensor.
3) Measure the resistance of harness
between camshaft position sensor connector
and engine ground.
Connector & terminal
(E15) No. 1 — Engine ground:Is the resistance more than
100 kΩ?Repair harness
and connector.
N
OTE:
In this case repair
the following:
Open circuit in
harness between
camshaft position
sensor and ECM
connector
Poor contact in
ECM connector.
Poor contact in
coupling connectorGo to step 3.
3 CHECK HARNESS BETWEEN CAMSHAFT
POSITION SENSOR AND ECM CONNEC-
TOR.
Measure the resistance of harness between
camshaft position sensor connector and
engine ground.
Connector & terminal
(E15) No. 1 — Engine ground:Is the resistance less than 10
Ω?Repair ground
short circuit in har-
ness between
camshaft position
sensor and ECM
connector.
N
OTE:
The harness be-
tween both con-
nectors are
shielded. Repair
ground short circuit
in harness togeth-
er with shield.Go to step 4.
4 CHECK HARNESS BETWEEN CAMSHAFT
POSITION SENSOR AND ECM CONNEC-
TOR.
Measure the resistance of harness between
camshaft position sensor connector and
engine ground.
Connector & terminal
(E15) No. 2 — Engine ground:Is the resistance less than 5
Ω?Go to step 5.Repair harness
and connector.
N
OTE:
In this case repair
the following:
Open circuit in
harness between
camshaft position
sensor and ECM
connector
Poor contact in
ECM connector.
Poor contact in
coupling connector
5 CHECK CONDITION OF CAMSHAFT POSI-
TION SENSOR.Is the camshaft position sensor
installation bolt tightened
securely?Go to step 6.Tighten the cam-
shaft position sen-
sor installation bolt
securely.
6 CHECK CAMSHAFT POSITION SENSOR.
1) Remove the camshaft position sensor.
2) Measure the resistance between connector
terminals of camshaft position sensor.
Te r m i n a l
No. 1 — No. 2:Is the resistance 1 — 4 kΩ? Go to step 7.Replace the cam-
shaft position sen-
sor.
Camshaft Position
Sensor.>
Page 1258 of 2870

EN(H4SO)-160
ENGINE (DIAGNOSTIC)
Diagnostic Procedure with Diagnostic Trouble Code (DTC)
7 CHECK CONDITION OF CAMSHAFT POSI-
TION SENSOR.
Turn the ignition switch to OFF.Is the camshaft position sensor
installation bolt tightened
securely?Go to step 8.Tighten the cam-
shaft position sen-
sor installation bolt
securely.
8 CHECK CAMSHAFT SPROCKET.
Remove the front belt cover.
cracked or damaged?Replace the cam
sprocket.
Cam Sprocket.>Go to step 9.
9 CHECK INSTALLATION CONDITION OF
TIMING BELT.
Turn the camshaft using ST, and align align-
ment mark on cam sprocket with alignment
mark on timing belt cover LH.
ST 499207100 CAM SPROCKET WRENCHIs the timing belt dislocated
from its proper position?Repair installation
condition of timing
belt.
Timing Belt.>Replace the cam-
shaft position sen-
sor.
Camshaft Position
Sensor.> Step Check Yes No
Page 1259 of 2870

EN(H4SO)-161
ENGINE (DIAGNOSTIC)
Diagnostic Procedure with Diagnostic Trouble Code (DTC)
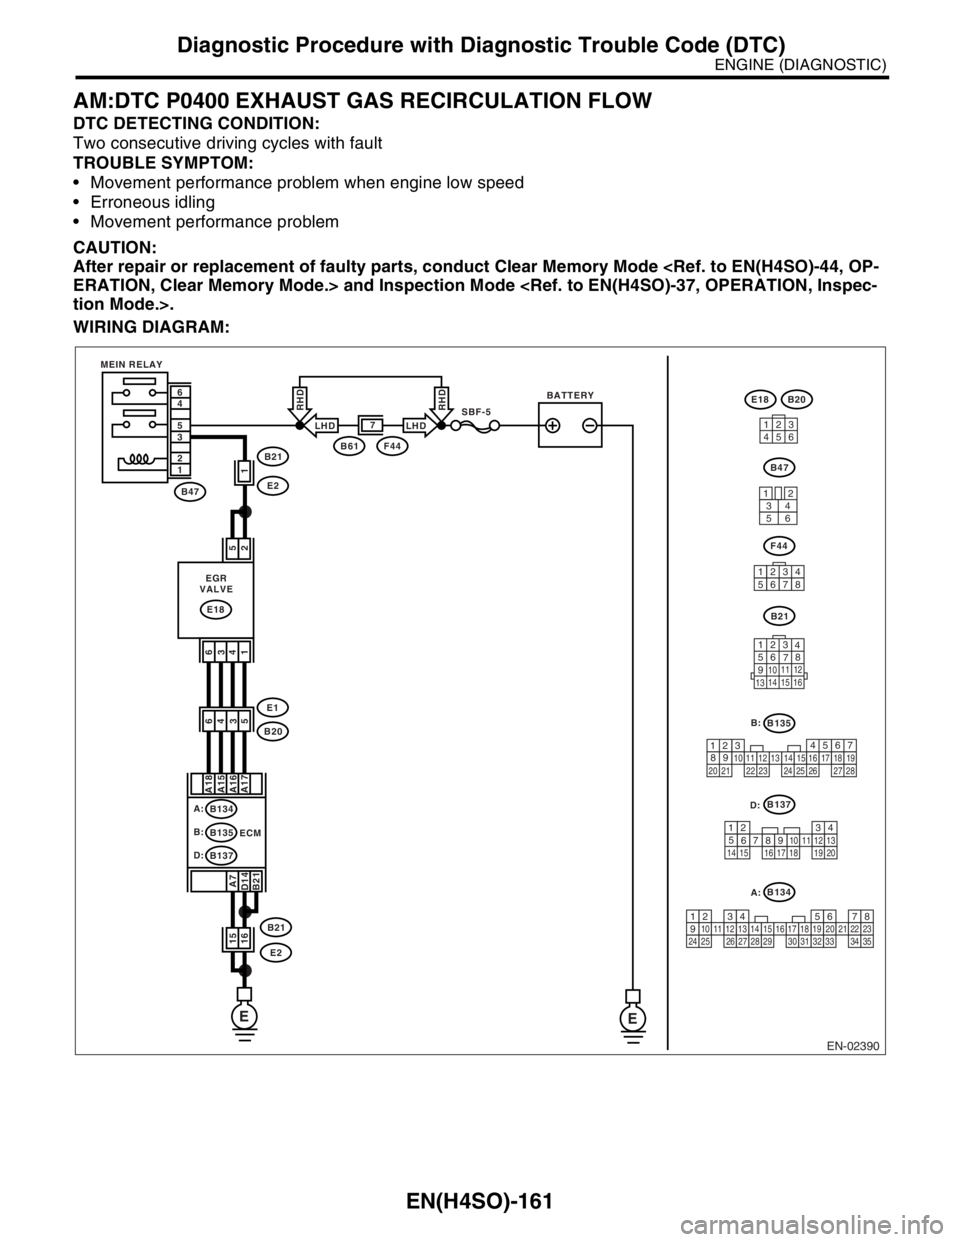
AM:DTC P0400 EXHAUST GAS RECIRCULATION FLOW
DTC DETECTING CONDITION:
Two consecutive driving cycles with fault
TROUBLE SYMPTOM:
Movement performance problem when engine low speed
Erroneous idling
Movement performance problem
CAUTION:
After repair or replacement of faulty parts, conduct Clear Memory Mode
WIRING DIAGRAM:
EN-02390
B137
B135
B134
B21
123
4
56
78
9
1011 12
1314 15 16
EE
B47
E18
2 5
1 4 3 6
B21B61F44
E2
B20
E1
B21
E2
6
4
5
3
2
1
1
5 A17 A16 A15 A18
B21 D14A74
3 6
15
16
SBF-5BATTERY MEIN RELAY
EGR
VALVE
A:
B134
B:
B135
D:
B137ECM
B47
F44
E18
3412
56
13
45627
12345678
4
1
53
2618 15 167891011
17 19
20121314
567
82 1
94
310
24 22 23 251112131415
26 27
281617181920 21
1234567891011121314151617181920212223242526272829303132333435
B20
LHDLHD
RHDRHD
A: B:
D:
Page 1260 of 2870

EN(H4SO)-162
ENGINE (DIAGNOSTIC)
Diagnostic Procedure with Diagnostic Trouble Code (DTC)
Step Check Yes No
1 CHECK ANY OTHER DTC ON DISPLAY.Is any other DTC displayed? Inspect the DTC
using “List of Diag-
nostic Trouble
Code (DTC)”.
of Diagnostic Trou-
ble Code (DTC).>Go to step 2.
2 CHECK CURRENT DATA.
1) Start the engine.
2) Read the data of intake manifold absolute
pressure sensor signal using Subaru Select
Monitor or OBD-II scan tool.
N
OTE:
Subaru Select Monitor
For detailed operation procedure, refer to the
“READ CURRENT DATA FOR ENGINE”.
OBD-II scan tool
For detailed operation procedures, refer to the
OBD-II Scan Tool Instruction Manual.Is the value more than 53.3
kPa (400 mmHg, 15.75 inHg)?Make sure that the
EGR valve, mani-
fold absolute pres-
sure sensor and
throttle body are
tightened firmly.Go to step 3.
3 CHECK THE POWER SUPPLY OF EGR
VALVE.
1) Disconnect the connector from EGR valve.
2) Turn the ignition switch to ON.
3) Measure the voltage between EGR valve
and engine ground.
Connector & terminal
(E18) No. 2 — Engine ground:
(E18) No. 5 — Engine ground:Is the voltage more than 10 V? Go to step 4.Repair open circuit
in harness
between main
relay and EGR
valve connector.
4 CHECK EGR VALVE.
Measure the resistance between EGR valve
terminals.
N
OTE:
Make sure there is no foreign material between
EGR valve and valve seat.
Te r m i n a l s
No. 1 — No. 2:
No. 3 — No. 2:
No. 4 — No. 5:
No. 6 — No. 5:Is the resistance 20 — 30 Ω? Go to step 5.Replace the EGR
valve.
EGR Valve.>
5 OUTPUT SIGNAL FROM ECM.
1) Turn the ignition switch to OFF.
2) Connect the connector to ECM and EGR
valve.
3) Turn the ignition switch to ON.
4) Measure the voltage between ECM and
chassis ground.
Connector & terminal
(B134) No. 15 (+) — Chassis ground (
−):
(B134) No. 16 (+) — Chassis ground (
−):
(B134) No. 17 (+) — Chassis ground (
−):
(B134) No. 18 (+) — Chassis ground (
−):Is the voltage 0 — 10 V? Repair poor con-
tact portion in
ECM connector.Go to step 6.