SUBARU FORESTER 2017 SJ / 4.G Owners Manual
Manufacturer: SUBARU, Model Year: 2017, Model line: FORESTER, Model: SUBARU FORESTER 2017 SJ / 4.GPages: 634, PDF Size: 11.77 MB
Page 251 of 634
Instruments and controls/Turn signal lever
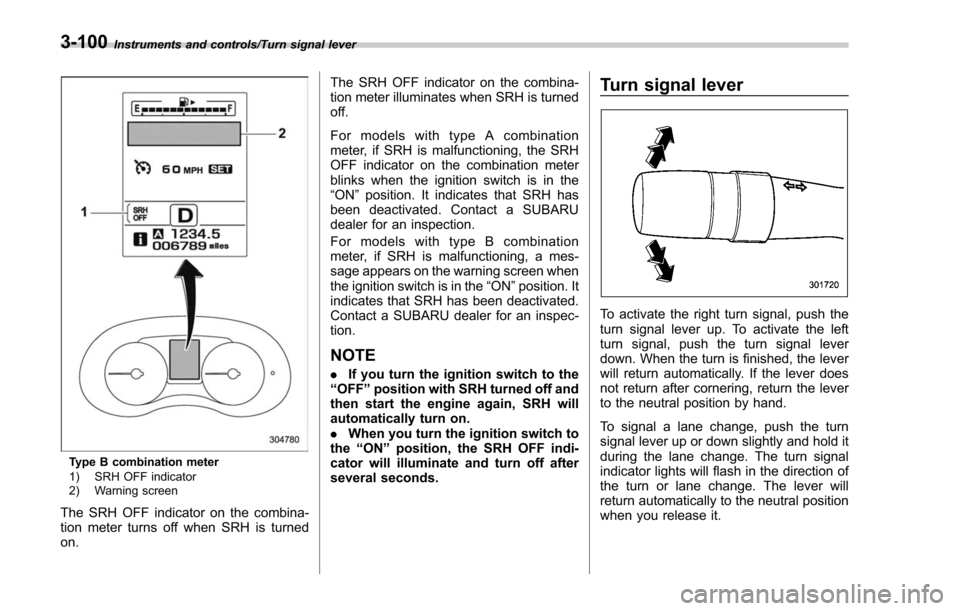
Type B combination meter
1) SRH OFF indicator
2) Warning screen
The SRH OFF indicator on the combina-
tion meter turns off when SRH is turned
on.The SRH OFF indicator on the combina-
tion meter illuminates when SRH is turned
off.
For models with type A combination
meter, if SRH is malfunctioning, the SRH
OFF indicator on the combination meter
blinks when the ignition switch is in the
“ON
”position. It indicates that SRH has
been deactivated. Contact a SUBARU
dealer for an inspection.
For models with type B combination
meter, if SRH is malfunctioning, a mes-
sage appears on the warning screen when
the ignition switch is in the “ON”position. It
indicates that SRH has been deactivated.
Contact a SUBARU dealer for an inspec-
tion.
NOTE
. If you turn the ignition switch to the
“ OFF ”position with SRH turned off and
then start the engine again, SRH will
automatically turn on.
. When you turn the ignition switch to
the “ON ”position, the SRH OFF indi-
cator will illuminate and turn off after
several seconds.
Turn signal lever
To activate the right turn signal, push the
turn signal lever up. To activate the left
turn signal, push the turn signal lever
down. When the turn is finished, the lever
will return automatically. If the lever does
not return after cornering, return the lever
to the neutral position by hand.
To signal a lane change, push the turn
signal lever up or down slightly and hold it
during the lane change. The turn signal
indicator lights will flash in the direction of
the turn or lane change. The lever will
return automatically to the neutral position
when you release it.
3-100
Page 252 of 634
&One-touch lane changer
To flash the turn signal and turn signal
indicator light three times, push the turn
signal lever up or down slightly and
immediately release it.
The operational/non-operational setting of
the one-touch lane changer can be
changed by a SUBARU dealer. Contact
your nearest SUBARU dealer for details.
Illumination brightness con-
trol
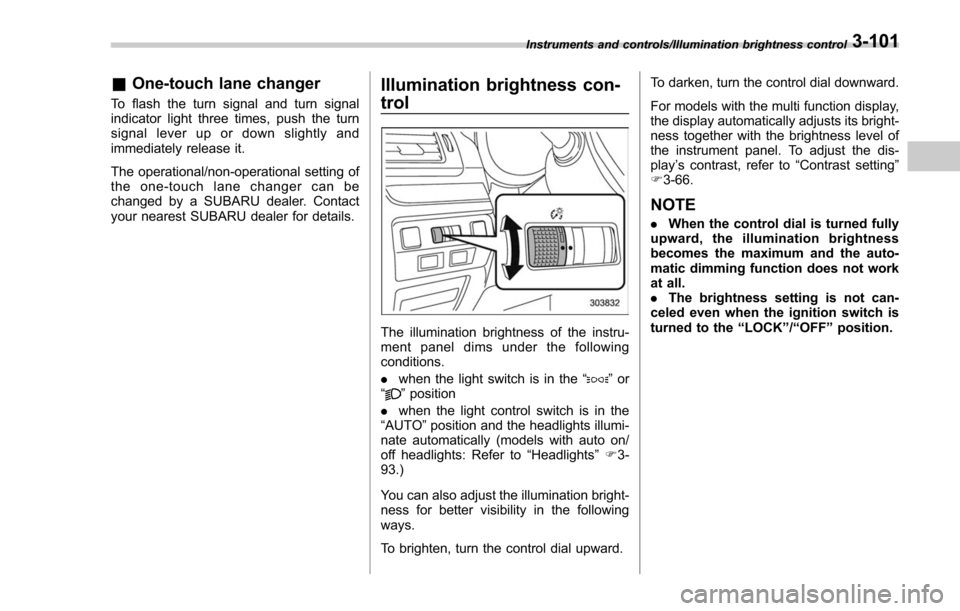
The illumination brightness of the instru-
ment panel dims under the following
conditions.
. when the light switch is in the “
”or
“” position
. when the light control switch is in the
“AUTO ”position and the headlights illumi-
nate automatically (models with auto on/
off headlights: Refer to “Headlights”F 3-
93.)
You can also adjust the illumination bright-
ness for better visibility in the following
ways.
To brighten, turn the control dial upward. To darken, turn the control dial downward.
For models with the multi function display,
the display automatically adjusts its bright-
ness together with the brightness level of
the instrument panel. To adjust the dis-
play
’s contrast, refer to “Contrast setting”
F 3-66.
NOTE
. When the control dial is turned fully
upward, the illumination brightness
becomes the maximum and the auto-
matic dimming function does not work
at all.
. The brightness setting is not can-
celed even when the ignition switch is
turned to the “LOCK ”/“ OFF ”position.
Instruments and controls/Illumination brightness control3-101
Page 253 of 634
Instruments and controls/Headlight beam leveler
Headlight beam leveler (if
equipped)
&Automatic headlight beam
leveler (models with LED
headlights)
The LED headlights generate more light
than conventional halogen headlights.
Therefore a driver of an oncoming vehicle
may experience too much glare if your
headlight beam height adjustment is high
when the vehicle is carrying a heavy load.
The automatic headlight beam leveler
adjusts the headlight beam height auto-
matically and optimally according to the
load being carried by the vehicle.
Fog light switch (if equipped)
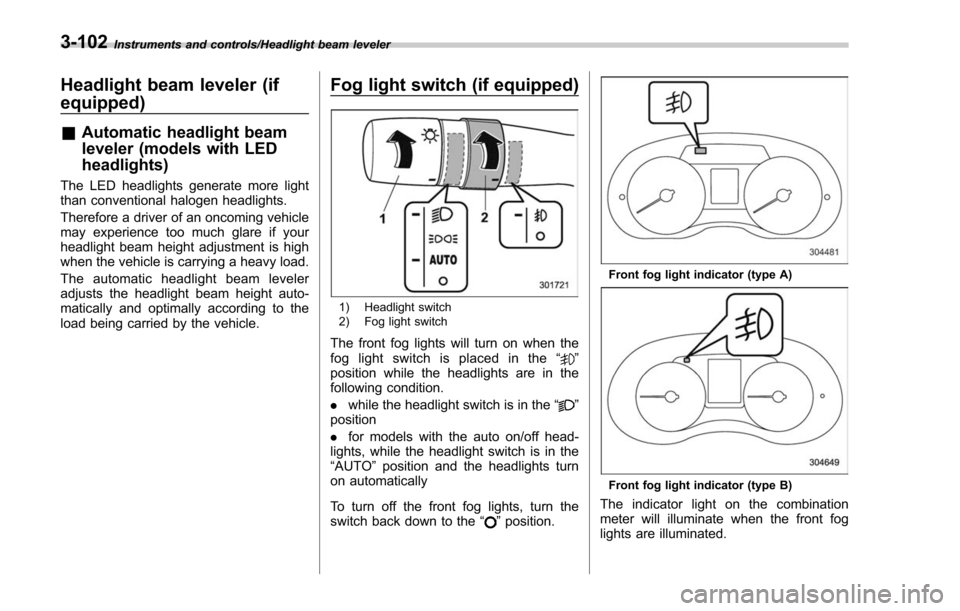
1) Headlight switch
2) Fog light switch
The front fog lights will turn on when the
fog light switch is placed in the “”
position while the headlights are in the
following condition.
. while the headlight switch is in the “
”
position
. for models with the auto on/off head-
lights, while the headlight switch is in the
“AUTO ”position and the headlights turn
on automatically
To turn off the front fog lights, turn the
switch back down to the “
”position.
Front fog light indicator (type A)
Front fog light indicator (type B)
The indicator light on the combination
meter will illuminate when the front fog
lights are illuminated.
3-102
Page 254 of 634
&Steering responsive fog
lights system (if equipped)
The steering responsive fog lights system
automatically turns the front fog light on
and off based on the steering angle and
vehicle speed when entering a curve or
driving on curved roads. The system is
intended to help prevent accidents by
enabling better visibility of curves ahead
and early recognition of any disabled
vehicles or other obstacles.
The front fog light on the inside of a curve
will turn on if all of the following conditions
are met.
. The light control switch is in the “
”
position, or the light control switch is in the
“AUTO ”position and the low beam head-
lights are turned on automatically
. The fog light switch is in the “
”
position
. The low beam mode is selected
. The select lever is in the “D”position or
the manual mode is selected
. The steering responsive fog lights
system has not been deactivated
. The operating conditions such as the
steering angle and vehicle speed are met
The front fog lights on both sides will turn
on as usual if all of the following conditions
are met. .
The light control switch is in either of
the following positions.
–in the “
”position
– in the “AUTO ”position and the low
beam headlights turn on automatically
. The fog light switch is in the “
”
position
. The low beam mode is selected
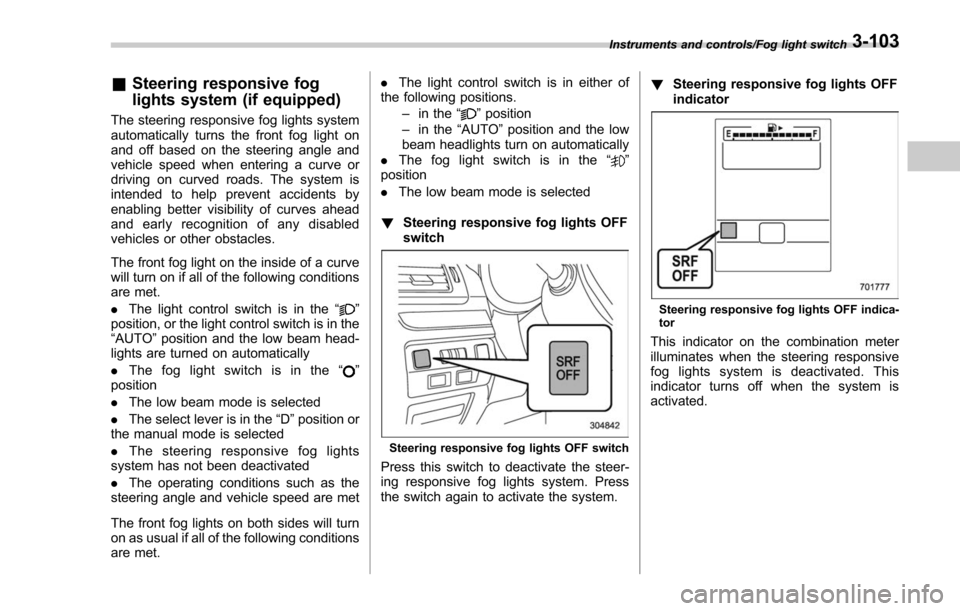
! Steering responsive fog lights OFF
switch
Steering responsive fog lights OFF switch
Press this switch to deactivate the steer-
ing responsive fog lights system. Press
the switch again to activate the system. !
Steering responsive fog lights OFF
indicator
Steering responsive fog lights OFF indica-
tor
This indicator on the combination meter
illuminates when the steering responsive
fog lights system is deactivated. This
indicator turns off when the system is
activated.
Instruments and controls/Fog light switch3-103
Page 255 of 634
Instruments and controls/Wiper and washer
Wiper and washer
WARNING
In freezing weather, do not use the
windshield washer until the wind-
shield is sufficiently warmed by the
defroster.
Otherwise the washer fluid can
freeze on the windshield, blocking
your view.
CAUTION
.Do not operate the washer con-
tinuously for more than 10 sec-
onds, or when the washer fluid
tank is empty. This may cause
overheating of the washer motor.
Check the washer fluid level
frequently, such as at fuel stops.
. Do not operate the wipers when
the windshield or rear window is
dry. This may scratch the glass,
damage the wiper blades and
might cause the wiper motor to
fail. Before operating the wiper
on a dry windshield or rear
window, always use the wind-
shield washer. .
In freezing weather, be sure that
the wiper blades are not frozen to
the windshield or rear window
before switching on the wipers.
Attempting to operate the wiper
with the blades frozen to the
window glass could cause not
only the wiper blades to be
damaged but also might cause
the wiper motor to fail. If the
wiper blades are frozen to the
window glass, be sure to operate
the defroster, windshield wiper
deicer (if equipped) or rear win-
dow defogger before turning on
the wiper.
. If the wipers stop during opera-
tion because of ice or some other
obstruction on the window, this
might cause the wiper motor to
fail even if the wiper switch is
turned off. If this occurs,
promptly stop the vehicle in a
safe place, turn the ignition
switch to the “LOCK ”/“ OFF ”po-
sition and clean the window
glass to allow proper wiper op-
eration.
. Use clean water if windshield
washer fluid is unavailable. In
areas where water freezes in
winter, use SUBARU Windshield Washer Fluid or the equivalent.
Refer to
“Windshield washer
fluid ”F 11-30.
Also, when driving the vehicle
when there are freezing tempera-
tures, use non-freezing type wi-
per blades.
. Do not clean the wiper blades
with gasoline or a solvent, such
as paint thinner or benzine. This
will cause deterioration of the
wiper blades.
NOTE
. The windshield wiper motor is pro-
tected against overloads by a circuit
breaker. If the motor operates continu-
ously under an unusually heavy load,
the circuit breaker may trip to stop the
motor temporarily. If this happens, park
your vehicle in a safe place, turn off the
wiper switch, and wait for approxi-
mately 10 minutes. The circuit breaker
will reset itself, and the wipers will
again operate normally.
. Clean your wiper blades and win-
dow glass periodically with a washer
solution to prevent streaking, and to
remove accumulations of road salt or
road film. Operate the windshield
washer for at least 1 second so that
3-104
Page 256 of 634
washer solution will be sprinkled all
over the windshield or rear window.
.Grease, wax, insects or other mate-
rial on the windshield or the wiper
blade results in jerky wiper operation
and streaking on the glass. If you
cannot remove those streaks after
operating the washer or if the wiper
operation is jerky, clean the outer sur-
face of the windshield or rear window
and the wiper blades using a sponge or
soft cloth with a neutral detergent or
mild-abrasive cleaner. After cleaning,
rinse the window glass and wiper
blades with clean water. The glass is
clean if no beads form on the glass
when you rinse with water.
. If you cannot eliminate the streaking
even after following this procedure,
replace the wiper blades with new
ones. For replacement instructions,
refer to “Replacement of wiper blades ”
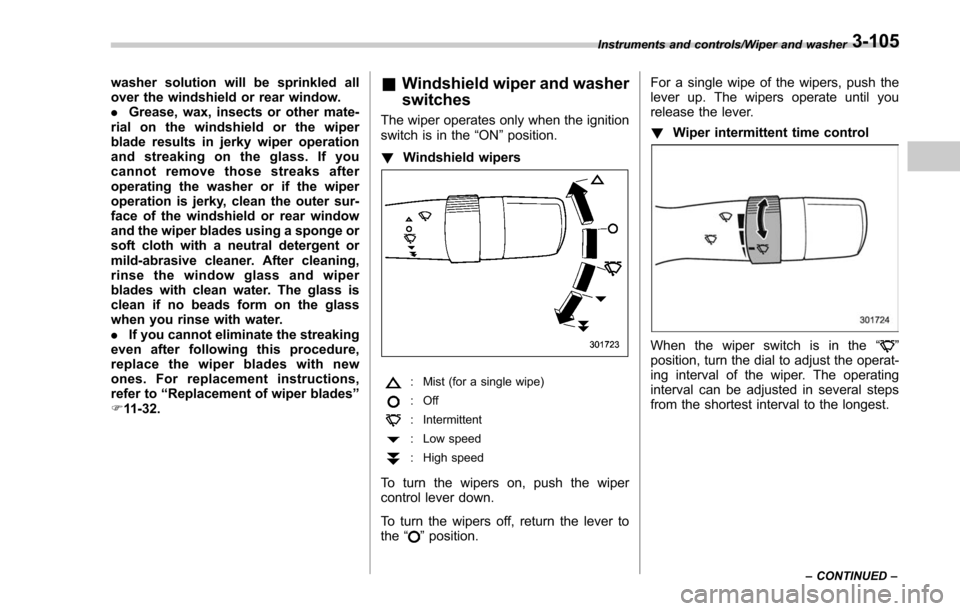
F 11-32.& Windshield wiper and washer
switches
The wiper operates only when the ignition
switch is in the “ON”position.
! Windshield wipers
: Mist (for a single wipe)
:Off
: Intermittent
: Low speed
:High speed
To turn the wipers on, push the wiper
control lever down.
To turn the wipers off, return the lever to
the
“
”position. For a single wipe of the wipers, push the
lever up. The wipers operate until you
release the lever.
!
Wiper intermittent time control
When the wiper switch is in the “”
position, turn the dial to adjust the operat-
ing interval of the wiper. The operating
interval can be adjusted in several steps
from the shortest interval to the longest.
Instruments and controls/Wiper and washer
–CONTINUED –3-105
Page 257 of 634
Instruments and controls/Wiper and washer
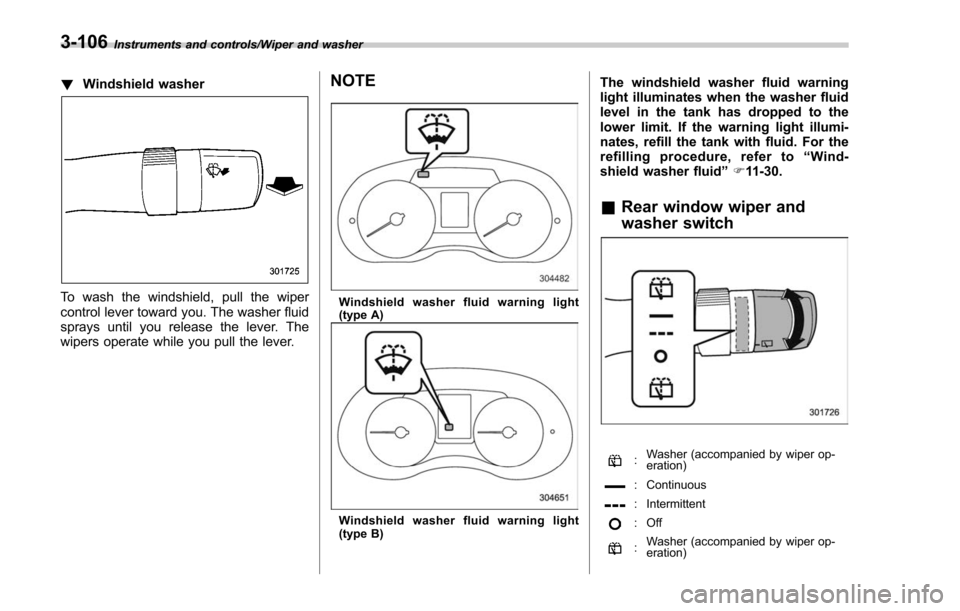
!Windshield washer
To wash the windshield, pull the wiper
control lever toward you. The washer fluid
sprays until you release the lever. The
wipers operate while you pull the lever.
NOTE
Windshield washer fluid warning light
(type A)
Windshield washer fluid warning light
(type B)
The windshield washer fluid warning
light illuminates when the washer fluid
level in the tank has dropped to the
lower limit. If the warning light illumi-
nates, refill the tank with fluid. For the
refilling procedure, refer to “Wind-
shield washer fluid ”F 11-30.
& Rear window wiper and
washer switch
:Washer (accompanied by wiper op-
eration)
: Continuous
: Intermittent
:Off
:Washer (accompanied by wiper op-
eration)
3-106
Page 258 of 634
!Rear wiper
To turn the rear wiper on, turn the knob
switch upward.
To turn the wiper off, return the knob
switch to the “
”position.
With the switch turned to the “
”posi-
tion, the rear wiper will operate intermit-
tently at intervals corresponding to the
vehicle speed. In this position, when you
move the select lever to the “R ” position
(CVT models) or the shift lever to the
reverse position (MT models), the rear
wiper will switch to continuous operation.
When you move the select lever/shift lever
from the “R”(reverse) position to another
position, the rear wiper will return to
intermittent operation.
CAUTION
Do not attach anything that disturbs
the rear wiper operation on the rear
gate. Doing so may damage the rear
wiper when it operates.
NOTE
Even if the rear wiper switch is in the
“” position, while the shift lever/
select lever is in the “R ” position with
the windshield wiper operating con-
tinuously, the rear wiper will operate intermittently.
!
Washer
To wash the rear window while the rear
wiper is operating, turn the knob switch
upward to the “
”position. The washer
fluid sprays until you release the knob.
To wash the rear window when the rear
wiper is not in use, turn the knob switch
downward to the “
”position. The washer
fluid sprays and the wiper operates until
you release the knob.
Mirrors
Always check that the inside and outside
mirrors are properly adjusted before you
start driving.
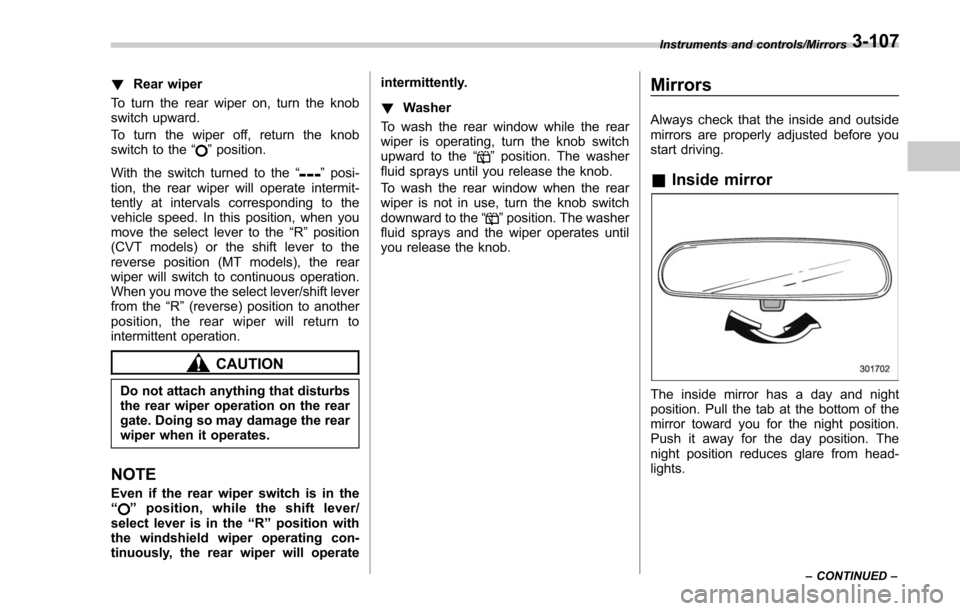
& Inside mirror
The inside mirror has a day and night
position. Pull the tab at the bottom of the
mirror toward you for the night position.
Push it away for the day position. The
night position reduces glare from head-
lights.
Instruments and controls/Mirrors
–CONTINUED –3-107
Page 259 of 634
Instruments and controls/Mirrors
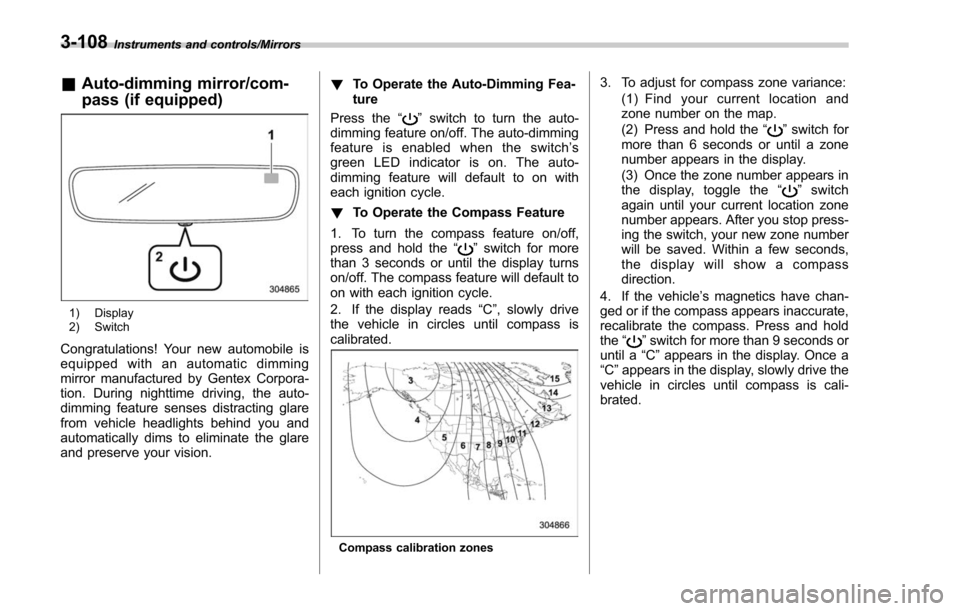
&Auto-dimming mirror/com-
pass (if equipped)
1) Display
2) Switch
Congratulations! Your new automobile is
equipped with an automatic dimming
mirror manufactured by Gentex Corpora-
tion. During nighttime driving, the auto-
dimming feature senses distracting glare
from vehicle headlights behind you and
automatically dims to eliminate the glare
and preserve your vision. !
To Operate the Auto-Dimming Fea-
ture
Press the “
”switch to turn the auto-
dimming feature on/off. The auto-dimming
feature is enabled when the switch’ s
green LED indicator is on. The auto-
dimming feature will default to on with
each ignition cycle.
! To Operate the Compass Feature
1. To turn the compass feature on/off,
press and hold the “
”switch for more
than 3 seconds or until the display turns
on/off. The compass feature will default to
on with each ignition cycle.
2. If the display reads “C”, slowly drive
the vehicle in circles until compass is
calibrated.
Compass calibration zones
3. To adjust for compass zone variance:
(1) Find your current location and
zone number on the map.
(2) Press and hold the “
”switch for
more than 6 seconds or until a zone
number appears in the display.
(3) Once the zone number appears in
thedisplay,togglethe “
”switch
again until your current location zone
number appears. After you stop press-
ing the switch, your new zone number
will be saved. Within a few seconds,
the display will show a compass
direction.
4. If the vehicle’ s magnetics have chan-
ged or if the compass appears inaccurate,
recalibrate the compass. Press and hold
the “
”switch for more than 9 seconds or
until a “C”appears in the display. Once a
“C ”appears in the display, slowly drive the
vehicle in circles until compass is cali-
brated.
3-108
Page 260 of 634
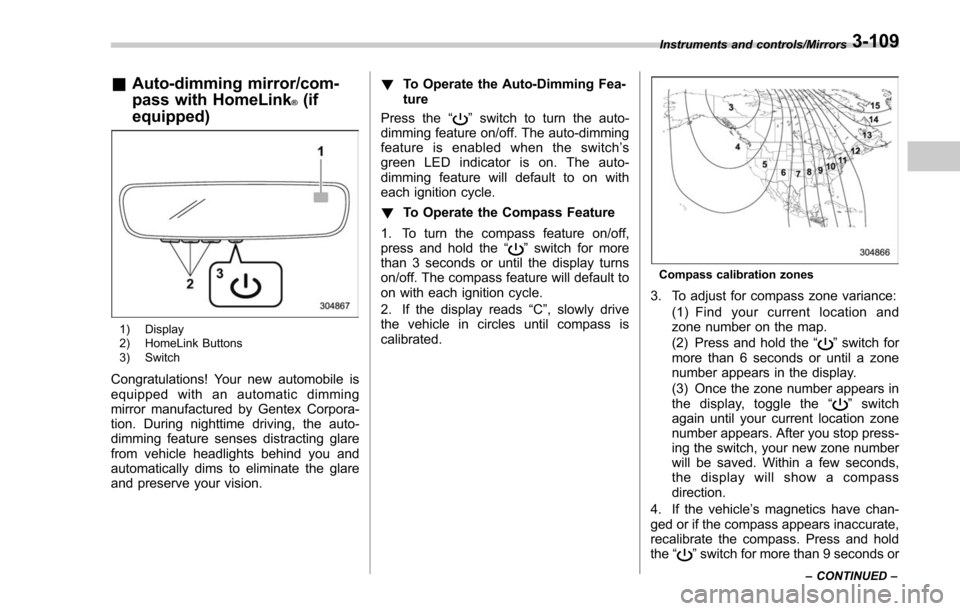
&Auto-dimming mirror/com-
pass with HomeLink
®(if
equipped)
1) Display
2) HomeLink Buttons
3) Switch
Congratulations! Your new automobile is
equipped with an automatic dimming
mirror manufactured by Gentex Corpora-
tion. During nighttime driving, the auto-
dimming feature senses distracting glare
from vehicle headlights behind you and
automatically dims to eliminate the glare
and preserve your vision. !
To Operate the Auto-Dimming Fea-
ture
Press the “
”switch to turn the auto-
dimming feature on/off. The auto-dimming
feature is enabled when the switch’ s
green LED indicator is on. The auto-
dimming feature will default to on with
each ignition cycle.
! To Operate the Compass Feature
1. To turn the compass feature on/off,
press and hold the “
”switch for more
than 3 seconds or until the display turns
on/off. The compass feature will default to
on with each ignition cycle.
2. If the display reads “C”, slowly drive
the vehicle in circles until compass is
calibrated.
Compass calibration zones
3. To adjust for compass zone variance:
(1) Find your current location and
zone number on the map.
(2) Press and hold the “
”switch for
more than 6 seconds or until a zone
number appears in the display.
(3) Once the zone number appears in
thedisplay,togglethe “
”switch
again until your current location zone
number appears. After you stop press-
ing the switch, your new zone number
will be saved. Within a few seconds,
the display will show a compass
direction.
4. If the vehicle’ s magnetics have chan-
ged or if the compass appears inaccurate,
recalibrate the compass. Press and hold
the “
”switch for more than 9 seconds or
Instruments and controls/Mirrors
–CONTINUED –3-109