reset SUBARU IMPREZA 2016 5.G User Guide
[x] Cancel search | Manufacturer: SUBARU, Model Year: 2016, Model line: IMPREZA, Model: SUBARU IMPREZA 2016 5.GPages: 594, PDF Size: 5.36 MB
Page 193 of 594
Instruments and controls/Multi function display
temperature has increased to 418F
(5 8C) or higher.
! Top display
One of the following items can be dis-
played on the top display.
. Average fuel consumption correspond-
ing to the driving distance of each trip
meter
. Current fuel consumption (This may
not be displayed when driving at a low
speed.)
. Driving range on remaining fuel
For details about the setting of the top
display, refer to “Top display setting ”F 3-
66.
NOTE
The driving range on the remaining fuel
is calculated using the average fuel
consumption of the last 19 miles (30
km) driven. This value may be different
from the values calculated using the
average fuel consumption correspond-
ing to the driving distance of each trip
meter or the current fuel consumption. !
Clock
The clock can be displayed in either 12-
hour display or 24-hour display. For details
about the setting, refer to “Current date
and time setting ”F 3-57.
NOTE
If the vehicle battery is disconnected,
the clock shown in the information bar
will be reset. Set the time again after
the vehicle battery is connected. For
details about the setting, refer to “To p
display setting ”F 3-66. !
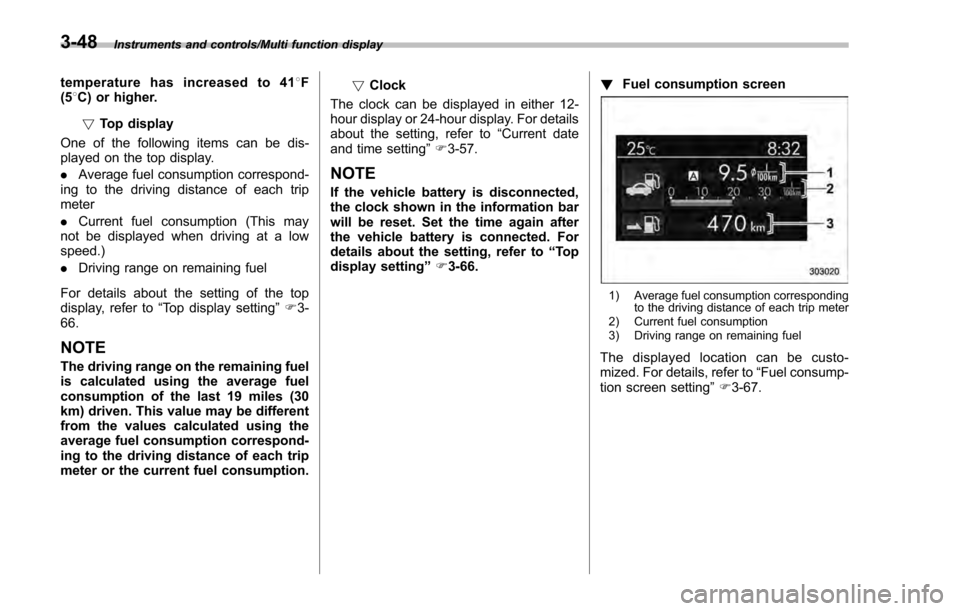
Fuel consumption screen
1) Average fuel consumption corresponding
to the driving distance of each trip meter
2) Current fuel consumption
3) Driving range on remaining fuel
The displayed location can be custo-
mized. For details, refer to “Fuel consump-
tion screen setting ”F 3-67.
3-48
Page 197 of 594
Instruments and controls/Multi function display
ItemDetails
Average vehicle speed (Average
vehicle speed for the entire driving
time from when the trip meter was
reset)
Lifetime fuel consumption
Engine oil temperature
Accelerator opening ratio
Journey time (the time that has
elapsed since the ignition switch
was turned to the“ON ”position) (if
equipped)
Journey distance (the distance
that has been driven since the
ignition switch was turned to the
“ ON ”position)
Average fuel consumption for the
entire driving distance from when
the ignition switch was turned to
the “ON ”position
Boost pressure
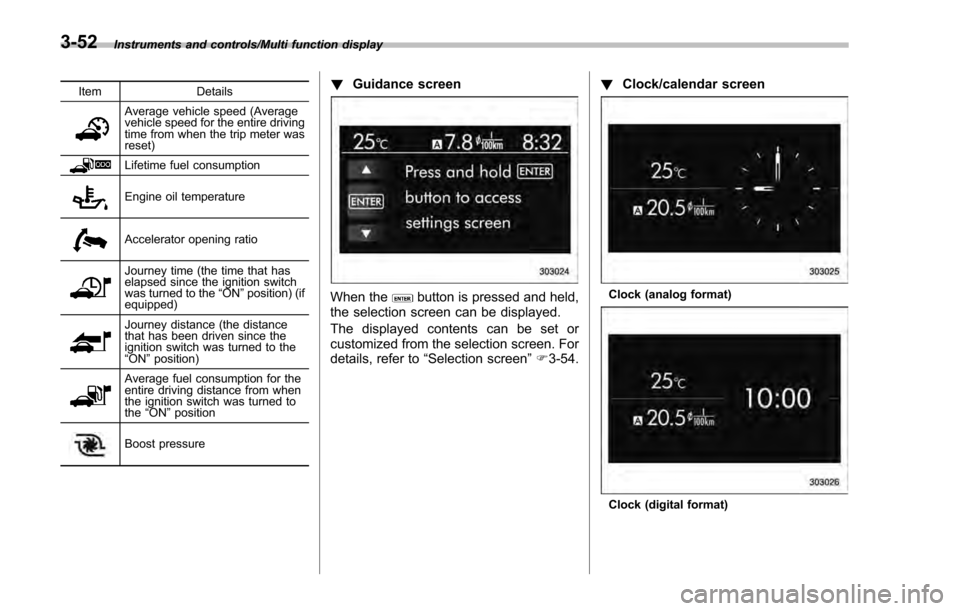
! Guidance screen
When thebutton is pressed and held,
the selection screen can be displayed.
The displayed contents can be set or
customized from the selection screen. For
details, refer to “Selection screen” F3-54. !
Clock/calendar screenClock (analog format)
Clock (digital format)
3-52
Page 201 of 594

Instruments and controls/Multi function display
Top menuMenu option DescriptionPage
Initialize Reset to Defaults Reset all settings to the default settings. Yes or No 3-87
Lifetime Fuel Consumption Reset Clear logged lifetime fuel consumption data. Yes or No 3-88
Go Back Return to the top menu. —
Go Back —Return to the top menu. —
3-56
Page 232 of 594
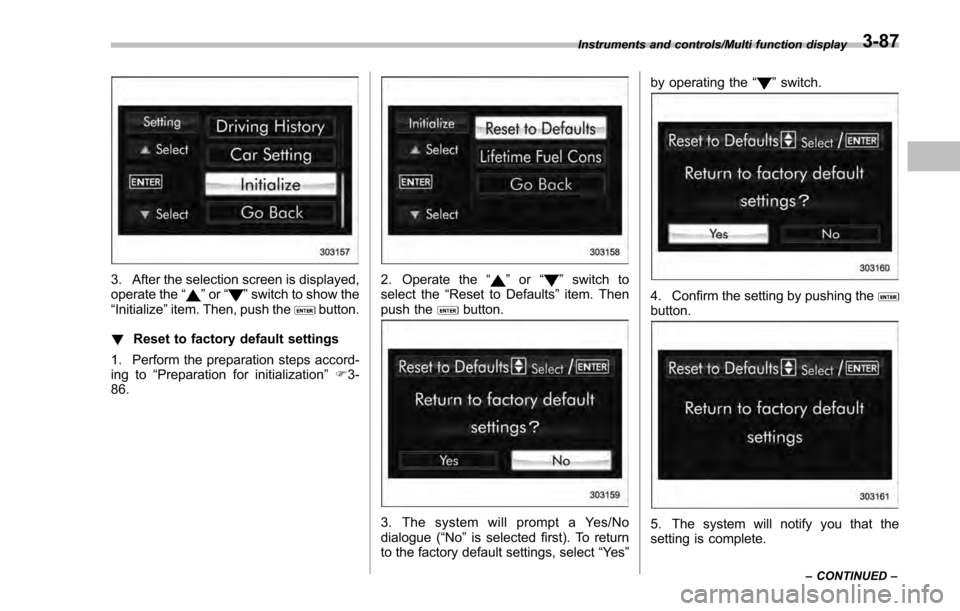
3. After the selection screen is displayed,
operate the“”or “”switch to show the
“Initialize ”item. Then, push thebutton.
! Reset to factory default settings
1. Perform the preparation steps accord-
ing to “Preparation for initialization ”F 3-
86.
2. Operate the “”or “”switch to
select the “Reset to Defaults ”item. Then
push the
button.
3. The system will prompt a Yes/No
dialogue (“No ”is selected first). To return
to the factory default settings, select “Ye s ” by operating the
“
”switch.
4. Confirm the setting by pushing thebutton.
5. The system will notify you that the
setting is complete.
Instruments and controls/Multi function display
–CONTINUED –3-87
Page 233 of 594
Instruments and controls/Multi function display
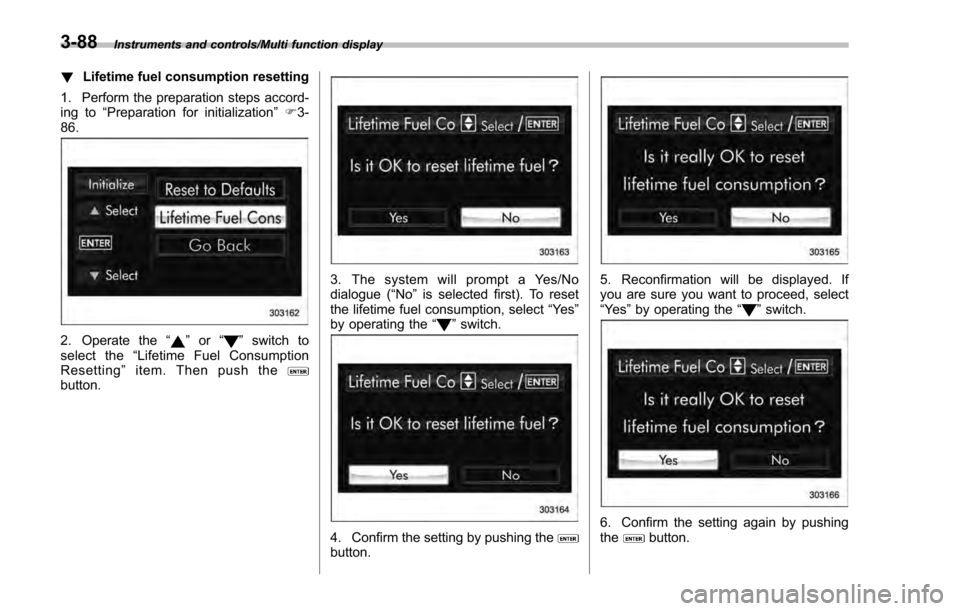
!Lifetime fuel consumption resetting
1. Perform the preparation steps accord-
ing to “Preparation for initialization ”F 3-
86.
2. Operate the “”or “”switch to
select the “Lifetime Fuel Consumption
Resetting ”item. Then push the
button.
3. The system will prompt a Yes/No
dialogue ( “No”is selected first). To reset
the lifetime fuel consumption, select “Ye s”
by operating the “
”switch.
4. Confirm the setting by pushing thebutton.
5. Reconfirmation will be displayed. If
you are sure you want to proceed, select
“Ye s ”by operating the “
”switch.
6. Confirm the setting again by pushing
thebutton.
3-88
Page 242 of 594

Washer Fluid or the equivalent.
Refer to“Windshield washer
fluid ”F 11-28.
Also, when driving the vehicle
when there are freezing tempera-
tures, use non-freezing type wi-
per blades.
. Do not clean the wiper blades
with gasoline or a solvent, such
as paint thinner or benzine. This
will cause deterioration of the
wiper blades.
NOTE
. The windshield wiper motor is pro-
tected against overloads by a circuit
breaker. If the motor operates continu-
ously under an unusually heavy load,
the circuit breaker may trip to stop the
motor temporarily. If this happens, park
your vehicle in a safe place, turn off the
wiper switch, and wait for approxi-
mately 10 minutes. The circuit breaker
will reset itself, and the wipers will
again operate normally.
. Clean your wiper blades and win-
dow glass periodically with a washer
solution to prevent streaking, and to
remove accumulations of road salt or
road film. Operate the windshield
washer for at least 1 second so that washer solution will be sprinkled all
over the windshield or rear window.
.
Grease, wax, insects or other mate-
rial on the windshield or the wiper
blade results in jerky wiper operation
and streaking on the glass. If you
cannot remove those streaks after
operating the washer or if the wiper
operation is jerky, clean the outer sur-
face of the windshield or rear window
and the wiper blades using a sponge or
soft cloth with a neutral detergent or
mild-abrasive cleaner. After cleaning,
rinse the window glass and wiper
blades with clean water. The glass is
clean if no beads form on the glass
when you rinse with water.
. If you cannot eliminate the streaking
even after following this procedure,
replace the wiper blades with new
ones. For replacement instructions,
refer to “Replacement of wiper blades ”
F 11-30.
& Windshield wiper and washer
switches
The wiper operates only when the ignition
switch is in the “ON”or “ACC ”position.
! Windshield wipers
: Mist (for a single wipe)
: Off
: Intermittent
: Low speed
:High speed
To turn the wipers on, push the wiper
control lever down.
To turn the wipers off, return the lever to
the
“
”position.
Instruments and controls/Wiper and washer
–CONTINUED –3-97
Page 291 of 594
Audio/Audio set
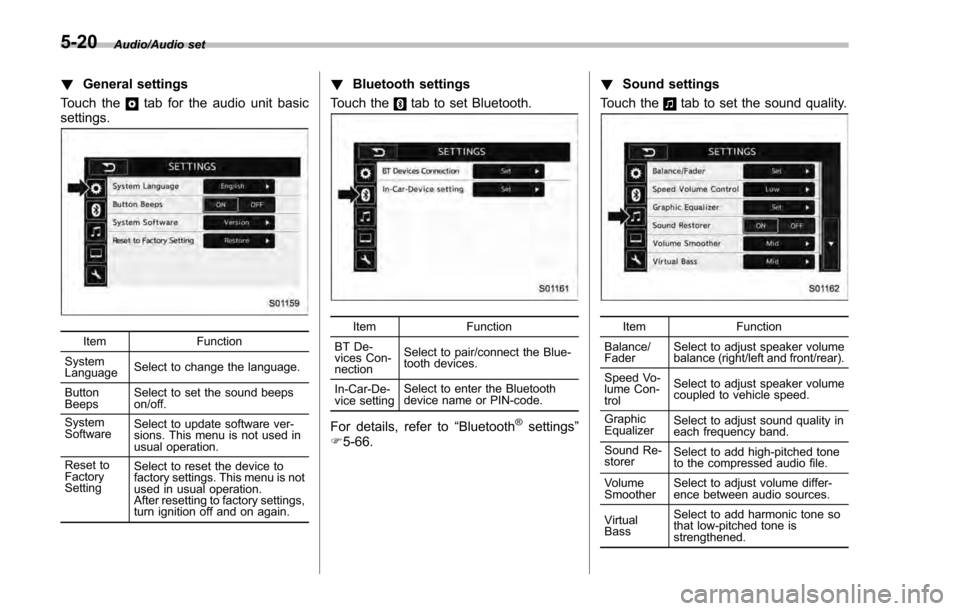
!General settings
Touch the
tab for the audio unit basic
settings.
Item Function
System
Language Select to change the language.
Button
Beeps Select to set the sound beeps
on/off.
System
Software Select to update software ver-
sions. This menu is not used in
usual operation.
Reset to
Factory
Setting Select to reset the device to
factory settings. This menu is not
used in usual operation.
After resetting to factory settings,
turn ignition off and on again.
!
Bluetooth settings
Touch the
tab to set Bluetooth.
Item Function
BT De-
vices Con-
nection Select to pair/connect the Blue-
tooth devices.
In-Car-De-
vice setting Select to enter the Bluetooth
device name or PIN-code.
For details, refer to
“Bluetooth®settings”
F 5-66. !
Sound settings
Touch the
tab to set the sound quality.
Item Function
Balance/
Fader Select to adjust speaker volume
balance (right/left and front/rear).
Speed Vo-
lume Con-
trol Select to adjust speaker volume
coupled to vehicle speed.
Graphic
Equalizer Select to adjust sound quality in
each frequency band.
Sound Re-
storer Select to add high-pitched tone
to the compressed audio file.
Volume
Smoother Select to adjust volume differ-
ence between audio sources.
Virtual
Bass Select to add harmonic tone so
that low-pitched tone is
strengthened.
5-20
Page 294 of 594
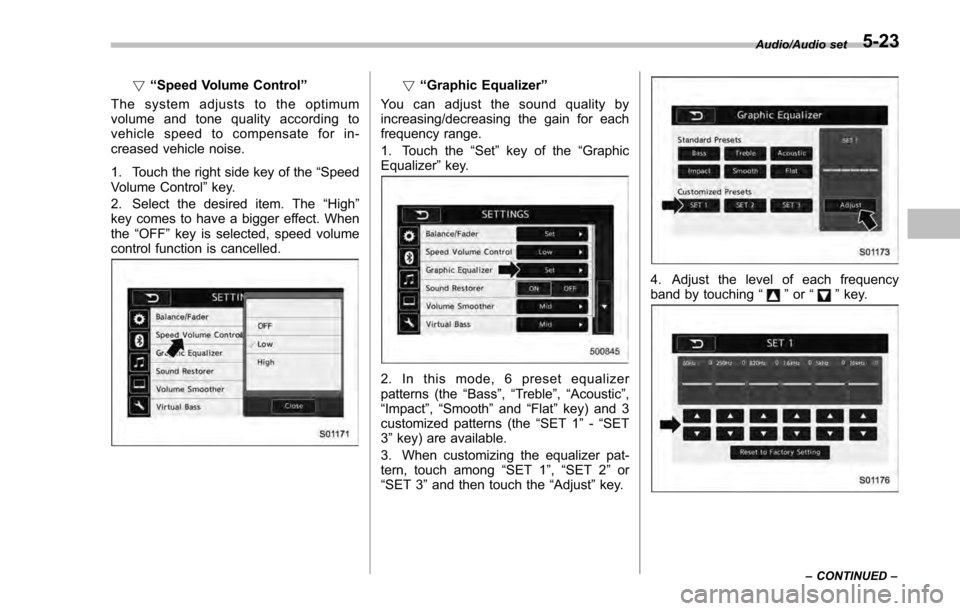
!“Speed Volume Control ”
The system adjusts to the optimum
volume and tone quality according to
vehicle speed to compensate for in-
creased vehicle noise.
1. Touch the right side key of the “Speed
Volume Control ”key.
2. Select the desired item. The “High ”
key comes to have a bigger effect. When
the “OFF ”key is selected, speed volume
control function is cancelled.! “Graphic Equalizer ”
You can adjust the sound quality by
increasing/decreasing the gain for each
frequency range.
1. Touch the “Set ”key of the “Graphic
Equalizer ”key.
2. In this mode, 6 preset equalizer
patterns (the “Bass ”,“Treble ”, “Acoustic ”,
“Impact” ,“Smooth” and“Flat”key) and 3
customized patterns (the “SET 1”-“SET
3 ” key) are available.
3. When customizing the equalizer pat-
tern, touch among “SET 1”, “SET 2 ”or
“SET 3 ”and then touch the “Adjust”key.
4. Adjust the level of each frequency
band by touching “”or “”key.
Audio/Audio set
–CONTINUED –5-23
Page 299 of 594
Audio/Audio set
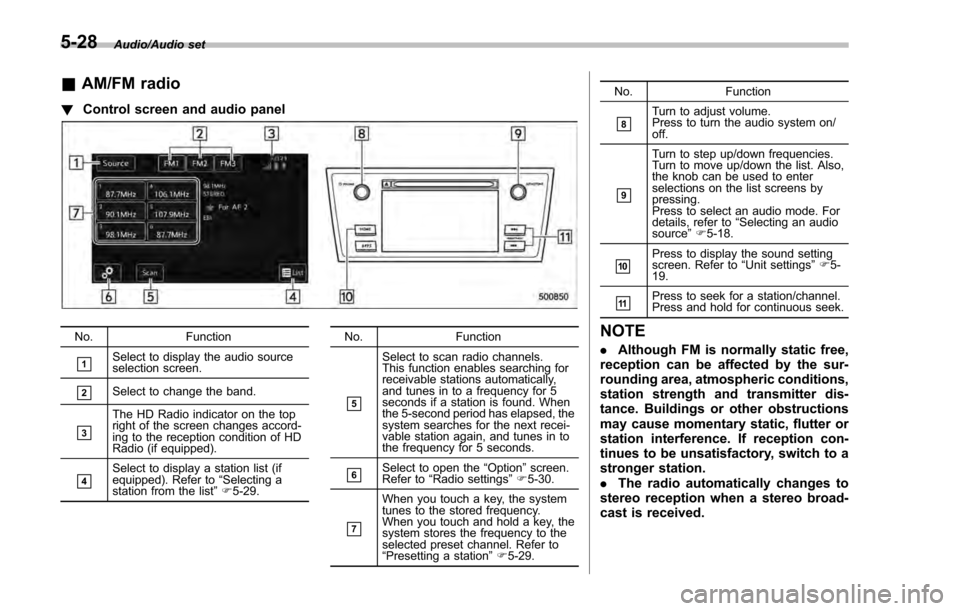
&AM/FM radio
! Control screen and audio panel
No. Function
&1Select to display the audio source
selection screen.
&2Select to change the band.
&3
The HD Radio indicator on the top
right of the screen changes accord-
ing to the reception condition of HD
Radio (if equipped).
&4Select to display a station list (if
equipped). Refer to“Selecting a
station from the list ”F 5-29. No. Function
&5
Select to scan radio channels.
This function enables searching for
receivable stations automatically,
and tunes in to a frequency for 5
seconds if a station is found. When
the 5-second period has elapsed, the
system searches for the next recei-
vable station again, and tunes in to
the frequency for 5 seconds.
&6Select to open the
“Option ”screen.
Refer to “Radio settings ”F 5-30.
&7
When you touch a key, the system
tunes to the stored frequency.
When you touch and hold a key, the
system stores the frequency to the
selected preset channel. Refer to
“Presetting a station ”F 5-29. No.
Function
&8Turn to adjust volume.
Press to turn the audio system on/
off.
&9
Turn to step up/down frequencies.
Turn to move up/down the list. Also,
the knob can be used to enter
selections on the list screens by
pressing.
Press to select an audio mode. For
details, refer to“Selecting an audio
source ”F 5-18.
&10Press to display the sound setting
screen. Refer to “Unit settings ”F 5-
19.
&11Press to seek for a station/channel.
Press and hold for continuous seek.
NOTE
. Although FM is normally static free,
reception can be affected by the sur-
rounding area, atmospheric conditions,
station strength and transmitter dis-
tance. Buildings or other obstructions
may cause momentary static, flutter or
station interference. If reception con-
tinues to be unsatisfactory, switch to a
stronger station.
. The radio automatically changes to
stereo reception when a stereo broad-
cast is received.
5-28
Page 300 of 594
.The radio automatically blends to an
HD Radio signal (if equipped) in AM or
FM where available.
! How to change the source
Select the “AM ”or “FM ”key on the source
select screen. Refer to “Selecting an audio
source” F5-18.
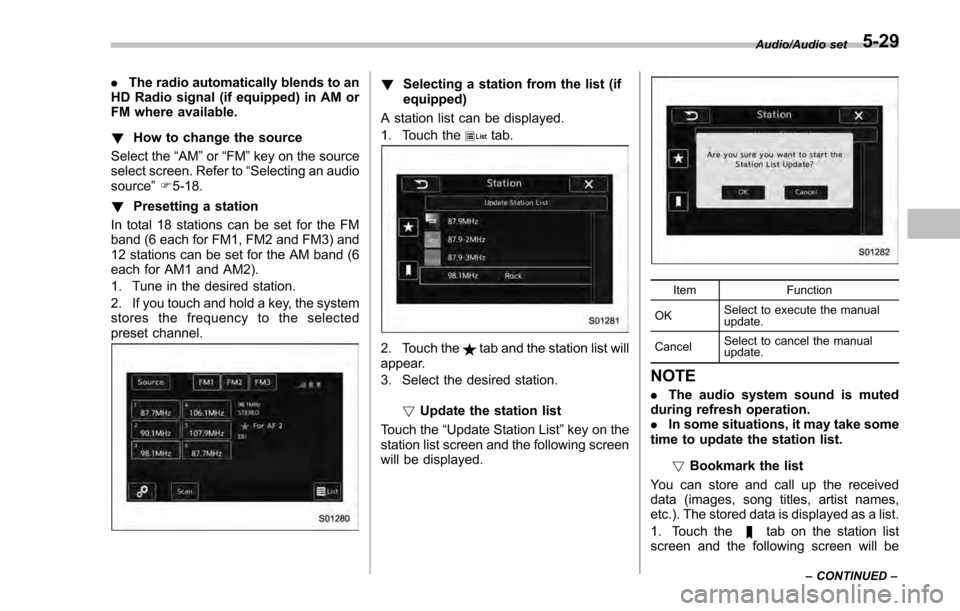
! Presetting a station
In total 18 stations can be set for the FM
band (6 each for FM1, FM2 and FM3) and
12 stations can be set for the AM band (6
each for AM1 and AM2).
1. Tune in the desired station.
2. If you touch and hold a key, the system
stores the frequency to the selected
preset channel.! Selecting a station from the list (if
equipped)
A station list can be displayed.
1. Touch the
tab.
2. Touch thetab and the station list will
appear.
3. Select the desired station.
!Update the station list
Touch the “Update Station List ”key on the
station list screen and the following screen
will be displayed.
Item Function
OK Select to execute the manual
update.
Cancel Select to cancel the manual
update.
NOTE
.
The audio system sound is muted
during refresh operation.
. In some situations, it may take some
time to update the station list.
!Bookmark the list
You can store and call up the received
data (images, song titles, artist names,
etc.). The stored data is displayed as a list.
1. Touch the
tab on the station list
screen and the following screen will be
Audio/Audio set
–CONTINUED –5-29