SUBARU IMPREZA WRX 2004 2.G Owners Manual
Manufacturer: SUBARU, Model Year: 2004, Model line: IMPREZA WRX, Model: SUBARU IMPREZA WRX 2004 2.GPages: 491, PDF Size: 5.93 MB
Page 241 of 491
5-28
Audio
“TAPE” (12), the player will enter standby mode. Press
the “CD” button to start playback. "
Loading all the magazine (Full disc loading mode)
1. If you continue to press the “LOAD” button for more
than 1.5 seconds, the player will produce beep sound
and will enter the full disc loading mode.
2. A “DISC” indicator will blink, and the “IN” will be on
display for a period of 15 seconds. If a disc is success-
fully loaded during this period, the “DISC” indicator will
stop blinking and will steadily light.
3. When the loading of a disc is complete, the next
“DISC” indicator will blink. Then repeat Step 2.
4. When the magazine is filled with discs by repeating
Steps 2 and 3, the player will start playback of the
discs, beginning with the one inserted first.
If you fail to insert any disc during each 15-second in-
terval, the full disc loading mode will be canceled, and
the player will start playback of the disc inserted first. ! How to play back a CD or make a pause
" When there is no CD inserted:
Insert a CD by referring to “How to Insert a CD(s)”.
When a CD is loaded, the player will start playback of
the CD, beginning with the first number. "
When there are CDs loaded:
Press a desired one of the “DISC SELECT” buttons
(26) the “DISC” indicator of which steadily lights up.
The player will then start playback of the selected CD,
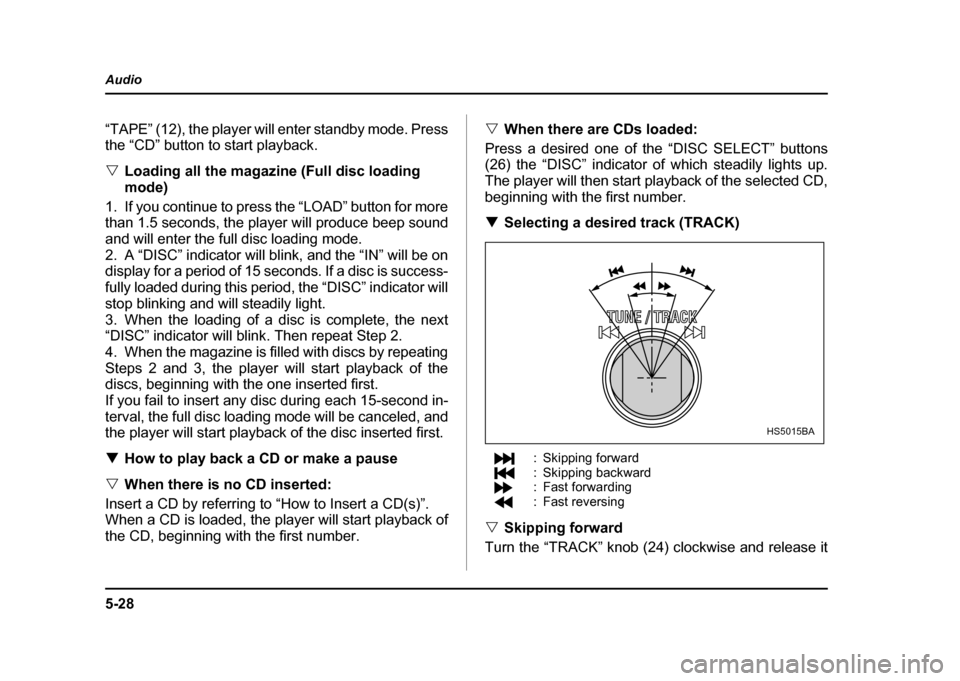
beginning with the first number. ! Selecting a desired track (TRACK)
: Skipping forward
: Skipping backward
: Fast forwarding
: Fast reversing
" Skipping forward
Turn the “TRACK” knob (24) clockwise and release it
HS5015BA
Page 242 of 491

5-29
Audio
– CONTINUED –
immediately to skip to the beginning of the next track.
Each time the knob is turned and released, the indicat-
ed track number will increase. "Skipping backward
Turn the “TRACK” knob (24) counterclockwise and re-
lease it immediately to skip to the beginning of the cur-
rent track. If you continue to turn and release the knob,
the indicated truck number will decrease. " Fast forwarding
Turn the “TRACK” knob (24) clockwise and hold it con-
tinuously for more than 2 seconds to fast forward the disc.
Release the knob to stop fast forwarding. " Fast reversing
Turn the “TRACK” knob (24) counterclockwise and
hold it continuously for more than 2 seconds to fast re-
verse the disc.
Release the knob to stop fast reverse. ! Repeat playback
Press the “RPT” button (25) while a song is playing to
play the song repeatedly. The “RPT” indicator will
come on and the song will be played continuously. To
cancel the repeat mode, press the button again. Then
the “RPT” indicator goes out, and normal playback mode is restored. !
Random playback
Press the “RDM” button (23) while a disc is being
played back to play all songs on the disc in a random
order. The “RDM” indicator will come on and all songs
on the disc will be played in a random order.
To cancel the random mode, press the button again.
Then the “RDM” indicator goes out, and normal play-
back mode is restored. ! Scan
When the “SCAN” button (19) is pressed while the disc
is being played back, you can hear the first 10 seconds
of each track to search for the desired program. To
continue listening to the program, press the “SCAN”
button again. After all tracks on the disc have been
scanned, normal playback mode is restored. ! How to unload CDs from the player
" Ejecting a CD from the player
Of the discs loaded, you can select and remove only
one disc.
1. Press the “DISC SELECT” button (26) of the disc
whose “DISC” indicator is ON.
2. Press the “EJECT” button (22). Then the “DISC” in-
dicator associated with the disc you have selected will
Page 243 of 491
5-30
Audio
blink, and the disc will be ejected.
To remove more discs in succession, repeat Steps 1
and 2. "
Ejecting all discs from the player (All disc ejec-
tion mode)
1. If you continue to press the “EJECT” button (22),
the player will produce beep sound and will enter the
all disc ejection mode.
2. Remove the disc that has been ejected. The other
discs loaded will then be ejected one after another. If
you do not remove the disc that has been ejected, the
“All disc ejection mode” will be canceled.
NOTE
Avoid driving the vehicle with a CD sticking out,
because vibration might make it fall out.
Page 244 of 491
5-31
Audio
– CONTINUED –
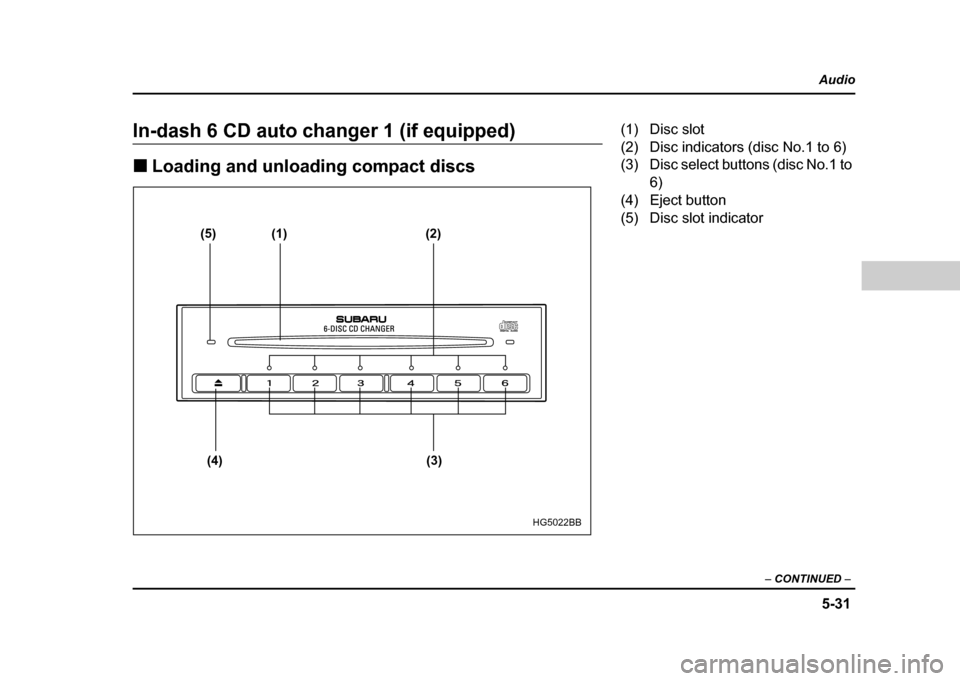
In-dash 6 CD auto changer 1 (if equipped) !Loading and unloading compact discs
(5) (1) (2)
(4) (3)
HG5022BB
(1) Disc slot
(2) Disc indicators (disc No.1 to 6)
(3) Disc select buttons (disc No.1 to 6)
(4) Eject button
(5) Disc slot indicator
Page 245 of 491
5-32
Audio
"
Do not attempt to insert two or more discs
into the slot at a time. Doing so can cause me-
chanical damage to the CD changer." Use only music CDs identified by
am ark .
" Do not use CDs listed below which could
cause damage to the CD player. "3-inch (8 cm) compact disc.
" Any disc with a peel-off or seal on it.
" Any disc with scratches and/or dust.
" Bent disc.
" Cleaning disc.
" CD accessory. (E.g., 3-inch (8 cm) disc
adapter)
" Do not insert or remove any disc when the
automatic transmission selector lever is in the
park position; the selector lever in that position
can interfere with disc insertion or removal,
causing scratches on the disc surface (for AT
vehicles).
! To insert a disc
1. Press one of the “Disc select” buttons (3) (num-
bered from 1 to 6) for which the disc indicator light (2) is “OFF”.
The Disc indicator lights are located directly above the
corresponding “Disc select” buttons.
2. The indicator will begin blinking. The blinking will last for 15 seconds.
During this period, insert a desired disc, and the disc
will begin to play. (If any disc is not inserted during this
period, the “Disc slot” (1) door will close. Repeat step
1.)
Be sure to hold a disc with the label side (the side
where titles are printed) up.
3. To insert another disc, repeat step 1 and 2 choos-
ing a different disc select button. !
To insert six discs at a time
1. Press and hold the “Disc select” button number 1
until all disc indicators begin blinking (about 1.5 sec-
onds).
2. The indicators will blink for 15 seconds. During this
period, insert desired six discs.
3. When all discs are loaded, the first disc will begin to
play. (If no disc is inserted within this 15 seconds, the
entire disc load sequence will be canceled.) ! To remove a disc
1. Press the desired one of the “Disc select” buttons
(3) (numbered from 1 to 6) for which the disc indicator
light is on.
Page 246 of 491

5-33
Audio
– CONTINUED –
2. Press the “Eject button” (4). The selected disc will
be ejected and the indicator light will begin blinking.
3. To remove another disc, repeat step 1 and 2
choosing a different “Disc select” button.
(To remove discs when the ignition switch is in the
“Lock” position, press the “Eject” button, and the first
disc will be ejected. Press the “Eject” button again,
and the next disc will be ejected and so on. At this
time, the “Disc select” buttons are disabled.) !To remove all discs at one time
1. Press and hold the “Eject” button (4) until all “Disc”
indicators begin blinking (about 1.5 seconds), and the
first disc will be ejected.
2. When the disc is removed, the next one will be
ejected, and so on. ! To replace a playing disc with another
Simply press the desired one of “Disc select” buttons
(3) (numbered from 1 to 6) or press the “DISC select”
button on the radio unit to select the desired disc, and
the disc will begin to play. ! Disc indicators
Lit: when the corresponding storage tray is occupied
by a disc.
Blinking: Disc player is either in loading, eject or
changing mode. OFF: No disc is loaded or the ignition switch is in the
“LOCK” position. "
Open/Closed disc slot indicator
When the disc slot is open, the disc indicators on both
sides of the slot illuminate. ! Function control
Refer to CD changer control operating instructions de-
scribed in the “Type B audio set (if equipped)” section.
Page 247 of 491
5-34
Audio
Precautions to observe when han-
dling a compact disc (CD)
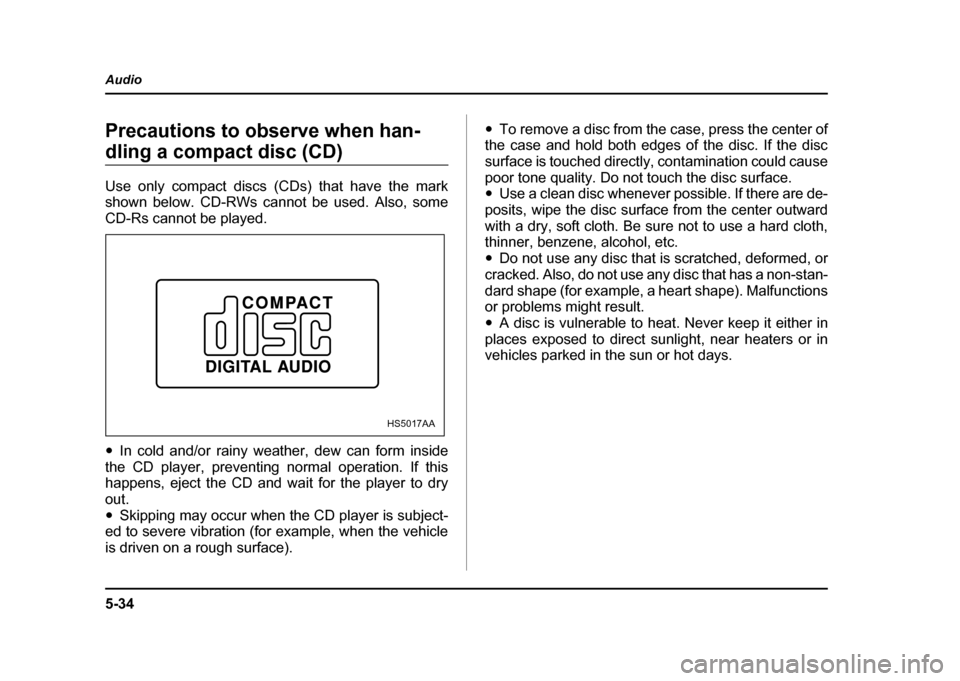
Use only compact discs (CDs) that have the mark
shown below. CD-RWs cannot be used. Also, some
CD-Rs cannot be played. "
In cold and/or rainy weather, dew can form inside
the CD player, preventing normal operation. If this
happens, eject the CD and wait for the player to dry
out." Skipping may occur when the CD player is subject-
ed to severe vibration (for example, when the vehicle
is driven on a rough surface). "
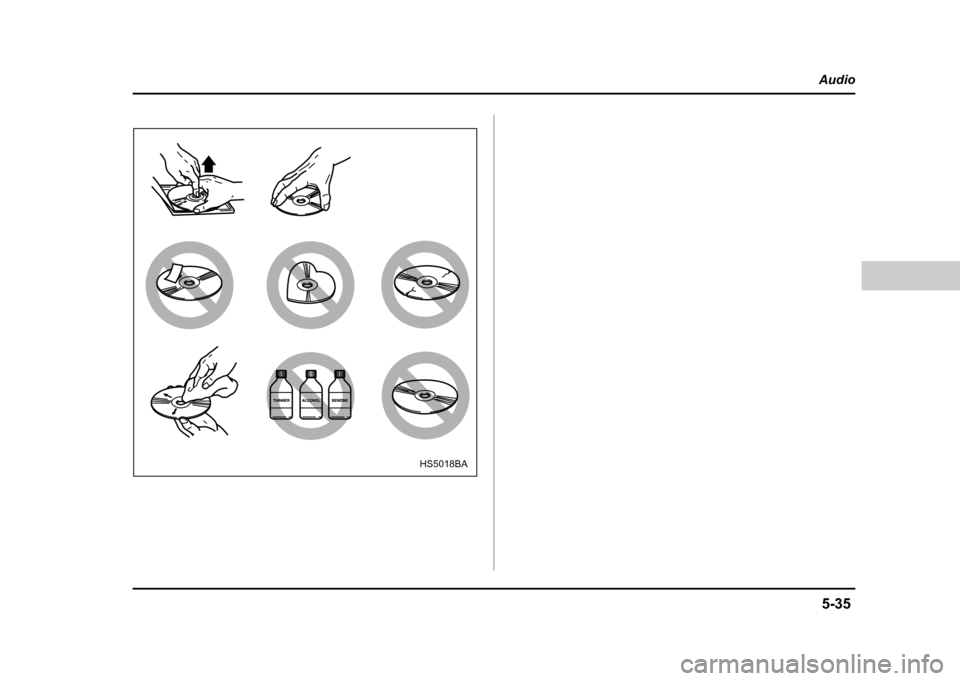
To remove a disc from the case, press the center of
the case and hold both edges of the disc. If the disc
surface is touched directly, contamination could cause
poor tone quality. Do not touch the disc surface. " Use a clean disc whenever possible. If there are de-
posits, wipe the disc surface from the center outward
with a dry, soft cloth. Be sure not to use a hard cloth,
thinner, benzene, alcohol, etc. " Do not use any disc that is scratched, deformed, or
cracked. Also, do not use any disc that has a non-stan-
dard shape (for example, a heart shape). Malfunctions
or problems might result. " A disc is vulnerable to heat. Never keep it either in
places exposed to direct sunlight, near heaters or in
vehicles parked in the sun or hot days.
HS5017AA
Page 248 of 491
5-35
Audio
– CONTINUED –
HS5018BA
Page 249 of 491

Page 250 of 491

6-1
6
Interior equipment
In te ri or lig ht ..... ... ... .. ... ... ... ... ... .. ... ... ... ... .. ... ... 6-2
D om e lig ht ............ ..................... ..................... ... 6-2
C argo are a lig ht (if eq uip ped) ....................... ... 6-2
Map li g h t (if e qui pp ed ) ..... ... ... .. ... ... ... ... .. ... ... 6-3
Sun visors .. ... ... ... ... .. ... ... ... ... ... .. ... ... ... ... .. ... ... 6-4
Center visor ....................................................... 6-4
Vanity mirror (if equipped) ............................... 6-5
Storage com partments .... ... ... .. ... ... ... ... .. ... ... 6-5
Gl ove b ox .............. ..................... ..................... ... 6-6
C enter con sole .......................... ..................... ... 6-6
C oin tray ............... ..................... ..................... ... 6-7
C up h older .... ... ... ... .. ... ... ... ... ... .. ... ... ... ... .. ... ... 6-7
In in stru ment pa nel ................... ..................... ... 6-7
In ce nter co nsole .. .................... ..................... ... 6-8
A cce sso ry p ow er o utlet ............................... 6-9
In t h e cargo area (if eq uip ped) .. .................... ... 6-9
C ig are tte lig hter so cket ................................ 6-10
U se with a cigarette li ght er ...... ..................... ... 6-11
U sing as an access ory power o utlet ............ ... 6-11
As htray .. ... .. ... ... ... ... .. ... ... ... ... ... .. ... ... ... ... .. ... ... 6-12
Fl oo r mat (if e qui pp ed ) .. ... ... ... .. ... ... ... ... .. ... ... 6-13
C oat hook ... ... ... ... ... .. ... ... ... ... ... .. ... ... ... ... .. ... ... 6-14
Cargo area c over ( if eq uip p ed) ... ... ... ... .. ... ... 6-15
U sing t h e cover .... ..................... ..................... ... 6-15
T o re move the c over ................. ..................... ... 6-15
Stowage of the c over ................ ..................... ... 6-16
T o in stall the co ver housi ng .... ..................... ... 6-16
Cargo tie-down hooks (if equipped) ........... 6-17 Under-floor storage compartment
(if equipped) ............................................... 6-18