specifications SUBARU LEGACY 1999 Service Manual PDF
[x] Cancel search | Manufacturer: SUBARU, Model Year: 1999, Model line: LEGACY, Model: SUBARU LEGACY 1999Pages: 1456, PDF Size: 59.93 MB
Page 654 of 1456
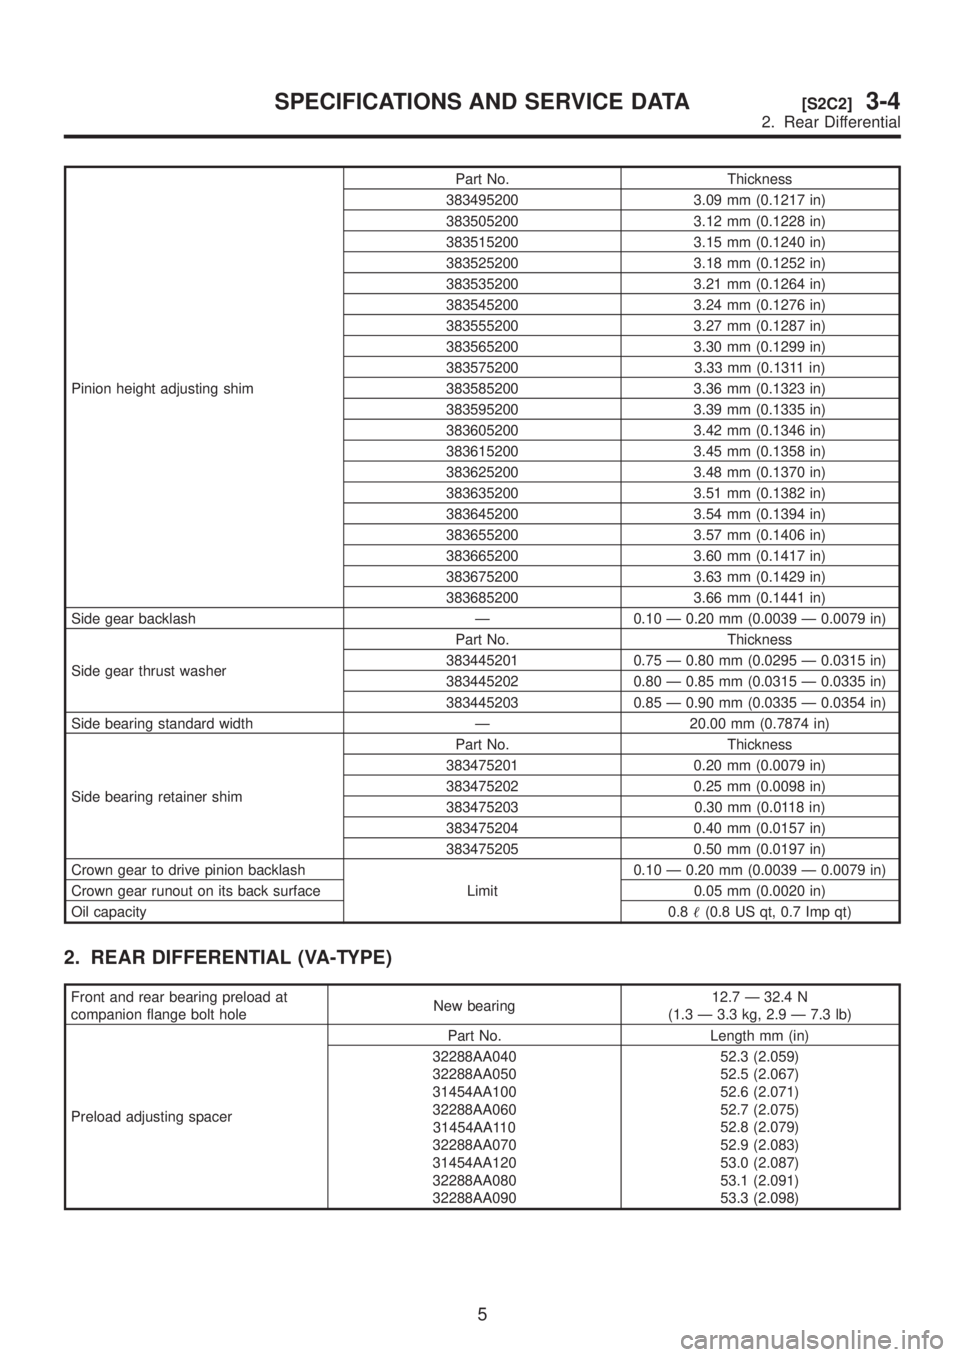
Pinion height adjusting shimPart No. Thickness
383495200 3.09 mm (0.1217 in)
383505200 3.12 mm (0.1228 in)
383515200 3.15 mm (0.1240 in)
383525200 3.18 mm (0.1252 in)
383535200 3.21 mm (0.1264 in)
383545200 3.24 mm (0.1276 in)
383555200 3.27 mm (0.1287 in)
383565200 3.30 mm (0.1299 in)
383575200 3.33 mm (0.1311 in)
383585200 3.36 mm (0.1323 in)
383595200 3.39 mm (0.1335 in)
383605200 3.42 mm (0.1346 in)
383615200 3.45 mm (0.1358 in)
383625200 3.48 mm (0.1370 in)
383635200 3.51 mm (0.1382 in)
383645200 3.54 mm (0.1394 in)
383655200 3.57 mm (0.1406 in)
383665200 3.60 mm (0.1417 in)
383675200 3.63 mm (0.1429 in)
383685200 3.66 mm (0.1441 in)
Side gear backlash Ð 0.10 Ð 0.20 mm (0.0039 Ð 0.0079 in)
Side gear thrust washerPart No. Thickness
383445201 0.75 Ð 0.80 mm (0.0295 Ð 0.0315 in)
383445202 0.80 Ð 0.85 mm (0.0315 Ð 0.0335 in)
383445203 0.85 Ð 0.90 mm (0.0335 Ð 0.0354 in)
Side bearing standard width Ð 20.00 mm (0.7874 in)
Side bearing retainer shimPart No. Thickness
383475201 0.20 mm (0.0079 in)
383475202 0.25 mm (0.0098 in)
383475203 0.30 mm (0.0118 in)
383475204 0.40 mm (0.0157 in)
383475205 0.50 mm (0.0197 in)
Crown gear to drive pinion backlash
Limit0.10 Ð 0.20 mm (0.0039 Ð 0.0079 in)
Crown gear runout on its back surface 0.05 mm (0.0020 in)
Oil capacity0.8(0.8 US qt, 0.7 Imp qt)
2. REAR DIFFERENTIAL (VA-TYPE)
Front and rear bearing preload at
companion flange bolt holeNew bearing12.7 Ð 32.4 N
(1.3 Ð 3.3 kg, 2.9 Ð 7.3 lb)
Preload adjusting spacerPart No. Length mm (in)
32288AA040
32288AA050
31454AA100
32288AA060
31454AA110
32288AA070
31454AA120
32288AA080
32288AA09052.3 (2.059)
52.5 (2.067)
52.6 (2.071)
52.7 (2.075)
52.8 (2.079)
52.9 (2.083)
53.0 (2.087)
53.1 (2.091)
53.3 (2.098)
5
[S2C2]3-4SPECIFICATIONS AND SERVICE DATA
2. Rear Differential
Page 655 of 1456
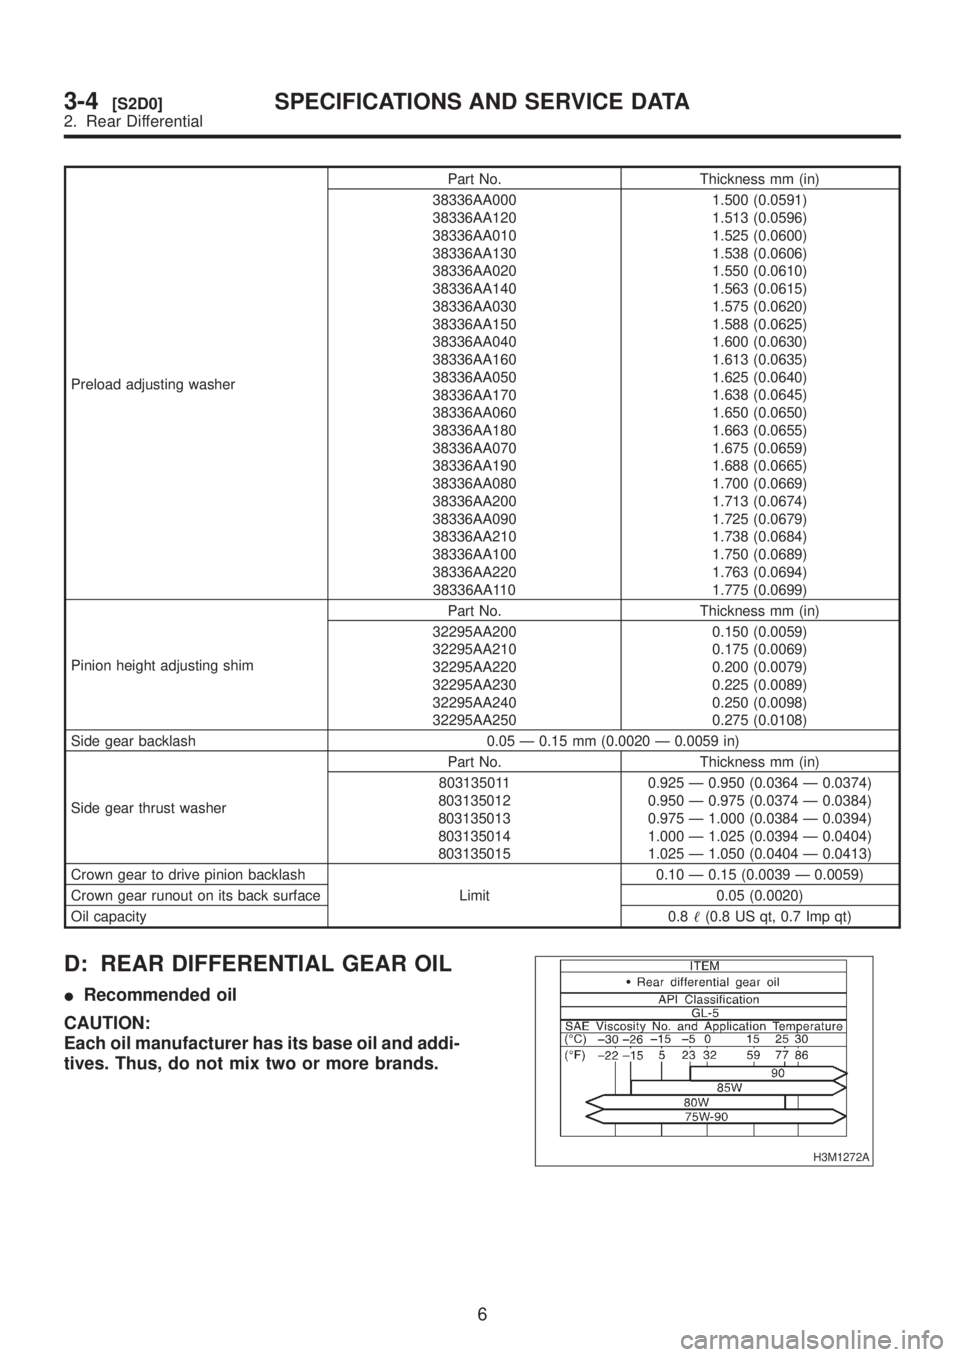
Preload adjusting washerPart No. Thickness mm (in)
38336AA000
38336AA120
38336AA010
38336AA130
38336AA020
38336AA140
38336AA030
38336AA150
38336AA040
38336AA160
38336AA050
38336AA170
38336AA060
38336AA180
38336AA070
38336AA190
38336AA080
38336AA200
38336AA090
38336AA210
38336AA100
38336AA220
38336AA1101.500 (0.0591)
1.513 (0.0596)
1.525 (0.0600)
1.538 (0.0606)
1.550 (0.0610)
1.563 (0.0615)
1.575 (0.0620)
1.588 (0.0625)
1.600 (0.0630)
1.613 (0.0635)
1.625 (0.0640)
1.638 (0.0645)
1.650 (0.0650)
1.663 (0.0655)
1.675 (0.0659)
1.688 (0.0665)
1.700 (0.0669)
1.713 (0.0674)
1.725 (0.0679)
1.738 (0.0684)
1.750 (0.0689)
1.763 (0.0694)
1.775 (0.0699)
Pinion height adjusting shimPart No. Thickness mm (in)
32295AA200
32295AA210
32295AA220
32295AA230
32295AA240
32295AA2500.150 (0.0059)
0.175 (0.0069)
0.200 (0.0079)
0.225 (0.0089)
0.250 (0.0098)
0.275 (0.0108)
Side gear backlash 0.05 Ð 0.15 mm (0.0020 Ð 0.0059 in)
Side gear thrust washerPart No. Thickness mm (in)
803135011
803135012
803135013
803135014
8031350150.925 Ð 0.950 (0.0364 Ð 0.0374)
0.950 Ð 0.975 (0.0374 Ð 0.0384)
0.975 Ð 1.000 (0.0384 Ð 0.0394)
1.000 Ð 1.025 (0.0394 Ð 0.0404)
1.025 Ð 1.050 (0.0404 Ð 0.0413)
Crown gear to drive pinion backlash
Limit0.10 Ð 0.15 (0.0039 Ð 0.0059)
Crown gear runout on its back surface 0.05 (0.0020)
Oil capacity0.8(0.8 US qt, 0.7 Imp qt)
D: REAR DIFFERENTIAL GEAR OIL
IRecommended oil
CAUTION:
Each oil manufacturer has its base oil and addi-
tives. Thus, do not mix two or more brands.
H3M1272A
6
3-4[S2D0]SPECIFICATIONS AND SERVICE DATA
2. Rear Differential
Page 656 of 1456
![SUBARU LEGACY 1999 Service Manual PDF MEMO:
7
[S2D0]3-4SPECIFICATIONS AND SERVICE DATA
2. Rear Differential SUBARU LEGACY 1999 Service Manual PDF MEMO:
7
[S2D0]3-4SPECIFICATIONS AND SERVICE DATA
2. Rear Differential](/img/17/57435/w960_57435-655.png)
MEMO:
7
[S2D0]3-4SPECIFICATIONS AND SERVICE DATA
2. Rear Differential
Page 704 of 1456
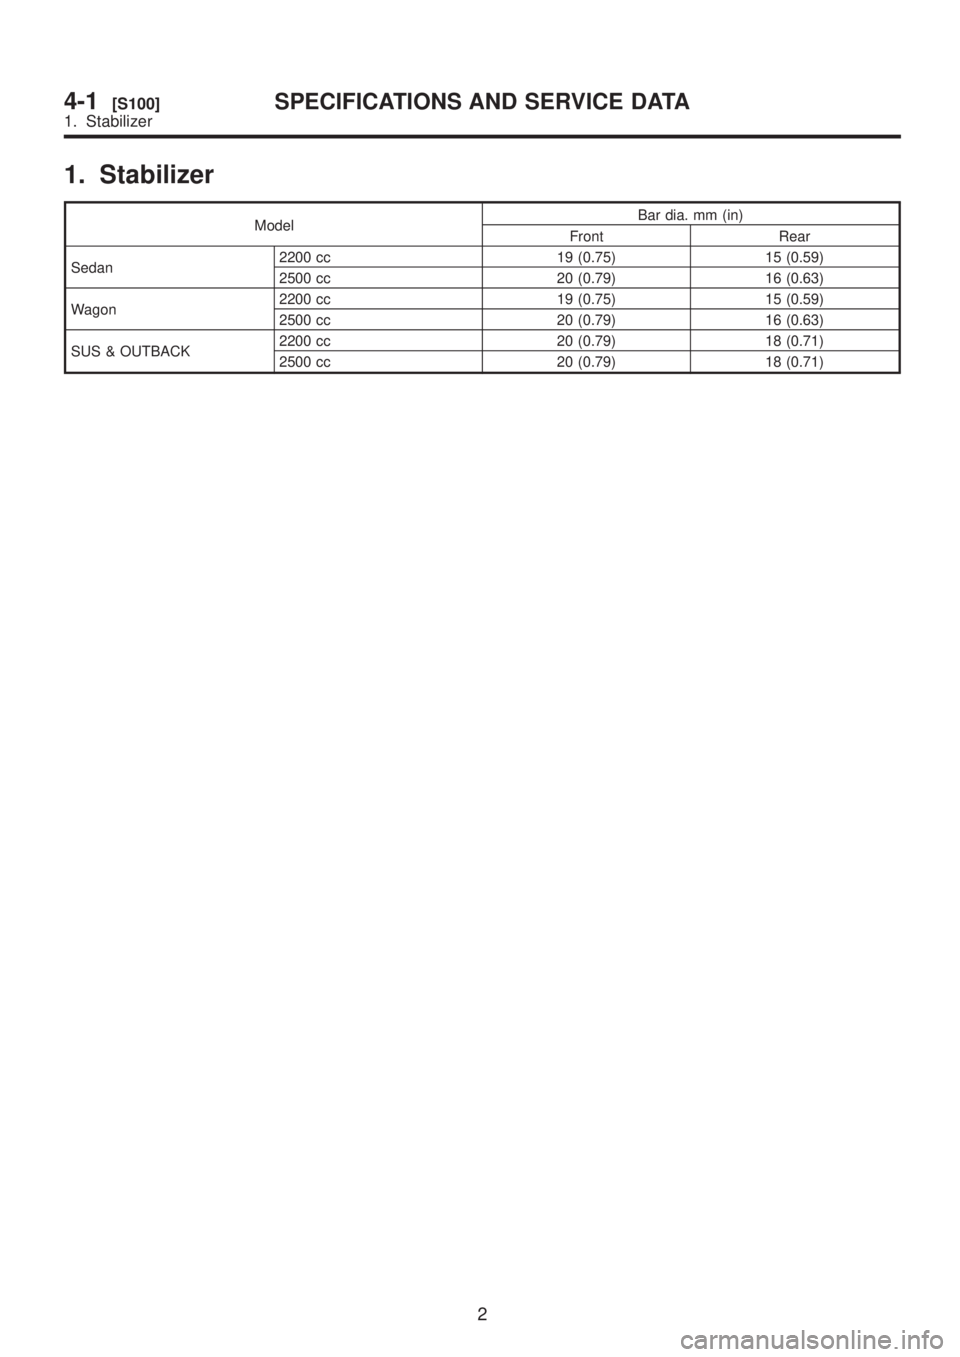
1. Stabilizer
ModelBar dia. mm (in)
Front Rear
Sedan2200 cc 19 (0.75) 15 (0.59)
2500 cc 20 (0.79) 16 (0.63)
Wagon2200 cc 19 (0.75) 15 (0.59)
2500 cc 20 (0.79) 16 (0.63)
SUS & OUTBACK2200 cc 20 (0.79) 18 (0.71)
2500 cc 20 (0.79) 18 (0.71)
2
4-1[S100]SPECIFICATIONS AND SERVICE DATA
1. Stabilizer
Page 705 of 1456
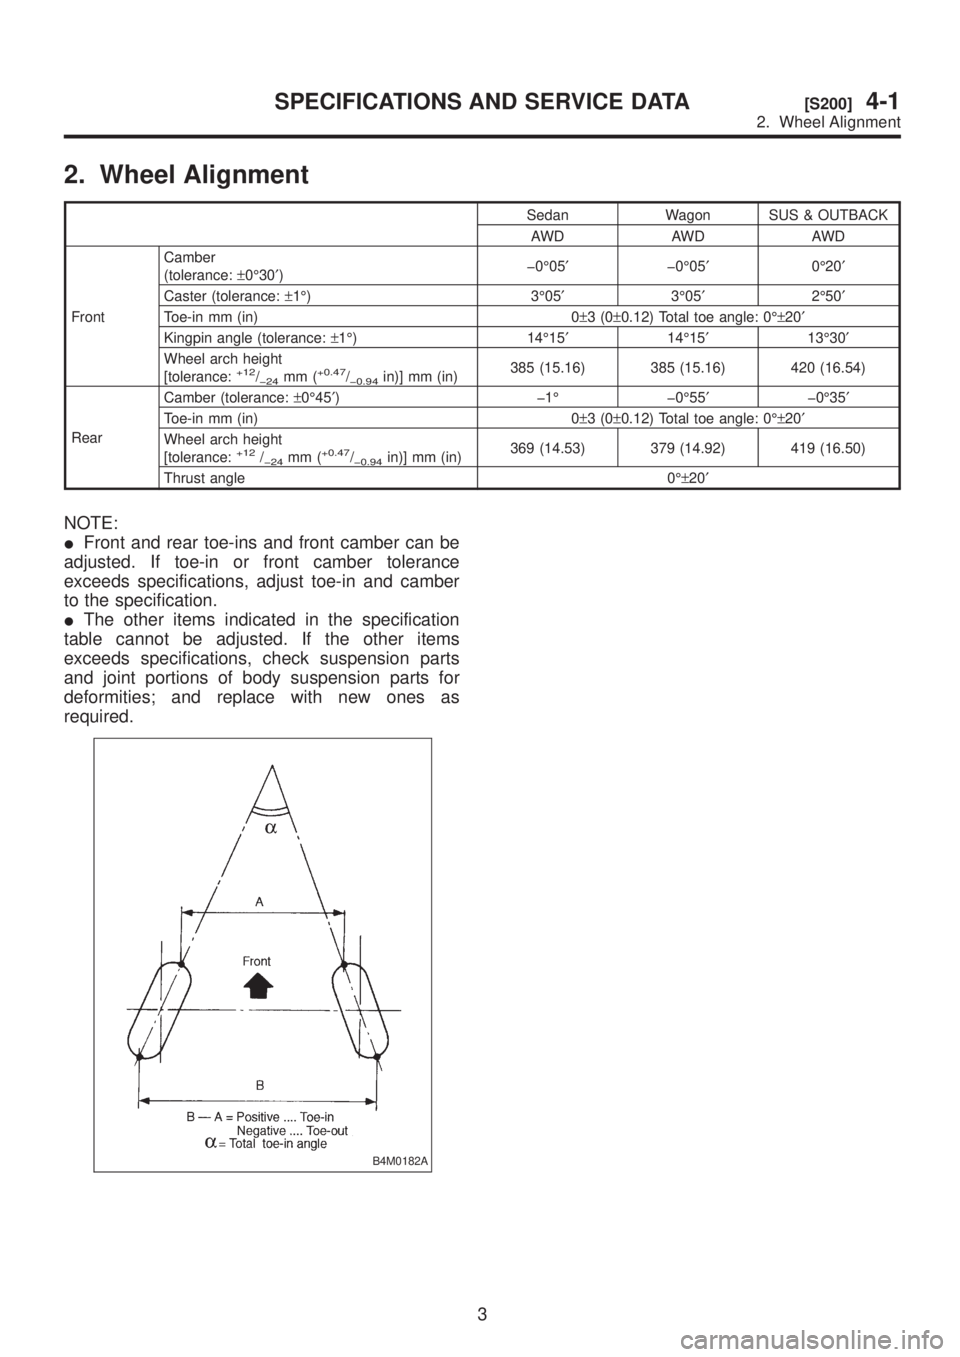
2. Wheel Alignment
Sedan Wagon SUS & OUTBACK
AWD AWD AWD
FrontCamber
(tolerance:±0É30¢)þ0É05¢þ0É05¢0É20¢
Caster (tolerance:±1É) 3É05¢3É05¢2É50¢
Toe-in mm (in) 0±3(0±0.12) Total toe angle: 0ɱ20¢
Kingpin angle (tolerance:±1É) 14É15¢14É15¢13É30¢
Wheel arch height
[tolerance:
+12/þ24mm (+0.47/þ0.94in)] mm (in)385 (15.16) 385 (15.16) 420 (16.54)
RearCamber (tolerance:±0É45¢) þ1É þ0É55¢þ0É35¢
Toe-in mm (in) 0±3(0±0.12) Total toe angle: 0ɱ20¢
Wheel arch height
[tolerance:
+12/þ24mm (+0.47/þ0.94in)] mm (in)369 (14.53) 379 (14.92) 419 (16.50)
Thrust angle 0ɱ20¢
NOTE:
IFront and rear toe-ins and front camber can be
adjusted. If toe-in or front camber tolerance
exceeds specifications, adjust toe-in and camber
to the specification.
IThe other items indicated in the specification
table cannot be adjusted. If the other items
exceeds specifications, check suspension parts
and joint portions of body suspension parts for
deformities; and replace with new ones as
required.
B4M0182A
3
[S200]4-1SPECIFICATIONS AND SERVICE DATA
2. Wheel Alignment
Page 710 of 1456
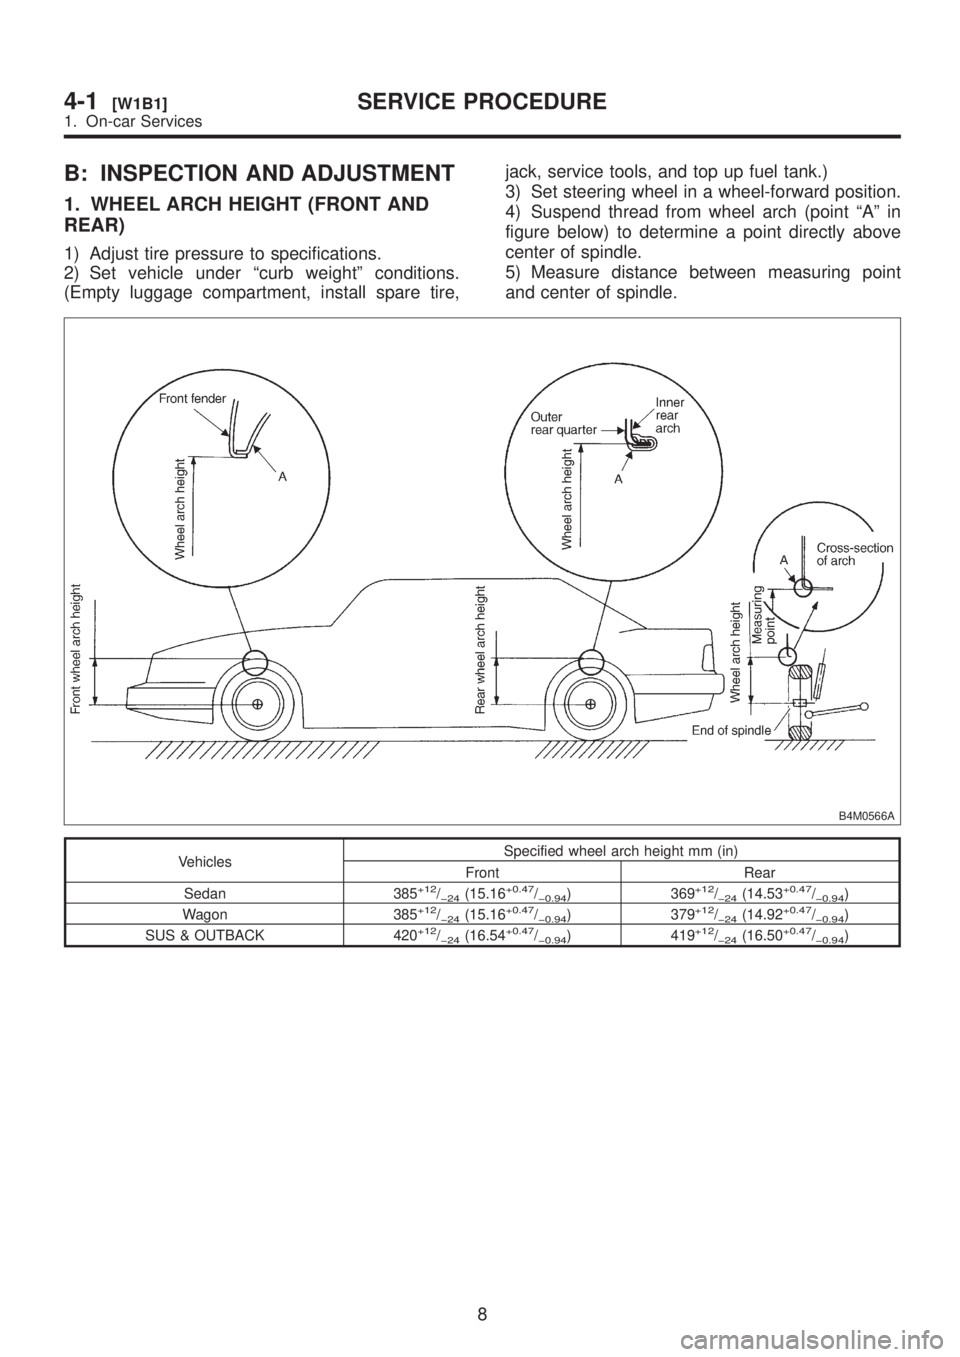
B: INSPECTION AND ADJUSTMENT
1. WHEEL ARCH HEIGHT (FRONT AND
REAR)
1) Adjust tire pressure to specifications.
2) Set vehicle under ªcurb weightº conditions.
(Empty luggage compartment, install spare tire,jack, service tools, and top up fuel tank.)
3) Set steering wheel in a wheel-forward position.
4) Suspend thread from wheel arch (point ªAº in
figure below) to determine a point directly above
center of spindle.
5) Measure distance between measuring point
and center of spindle.
B4M0566A
VehiclesSpecified wheel arch height mm (in)
Front Rear
Sedan 385
+12/þ24(15.16+0.47/þ0.94) 369+12/þ24(14.53+0.47/þ0.94)
Wagon 385+12/þ24(15.16+0.47/þ0.94) 379+12/þ24(14.92+0.47/þ0.94)
SUS & OUTBACK 420+12/þ24(16.54+0.47/þ0.94) 419+12/þ24(16.50+0.47/þ0.94)
8
4-1[W1B1]SERVICE PROCEDURE
1. On-car Services
Page 711 of 1456
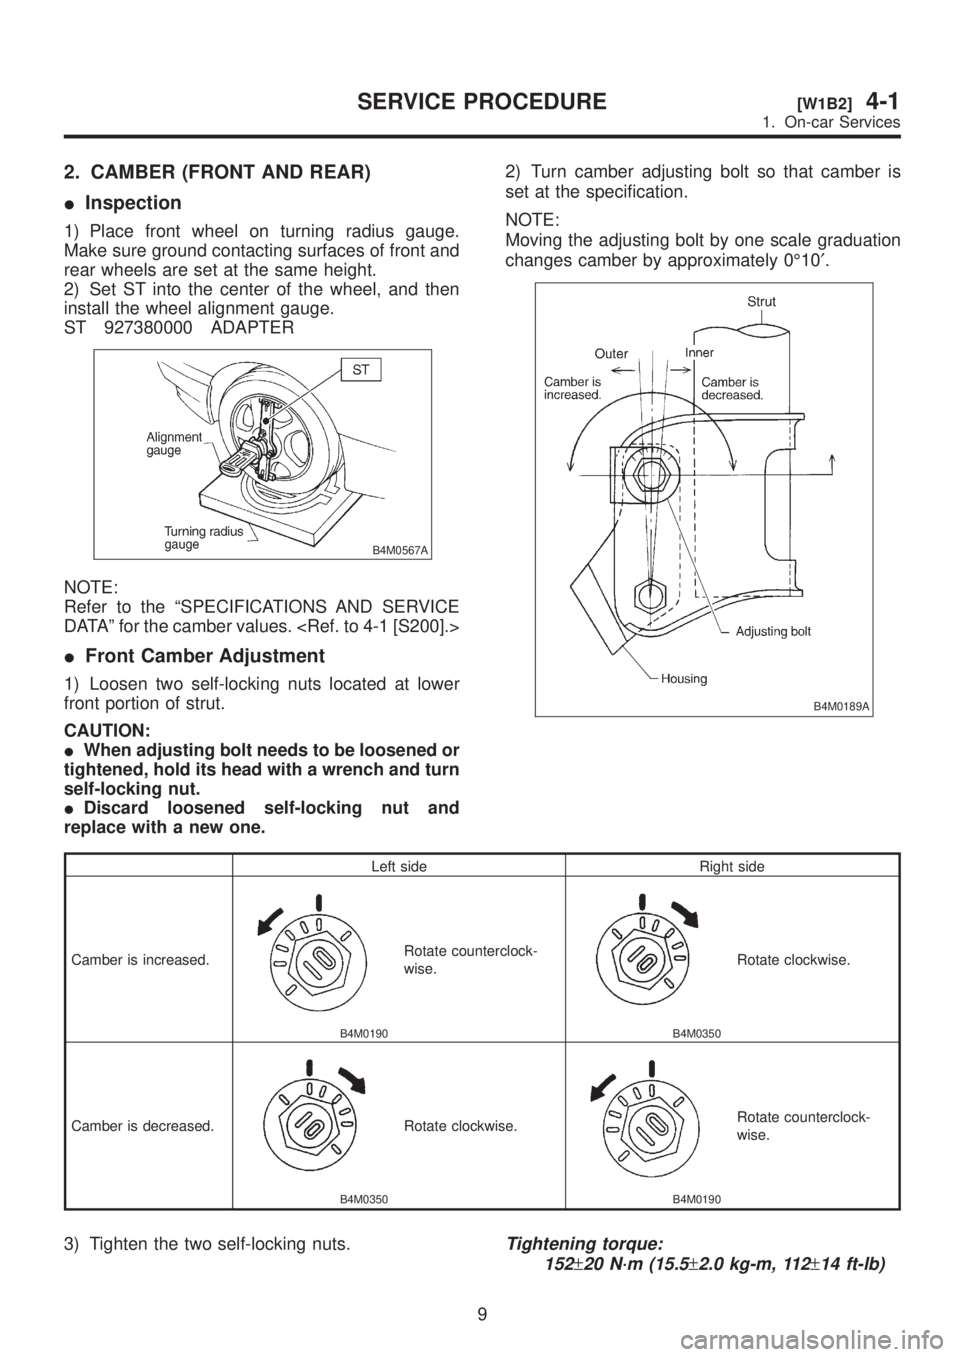
2. CAMBER (FRONT AND REAR)
IInspection
1) Place front wheel on turning radius gauge.
Make sure ground contacting surfaces of front and
rear wheels are set at the same height.
2) Set ST into the center of the wheel, and then
install the wheel alignment gauge.
ST 927380000 ADAPTER
B4M0567A
NOTE:
Refer to the ªSPECIFICATIONS AND SERVICE
DATAº for the camber values.
IFront Camber Adjustment
1) Loosen two self-locking nuts located at lower
front portion of strut.
CAUTION:
IWhen adjusting bolt needs to be loosened or
tightened, hold its head with a wrench and turn
self-locking nut.
IDiscard loosened self-locking nut and
replace with a new one.2) Turn camber adjusting bolt so that camber is
set at the specification.
NOTE:
Moving the adjusting bolt by one scale graduation
changes camber by approximately 0É10¢.
B4M0189A
Left side Right side
Camber is increased.
B4M0190
Rotate counterclock-
wise.
B4M0350
Rotate clockwise.
Camber is decreased.
B4M0350
Rotate clockwise.
B4M0190
Rotate counterclock-
wise.
3) Tighten the two self-locking nuts.Tightening torque:
152
±20 N´m (15.5±2.0 kg-m, 112±14 ft-lb)
9
[W1B2]4-1SERVICE PROCEDURE
1. On-car Services
Page 712 of 1456
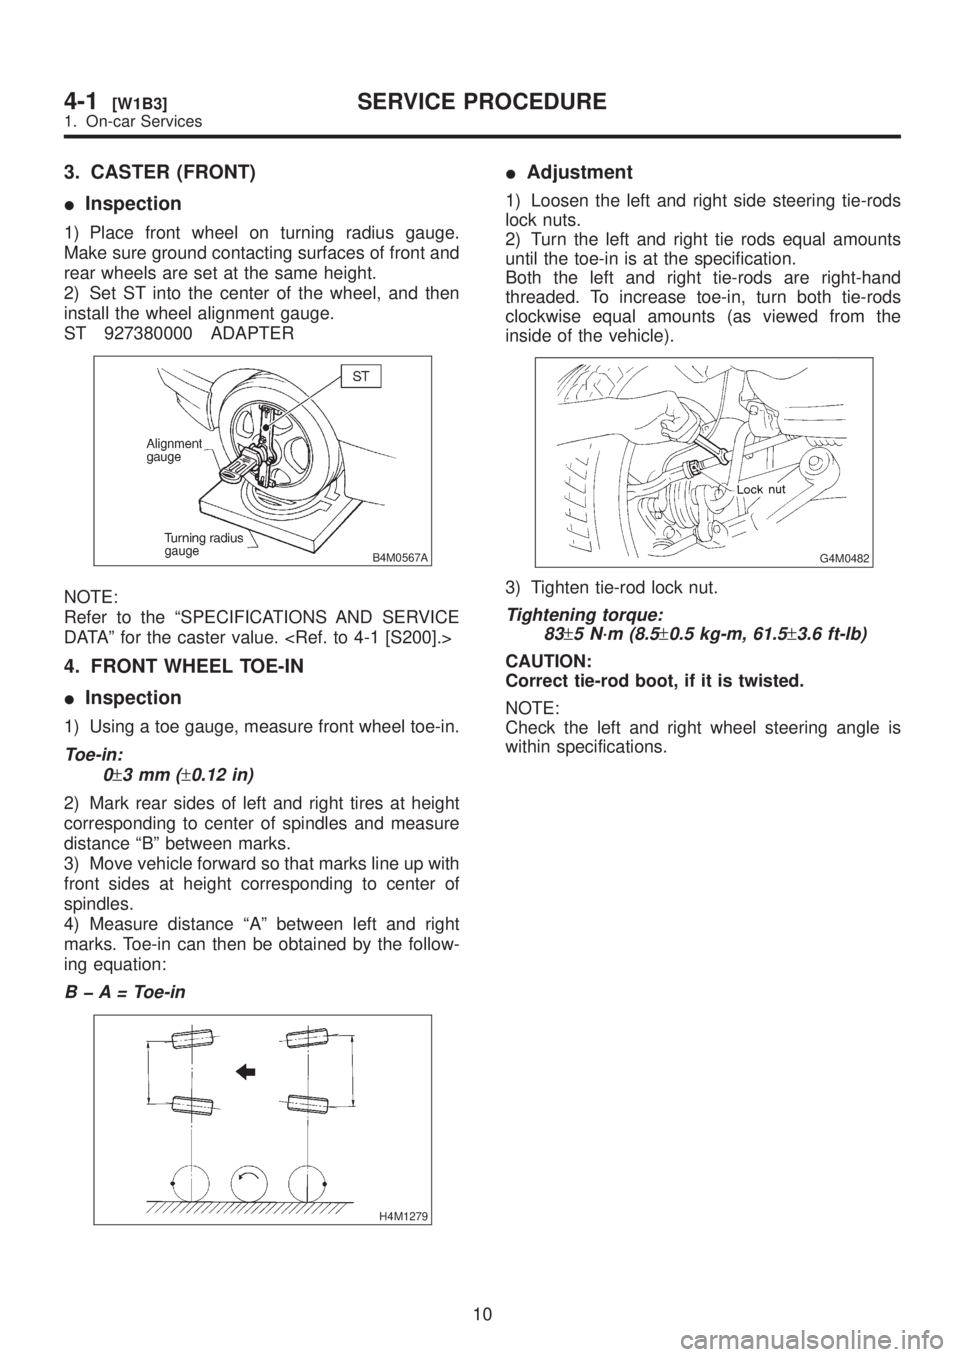
3. CASTER (FRONT)
IInspection
1) Place front wheel on turning radius gauge.
Make sure ground contacting surfaces of front and
rear wheels are set at the same height.
2) Set ST into the center of the wheel, and then
install the wheel alignment gauge.
ST 927380000 ADAPTER
B4M0567A
NOTE:
Refer to the ªSPECIFICATIONS AND SERVICE
DATAº for the caster value.
4. FRONT WHEEL TOE-IN
IInspection
1) Using a toe gauge, measure front wheel toe-in.
Toe-in:
0
±3mm(±0.12 in)
2) Mark rear sides of left and right tires at height
corresponding to center of spindles and measure
distance ªBº between marks.
3) Move vehicle forward so that marks line up with
front sides at height corresponding to center of
spindles.
4) Measure distance ªAº between left and right
marks. Toe-in can then be obtained by the follow-
ing equation:
B þ A = Toe-in
H4M1279
IAdjustment
1) Loosen the left and right side steering tie-rods
lock nuts.
2) Turn the left and right tie rods equal amounts
until the toe-in is at the specification.
Both the left and right tie-rods are right-hand
threaded. To increase toe-in, turn both tie-rods
clockwise equal amounts (as viewed from the
inside of the vehicle).
G4M0482
3) Tighten tie-rod lock nut.
Tightening torque:
83
±5 N´m (8.5±0.5 kg-m, 61.5±3.6 ft-lb)
CAUTION:
Correct tie-rod boot, if it is twisted.
NOTE:
Check the left and right wheel steering angle is
within specifications.
10
4-1[W1B3]SERVICE PROCEDURE
1. On-car Services
Page 745 of 1456
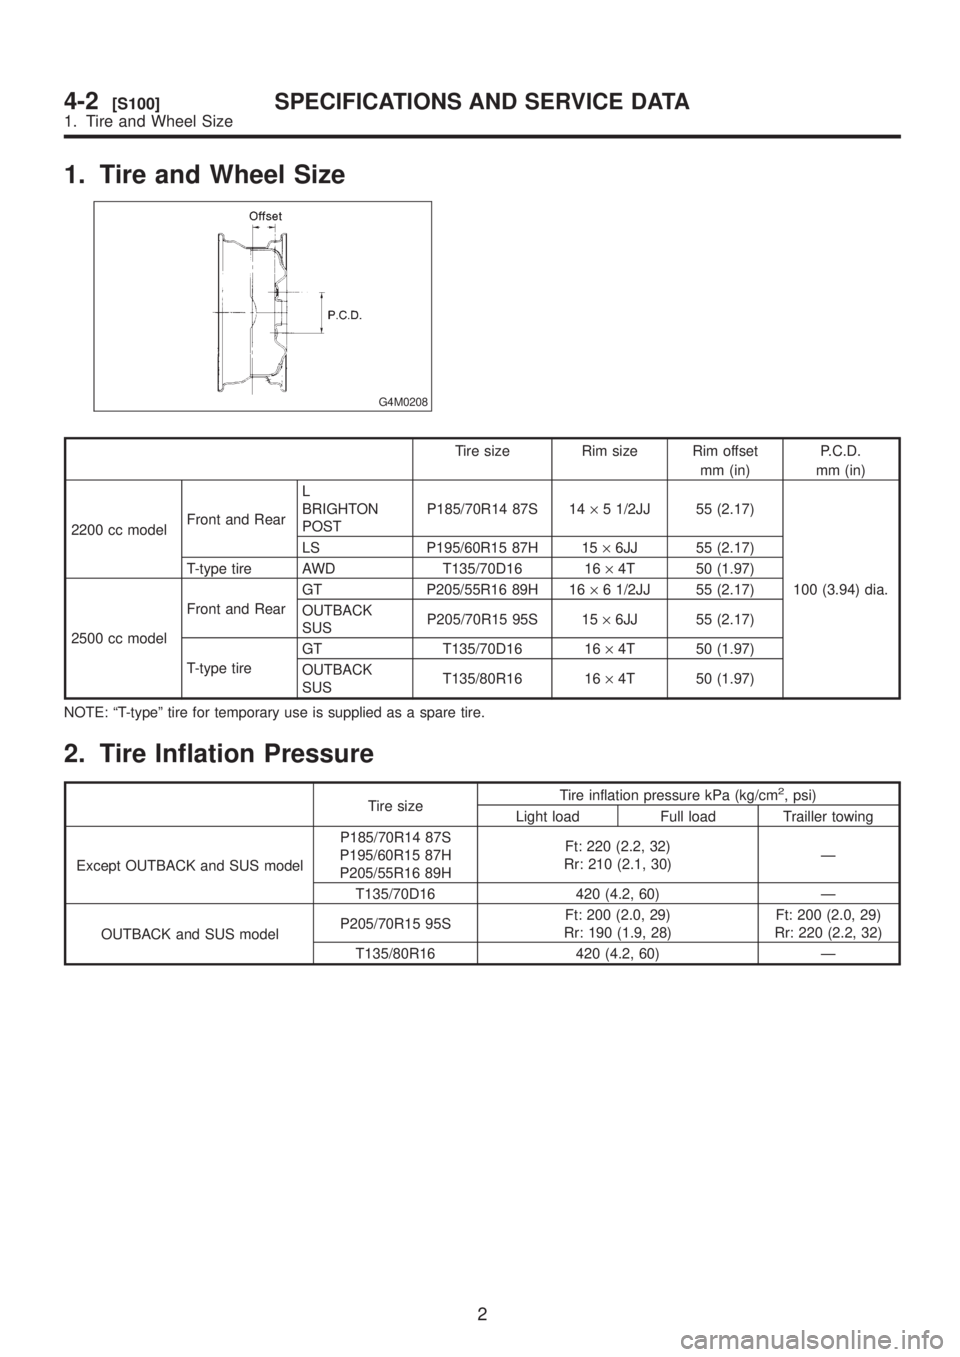
1. Tire and Wheel Size
G4M0208
Tire size Rim size Rim offset
mm (in)P.C.D.
mm (in)
2200 cc modelFront and RearL
BRIGHTON
POSTP185/70R14 87S 14´5 1/2JJ 55 (2.17)
100 (3.94) dia. LS P195/60R15 87H 15´6JJ 55 (2.17)
T-type tire AWD T135/70D16 16´4T 50 (1.97)
2500 cc modelFront and RearGT P205/55R16 89H 16´6 1/2JJ 55 (2.17)
OUTBACK
SUSP205/70R15 95S 15´6JJ 55 (2.17)
T-type tireGT T135/70D16 16´4T 50 (1.97)
OUTBACK
SUST135/80R16 16´4T 50 (1.97)
NOTE: ªT-typeº tire for temporary use is supplied as a spare tire.
2. Tire Inflation Pressure
Tire sizeTire inflation pressure kPa (kg/cm
2, psi)
Light load Full load Trailler towing
Except OUTBACK and SUS modelP185/70R14 87S
P195/60R15 87H
P205/55R16 89HFt: 220 (2.2, 32)
Rr: 210 (2.1, 30)Ð
T135/70D16 420 (4.2, 60) Ð
OUTBACK and SUS modelP205/70R15 95SFt: 200 (2.0, 29)
Rr: 190 (1.9, 28)Ft: 200 (2.0, 29)
Rr: 220 (2.2, 32)
T135/80R16 420 (4.2, 60) Ð
2
4-2[S100]SPECIFICATIONS AND SERVICE DATA
1. Tire and Wheel Size
Page 746 of 1456

1. Tire and Wheel Size
G4M0208
Tire size Rim size Rim offset
mm (in)P.C.D.
mm (in)
2200 cc modelFront and RearL
BRIGHTON
POSTP185/70R14 87S 14´5 1/2JJ 55 (2.17)
100 (3.94) dia. LS P195/60R15 87H 15´6JJ 55 (2.17)
T-type tire AWD T135/70D16 16´4T 50 (1.97)
2500 cc modelFront and RearGT P205/55R16 89H 16´6 1/2JJ 55 (2.17)
OUTBACK
SUSP205/70R15 95S 15´6JJ 55 (2.17)
T-type tireGT T135/70D16 16´4T 50 (1.97)
OUTBACK
SUST135/80R16 16´4T 50 (1.97)
NOTE: ªT-typeº tire for temporary use is supplied as a spare tire.
2. Tire Inflation Pressure
Tire sizeTire inflation pressure kPa (kg/cm
2, psi)
Light load Full load Trailler towing
Except OUTBACK and SUS modelP185/70R14 87S
P195/60R15 87H
P205/55R16 89HFt: 220 (2.2, 32)
Rr: 210 (2.1, 30)Ð
T135/70D16 420 (4.2, 60) Ð
OUTBACK and SUS modelP205/70R15 95SFt: 200 (2.0, 29)
Rr: 190 (1.9, 28)Ft: 200 (2.0, 29)
Rr: 220 (2.2, 32)
T135/80R16 420 (4.2, 60) Ð
2
4-2[S100]SPECIFICATIONS AND SERVICE DATA
1. Tire and Wheel Size