driver SUBARU OUTBACK 2010 5.G Owners Manual
[x] Cancel search | Manufacturer: SUBARU, Model Year: 2010, Model line: OUTBACK, Model: SUBARU OUTBACK 2010 5.GPages: 448, PDF Size: 7.36 MB
Page 343 of 448
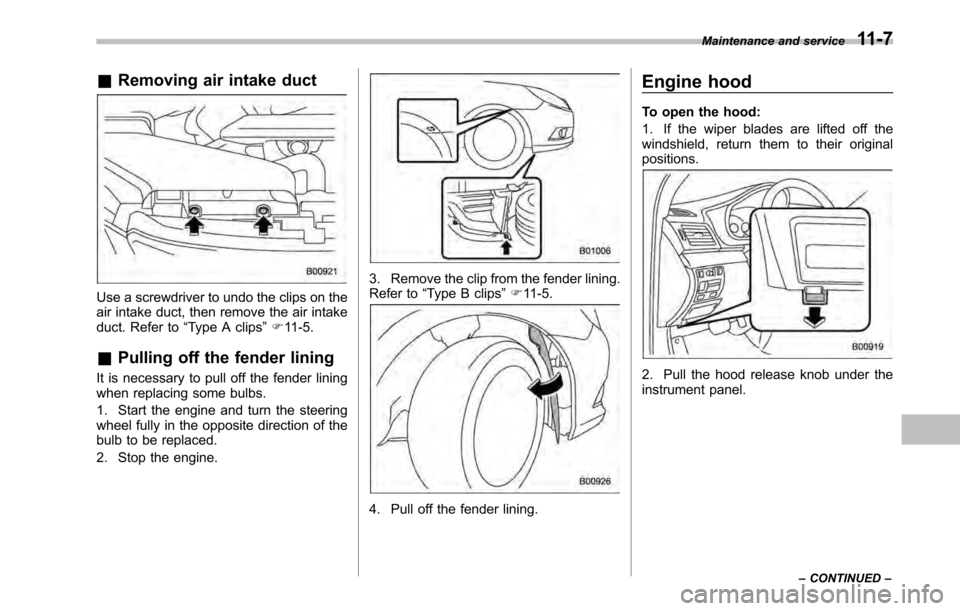
&Removing air intake duct
Use a screwdriver to undo the clips on the
air intake duct, then remove the air intake
duct. Refer to “Type A clips ”F 11-5.
& Pulling off the fender lining
It is necessary to pull off the fender lining
when replacing some bulbs.
1. Start the engine and turn the steering
wheel fully in the opposite direction of the
bulb to be replaced.
2. Stop the engine.
3. Remove the clip from the fender lining.
Refer to “Type B clips ”F 11-5.
4. Pull off the fender lining. Engine hood
To open the hood:
1. If the wiper blades are lifted off the
windshield, return them to their originalpositions.
2. Pull the hood release knob under the
instrument panel.
Maintenance and service
11-7
– CONTINUED –
Page 371 of 448

Tires and wheels &Types of tires
You should be familiar with type of tires
present on your vehicle. ! All season tires
The factory-installed tires on your new
vehicle except 2.5 L turbo models are all
season tires.
All season tires are designed to provide
an adequate measure of traction, handling
and braking performance in year-round
driving including snowy and icy road
conditions. However all season tires do
not offer as much traction performance as
winter (snow) tires in heavy or loose snow
or on icy roads.
All season tires are identified by “ALL
SEASON ”and/or “M+S ”(Mud & Snow) on
the tire sidewall. ! Summer tires
The factory-installed tires on your new 2.5
L turbo models are summer tires. Summer
tires are high-speed capability tires best
suited for highway driving under dryconditions.
Summer tires are inadequate for driving
on slippery roads such as on snow-
covered or icy roads.
If you drive your vehicle on snow-covered or icy roads, we strongly recommend the
use of winter (snow) tires.
When installing winter tires, be sure to
replace all four tires. !
Winter (snow) tires
Winter tires are best suited for driving on
snow-covered and icy roads. However
winter tires do not perform as well as
summer tires and all season tires on roads
other than snow-covered and icy roads.
& Tire pressure monitoring
system (TPMS) (if equipped)
The tire pressure monitoring system pro-
vides the driver with a warning message
by sending a signal from a sensor that is
installed in each wheel when tire pressure
is severely low. The tire pressure monitor-
ing system will activate only when the
vehicle is driven. Also, this system may
not react immediately to a sudden drop in
tire pressure (for example, a blow-out
caused by running over a sharp object).
If you adjust the tire pressures in a warm
garage and will then drive the vehicle in
cold outside air, the resulting drop in tire
pressures may cause the low tire pressure
warning light to illuminate. To avoid this
problem when adjusting the tire pressures
in a warm garage, inflate the tires to
pressures higher than those shown on the tire placard. Specifically, inflate them by an
extra 1 psi (6.9 kPa, 0.07 kgf/cm2) for
every difference of 10 8F (5.6 8C) between
the temperature in the garage and the
temperature outside. By way of example,
the following table shows the required tire
pressures that correspond to various out-
side temperatures when the temperature
in the garage is 60 8F (15.6 8C).
Example:
Tire size: P215/70R16 99S, P225/60R17 98T
Standard tire pressures:
Front: 32 psi (220 kPa, 2.2 kgf/cm
2)
Rear: 30 psi (210 kPa, 2.1 kgf/cm2)
Garage temperature: 60 8F (15.6 8C)
Outside
temperature Adjusted pressure
[psi (kPa, kgf/cm
2)]
Front Rear
30 8F( 18C) 35 (240, 2.4) 33 (230, 2.3)
10 8F( 12 8C) 37
(255, 2.55) 35
(240, 2.4)
10 8F
( 23 8C) 39 (270, 2.7)
37 (255, 2.55)
Example:
Tire size: P205/60R16 91V, P215/50R17
90V, P225/50R17 93V, 225/45R18 91W
Standard tire pressures:
Front: 33 psi (230 kPa, 2.3 kgf/cm
2)
Maintenance and service
11-35
– CONTINUED –
Page 373 of 448
mately one minute. This indicates
the TPMS is unable to monitor all
four road wheels. Contact your
SUBARU dealer as soon as possible
for tire and sensor replacement and/
or system resetting. If the light
illuminates steadily after blinking
for approximately one minute,
promptly contact a SUBARU dealer
to have the system inspected.
& Tire inspection
Check on a daily basis that the tires are
free from serious damage, nails, and
stones. At the same time, check the tires
for abnormal wear.
Contact your SUBARU dealer immedi-
ately if you find any problem. NOTE . When the wheels and tires strike
curbs or are subjected to harsh treat-
ment as when the vehicle is driven on a
rough surface, they can suffer damage
that cannot be seen with the naked eye.
This type of damage does not become
evident until time has passed. Try not
to drive over curbs, potholes or on
other rough surfaces. If doing so is
unavoidable, keep the vehicle ’s speed
down to a walking pace or less, and approach the curbs as squarely as
possible. Also, make sure the tires are
not pressed against the curb when you
park the vehicle..
If you feel unusual vibration while
driving or find it difficult to steer the
vehicle in a straight line, one of the
tires and/or wheels may be damaged.
Drive slowly to the nearest authorized
SUBARU dealer and have the vehicleinspected.
& Tire pressures and wear
Maintaining the correct tire pressures
helps to maximize the tires ’service lives
and is essential for good running perfor-
mance. Check and, if necessary, adjust
the pressure of each tire (including the
spare) at least once a month (for example,
during a fuel stop) and before any long
journey.
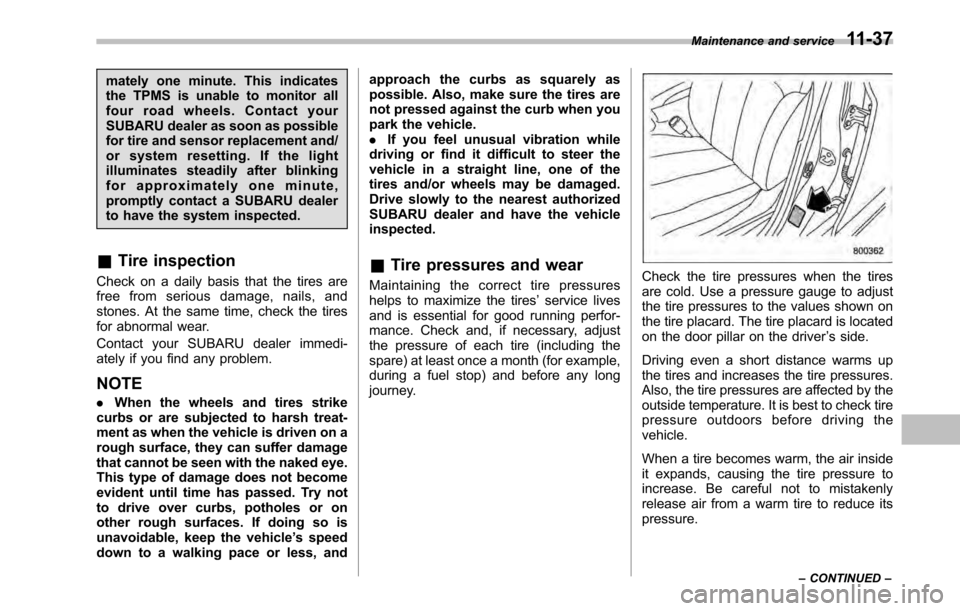
Check the tire pressures when the tires
are cold. Use a pressure gauge to adjust
the tire pressures to the values shown on
the tire placard. The tire placard is located
on the door pillar on the driver ’s side.
Driving even a short distance warms up
the tires and increases the tire pressures.
Also, the tire pressures are affected by the
outside temperature. It is best to check tire
pressure outdoors before driving thevehicle.
When a tire becomes warm, the air inside
it expands, causing the tire pressure to
increase. Be careful not to mistakenly
release air from a warm tire to reduce itspressure. Maintenance and service
11-37
– CONTINUED –
Page 379 of 448

In areas where water freezes in winter,
use an anti-freeze type windshield washer
fluid. SUBARU Windshield Washer Fluid
contains 58.5% methyl alcohol and 41.5%
surfactant, by volume. Its freezing tem-
perature varies according to how much it
is diluted, as indicated in the followingtable.Washer Fluid
Concentration Freezing
Temperature
30% 10.48F( 12 8C)
50% 48F( 20 8C)
100% 49 8F( 45 8C)
CAUTION
Never use engine coolant as washer
fluid because it could cause paintdamage.
In order to prevent freezing of washer
fluid, check the freezing temperatures in
the table above when adjusting the fluid
concentration to the outside temperature.
If you fill the reservoir tank with a fluid with
a different concentration from the one
used previously, purge the old fluid from
the piping between the reservoir tank and
washer nozzles by operating the washer
for a certain period of time. Otherwise, if the concentration of the fluid remaining in
the piping is too low for the outside
temperature, it may freeze and block thenozzles.
CAUTION
. Adjust the washer fluid concen-
tration appropriately for the out-
side temperature. If the concen-
tration is inappropriate, sprayed
washer fluid may freeze on the
windshield and obstruct your
view, and the fluid may freeze in
the reservoir tank.
. State or local regulations on
volatile organic compounds may
restrict the use of methanol, a
common windshield washer anti-
freeze additive. Washer fluids
containing non-methanol anti-
freeze agents should be used
only if they provide cold weather
protection without damaging
your vehicle ’s paint, wiper blades
or washer system. Replacement of wiper blades
Grease, wax, insects, or other materials
on the windshield or the wiper blade
results in jerky wiper operation and streak-
ing on the glass. If you cannot remove the
streaks after operating the windshield
washer or if the wiper operation is jerky,
clean the outer surface of the windshield
(or rear window) and the wiper blades
using a sponge or soft cloth with a neutral
detergent or mild-abrasive cleaner. After
cleaning, rinse the windshield and wiper
blades with clean water. The windshield is
clean if beads do not form when you rinse
the windshield with water.
CAUTION
. Do not clean the wiper blades
with gasoline or a solvent, such
as paint thinner or benzine. This
will cause deterioration of the
wiper blades.
. When you wish to raise the
passenger-side wiper arm, first
raise the driver-side wiper arm.
Otherwise, the passenger-side
wiper assembly and driver-side
wiper assembly will touch each
other, possibly resulting inscratches. Maintenance and service
11-43
– CONTINUED –
Page 380 of 448
11-44Maintenance and service
.Return the passenger-side wiper
arm to its original position before
returning the driver-side wiper
arm to its original position.
Otherwise, the passenger-side
wiper assembly and driver-side
wiper assembly will touch each
other, possibly resulting inscratches.
. When returning the raised wipers
to the original positions, return
the wipers slowly on the wind-
shield by hand. Returning the
wipers from the detached posi-
tions by the spring operation
might change the shape of the
wiper arm or scratch the wind-shield.
If you cannot eliminate the streaking even
after following this method, replace the
wiper blades using the following proce-dures. &
Windshield wiper blade as- sembly
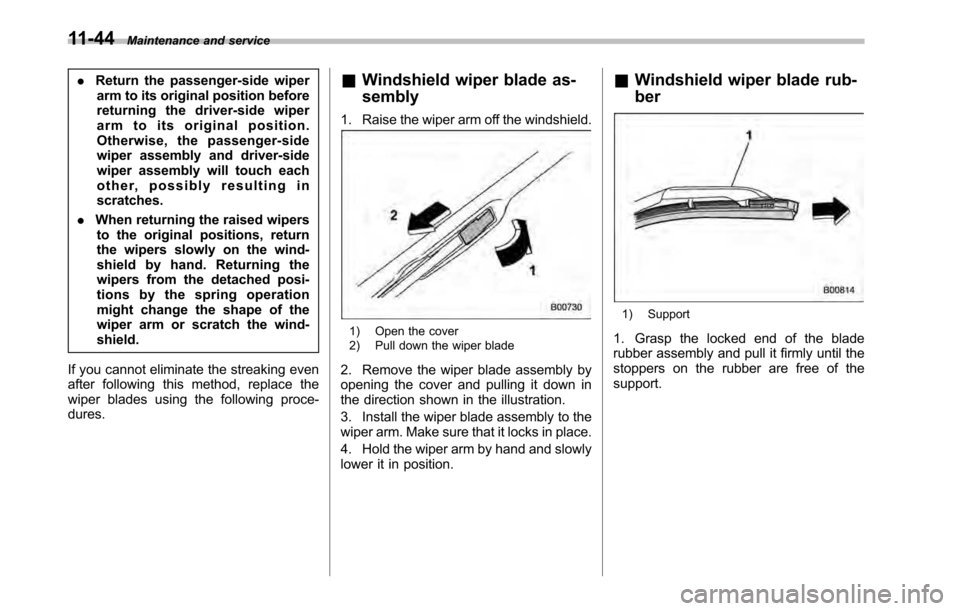
1. Raise the wiper arm off the windshield.
1) Open the cover
2) Pull down the wiper blade
2. Remove the wiper blade assembly by
opening the cover and pulling it down in
the direction shown in the illustration.
3. Install the wiper blade assembly to the
wiper arm. Make sure that it locks in place.
4. Hold the wiper arm by hand and slowly
lower it in position. &
Windshield wiper blade rub- ber
1) Support
1. Grasp the locked end of the blade
rubber assembly and pull it firmly until the
stoppers on the rubber are free of thesupport.
Page 384 of 448
11-48Maintenance and service
remove rings, metal watchbands,
and other metal jewelry. Never
allow metal tools to contact the
positive battery terminal and any-
thing connected to it WHILE you
are at the same time in contact
with any other metallic portion of
the vehicle because a short cir-
cuit will result.
. Keep everyone including children
away from the battery.
. Charge the battery in a well-
ventilated area.
. Battery posts, terminals, and re-
lated accessories contain lead
and lead compounds, chemicals
known to the State of California
to cause cancer and reproductive
harm. Batteries also contain
other chemicals known to the
State of California to cause can-
cer. Wash hands after handling.
CAUTION
Never use more than 10 amperes
when charging the battery because
it will shorten battery life.
It is unnecessary to periodically check the
battery fluid level or periodically refill with distilled water.
Fuses
CAUTION
Never replace a fuse with one hav-
ing a higher rating or with material
other than a fuse because serious
damage or a fire could result.
The fuses are designed to melt during an
overload to prevent damage to the wiring
harness and electrical equipment. The
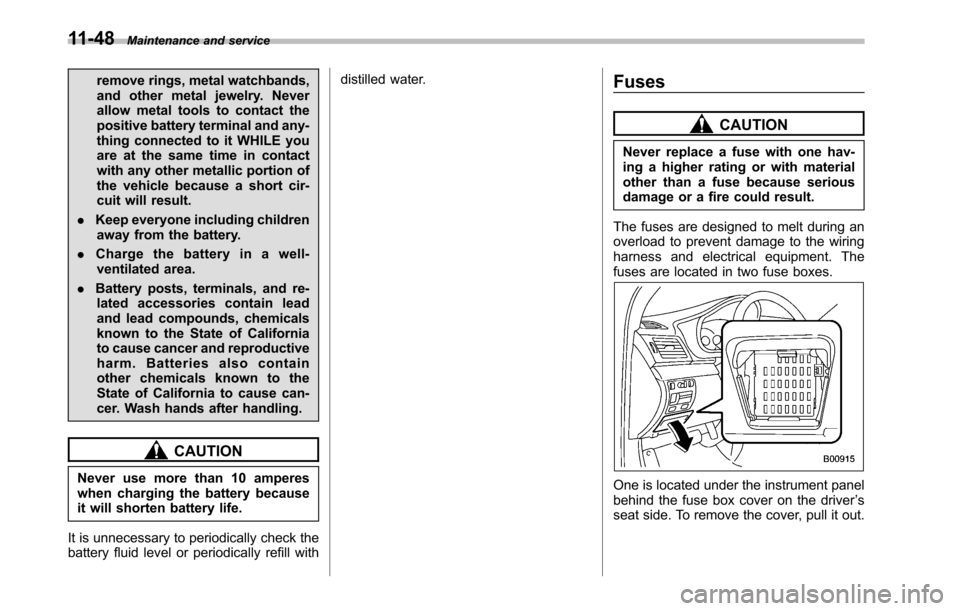
fuses are located in two fuse boxes.
One is located under the instrument panel
behind the fuse box cover on the driver ’s
seat side. To remove the cover, pull it out.
Page 388 of 448
11-52Maintenance and service
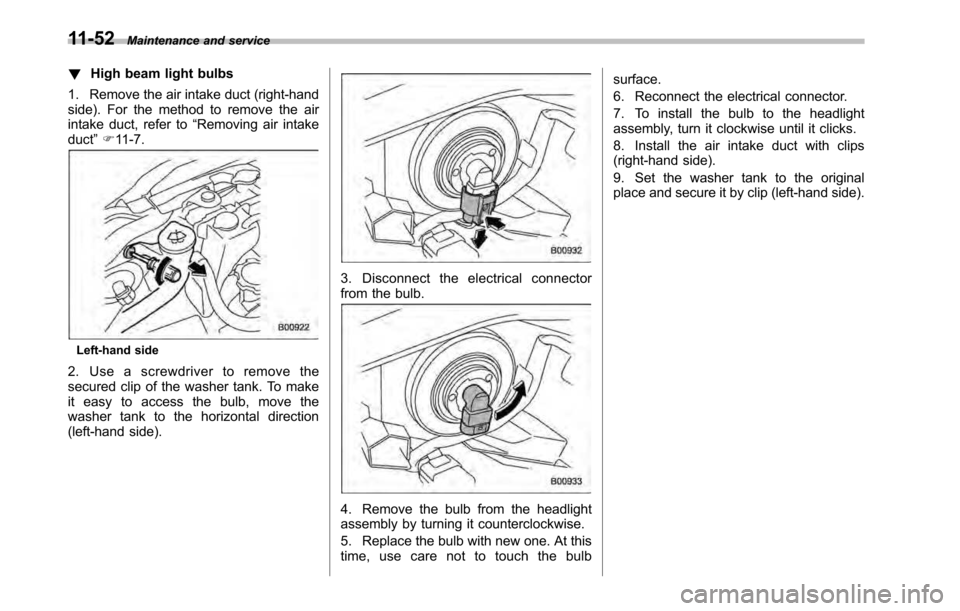
! High beam light bulbs
1. Remove the air intake duct (right-hand
side). For the method to remove the air
intake duct, refer to “Removing air intake
duct ”F 11-7.
Left-hand side
2. Use a screwdriver to remove the
secured clip of the washer tank. To make
it easy to access the bulb, move the
washer tank to the horizontal direction
(left-hand side).
3. Disconnect the electrical connector
from the bulb.
4. Remove the bulb from the headlight
assembly by turning it counterclockwise.
5. Replace the bulb with new one. At this
time, use care not to touch the bulb surface.
6. Reconnect the electrical connector.
7. To install the bulb to the headlight
assembly, turn it clockwise until it clicks.
8. Install the air intake duct with clips
(right-hand side).
9. Set the washer tank to the original
place and secure it by clip (left-hand side).
Page 392 of 448
11-56Maintenance and service
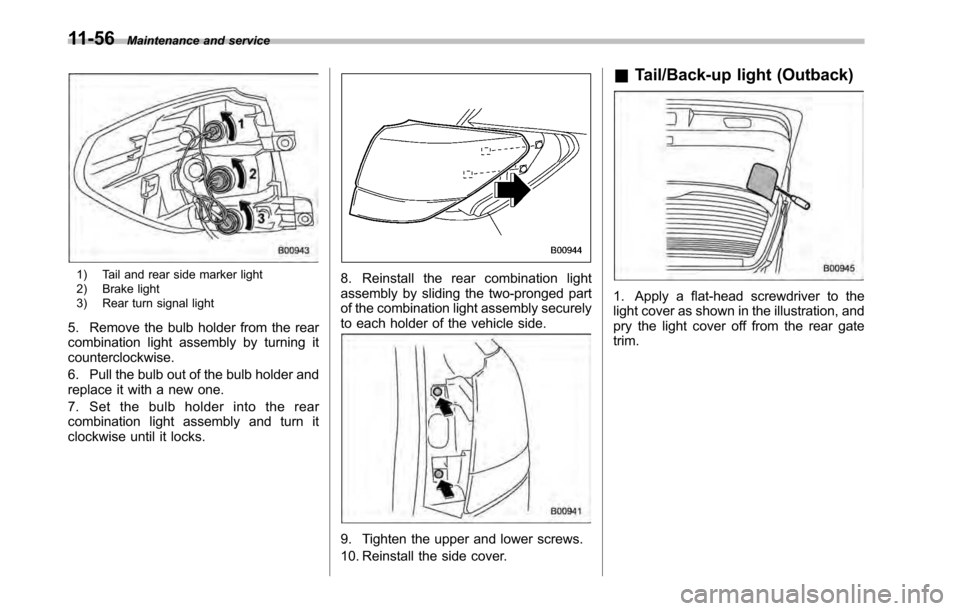
1) Tail and rear side marker light
2) Brake light
3) Rear turn signal light
5. Remove the bulb holder from the rear
combination light assembly by turning itcounterclockwise.
6. Pull the bulb out of the bulb holder and
replace it with a new one.
7. Set the bulb holder into the rear
combination light assembly and turn it
clockwise until it locks.8. Reinstall the rear combination light
assembly by sliding the two-pronged part
of the combination light assembly securely
to each holder of the vehicle side.
9. Tighten the upper and lower screws.
10. Reinstall the side cover. &
Tail/Back-up light (Outback)
1. Apply a flat-head screwdriver to the
light cover as shown in the illustration, and
pry the light cover off from the rear gatetrim.
Page 394 of 448
11-58Maintenance and service
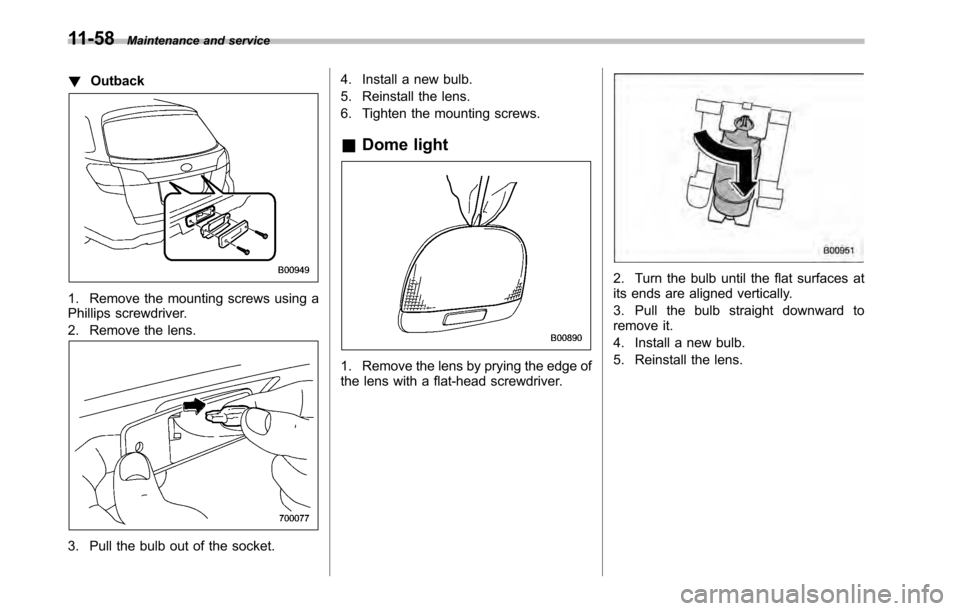
! Outback
1. Remove the mounting screws using a
Phillips screwdriver.
2. Remove the lens.
3. Pull the bulb out of the socket. 4. Install a new bulb.
5. Reinstall the lens.
6. Tighten the mounting screws.
& Dome light
1. Remove the lens by prying the edge of
the lens with a flat-head screwdriver.
2. Turn the bulb until the flat surfaces at
its ends are aligned vertically.
3. Pull the bulb straight downward to
remove it.
4. Install a new bulb.
5. Reinstall the lens.
Page 395 of 448
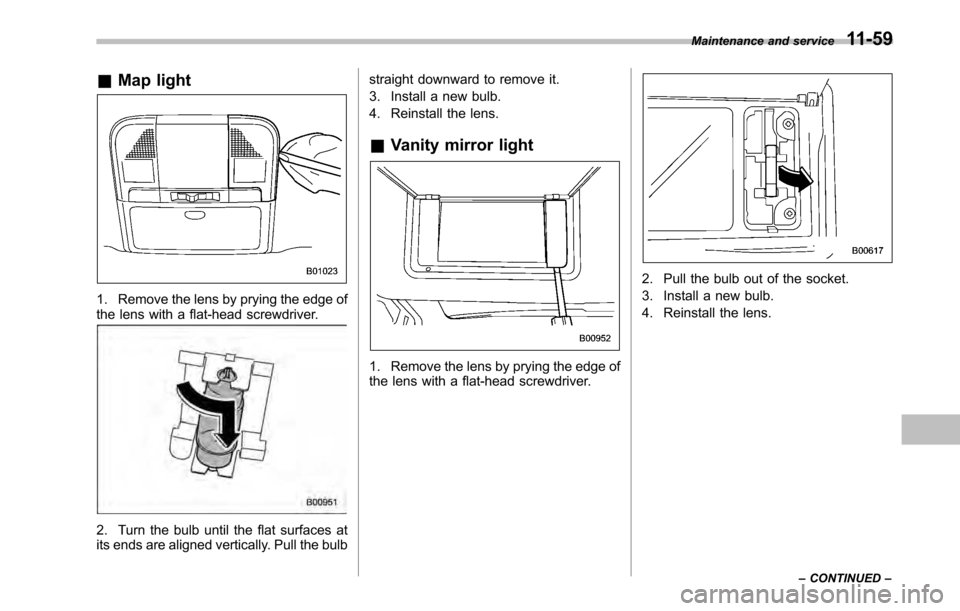
&Map light
1. Remove the lens by prying the edge of
the lens with a flat-head screwdriver.
2. Turn the bulb until the flat surfaces at
its ends are aligned vertically. Pull the bulb straight downward to remove it.
3. Install a new bulb.
4. Reinstall the lens.
& Vanity mirror light
1. Remove the lens by prying the edge of
the lens with a flat-head screwdriver.
2. Pull the bulb out of the socket.
3. Install a new bulb.
4. Reinstall the lens. Maintenance and service
11-59
– CONTINUED –