driver SUBARU OUTBACK 2010 5.G Manual Online
[x] Cancel search | Manufacturer: SUBARU, Model Year: 2010, Model line: OUTBACK, Model: SUBARU OUTBACK 2010 5.GPages: 448, PDF Size: 7.36 MB
Page 314 of 448
9-4In case of emergency
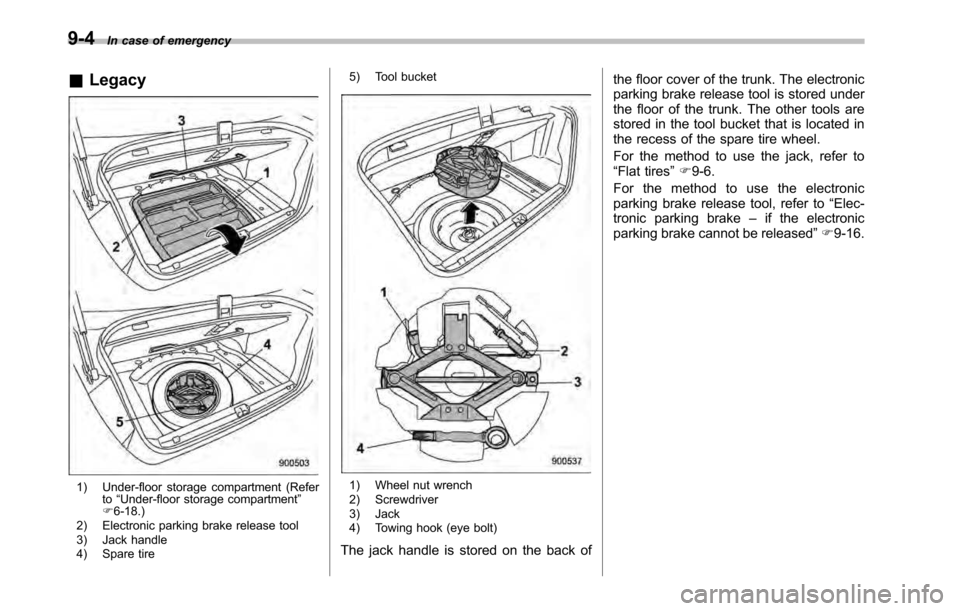
& Legacy
1) Under-floor storage compartment (Refer
to“Under-floor storage compartment ”
F 6-18.)
2) Electronic parking brake release tool
3) Jack handle
4) Spare tire 5) Tool bucket1) Wheel nut wrench
2) Screwdriver
3) Jack
4) Towing hook (eye bolt)
The jack handle is stored on the back of the floor cover of the trunk. The electronic
parking brake release tool is stored under
the floor of the trunk. The other tools are
stored in the tool bucket that is located in
the recess of the spare tire wheel.
For the method to use the jack, refer to “
Flat tires ”F 9-6.
For the method to use the electronic
parking brake release tool, refer to “Elec-
tronic parking brake –if the electronic
parking brake cannot be released ”F 9-16.
Page 315 of 448
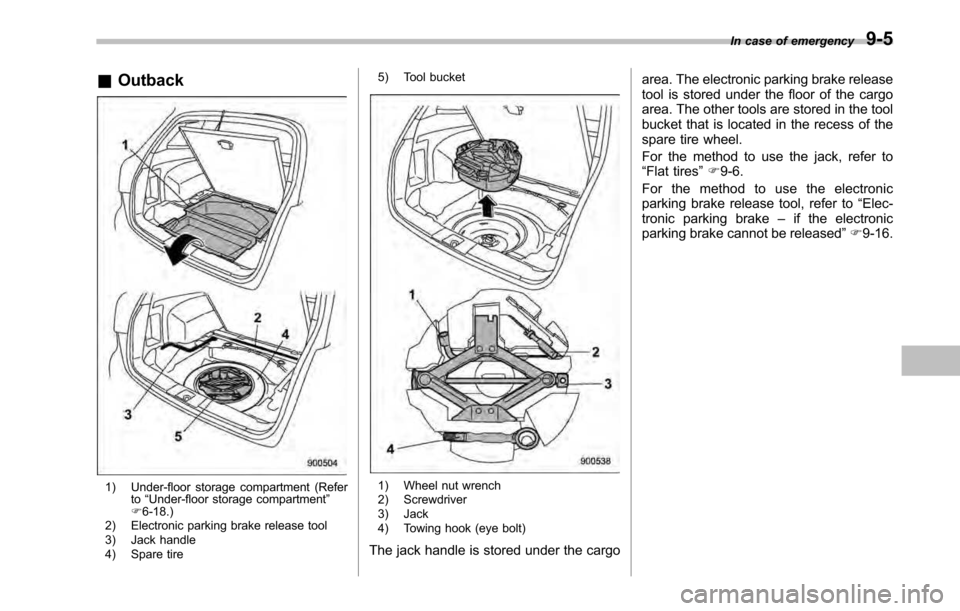
&Outback
1) Under-floor storage compartment (Refer
to“Under-floor storage compartment ”
F 6-18.)
2) Electronic parking brake release tool
3) Jack handle
4) Spare tire 5) Tool bucket1) Wheel nut wrench
2) Screwdriver
3) Jack
4) Towing hook (eye bolt)
The jack handle is stored under the cargo area. The electronic parking brake release
tool is stored under the floor of the cargo
area. The other tools are stored in the tool
bucket that is located in the recess of the
spare tire wheel.
For the method to use the jack, refer to “
Flat tires ”F 9-6.
For the method to use the electronic
parking brake release tool, refer to “Elec-
tronic parking brake –if the electronic
parking brake cannot be released ”F 9-16.
In case of emergency
9-5
Page 319 of 448
WARNING
Never place a tire or tire changing
tools in the passenger compartment
after changing wheels. In a sudden
stop or collision, loose equipment
could strike occupants and cause
injury. Store the tire and all tools in
the proper place.
& Tire pressure monitoring
system (TPMS) (if equipped)
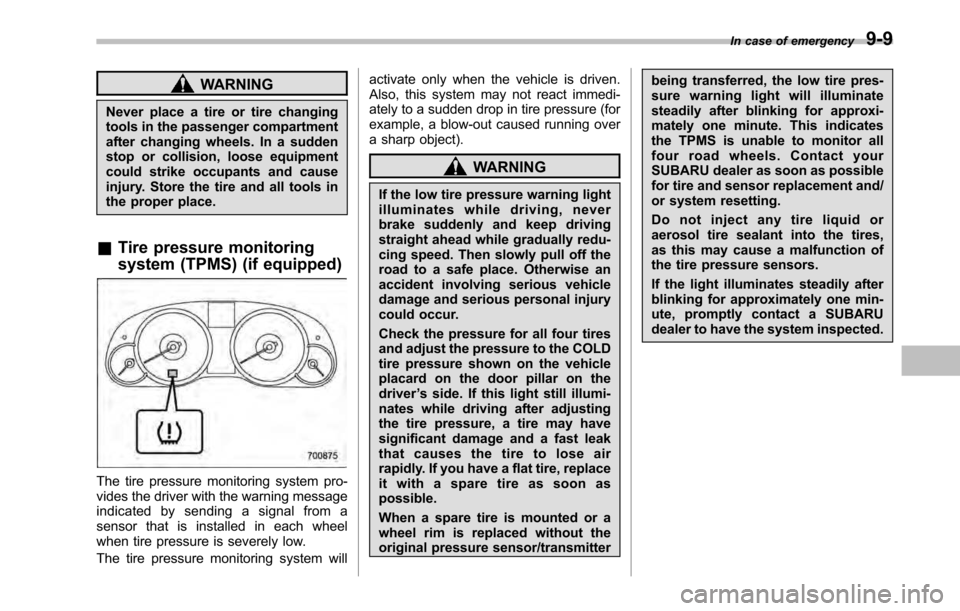
The tire pressure monitoring system pro-
vides the driver with the warning message
indicated by sending a signal from a
sensor that is installed in each wheel
when tire pressure is severely low.
The tire pressure monitoring system will activate only when the vehicle is driven.
Also, this system may not react immedi-
ately to a sudden drop in tire pressure (for
example, a blow-out caused running over
a sharp object).
WARNING
If the low tire pressure warning light
illuminates while driving, never
brake suddenly and keep driving
straight ahead while gradually redu-
cing speed. Then slowly pull off the
road to a safe place. Otherwise an
accident involving serious vehicle
damage and serious personal injury
could occur.
Check the pressure for all four tires
and adjust the pressure to the COLD
tire pressure shown on the vehicle
placard on the door pillar on thedriver ’s side. If this light still illumi-
nates while driving after adjusting
the tire pressure, a tire may have
significant damage and a fast leak
that causes the tire to lose air
rapidly. If you have a flat tire, replace
it with a spare tire as soon aspossible.
When a spare tire is mounted or a
wheel rim is replaced without the
original pressure sensor/transmitter being transferred, the low tire pres-
sure warning light will illuminate
steadily after blinking for approxi-
mately one minute. This indicates
the TPMS is unable to monitor all
four road wheels. Contact your
SUBARU dealer as soon as possible
for tire and sensor replacement and/
or system resetting.
Do not inject any tire liquid or
aerosol tire sealant into the tires,
as this may cause a malfunction of
the tire pressure sensors.
If the light illuminates steadily after
blinking for approximately one min-
ute, promptly contact a SUBARU
dealer to have the system inspected.
In case of emergency
9-9
Page 323 of 448
procedures for safety. &Towing and tie-down hooks
The towing hooks should be used only in
an emergency (e.g., to free a stuck vehicle
from mud, sand or snow).
CAUTION
. Use only the specified towing
hooks and tie-down hooks. Never
use suspension parts or other
parts of the body for towing or
tie-down purposes.
. Never use the tie-down hook
closest to the muffler under the
vehicle for towing purposes.
. To prevent deformation to the
bumper and the towing hook, do
not apply excessive lateral load
to the towing hooks.
Front towing hook:
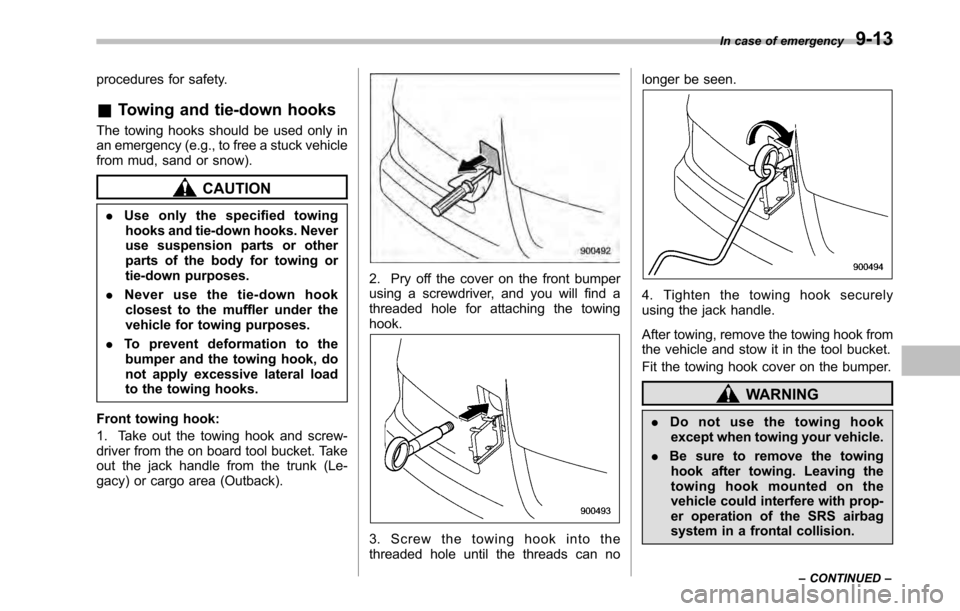
1. Take out the towing hook and screw-
driver from the on board tool bucket. Take
out the jack handle from the trunk (Le-
gacy) or cargo area (Outback).
2. Pry off the cover on the front bumper
using a screwdriver, and you will find a
threaded hole for attaching the towinghook.
3. Screw the towing hook into the
threaded hole until the threads can no longer be seen.
4. Tighten the towing hook securely
using the jack handle.
After towing, remove the towing hook from
the vehicle and stow it in the tool bucket.
Fit the towing hook cover on the bumper.
WARNING
. Do not use the towing hook
except when towing your vehicle.
. Be sure to remove the towing
hook after towing. Leaving the
towing hook mounted on the
vehicle could interfere with prop-
er operation of the SRS airbag
system in a frontal collision. In case of emergency
9-13
– CONTINUED –
Page 324 of 448
9-14In case of emergency
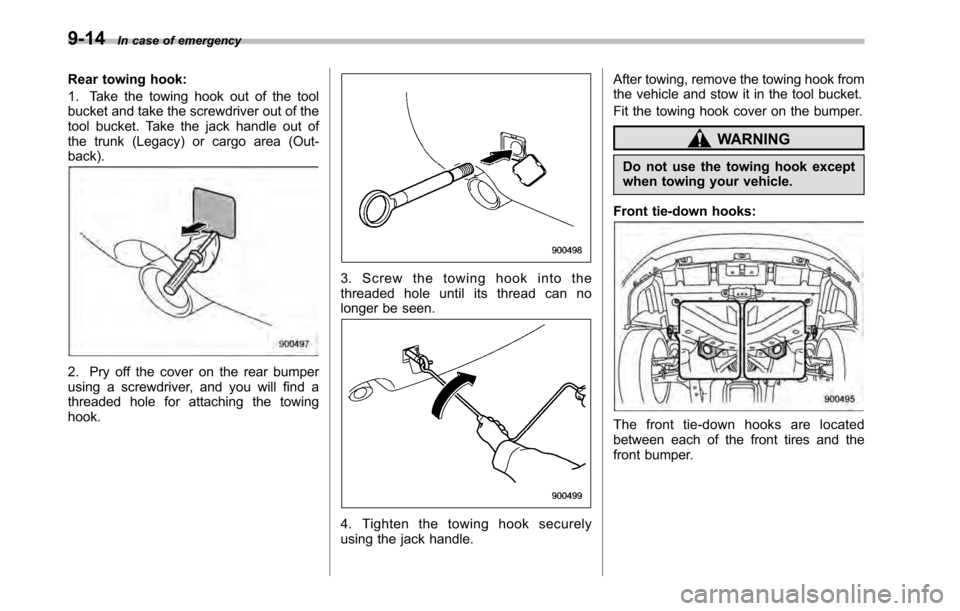
Rear towing hook:
1. Take the towing hook out of the tool
bucket and take the screwdriver out of the
tool bucket. Take the jack handle out of
the trunk (Legacy) or cargo area (Out-back).
2. Pry off the cover on the rear bumper
using a screwdriver, and you will find a
threaded hole for attaching the towinghook.
3. Screw the towing hook into the
threaded hole until its thread can no
longer be seen.
4. Tighten the towing hook securely
using the jack handle. After towing, remove the towing hook from
the vehicle and stow it in the tool bucket.
Fit the towing hook cover on the bumper.
WARNING
Do not use the towing hook except
when towing your vehicle.
Front tie-down hooks:
The front tie-down hooks are located
between each of the front tires and the
front bumper.
Page 328 of 448
9-18In case of emergency
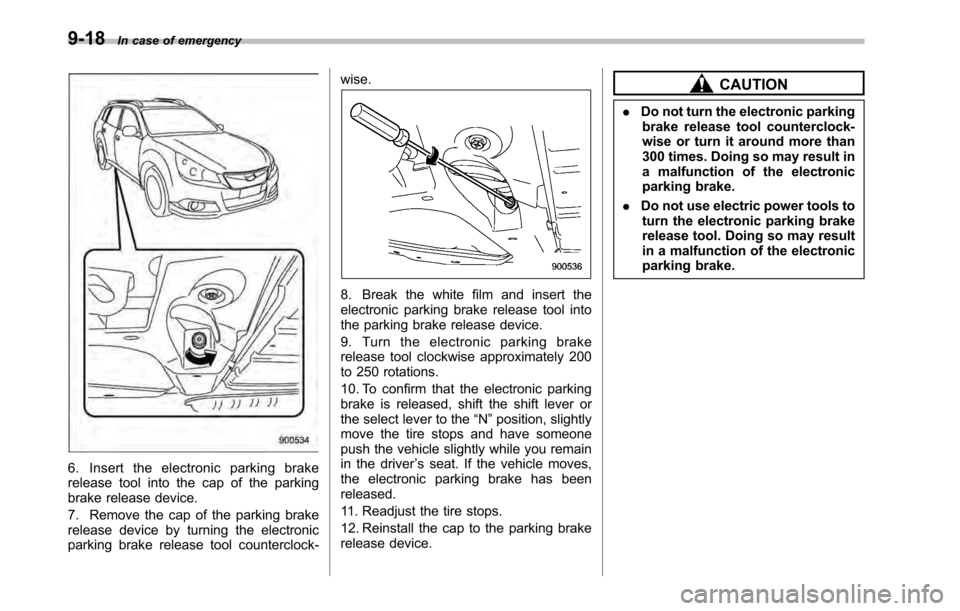
6. Insert the electronic parking brake
release tool into the cap of the parking
brake release device.
7. Remove the cap of the parking brake
release device by turning the electronic
parking brake release tool counterclock- wise.
8. Break the white film and insert the
electronic parking brake release tool into
the parking brake release device.
9. Turn the electronic parking brake
release tool clockwise approximately 200
to 250 rotations.
10. To confirm that the electronic parking
brake is released, shift the shift lever or
the select lever to the
“N ”position, slightly
move the tire stops and have someone
push the vehicle slightly while you remain
in the driver ’s seat. If the vehicle moves,
the electronic parking brake has beenreleased.
11. Readjust the tire stops.
12. Reinstall the cap to the parking brake
release device.
CAUTION
. Do not turn the electronic parking
brake release tool counterclock-
wise or turn it around more than
300 times. Doing so may result in
a malfunction of the electronic
parking brake.
. Do not use electric power tools to
turn the electronic parking brake
release tool. Doing so may result
in a malfunction of the electronic
parking brake.
Page 329 of 448
Trunk lid (Legacy)–if the
trunk lid cannot be opened
The trunk lid can also be opened using the
key.
To open the trunk lid, insert the key into
the key cylinder and turn it clockwise. Rear gate (Outback)
–if the
rear gate cannot be unlocked
In the event that you cannot unlock the
rear gate by operating the power door
locking switches or the remote keyless
entry system, you can unlock it from inside
the cargo area.
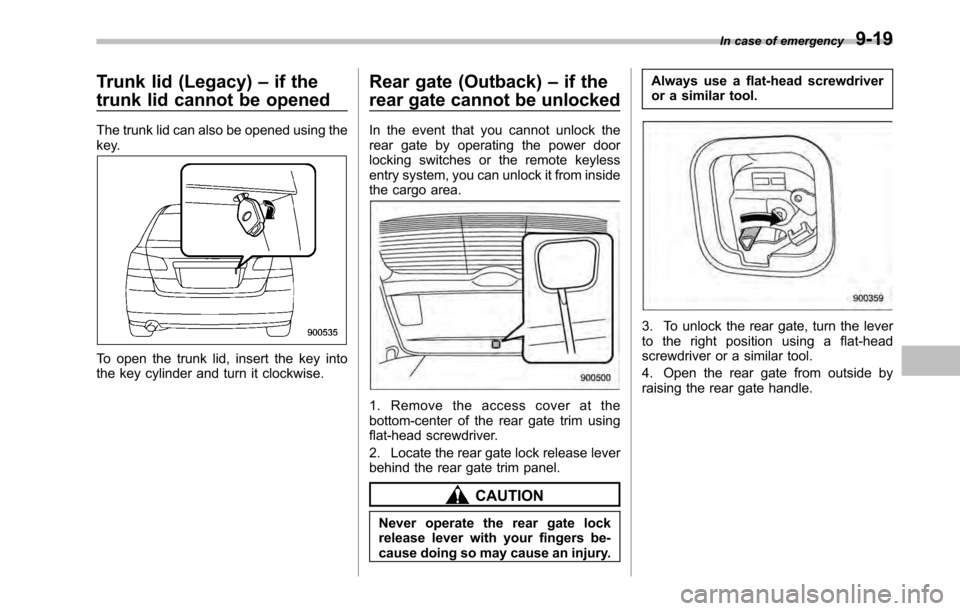
1. Remove the access cover at the
bottom-center of the rear gate trim using
flat-head screwdriver.
2. Locate the rear gate lock release lever
behind the rear gate trim panel.
CAUTION
Never operate the rear gate lock
release lever with your fingers be-
cause doing so may cause an injury. Always use a flat-head screwdriver
or a similar tool.
3. To unlock the rear gate, turn the lever
to the right position using a flat-head
screwdriver or a similar tool.
4. Open the rear gate from outside by
raising the rear gate handle.
In case of emergency
9-19
Page 330 of 448
9-20In case of emergency
Moonroof –if moonroof can-
not be closed
If the moonroof cannot be closed with the
moonroof switch, you can close the moon-
roof manually.
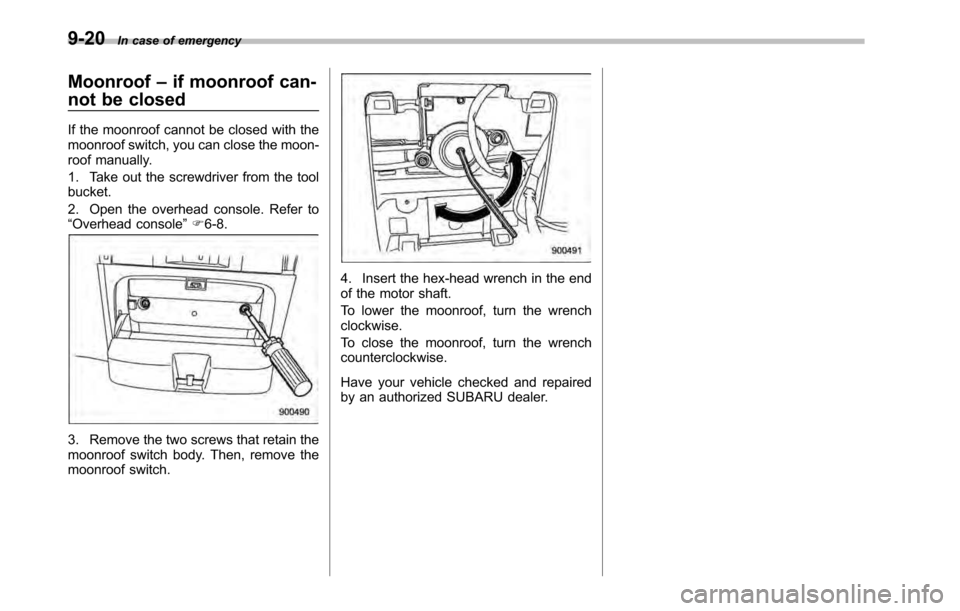
1. Take out the screwdriver from the tool bucket.
2. Open the overhead console. Refer to “ Overhead console ”F 6-8.
3. Remove the two screws that retain the
moonroof switch body. Then, remove the
moonroof switch.
4. Insert the hex-head wrench in the end
of the motor shaft.
To lower the moonroof, turn the wrench clockwise.
To close the moonroof, turn the wrench counterclockwise.
Have your vehicle checked and repaired
by an authorized SUBARU dealer.
Page 341 of 448
&When checking or servicing
in the engine compartment
while the engine is running
WARNING
A running engine can be dangerous.
Keep your fingers, hands, clothing,
hair and tools away from the cooling
fan, belts and any other moving
engine parts. Removing rings,
watches and ties is advisable. Maintenance tips
Some clips and fender linings must be
removed before replacing the air cleaner
elements or specific bulbs. &
Removing and reinstalling clips
! Removing clips
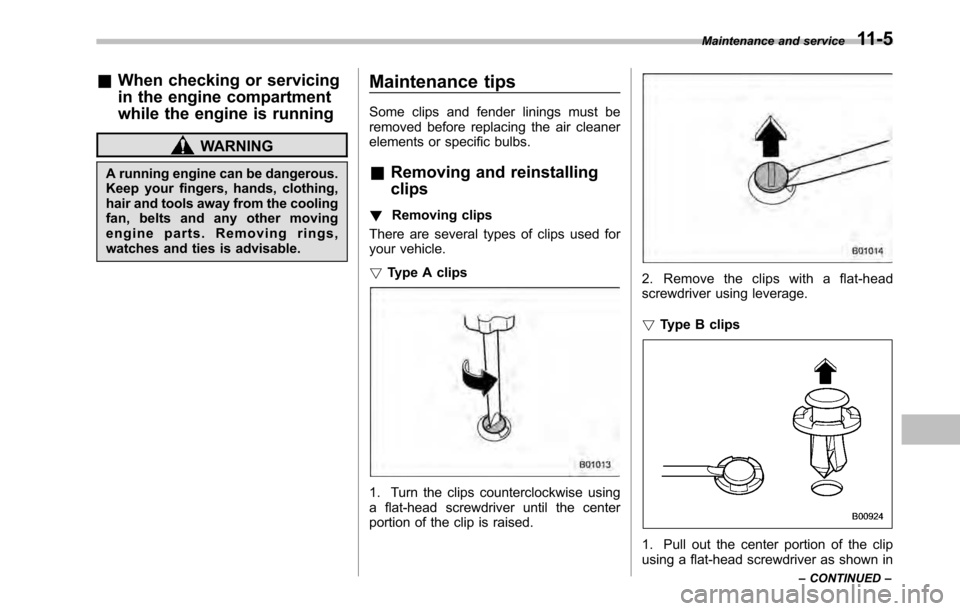
There are several types of clips used for
your vehicle. ! Type A clips
1. Turn the clips counterclockwise using
a flat-head screwdriver until the center
portion of the clip is raised.
2. Remove the clips with a flat-head
screwdriver using leverage. !Type B clips
1. Pull out the center portion of the clip
using a flat-head screwdriver as shown in Maintenance and service
11-5
– CONTINUED –
Page 342 of 448

11-6Maintenance and service
the illustration.
2. Pull the protruded center portion to
remove the entire body of the clip. ! Type C clips
1. Turn the clip counterclockwise using a
Phillips screwdriver until the center portion
of the clip is raised.
2. Remove the entire clip by pulling it up. !
Reinstalling clips
Type A clips
Type B clips
Type C clips
Insert the clip without the center portion
first and then push the center portion of
the clip into the hole.