window SUBARU OUTBACK 2017 6.G User Guide
[x] Cancel search | Manufacturer: SUBARU, Model Year: 2017, Model line: OUTBACK, Model: SUBARU OUTBACK 2017 6.GPages: 610, PDF Size: 10.28 MB
Page 66 of 610
CAUTION
Store the head restraint that has
been removed in the trunk or cargo
area. Avoid placing the head re-
straint in the passenger compart-
ment to prevent it from being thrown
around in the passenger compart-
ment in a sudden stop or a sharp
turn.
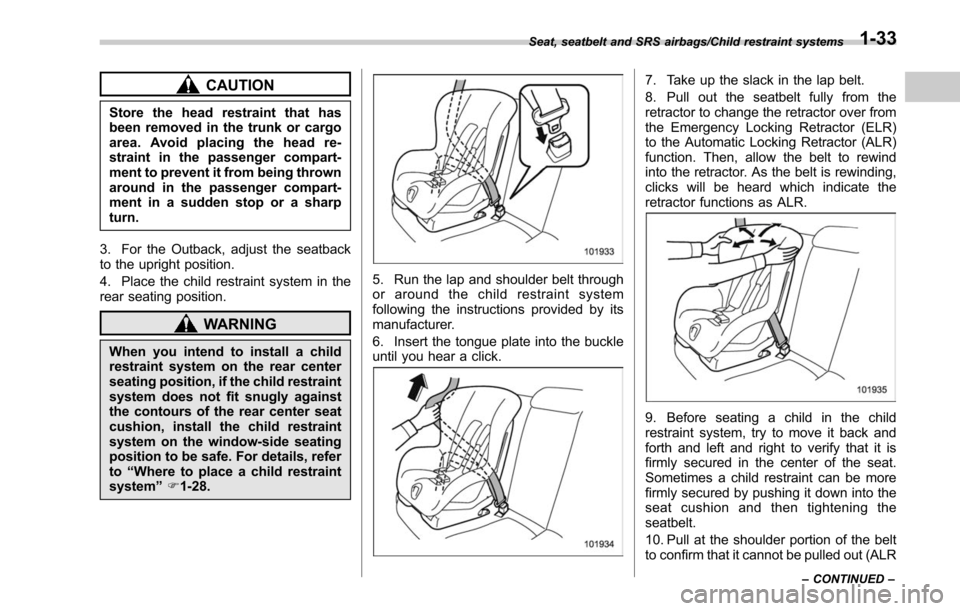
3. For the Outback, adjust the seatback
to the upright position.
4. Place the child restraint system in the
rear seating position.
WARNING
When you intend to install a child
restraint system on the rear center
seating position, if the child restraint
system does not fit snugly against
the contours of the rear center seat
cushion, install the child restraint
system on the window-side seating
position to be safe. For details, refer
to “Where to place a child restraint
system ”F 1-28.
5. Run the lap and shoulder belt through
or around the child restraint system
following the instructions provided by its
manufacturer.
6. Insert the tongue plate into the buckle
until you hear a click.
7. Take up the slack in the lap belt.
8. Pull out the seatbelt fully from the
retractor to change the retractor over from
the Emergency Locking Retractor (ELR)
to the Automatic Locking Retractor (ALR)
function. Then, allow the belt to rewind
into the retractor. As the belt is rewinding,
clicks will be heard which indicate the
retractor functions as ALR.
9. Before seating a child in the child
restraint system, try to move it back and
forth and left and right to verify that it is
firmly secured in the center of the seat.
Sometimes a child restraint can be more
firmly secured by pushing it down into the
seat cushion and then tightening the
seatbelt.
10. Pull at the shoulder portion of the belt
to confirm that it cannot be pulled out (ALR
Seat, seatbelt and SRS airbags/Child restraint systems
–CONTINUED –1-33
Page 70 of 610
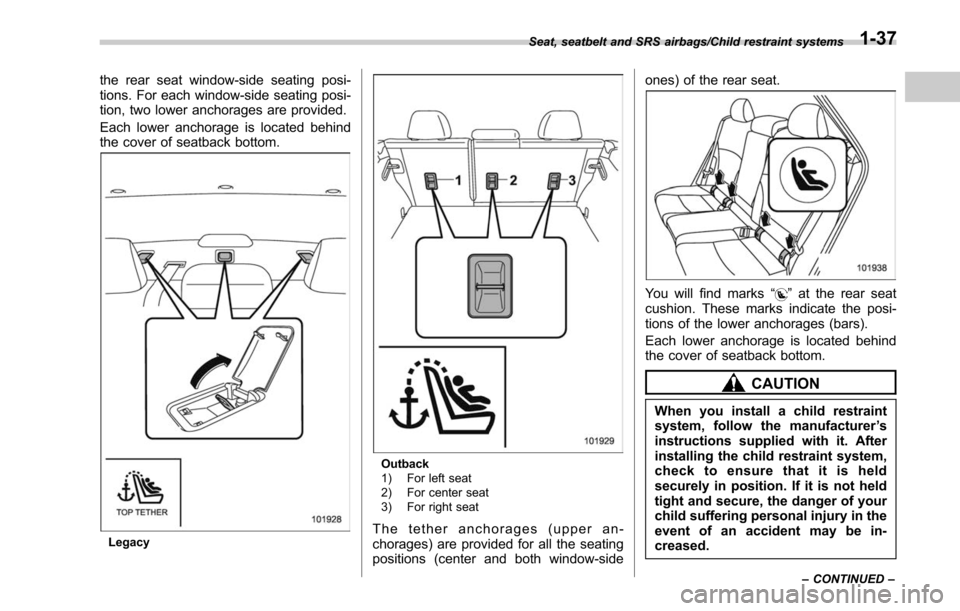
the rear seat window-side seating posi-
tions. For each window-side seating posi-
tion, two lower anchorages are provided.
Each lower anchorage is located behind
the cover of seatback bottom.
Legacy
Outback
1) For left seat
2) For center seat
3) For right seat
The tether anchorages (upper an-
chorages) are provided for all the seating
positions (center and both window-sideones) of the rear seat.
You will find marks
“”at the rear seat
cushion. These marks indicate the posi-
tions of the lower anchorages (bars).
Each lower anchorage is located behind
the cover of seatback bottom.
CAUTION
When you install a child restraint
system, follow the manufacturer ’s
instructions supplied with it. After
installing the child restraint system,
check to ensure that it is held
securely in position. If it is not held
tight and secure, the danger of your
child suffering personal injury in the
event of an accident may be in-
creased.
Seat, seatbelt and SRS airbags/Child restraint systems
–CONTINUED –1-37
Page 73 of 610
Seat, seatbelt and SRS airbags/Child restraint systems
installed on the back side of the rear
seatback.
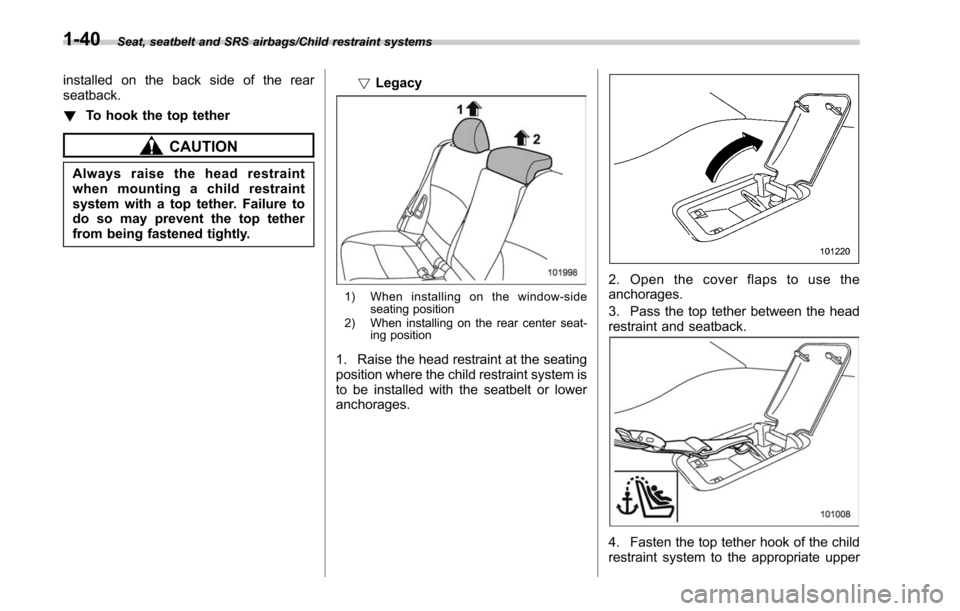
!To hook the top tether
CAUTION
Always raise the head restraint
when mounting a child restraint
system with a top tether. Failure to
do so may prevent the top tether
from being fastened tightly. !
Legacy
1) When installing on the window-side
seating position
2) When installing on the rear center seat- ing position
1. Raise the head restraint at the seating
position where the child restraint system is
to be installed with the seatbelt or lower
anchorages.
2. Open the cover flaps to use the
anchorages.
3. Pass the top tether between the head
restraint and seatback.
4. Fasten the top tether hook of the child
restraint system to the appropriate upper
1-40
Page 74 of 610
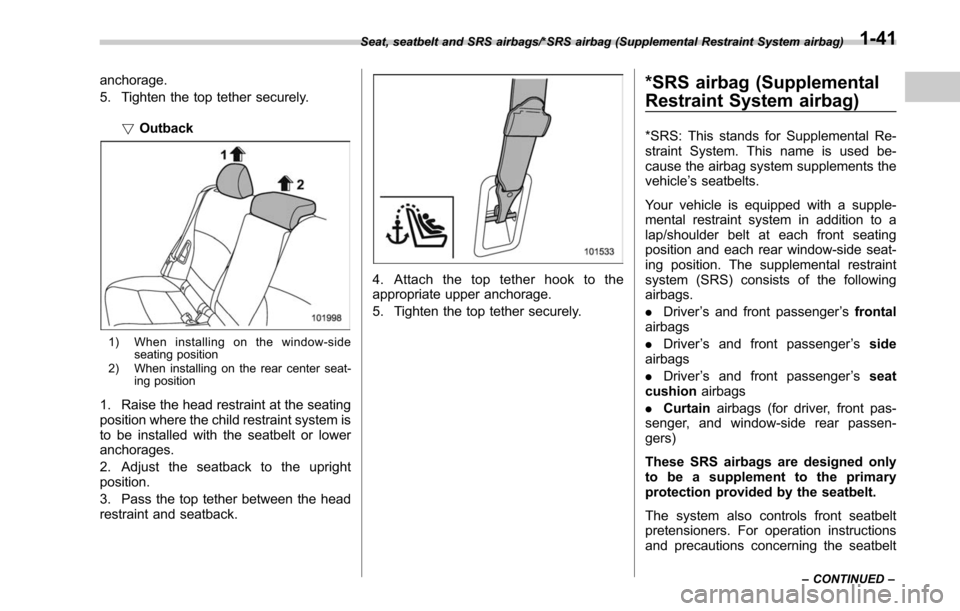
anchorage.
5. Tighten the top tether securely.!Outback
1) When installing on the window-side
seating position
2) When installing on the rear center seat- ing position
1. Raise the head restraint at the seating
position where the child restraint system is
to be installed with the seatbelt or lower
anchorages.
2. Adjust the seatback to the upright
position.
3. Pass the top tether between the head
restraint and seatback.
4. Attach the top tether hook to the
appropriate upper anchorage.
5. Tighten the top tether securely.
*SRS airbag (Supplemental
Restraint System airbag)
*SRS: This stands for Supplemental Re-
straint System. This name is used be-
cause the airbag system supplements the
vehicle ’s seatbelts.
Your vehicle is equipped with a supple-
mental restraint system in addition to a
lap/shoulder belt at each front seating
position and each rear window-side seat-
ing position. The supplemental restraint
system (SRS) consists of the following
airbags.
. Driver ’s and front passenger ’s frontal
airbags
. Driver ’s and front passenger ’s side
airbags
. Driver ’s and front passenger ’s seat
cushion airbags
. Curtain airbags (for driver, front pas-
senger, and window-side rear passen-
gers)
These SRS airbags are designed only
to be a supplement to the primary
protection provided by the seatbelt.
The system also controls front seatbelt
pretensioners. For operation instructions
and precautions concerning the seatbelt
Seat, seatbelt and SRS airbags/*SRS airbag (Supplemental Restraint System airbag)
–CONTINUED –1-41
Page 76 of 610
airbag deployment may cause
injuries if your head or other
parts of the body are too close
to the SRS side airbag.
. Since your vehicle is equipped
with SRS curtain airbags, do not
sit or lean unnecessarily close to
the front or rear door on either
side. Also, do not put your head,
arms or hands out of the window.
The SRS curtain airbags on both
sides of the cabin are stored in
the roof side (between the front
pillar and a point over the rear
seat), and they provide protec-
tion by deploying rapidly (faster
than the blink of an eye) in the
event of a side impact, a rollover
or also a frontal collision depend-
ing on circumstances. However,
the force of its deployment may
cause injuries if your head is too
close to it.
. Do not sit or lean unnecessarily
close to the SRS airbag. Because
the SRS airbag deploys with
considerable speed (faster than
the blink of an eye) and force to
protect in high speed collisions,
the force of an airbag can injure
an occupant whose body is too
close to SRS airbag. It is also important to wear your
seatbelt to help avoid injuries
that can result when the SRS
airbag contacts an occupant not
in proper position such as one
thrown forward during pre-acci-
dent braking.
Even when properly positioned,
there remains a possibility that
an occupant may suffer minor
injury such as abrasions and
bruises to the face or arms
because of the SRS airbag de-
ployment force.
WARNING
.
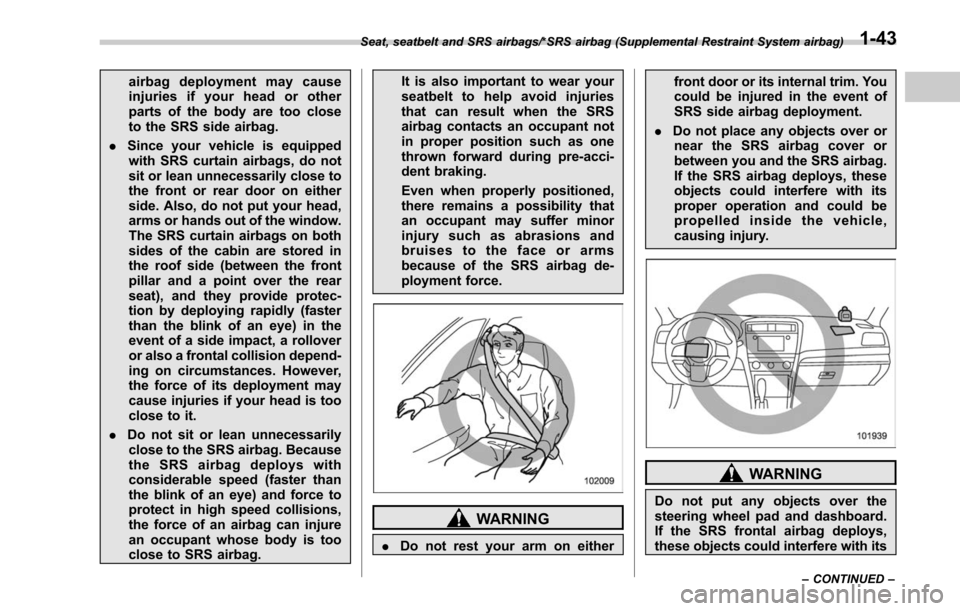
Do not rest your arm on either front door or its internal trim. You
could be injured in the event of
SRS side airbag deployment.
. Do not place any objects over or
near the SRS airbag cover or
between you and the SRS airbag.
If the SRS airbag deploys, these
objects could interfere with its
proper operation and could be
propelled inside the vehicle,
causing injury.
WARNING
Do not put any objects over the
steering wheel pad and dashboard.
If the SRS frontal airbag deploys,
these objects could interfere with its
Seat, seatbelt and SRS airbags/*SRS airbag (Supplemental Restraint System airbag)
–CONTINUED –1-43
Page 80 of 610
seat facing the side window
– Wrap his/her arms around the
front seat seatback
– Put his/her head, arms or
other parts of the body out of
the window
In the event of an accident, the force of SRS side airbag and/or
SRS curtain airbag deployment
could injure the child seriously
because his/her head, arms or
other parts of the body are too
close to the SRS side airbag and/
or SRS curtain airbag.
. Since your vehicle is also
equipped with a front passen-
ger ’s SRS frontal airbag, children
should be placed in the rear seat
anyway and should be properly
restrained at all times.
CAUTION
. When the SRS airbag deploys,
some smoke will be released.
This smoke could cause breath-
ing problems for people with a
history of asthma or other
breathing trouble. If you or your
passengers have breathing pro-
blems after SRS airbag deploys, get fresh air promptly.
. A deploying SRS airbag releases
hot gas. Occupants could get
burned if they come into direct
contact with the hot gas.
NOTE
. When you sell your vehicle, we urge
you to explain to the buyer that it is
equipped with SRS airbags by alerting
the buyer to the applicable section in
this Owner ’s Manual.
. If the SRS airbag deploys, fuel
supply will be cut off to reduce the risk
of fire caused by leaking fuel. For
details about restarting of the engine,
refer to “If your vehicle is involved in
an accident ”F 9-22.
Seat, seatbelt and SRS airbags/*SRS airbag (Supplemental Restraint System airbag)
–CONTINUED –1-47
Page 85 of 610
Seat, seatbelt and SRS airbags/*SRS airbag (Supplemental Restraint System airbag)
waist.
In a moderate to severe side impact
collision, the SRS curtain airbag on the
impacted side of the vehicle deploys
between the occupant and the side
window and supplements the seatbelt by
reducing the impact to the occupant’s
head.
NOTE
The SRS side airbag and seatbelt
pretensioner are not controlled by the
SUBARU advanced frontal airbag sys-
tem.
! Driver ’s SRS frontal airbag
The driver ’s SRS frontal airbag uses a
dual stage inflator. The inflator operates in
different ways depending on the severity
of impact.
Have the system inspected by your
SUBARU dealer immediately if the SRS
airbag system warning light illuminates.
! Front passenger ’s SRS frontal air-
bag
The front passenger ’s SRS frontal airbag
uses a dual stage inflator. The inflator
operates in different ways depending on
the severity of impact.
The total load on the seat is monitored by
the passenger ’s occupant detection sys- tem sensor located under the seat.
The system has another sensor that
monitors the tension of the front passen-
ger
’s seatbelt. Using the total seat load
and seatbelt tension data from the sen-
sors, the occupant detection system de-
termines whether the front passenger ’s
SRS frontal airbag should or should not be
inflated.
The occupant detection system may not
inflate the front passenger ’s SRS frontal
airbag even when the driver ’s SRS frontal
airbag deploys. This is normal.
CAUTION
Observe the following precautions.
Failure to do so may prevent the
SUBARU advanced frontal airbag
system from functioning correctly
or cause the system to fail.
. Do not apply any strong impact
to the front passenger ’sseat
such as by kicking.
. Do not let rear passengers rest
their feet between the front seat-
back and seat cushion.
. Do not spill liquid on the front
passenger ’s seat. If liquid is
spilled, wipe it off immediately.
. Do not remove or disassemble the front passenger
’s seat.
. Do not install any accessory
(such as an audio amplifier) other
than a genuine SUBARU acces-
sory under the front passenger ’s
seat.
. Do not place anything (shoes,
umbrella, etc.) under the front
passenger ’s seat.
. Do not use the front passenger ’s
seat with the head restraint re-
moved.
. Do not leave any articles on the
front passenger ’s seat or the
seatbelt tongue and buckle en-
gaged when you leave your ve-
hicle.
. Do not place a magnet near the
seatbelt buckle and the seatbelt
retractor.
. Do not use front seats with their
backward-forward position and
seatback not being locked into
place securely. If any of them are
not locked securely, adjust them
again. For adjusting procedure,
refer to “Manual seat ”F1-4
(models equipped with manual
seats only).
If the seatbelt buckle switch and/or front
1-52
Page 103 of 610
Seat, seatbelt and SRS airbags/*SRS airbag (Supplemental Restraint System airbag)
CAUTION
If you need service or repair in areas
indicated in the following list, have
the work performed by an author-
ized SUBARU dealer. The SRS air-
bag control module, impact sensors
and airbag modules are stored in
these areas.
.Under the center console
. Inside each front fender
. Steering wheel and column and
nearby areas
. Top of the dashboard on front
passenger ’ssideandnearby
areas
. Each front seat and nearby area
. Inside each center pillar
. Inside each front door
. In each roof side (from the front
pillar to a point over the rear seat)
. Between the rear seat cushion
and rear wheel house on each
side
. Under the rear center seat
In the event that the SRS airbag is
deployed, replacement of the system
should be performed only by an author-
ized SUBARU dealer. When the compo- nents of the SRS airbag system are
replaced, use only genuine SUBARU
parts.
NOTE
In the following cases, contact your
SUBARU dealer as soon as possible.
.
The front part of the vehicle was
involved in an accident in which only
the driver ’s SRS frontal airbag or both
driver ’s and front passenger ’sSRS
frontal airbags did not deploy.
. The pad of the steering wheel, the
cover over the front passenger ’s SRS
frontal airbag, or either roof side (from
the front pillar to a point over the rear
seat) is scratched, cracked, or other-
wise damaged.
. The center pillar, front door, rear
wheel house or rear sub frame, or an
area near these parts, was involved in
an accident in which the SRS side
airbag and SRS curtain airbag did not
deploy.
. The fabric or leather of either front
seatback and seat cushion is cut,
frayed, or otherwise damaged.
. The rear part of the vehicle was
involved in an accident.
& Precautions against vehicle
modification
WARNING
. To avoid accidental activation of
the system or rendering the sys-
tem inoperative, which may re-
sult in serious injury, no modifi-
cations should be made to any
components or wiring of the SRS
airbag system.
This includes the following mod-
ifications.
– Installation of custom steering
wheels
– Attachment of additional trim
materials to the dashboard
– Installation of custom seats
– Replacement of seat fabric or
leather
– Installation of additional fabric
or leather on the front seat
– Attachment of a hands-free
microphone or any other ac-
cessory to a front pillar, a
center pillar, a rear pillar, the
windshield, a side window, an
assist grip, or any other cabin
surface that would be near a
1-70
Page 106 of 610
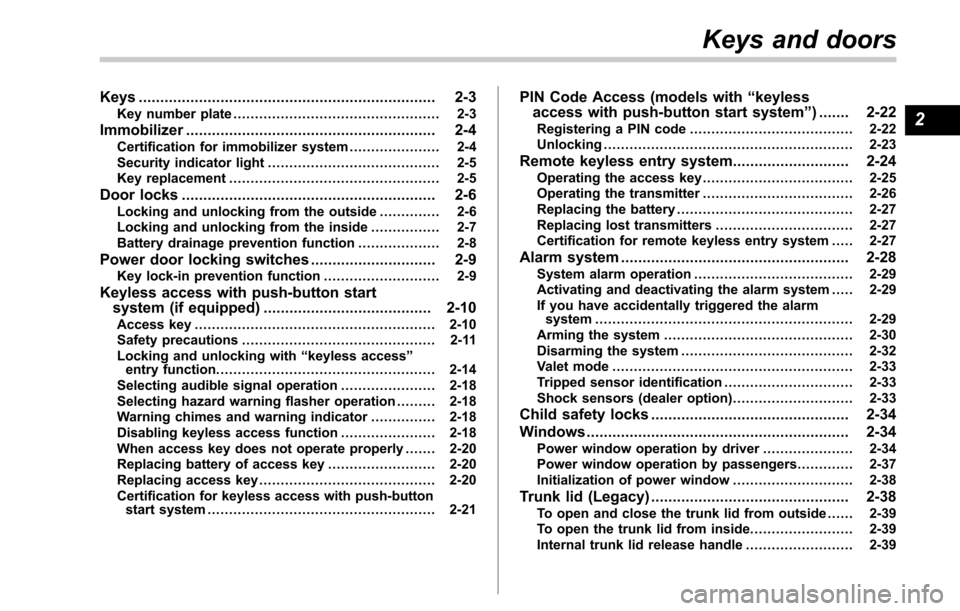
Keys..................................................................... 2-3
Key number plate ................................................ 2-3
Immobilizer.......................................................... 2-4Certification for immobilizer system ..................... 2-4
Security indicator light ........................................ 2-5
Key replacement ................................................. 2-5
Door locks........................................................... 2-6Locking and unlocking from the outside . ............. 2-6
Locking and unlocking from the inside ................ 2-7
Battery drainage prevention function ................... 2-8
Power door locking switches............................. 2-9Key lock-in prevention function ........................... 2-9
Keyless access with push-button start
system (if equipped) ....................................... 2-10
Access key........................................................ 2-10
Safety precautions ............................................. 2-11
Locking and unlocking with “keyless access ”
entry function. .................................................. 2-14
Selecting audible signal operation ...................... 2-18
Selecting hazard warning flasher operation ......... 2-18
Warning chimes and warning indicator ............... 2-18
Disabling keyless access function ...................... 2-18
When access key does not operate properly ....... 2-20
Replacing battery of access key ......................... 2-20
Replacing access key ......................................... 2-20
Certification for keyless access with push-button start system ..................................................... 2-21
PIN Code Access (models with “keyless
access with push-button start system ”) ....... 2-22
Registering a PIN code ...................................... 2-22
Unlocking .......................................................... 2-23
Remote keyless entry system ........................... 2-24Operating the access key................................... 2-25
Operating the transmitter ................................... 2-26
Replacing the battery ......................................... 2-27
Replacing lost transmitters ................................ 2-27
Certification for remote keyless entry system ..... 2-27
Alarm system..................................................... 2-28System alarm operation ..................................... 2-29
Activating and deactivating the alarm system ..... 2-29
If you have accidentally triggered the alarm system ............................................................ 2-29
Arming the system ............................................ 2-30
Disarming the system ........................................ 2-32
Valet mode ........................................................ 2-33
Tripped sensor identification .............................. 2-33
Shock sensors (dealer option).. .......................... 2-33
Child safety locks.............................................. 2-34
Windows ............................................................. 2-34
Power window operation by driver ..................... 2-34
Power window operation by passengers ............. 2-37
Initialization of power window .. .......................... 2-38
Trunk lid (Legacy).............................................. 2-38
To open and close the trunk lid from outside . ..... 2-39
To open the trunk lid from inside. ....................... 2-39
Internal trunk lid release handle ......................... 2-39
Keys and doors
2
Page 109 of 610
Keys and doors/Immobilizer
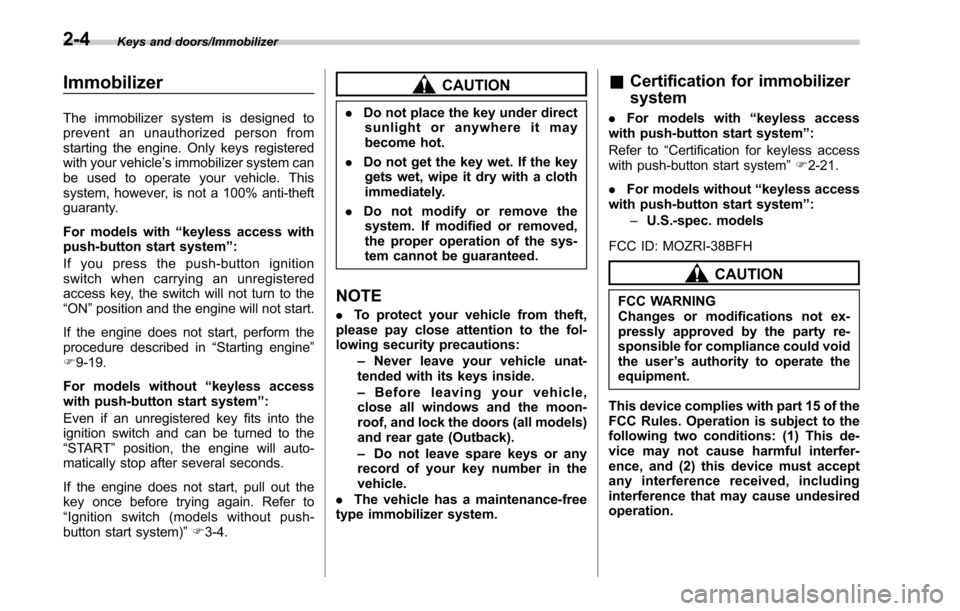
Immobilizer
The immobilizer system is designed to
prevent an unauthorized person from
starting the engine. Only keys registered
with your vehicle’s immobilizer system can
be used to operate your vehicle. This
system, however, is not a 100% anti-theft
guaranty.
For models with “keyless access with
push-button start system ”:
If you press the push-button ignition
switch when carrying an unregistered
access key, the switch will not turn to the
“ON ”position and the engine will not start.
If the engine does not start, perform the
procedure described in “Starting engine”
F 9-19.
For models without “keyless access
with push-button start system ”:
Even if an unregistered key fits into the
ignition switch and can be turned to the
“START ”position, the engine will auto-
matically stop after several seconds.
If the engine does not start, pull out the
key once before trying again. Refer to
“ Ignition switch (models without push-
button start system) ”F 3-4.
CAUTION
. Do not place the key under direct
sunlight or anywhere it may
become hot.
. Do not get the key wet. If the key
gets wet, wipe it dry with a cloth
immediately.
. Do not modify or remove the
system. If modified or removed,
the proper operation of the sys-
tem cannot be guaranteed.
NOTE
. To protect your vehicle from theft,
please pay close attention to the fol-
lowing security precautions:
–Never leave your vehicle unat-
tended with its keys inside.
– Before leaving your vehicle,
close all windows and the moon-
roof, and lock the doors (all models)
and rear gate (Outback).
– Do not leave spare keys or any
record of your key number in the
vehicle.
. The vehicle has a maintenance-free
type immobilizer system.
& Certification for immobilizer
system
. For models with “keyless access
with push-button start system ”:
Refer to “Certification for keyless access
with push-button start system ”F 2-21.
. For models without “keyless access
with push-button start system ”:
– U.S.-spec. models
FCC ID: MOZRI-38BFH
CAUTION
FCC WARNING
Changes or modifications not ex-
pressly approved by the party re-
sponsible for compliance could void
the user ’s authority to operate the
equipment.
This device complies with part 15 of the
FCC Rules. Operation is subject to the
following two conditions: (1) This de-
vice may not cause harmful interfer-
ence, and (2) this device must accept
any interference received, including
interference that may cause undesired
operation.
2-4