er ss displayed SUBARU TRIBECA 2009 1.G Service Workshop Manual
[x] Cancel search | Manufacturer: SUBARU, Model Year: 2009, Model line: TRIBECA, Model: SUBARU TRIBECA 2009 1.GPages: 2453, PDF Size: 46.32 MB
Page 1425 of 2453
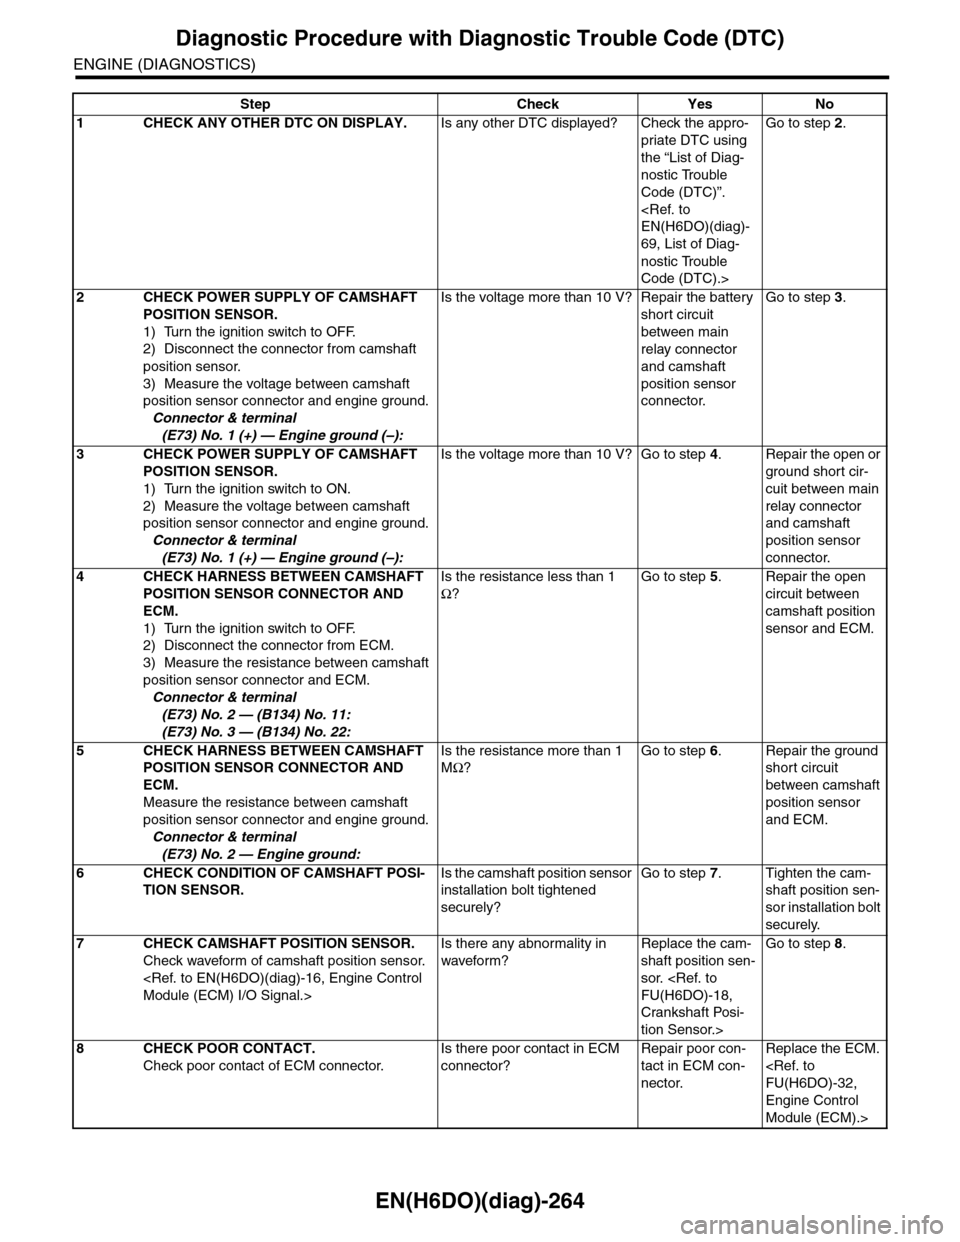
EN(H6DO)(diag)-264
Diagnostic Procedure with Diagnostic Trouble Code (DTC)
ENGINE (DIAGNOSTICS)
Step Check Yes No
1CHECK ANY OTHER DTC ON DISPLAY.Is any other DTC displayed? Check the appro-
priate DTC using
the “List of Diag-
nostic Trouble
Code (DTC)”.
69, List of Diag-
nostic Trouble
Code (DTC).>
Go to step 2.
2CHECK POWER SUPPLY OF CAMSHAFT
POSITION SENSOR.
1) Turn the ignition switch to OFF.
2) Disconnect the connector from camshaft
position sensor.
3) Measure the voltage between camshaft
position sensor connector and engine ground.
Connector & terminal
(E73) No. 1 (+) — Engine ground (–):
Is the voltage more than 10 V? Repair the battery
short circuit
between main
relay connector
and camshaft
position sensor
connector.
Go to step 3.
3CHECK POWER SUPPLY OF CAMSHAFT
POSITION SENSOR.
1) Turn the ignition switch to ON.
2) Measure the voltage between camshaft
position sensor connector and engine ground.
Connector & terminal
(E73) No. 1 (+) — Engine ground (–):
Is the voltage more than 10 V? Go to step 4.Repair the open or
ground short cir-
cuit between main
relay connector
and camshaft
position sensor
connector.
4CHECK HARNESS BETWEEN CAMSHAFT
POSITION SENSOR CONNECTOR AND
ECM.
1) Turn the ignition switch to OFF.
2) Disconnect the connector from ECM.
3) Measure the resistance between camshaft
position sensor connector and ECM.
Connector & terminal
(E73) No. 2 — (B134) No. 11:
(E73) No. 3 — (B134) No. 22:
Is the resistance less than 1
Ω?
Go to step 5.Repair the open
circuit between
camshaft position
sensor and ECM.
5CHECK HARNESS BETWEEN CAMSHAFT
POSITION SENSOR CONNECTOR AND
ECM.
Measure the resistance between camshaft
position sensor connector and engine ground.
Connector & terminal
(E73) No. 2 — Engine ground:
Is the resistance more than 1
MΩ?
Go to step 6.Repair the ground
short circuit
between camshaft
position sensor
and ECM.
6CHECK CONDITION OF CAMSHAFT POSI-
TION SENSOR.
Is the camshaft position sensor
installation bolt tightened
securely?
Go to step 7.Tighten the cam-
shaft position sen-
sor installation bolt
securely.
7CHECK CAMSHAFT POSITION SENSOR.
Check waveform of camshaft position sensor.
Is there any abnormality in
waveform?
Replace the cam-
shaft position sen-
sor.
Crankshaft Posi-
tion Sensor.>
Go to step 8.
8CHECK POOR CONTACT.
Check poor contact of ECM connector.
Is there poor contact in ECM
connector?
Repair poor con-
tact in ECM con-
nector.
Replace the ECM.
Engine Control
Module (ECM).>
Page 1427 of 2453
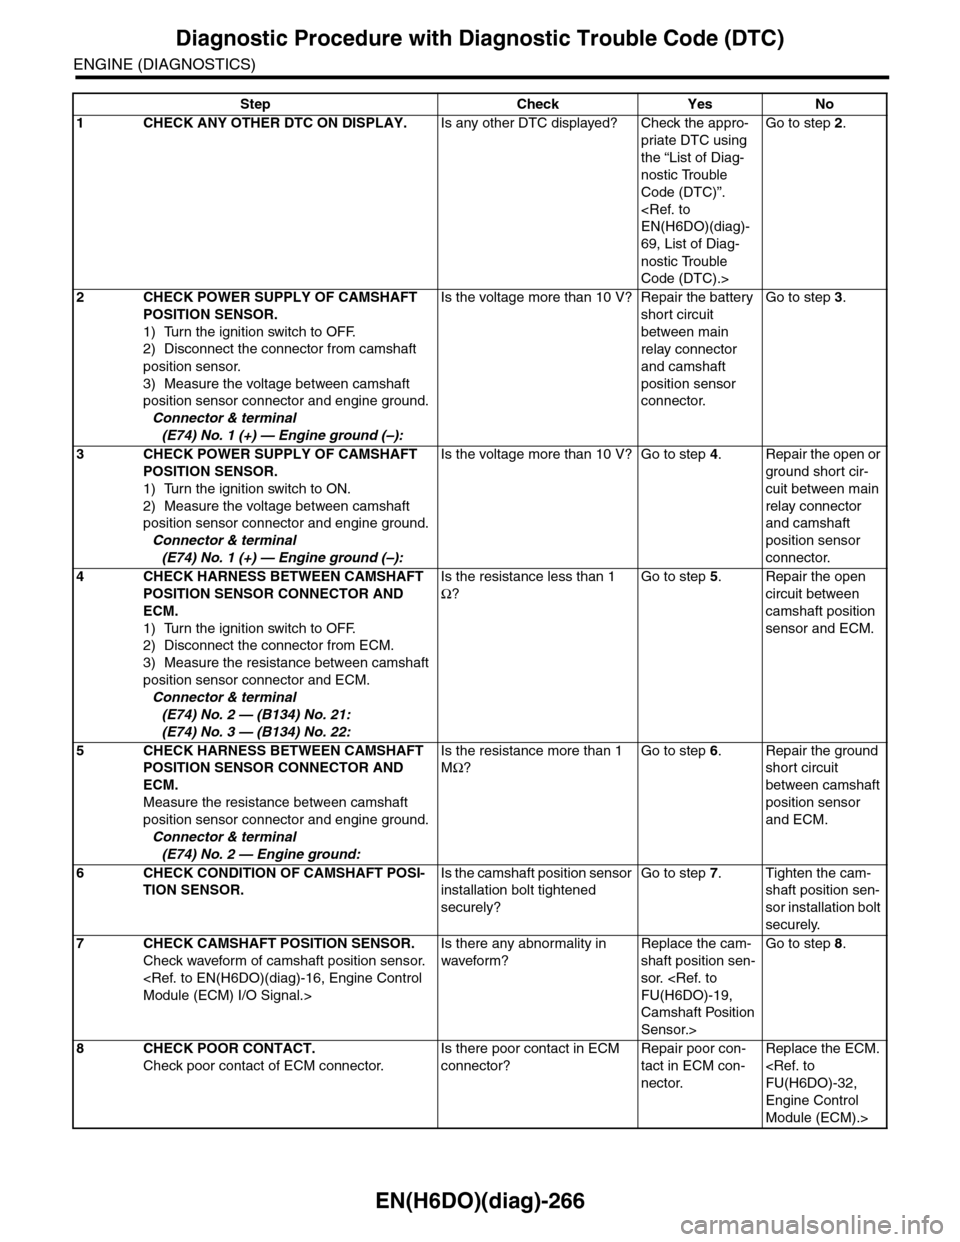
EN(H6DO)(diag)-266
Diagnostic Procedure with Diagnostic Trouble Code (DTC)
ENGINE (DIAGNOSTICS)
Step Check Yes No
1CHECK ANY OTHER DTC ON DISPLAY.Is any other DTC displayed? Check the appro-
priate DTC using
the “List of Diag-
nostic Trouble
Code (DTC)”.
69, List of Diag-
nostic Trouble
Code (DTC).>
Go to step 2.
2CHECK POWER SUPPLY OF CAMSHAFT
POSITION SENSOR.
1) Turn the ignition switch to OFF.
2) Disconnect the connector from camshaft
position sensor.
3) Measure the voltage between camshaft
position sensor connector and engine ground.
Connector & terminal
(E74) No. 1 (+) — Engine ground (–):
Is the voltage more than 10 V? Repair the battery
short circuit
between main
relay connector
and camshaft
position sensor
connector.
Go to step 3.
3CHECK POWER SUPPLY OF CAMSHAFT
POSITION SENSOR.
1) Turn the ignition switch to ON.
2) Measure the voltage between camshaft
position sensor connector and engine ground.
Connector & terminal
(E74) No. 1 (+) — Engine ground (–):
Is the voltage more than 10 V? Go to step 4.Repair the open or
ground short cir-
cuit between main
relay connector
and camshaft
position sensor
connector.
4CHECK HARNESS BETWEEN CAMSHAFT
POSITION SENSOR CONNECTOR AND
ECM.
1) Turn the ignition switch to OFF.
2) Disconnect the connector from ECM.
3) Measure the resistance between camshaft
position sensor connector and ECM.
Connector & terminal
(E74) No. 2 — (B134) No. 21:
(E74) No. 3 — (B134) No. 22:
Is the resistance less than 1
Ω?
Go to step 5.Repair the open
circuit between
camshaft position
sensor and ECM.
5CHECK HARNESS BETWEEN CAMSHAFT
POSITION SENSOR CONNECTOR AND
ECM.
Measure the resistance between camshaft
position sensor connector and engine ground.
Connector & terminal
(E74) No. 2 — Engine ground:
Is the resistance more than 1
MΩ?
Go to step 6.Repair the ground
short circuit
between camshaft
position sensor
and ECM.
6CHECK CONDITION OF CAMSHAFT POSI-
TION SENSOR.
Is the camshaft position sensor
installation bolt tightened
securely?
Go to step 7.Tighten the cam-
shaft position sen-
sor installation bolt
securely.
7CHECK CAMSHAFT POSITION SENSOR.
Check waveform of camshaft position sensor.
Is there any abnormality in
waveform?
Replace the cam-
shaft position sen-
sor.
Camshaft Position
Sensor.>
Go to step 8.
8CHECK POOR CONTACT.
Check poor contact of ECM connector.
Is there poor contact in ECM
connector?
Repair poor con-
tact in ECM con-
nector.
Replace the ECM.
Engine Control
Module (ECM).>
Page 1430 of 2453
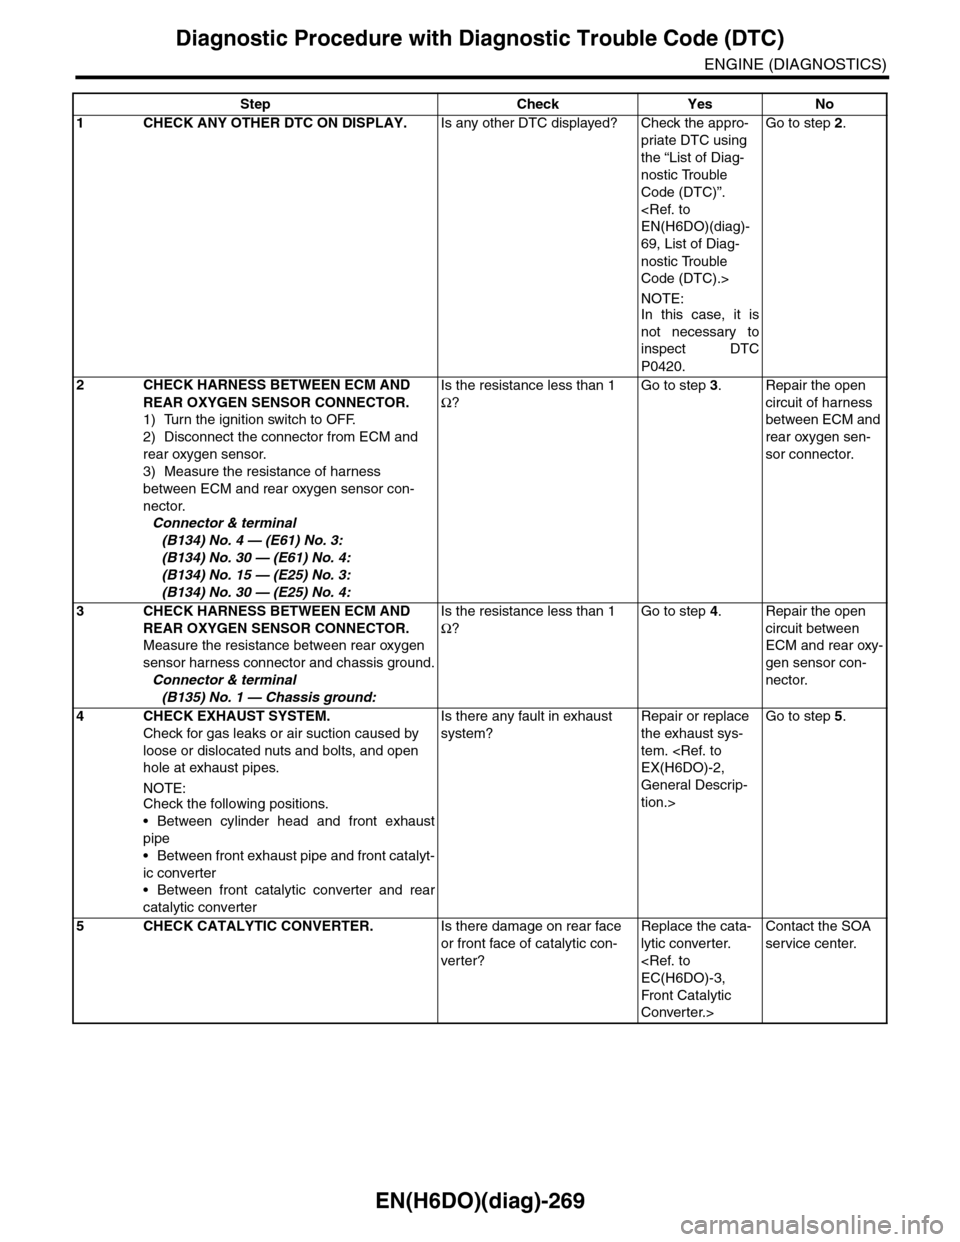
EN(H6DO)(diag)-269
Diagnostic Procedure with Diagnostic Trouble Code (DTC)
ENGINE (DIAGNOSTICS)
Step Check Yes No
1CHECK ANY OTHER DTC ON DISPLAY.Is any other DTC displayed? Check the appro-
priate DTC using
the “List of Diag-
nostic Trouble
Code (DTC)”.
69, List of Diag-
nostic Trouble
Code (DTC).>
NOTE:In this case, it is
not necessary to
inspect DTC
P0420.
Go to step 2.
2CHECK HARNESS BETWEEN ECM AND
REAR OXYGEN SENSOR CONNECTOR.
1) Turn the ignition switch to OFF.
2) Disconnect the connector from ECM and
rear oxygen sensor.
3) Measure the resistance of harness
between ECM and rear oxygen sensor con-
nector.
Connector & terminal
(B134) No. 4 — (E61) No. 3:
(B134) No. 30 — (E61) No. 4:
(B134) No. 15 — (E25) No. 3:
(B134) No. 30 — (E25) No. 4:
Is the resistance less than 1
Ω?
Go to step 3.Repair the open
circuit of harness
between ECM and
rear oxygen sen-
sor connector.
3CHECK HARNESS BETWEEN ECM AND
REAR OXYGEN SENSOR CONNECTOR.
Measure the resistance between rear oxygen
sensor harness connector and chassis ground.
Connector & terminal
(B135) No. 1 — Chassis ground:
Is the resistance less than 1
Ω?
Go to step 4.Repair the open
circuit between
ECM and rear oxy-
gen sensor con-
nector.
4 CHECK EXHAUST SYSTEM.
Check for gas leaks or air suction caused by
loose or dislocated nuts and bolts, and open
hole at exhaust pipes.
NOTE:Check the following positions.
•Between cylinder head and front exhaust
pipe
•Between front exhaust pipe and front catalyt-
ic converter
•Between front catalytic converter and rear
catalytic converter
Is there any fault in exhaust
system?
Repair or replace
the exhaust sys-
tem.
General Descrip-
tion.>
Go to step 5.
5CHECK CATALYTIC CONVERTER.Is there damage on rear face
or front face of catalytic con-
ver ter?
Replace the cata-
lytic converter.
Front Catalytic
Converter.>
Contact the SOA
service center.
Page 1431 of 2453

EN(H6DO)(diag)-270
Diagnostic Procedure with Diagnostic Trouble Code (DTC)
ENGINE (DIAGNOSTICS)
CC:DTC P0442 EVAPORATIVE EMISSION CONTROL SYSTEM LEAK DETECT-
ED (SMALL LEAK)
DTC DETECTING CONDITION:
•Detected when two consecutive driving cycles with fault occur.
•GENERAL DESCRIPTION
TROUBLE SYMPTOM:
•Fuel odor
•There is a hole of more than 1.0 mm (0.04 in) dia. in evaporation system or fuel tank.
CAUTION:
After repair or replacement of faulty parts, perform Clear Memory Mode
Step Check Yes No
1CHECK ANY OTHER DTC ON DISPLAY.Is any other DTC displayed? Check the appro-
priate DTC using
the “List of Diag-
nostic Trouble
Code (DTC)”.
69, List of Diag-
nostic Trouble
Code (DTC).>
Go to step 2.
2CHECK FUEL FILLER CAP.
1) Turn the ignition switch to OFF.
2) Check the fuel filler cap.
NOTE:
The DTC is stored in memory if fuel filler cap is
or was loose or if the cap chain has caught
while tightening.
Is the fuel filler cap tightened
securely?
Go to step 3.Tighten fuel filler
cap securely.
3CHECK FUEL FILLER CAP.Is the fuel filler cap SUBARU
genuine?
Go to step 4.Replace with a
SUBARU genuine
fuel filler cap.
4CHECK FUEL FILLER PIPE PACKING.Is there any damage to the
seal between fuel filler cap and
fuel filler pipe?
Repair or replace
the fuel filler cap
and fuel filler pipe.
Fuel Filler Pipe.>
Go to step 5.
5CHECK DRAIN VALVE.
1) Connect the test mode connector.
2) Turn the ignition switch to ON.
3) Operate the drain valve.
NOTE:
Drain valve operation can also be executed us-
ing Subaru Select Monitor. Refer to “Compulso-
ry Valve Operation Check Mode” for
procedures.
Does the drain valve operate? Go to step 6.Replace the drain
valve.
Drain Valve.>
Page 1439 of 2453

EN(H6DO)(diag)-278
Diagnostic Procedure with Diagnostic Trouble Code (DTC)
ENGINE (DIAGNOSTICS)
Step Check Yes No
1CHECK ANY OTHER DTC ON DISPLAY.Is any other DTC displayed? Check the appro-
priate DTC using
the “List of Diag-
nostic Trouble
Code (DTC)”.
69, List of Diag-
nostic Trouble
Code (DTC).>
Go to step 2.
2CHECK FUEL FILLER CAP.
1) Turn the ignition switch to OFF.
2) Open the fuel flap.
Is the fuel filler cap tightened
securely?
Go to step 3.Tighten fuel filler
cap securely.
3CHECK PRESSURE VACUUM LINE.
NOTE:Check the following item.
•Disconnection, leakage and clogging of the
vacuum hoses and pipes between fuel tank
pressure sensor and fuel tank
•Disconnection, leakage and clogging of the
air ventilation hoses and pipes between fuel fill-
er pipe and fuel tank
Is there a fault in pressure/vac-
uum line?
Repair or replace
the hoses and
pipes.
Replace the fuel
tank pressure sen-
sor.
Fuel Tank Pres-
sure Sensor.>
Page 1446 of 2453
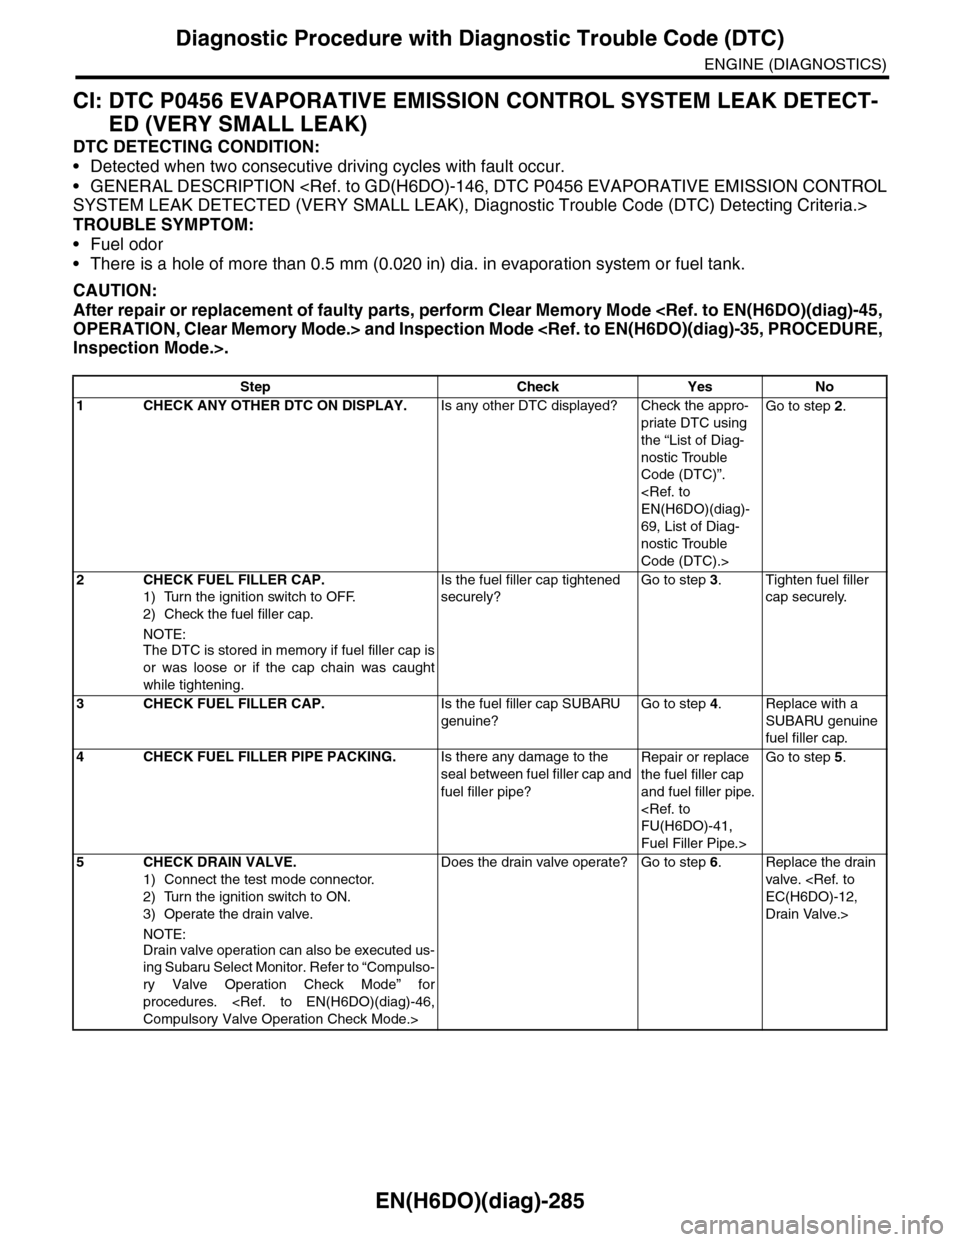
EN(H6DO)(diag)-285
Diagnostic Procedure with Diagnostic Trouble Code (DTC)
ENGINE (DIAGNOSTICS)
CI: DTC P0456 EVAPORATIVE EMISSION CONTROL SYSTEM LEAK DETECT-
ED (VERY SMALL LEAK)
DTC DETECTING CONDITION:
•Detected when two consecutive driving cycles with fault occur.
•GENERAL DESCRIPTION
TROUBLE SYMPTOM:
•Fuel odor
•There is a hole of more than 0.5 mm (0.020 in) dia. in evaporation system or fuel tank.
CAUTION:
After repair or replacement of faulty parts, perform Clear Memory Mode
Step Check Yes No
1CHECK ANY OTHER DTC ON DISPLAY.Is any other DTC displayed? Check the appro-
priate DTC using
the “List of Diag-
nostic Trouble
Code (DTC)”.
69, List of Diag-
nostic Trouble
Code (DTC).>
Go to step 2.
2CHECK FUEL FILLER CAP.
1) Turn the ignition switch to OFF.
2) Check the fuel filler cap.
NOTE:
The DTC is stored in memory if fuel filler cap is
or was loose or if the cap chain was caught
while tightening.
Is the fuel filler cap tightened
securely?
Go to step 3.Tighten fuel filler
cap securely.
3CHECK FUEL FILLER CAP.Is the fuel filler cap SUBARU
genuine?
Go to step 4.Replace with a
SUBARU genuine
fuel filler cap.
4CHECK FUEL FILLER PIPE PACKING.Is there any damage to the
seal between fuel filler cap and
fuel filler pipe?
Repair or replace
the fuel filler cap
and fuel filler pipe.
Fuel Filler Pipe.>
Go to step 5.
5CHECK DRAIN VALVE.
1) Connect the test mode connector.
2) Turn the ignition switch to ON.
3) Operate the drain valve.
NOTE:
Drain valve operation can also be executed us-
ing Subaru Select Monitor. Refer to “Compulso-
ry Valve Operation Check Mode” for
procedures.
Does the drain valve operate? Go to step 6.Replace the drain
valve.
Drain Valve.>
Page 1448 of 2453
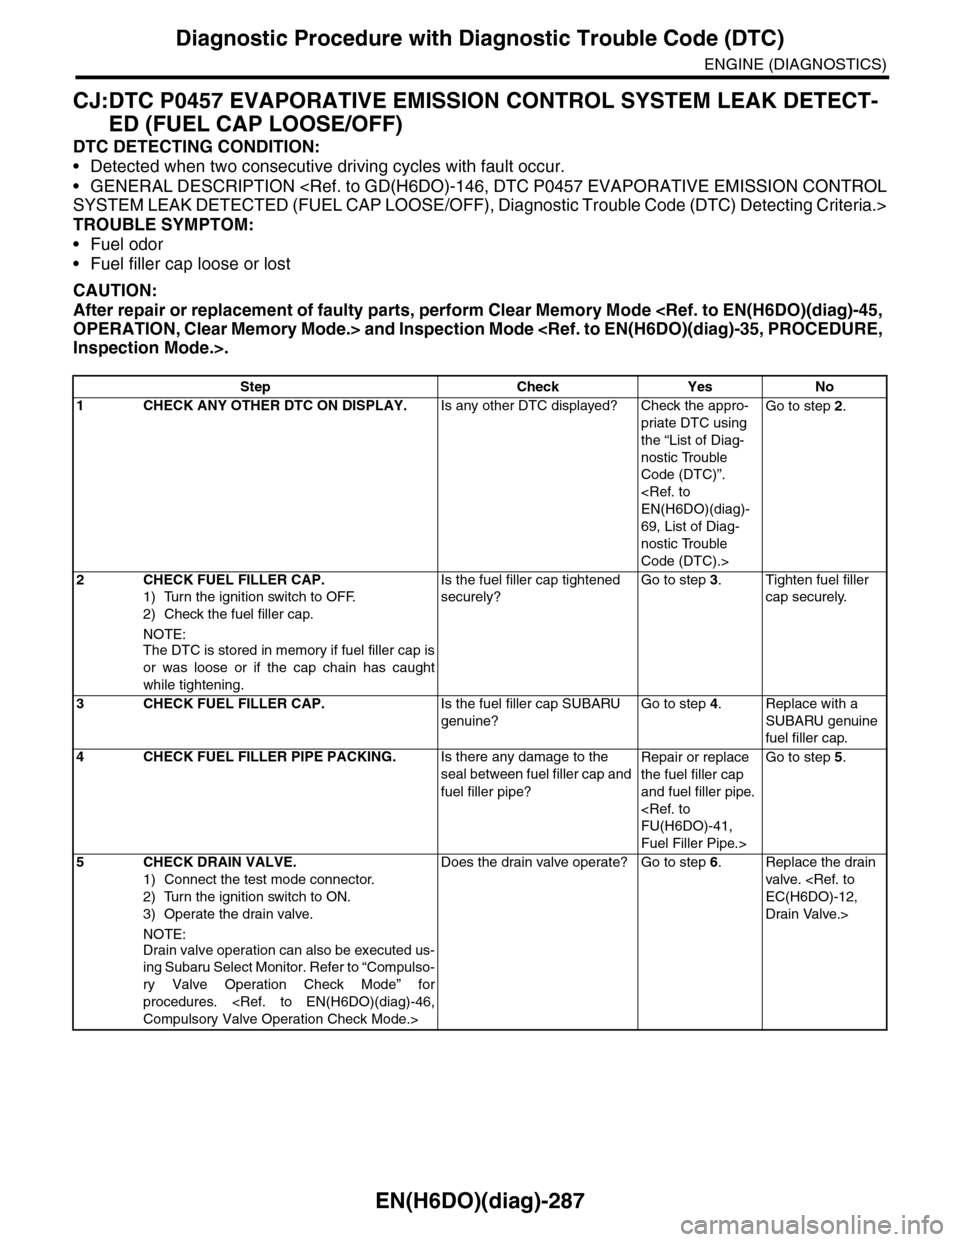
EN(H6DO)(diag)-287
Diagnostic Procedure with Diagnostic Trouble Code (DTC)
ENGINE (DIAGNOSTICS)
CJ:DTC P0457 EVAPORATIVE EMISSION CONTROL SYSTEM LEAK DETECT-
ED (FUEL CAP LOOSE/OFF)
DTC DETECTING CONDITION:
•Detected when two consecutive driving cycles with fault occur.
•GENERAL DESCRIPTION
TROUBLE SYMPTOM:
•Fuel odor
•Fuel filler cap loose or lost
CAUTION:
After repair or replacement of faulty parts, perform Clear Memory Mode
Step Check Yes No
1CHECK ANY OTHER DTC ON DISPLAY.Is any other DTC displayed? Check the appro-
priate DTC using
the “List of Diag-
nostic Trouble
Code (DTC)”.
69, List of Diag-
nostic Trouble
Code (DTC).>
Go to step 2.
2CHECK FUEL FILLER CAP.
1) Turn the ignition switch to OFF.
2) Check the fuel filler cap.
NOTE:
The DTC is stored in memory if fuel filler cap is
or was loose or if the cap chain has caught
while tightening.
Is the fuel filler cap tightened
securely?
Go to step 3.Tighten fuel filler
cap securely.
3CHECK FUEL FILLER CAP.Is the fuel filler cap SUBARU
genuine?
Go to step 4.Replace with a
SUBARU genuine
fuel filler cap.
4CHECK FUEL FILLER PIPE PACKING.Is there any damage to the
seal between fuel filler cap and
fuel filler pipe?
Repair or replace
the fuel filler cap
and fuel filler pipe.
Fuel Filler Pipe.>
Go to step 5.
5CHECK DRAIN VALVE.
1) Connect the test mode connector.
2) Turn the ignition switch to ON.
3) Operate the drain valve.
NOTE:
Drain valve operation can also be executed us-
ing Subaru Select Monitor. Refer to “Compulso-
ry Valve Operation Check Mode” for
procedures.
Does the drain valve operate? Go to step 6.Replace the drain
valve.
Drain Valve.>
Page 1454 of 2453
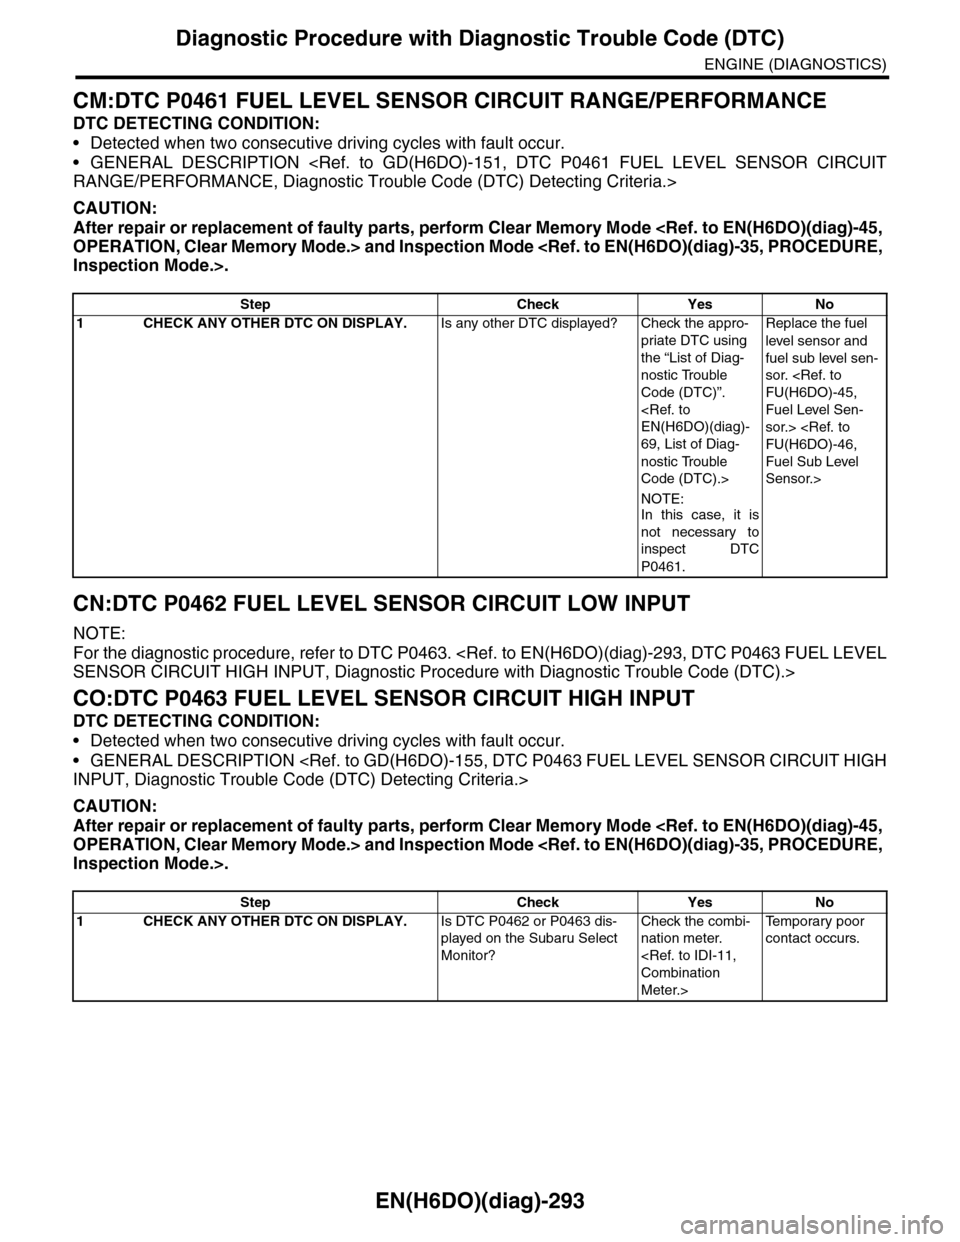
EN(H6DO)(diag)-293
Diagnostic Procedure with Diagnostic Trouble Code (DTC)
ENGINE (DIAGNOSTICS)
CM:DTC P0461 FUEL LEVEL SENSOR CIRCUIT RANGE/PERFORMANCE
DTC DETECTING CONDITION:
•Detected when two consecutive driving cycles with fault occur.
•GENERAL DESCRIPTION
CAUTION:
After repair or replacement of faulty parts, perform Clear Memory Mode
CN:DTC P0462 FUEL LEVEL SENSOR CIRCUIT LOW INPUT
NOTE:
For the diagnostic procedure, refer to DTC P0463.
CO:DTC P0463 FUEL LEVEL SENSOR CIRCUIT HIGH INPUT
DTC DETECTING CONDITION:
•Detected when two consecutive driving cycles with fault occur.
•GENERAL DESCRIPTION
CAUTION:
After repair or replacement of faulty parts, perform Clear Memory Mode
Step Check Yes No
1CHECK ANY OTHER DTC ON DISPLAY.Is any other DTC displayed? Check the appro-
priate DTC using
the “List of Diag-
nostic Trouble
Code (DTC)”.
69, List of Diag-
nostic Trouble
Code (DTC).>
NOTE:In this case, it is
not necessary to
inspect DTC
P0461.
Replace the fuel
level sensor and
fuel sub level sen-
sor.
Fuel Level Sen-
sor.>
Fuel Sub Level
Sensor.>
Step Check Yes No
1CHECK ANY OTHER DTC ON DISPLAY.Is DTC P0462 or P0463 dis-
played on the Subaru Select
Monitor?
Check the combi-
nation meter.
Meter.>
Te m p o r a r y p o o r
contact occurs.
Page 1455 of 2453
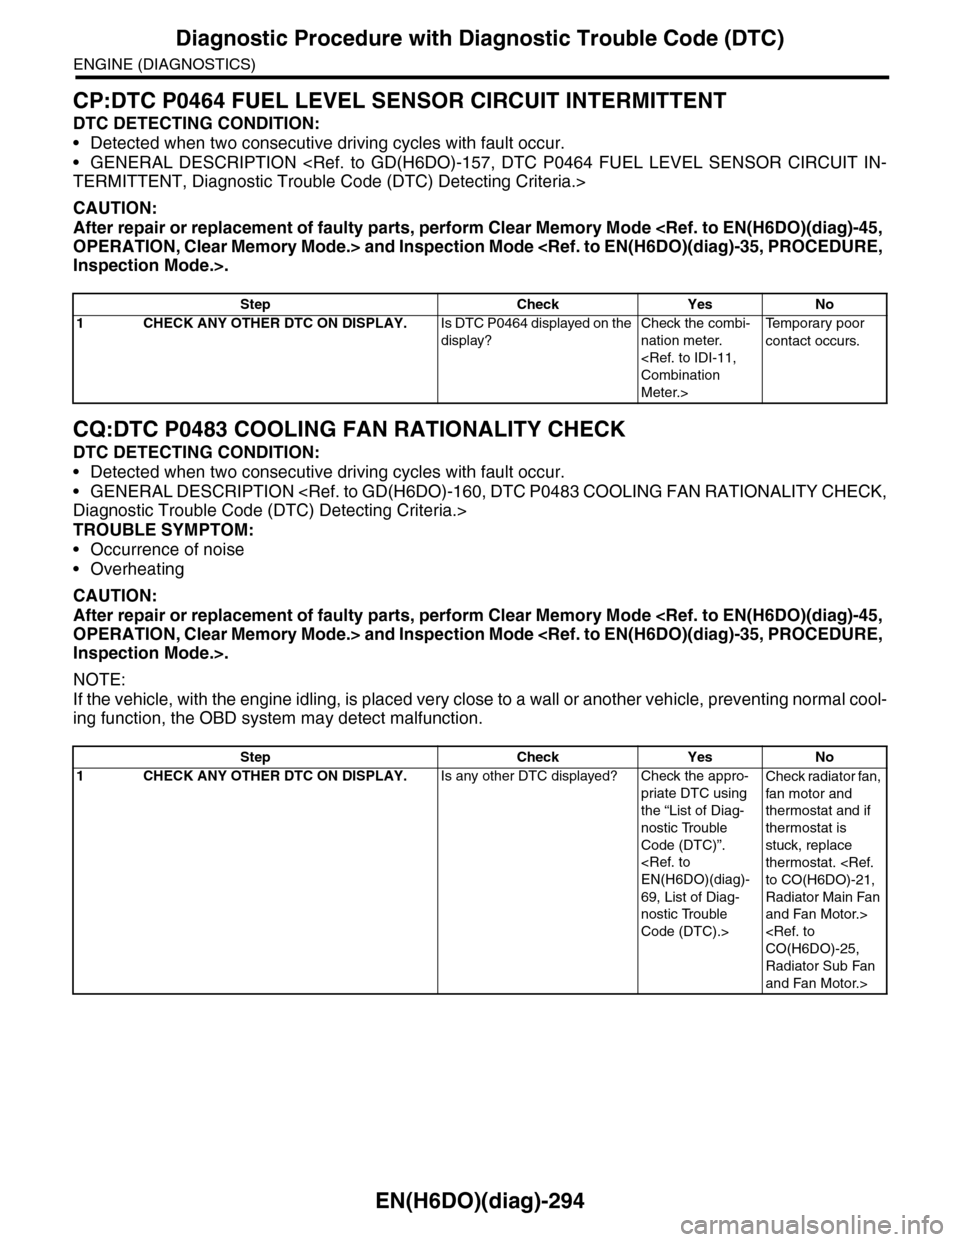
EN(H6DO)(diag)-294
Diagnostic Procedure with Diagnostic Trouble Code (DTC)
ENGINE (DIAGNOSTICS)
CP:DTC P0464 FUEL LEVEL SENSOR CIRCUIT INTERMITTENT
DTC DETECTING CONDITION:
•Detected when two consecutive driving cycles with fault occur.
•GENERAL DESCRIPTION
CAUTION:
After repair or replacement of faulty parts, perform Clear Memory Mode
CQ:DTC P0483 COOLING FAN RATIONALITY CHECK
DTC DETECTING CONDITION:
•Detected when two consecutive driving cycles with fault occur.
•GENERAL DESCRIPTION
TROUBLE SYMPTOM:
•Occurrence of noise
•Overheating
CAUTION:
After repair or replacement of faulty parts, perform Clear Memory Mode
NOTE:
If the vehicle, with the engine idling, is placed very close to a wall or another vehicle, preventing normal cool-
ing function, the OBD system may detect malfunction.
Step Check Yes No
1CHECK ANY OTHER DTC ON DISPLAY.Is DTC P0464 displayed on the
display?
Check the combi-
nation meter.
Meter.>
Te m p o r a r y p o o r
contact occurs.
Step Check Yes No
1CHECK ANY OTHER DTC ON DISPLAY.Is any other DTC displayed? Check the appro-
priate DTC using
the “List of Diag-
nostic Trouble
Code (DTC)”.
69, List of Diag-
nostic Trouble
Code (DTC).>
Check radiator fan,
fan motor and
thermostat and if
thermostat is
stuck, replace
thermostat.
Radiator Main Fan
and Fan Motor.>
Radiator Sub Fan
and Fan Motor.>
Page 1456 of 2453
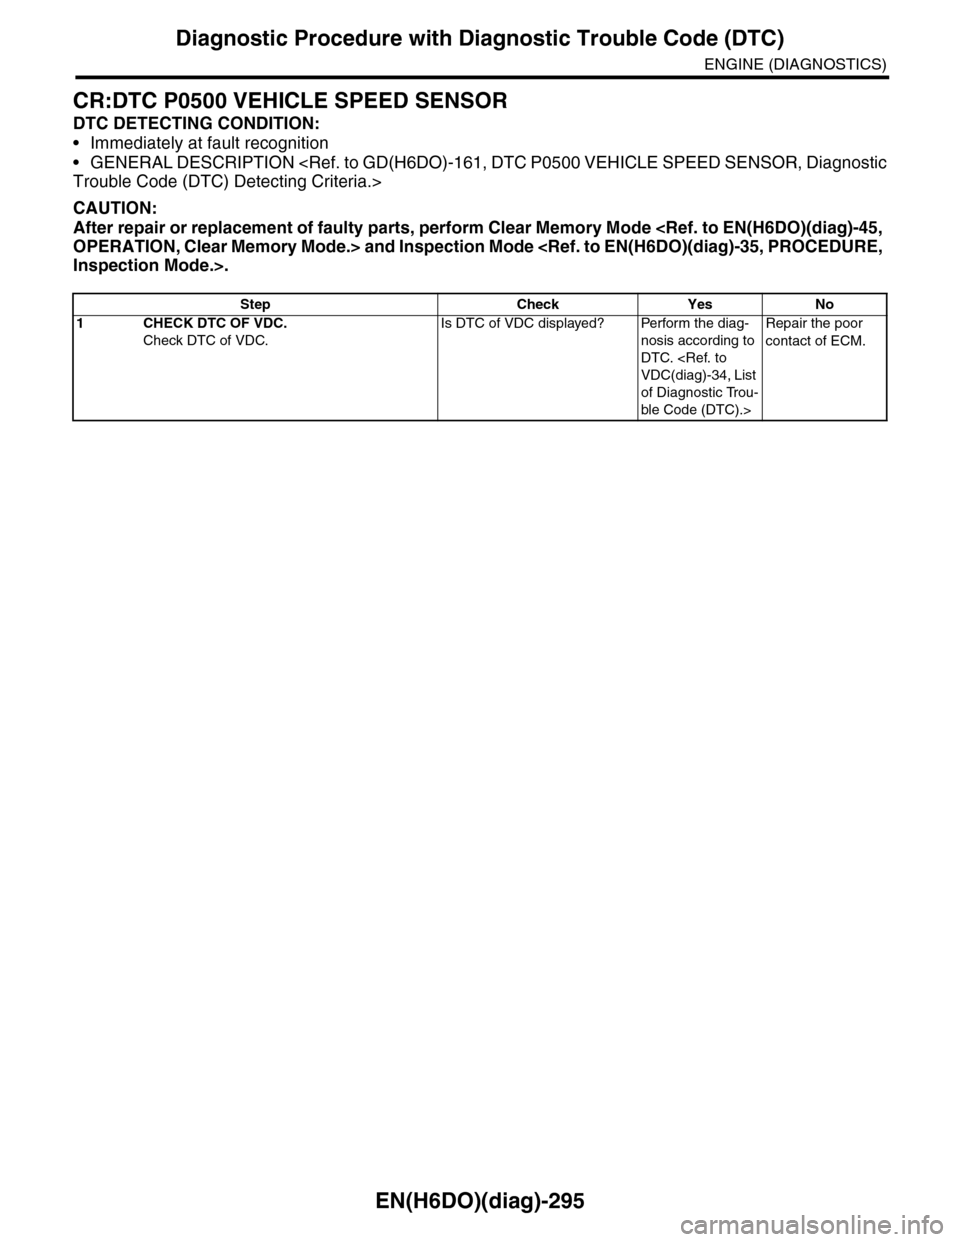
EN(H6DO)(diag)-295
Diagnostic Procedure with Diagnostic Trouble Code (DTC)
ENGINE (DIAGNOSTICS)
CR:DTC P0500 VEHICLE SPEED SENSOR
DTC DETECTING CONDITION:
•Immediately at fault recognition
•GENERAL DESCRIPTION
CAUTION:
After repair or replacement of faulty parts, perform Clear Memory Mode
Step Check Yes No
1CHECK DTC OF VDC.
Check DTC of VDC.
Is DTC of VDC displayed? Perform the diag-
nosis according to
DTC.
of Diagnostic Trou-
ble Code (DTC).>
Repair the poor
contact of ECM.