diff SUBARU TRIBECA 2009 1.G Service Repair Manual
[x] Cancel search | Manufacturer: SUBARU, Model Year: 2009, Model line: TRIBECA, Model: SUBARU TRIBECA 2009 1.GPages: 2453, PDF Size: 46.32 MB
Page 830 of 2453
DS-13
Front Axle
DRIVE SHAFT SYSTEM
3. Front Axle
A: REMOVAL
1) Disconnect the ground cable from the battery.
2) Lift-up the vehicle, and remove the front wheels.
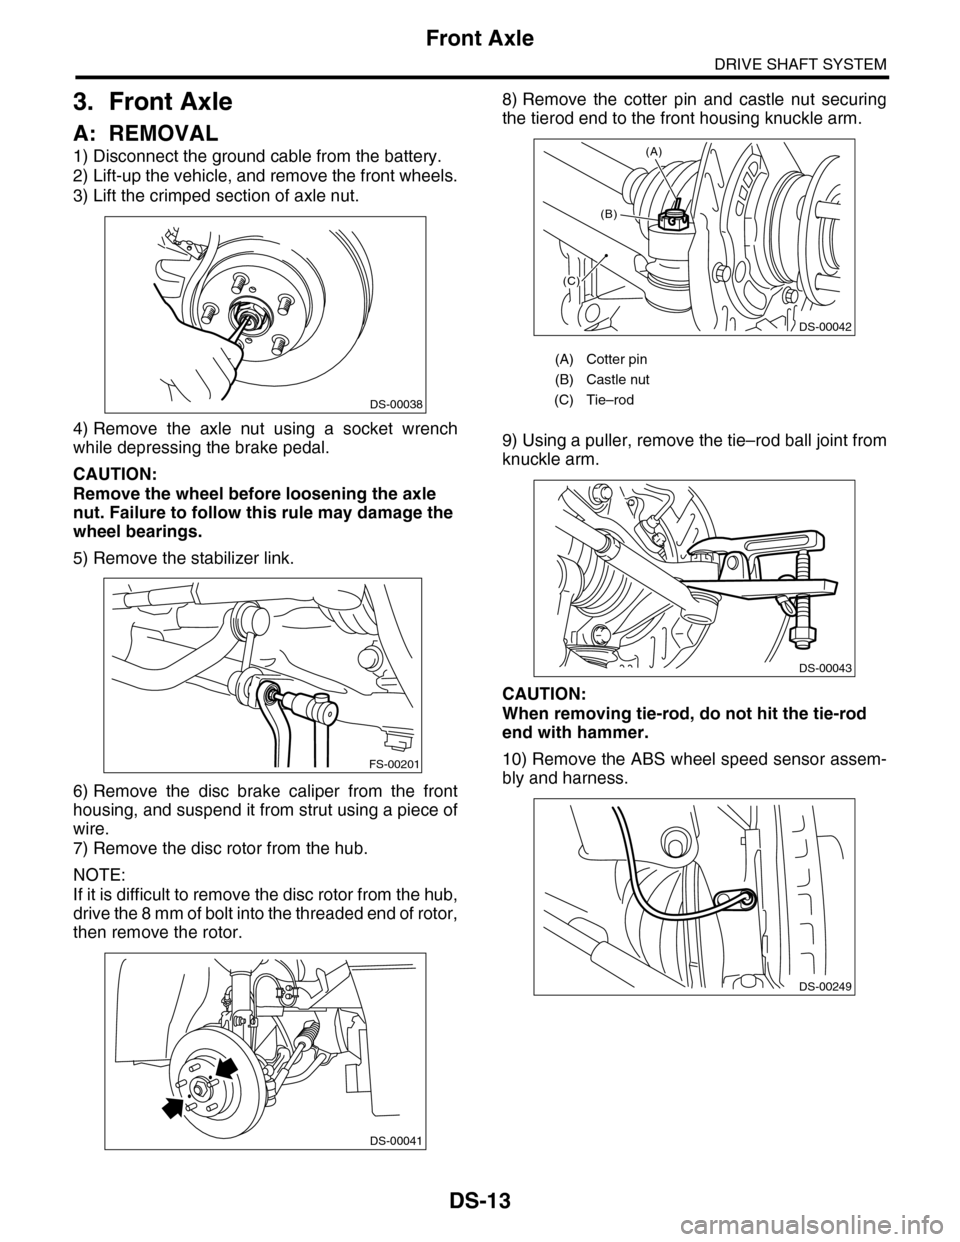
3) Lift the crimped section of axle nut.
4) Remove the axle nut using a socket wrench
while depressing the brake pedal.
CAUTION:
Remove the wheel before loosening the axle
nut. Failure to follow this rule may damage the
wheel bearings.
5) Remove the stabilizer link.
6) Remove the disc brake caliper from the front
housing, and suspend it from strut using a piece of
wire.
7) Remove the disc rotor from the hub.
NOTE:
If it is difficult to remove the disc rotor from the hub,
drive the 8 mm of bolt into the threaded end of rotor,
then remove the rotor.
8) Remove the cotter pin and castle nut securing
the tierod end to the front housing knuckle arm.
9) Using a puller, remove the tie–rod ball joint from
knuckle arm.
CAUTION:
When removing tie-rod, do not hit the tie-rod
end with hammer.
10) Remove the ABS wheel speed sensor assem-
bly and harness.
DS-00038
FS-00201
DS-00041
(A) Cotter pin
(B) Castle nut
(C) Tie–rod
DS-00042
(C)
(B)
(A)
DS-00043
DS-00249
Page 836 of 2453
DS-19
Front Hub Unit Bearing
DRIVE SHAFT SYSTEM
5. Front Hub Unit Bearing
A: REMOVAL
1) Disconnect the ground cable from the battery.
2) Lift-up the vehicle, and remove the front wheels.
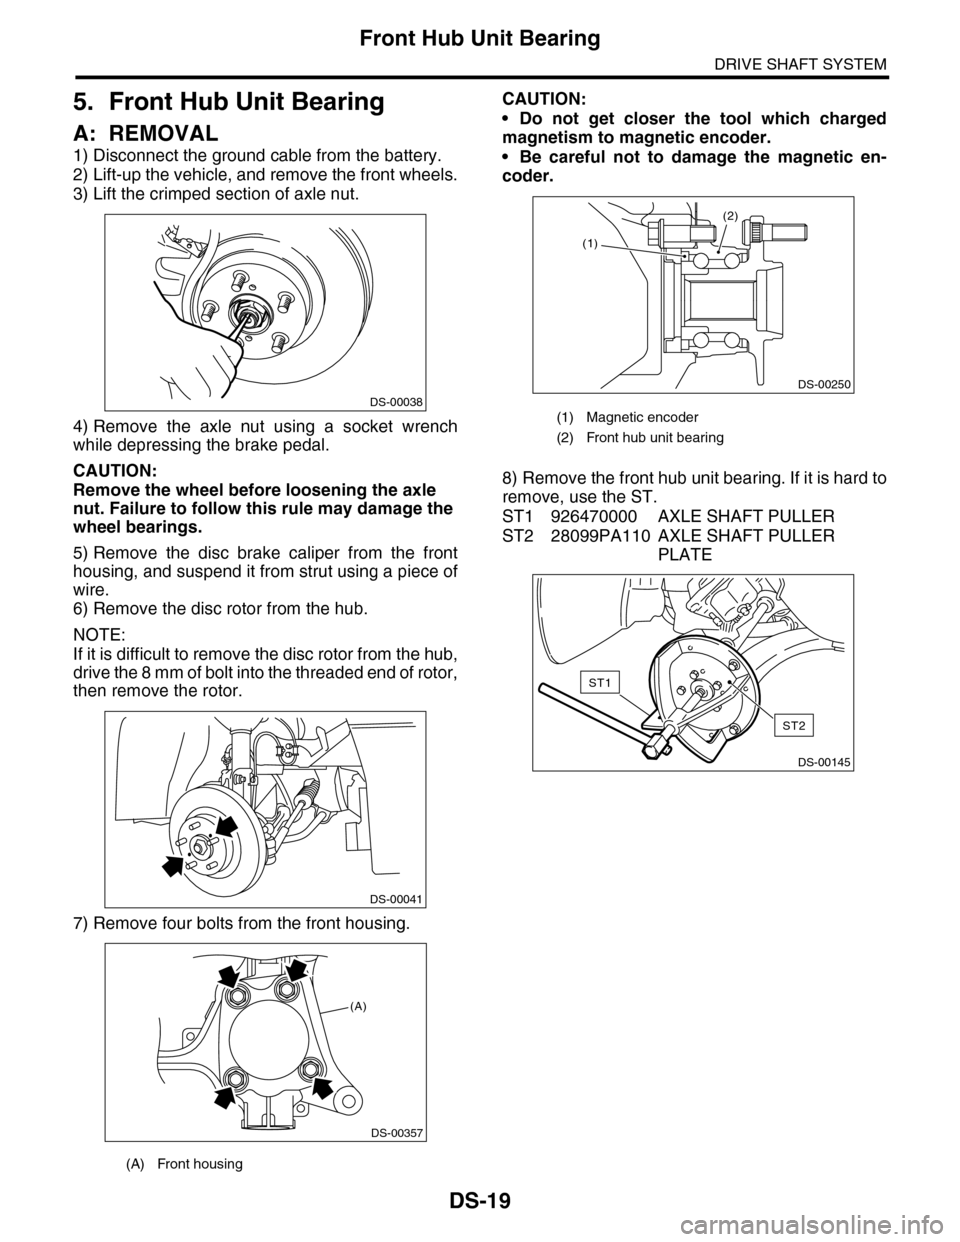
3) Lift the crimped section of axle nut.
4) Remove the axle nut using a socket wrench
while depressing the brake pedal.
CAUTION:
Remove the wheel before loosening the axle
nut. Failure to follow this rule may damage the
wheel bearings.
5) Remove the disc brake caliper from the front
housing, and suspend it from strut using a piece of
wire.
6) Remove the disc rotor from the hub.
NOTE:
If it is difficult to remove the disc rotor from the hub,
drive the 8 mm of bolt into the threaded end of rotor,
then remove the rotor.
7) Remove four bolts from the front housing.
CAUTION:
•Do not get closer the tool which charged
magnetism to magnetic encoder.
•Be careful not to damage the magnetic en-
coder.
8) Remove the front hub unit bearing. If it is hard to
remove, use the ST.
ST1 926470000 AXLE SHAFT PULLER
ST2 28099PA110 AXLE SHAFT PULLER
PLATE
(A) Front housing
DS-00038
DS-00041
(A)
DS-00357
(1) Magnetic encoder
(2) Front hub unit bearing
(2)
DS-00250
(1)
DS-00145
ST2
ST1
Page 838 of 2453
DS-21
Rear Hub Unit Bearing
DRIVE SHAFT SYSTEM
6. Rear Hub Unit Bearing
A: REMOVAL
1) Disconnect the ground cable from the battery.
2) Lift-up the vehicle, and then remove the rear
wheels.
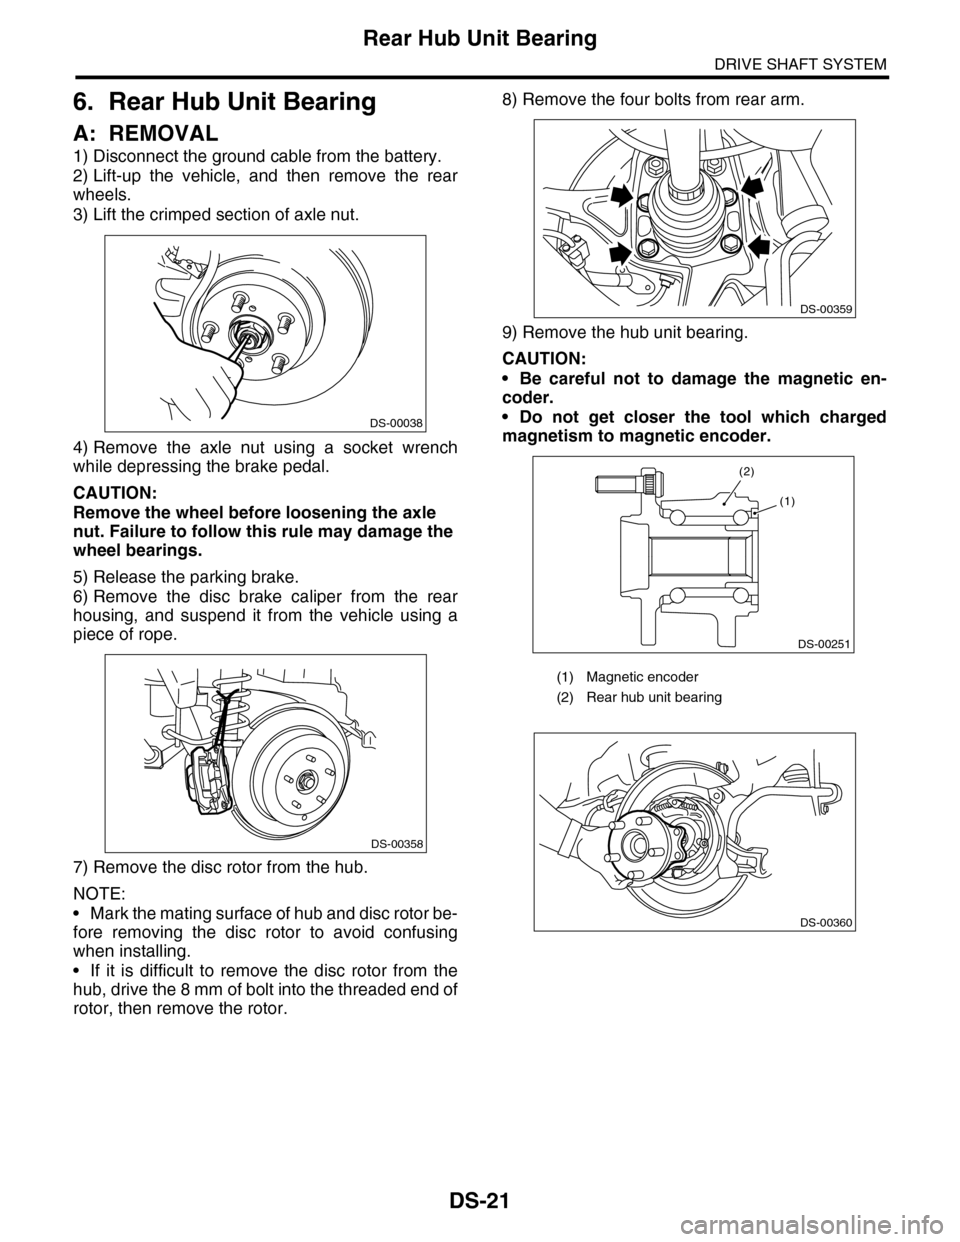
3) Lift the crimped section of axle nut.
4) Remove the axle nut using a socket wrench
while depressing the brake pedal.
CAUTION:
Remove the wheel before loosening the axle
nut. Failure to follow this rule may damage the
wheel bearings.
5) Release the parking brake.
6) Remove the disc brake caliper from the rear
housing, and suspend it from the vehicle using a
piece of rope.
7) Remove the disc rotor from the hub.
NOTE:
•Mark the mating surface of hub and disc rotor be-
fore removing the disc rotor to avoid confusing
when installing.
•If it is difficult to remove the disc rotor from the
hub, drive the 8 mm of bolt into the threaded end of
rotor, then remove the rotor.
8) Remove the four bolts from rear arm.
9) Remove the hub unit bearing.
CAUTION:
•Be careful not to damage the magnetic en-
coder.
•Do not get closer the tool which charged
magnetism to magnetic encoder.DS-00038
DS-00358
(1) Magnetic encoder
(2) Rear hub unit bearing
DS-00359
DS-00251
(2)
(1)
DS-00360
Page 841 of 2453
DS-24
Front Drive Shaft
DRIVE SHAFT SYSTEM
7. Front Drive Shaft
A: REMOVAL
1) Disconnect the ground cable from the battery.
2) Lift-up the vehicle, and remove the front wheels.
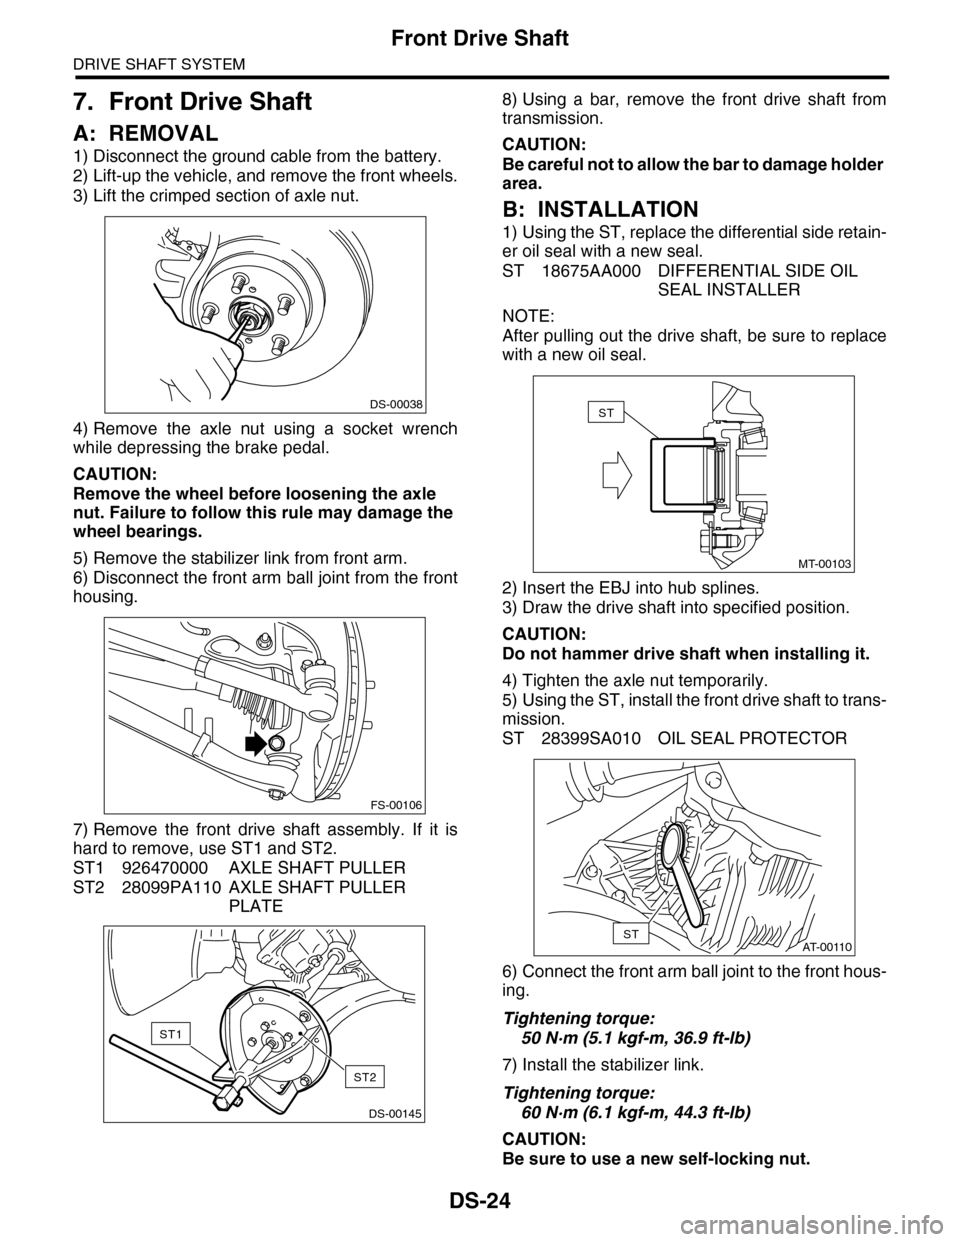
3) Lift the crimped section of axle nut.
4) Remove the axle nut using a socket wrench
while depressing the brake pedal.
CAUTION:
Remove the wheel before loosening the axle
nut. Failure to follow this rule may damage the
wheel bearings.
5) Remove the stabilizer link from front arm.
6) Disconnect the front arm ball joint from the front
housing.
7) Remove the front drive shaft assembly. If it is
hard to remove, use ST1 and ST2.
ST1 926470000 AXLE SHAFT PULLER
ST2 28099PA110 AXLE SHAFT PULLER
PLATE
8) Using a bar, remove the front drive shaft from
transmission.
CAUTION:
Be careful not to allow the bar to damage holder
area.
B: INSTALLATION
1) Using the ST, replace the differential side retain-
er oil seal with a new seal.
ST 18675AA000 DIFFERENTIAL SIDE OIL
SEAL INSTALLER
NOTE:
After pulling out the drive shaft, be sure to replace
with a new oil seal.
2) Insert the EBJ into hub splines.
3) Draw the drive shaft into specified position.
CAUTION:
Do not hammer drive shaft when installing it.
4) Tighten the axle nut temporarily.
5) Using the ST, install the front drive shaft to trans-
mission.
ST 28399SA010 OIL SEAL PROTECTOR
6) Connect the front arm ball joint to the front hous-
ing.
Tightening torque:
50 N·m (5.1 kgf-m, 36.9 ft-lb)
7) Install the stabilizer link.
Tightening torque:
60 N·m (6.1 kgf-m, 44.3 ft-lb)
CAUTION:
Be sure to use a new self-locking nut.
DS-00038
FS-00106
DS-00145
ST2
ST1
MT-00103
ST
AT-00110ST
Page 845 of 2453
DS-28
Rear Drive Shaft
DRIVE SHAFT SYSTEM
8. Rear Drive Shaft
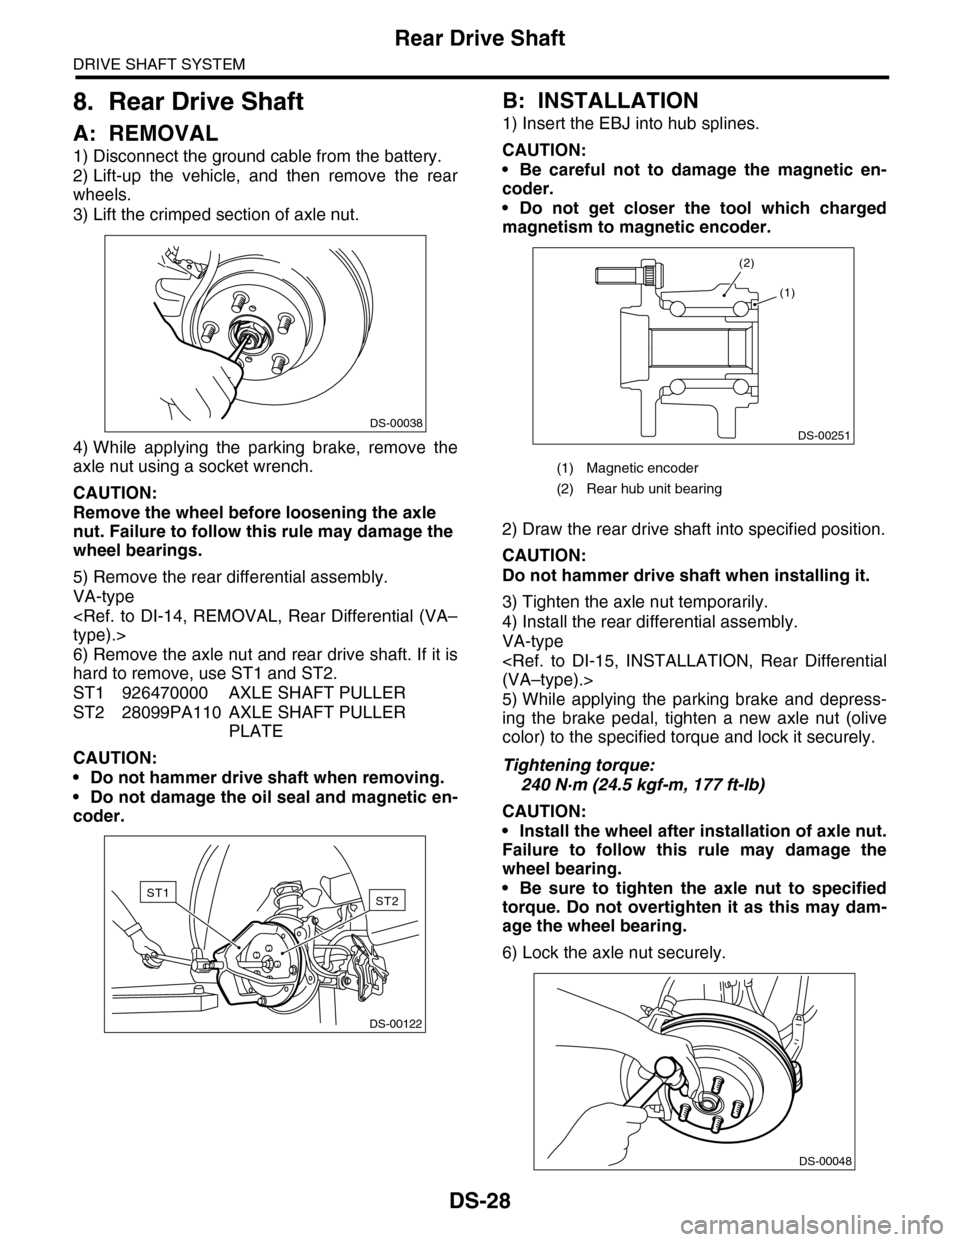
A: REMOVAL
1) Disconnect the ground cable from the battery.
2) Lift-up the vehicle, and then remove the rear
wheels.
3) Lift the crimped section of axle nut.
4) While applying the parking brake, remove the
axle nut using a socket wrench.
CAUTION:
Remove the wheel before loosening the axle
nut. Failure to follow this rule may damage the
wheel bearings.
5) Remove the rear differential assembly.
VA-type
6) Remove the axle nut and rear drive shaft. If it is
hard to remove, use ST1 and ST2.
ST1 926470000 AXLE SHAFT PULLER
ST2 28099PA110 AXLE SHAFT PULLER
PLATE
CAUTION:
•Do not hammer drive shaft when removing.
•Do not damage the oil seal and magnetic en-
coder.
B: INSTALLATION
1) Insert the EBJ into hub splines.
CAUTION:
•Be careful not to damage the magnetic en-
coder.
•Do not get closer the tool which charged
magnetism to magnetic encoder.
2) Draw the rear drive shaft into specified position.
CAUTION:
Do not hammer drive shaft when installing it.
3) Tighten the axle nut temporarily.
4) Install the rear differential assembly.
VA-type
5) While applying the parking brake and depress-
ing the brake pedal, tighten a new axle nut (olive
color) to the specified torque and lock it securely.
Tightening torque:
240 N·m (24.5 kgf-m, 177 ft-lb)
CAUTION:
•Install the wheel after installation of axle nut.
Failure to follow this rule may damage the
wheel bearing.
•Be sure to tighten the axle nut to specified
torque. Do not overtighten it as this may dam-
age the wheel bearing.
6) Lock the axle nut securely.
DS-00038
DS-00122
ST2ST1
(1) Magnetic encoder
(2) Rear hub unit bearing
DS-00251
(2)
(1)
DS-00048
Page 850 of 2453
FS-2
General Description
FRONT SUSPENSION
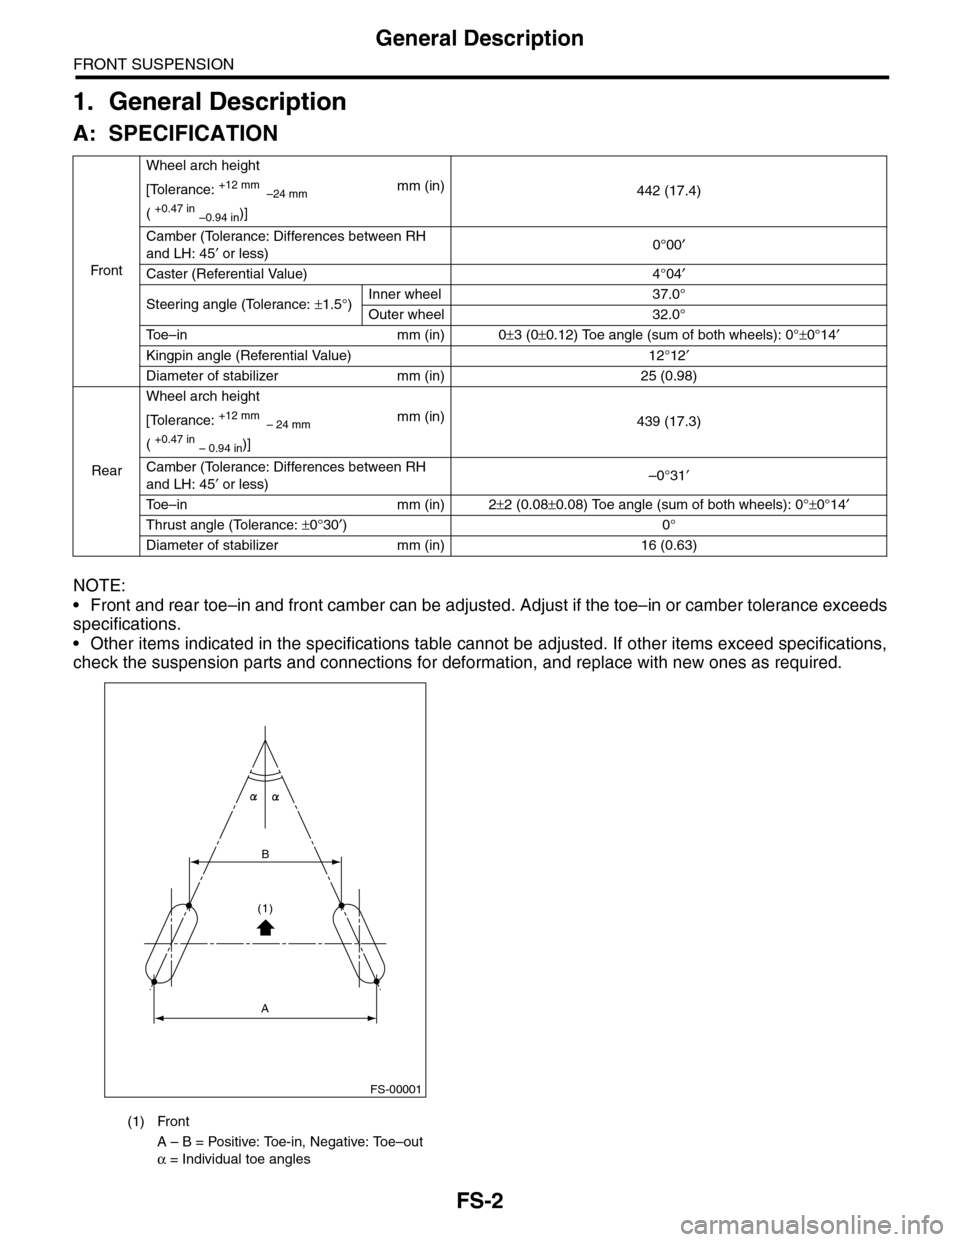
1. General Description
A: SPECIFICATION
NOTE:
•Front and rear toe–in and front camber can be adjusted. Adjust if the toe–in or camber tolerance exceeds
specifications.
•Other items indicated in the specifications table cannot be adjusted. If other items exceed specifications,
check the suspension parts and connections for deformation, and replace with new ones as required.
Fr o nt
Wheel arch height
442 (17.4)[Tolerance: +12 mm –24 mm
( +0.47 in –0.94 in)]
mm (in)
Camber (Tolerance: Differences between RH
and LH: 45′ or less)0°00′
Caster (Referential Value) 4°04′
Steering angle (Tolerance: ±1.5°)Inner wheel 37.0°
Outer wheel 32.0°
To e – i n m m ( i n ) 0±3 (0±0.12) Toe angle (sum of both wheels): 0°±0°14′
Kingpin angle (Referential Value) 12°12′
Diameter of stabilizer mm (in) 25 (0.98)
Rear
Wheel arch height
439 (17.3)[Tolerance: +12 mm – 24 mm
( +0.47 in – 0.94 in)]
mm (in)
Camber (Tolerance: Differences between RH
and LH: 45′ or less)–0°31′
To e – i n m m ( i n ) 2±2 (0.08±0.08) Toe angle (sum of both wheels): 0°±0°14′
Thrust angle (Tolerance: ±0°30′)0°
Diameter of stabilizer mm (in) 16 (0.63)
(1) Front
A – B = Positive: Toe-in, Negative: Toe–out
α = Individual toe angles
FS-00001
B
A
(1)
Page 854 of 2453
FS-6
Wheel Alignment
FRONT SUSPENSION
2. Wheel Alignment
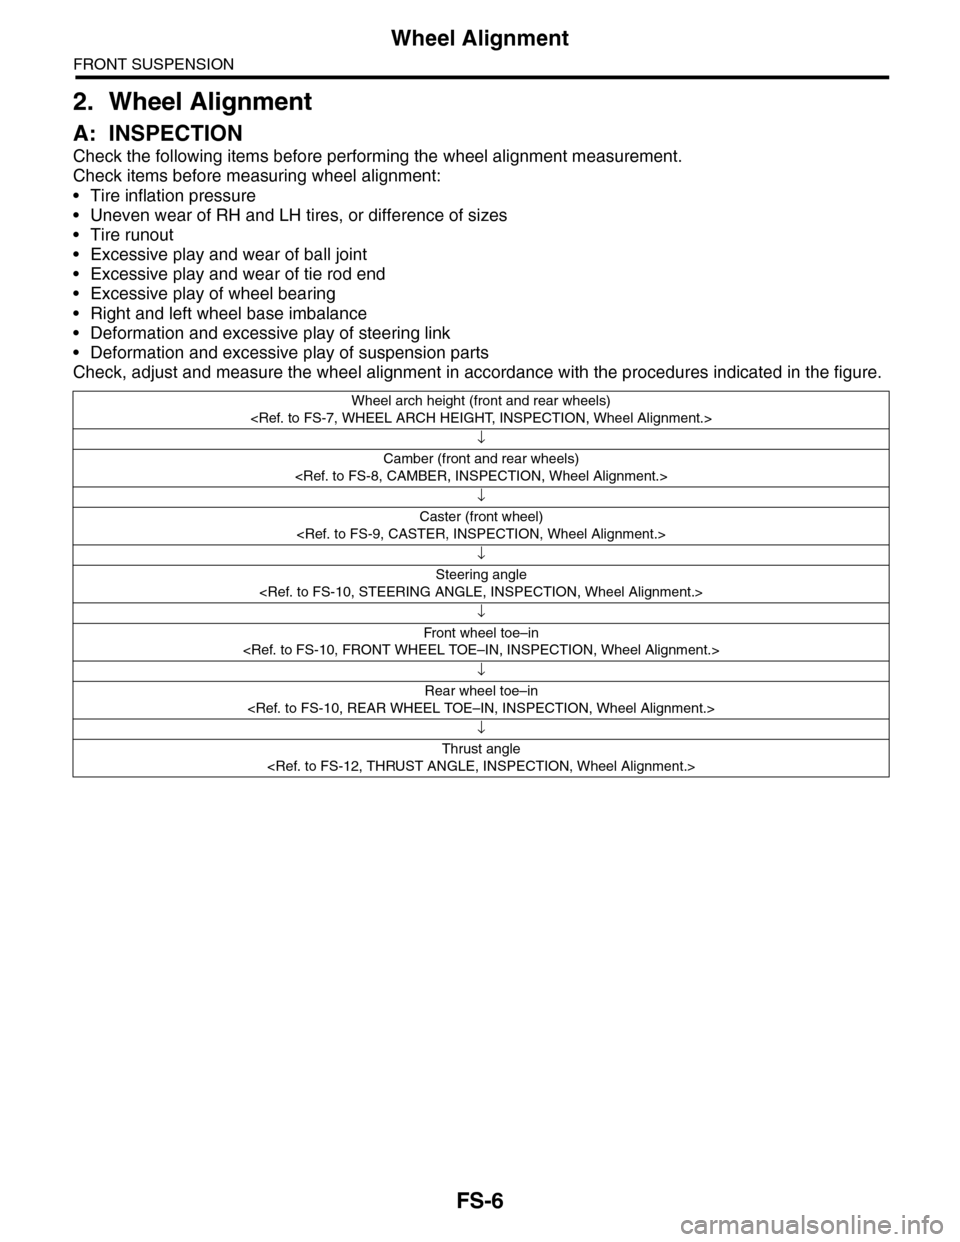
A: INSPECTION
Check the following items before performing the wheel alignment measurement.
Check items before measuring wheel alignment:
•Tire inflation pressure
•Uneven wear of RH and LH tires, or difference of sizes
•Tire runout
•Excessive play and wear of ball joint
•Excessive play and wear of tie rod end
•Excessive play of wheel bearing
•Right and left wheel base imbalance
•Deformation and excessive play of steering link
•Deformation and excessive play of suspension parts
Check, adjust and measure the wheel alignment in accordance with the procedures indicated in the figure.
Wheel arch height (front and rear wheels)
↓
Camber (front and rear wheels)
↓
Caster (front wheel)
↓
Steering angle
↓
Fr o nt wh ee l to e –i n
↓
Rear wheel toe–in
↓
Thrust angle
Page 856 of 2453
FS-8
Wheel Alignment
FRONT SUSPENSION
2. CAMBER
•INSPECTION
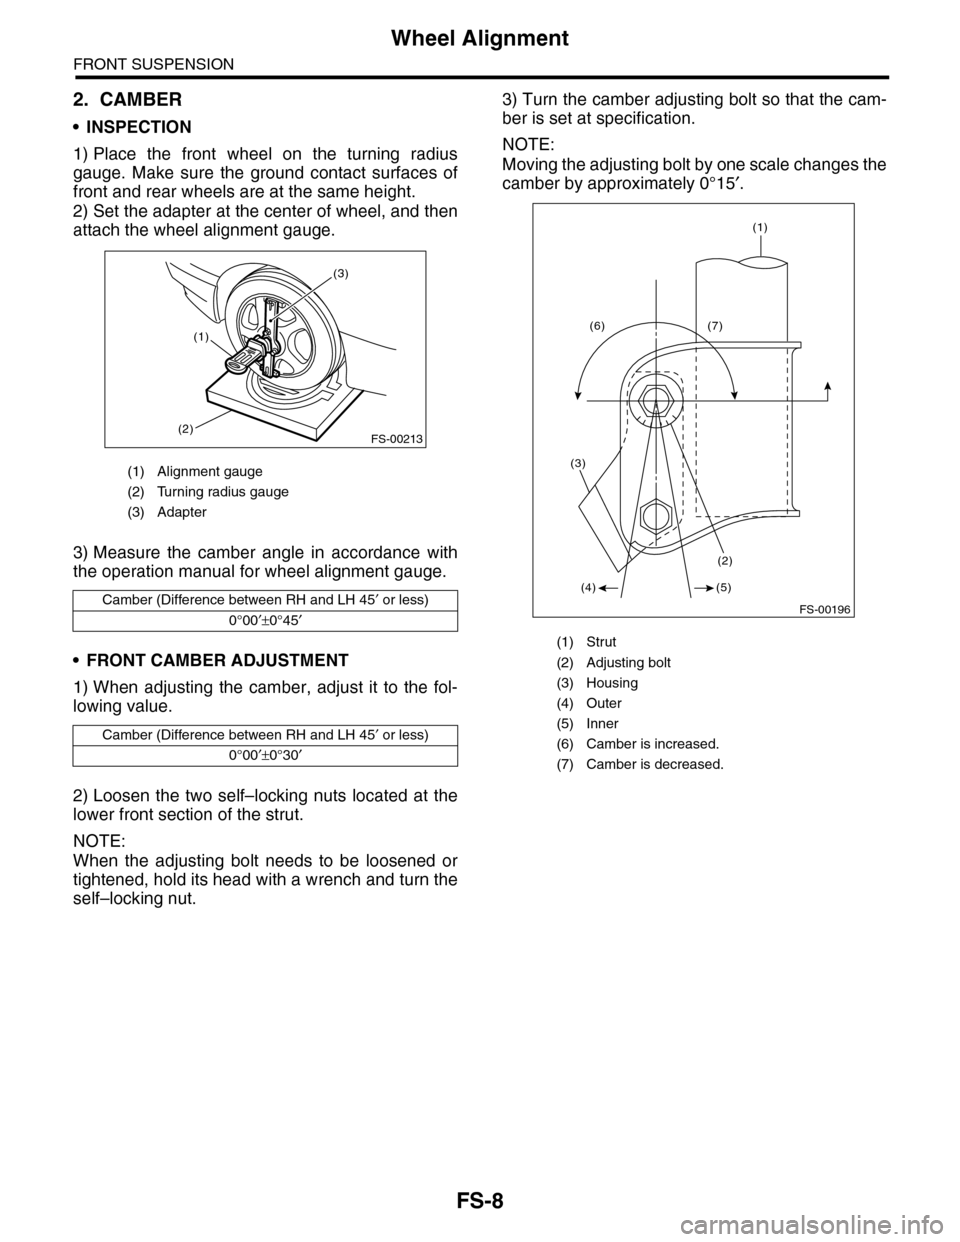
1) Place the front wheel on the turning radius
gauge. Make sure the ground contact surfaces of
front and rear wheels are at the same height.
2) Set the adapter at the center of wheel, and then
attach the wheel alignment gauge.
3) Measure the camber angle in accordance with
the operation manual for wheel alignment gauge.
•FRONT CAMBER ADJUSTMENT
1) When adjusting the camber, adjust it to the fol-
lowing value.
2) Loosen the two self–locking nuts located at the
lower front section of the strut.
NOTE:
When the adjusting bolt needs to be loosened or
tightened, hold its head with a wrench and turn the
self–locking nut.
3) Turn the camber adjusting bolt so that the cam-
ber is set at specification.
NOTE:
Moving the adjusting bolt by one scale changes the
camber by approximately 0°15′.
(1) Alignment gauge
(2) Turning radius gauge
(3) Adapter
Camber (Difference between RH and LH 45′ or less)
0°00′±0°45′
Camber (Difference between RH and LH 45′ or less)
0°00′±0°30′
FS-00213
(1)
(2)
(3)
(1) Strut
(2) Adjusting bolt
(3) Housing
(4) Outer
(5) Inner
(6) Camber is increased.
(7) Camber is decreased.
(1)
(4)
(6) (7)
(2)
(3)
(5)
FS-00196
Page 878 of 2453
PB-7
Parking Brake Assembly (Rear Disc Brake)
PARKING BRAKE
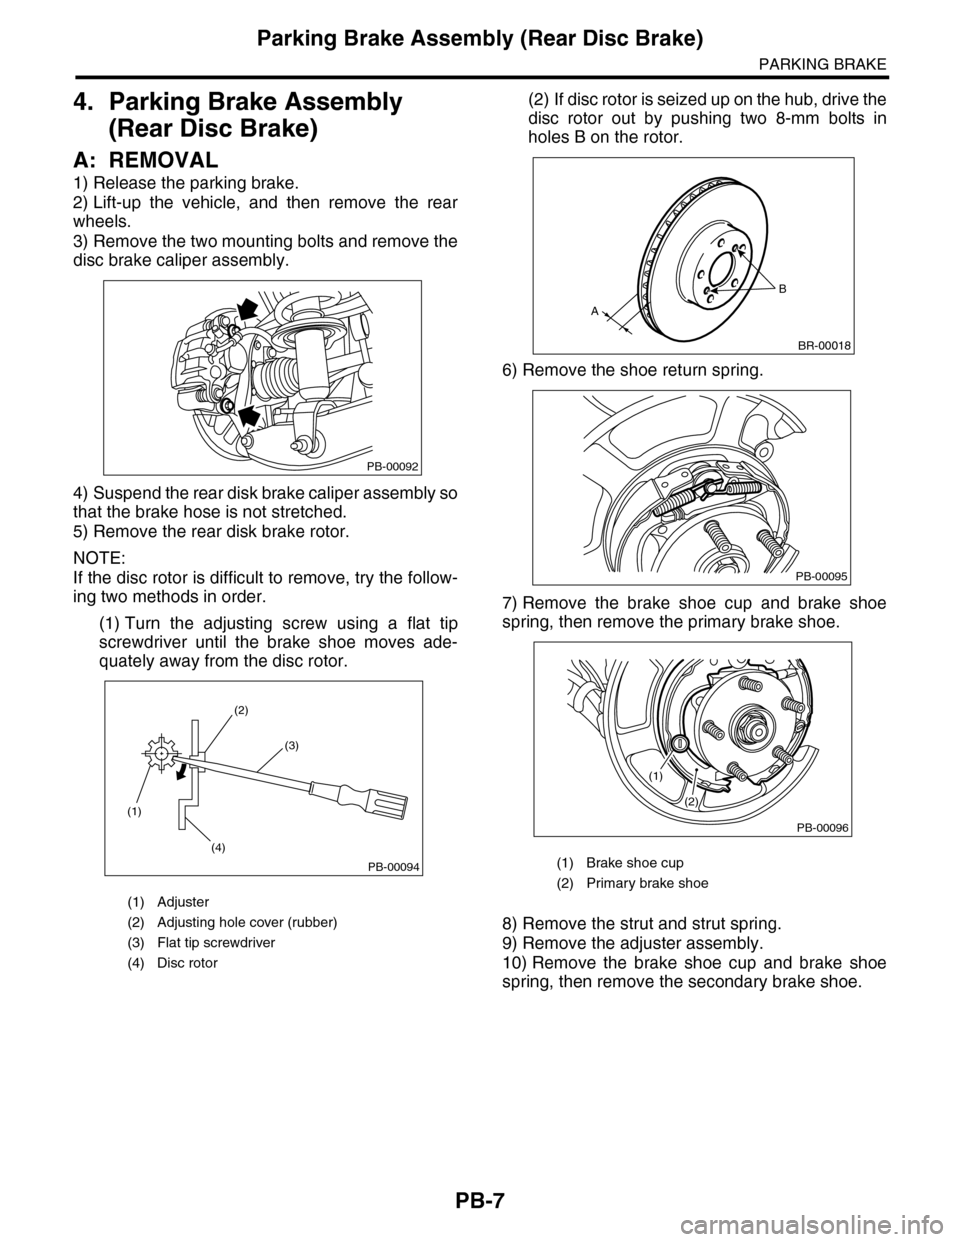
4. Parking Brake Assembly
(Rear Disc Brake)
A: REMOVAL
1) Release the parking brake.
2) Lift-up the vehicle, and then remove the rear
wheels.
3) Remove the two mounting bolts and remove the
disc brake caliper assembly.
4) Suspend the rear disk brake caliper assembly so
that the brake hose is not stretched.
5) Remove the rear disk brake rotor.
NOTE:
If the disc rotor is difficult to remove, try the follow-
ing two methods in order.
(1) Turn the adjusting screw using a flat tip
screwdriver until the brake shoe moves ade-
quately away from the disc rotor.
(2) If disc rotor is seized up on the hub, drive the
disc rotor out by pushing two 8-mm bolts in
holes B on the rotor.
6) Remove the shoe return spring.
7) Remove the brake shoe cup and brake shoe
spring, then remove the primary brake shoe.
8) Remove the strut and strut spring.
9) Remove the adjuster assembly.
10) Remove the brake shoe cup and brake shoe
spring, then remove the secondary brake shoe.
(1) Adjuster
(2) Adjusting hole cover (rubber)
(3) Flat tip screwdriver
(4) Disc rotor
PB-00092
(1)
(4)
(2)
(3)
PB-00094(1) Brake shoe cup
(2) Primary brake shoe
B
A
BR-00018
PB-00095
(1)
(2)
PB-00096
Page 882 of 2453
PS-2
General Description
POWER ASSISTED SYSTEM (POWER STEERING)
1. General Description
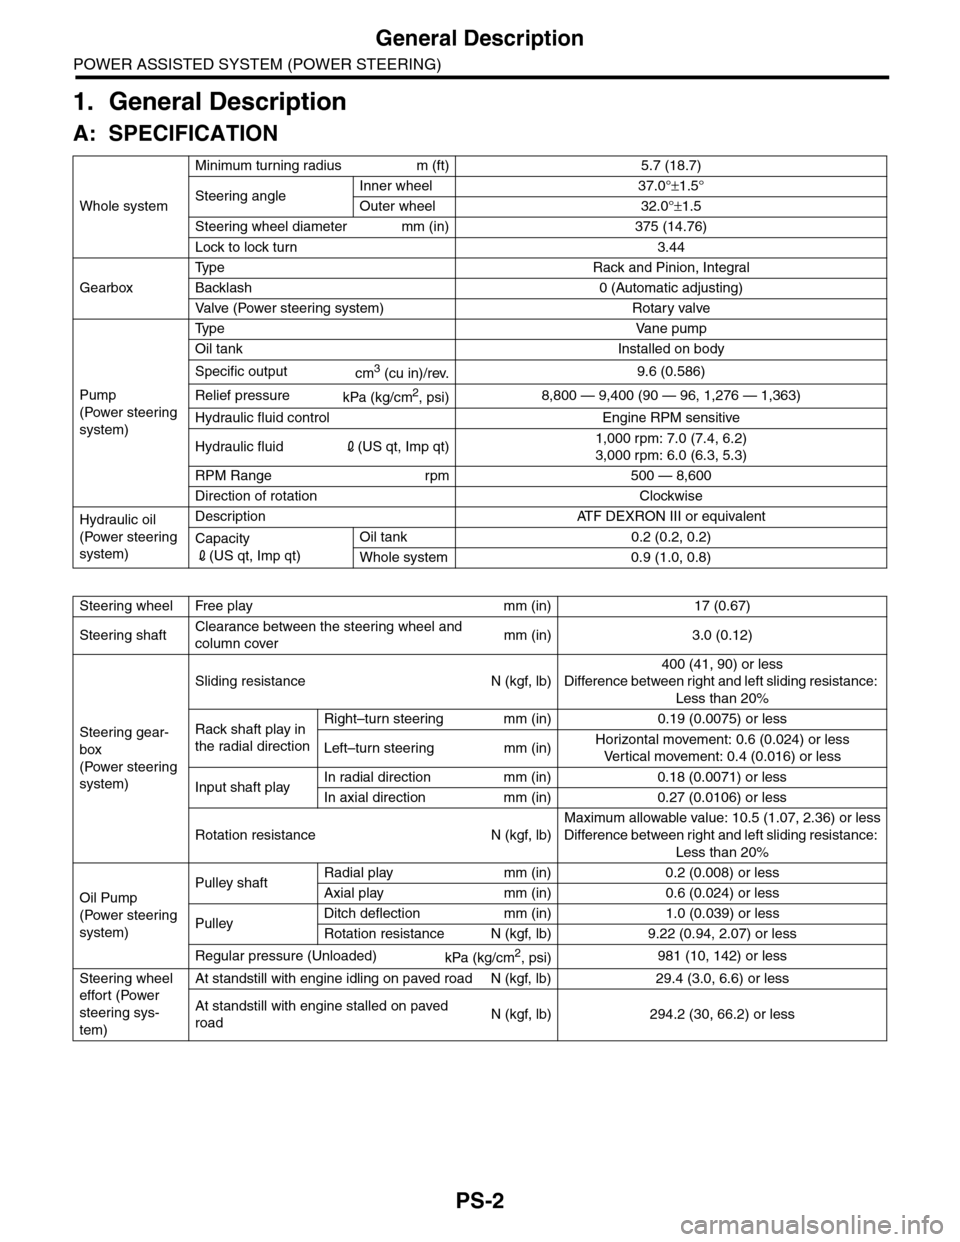
A: SPECIFICATION
Whole system
Minimum turning radius m (ft) 5.7 (18.7)
Steering angleInner wheel 37.0°±1.5°
Outer wheel 32.0°±1.5
Steering wheel diameter mm (in) 375 (14.76)
Lock to lock turn 3.44
Gearbox
Ty p e R a c k a n d P i n i o n , I n t e g r a l
Backlash 0 (Automatic adjusting)
Va l ve ( Po w e r s t e e r i n g s y s t e m ) R o t a r y va l ve
Pump
(Power steering
system)
Ty p e Va n e p u m p
Oil tank Installed on body
Specific outputcm3 (cu in)/rev.9.6 (0.586)
Relief pressurekPa (kg/cm2, psi)8,800 — 9,400 (90 — 96, 1,276 — 1,363)
Hydraulic fluid control Engine RPM sensitive
Hydraulic fluid2(US qt, Imp qt)1,000 rpm: 7.0 (7.4, 6.2)
3,000 rpm: 6.0 (6.3, 5.3)
RPM Range rpm 500 — 8,600
Direction of rotation Clockwise
Hydraulic oil
(Power steering
system)
Description ATF DEXRON III or equivalent
Capacity
2(US qt, Imp qt)
Oil tank 0.2 (0.2, 0.2)
Whole system 0.9 (1.0, 0.8)
Steering wheel Free play mm (in) 17 (0.67)
Steering shaftClearance between the steering wheel and
column covermm (in) 3.0 (0.12)
Steering gear-
box
(Power steering
system)
Sliding resistance N (kgf, lb)
400 (41, 90) or less
Difference between right and left sliding resistance:
Less than 20%
Rack shaft play in
the radial direction
Right–turn steering mm (in) 0.19 (0.0075) or less
Left–turn steering mm (in)Horizontal movement: 0.6 (0.024) or less
Ve r t i c a l m o v e m e n t : 0 . 4 ( 0 . 0 1 6 ) o r l e s s
Input shaft playIn radial direction mm (in) 0.18 (0.0071) or less
In axial direction mm (in) 0.27 (0.0106) or less
Rotation resistance N (kgf, lb)
Maximum allowable value: 10.5 (1.07, 2.36) or less
Difference between right and left sliding resistance:
Less than 20%
Oil Pump
(Power steering
system)
Pulley shaftRadial play mm (in) 0.2 (0.008) or less
Axial play mm (in) 0.6 (0.024) or less
PulleyDitch deflection mm (in) 1.0 (0.039) or less
Rotation resistance N (kgf, lb) 9.22 (0.94, 2.07) or less
Regular pressure (Unloaded)kPa (kg/cm2, psi)981 (10, 142) or less
Steering wheel
effort (Power
steering sys-
tem)
At standstill with engine idling on paved road N (kgf, lb) 29.4 (3.0, 6.6) or less
At standstill with engine stalled on paved
roadN (kgf, lb) 294.2 (30, 66.2) or less