check engine light SUBARU TRIBECA 2009 1.G Service Workshop Manual
[x] Cancel search | Manufacturer: SUBARU, Model Year: 2009, Model line: TRIBECA, Model: SUBARU TRIBECA 2009 1.GPages: 2453, PDF Size: 46.32 MB
Page 81 of 2453
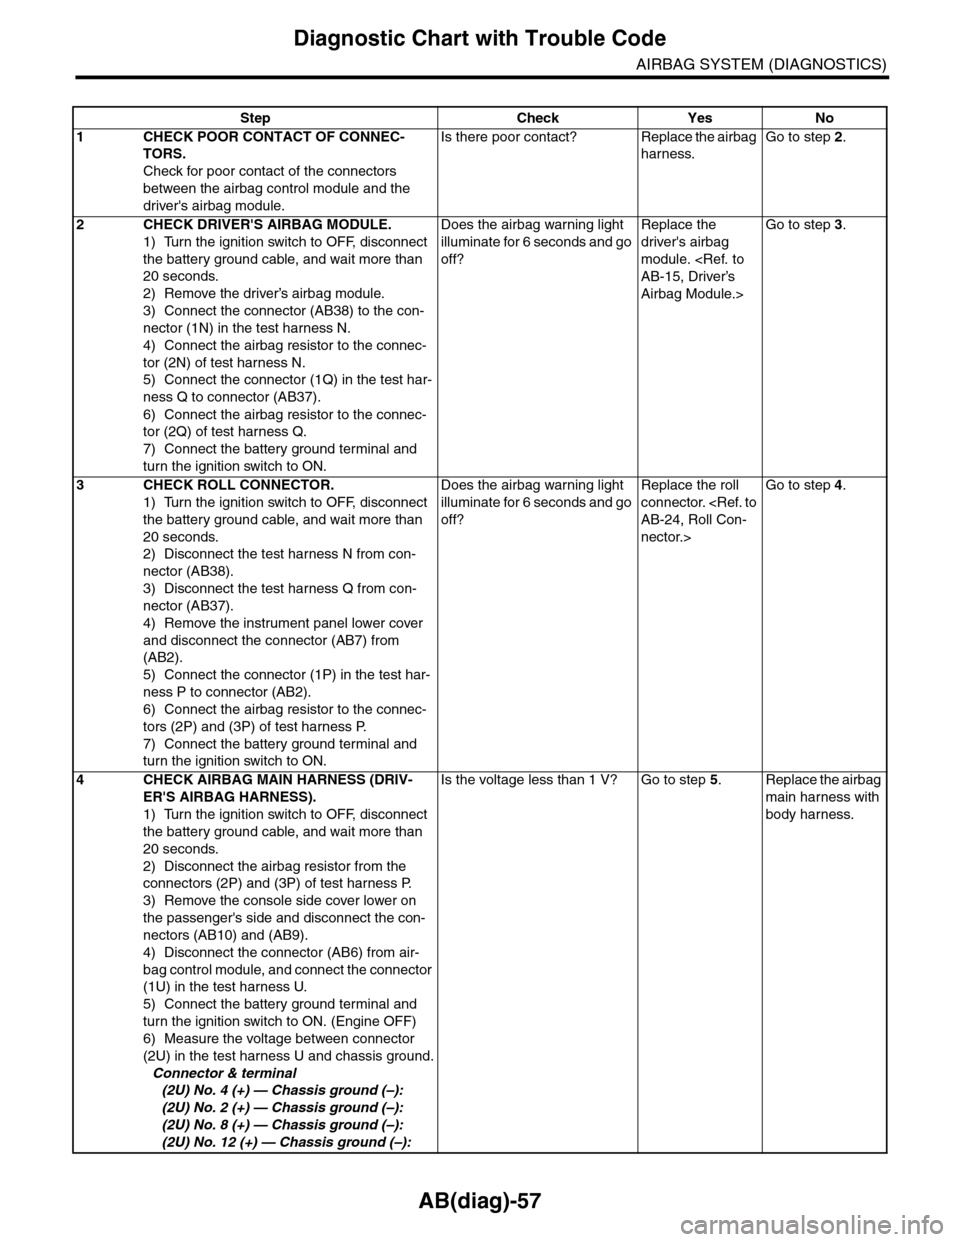
AB(diag)-57
Diagnostic Chart with Trouble Code
AIRBAG SYSTEM (DIAGNOSTICS)
Step Check Yes No
1CHECK POOR CONTACT OF CONNEC-
TORS.
Check for poor contact of the connectors
between the airbag control module and the
driver's airbag module.
Is there poor contact? Replace the airbag
harness.
Go to step 2.
2CHECK DRIVER'S AIRBAG MODULE.
1) Turn the ignition switch to OFF, disconnect
the battery ground cable, and wait more than
20 seconds.
2) Remove the driver’s airbag module.
3) Connect the connector (AB38) to the con-
nector (1N) in the test harness N.
4) Connect the airbag resistor to the connec-
tor (2N) of test harness N.
5) Connect the connector (1Q) in the test har-
ness Q to connector (AB37).
6) Connect the airbag resistor to the connec-
tor (2Q) of test harness Q.
7) Connect the battery ground terminal and
turn the ignition switch to ON.
Does the airbag warning light
illuminate for 6 seconds and go
off?
Replace the
driver's airbag
module.
Airbag Module.>
Go to step 3.
3CHECK ROLL CONNECTOR.
1) Turn the ignition switch to OFF, disconnect
the battery ground cable, and wait more than
20 seconds.
2) Disconnect the test harness N from con-
nector (AB38).
3) Disconnect the test harness Q from con-
nector (AB37).
4) Remove the instrument panel lower cover
and disconnect the connector (AB7) from
(AB2).
5) Connect the connector (1P) in the test har-
ness P to connector (AB2).
6) Connect the airbag resistor to the connec-
tors (2P) and (3P) of test harness P.
7) Connect the battery ground terminal and
turn the ignition switch to ON.
Does the airbag warning light
illuminate for 6 seconds and go
off?
Replace the roll
connector.
nector.>
Go to step 4.
4CHECK AIRBAG MAIN HARNESS (DRIV-
ER'S AIRBAG HARNESS).
1) Turn the ignition switch to OFF, disconnect
the battery ground cable, and wait more than
20 seconds.
2) Disconnect the airbag resistor from the
connectors (2P) and (3P) of test harness P.
3) Remove the console side cover lower on
the passenger's side and disconnect the con-
nectors (AB10) and (AB9).
4) Disconnect the connector (AB6) from air-
bag control module, and connect the connector
(1U) in the test harness U.
5) Connect the battery ground terminal and
turn the ignition switch to ON. (Engine OFF)
6) Measure the voltage between connector
(2U) in the test harness U and chassis ground.
Connector & terminal
(2U) No. 4 (+) — Chassis ground (–):
(2U) No. 2 (+) — Chassis ground (–):
(2U) No. 8 (+) — Chassis ground (–):
(2U) No. 12 (+) — Chassis ground (–):
Is the voltage less than 1 V? Go to step 5.Replace the airbag
main harness with
body harness.
Page 145 of 2453
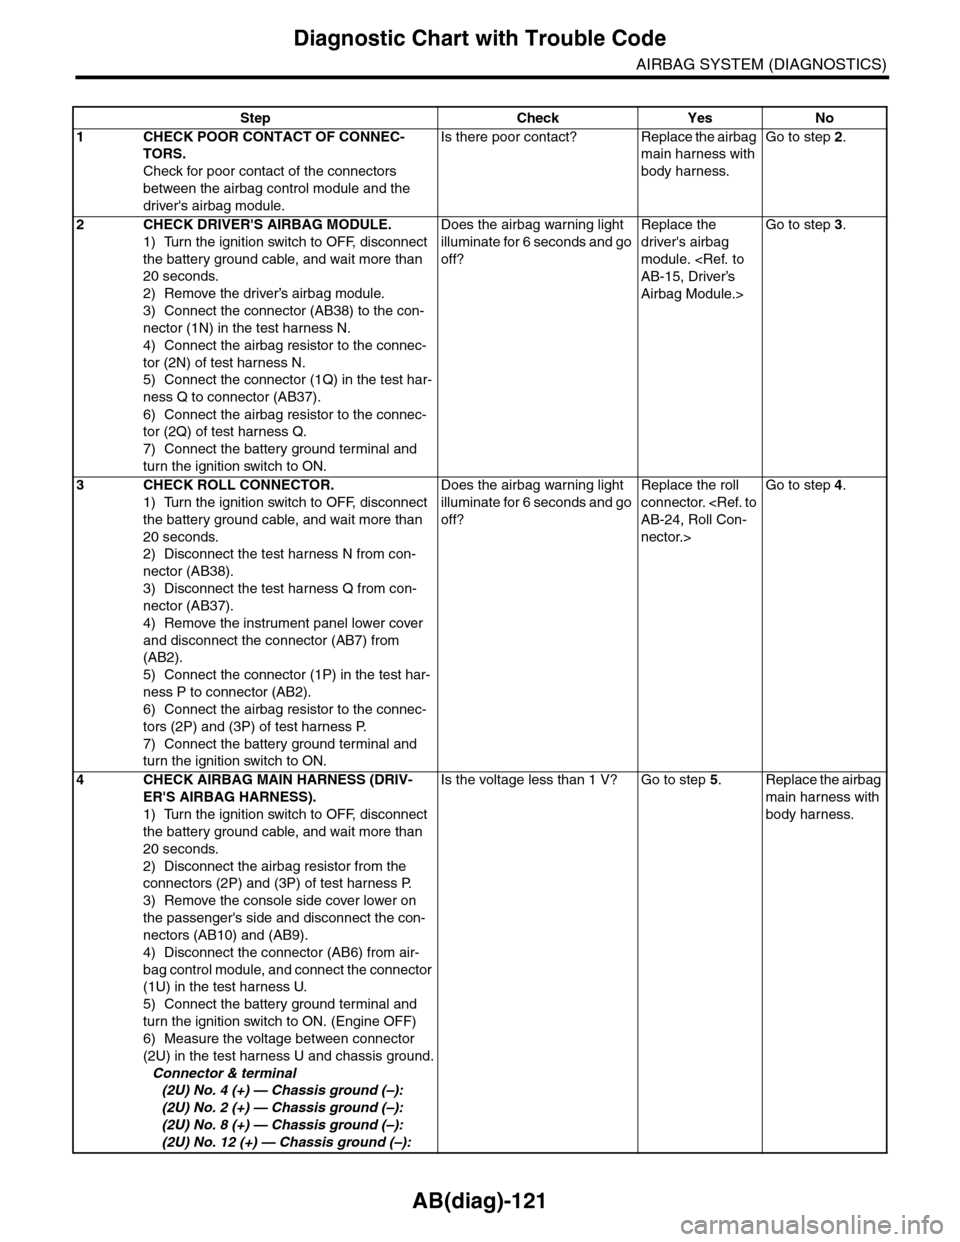
AB(diag)-121
Diagnostic Chart with Trouble Code
AIRBAG SYSTEM (DIAGNOSTICS)
Step Check Yes No
1CHECK POOR CONTACT OF CONNEC-
TORS.
Check for poor contact of the connectors
between the airbag control module and the
driver's airbag module.
Is there poor contact? Replace the airbag
main harness with
body harness.
Go to step 2.
2CHECK DRIVER'S AIRBAG MODULE.
1) Turn the ignition switch to OFF, disconnect
the battery ground cable, and wait more than
20 seconds.
2) Remove the driver’s airbag module.
3) Connect the connector (AB38) to the con-
nector (1N) in the test harness N.
4) Connect the airbag resistor to the connec-
tor (2N) of test harness N.
5) Connect the connector (1Q) in the test har-
ness Q to connector (AB37).
6) Connect the airbag resistor to the connec-
tor (2Q) of test harness Q.
7) Connect the battery ground terminal and
turn the ignition switch to ON.
Does the airbag warning light
illuminate for 6 seconds and go
off?
Replace the
driver's airbag
module.
Airbag Module.>
Go to step 3.
3CHECK ROLL CONNECTOR.
1) Turn the ignition switch to OFF, disconnect
the battery ground cable, and wait more than
20 seconds.
2) Disconnect the test harness N from con-
nector (AB38).
3) Disconnect the test harness Q from con-
nector (AB37).
4) Remove the instrument panel lower cover
and disconnect the connector (AB7) from
(AB2).
5) Connect the connector (1P) in the test har-
ness P to connector (AB2).
6) Connect the airbag resistor to the connec-
tors (2P) and (3P) of test harness P.
7) Connect the battery ground terminal and
turn the ignition switch to ON.
Does the airbag warning light
illuminate for 6 seconds and go
off?
Replace the roll
connector.
nector.>
Go to step 4.
4CHECK AIRBAG MAIN HARNESS (DRIV-
ER'S AIRBAG HARNESS).
1) Turn the ignition switch to OFF, disconnect
the battery ground cable, and wait more than
20 seconds.
2) Disconnect the airbag resistor from the
connectors (2P) and (3P) of test harness P.
3) Remove the console side cover lower on
the passenger's side and disconnect the con-
nectors (AB10) and (AB9).
4) Disconnect the connector (AB6) from air-
bag control module, and connect the connector
(1U) in the test harness U.
5) Connect the battery ground terminal and
turn the ignition switch to ON. (Engine OFF)
6) Measure the voltage between connector
(2U) in the test harness U and chassis ground.
Connector & terminal
(2U) No. 4 (+) — Chassis ground (–):
(2U) No. 2 (+) — Chassis ground (–):
(2U) No. 8 (+) — Chassis ground (–):
(2U) No. 12 (+) — Chassis ground (–):
Is the voltage less than 1 V? Go to step 5.Replace the airbag
main harness with
body harness.
Page 169 of 2453
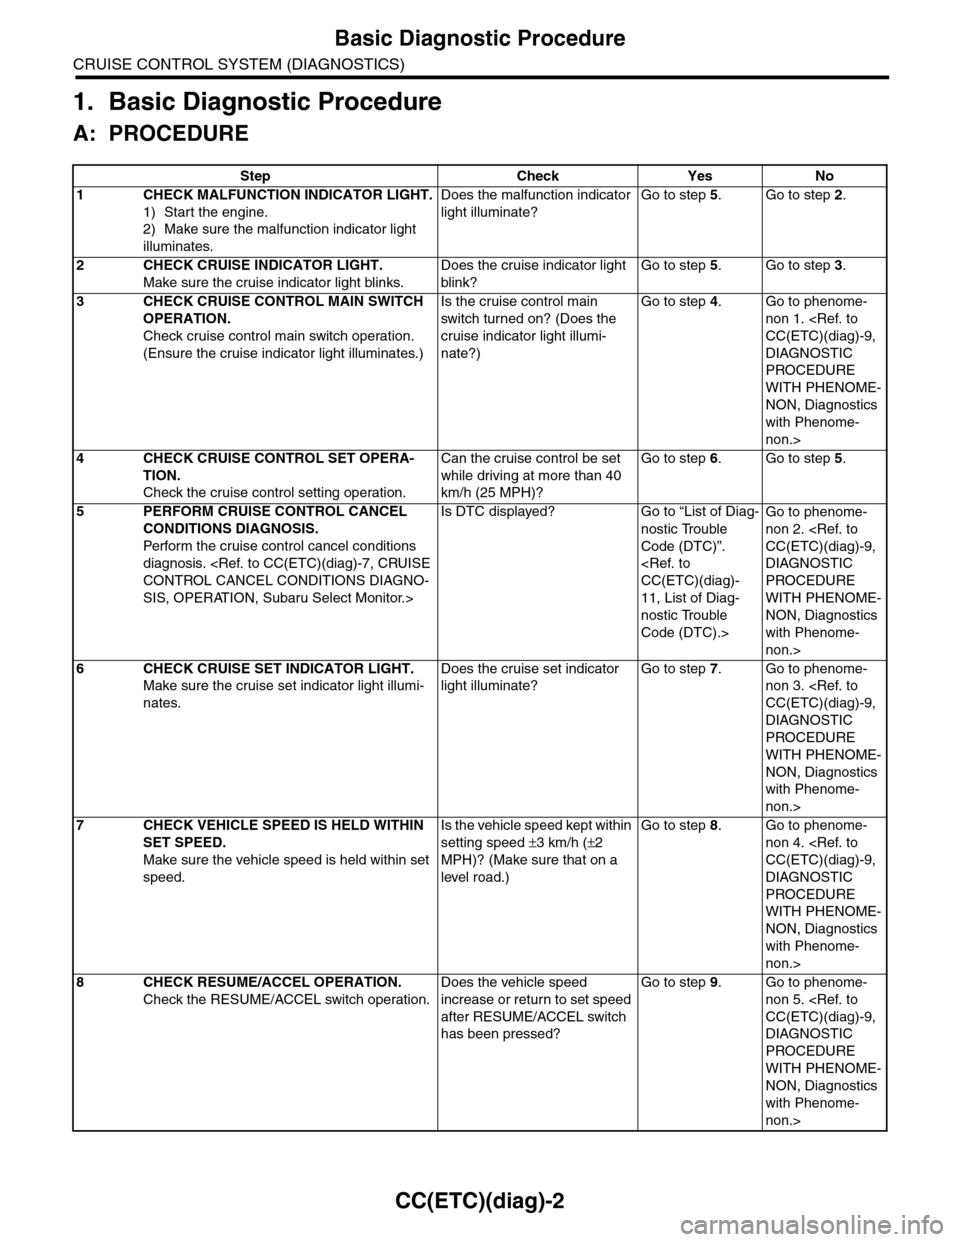
CC(ETC)(diag)-2
Basic Diagnostic Procedure
CRUISE CONTROL SYSTEM (DIAGNOSTICS)
1. Basic Diagnostic Procedure
A: PROCEDURE
Step Check Yes No
1CHECK MALFUNCTION INDICATOR LIGHT.
1) Start the engine.
2) Make sure the malfunction indicator light
illuminates.
Does the malfunction indicator
light illuminate?
Go to step 5.Go to step 2.
2CHECK CRUISE INDICATOR LIGHT.
Make sure the cruise indicator light blinks.
Does the cruise indicator light
blink?
Go to step 5.Go to step 3.
3CHECK CRUISE CONTROL MAIN SWITCH
OPERATION.
Check cruise control main switch operation.
(Ensure the cruise indicator light illuminates.)
Is the cruise control main
switch tur ned on? (Does the
cruise indicator light illumi-
nate?)
Go to step 4.Go to phenome-
non 1.
DIAGNOSTIC
PROCEDURE
WITH PHENOME-
NON, Diagnostics
with Phenome-
non.>
4CHECK CRUISE CONTROL SET OPERA-
TION.
Check the cruise control setting operation.
Can the cruise control be set
while driving at more than 40
km/h (25 MPH)?
Go to step 6.Go to step 5.
5PERFORM CRUISE CONTROL CANCEL
CONDITIONS DIAGNOSIS.
Perfor m the cr uise control cancel conditions
diagnosis.
SIS, OPERATION, Subaru Select Monitor.>
Is DTC displayed? Go to “List of Diag-
nostic Trouble
Code (DTC)”.
11, List of Diag-
nostic Trouble
Code (DTC).>
Go to phenome-
non 2.
DIAGNOSTIC
PROCEDURE
WITH PHENOME-
NON, Diagnostics
with Phenome-
non.>
6CHECK CRUISE SET INDICATOR LIGHT.
Make sure the cruise set indicator light illumi-
nates.
Does the cruise set indicator
light illuminate?
Go to step 7.Go to phenome-
non 3.
DIAGNOSTIC
PROCEDURE
WITH PHENOME-
NON, Diagnostics
with Phenome-
non.>
7CHECK VEHICLE SPEED IS HELD WITHIN
SET SPEED.
Make sure the vehicle speed is held within set
speed.
Is the vehicle speed kept within
setting speed ±3 km/h (±2
MPH)? (Make sure that on a
level road.)
Go to step 8.Go to phenome-
non 4.
DIAGNOSTIC
PROCEDURE
WITH PHENOME-
NON, Diagnostics
with Phenome-
non.>
8CHECK RESUME/ACCEL OPERATION.
Check the RESUME/ACCEL switch operation.
Does the vehicle speed
increase or return to set speed
after RESUME/ACCEL switch
has been pressed?
Go to step 9.Go to phenome-
non 5.
DIAGNOSTIC
PROCEDURE
WITH PHENOME-
NON, Diagnostics
with Phenome-
non.>
Page 175 of 2453
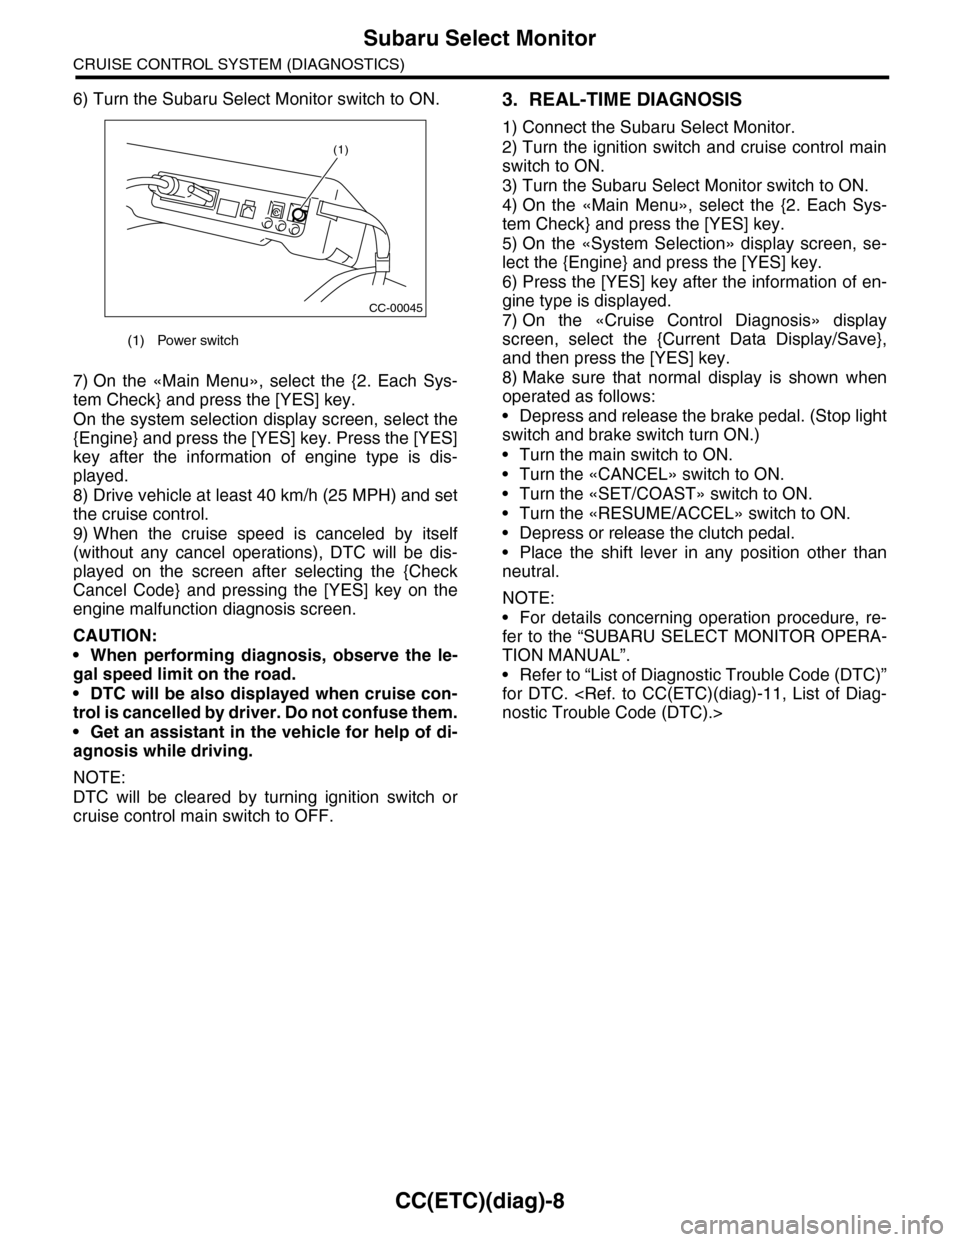
CC(ETC)(diag)-8
Subaru Select Monitor
CRUISE CONTROL SYSTEM (DIAGNOSTICS)
6) Turn the Subaru Select Monitor switch to ON.
7) On the «Main Menu», select the {2. Each Sys-
tem Check} and press the [YES] key.
On the system selection display screen, select the
{Engine} and press the [YES] key. Press the [YES]
key after the information of engine type is dis-
played.
8) Drive vehicle at least 40 km/h (25 MPH) and set
the cruise control.
9) When the cruise speed is canceled by itself
(without any cancel operations), DTC will be dis-
played on the screen after selecting the {Check
Cancel Code} and pressing the [YES] key on the
engine malfunction diagnosis screen.
CAUTION:
•When performing diagnosis, observe the le-
gal speed limit on the road.
•DTC will be also displayed when cruise con-
trol is cancelled by driver. Do not confuse them.
•Get an assistant in the vehicle for help of di-
agnosis while driving.
NOTE:
DTC will be cleared by turning ignition switch or
cruise control main switch to OFF.
3. REAL-TIME DIAGNOSIS
1) Connect the Subaru Select Monitor.
2) Turn the ignition switch and cruise control main
switch to ON.
3) Turn the Subaru Select Monitor switch to ON.
4) On the «Main Menu», select the {2. Each Sys-
tem Check} and press the [YES] key.
5) On the «System Selection» display screen, se-
lect the {Engine} and press the [YES] key.
6) Press the [YES] key after the information of en-
gine type is displayed.
7) On the «Cruise Control Diagnosis» display
screen, select the {Current Data Display/Save},
and then press the [YES] key.
8) Make sure that normal display is shown when
operated as follows:
•Depress and release the brake pedal. (Stop light
switch and brake switch turn ON.)
•Turn the main switch to ON.
•Turn the «CANCEL» switch to ON.
•Turn the «SET/COAST» switch to ON.
•Turn the «RESUME/ACCEL» switch to ON.
•Depress or release the clutch pedal.
•Place the shift lever in any position other than
neutral.
NOTE:
•For details concerning operation procedure, re-
fer to the “SUBARU SELECT MONITOR OPERA-
TION MANUAL”.
•Refer to “List of Diagnostic Trouble Code (DTC)”
for DTC.
(1) Power switch
CC-00045
(1)
Page 177 of 2453
CC(ETC)(diag)-10
Diagnostics with Phenomenon
CRUISE CONTROL SYSTEM (DIAGNOSTICS)
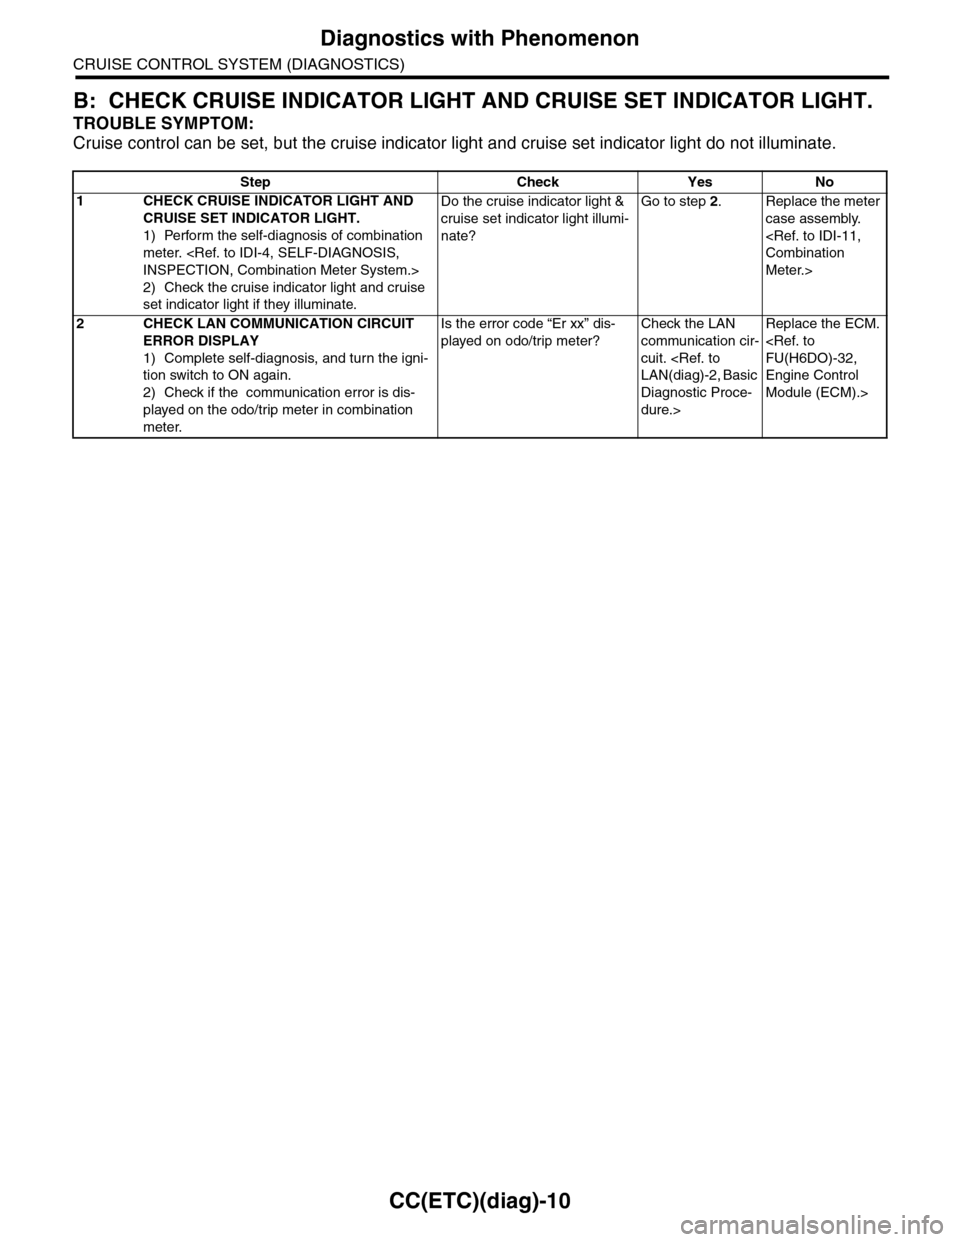
B: CHECK CRUISE INDICATOR LIGHT AND CRUISE SET INDICATOR LIGHT.
TROUBLE SYMPTOM:
Cruise control can be set, but the cruise indicator light and cruise set indicator light do not illuminate.
Step Check Yes No
1CHECK CRUISE INDICATOR LIGHT AND
CRUISE SET INDICATOR LIGHT.
1) Perform the self-diagnosis of combination
meter.
2) Check the cruise indicator light and cruise
set indicator light if they illuminate.
Do the cruise indicator light &
cruise set indicator light illumi-
nate?
Go to step 2.Replace the meter
case assembly.
Meter.>
2CHECK LAN COMMUNICATION CIRCUIT
ERROR DISPLAY
1) Complete self-diagnosis, and turn the igni-
tion switch to ON again.
2) Check if the communication error is dis-
played on the odo/trip meter in combination
meter.
Is the error code “Er xx” dis-
played on odo/trip meter?
Check the LAN
communication cir-
cuit.
Diagnostic Proce-
dure.>
Replace the ECM.
Engine Control
Module (ECM).>
Page 183 of 2453
CC(ETC)(diag)-16
Diagnostic Procedure with Diagnostic Trouble Code (DTC)
CRUISE CONTROL SYSTEM (DIAGNOSTICS)
Step Check Yes No
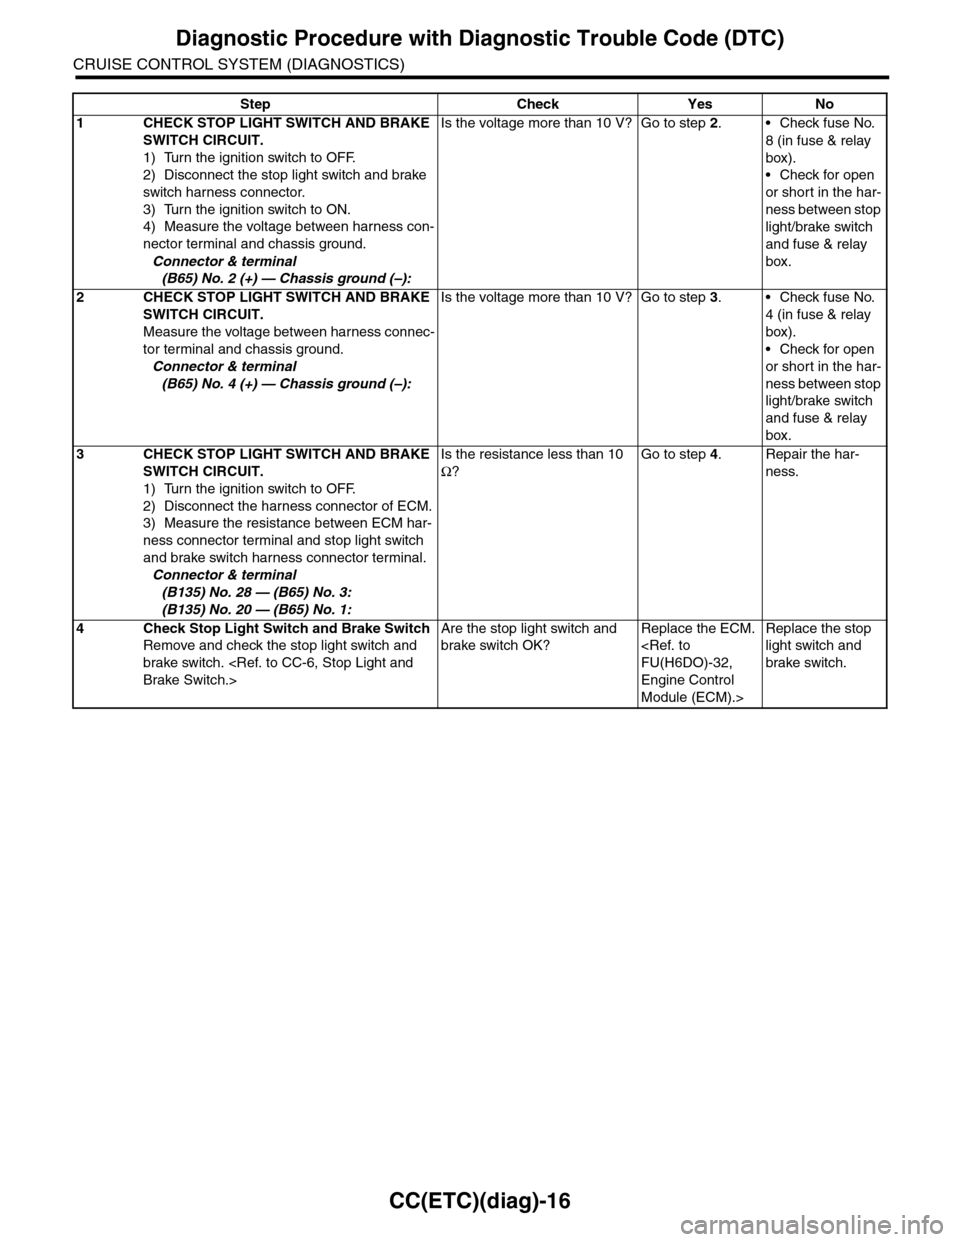
1CHECK STOP LIGHT SWITCH AND BRAKE
SWITCH CIRCUIT.
1) Turn the ignition switch to OFF.
2) Disconnect the stop light switch and brake
switch harness connector.
3) Turn the ignition switch to ON.
4) Measure the voltage between harness con-
nector terminal and chassis ground.
Connector & terminal
(B65) No. 2 (+) — Chassis ground (–):
Is the voltage more than 10 V? Go to step 2.•Check fuse No.
8 (in fuse & relay
box).
•Check for open
or short in the har-
ness between stop
light/brake switch
and fuse & relay
box.
2CHECK STOP LIGHT SWITCH AND BRAKE
SWITCH CIRCUIT.
Measure the voltage between harness connec-
tor terminal and chassis ground.
Connector & terminal
(B65) No. 4 (+) — Chassis ground (–):
Is the voltage more than 10 V? Go to step 3.•Check fuse No.
4 (in fuse & relay
box).
•Check for open
or short in the har-
ness between stop
light/brake switch
and fuse & relay
box.
3CHECK STOP LIGHT SWITCH AND BRAKE
SWITCH CIRCUIT.
1) Turn the ignition switch to OFF.
2) Disconnect the harness connector of ECM.
3) Measure the resistance between ECM har-
ness connector terminal and stop light switch
and brake switch harness connector terminal.
Connector & terminal
(B135) No. 28 — (B65) No. 3:
(B135) No. 20 — (B65) No. 1:
Is the resistance less than 10
Ω?
Go to step 4.Repair the har-
ness.
4Check Stop Light Switch and Brake Switch
Remove and check the stop light switch and
brake switch.
Are the stop light switch and
brake switch OK?
Replace the ECM.
Engine Control
Module (ECM).>
Replace the stop
light switch and
brake switch.
Page 187 of 2453
CC(ETC)(diag)-20
Diagnostic Procedure with Diagnostic Trouble Code (DTC)
CRUISE CONTROL SYSTEM (DIAGNOSTICS)
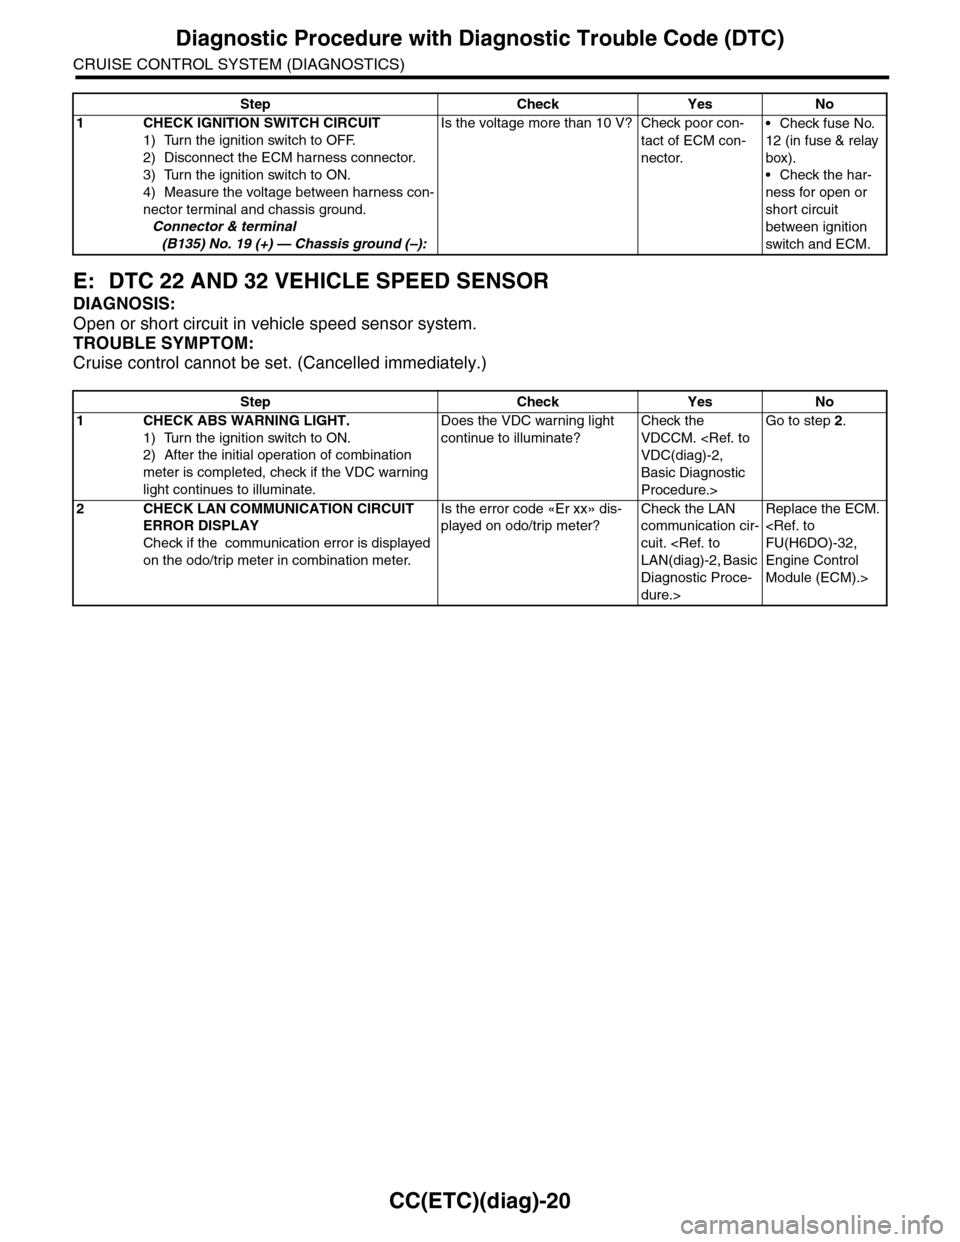
E: DTC 22 AND 32 VEHICLE SPEED SENSOR
DIAGNOSIS:
Open or short circuit in vehicle speed sensor system.
TROUBLE SYMPTOM:
Cruise control cannot be set. (Cancelled immediately.)
Step Check Yes No
1 CHECK IGNITION SWITCH CIRCUIT
1) Turn the ignition switch to OFF.
2) Disconnect the ECM harness connector.
3) Turn the ignition switch to ON.
4) Measure the voltage between harness con-
nector terminal and chassis ground.
Connector & terminal
(B135) No. 19 (+) — Chassis ground (–):
Is the voltage more than 10 V? Check poor con-
tact of ECM con-
nector.
•Check fuse No.
12 (in fuse & relay
box).
•Check the har-
ness for open or
short circuit
between ignition
switch and ECM.
Step Check Yes No
1CHECK ABS WARNING LIGHT.
1) Turn the ignition switch to ON.
2) After the initial operation of combination
meter is completed, check if the VDC warning
light continues to illuminate.
Does the VDC warning light
continue to illuminate?
Check the
VDCCM.
Basic Diagnostic
Procedure.>
Go to step 2.
2CHECK LAN COMMUNICATION CIRCUIT
ERROR DISPLAY
Check if the communication error is displayed
on the odo/trip meter in combination meter.
Is the error code «Er xx» dis-
played on odo/trip meter?
Check the LAN
communication cir-
cuit.
Diagnostic Proce-
dure.>
Replace the ECM.
Engine Control
Module (ECM).>
Page 192 of 2453
ET-6
Navigation System
ENTERTAINMENT
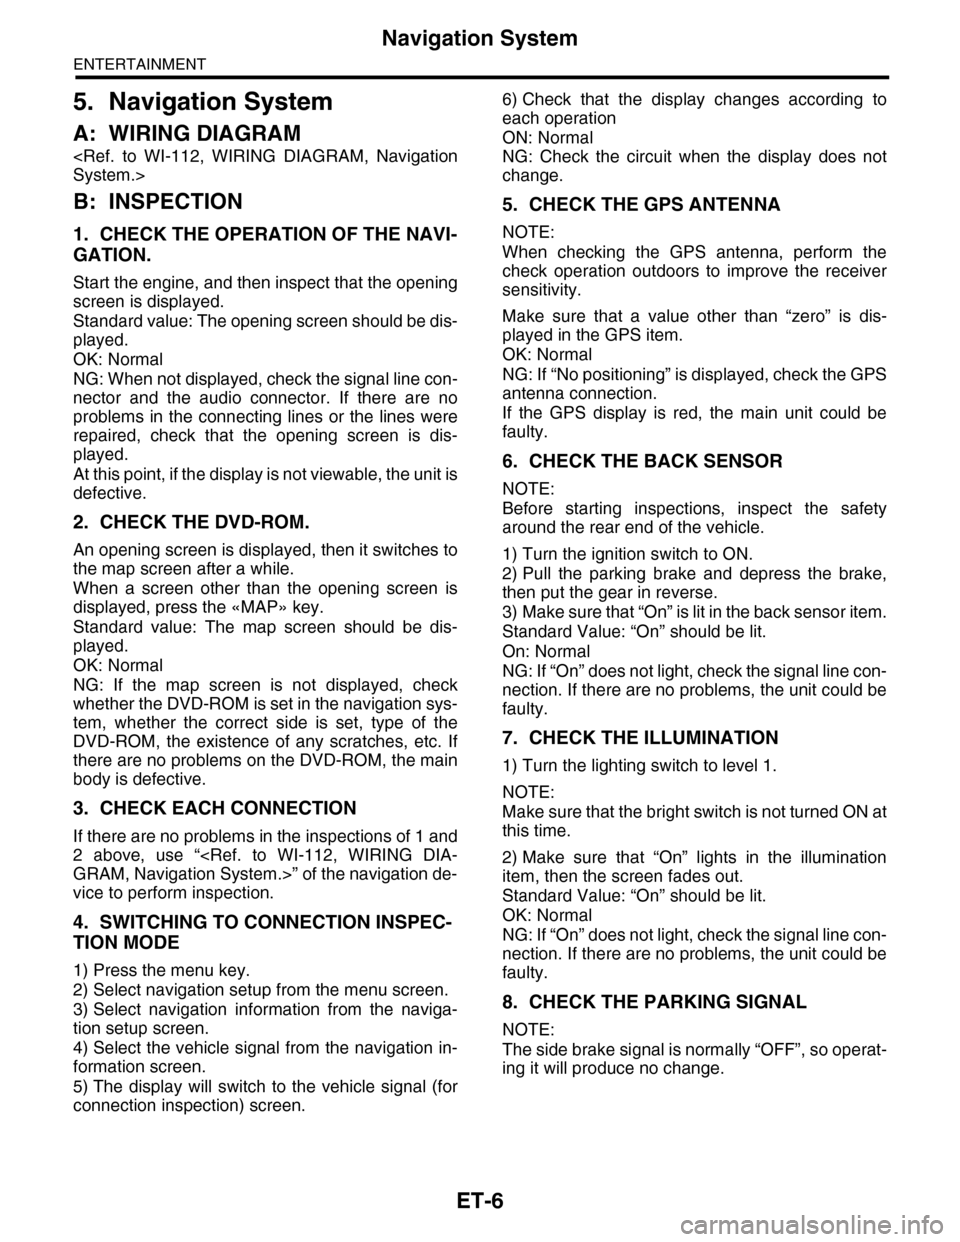
5. Navigation System
A: WIRING DIAGRAM
B: INSPECTION
1. CHECK THE OPERATION OF THE NAVI-
GATION.
Start the engine, and then inspect that the opening
screen is displayed.
Standard value: The opening screen should be dis-
played.
OK: Normal
NG: When not displayed, check the signal line con-
nector and the audio connector. If there are no
problems in the connecting lines or the lines were
repaired, check that the opening screen is dis-
played.
At this point, if the display is not viewable, the unit is
defective.
2. CHECK THE DVD-ROM.
An opening screen is displayed, then it switches to
the map screen after a while.
When a screen other than the opening screen is
displayed, press the «MAP» key.
Standard value: The map screen should be dis-
played.
OK: Normal
NG: If the map screen is not displayed, check
whether the DVD-ROM is set in the navigation sys-
tem, whether the correct side is set, type of the
DVD-ROM, the existence of any scratches, etc. If
there are no problems on the DVD-ROM, the main
body is defective.
3. CHECK EACH CONNECTION
If there are no problems in the inspections of 1 and
2 above, use “
vice to perform inspection.
4. SWITCHING TO CONNECTION INSPEC-
TION MODE
1) Press the menu key.
2) Select navigation setup from the menu screen.
3) Select navigation information from the naviga-
tion setup screen.
4) Select the vehicle signal from the navigation in-
formation screen.
5) The display will switch to the vehicle signal (for
connection inspection) screen.
6) Check that the display changes according to
each operation
ON: Normal
NG: Check the circuit when the display does not
change.
5. CHECK THE GPS ANTENNA
NOTE:
When checking the GPS antenna, perform the
check operation outdoors to improve the receiver
sensitivity.
Make sure that a value other than “zero” is dis-
played in the GPS item.
OK: Normal
NG: If “No positioning” is displayed, check the GPS
antenna connection.
If the GPS display is red, the main unit could be
faulty.
6. CHECK THE BACK SENSOR
NOTE:
Before starting inspections, inspect the safety
around the rear end of the vehicle.
1) Turn the ignition switch to ON.
2) Pull the parking brake and depress the brake,
then put the gear in reverse.
3) Make sure that “On” is lit in the back sensor item.
Standard Value: “On” should be lit.
On: Normal
NG: If “On” does not light, check the signal line con-
nection. If there are no problems, the unit could be
faulty.
7. CHECK THE ILLUMINATION
1) Turn the lighting switch to level 1.
NOTE:
Make sure that the bright switch is not turned ON at
this time.
2) Make sure that “On” lights in the illumination
item, then the screen fades out.
Standard Value: “On” should be lit.
OK: Normal
NG: If “On” does not light, check the signal line con-
nection. If there are no problems, the unit could be
faulty.
8. CHECK THE PARKING SIGNAL
NOTE:
The side brake signal is normally “OFF”, so operat-
ing it will produce no change.
Page 350 of 2453
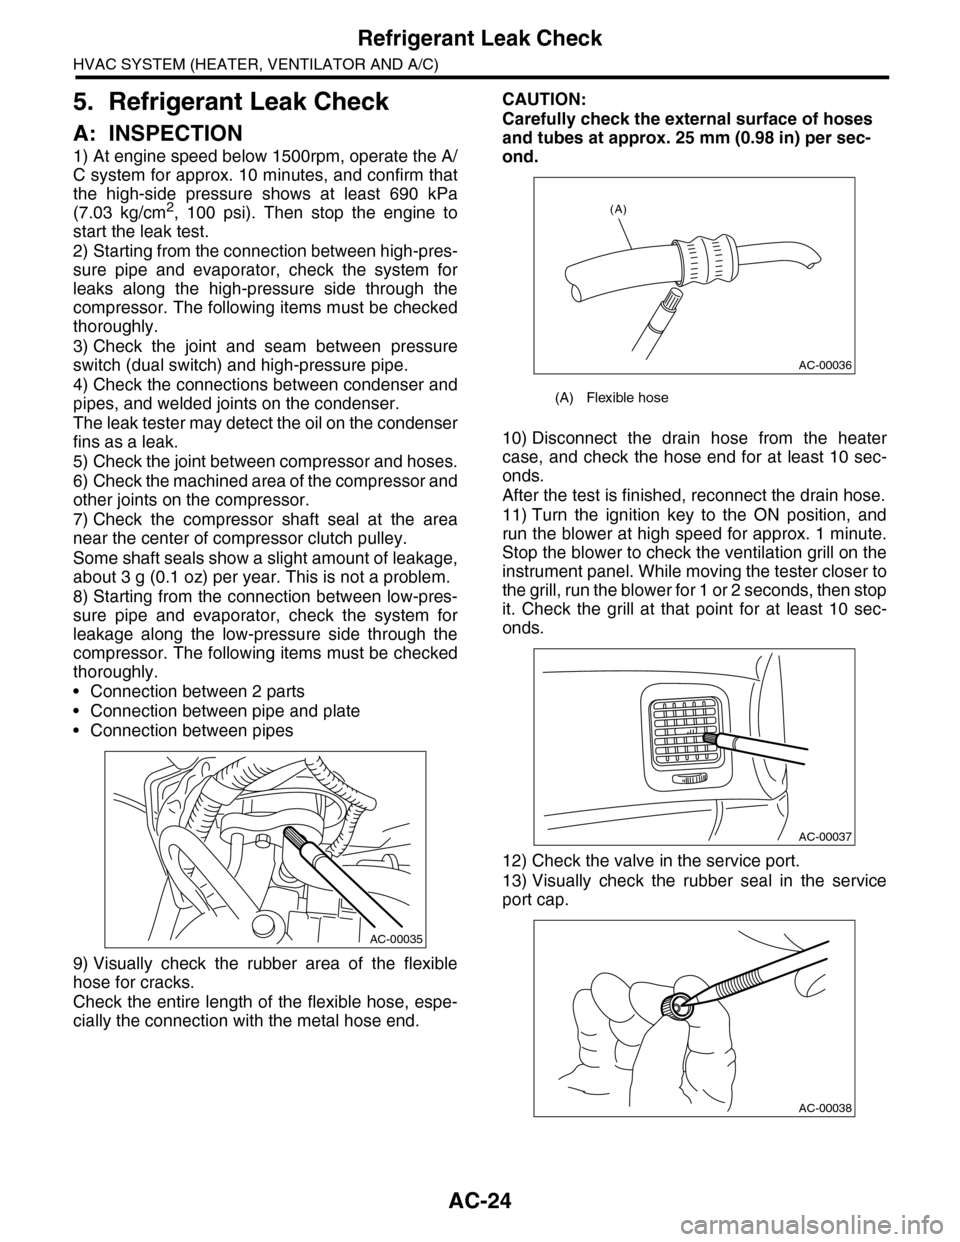
AC-24
Refrigerant Leak Check
HVAC SYSTEM (HEATER, VENTILATOR AND A/C)
5. Refrigerant Leak Check
A: INSPECTION
1) At engine speed below 1500rpm, operate the A/
C system for approx. 10 minutes, and confirm that
the high-side pressure shows at least 690 kPa
(7.03 kg/cm2, 100 psi). Then stop the engine to
start the leak test.
2) Starting from the connection between high-pres-
sure pipe and evaporator, check the system for
leaks along the high-pressure side through the
compressor. The following items must be checked
thoroughly.
3) Check the joint and seam between pressure
switch (dual switch) and high-pressure pipe.
4) Check the connections between condenser and
pipes, and welded joints on the condenser.
The leak tester may detect the oil on the condenser
fins as a leak.
5) Check the joint between compressor and hoses.
6) Check the machined area of the compressor and
other joints on the compressor.
7) Check the compressor shaft seal at the area
near the center of compressor clutch pulley.
Some shaft seals show a slight amount of leakage,
about 3 g (0.1 oz) per year. This is not a problem.
8) Starting from the connection between low-pres-
sure pipe and evaporator, check the system for
leakage along the low-pressure side through the
compressor. The following items must be checked
thoroughly.
•Connection between 2 parts
•Connection between pipe and plate
•Connection between pipes
9) Visually check the rubber area of the flexible
hose for cracks.
Check the entire length of the flexible hose, espe-
cially the connection with the metal hose end.
CAUTION:
Carefully check the external surface of hoses
and tubes at approx. 25 mm (0.98 in) per sec-
ond.
10) Disconnect the drain hose from the heater
case, and check the hose end for at least 10 sec-
onds.
After the test is finished, reconnect the drain hose.
11) Turn the ignition key to the ON position, and
run the blower at high speed for approx. 1 minute.
Stop the blower to check the ventilation grill on the
instrument panel. While moving the tester closer to
the grill, run the blower for 1 or 2 seconds, then stop
it. Check the grill at that point for at least 10 sec-
onds.
12) Check the valve in the service port.
13) Visually check the rubber seal in the service
port cap.
AC-00035
(A) Flexible hose
AC-00036
(A)
AC-00037
AC-00038
Page 381 of 2453
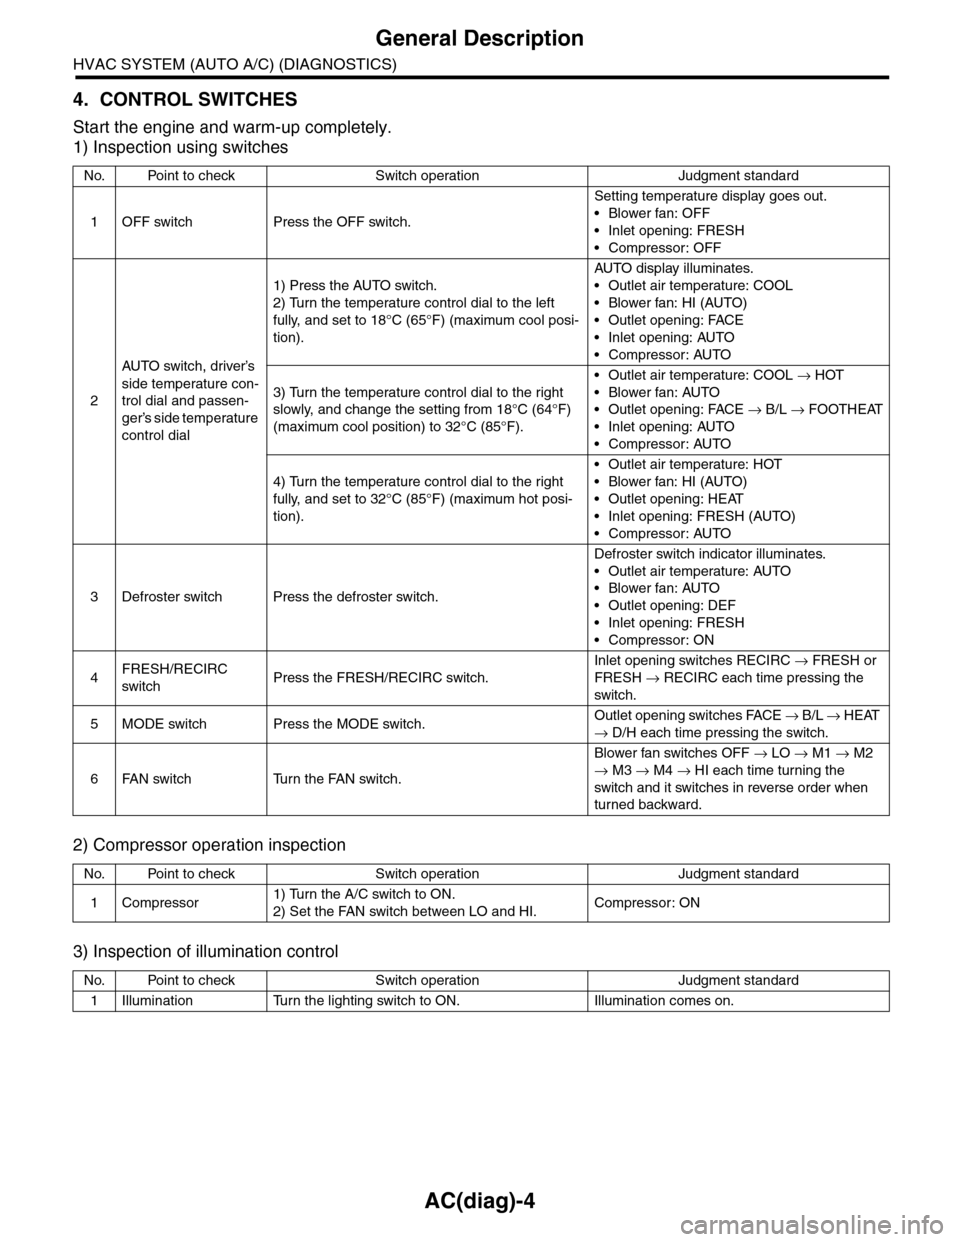
AC(diag)-4
General Description
HVAC SYSTEM (AUTO A/C) (DIAGNOSTICS)
4. CONTROL SWITCHES
Start the engine and warm-up completely.
1) Inspection using switches
2) Compressor operation inspection
3) Inspection of illumination control
No. Point to check Switch operation Judgment standard
1OFF switch Press the OFF switch.
Setting temperature display goes out.
•Blower fan: OFF
•Inlet opening: FRESH
•Compressor: OFF
2
AU TO sw it c h, d r iver ’s
side temperature con-
trol dial and passen-
ger’s side temperature
control dial
1) Press the AUTO switch.
2) Turn the temperature control dial to the left
fully, and set to 18°C (65°F) (maximum cool posi-
tion).
AU TO di sp l ay i l lu mi n at e s.
•Outlet air temperature: COOL
•Blower fan: HI (AUTO)
•Outlet opening: FACE
•Inlet opening: AUTO
•Compressor: AUTO
3) Turn the temperature control dial to the right
slowly, and change the setting from 18°C (64°F)
(maximum cool position) to 32°C (85°F).
•Outlet air temperature: COOL → HOT
•Blower fan: AUTO
•Outlet opening: FACE → B/L → FOOTHEAT
•Inlet opening: AUTO
•Compressor: AUTO
4) Turn the temperature control dial to the right
fully, and set to 32°C (85°F) (maximum hot posi-
tion).
•Outlet air temperature: HOT
•Blower fan: HI (AUTO)
•Outlet opening: HEAT
•Inlet opening: FRESH (AUTO)
•Compressor: AUTO
3Defroster switch Press the defroster switch.
Defroster switch indicator illuminates.
•Outlet air temperature: AUTO
•Blower fan: AUTO
•Outlet opening: DEF
•Inlet opening: FRESH
•Compressor: ON
4FRESH/RECIRC
switchPress the FRESH/RECIRC switch.
Inlet opening switches RECIRC → FRESH or
FRESH → RECIRC each time pressing the
switch.
5MODE switch Press the MODE switch.Outlet opening switches FACE → B / L → HEAT
→ D/H each time pressing the switch.
6FAN switch Turn the FAN switch.
Blower fan switches OFF → LO → M1 → M2
→ M3 → M4 → HI each time turning the
switch and it switches in reverse order when
turned backward.
No. Point to check Switch operation Judgment standard
1Compressor1) Turn the A/C switch to ON.
2) Set the FAN switch between LO and HI.Compressor: ON
No. Point to check Switch operation Judgment standard
1Illumination Turn the lighting switch to ON. Illumination comes on.