SUBARU TRIBECA 2014 1.G Workshop Manual
Manufacturer: SUBARU, Model Year: 2014, Model line: TRIBECA, Model: SUBARU TRIBECA 2014 1.GPages: 426, PDF Size: 6.37 MB
Page 51 of 426
1-20Seat, seatbelt and SRS airbags
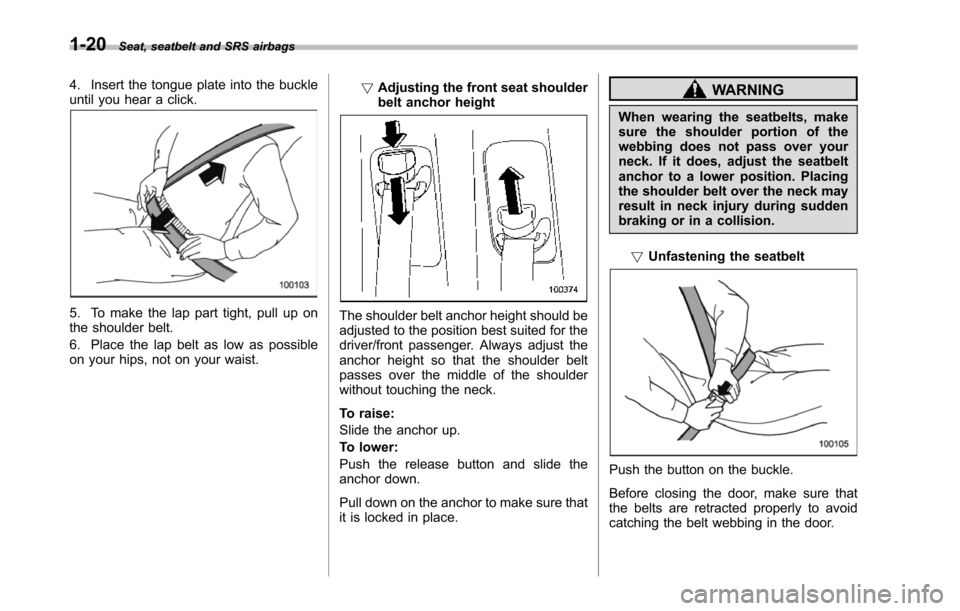
4. Insert the tongue plate into the buckleuntil you hear a click.
5. To make the lap part tight, pull up onthe shoulderbelt.
6. Place the lap belt as low as possibleon your hips, not on your waist.
!Adjusting the front seat shoulderbelt anchor height
The shoulderbelt anchor height should beadjusted to the position best suited for thedriver/front passenger. Always adjust theanchor height so that the shoulder beltpasses over the middle of the shoulderwithout touching the neck.
To raise:
Slide the anchor up.
To lower:
Push the release button and slide theanchor down.
Pull down on the anchor to make sure thatit is locked in place.
WARNING
When wearing the seatbelts, makesure the shoulder portion of thewebbing does not pass over yourneck. If it does, adjust the seatbeltanchor to a lower position. Placingthe shoulder belt over the neck mayresult in neck injury during suddenbrakingor in a collision.
!Unfastening the seatbelt
Push the button on the buckle.
Before closing the door, make sure thatthe belts are retracted properly to avoidcatching the belt webbing in the door.
Page 52 of 426
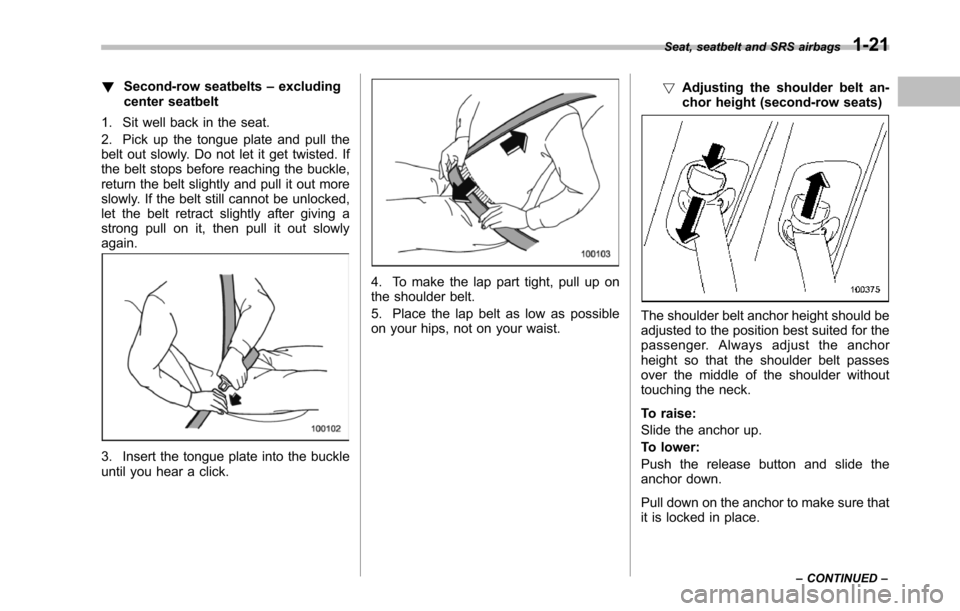
!Second-row seatbelts–excludingcenter seatbelt
1. Sit well back in the seat.
2. Pick up the tongue plate and pull thebelt out slowly. Do not let it get twisted. Ifthe belt stops before reaching the buckle,return the belt slightly and pull it out moreslowly. If the belt still cannot be unlocked,let the belt retract slightly after giving astrong pull on it, then pull it out slowlyagain.
3. Insert the tongue plate into the buckleuntil you hear a click.
4. To make the lap part tight, pull up onthe shoulder belt.
5. Place the lap belt as low as possibleon your hips, not on your waist.
!Adjusting the shoulder belt an-chor height (second-row seats)
The shoulder belt anchor height should beadjusted to the position best suited for thepassenger. Always adjust the anchorheight so that the shoulder belt passesover the middle of the shoulder withouttouching the neck.
To raise:
Slide the anchor up.
To lower:
Push the release button and slide theanchor down.
Pull down on the anchor to make sure thatit is locked in place.
Seat, seatbelt and SRS airbags1-21
–CONTINUED–
Page 53 of 426
1-22Seat, seatbelt and SRS airbags
WARNING
When wearing the seatbelts, makesure the shoulder portion of thewebbing does not pass over yourneck. If it does, adjust the seatbeltanchor to a lower position. Placingthe shoulder belt over the neck mayresult in neck injury during suddenbrakingor in a collision.
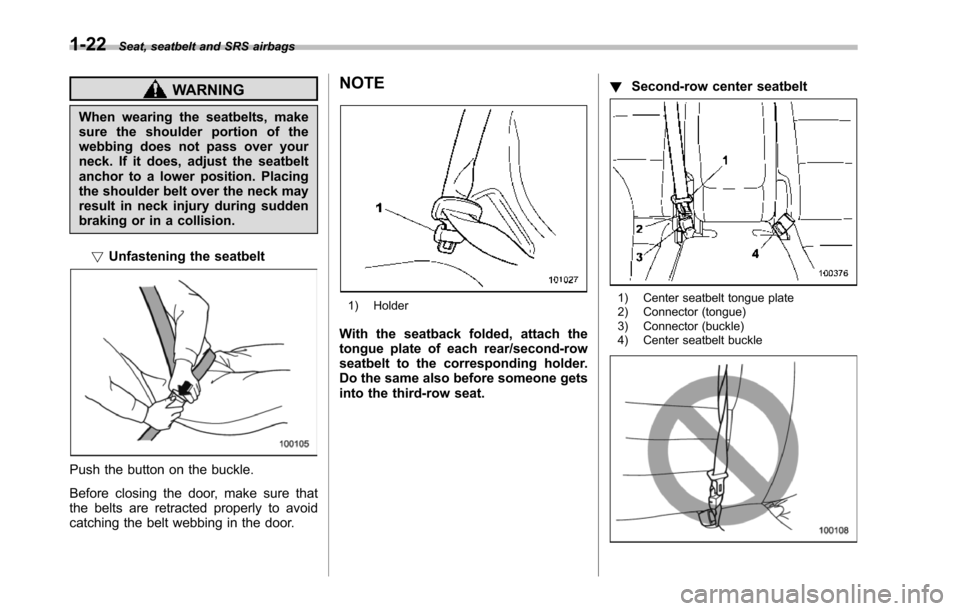
!Unfastening the seatbelt
Push the button on the buckle.
Before closing the door, make sure thatthe belts are retracted properly to avoidcatching the belt webbing in the door.
NOTE
1) Holder
With the seatback folded, attach thetongue plate of each rear/second-rowseatbeltto the corresponding holder.Do the same also before someone getsinto the third-row seat.
!Second-row center seatbelt
1) Center seatbelt tongue plate2) Connector (tongue)3) Connector (buckle)4) Center seatbelt buckle
Page 54 of 426
WARNING
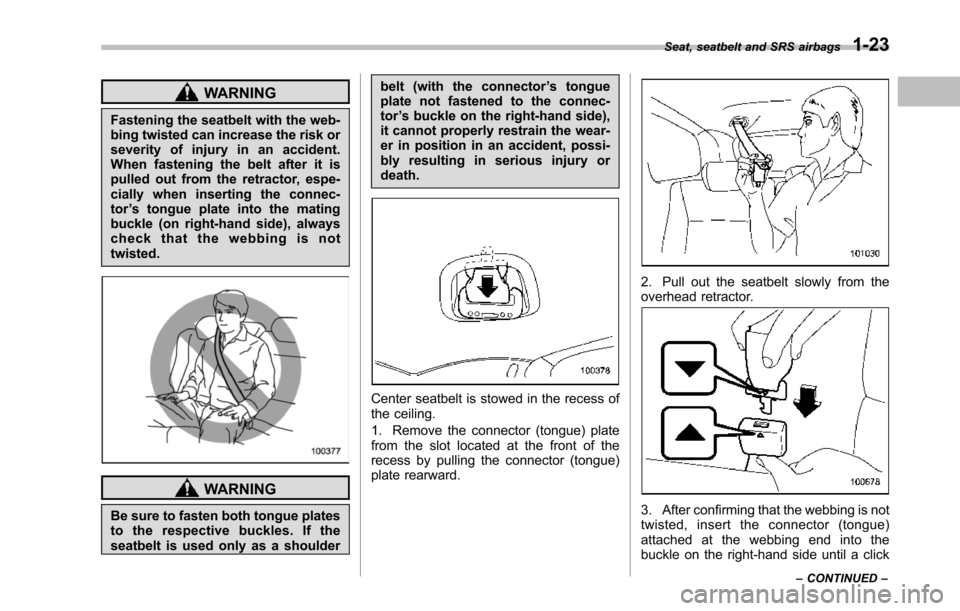
Fastening the seatbelt with the web-bing twisted can increase the risk orseverity of injury in an accident.When fastening the belt after it ispulled out from the retractor, espe-cially when inserting the connec-tor’s tongue plate into the matingbuckle (on right-hand side), alwayscheck that the webbing is nottwisted.
WARNING
Be sure to fasten both tongue platesto the respective buckles. If theseatbelt is used only as a shoulder
belt (with the connector’s tongueplate not fastened to the connec-tor’s buckle on the right-hand side),it cannot properly restrain the wear-er in position in an accident, possi-bly resulting in serious injury ordeath.
Center seatbelt is stowed in the recess ofthe ceiling.
1. Remove the connector (tongue) platefrom the slot located at the front of therecess by pulling the connector (tongue)plate rearward.
2. Pull out the seatbelt slowly from theoverhead retractor.
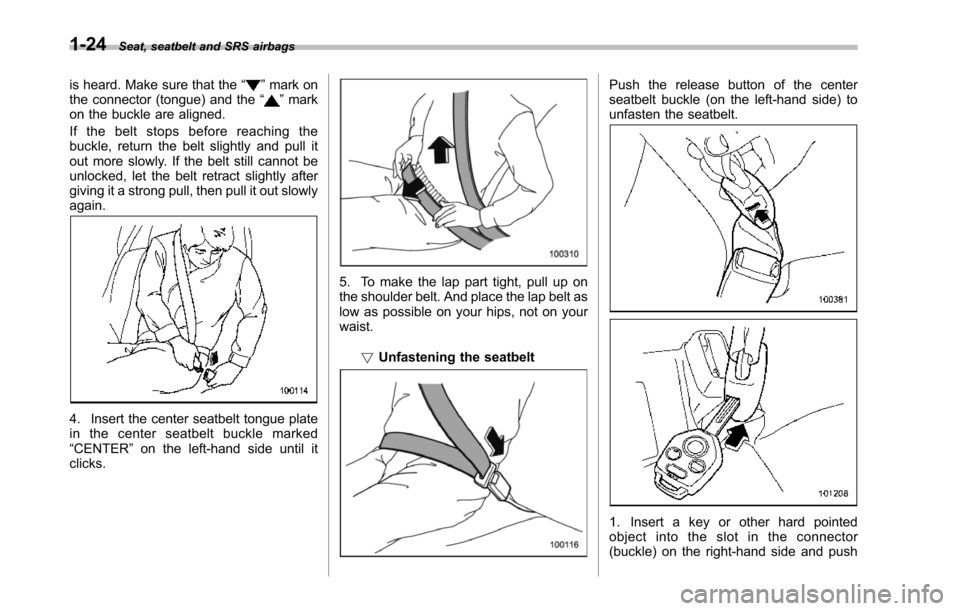
3. After confirming that the webbing is nottwisted, insert the connector (tongue)attached at the webbing end into thebuckle on the right-hand side until a click
Seat, seatbelt and SRS airbags1-23
–CONTINUED–
Page 55 of 426
1-24Seat, seatbelt and SRS airbags
is heard. Make sure that the“”mark onthe connector (tongue) and the“”markon the buckle are aligned.
If the belt stops before reaching thebuckle, return the belt slightly and pull itout more slowly. If the belt still cannot beunlocked, let the belt retract slightly aftergiving it a strong pull, then pull it out slowlyagain.
4. Insert the center seatbelt tongue platein the center seatbelt buckle marked“CENTER”on the left-hand side until itclicks.
5. To make the lap part tight, pull up onthe shoulder belt. And place the lap belt aslow as possible on your hips, not on yourwaist.
!Unfastening the seatbelt
Push the release button of the centerseatbelt buckle (on the left-hand side) tounfasten the seatbelt.
1. Insert a key or other hard pointedobject into the slot in the connector(buckle) on the right-hand side and push
Page 56 of 426
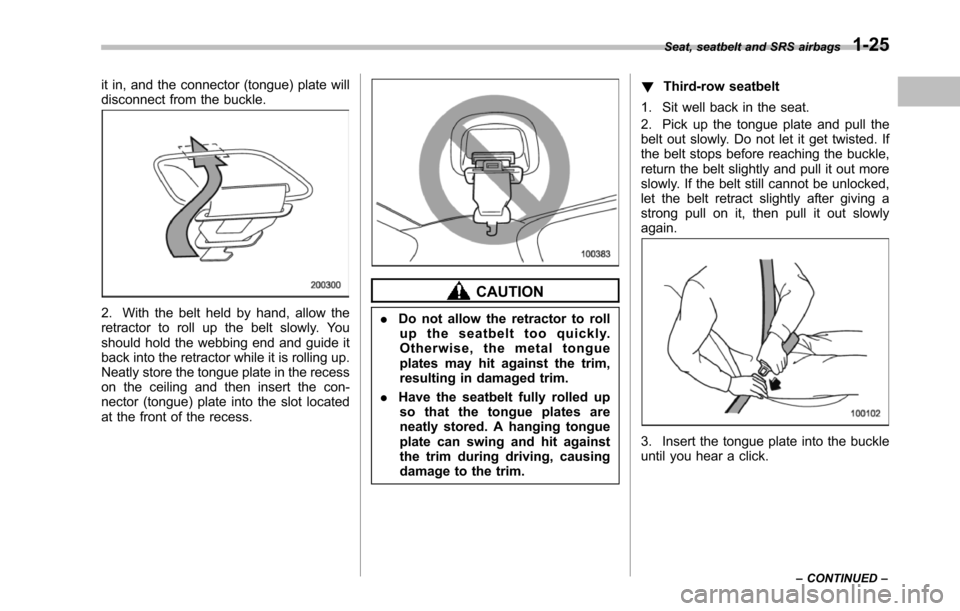
it in, and the connector (tongue) plate willdisconnect from the buckle.
2. With the belt held by hand, allow theretractor to roll up the belt slowly. Youshould hold thewebbing end and guide itback into the retractor while it is rolling up.Neatly store the tongue plate in the recesson the ceiling and then insert the con-nector (tongue) plate into the slot locatedat the front of the recess.
CAUTION
.Do not allow the retractor to rollup the seatbelt too quickly.Otherwise, the metal tongueplates may hit against the trim,resulting in damaged trim.
.Have the seatbelt fully rolled upso that the tongue plates areneatly stored. A hanging tongueplate can swing and hit againstthe trim during driving, causingdamage to the trim.
!Third-row seatbelt
1. Sit well back in the seat.
2. Pick up the tongue plate and pull thebelt out slowly. Do not let it get twisted. Ifthe belt stops before reaching the buckle,return the belt slightly and pull it out moreslowly. If the belt still cannot be unlocked,let the belt retract slightly after giving astrong pull on it, then pull it out slowlyagain.
3. Insert the tongue plate into the buckleuntil you hear a click.
Seat, seatbelt and SRS airbags1-25
–CONTINUED–
Page 57 of 426
1-26Seat, seatbelt and SRS airbags
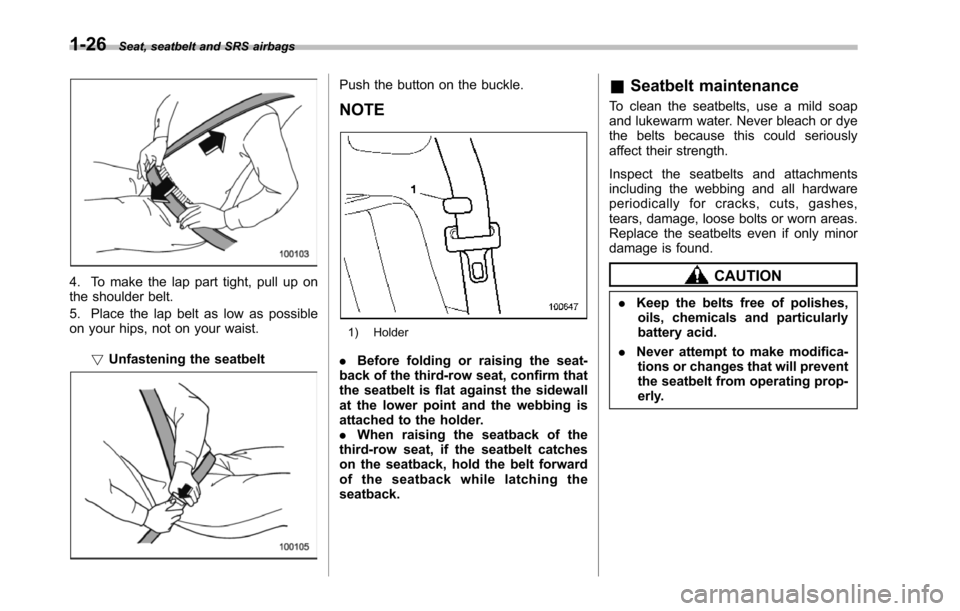
4. To make the lap part tight, pull up onthe shoulder belt.
5. Place the lap belt as low as possibleon your hips, not on your waist.
!Unfastening the seatbelt
Push the button on the buckle.
NOTE
1) Holder
.Before folding or raising the seat-backof the third-row seat, confirm thatthe seatbelt is flat against the sidewallat the lower point and the webbing isattached to the holder..When raising the seatback of thethird-rowseat, if the seatbelt catcheson the seatback, hold the belt forwardof the seatback while latching theseatback.
&Seatbelt maintenance
To clean the seatbelts, use a mild soapand lukewarm water. Never bleach or dyethe belts because this could seriouslyaffect their strength.
Inspect the seatbelts and attachmentsincluding the webbing and all hardwareperiodically for cracks, cuts, gashes,tears, damage, loose bolts or worn areas.Replacethe seatbelts even if only minordamage is found.
CAUTION
.Keep the belts free of polishes,oils, chemicals and particularlybattery acid.
.Never attempt to make modifica-tions or changes that will preventthe seatbelt from operating prop-erly.
Page 58 of 426
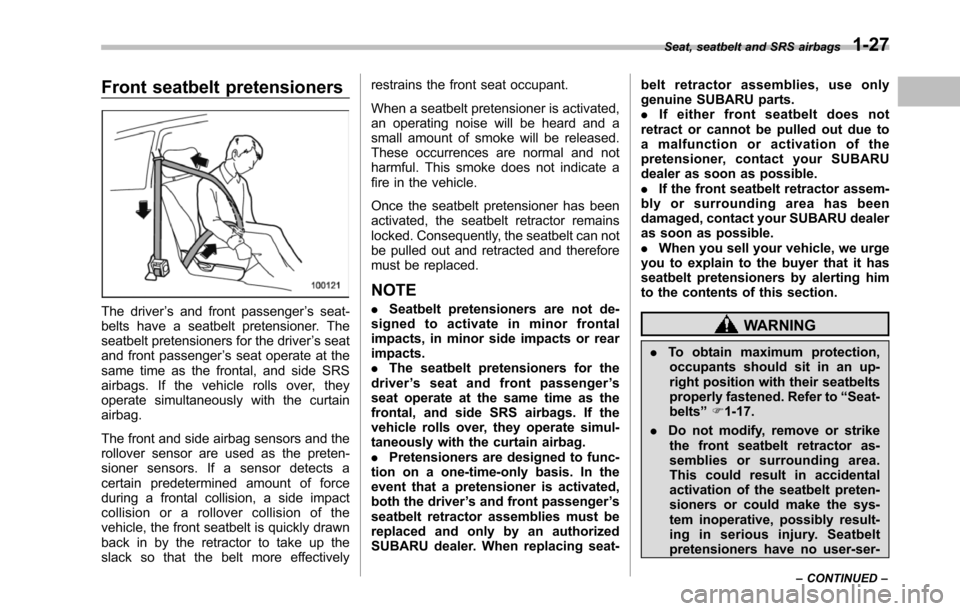
Front seatbelt pretensioners
Thedriver’s and front passenger’s seat-belts have a seatbelt pretensioner. Theseatbelt pretensioners for the driver’s seatand front passenger’s seat operate at thesame time as the frontal, and side SRSairbags. If the vehicle rolls over, theyoperate simultaneously with the curtainairbag.
The front and side airbag sensors and therollover sensor are used as the preten-sioner sensors. If a sensor detects acertain predetermined amount of forceduring a frontal collision, a side impactcollision or a rollover collision of thevehicle, the front seatbelt is quickly drawnback in by the retractor to take up theslack so that the belt more effectively
restrains the front seat occupant.
When a seatbelt pretensioner is activated,an operating noise will be heard and asmall amount of smoke will be released.These occurrences are normal and notharmful. This smoke does not indicate afire in the vehicle.
Once the seatbelt pretensioner has beenactivated, the seatbelt retractor remainslocked. Consequently, the seatbelt can notbe pulled out and retracted and thereforemust be replaced.
NOTE
.Seatbelt pretensioners are not de-signed to activate in minor frontalimpacts, in minor side impacts or rearimpacts..The seatbelt pretensioners for thedriver’sseatandfrontpassenger’sseat operate at the same time as thefrontal, and side SRS airbags. If thevehicle rolls over, they operate simul-taneously with thecurtain airbag..Pretensioners are designed to func-tion on a one-time-only basis. In theevent that a pretensioner is activated,both the driver’s and front passenger’sseatbelt retractor assemblies must bereplaced and only by an authorizedSUBARU dealer. When replacing seat-
belt retractor assemblies, use onlygenuine SUBARU parts..If either front seatbelt does notretract or cannot be pulled out due toamalfunctionoractivationofthepretensioner, contact your SUBARUdealer as soon as possible..If the front seatbelt retractor assem-bly or surrounding area has beendamaged, contact your SUBARU dealeras soon as possible..When you sell your vehicle, we urgeyou to explain to the buyer that it hasseatbelt pretensioners by alerting himto the contents of this section.
WARNING
.To obtain maximum protection,occupants should sit in an up-right position with their seatbeltsproperly fastened. Refer to“Seat-belts”F1-17.
.Do not modify, remove or strikethe front seatbelt retractor as-semblies or surrounding area.This could result in accidentalactivation of the seatbelt preten-sioners or could make the sys-tem inoperative, possibly result-ing in serious injury. Seatbeltpretensioners have no user-ser-
Seat, seatbelt and SRS airbags1-27
–CONTINUED–
Page 59 of 426
1-28Seat, seatbelt and SRS airbags
viceable parts. For required ser-vicing of front seatbelt retractorsequipped with seatbelt preten-sioners, see your nearestSUBARU dealer.
.When discarding front seatbeltretractor assemblies or scrap-ping the entire vehicle due tocollision damage or for otherreasons, consult your SUBARUdealer.
&System monitors
A diagnostic system continually monitorsthe readiness of the seatbelt pretensionerwhile the vehicle is being driven. Theseatbeltpretensioners share the controlmodule with the airbag system. Therefore,if any malfunction occurs in a seatbeltpretensioner, the SRS airbag systemwarning light will illuminate. For details,refer to“SRS airbag system monitors”F1-71.
&System servicing
WARNING
.When discarding a seatbelt re-tractor assembly or scrappingthe entire vehicle damaged by a
collision, consult your SUBARUdealer.
.Tampering with or disconnectingthe system’s wiring could resultin accidental activation of theseatbelt pretensioner and/or air-bag or could make the systeminoperative, which may result inserious injury. Do not use elec-trical test equipment on anycircuit related to the seatbeltpretensioner and airbag sys-tems. For required servicing ofthe seatbelt pretensioner, seeyour nearest SUBARU dealer.
CAUTION
The front sub sensors are locatedon both sides of the radiator panel,and the airbag control module in-cludingthe impact sensors is lo-cated under the center console. Ifyou need service or repair in thoseareas or near the front seatbeltretractors, we recommend that youhave an authorized SUBARU dealerperform the work.
NOTE
If the front part of the vehicle isdamaged in an accident to the extentthat the seatbelt pretensioner does notoperate, contact your SUBARU dealeras soon as possible.
&Precautions against vehicle
modification
Always consult your SUBARU dealer ifyou want to install any accessory parts toyour vehicle.
CAUTION
Do not perform any of the followingmodifications. Such modificationscan interfere with proper operationof the seatbelt pretensioners.
.Attachment of any equipment(bush bar, winches, snow plow,skid plate, etc.)other than genu-ine SUBARU accessory parts tothe front end.
.Modification of the suspensionsystem or front end structure.
.Installation of a tire of differentsize and construction from thetires specified on the vehicleplacard attached to the doorpillar or specified for individual
Page 60 of 426
vehicle models in this Owner’sManual.Child restraint systems
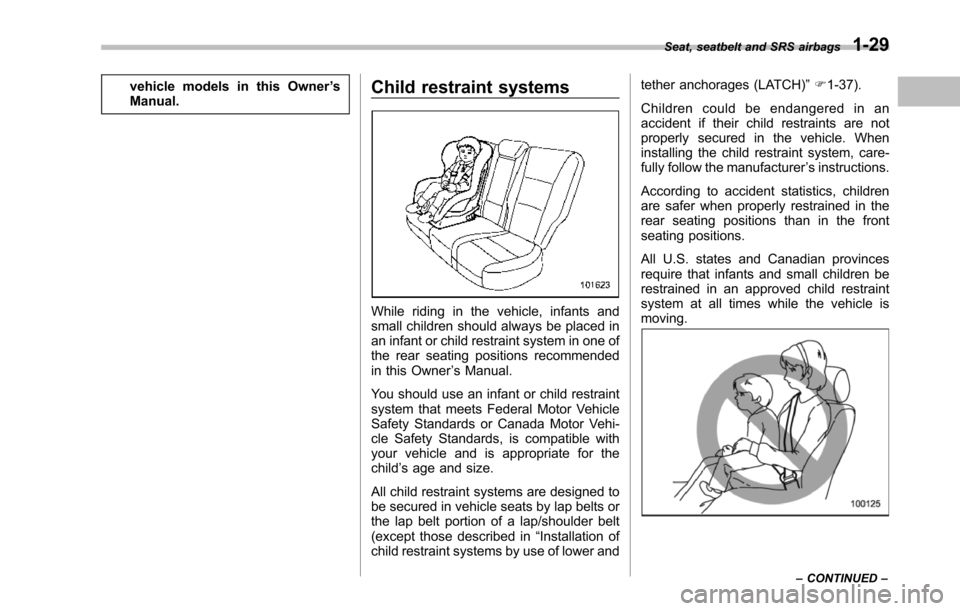
Whileriding in the vehicle, infants andsmall children should always be placed inan infant or child restraint system in one ofthe rear seating positions recommendedin this Owner’s Manual.
You should use an infant or child restraintsystem that meets Federal Motor VehicleSafetyStandards or Canada Motor Vehi-cle Safety Standards, is compatible withyour vehicle and is appropriate for thechild’s age and size.
Allchild restraint systems are designed tobe secured in vehicle seats by lap belts orthe lap belt portion of a lap/shoulder belt(except those described in“Installation ofchild restraint systems by use of lower and
tether anchorages (LATCH)”F1-37).
Children could be endangered in anaccident if their child restraints are notproperly secured in the vehicle. Wheninstalling the child restraint system, care-fully follow the manufacturer’s instructions.
According to accident statistics, childrenare safer when properly restrained in therear seating positions than in the frontseating positions.
All U.S. states and Canadian provincesrequire that infants and small children berestrained in an approved child restraintsystem at all times while the vehicle ismoving.
Seat, seatbelt and SRS airbags1-29
–CONTINUED–