SUBARU WRX 2016 Owners Manual
Manufacturer: SUBARU, Model Year: 2016, Model line: WRX, Model: SUBARU WRX 2016Pages: 594, PDF Size: 19.43 MB
Page 271 of 594
Audio/Basic operation
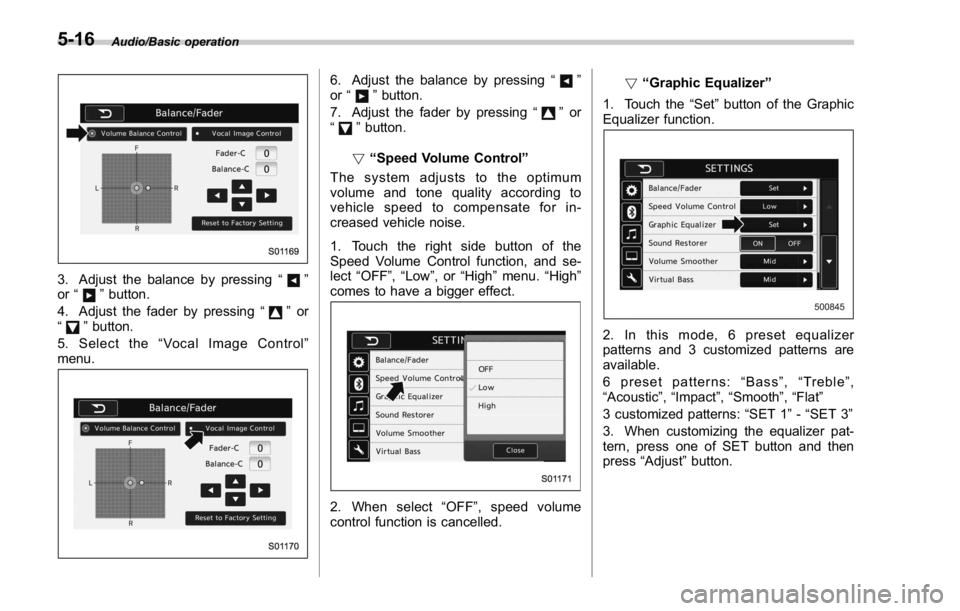
3. Adjust the balance by pressing “ ”
or “
” button.
4. Adjust the fader by pressing “
” or
“
” button.
5. Select the “ Vocal Image Control ”
menu. 6. Adjust the balance by pressing “ ”
or “
” button.
7. Adjust the fader by pressing “
” or
“
” button.
! “ Speed Volume Control ”
The system adjusts to the optimum
volume and tone quality according to
vehicle speed to compensate for in-
creased vehicle noise.
1. Touch the right side button of the
Speed Volume Control function, and se-
lect “ OFF ” , “ Low ” ,or “ High ” menu. “ High ”
comes to have a bigger effect.
2. When select “ OFF ” , speed volume
control function is cancelled. ! “ Graphic Equalizer ”
1. Touch the “ Set ” button of the Graphic
Equalizer function.
2. In this mode, 6 preset equalizer
patterns and 3 customized patterns are
available.
6 preset patterns: “ Bass ” , “ Treble ” ,
“ Acoustic ” , “ Impact ” , “ Smooth ” , “ Flat ”
3 customized patterns: “ SET 1 ” - “ SET 3 ”
3. When customizing the equalizer pat-
tern, press one of SET button and then
press “ Adjust ” button.5-16
Page 272 of 594
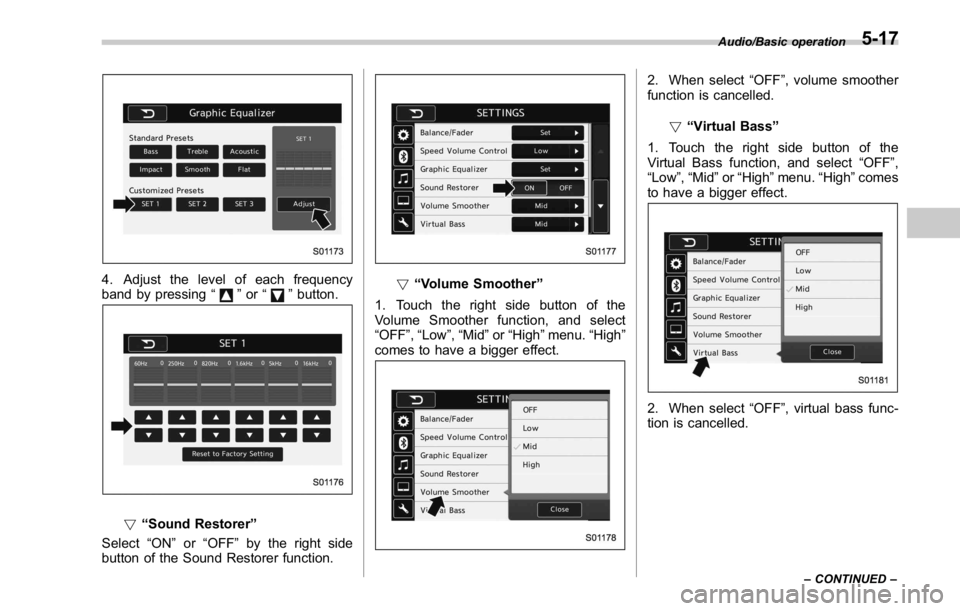
4. Adjust the level of each frequency
band by pressing “
” or “ ” button.
! “ Sound Restorer ”
Select “ ON ” or “ OFF ” by the right side
button of the Sound Restorer function. ! “ Volume Smoother ”
1. Touch the right side button of the
Volume Smoother function, and select
“ OFF ” , “ Low ” , “ Mid ” or “ High ” menu. “ High ”
comes to have a bigger effect. 2. When select “ OFF ” , volume smoother
function is cancelled.
! “ Virtual Bass ”
1. Touch the right side button of the
Virtual Bass function, and select “ OFF ” ,
“ Low ” , “ Mid ” or “ High ” menu. “ High ” comes
to have a bigger effect.
2. When select “ OFF ” , virtual bass func-
tion is cancelled. Audio/Basic operation
– CONTINUED –5-17
Page 273 of 594
Audio/Audio/visual remote controls
! Voice command system
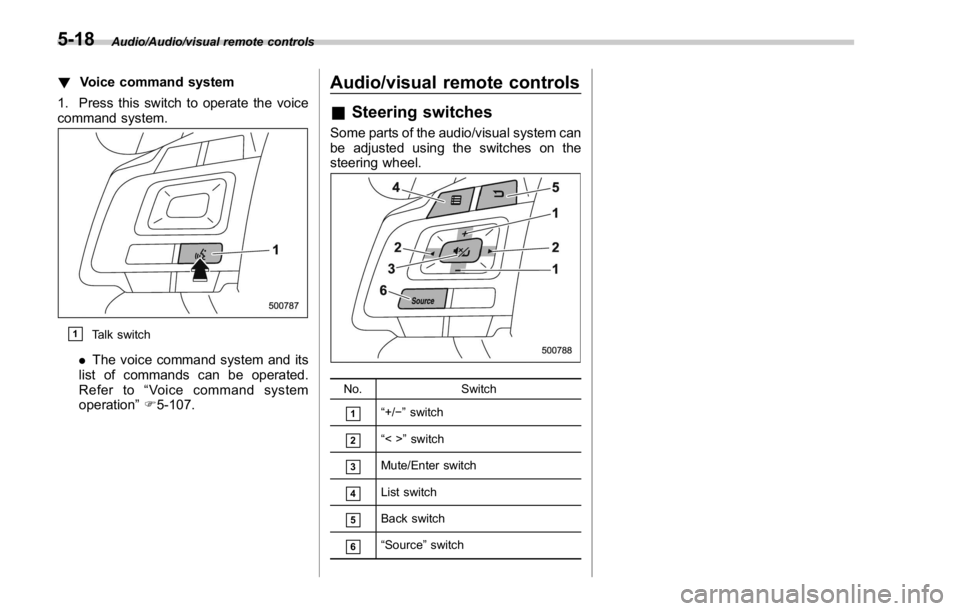
1. Press this switch to operate the voice
command system.
& 1
Talk switch
. The voice command system and its
list of commands can be operated.
Refer to “ Voice command system
operation ” F 5-107. Audio/visual remote controls & Steering switches Some parts of the audio/visual system can
be adjusted using the switches on the
steering wheel.
No. Switch
& 1
“ +/ − ” switch
& 2
“ <> ” switch
& 3
Mute/Enter switch
& 4
List switch
& 5
Back switch
& 6
“ Source ” switch5-18
Page 274 of 594

“ +/- ” switch Mode Operation Function
Except list screen Press Volume up/down
Press and hold Volume up/down continuously
List screen Press Move cursor up/down
“ <> ” switch Mode Operation Function
AM/FM Radio, SiriusXM Press Preset channel up/down
Press and hold Seek up/down continuously
while the switch is being
pressed
aha Press Content up/down
Press and hold Reverse the current content
item for 15 seconds/Fast for-
ward the current content item
for 30 seconds
Audio CD, MP3/WMA/AAC
disc, USB, iPod, BT audio Press Select a track/file
Press and hold Fast forward/rewind
Pandora Press and hold Thumbs up
List screen Press Move cursor left/right Audio/Audio/visual remote controls
– CONTINUED –5-19
Page 275 of 594

Audio/Audio/visual remote controls
Mute/Enter switch Mode Operation Function
Except list screen Press Audio ON/OFF
List screen Press Select cursor entry
Back switch Mode Operation Function
All (except STARLINK) Press Return to the previous screen
All Press and hold Return to the HOME screen
List switch Mode Operation Function
All (except STARLINK) Press Show list screen
“ Source ” switch
Mode Operation Function
All Press Change audio modes
NOTE In the aha, Pandora and STARLINK mode, some operation may be done on the
screen depend on the selected APPS.5-20
Page 276 of 594

Tips for operating the audio/
visual system & Operating information CAUTION. To avoid damage to the audio/
visual system:
– Be careful not to spill bev-
erages over the audio/visual
system.
– Do not put anything other than
an appropriate disc into the
disc slot.
NOTE The use of a cellular phone inside or
near the vehicle may cause a noise
from the speakers of the audio/visual
system which you are listening to.
However, this does not indicate a
malfunction.
! Radio
Usually, a problem with radio reception
does not mean there is a problem with the
radio — it is just the normal result of
conditions outside the vehicle.
For example, nearby buildings and terrain can interfere with FM reception. Power
lines or phone wires can interfere with AM
signals. And of course, radio signals have
a limited range. The farther the vehicle is
from a station, the weaker its signal will
be. In addition, reception conditions
change constantly as the vehicle moves.
Here, some common reception problems
that probably do not indicate a problem
with the radio are described.
! FM
Fading and drifting stations: Generally, the
effective range of FM is about 25 miles (40
km). Once outside this range, you may
notice fading and drifting, which increase
with the distance from the radio transmit-
ter. They are often accompanied by
distortion.
Static and fluttering: These occur when
signals are blocked by buildings, trees or
other large objects. Increasing the bass
level may reduce static and fluttering.
Station swapping: If the FM signal being
listened to is interrupted or weakened, and
there is another strong station nearby on
the FM band, the radio may tune in the
second station until the original signal can
be picked up again. ! AM
Fading: AM broadcasts are reflected by
the upper atmosphere — especially at
night. These reflected signals can inter-
fere with those received directly from the
radio station, causing the radio station to
sound alternately strong and weak.
Station interference: When a reflected
signal and a signal received directly from
a radio station are very nearly the same
frequency, they can interfere with each
other, making it difficult to hear the broad-
cast.
Static: AM is easily affected by external
sources of electrical noise, such as high
tension power lines, lightening or electrical
motors. This results in static.
! SiriusXM
. Cargo loaded on the roof luggage
carrier, especially metal objects, may
adversely affect the reception of SiriusXM
Satellite Radio.
. Alternation or modifications carried out
without appropriate authorization may in-
validate the user ’ s right to operate the
equipment.Audio/Tips for operating the audio/visual system
– CONTINUED –5-21
Page 277 of 594
Audio/Tips for operating the audio/visual system
! CD player and disc
. This CD player is intended for use with
4.7 in. (12 cm) discs only.
. Extremely high temperatures can keep
the CD player from working. On hot days,
use the air conditioning system to cool the
inside of the vehicle before using the
player.
. Bumpy roads or other vibrations may
make the CD player skip.
. If moisture gets into the CD player, the
discs may not be able to be played.
Remove the discs from the player and
wait until it dries.
WARNINGCD players use an invisible laser
beam which could cause hazardous
radiation exposure if directed out-
side the unit. Be sure to operate the
player correctly.
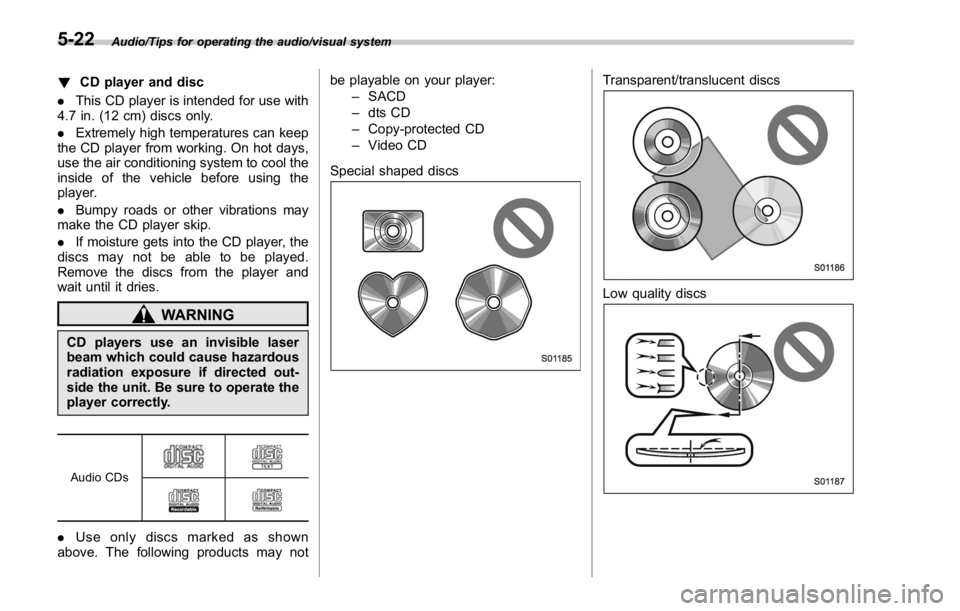
Audio CDs
. Use only discs marked as shown
above. The following products may not be playable on your player:
– SACD
– dts CD
– Copy-protected CD
– Video CD
Special shaped discs Transparent/translucent discs
Low quality discs5-22
Page 278 of 594
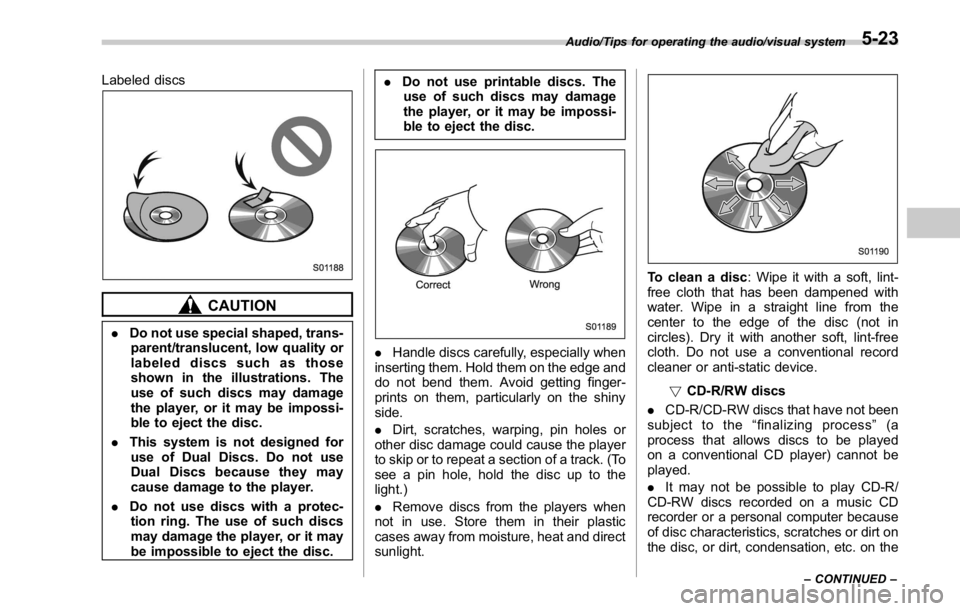
Labeled discs
CAUTION. Do not use special shaped, trans-
parent/translucent, low quality or
labeled discs such as those
shown in the illustrations. The
use of such discs may damage
the player, or it may be impossi-
ble to eject the disc.
. This system is not designed for
use of Dual Discs. Do not use
Dual Discs because they may
cause damage to the player.
. Do not use discs with a protec-
tion ring. The use of such discs
may damage the player, or it may
be impossible to eject the disc. . Do not use printable discs. The
use of such discs may damage
the player, or it may be impossi-
ble to eject the disc.
. Handle discs carefully, especially when
inserting them. Hold them on the edge and
do not bend them. Avoid getting finger-
prints on them, particularly on the shiny
side.
. Dirt, scratches, warping, pin holes or
other disc damage could cause the player
to skip or to repeat a section of a track. (To
see a pin hole, hold the disc up to the
light.)
. Remove discs from the players when
not in use. Store them in their plastic
cases away from moisture, heat and direct
sunlight. To clean a disc : Wipe it with a soft, lint-
free cloth that has been dampened with
water. Wipe in a straight line from the
center to the edge of the disc (not in
circles). Dry it with another soft, lint-free
cloth. Do not use a conventional record
cleaner or anti-static device.
! CD-R/RW discs
. CD-R/CD-RW discs that have not been
subject to the “ finalizing process ” (a
process that allows discs to be played
on a conventional CD player) cannot be
played.
. It may not be possible to play CD-R/
CD-RW discs recorded on a music CD
recorder or a personal computer because
of disc characteristics, scratches or dirt on
the disc, or dirt, condensation, etc. on theAudio/Tips for operating the audio/visual system
– CONTINUED –5-23
Page 279 of 594

Audio/Tips for operating the audio/visual system
lens of the unit.
. It may not be possible to play discs
recorded on a personal computer depend-
ing on the application settings and the
environment. Record with the correct
format. (For details, contact the appropri-
ate application manufacturers of the ap-
plications.)
. CD-R/CD-RW discs may be damaged
by direct exposure to sunlight, high tem-
peratures or other storage conditions. The
unit may be unable to play some damaged
discs.
. If you insert a CD-RW disc into the
player, playback will begin more slowly
than with a conventional CD or CD-R disc.
. Recordings on CD-R/CD-RW cannot
be played using the DDCD (Double
Density CD) system.
! USB memory device
. USB communication formats: USB
1.1/2.0 HS (480 Mbps) and FS (12 Mbps)
. File formats: FAT 16/32
. Correspondence class: Mass storage
class
! iPod
The following iPod ®
, iPod nano ®
, iPod
classic ®
, iPod touch ®
and iPhone ®
de-
vices can be used with this system. Made for
. iPod touch (5th generation)*
. iPod touch (4th generation)
. iPod touch (3rd generation)
. iPod touch (2nd generation)
. iPod touch (1st generation)
. iPod classic
. iPod nano (7th generation)*
. iPod nano (6th generation)*
. iPod nano (5th generation)
. iPod nano (4th generation)
. iPod nano (3rd generation)
. iPod nano (2nd generation)*
. iPod nano (1st generation)*
. iPhone 5S*
. iPhone 5C*
. iPhone 5*
. iPhone 4S
. iPhone 4
. iPhone 3GS
. iPhone 3G
. iPhone
*: iPod video not supported
Depending on differences between mod-
els or software versions etc., some mod-
els might be incompatible with this sys-
tem. ! File information
Compatible compressed files (Audio) Item USB DISC
Compatible
file format MP3/WMA/AAC
Folders in the
device Maximum
512 Maximum
255
Files in the
device Maximum
8000 Maximum
512
Files per
folder Maximum
255 —
Corresponding sampling frequency
(Audio) File type Frequency (kHz)
MP3 files:
MPEG 1 LAYER 3 32/44.1/48
MP3 files:
MPEG 2 LSF LAYER 3 16/22.05/24
WMA files:
Ver. 7, 8, 9 (9.1/9.2) 32/48/64/80/96/128/
160/192
AAC files:
MPEG4/AAC-LC 48/44.1/32/24/22.05/
16/12/11.025/85-24
Page 280 of 594

Corresponding bit rates (Audio) File type Bit rate (kbps)
MP3 files:
MPEG 1 LAYER 3 32 - 320
MP3 files:
MPEG 2 LSF LAYER 3 8 - 160
WMA files: Ver. 7, 8 CBR 48 - 192
WMA files:
Ver. 9 (9.1/9.2) CBR 32 - 192
AAC files:
MPEG4/AAC-LC 16 - 320
(Variable Bit Rate (VBR) compatible)
. MP3 (MPEG Audio Layer 3), WMA
(Windows Media Audio) and AAC (Ad-
vanced Audio Coding) are audio compres-
sion standards.
. This system can play MP3/WMA/AAC
files on CD-R, CD-RW discs, USB mem-
ory, and Bluetooth device.
. This system can play disc recordings
compatible with ISO 9660 level 1 and level
2 and with the Romeo and Joliet file
system.
. When naming an MP3/WMA/AAC file,
add an appropriate file extension (.mp3/
.wma/.m4a).
. This system plays back files with .mp3/
.wma/.m4a file extensions as MP3/WMA/
AAC files respectively. To prevent noise and playback errors, use the appropriate
file extension.
. This system can play only the first
session when using multi-session compa-
tible CDs.
. MP3 files are compatible with the ID3
Tag Ver. 1.0, Ver. 1.1, Ver. 2.2 and Ver. 2.3
formats. This system cannot display disc
title, track title and artist name in other
formats.
. WMA/AAC files can contain a WMA/
AAC tag that is used in the same way as
an ID3 tag. WMA/AAC tags carry informa-
tion such as track title and artist name.
. The emphasis function is available only
when playing MP3/WMA files recorded at
32, 44.1 and 48 kHz.
. This system can play back AAC files
encoded by iTunes.
. The sound quality of MP3/WMA files
generally improves with higher bit rates. In
order to achieve a reasonable level of
sound quality, discs recorded with a bit
rate of at least 128 kbps are recom-
mended.
. The MP3/WMA player does not play
back MP3/WMA files from discs recorded
using packet write data transfer (UDF
format). Discs should be recorded using
“ pre-mastering ” software rather than
“ packet write ” software. . M3u playlists are not compatible with
the audio device.
. MP3i (MP3 interactive) and MP3PRO
formats are not compatible with the audio
device.
. The player is compatible with VBR
(Variable Bit Rate).
. When playing back files recorded as
VBR (Variable Bit Rate) files, the play time
will not be correctly displayed if the fast
forward or reverse operations are used.
. It is not possible to check folders that
do not include MP3/WMA/AAC files.
. MP3/WMA/AAC files in folders up to 8
levels deep can be played. However, the
start of playback may be delayed when
using discs containing numerous levels of
folders. For this reason, we recommend
creating discs with no more than 2 levels
of folders.Audio/Tips for operating the audio/visual system
– CONTINUED –5-25