key SUBARU WRX 2016 Repair Manual
[x] Cancel search | Manufacturer: SUBARU, Model Year: 2016, Model line: WRX, Model: SUBARU WRX 2016Pages: 594, PDF Size: 19.43 MB
Page 171 of 594
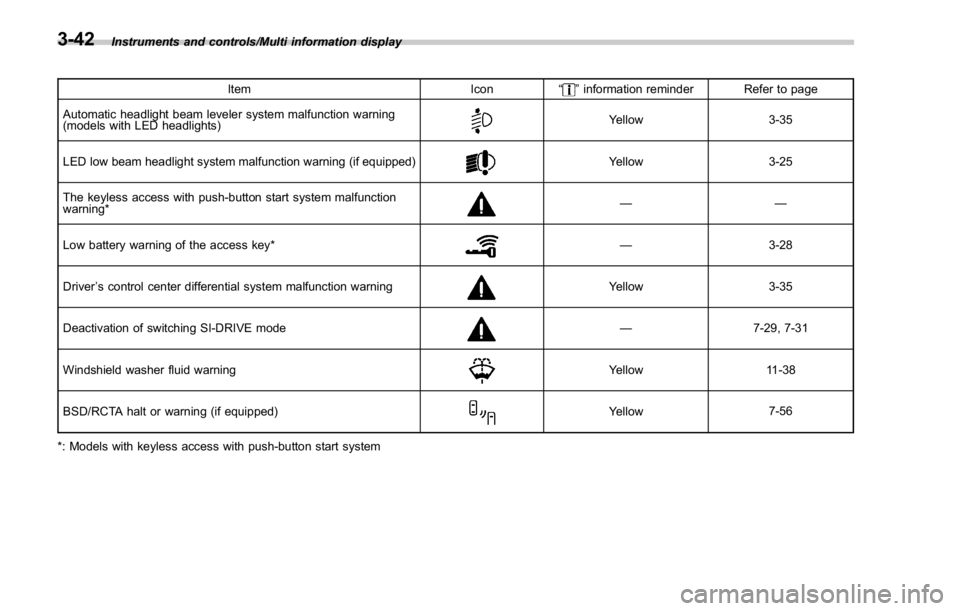
Instruments and controls/Multi information display
Item Icon “ ” information reminder Refer to page
Automatic headlight beam leveler system malfunction warning
(models with LED headlights) Yellow 3-35
LED low beam headlight system malfunction warning (if equipped) Yellow 3-25
The keyless access with push-button start system malfunction
warning* ——
Low battery warning of the access key* — 3-28
Driver ’ s control center differential system malfunction warning Yellow 3-35
Deactivation of switching SI-DRIVE mode — 7-29, 7-31
Windshield washer fluid warning Yellow 11-38
BSD/RCTA halt or warning (if equipped) Yellow 7-56
*: Models with keyless access with push-button start system3-42
Page 172 of 594
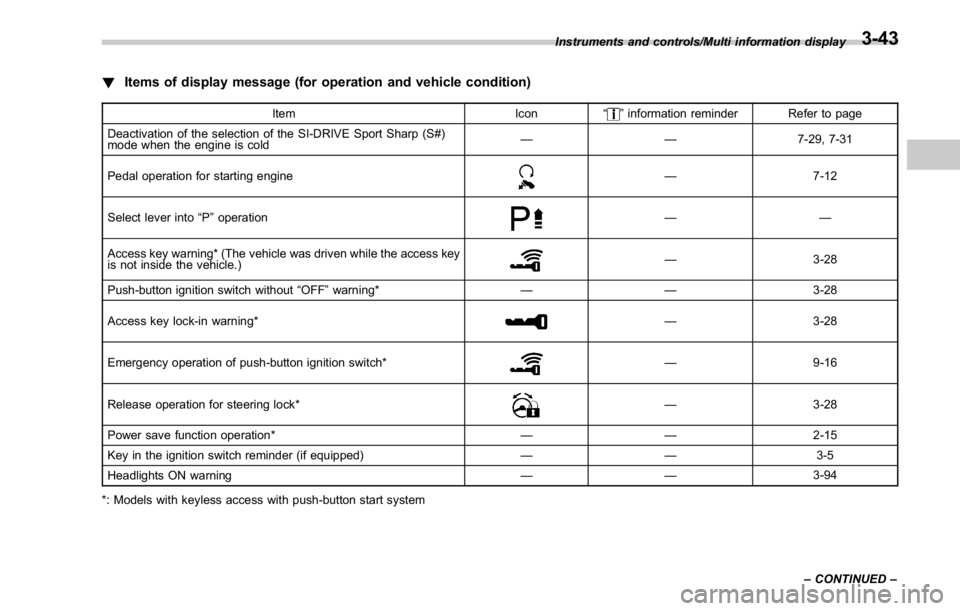
! Items of display message (for operation and vehicle condition) Item Icon “ ” information reminder Refer to page
Deactivation of the selection of the SI-DRIVE Sport Sharp (S#)
mode when the engine is cold —— 7-29, 7-31
Pedal operation for starting engine
— 7-12
Select lever into “ P ” operation ——
Access key warning* (The vehicle was driven while the access key
is not inside the vehicle.) — 3-28
Push-button ignition switch without “ OFF ” warning* —— 3-28
Access key lock-in warning* — 3-28
Emergency operation of push-button ignition switch* — 9-16
Release operation for steering lock* — 3-28
Power save function operation* —— 2-15
Key in the ignition switch reminder (if equipped) —— 3-5
Headlights ON warning —— 3-94
*: Models with keyless access with push-button start system Instruments and controls/Multi information display
– CONTINUED –3-43
Page 189 of 594
Instruments and controls/Multi function display
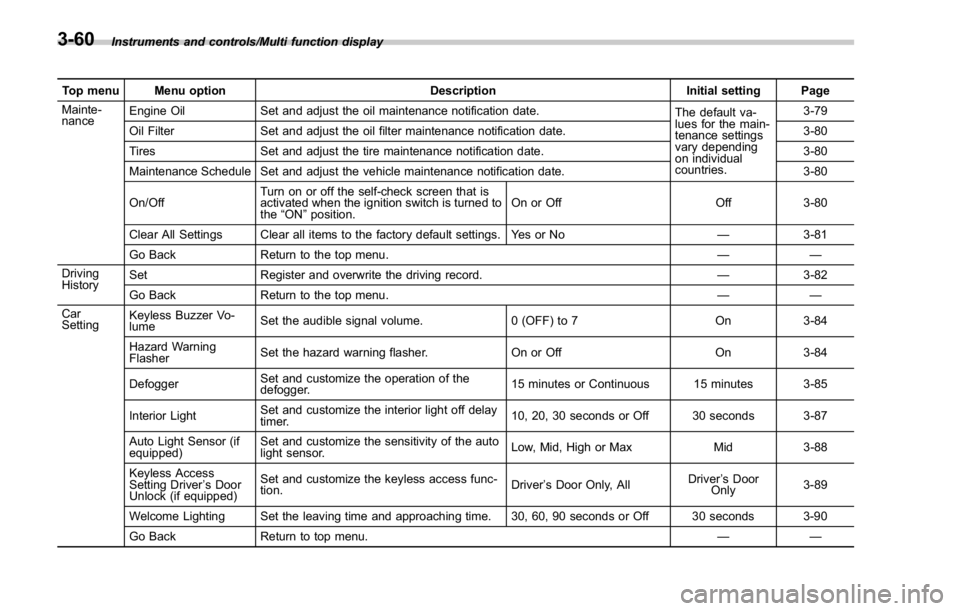
Top menu Menu option Description Initial setting Page
Mainte-
nance Engine Oil Set and adjust the oil maintenance notification date.
The default va-
lues for the main-
tenance settings
vary depending
on individual
countries. 3-79
Oil Filter Set and adjust the oil filter maintenance notification date. 3-80
Tires Set and adjust the tire maintenance notification date. 3-80
Maintenance Schedule Set and adjust the vehicle maintenance notification date. 3-80
On/Off Turn on or off the self-check screen that is
activated when the ignition switch is turned to
the “ ON ” position. On or Off Off 3-80
Clear All Settings Clear all items to the factory default settings. Yes or No — 3-81
Go Back Return to the top menu. ——
Driving
History Set Register and overwrite the driving record. — 3-82
Go Back Return to the top menu. ——
Car
Setting Keyless Buzzer Vo-
lume Set the audible signal volume. 0 (OFF) to 7 On 3-84
Hazard Warning
Flasher Set the hazard warning flasher. On or Off On 3-84
Defogger Set and customize the operation of the
defogger. 15 minutes or Continuous 15 minutes 3-85
Interior Light Set and customize the interior light off delay
timer. 10, 20, 30 seconds or Off 30 seconds 3-87
Auto Light Sensor (if
equipped) Set and customize the sensitivity of the auto
light sensor. Low, Mid, High or Max Mid 3-88
Keyless Access
Setting Driver ’ s Door
Unlock (if equipped) Set and customize the keyless access func-
tion. Driver ’ s Door Only, All Driver ’ s Door
Only 3-89
Welcome Lighting Set the leaving time and approaching time. 30, 60, 90 seconds or Off 30 seconds 3-90
Go Back Return to top menu. ——3-60
Page 213 of 594
Instruments and controls/Multi function display
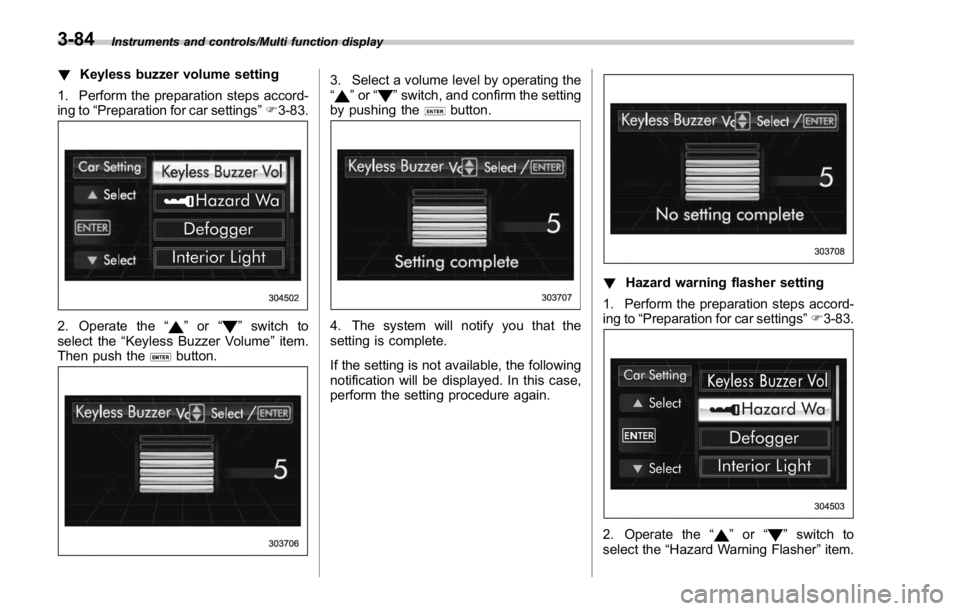
! Keyless buzzer volume setting
1. Perform the preparation steps accord-
ing to “ Preparation for car settings ” F 3-83.
2. Operate the “ ” or “ ” switch to
select the “ Keyless Buzzer Volume ” item.
Then push the
button. 3. Select a volume level by operating the
“
” or “ ” switch, and confirm the setting
by pushing the
button.
4. The system will notify you that the
setting is complete.
If the setting is not available, the following
notification will be displayed. In this case,
perform the setting procedure again. ! Hazard warning flasher setting
1. Perform the preparation steps accord-
ing to “ Preparation for car settings ” F 3-83.
2. Operate the “ ” or “ ” switch to
select the “ Hazard Warning Flasher ” item.3-84
Page 218 of 594
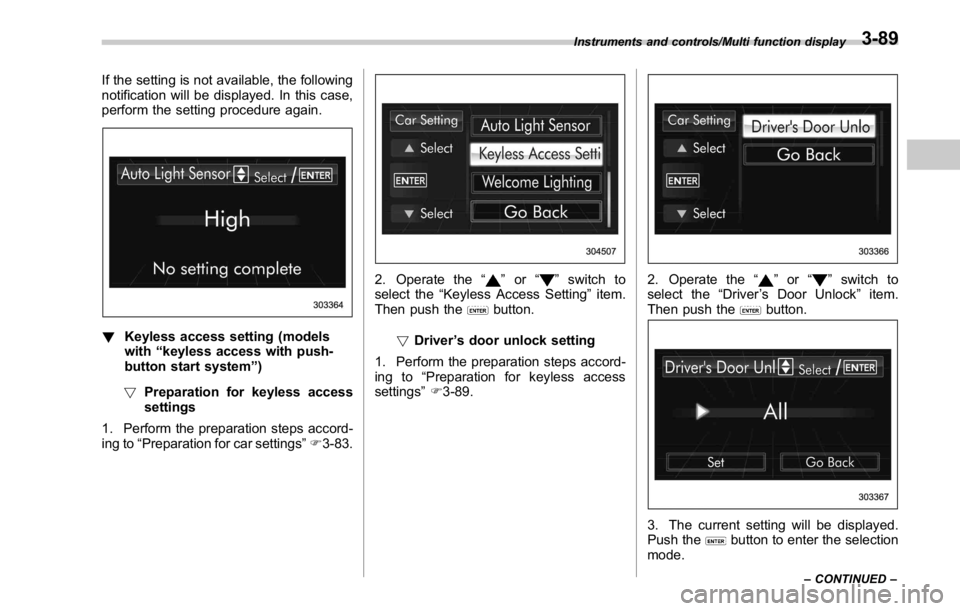
If the setting is not available, the following
notification will be displayed. In this case,
perform the setting procedure again.
! Keyless access setting (models
with “ keyless access with push-
button start system ” )
! Preparation for keyless access
settings
1. Perform the preparation steps accord-
ing to “ Preparation for car settings ” F 3-83. 2. Operate the “ ” or “ ” switch to
select the “ Keyless Access Setting ” item.
Then push the
button.
! Driver ’ s door unlock setting
1. Perform the preparation steps accord-
ing to “ Preparation for keyless access
settings ” F 3-89. 2. Operate the “ ” or “ ” switch to
select the “ Driver ’ s Door Unlock ” item.
Then push the
button.
3. The current setting will be displayed.
Push the
button to enter the selection
mode.Instruments and controls/Multi function display
– CONTINUED –3-89
Page 223 of 594
Instruments and controls/Light control switch
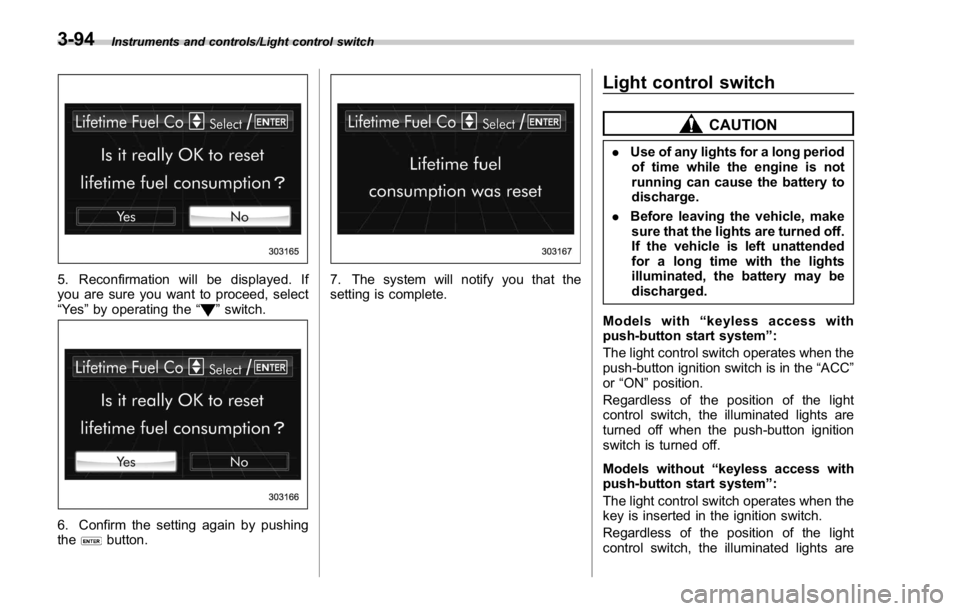
5. Reconfirmation will be displayed. If
you are sure you want to proceed, select
“ Ye s ” by operating the “
” switch.
6. Confirm the setting again by pushing
the
button. 7. The system will notify you that the
setting is complete. Light control switch CAUTION. Use of any lights for a long period
of time while the engine is not
running can cause the battery to
discharge.
. Before leaving the vehicle, make
sure that the lights are turned off.
If the vehicle is left unattended
for a long time with the lights
illuminated, the battery may be
discharged.
Models with “ keyless access with
push-button start system ” :
The light control switch operates when the
push-button ignition switch is in the “ ACC ”
or “ ON ” position.
Regardless of the position of the light
control switch, the illuminated lights are
turned off when the push-button ignition
switch is turned off.
Models without “ keyless access with
push-button start system ” :
The light control switch operates when the
key is inserted in the ignition switch.
Regardless of the position of the light
control switch, the illuminated lights are3-94
Page 224 of 594
turned off when the key is removed from
the ignition switch.
NOTE The light control switch can be oper-
ated (except auto on/off headlights),
even under the following conditions.
. when the key is not inserted into the
ignition switch (models without “ key-
less access with push-button start
system ” )
. when the push-button ignition
switch is turned off (models with “ key-
less access with push-button start
system ” )
If the driver ’ s door is opened while the
headlights are illuminated under such
conditions, the chirp sound will inform
the driver that the lights are illumi-
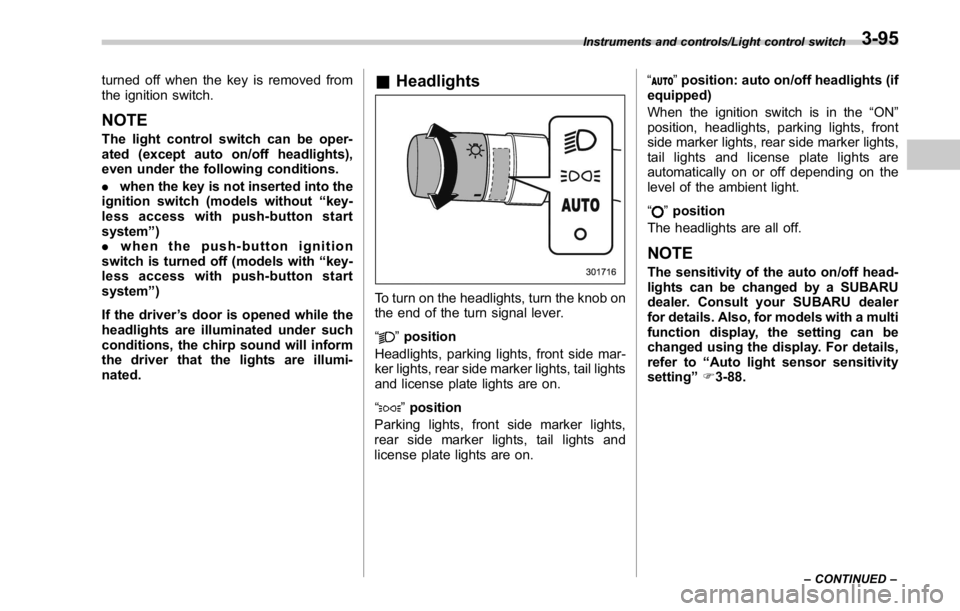
nated. & Headlights
To turn on the headlights, turn the knob on
the end of the turn signal lever.
“ ” position
Headlights, parking lights, front side mar-
ker lights, rear side marker lights, tail lights
and license plate lights are on.
“
” position
Parking lights, front side marker lights,
rear side marker lights, tail lights and
license plate lights are on. “
” position: auto on/off headlights (if
equipped)
When the ignition switch is in the “ ON ”
position, headlights, parking lights, front
side marker lights, rear side marker lights,
tail lights and license plate lights are
automatically on or off depending on the
level of the ambient light.
“
” position
The headlights are all off.
NOTE The sensitivity of the auto on/off head-
lights can be changed by a SUBARU
dealer. Consult your SUBARU dealer
for details. Also, for models with a multi
function display, the setting can be
changed using the display. For details,
refer to “ Auto light sensor sensitivity
setting ” F 3-88.Instruments and controls/Light control switch
– CONTINUED –3-95
Page 263 of 594
Audio/Basic information before use
it again.
. Grayed-out screen buttons cannot
be operated.
. The displayed image may become
darkerandmovingimagesmaybe
slightly distorted when the screen is
cold.
. In extremely cold conditions, the
map may not be displayed and the data
input by a user may be deleted. Also,
the screen buttons may be harder than
usual to press.
. When you look at the screen
through polarized material such as
polarized sunglasses, the screen may
be dark and hard to see. If so, look at
the screen from different angles, adjust
the screen settings on the “ Display
Settings (Display Settings) ” screen or
take off your sunglasses.
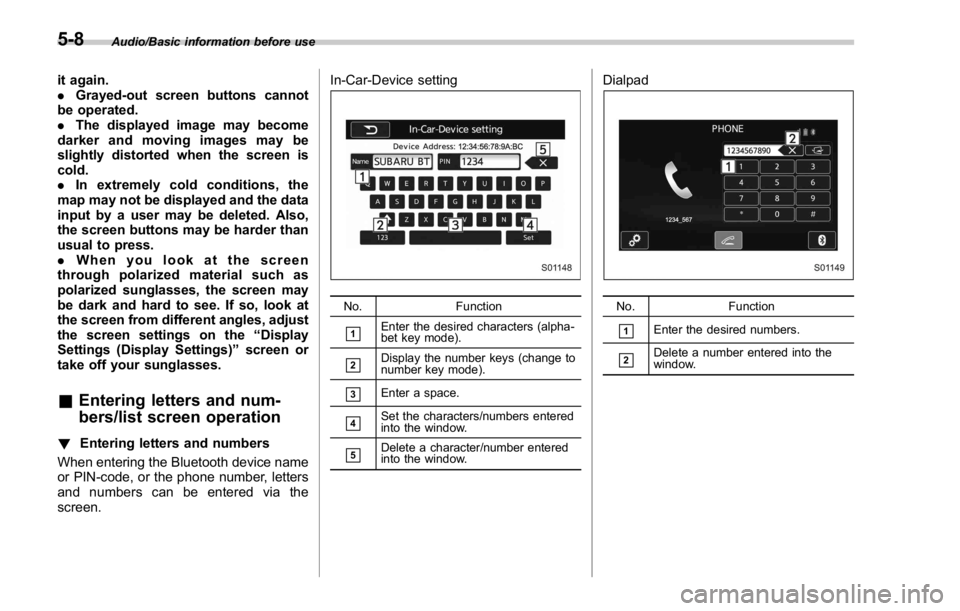
& Entering letters and num-
bers/list screen operation! Entering letters and numbers
When entering the Bluetooth device name
or PIN-code, or the phone number, letters
and numbers can be entered via the
screen. In-Car-Device setting
No. Function
& 1
Enter the desired characters (alpha-
bet key mode).
& 2
Display the number keys (change to
number key mode).
& 3
Enter a space.
& 4
Set the characters/numbers entered
into the window.
& 5
Delete a character/number entered
into the window. Dialpad
No. Function
& 1
Enter the desired numbers.
& 2
Delete a number entered into the
window.5-8
Page 283 of 594
Audio/Useful information
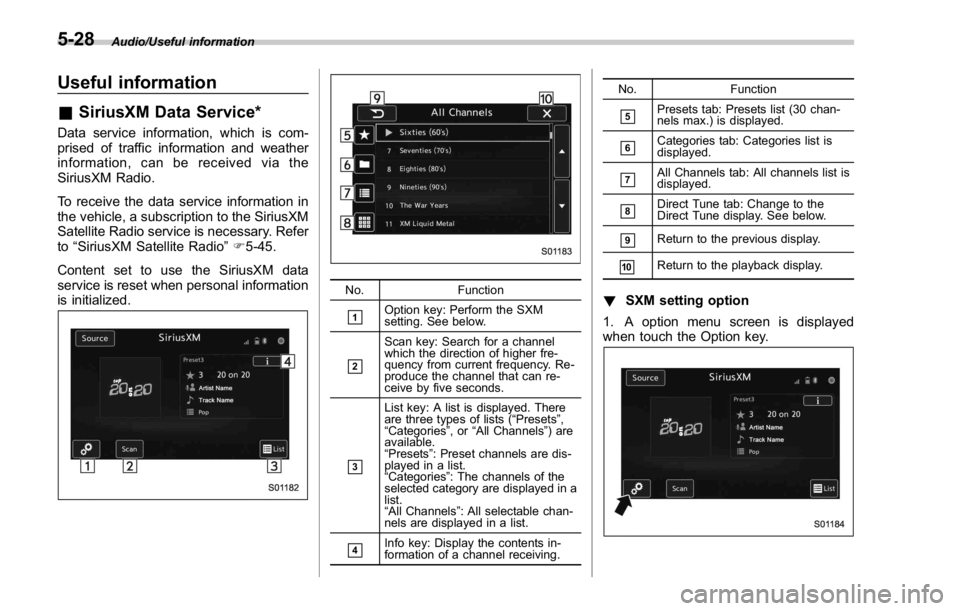
Useful information & SiriusXM Data Service*Data service information, which is com-
prised of traffic information and weather
information, can be received via the
SiriusXM Radio.
To receive the data service information in
the vehicle, a subscription to the SiriusXM
Satellite Radio service is necessary. Refer
to “ SiriusXM Satellite Radio ” F 5-45.
Content set to use the SiriusXM data
service is reset when personal information
is initialized. No. Function
& 1
Option key: Perform the SXM
setting. See below.
& 2
Scan key: Search for a channel
which the direction of higher fre-
quency from current frequency. Re-
produce the channel that can re-
ceive by five seconds.
& 3List key: A list is displayed. There
are three types of lists ( “ Presets ” ,
“ Categories ” ,or “ All Channels ” ) are
available.
“ Presets ” : Preset channels are dis-
played in a list.
“ Categories ” : The channels of the
selected category are displayed in a
list.
“ All Channels ” : All selectable chan-
nels are displayed in a list.
& 4
Info key: Display the contents in-
formation of a channel receiving. No. Function
& 5
Presets tab: Presets list (30 chan-
nels max.) is displayed.
& 6
Categories tab: Categories list is
displayed.
& 7
All Channels tab: All channels list is
displayed.
& 8
Direct Tune tab: Change to the
Direct Tune display. See below.
& 9
Return to the previous display.
& 10
Return to the playback display.
! SXM setting option
1. A option menu screen is displayed
when touch the Option key.5-28
Page 285 of 594
Audio/Useful information
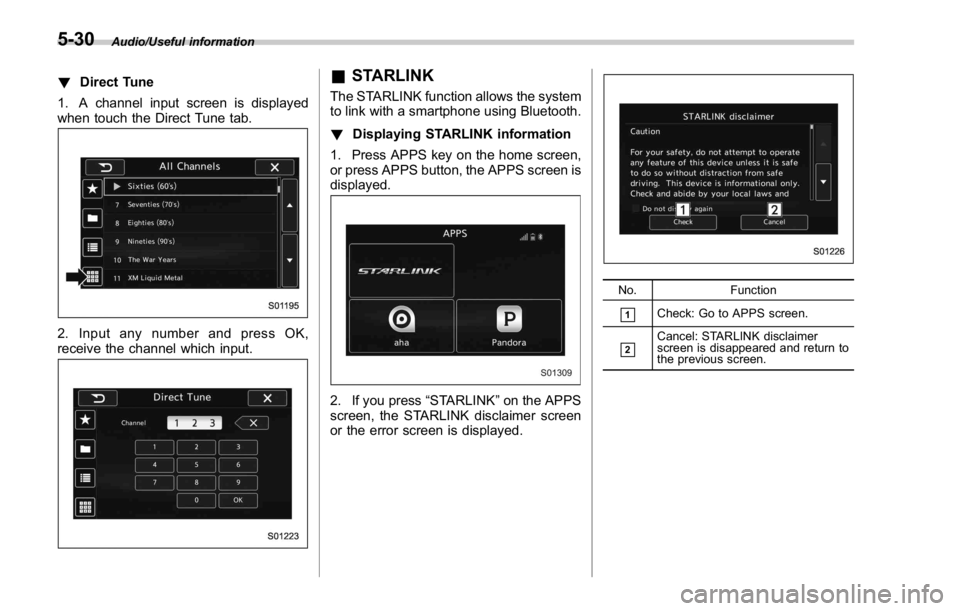
! Direct Tune
1. A channel input screen is displayed
when touch the Direct Tune tab.
2. Input any number and press OK,
receive the channel which input. & STARLINK The STARLINK function allows the system
to link with a smartphone using Bluetooth.
! Displaying STARLINK information
1. Press APPS key on the home screen,
or press APPS button, the APPS screen is
displayed.
2. If you press “ STARLINK ” on the APPS
screen, the STARLINK disclaimer screen
or the error screen is displayed. No. Function
& 1
Check: Go to APPS screen.
& 2
Cancel: STARLINK disclaimer
screen is disappeared and return to
the previous screen.5-30