key SUBARU WRX 2016 Manual PDF
[x] Cancel search | Manufacturer: SUBARU, Model Year: 2016, Model line: WRX, Model: SUBARU WRX 2016Pages: 594, PDF Size: 19.43 MB
Page 289 of 594
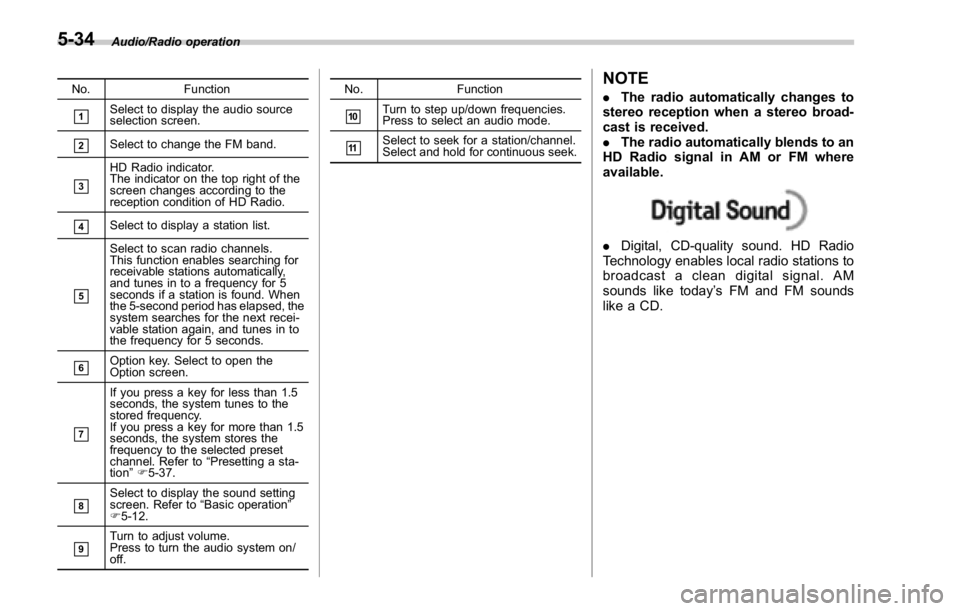
Audio/Radio operation
No. Function
& 1
Select to display the audio source
selection screen.
& 2
Select to change the FM band.
& 3
HD Radio indicator.
The indicator on the top right of the
screen changes according to the
reception condition of HD Radio.
& 4
Select to display a station list.
& 5
Select to scan radio channels.
This function enables searching for
receivable stations automatically,
and tunes in to a frequency for 5
seconds if a station is found. When
the 5-second period has elapsed, the
system searches for the next recei-
vable station again, and tunes in to
the frequency for 5 seconds.
& 6
Option key. Select to open the
Option screen.
& 7 If you press a key for less than 1.5
seconds, the system tunes to the
stored frequency.
If you press a key for more than 1.5
seconds, the system stores the
frequency to the selected preset
channel. Refer to “ Presetting a sta-
tion ” F 5-37.
& 8
Select to display the sound setting
screen. Refer to “ Basic operation ”
F 5-12.
& 9
Turn to adjust volume.
Press to turn the audio system on/
off. No. Function
& 10
Turn to step up/down frequencies.
Press to select an audio mode.
& 11
Select to seek for a station/channel.
Select and hold for continuous seek.
NOTE . The radio automatically changes to
stereo reception when a stereo broad-
cast is received.
. The radio automatically blends to an
HD Radio signal in AM or FM where
available.
. Digital, CD-quality sound. HD Radio
Technology enables local radio stations to
broadcast a clean digital signal. AM
sounds like today ’ s FM and FM sounds
like a CD.5-34
Page 292 of 594
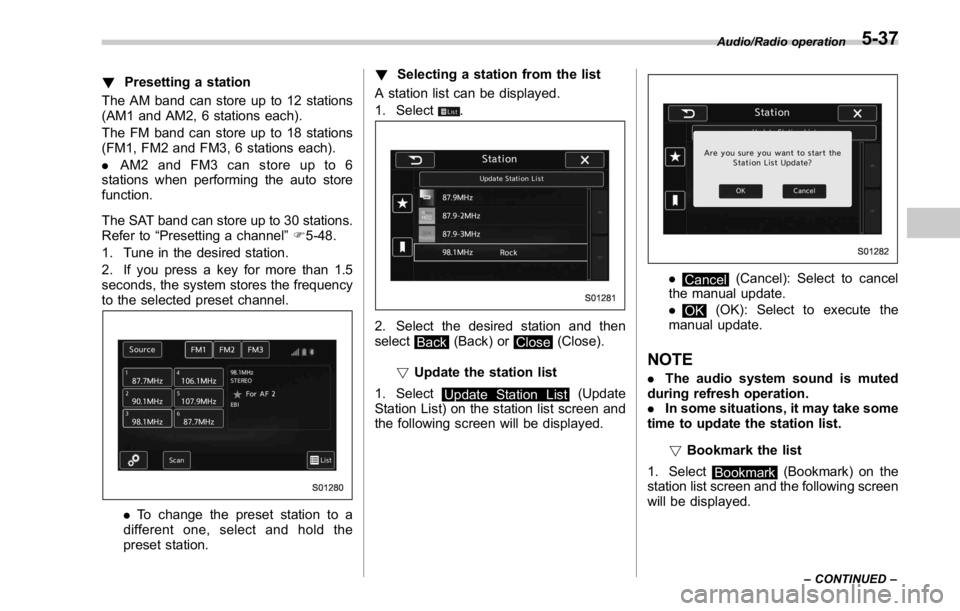
! Presetting a station
The AM band can store up to 12 stations
(AM1 and AM2, 6 stations each).
The FM band can store up to 18 stations
(FM1, FM2 and FM3, 6 stations each).
. AM2andFM3canstoreupto6
stations when performing the auto store
function.
The SAT band can store up to 30 stations.
Refer to “ Presetting a channel ” F 5-48.
1. Tune in the desired station.
2. If you press a key for more than 1.5
seconds, the system stores the frequency
to the selected preset channel.
. To change the preset station to a
different one, select and hold the
preset station. ! Selecting a station from the list
A station list can be displayed.
1. Select
.
2. Select the desired station and then
select
Back (Back) or
Close (Close).
! Update the station list
1. Select
Update Station List (Update
Station List) on the station list screen and
the following screen will be displayed. .
Cancel (Cancel): Select to cancel
the manual update.
.
OK (OK): Select to execute the
manual update.
NOTE . The audio system sound is muted
during refresh operation.
. In some situations, it may take some
time to update the station list.
! Bookmark the list
1. Select
Bookmark (Bookmark) on the
station list screen and the following screen
will be displayed. Audio/Radio operation
– CONTINUED –5-37
Page 294 of 594
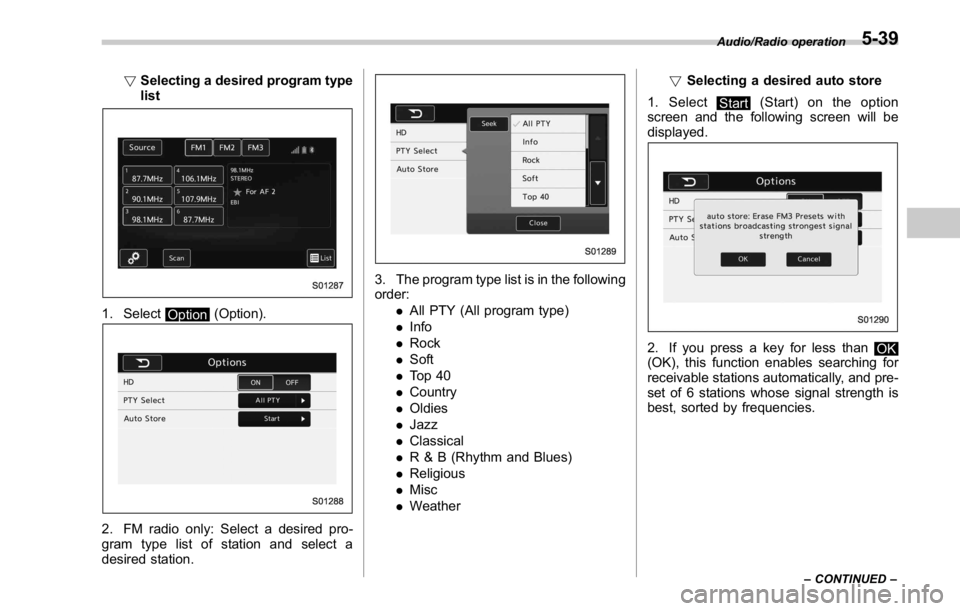
! Selecting a desired program type
list
1. Select
Option (Option).
2. FM radio only: Select a desired pro-
gram type list of station and select a
desired station. 3. The program type list is in the following
order:
. All PTY (All program type)
. Info
. Rock
. Soft
. To p 4 0
. Country
. Oldies
. Jazz
. Classical
. R & B (Rhythm and Blues)
. Religious
. Misc
. Weather ! Selecting a desired auto store
1. Select
Start (Start) on the option
screen and the following screen will be
displayed.
2. If you press a key for less than
OK
(OK), this function enables searching for
receivable stations automatically, and pre-
set of 6 stations whose signal strength is
best, sorted by frequencies. Audio/Radio operation
– CONTINUED –5-39
Page 301 of 594
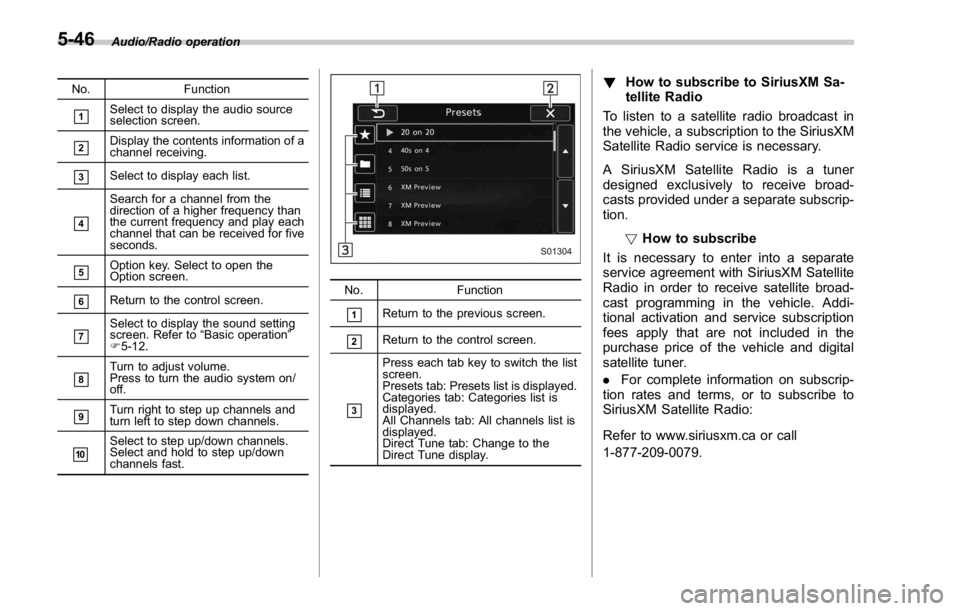
Audio/Radio operation
No. Function
& 1
Select to display the audio source
selection screen.
& 2
Display the contents information of a
channel receiving.
& 3
Select to display each list.
& 4
Search for a channel from the
direction of a higher frequency than
the current frequency and play each
channel that can be received for five
seconds.
& 5
Option key. Select to open the
Option screen.
& 6
Return to the control screen.
& 7
Select to display the sound setting
screen. Refer to “ Basic operation ”
F 5-12.
& 8
Turn to adjust volume.
Press to turn the audio system on/
off.
& 9
Turn right to step up channels and
turn left to step down channels.
& 10
Select to step up/down channels.
Select and hold to step up/down
channels fast. No. Function
& 1
Return to the previous screen.
& 2
Return to the control screen.
& 3Press each tab key to switch the list
screen.
Presets tab: Presets list is displayed.
Categories tab: Categories list is
displayed.
All Channels tab: All channels list is
displayed.
Direct Tune tab: Change to the
Direct Tune display. ! How to subscribe to SiriusXM Sa-
tellite Radio
To listen to a satellite radio broadcast in
the vehicle, a subscription to the SiriusXM
Satellite Radio service is necessary.
A SiriusXM Satellite Radio is a tuner
designed exclusively to receive broad-
casts provided under a separate subscrip-
tion.
! How to subscribe
It is necessary to enter into a separate
service agreement with SiriusXM Satellite
Radio in order to receive satellite broad-
cast programming in the vehicle. Addi-
tional activation and service subscription
fees apply that are not included in the
purchase price of the vehicle and digital
satellite tuner.
. For complete information on subscrip-
tion rates and terms, or to subscribe to
SiriusXM Satellite Radio:
Refer to www.siriusxm.ca or call
1-877-209-0079.5-46
Page 303 of 594
Audio/Radio operation
1-877-209-0079
. SiriusXM Satellite Radio is solely
responsible for the quality, availability
and content of the satellite radio ser-
vices provided, which are subject to
the terms and conditions of the
SiriusXM Satellite Radio customer ser-
vice agreement.
. Customers should have their radio
ID ready; the radio ID can be found by
tuning to “ Ch 000 ” on the radio. For
details, see “ DISPLAYING THE RADIO
ID ” below.
. All fees and programming are the
responsibility of SiriusXM Satellite
Radio and are subject to change.
! Displaying the Radio ID
Each SiriusXM tuner is identified with a
unique radio ID. The radio ID is required
when activating an SiriusXM Satellite
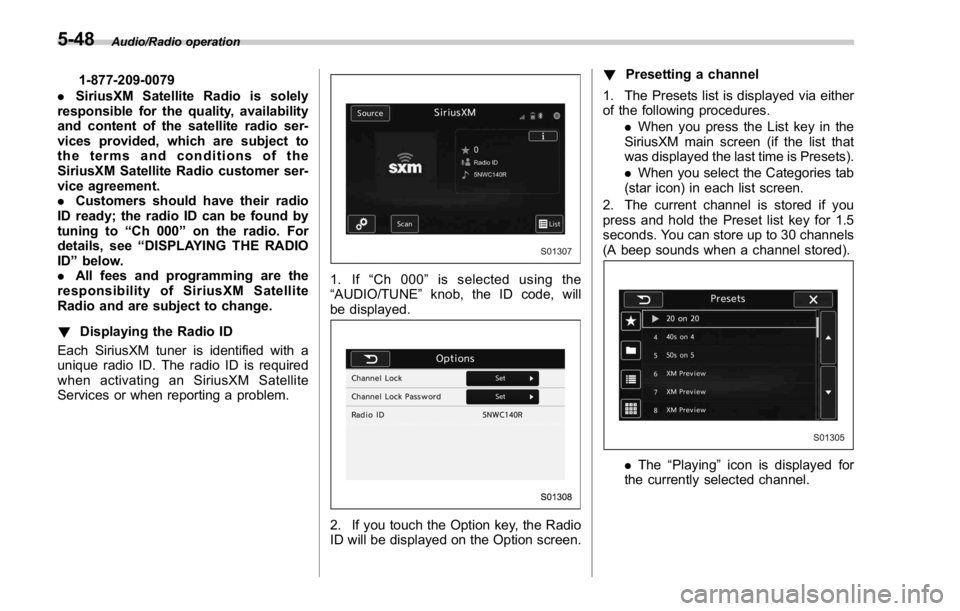
Services or when reporting a problem. 1. If “ Ch 000 ” is selected using the
“ AUDIO/TUNE ” knob, the ID code, will
be displayed.
2. If you touch the Option key, the Radio
ID will be displayed on the Option screen. ! Presetting a channel
1. The Presets list is displayed via either
of the following procedures.
. When you press the List key in the
SiriusXM main screen (if the list that
was displayed the last time is Presets).
. When you select the Categories tab
(star icon) in each list screen.
2. The current channel is stored if you
press and hold the Preset list key for 1.5
seconds. You can store up to 30 channels
(A beep sounds when a channel stored).
. The “ Playing ” icon is displayed for
the currently selected channel.5-48
Page 304 of 594
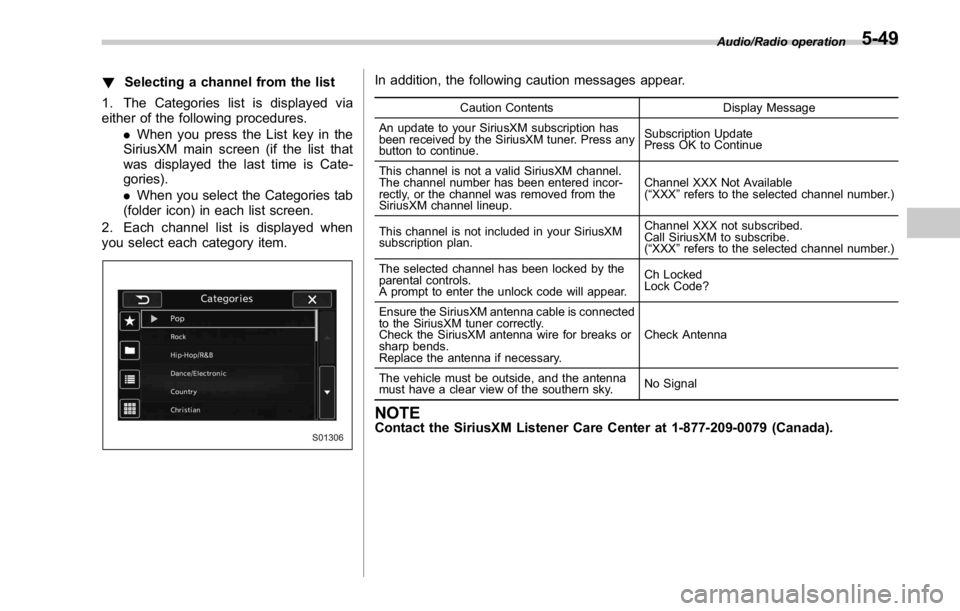
! Selecting a channel from the list
1. The Categories list is displayed via
either of the following procedures.
. When you press the List key in the
SiriusXM main screen (if the list that
was displayed the last time is Cate-
gories).
. When you select the Categories tab
(folder icon) in each list screen.
2. Each channel list is displayed when
you select each category item. In addition, the following caution messages appear. Caution Contents Display Message
An update to your SiriusXM subscription has
been received by the SiriusXM tuner. Press any
button to continue. Subscription Update
Press OK to Continue
This channel is not a valid SiriusXM channel.
The channel number has been entered incor-
rectly, or the channel was removed from the
SiriusXM channel lineup. Channel XXX Not Available
( “ XXX ” refers to the selected channel number.)
This channel is not included in your SiriusXM
subscription plan. Channel XXX not subscribed.
Call SiriusXM to subscribe.
( “ XXX ” refers to the selected channel number.)
The selected channel has been locked by the
parental controls.
A prompt to enter the unlock code will appear. Ch Locked
Lock Code?
Ensure the SiriusXM antenna cable is connected
to the SiriusXM tuner correctly.
Check the SiriusXM antenna wire for breaks or
sharp bends.
Replace the antenna if necessary. Check Antenna
The vehicle must be outside, and the antenna
must have a clear view of the southern sky. No Signal
NOTE Contact the SiriusXM Listener Care Center at 1-877-209-0079 (Canada). Audio/Radio operation
5-49
Page 318 of 594
WARNING. Do not operate the player ’ s con-
trols or connect to the Bluetooth
audio system while driving.
. Your audio unit is fitted with
Bluetooth antennas. People with
implantable cardiac pacemakers,
cardiac resynchronization ther-
apy-pacemakers or implantable
cardioverter defibrillators should
maintain a reasonable distance
between themselves and the
Bluetooth antennas. The radio
waves may affect the operation
of such devices.
. Before using Bluetooth devices,
users of any electrical medical
device other than implantable
cardiac pacemakers, cardiac re-
synchronization therapy-pace-
makers or implantable cardiover-
ter defibrillators should consult
the manufacturer of the device
for information about its opera-
tion under the influence of radio
waves. Radio waves could have
unexpected effects on the opera-
tion of such medical devices. CAUTIONDo not leave your portable player in
the vehicle. In particular, high tem-
peratures inside the vehicle may
damage the portable player.
NOTE . Depending on the Bluetooth device
that is connected to the system, the
music may start playing when selecting
while it is paused. Conversely, the
music may pause when selecting
while it is playing.
. In the following conditions, the sys-
tem may not function:
– The Bluetooth device is turned
off.
– The Bluetooth device is not con-
nected.
– The Bluetooth device has a low
battery.
. Itmaytaketimetoconnectthe
phone when Bluetooth audio is being
played.
. For operating the portable player,
see the instruction manual that comes
with it.
. If the Bluetooth device is discon-
nected due to poor reception from the
Bluetooth network when the ignition switch is in the “ ACC ” or “ ON ” posi-
tion, the system will automatically
reconnect to the portable player.
. If the Bluetooth device is discon-
nected on purpose, such as it was
turned off, this does not happen.
Reconnect the portable player manu-
ally.
. Bluetooth device information is re-
gistered when the Bluetooth device is
connected to the Bluetooth audio sys-
tem. When selling or disposing of the
vehicle, remove the Bluetooth audio
information from the system. Refer to
“ Other settings ” F 5-10.
! Connecting a Bluetooth device
To use the Bluetooth audio system, it is
necessary to register a Bluetooth device
with the system.
Registering an additional device
1. Select the Bluetooth Setting Key on
the BT Audio menu screen.
2. Select
Add (Add) on the BT Devices
Connection screen.
3. Register a Bluetooth device.
4. For more information: Refer to “ Regis-
tering a Bluetooth device ” F 5-84.
Selecting a registered device
1. Select the Bluetooth Setting Key on
the BT Audio menu screen. Audio/Media operation
– CONTINUED –5-63
Page 332 of 594
Control screen
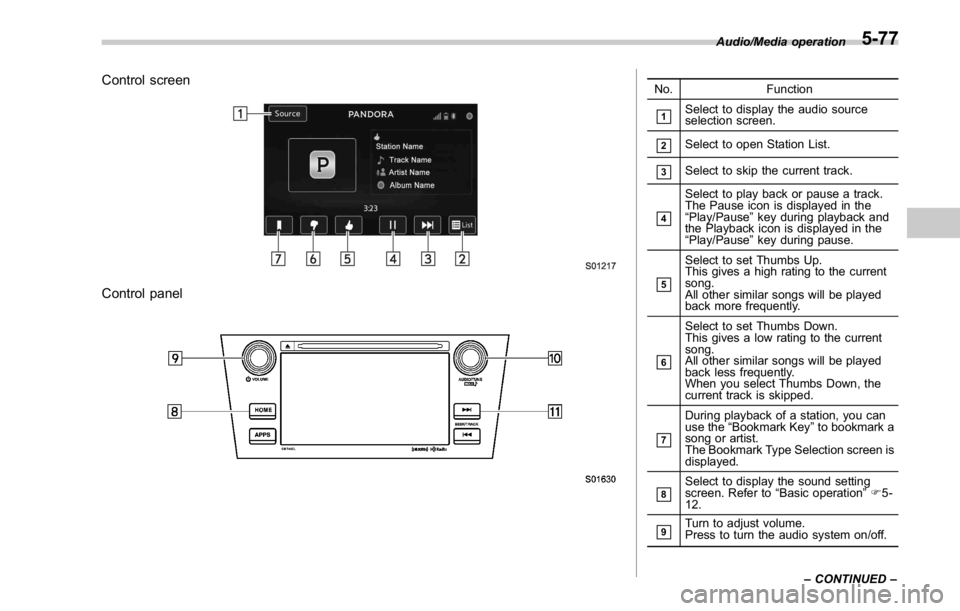
Control panel No. Function
& 1
Select to display the audio source
selection screen.
& 2
Select to open Station List.
& 3
Select to skip the current track.
& 4
Select to play back or pause a track.
The Pause icon is displayed in the
“ Play/Pause ” key during playback and
the Playback icon is displayed in the
“ Play/Pause ” key during pause.
& 5
Select to set Thumbs Up.
This gives a high rating to the current
song.
All other similar songs will be played
back more frequently.
& 6
Select to set Thumbs Down.
This gives a low rating to the current
song.
All other similar songs will be played
back less frequently.
When you select Thumbs Down, the
current track is skipped.
& 7
During playback of a station, you can
use the “ Bookmark Key ” to bookmark a
song or artist.
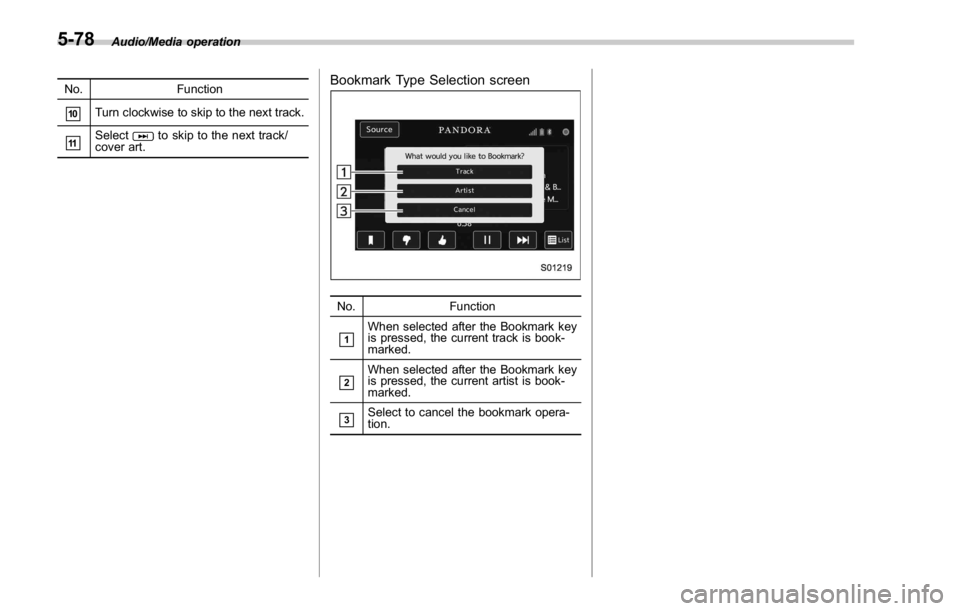
The Bookmark Type Selection screen is
displayed.
& 8
Select to display the sound setting
screen. Refer to “ Basic operation ” F 5-
12.
& 9
Turn to adjust volume.
Press to turn the audio system on/off. Audio/Media operation
– CONTINUED –5-77
Page 333 of 594
Audio/Media operation
No. Function
& 10
Turn clockwise to skip to the next track.
& 11
Select to skip to the next track/
cover art. Bookmark Type Selection screen
No. Function
& 1
When selected after the Bookmark key
is pressed, the current track is book-
marked.
& 2
When selected after the Bookmark key
is pressed, the current artist is book-
marked.
& 3
Select to cancel the bookmark opera-
tion.5-78
Page 339 of 594
Audio/Bluetooth ®
settings
& Setting Bluetooth details1. Select .
2. Select
SETTINGS (SETTINGS).
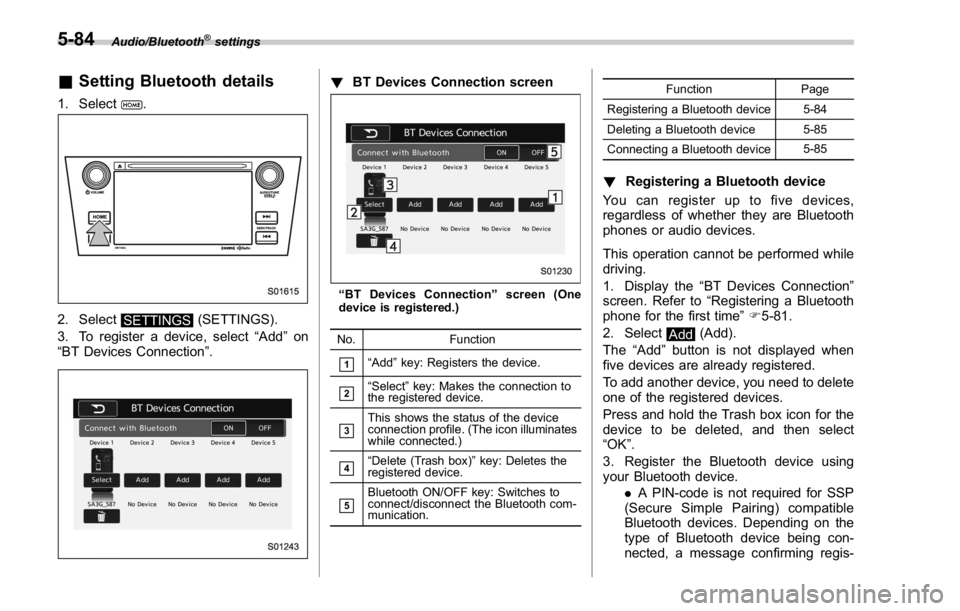
3. To register a device, select “ Add ” on
“ BT Devices Connection ” . ! BT Devices Connection screen
“ BT Devices Connection ” screen (One
device is registered.)
No. Function
& 1
“ Add ” key: Registers the device.
& 2
“ Select ” key: Makes the connection to
the registered device.
& 3
This shows the status of the device
connection profile. (The icon illuminates
while connected.)
& 4
“ Delete (Trash box) ” key: Deletes the
registered device.
& 5
Bluetooth ON/OFF key: Switches to
connect/disconnect the Bluetooth com-
munication. Function Page
Registering a Bluetooth device 5-84
Deleting a Bluetooth device 5-85
Connecting a Bluetooth device 5-85
! Registering a Bluetooth device
You can register up to five devices,
regardless of whether they are Bluetooth
phones or audio devices.
This operation cannot be performed while
driving.
1. Display the “ BT Devices Connection ”
screen. Refer to “ Registering a Bluetooth
phone for the first time ” F 5-81.
2. Select
Add (Add).
The “ Add ” button is not displayed when
five devices are already registered.
To add another device, you need to delete
one of the registered devices.
Press and hold the Trash box icon for the
device to be deleted, and then select
“ OK ” .
3. Register the Bluetooth device using
your Bluetooth device.
. A PIN-code is not required for SSP
(Secure Simple Pairing) compatible
Bluetooth devices. Depending on the
type of Bluetooth device being con-
nected, a message confirming regis-5-84